USER MANUAL BENUTZERHANDBUCH MANUEL DE L'UTILISATEUR MANUALE D'USO - Car-Specific Infotainer X-F280 ARGO Series - XZENT
←
→
Page content transcription
If your browser does not render page correctly, please read the page content below
USER MANUAL
BENUTZERHANDBUCH
MANUEL DE L’UTILISATEUR
MUAS
   NUEAR
       LE M ASN
          D'U O UAL

                    X-F280

     Car-Specific Infotainer X-F280
     ARGO Series
CONTENT               INHALT              SOMMAIRE                  SOMMARIO                                                                      SAFTY INFORMATION
                                   Seite 20            Page 38                   Pagina 56

                                                                                                      General

    ABOUT THIS MANUAL                                                                                 1. The descriptions and other content shown in this manual may deviate from the real device.
    This manual contains important information and warnings about the operation of this XZENT unit.   2. Pictures shown in this manual and some HMI screenshots may deviate from the real unit.
    Please store it in a place where you have access later on.                                        3. Specifications and technical design of this device model are necessarily subject to change
                                                                                                         without notice.

                                                                                                      ■   Read the instructions entirely. Heed all warnings. Follow the instructions.
                                                                                                      ■   Retain this manual. Whoever will use the unit should have access to this manual.
    SAFETY INFORMATION		                                                           3                  ■   This unit is designed to be functional in vehicles with 12 V DC battery and negative ground.
                                                                                                      ■   Do not operate the unit in any other way than described in this manual. Failure to follow the
    DEVICE SUPPORT, SOFTWARE UPDATES AND MAINTENANCE		                             4                       instructions as provided may void your warranty.
                                                                                                      ■   Do not disassemble or alter the unit in any way because this will void your warranty. Do not
    FRONT PANEL		5                                                                                        attempt to repair or to service the unit yourself, but contact an authorized XZENT dealer instead.
                                                                                                      ■   Use only original accessories which are designed and manufactured for the unit, otherwise you
    MAIN MENU		                                                                    6                      will risk damage. Install the unit according to the mounting instructions by using the supplied
                                                                                                          mounting accessories. Acceleration forces during accidents can be huge. Incorrectly mounted
    STEERING WHEEL CONTROL (OE mode, IR-Stalk-interface)		                         7                      devices pose a serious risk for the driver and passengers during an accident.
                                                                                                      ■   Protect the unit from water and other liquids that could enter the housing. A short circuit or even
    DEVICE SETTINGS		                                                              8-9                    a fire could result.
                                                                                                      ■   To prevent a short circuit, never insert any metallic object (such as coins or metal tools) into the unit.
    DAB RADIO SOURCE		                                                             10                 ■   Before you replace a defective fuse try to find the cause for the short circuit. Pay attention to
                                                                                                          the cables of the power supply! If the short circuit does not result from a failure of the power
    FM RADIO SOURCE		                                                              11                     supply or wiring, you can replace the defective fuse with a new one (of identical value). If the
                                                                                                          shortcircuit persists, contact an authorized XZENT dealer.
    USB/IPod/BT MUSIC (A/V) SOURCE		                                               12-13              ■   When connecting to any other device, read the user‘s guide for compatibility and notes on
                                                                                                          electrical connections. Do not try to connect incompatible products.
    BLUETOOTH PAIR, CONNECT, CALL, MUSIC		                                         14-15              ■   Be careful not to drain the car battery while using the unit when the car engine is turned off.
                                                                                                          Because the unit consumes a considerable amount of energy and the battery will be charged
    NAVIGATION SOURCE		                                                            16                     only while the engine is running, it might happen that the battery will discharge to a point where
                                                                                                          it is not possible to start the engine anymore.
    WEBLINK SOURCE		                                                               16                 ■   According to the law in different European countries, driving with monitors showing movies in
                                                                                                          the viewing range of the driver is not allowed, because the driver might get distracted from
    ANDROID LINK		17                                                                                      traffic. Please respect the traffic regulations of your country or you may face legal penalties
                                                                                                          in case of accidents or even lose your insurance coverage. Pay attention to the playback volume
    A / V IN SOURCE		                                                              17                     inside your vehicle since you are required to notice exterior warning sounds like police sirens etc..
                                                                                                      ■   Don‘t expose the unit to hard impacts. A mechanical or electrical malfunction of the unit could be
    TERMS OF WARRANTY		18-19                                                                              the result.
                                                                                                      ■   Should any problems or questions occur during the installation, please consult your
                                                                                                          XZENT dealer/importer.

2                                                                                                                                                                                                                      3
DEVICE SUPPORT, SOFTWARE UPDATES AND                                                                                                                          FRONT PANEL
             MAINTENANCE

    Software updates and improvements are provided via USB updates which can be downloaded from
    our website www.xzent.com Also customer care, FAQs and other helpful information can be found
    there.

    ATTENTION: this device has specific USB ports with special functions (USB-1 / top port at device                                                                                                 B
    backside) and (USB-2 / bottom port at device backside). The extension cables are distinguishable thru
    text-label to ensure proper identification.
                                                                                                                                                                                                     A
    Software updates provided via XZENT MUST be installed on “USB-1” (USE FOR SW UPDATE). If the
    installation has been done by 3rd party without proper marking/identification of the extension wire – do
    try the other port in case of update-failure.

                                                                                                                           E

                                                                                                                      C         1   2     3       4        5       6        7       E
                       USB1             Can be used for SW Updates

                       USB2             NOT for software updates

                                                                                                               Operation buttons:
                                                                                                               1.  VOL/POWER:           Press and hold for standby mode (Screen OFF, Audio OFF).
                                                                                                                                        If powered on, press to mute.
                                                                                                                                        If powered off, press to power on.
                                                                                                                                        Rotate clockwise to increase audio volume.
                                                                                                                                        Rotate anti-clockwise to decrease volume.
                                                                                                               2.   Home                Press to return to home screen.
                                                                                                                                        Press in home screen to go to last source (if available).
                                                                                                                                        Press and hold to open EQ.
                                                                                                               3.   NAV:                Press to open navigation mode.
                                                                                                               4.   CAM:                Press to show default camera, press again to close the camera view.
                                                                                                               5.   DAB                 Press to open DAB source. In DAB source press again to switch to FM.
                                                                                                               6.   ALT                 Press to execute assigned ALT shortpress function from device
                                                                                                                                        settings (see chapter device settings).
                                                                                                                                        Press and hold to execute assigned ALT longpress function from
                                                                                               B                                        device settings (see chapter device settings).
                                                                                                               7.   BT                  Press to open Bluetooth source.

                                                                                           A                   A.   RESET               Press to perform a power reset.
                                                                                                               B.   MAP                 MicroSD slot for navigationssoftware (optional, not included in this set).
                                                                                                               C.   MIC                 internal microphone for handsfree functions.
                                                                                                               D.   IR                  IR lense for remote control.
                                                                                                               E    Release Notch       Used for release keys to unmount the device.

4                                                                                                                                                                                                                    5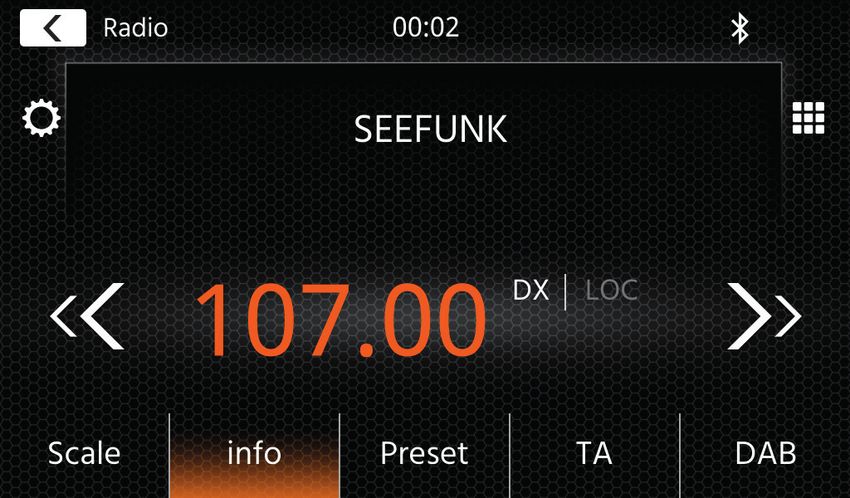
MAIN MENU                                                                                     STEERING WHEEL CONTROL (OE MODE, IR-STALK-INTERFACE)

                                                                                                            The XZENT device is pre-configured to work with an IR-Stalk-Interface which is included in the set
                                                                                                            and allows you to utilize some of the steering wheel control buttons of your vehicle.

                                                                                                            Operation Buttons
                                                 A
                                                                                                            1.   Skip         These are supported buttons and trigger the same functionality as the UI
                                                                                                                              button of the corresponding active source.
                                                                                                                              It can also be short and long-pressed for different function.
                                                                                                                              For example in DAB source, the short press result in a station change,
                                                                                                                              while a long press will change the active DAB ensemble.
                                                                                                                              During call handling – the buttons functionality will change to
                              1
                                                                                                            2.   Phone        These buttons are sharing the pickup and hang-up buttons with the
                                                                                                                              SKIP buttons depending on the situation. In case of an incoming call or active
                                                                                                                              call, the phone functionality of the button comes into effect.
                                                                                                            3.   Volume       These buttons are supported and allow to change the volume level of current
                                                                                                                              active audio channel.
                                                                                                            4.   Camera/Voice If present in your compatible vehicle the  button will invoke or
                                                                                                                              close CAMERA view (if cam is connected to device).

                                             B                                                              Board/Trip-Computer:

                                                                                                            The SWC buttons for trip-, board computer and cruise control operation are directly assigned to
                                                                                                            the related vehicle functions, e.g. the function of these buttons on the steering wheel is completely
    MAIN MENU operation buttons and display                                                                 independent of the device mounted in the vehicle.

    A                    Time and date.
    B                    Page indicator.                                                                    Note:

    1.   Source Icon     Press to open selected source.                                                     The SWC related functions are only available if the device is connected with the provided and
                                                                                                            compatible stalk-interface via IR in wire to a compatible FORD model.
    To browse the different source icons, swipe left or right. Alternatively you can press the arrow keys
    to browse the different pages.
    To return to this screen you can press the HOME front sensor key or the return arrow button in top
    left corner of every source.

6                                                                                                                                                                                                                   7
DEVICE SETTINGS

                                                                                                                   4.   Audio         Contains setting for audio and sound adjustments.
                           1                                                                                                          4(a) Balance: Press arrow keys to shift the center to left or right position.
                                                                                                                                      4(b) Fader: Press arrow keys to shift the center to front or rear position.
                     2                                                                                                                4(c) Equalizer:
                                                                                                                                           Press to open EQ. You can select different EQ-Presets or manually
                                                                                                                                           change the frequency bands to your liking.
                                                                                                                                           Balance and Fader can also be optically adjusted or LPF, Subwoofer
                                                                                                                                           level and Loudness can be adjusted.
                                                                                                                                      4(d) Navi Mixer: Press switch to activate or deactivate mixing of navigation
                                                                                                                                           voice and background audio.
                                                                                                                                      4(e) Startup volume: Press more key. Here you can change individually all
                                                                                                                                           available sources in regard of startup volume.
                                                                                                                                           You can choose to apply the last used volume, or set a fix volume on startup.
                                                                                                                   5.   TFT           Here you can adjust settings in regard of the screen for example brightness
                                                                                                                                      mode or brightness values.
                     3                   4                     5                     6                     7                          5(a) TFT brightness day: Press arrow keys to set value for day mode.
                                                                                                                                      5(b) TFT brightness night: Press arrow keys to set value for night mode.
                                                                                                                                      5(c) Dim mode: Press arrow keys to set value.
                                                                                                                                           Auto: the brightness is adjusted automatically with switching on the front
    Operation Buttons:                                                                                                                     headlights of the vehicle (Night).
                                                                                                                                           Day: the brightness is permanently at day value.
    1.   Return          Press to return to the home screen.                                                                               Night: the brightness is permanently at night value.
    2.   List area       The shown list area is depending on the currently selected category.                                         5(d) Touchscreen Auto Standby: On set idle time, the screen will be powered
                         To see other settings you can scroll/swipe the list up and down or select                                         off when not operated (audio will continue in background).
                          different category from the lower area.                                                  6.   Camera        Enables you to adjust settings on the connected rear view camera.
    3.   General         Contains general settings like language, date&time, ALT key assignment.                                      6(a) Rearviewcamera: Press arrow keys to adjust value.
                         3(a) Press date to manually set a date (only possible if the sync modus is set to OFF).                      6(b) Reverse Mute: Press to change value (Volume 50%, Mute 0% or 100% no muting)
                         3(b) Press time to manually set time (only possible if the sync modus is set to OFF).                        6(c) Reverse delay: Press arrow keys to change the delay time until the cam
                         3(c) 12/24: Press arrow keys to change 12/24h format.                                                             view auto closes after leaving reverse gear.
                         3(d) Time zone: Press arrow keys to set a time zone (only possible if the sync                               6(d) Camera picture: Press arrow keys to adjust value (normal or horizontal
                         modus is set to OFF).                                                                                             mirrowed).
                         3(e) DAB+ Time sync mode: Press switch to ON/OFF setting.                                 7.   Miscellaneous Here you can find information on the software device version and load factory.
                         3(f) ALT short press: Press arrow keys to assign a different function.                                       7(a) Factory default: Press more key and confirm to perform a factory reset.
                         3(g) ALT long press: Press arrow keys to assign a different function.                                        7(b) Software version: Press more key to show the device system software version.
                         3(h) Beep: Press switch to ON/OFF setting (Enable/Disable key press beeps).
                         3(i) WebLink: Press switch to ON/OFF setting *                                            Note:
                         3(j) Language: Press arrow keys to select language.                                       * This feature will become available via future software update, if not present on device upon market
                         3(k) Microphone: Press arrow key to change selected microphone.                             launch
                         3(l) Background: Press to select a different background.

8                                                                                                                                                                                                                          9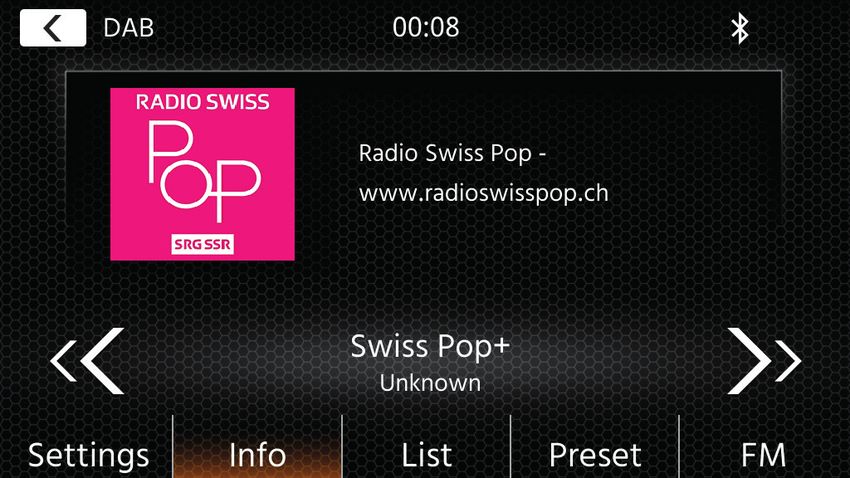
DAB RADIO SOURCE                                                                                                                                                         FM RADIO SOURCE

     You can enter the DAB source among other ways via the front panel DAB sensor key or via the            You can enter the FM source among other ways via the front panel via the Home Screen Source Icon. You can
     Home Screen Source Icon. You can also directly switch from the FM source to DAB source via the         also directly switch from the DAB source to FM source via the FM key in lower right corner of the DAB source.
     DAB key in lower right corner of the FM source.                                                        In the lower section you can change the category which will also update the main area of the source accordingly.
     With the DAB source you can enjoy the enriched digital radio services which are possible via the
     new DAB+ standard. In the lower section you can change the category which will update the main
     area of the source accordingly.

                                                                                                                        1
           1

                                                                                                               2

                                                                                                                            3                4                   5                 6                  7
          2              3               4                 5               6

     Operation buttons                                                                                      Operation buttons

     1. Return      Press to return to the home screen.                                                     1. Return           Press to return to the home screen.
     2. Settings    2(a) DAB-DAB Service Following: Press to switch function ON/OFF.                        2. Settings         With the settings menu, you can initiate an auto search&store for the presets, change AF
                    2(b) Antenna supply: Press switch to activate/deactivate 12V power supply for your                          behaviour or the reception mode.
                    DAB antenna.                                                                                                2(a) Auto Save: Press the key arrows to initiate auto search&store for the presets.
                    2(c) DAB Firmware: Shows current DAB firmware version.                                                      2(b) Mode: Press the key arrows to change DX/LOC mode.
     3. Info        This view allows you to see current played station logos, slideshow pictures and                            2(c) AF: Press switch to ON/OFF AF-function (Alternative Frequencies).
                    text which is aired from the station.                                                                       2(d) Antenna supply: Press switch to activate/deactivate 12V power supply for your
                    Press the arrow keys to change the station of current selected ensemble.                                    FM antenna
                    Press and hold the arrow keys to change to next possible ensemble – the first station   3. Scale            This view will display a frequency scale band with a marker of the current tuned frequency.
                    of new ensemble will be auto played.                                                                        Between the up and down seek buttons (arrow keys) the frequency is additionally displayed.
     4. List        The list view allows you to see all received ensembles and will be periodically                             Press the arrow keys to initiate up/down seek to the next receivable station.
                    refreshed.                                                                              4. Info             This view will show you the station name and the received radio text.
                    You can select an ensemble by tapping on it and it will show the containing stations                        Between the up and down seek buttons (arrow keys) the frequency is additionally displayed.
                    which you also can directly tap to play.                                                                    Press the arrow keys to initiate up/down seek to the next receivable station.
     5. Preset      This view show the preset buttons that work like a quick select or favorite button.     5. Preset           This view show the preset buttons that work like a quick select or favorite button.
                    To save the current station to a preset button, press and hold it until the button is                       To save the current station to a preset button, press and hold it until the button is updated
                    updated with the station information.                                                                       with the station information.
     6. FM          Press the button to change directly to FM radio source.                                 6. TA               Press button to ON/OFF TA (Traffic Announcement).
                                                                                                            7. DAB              Press button to directly switch to DAB radio source.
     Notes:
     Please remark that some features depend on the aired station or the reception.                         Note:
                                                                                                            This unit features an RDS tuner. RDS is a system which transmits data on top of the FM radio signal. Availability
                                                                                                            and content of the RDS data depend on the respective broadcast station and its signal strength. RDS does, for
                                                                                                            example, transmit alternative frequencies, which allow for frequency changes without user interaction.
                                                                                                            You need to have the AF function activated in order to use the RDS functionality and features.

10                                                                                                                                                                                                                              11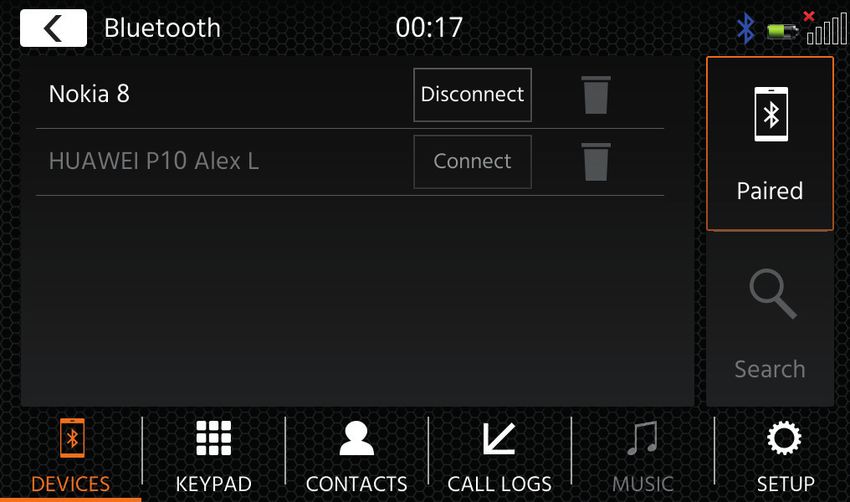
USB/IPOD/BT MUSIC (A/V) SOURCE
     The sources USB and iPod can be accessed among other ways thru their home screen icon and BT
     music with a connected phone via the Bluetooth source to play audio (BT, USB, iPod) or video (USB only).
     Playing files is similar for all sources and can be controlled via the mediaplayer UI. To play videos in                                                                                          B
     USB mode you need change the standard filter in list view (4) to the video file type (B).                                        A

                1                                                                2         3         4

                                                                                                                    At the list view mode (not available in Bluetooth music) you can browse your media files similar like
                                                                                                                    a folder-file list. To open folders just simply tap on them to show their content which you also can
                                                                                                                    directly tap to start playback. It will be shown with a play icon and also at the bottom line. To go back
                                                                                                                    one level use the back (A) button or you can change to the video media type (only USB mode) by
                                                                                                                    pressing (B) the filter icon.
     In this main view the mediaplayer controls are displayed. As usual you can use the pause/resume/play
     or skip buttons to play the next track. You can also activate the special functions like repeat and shuffle.   Additional notes on Video playback:
                                                                                                                    The video playback is only possible if the handbrake is engaged.
     Operation buttons:                                                                                             The playback will be in full screen mode – to leave the full screen mode press simply the touch
                                                                                                                    screen area of your device.
     1.   Return      Press to return to the home screen.
     2.   EQ          Press to open equalizer settings (see chapter device settings).
     3.   Search      Press to open search (not available in Bluetooth music).
     4.   List        Press to open the list view (not available in Bluetooth music).

12                                                                                                                                                                                                                              13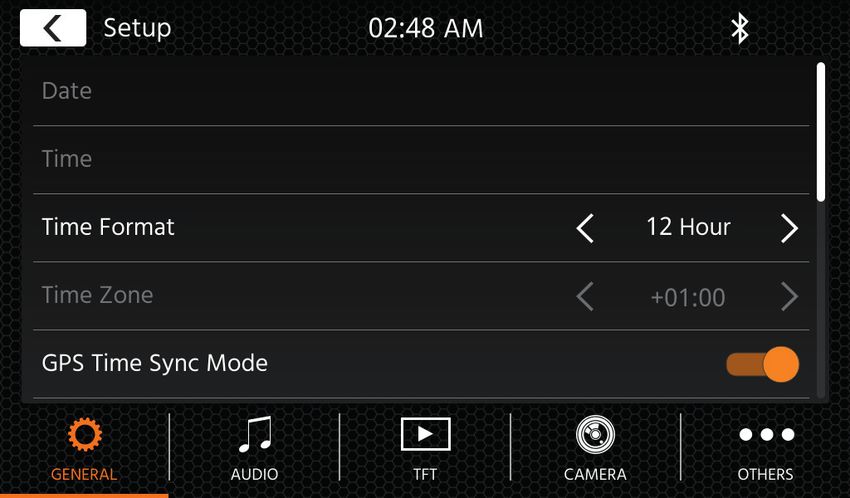
BLUETOOTH PAIR, CONNECT, CALL, MUSIC
     On initial use the category (2) is active and you can pair your compatible phone via scan/search. Plea-      On incoming/outgoing or active call, the device will automatically switch to a full screen mode and
     se ensure your phone is visible until it appears in the search result list. To pair tap the line with your   shows you the contact name or number (if available) or unknown in case of a suppressed callerID.
     phone from the list and confirm the pass key. Please also ensure that permission such as to contacts         Depending on the call status (initiate, ringing, dialling, active) you can hang-up, reject, accept/
     are granted/accepted. Active or auto connected phones are shown in status area (A) with an active            pick-up a call (1), on active call you can switch to private mode (2) or to car loudspeakers, mute the
     Bluetooth icon, battery and signal strength icon (if supported).                                             XZENT microphone (3) or open the keypad for call options (4). 5) to return to navigation mode.
     In the lower section you can choose a different category which will update the main view area.

             1

                                                                                                                                         1            2            3            4            5

                 2             3              4               5              6              7

     Operation buttons
     1. Return      Press to return to the home screen.
     2. Devices     Here you can manage your paired phones (manual connect/disconnect, delete) or
                    add new phones via search.
                    Tap the connect/disconnect button to disconnect manually and connect a different
                    other phone.
                    Tap the waste bin icon button to delete a paired phone
                    Note: it is only possible to connect a single phone at the same time.
     3. Keypad      Press to open the dial keypad with the active phone.
     4. contacts    Press to open the contact list of the active phone.
                    ou can manually re-sync in case if not all contacts are shown or new contacts have
                    been added to the phone.
                    You can slide the list or use the search function to look up a contact.
                    A contact can be operated like a folder and be tapped to open its containing numbers.
                    Tap on the line number to initiate a call attempt.
                    Use the orange back button on top left position of the list view to browse one level up.
     5. Call log    Here you have a separate list view for outgoing, received/incoming or missed calls.
                    You can tap a line to initiate a call attempt.
     6. Music       Press to initiate the Bluetooth music playback via A2DP.
                    Note: Some smartphones need to start the music app on the smartphone first.
                    The usage of Bluetooth music player is described in chapter „USB/IPod/BT Music
                    (A/V) Source“
     7. Settings    Press to open the Bluetooth settings for extended options like auto connect, auto
                    answer contact list settings and microphone adjustments.
                    6(a) Auto Connect: Press switch to ON/OFF Auto Connect.
                    6(b) Auto Answer: Press switch to ON/OFF Auto Answer.
                    6(c) Microphone Gain: Press arrow keys to change values.
                    6(d) Contact Order: Press arrow keys to change value.

14                                                                                                                                                                                                                         15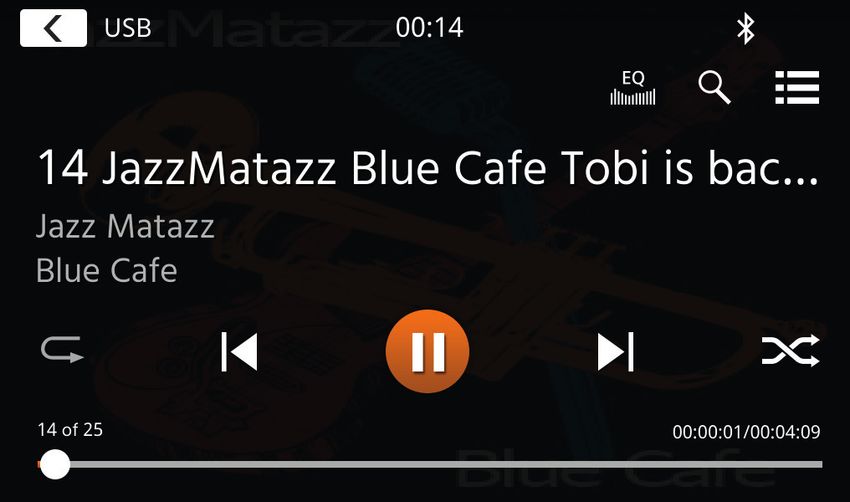
NAVIGATION SOURCE                                                                                                                                                          ANDROID LINK
     The Navigation source can be entered among other ways via the home screen icon or the sensor NAV          With AndroidLink you can connect your compatible Android Phone to the XZENT device and enjoy
     front key.                                                                                                compatible smartphone apps in your car. Make sure that you enabled the Android Link function in
     Please insert the microSD card to the NAV slot on found on the right side of the device (see Front View   the system settings of your XZENT device.
     Chapter).
                                                                                                               Warning!
     For the Navigation source UI operation a quick start guide is provided, you can also download a navi-     Please keep in mind that in certain countries it is illegal to operate a smartphone while driving.
     gation manual (PDF) from our web site.                                                                    XZENT is not liable for any problems or incorrect use of app-based content. Using connected cont-
                                                                                                               ent should respect your phones data plan to avoid additional costs.
     Navigation Software and map updates:
     The navigation software and maps on your microSD card is maintained and updated via www.na-               1.   To use this functionality you need first download the AutoLink Host App from your App-Store.
     viextras.com. You can find additional information, help and instructions how to install the toolbox and   2.   Launch the AutoLink Host App on your phone
     performing the desired action.                                                                            3.   Unlock your Phone and connect it via USB-1 (usually the OE-USB port located next to the 12V
                                                                                                                    port and the passenger airbag warning) to your XZENT – make sure your XZENT Setting is set
                                                                                                                    to AndroidLink.
                                                                                                               4.   Press the AndroidLink home screen icon on your XZENT
     WEBLINK SOURCE                                                                                            5.   On initial connection allow/accept requested access and accept and Bluetooth pairing request.
     This feature will become available via future software update, if not present on device upon market
     launch.

     With WebLink you can connect your compatible Phone* to the XZENT device and enjoy compatible
     smartphone apps in your car.
                                                                                                               A/V-IN SOURCE
     Warning!
     Please keep in mind that in certain countries it is not legal to operate a smartphone while driving.
                                                                                                               The A/V-IN can be entered among other ways via the home screen icon. Here you have the
     XZENT is not liable for any problems or incorrect use of app-based content. Using connected content
                                                                                                               possibility to listen to audio from an external device connected via audio line in with your XZENT
     should respect your phones data plan to avoid additional costs.
                                                                                                               via vehicle loudspeaker.
     1.   To use this functionality you need first download the WebLink Host App from your App-Store.
                                                                                                               Operation Buttons
     2.   Launch the WebLink Host App on your phone
                                                                                                               1. Return      Press to return to the home screen.
     3.   Unlock your Phone and connect it via USB-1 (usually the OE-USB port located next to the 12V
          port and the passenger airbag warning) to your XZENT
     4.   Press the WebLink home screen icon on your XZENT
     5.   Touch the phone icon on the XZENT screen and select the desired compatible WebLink App to
          be launched                                                                                                      1

     Note
     To see if your iPhone or Android Phone is compatible, please check if the phone App store offers the
     official Weblink Host app. You can find additional information on the official websites of WebLink (by
     Abalta) or XZENT.

16                                                                                                                                                                                                                  17
TERMS OF WARRANTY
     What products are covered by XZENT’s limited Warranty?
                                                                                                                         No warranty service will be provided, moreover, if the model number
     The limited Warranty (the “Warranty”) applies to XZENT products purchased from an authorized dealer by
                                                                                                                         /serial number/UUID/product number on the product is changed, erased, made illegible or removed. The
     end customers in the European Economic Area or Switzerland (“Territorial Scope”).
                                                                                                                         same applies if the receipt or invoice is incomplete and/or illegible when presented.
     What is the validity period of XZENT’s Warranty?
                                                                                                                         Is XZENT liable for other defects or damage?
     Under this Warranty, XZENT warrants, for a period of 2 years, that the product is free from defects in material
                                                                                                                         XZENT will repair or replace products, only if they are covered by the terms of this Warranty. XZENT is not
     and/or workmanship at the time of the original purchase. This 2-year period commences on the date of the
                                                                                                                         liable for any material or intangible loss or damage such as the price paid for the product, loss of profits,
     original purchase as per the original invoice or until receipt. If you have purchased the product as a consumer,
                                                                                                                         revenue, data, or relating to the enjoyment of the product or components associated with it, arising directly
     and the defect is identified within the first six months after the original purchase (see above), we will assume
                                                                                                                         or indirectly under this Warranty or otherwise in relation to products or services. This likewise applies to
     that the defect already existed at the time of purchase.
                                                                                                                         loss or damage relating to the impairment or operational failure of the product, or devices associated with
                                                                                                                         it, caused by defects or the non-availability of the product during the time it is with XZENT or XZENT’s
     Who can claim under the Warranty?
                                                                                                                         service partner, as well as to periods of downtime and business interruptions. In addition, XZENT does not
     XZENT grants the limited Warranty to natural persons only, who purchased the relevant product primarily for         accept any liability for shipment-related risks - such as the loss or destruction of the product - in connection
     personal use.                                                                                                       with the fulfilment of the Warranty.
                                                                                                                         This disclaimer applies to losses of damage irrespective of the legal basis, especially on the grounds of
     What is covered by the Warranty?                                                                                    negligence, other wrongful conduct (torts), breach of contract, express or implied guarantees, and strict
     XZENT warrants that the product is free from defects in material and/or workmanship at the time of the original     liability (even if XZENT or its service partner has been advised of the possibility of such damage occurring).
     purchase. XZENT does not, however, provide a warranty covering every defect and damage that may occur.              If these disclaimers are prohibited or limited under the applicable law, XZENT will limit its Warranty and
     It only covers the hardware components of the device, and in no event the software used with the device,            liability to the extent permissible under the applicable regulations. For example, some national laws prohibit
     regardless if this was provided by XZENT or the third-party vendor. The Warranty therefore does not cover           the exclusion or limiting of damages payable in connection with negligence, gross negligence, willful
     the following cases, in particular:                                                                                 wrongdoing, deceitful conduct, and other such acts. For the duration of this Warranty, all liability that
                                                                                                                         cannot be excluded completely will be limited to the extent permissible under the applicable law. Liability
     ■   normal wear and tear (such as to surfaces and protective coverings);                                            under this Warranty is limited to the price paid for the product. If the applicable law only permits higher
     ■   superficial damage, such as scratches, dents, and damaged plastic, worn or mechanically defective               limits on any liability, this higher limitation will apply.
         connections;
     ■   misuse, including any treatment resulting in physical or superficial damage, such as a cosmetic defect,         How do I exercise my Warranty rights?
         to the product;
     ■   damage caused by connecting or using the product for a purpose other than those specified, or a                 If you want to exercise your entitlements under this Warranty, please contact the authorized dealer where
         failure to observe the operating and/or installation instructions for the particular model;                     the product was purchased, and present it with the original copy of the till receipt or invoice. Do not return
     ■   installation or use of the product contrary to the applicable technical standards, or the safety regulations    any products to XZENT directly, otherwise our Warranty obligations cannot be fulfilled. You will find the
         in the country in which the product is installed or used;                                                       name of the relevant dealer or reseller on your proof of purchase.
     ■   damage caused through an unauthorized attempted repair, or an attempted repair by someone other                 Defective devices sent by the authorized dealer to the service center, must also be accompanied by
         than a XZENT authorized service partner;                                                                        any accessories with a logical connection to the observed fault. This means, for example, the navigation
     ■   damage caused by modifications to the product not expressly authorized by the manufacturer;                     package on an SD or microSD card supplied or purchased with the device, if problems or functional errors
     ■   damage caused by malicious code (“Software Viruses”) or by using software not supplied with the                 were observed in connection with the navigation function.
         product or which was incorrectly installed;
     ■   use of third party vendor software programs for editing, modifying, adapting, or extending XZENT’s              How will XZENT fulfil its Warranty?
         authorized software components as are run on the product;                                                       XZENT or its service partner will choose to either repair or replace the product or its defective parts covered
     ■   use of third-party vendor firmware/operating system software                                                    by the Warranty, and assume the costs of material and labor in doing so.
     ■   damage caused by liquids or chemicals of whatever type, and/or excessive temperatures, moisture,                Repairs under the Warranty must be carried out by XZENT or its authorized service partner. Products that
         or damp;                                                                                                        are repaired or replaced may contain new and/or refurbished components and devices. Components that
     ■   accidents, drops or other such effects of extreme accelerating forces;                                          are swapped out will become the property of XZENT.
     ■   damage caused by lightning strikes, electrostatic charge, incorrect operating voltage, water, fire, force
         majeure, inadequate ventilation for other reasons for which XZENT is not responsible;                           Will I incur any costs in connection with the Warranty service?
     ■   damage caused by using the device outside of the defined specifications;
                                                                                                                         XZENT assumes the costs of material and labor in connection with its Warranty service. The Warranty
     ■   damage caused by using the product with other systems or devices, which are not designed to be used
                                                                                                                         holder is responsible for the costs of shipment and bears the risks connected with the shipment (see
         with this product;
                                                                                                                         above). If the product is found to be operating faultlessly, or there is no warranty entitlement because the
     ■   adjustments or modifications without XZENT‘s prior written approval, including product upgrades
                                                                                                                         warrant period has expired or for any other reason, XZENT or its authorized service partner will be entitled
         extending beyond the specifications or characteristics described in the operating manual;
                                                                                                                         to charge a flat-rate investigation fee of €30.00.
     ■   modifications of the product for the purpose of adapting it to national or local technical norms or safety
         standards of countries for which the product was not expressly designed or manufactured;
                                                                                                                         Do this Warranty affect my statutory or contractual rights?
     ■   using service or spare parts not produced or distributed by XZENT;
     ■   using the product in connection with accessories not approved for use with this product;                        This Warranty is made voluntarily by XZENT, and it will, in any case, extend your statutory rights. As a
                                                                                                                         consumer, you remain fully entitled to your statutory rights, such as the statutory guarantee. This Warranty
     XZENT, moreover, does not warrant (expressly, implicitly, statutorily, or otherwise) the quality, performance,      also has no effect whatsoever on your contractual rights against the reseller. You may continue to exercise
     reliability or suitability of the product for a particular purpose except as described, nor the software/firmware   these rights in full.
     installed on the device ex works.

18                                                                                                                                                                                                                                          19
INHALT SICHERHEITSINFORMATIONEN
Allgemein
ÜBER DIESES HANDBUCH 1. Die in diesem Handbuch enthaltenen Beschreibungen und sonstigen Inhalte können vom
Dieses Handbuch enthält wichtige Informationen und Warnungen zum Betrieb dieses XZENT-Gerätes. tatsächlichen Gerät abweichen.
Bitte bewahren Sie es an einem Ort auf, zu dem Sie später Zugriff haben. 2. Die in diesem Handbuch und einigen HMI-Screenshots gezeigten Bilder können vom realen Gerät
abweichen.
3. Die technischen Daten und das technische Design dieses Gerätemodells können ohne
Vorankündigung geändert werden.
SICHERHEITSINFORMATIONEN 21 ■ Lesen Sie die Anleitung vollständig durch. Beachten Sie alle Warnhinweise. Befolgen Sie die
Anweisungen.
GERÄTESUPPORT, SOFTWARE-UPDATES UND WARTUNG 22 ■ Bewahren Sie dieses Handbuch auf. Jeder, der das Gerät benutzen will, sollte Zugang zu diesem
Handbuch haben.
FRONTANSCHLÜSSE 23 ■ Dieses Gerät ist für den Einsatz in Fahrzeugen mit 12-V-Gleichstrombatterie und negativer Masse
ausgelegt.
HAUPTMENÜ 24 ■ Das Gerät darf nicht anders betrieben werden, als in dieser Anleitung beschrieben. Bei
Nichtbeachtung der Anweisungen kann die Gewährleistung erlöschen.
LENKRADSTEUERUNG (OE-Modus, IR-Stalk-Schnittstelle) 25 ■ Nehmen Sie das Gerät nicht auseinander und verändern Sie es in keiner Weise, da sonst Ihre
Garantie erlischt. Versuchen Sie nicht, das Gerät selbst zu reparieren oder zu warten, sondern
GERÄTEEINSTELLUNGEN 26–27 wenden Sie sich stattdessen an einen autorisierten XZENT-Händler.
■ Verwenden Sie nur Originalzubehör, das für das Gerät konzipiert und hergestellt wurde, da sonst
DAB-RADIO-QUELLE 28 Schäden auftreten können. Montieren Sie das Gerät gemäß der Montageanleitung mit dem
mitgelieferten Montagezubehör. Die Beschleunigungskräfte bei Unfällen können enorm sein. Fehlerhaft
UKW-RADIO-QUELLE 29 montierte Geräte stellen bei einem Unfall ein ernsthaftes Risiko für Fahrer und Beifahrer dar.
■ Schützen Sie das Gerät vor Wasser und anderen Flüssigkeiten, die in das Gehäuse gelangen
USB- / iPod- / BT- / MUSIK(A/V)-QUELLE 30–31 könnten. Ein Kurzschluss oder sogar ein Brand könnte die Folge sein.
■ Um einen Kurzschluss zu vermeiden, stecken Sie niemals metallische Gegenstände (z. B. Münzen
BLUETOOTH: KOPPELN, VERBINDEN, TELEFONIEREN, MUSIK 32–33 oder Metallwerkzeuge) in das Gerät.
■ Bevor Sie eine defekte Sicherung austauschen, versuchen Sie, die Ursache für den Kurzschluss zu
NAVIGATIONS-QUELLE 34 finden. Achten Sie auf die Kabel des Netzteils! Wenn der Kurzschluss nicht auf einen Fehler in der
Stromversorgung oder Verkabelung zurückzuführen ist, können Sie die defekte Sicherung durch eine
WEBLINK-QUELLE 34 neue (mit demselben Wert) ersetzen. Wenn der Kurzschluss weiterhin besteht, wenden Sie sich an
einen autorisierten XZENT-Händler.
ANDROID LINK 35 ■ Wenn Sie ein anderes Gerät anschließen, lesen Sie die Bedienungsanleitung bezüglich der
Kompatibilität und der Hinweise zu den elektrischen Anschlüssen. Versuchen Sie nicht, inkompatible
A/V IN QUELLE 35 Produkte anzuschließen.
■ Achten Sie darauf, dass Sie die Autobatterie während der Benutzung des Geräts nicht entleeren,
GARANTIEBESTIMMUNGEN 36-37 wenn der Fahrzeugmotor abgestellt ist. Da das Gerät viel Energie verbraucht und die Batterie nur bei
laufendem Motor geladen wird, kann es vorkommen, dass sich die Batterie so weit entlädt, dass es
nicht mehr möglich ist, den Motor zu starten.
■ Nach geltenden Recht in verschiedenen europäischen Ländern ist das Fahren mit Monitoren, die
Filme im Sichtbereich des Fahrers zeigen, nicht erlaubt, da der Fahrer vom Verkehr abgelenkt werden
kann. Bitte beachten Sie die Verkehrsvorschriften Ihres Landes oder Sie können bei Unfällen, sonst
müssen Sie bei Unfällen mit Strafen oder sogar Verlust Ihres Versicherungsschutzes rechnen. Achten
Sie auf die Wiedergabelautstärke in Ihrem Fahrzeug, da Sie äußere Warntöne wie Polizeisirenen usw.
wahrnehmen können müssen.
■ Setzen Sie das Gerät keinen harten Stößen aus. Eine mechanische oder elektrische Fehlfunktion des
Gerätes kann die Folge sein.
■ Sollten während der Montage Probleme oder Fragen auftreten, wenden Sie sich bitte an Ihren XZENT-
Händler bzw. -Importeur.
20 21GERÄTESUPPORT, SOFTWARE-UPDATES UND FRONTANSCHLÜSSE
WARTUNG
ermöglichen.Sie müssen die AF-Funktion aktiviert haben, um die RDS-Funktionen nutzen zu können.
Software-Updates und -Verbesserungen werden über USB-Updates bereitgestellt, die von unserer Website
www.xzent.com heruntergeladen werden können. Dort finden Sie auch Kundenbetreuung, FAQs und andere
nützliche Informationen.
ACHTUNG: Dieses Gerät verfügt über spezielle USB-Ports mit speziellen Funktionen (USB-1 / oberer Port
B
auf der Geräterückseite) und (USB-2 / unterer Port auf der Geräterückseite). Die Verlängerungskabel sind
durch ein Textetikett unterscheidbar, um eine korrekte Zuordnung zu gewährleisten.
A
Über XZENT bereitgestellte Software-Updates MÜSSEN auf „USB-1“ (USE FOR SW UPDATE) installiert
werden. Wenn die Installation durch Dritte ohne ordnungsgemäße Markierung/Identifikation des Verlänge-
rungskabels durchgeführt wurde, versuchen Sie es am anderen Port, falls das Update fehlschlägt.
E
C 1 2 3 4 5 6 7 E
USB1 Kann für SW-Updates verwendet werden.
USB2 NICHT für Software-Updates
Bedientasten:
1. VOL/POWER: Halten Sie diese Taste gedrückt, um den Standby-Modus zu aktivieren (Bild-
schirm AUS, Audio AUS).
Wenn das Gerät eingeschaltet ist, drücken Sie, um es stumm zu schalten.
Wenn das Gerät ausgeschaltet ist, drücken Sie zum Einschalten.
Drehen Sie im Uhrzeigersinn, um die Lautstärke zu erhöhen.
Drehen Sie gegen den Uhrzeigersinn, um die Lautstärke zu verringern.
2. HOME: Drücken Sie, um zum Startbildschirm zurückzukehren.
Drücken Sie auf dem Startbildschirm, um zur letzten Quelle zu gelangen (falls
vorhanden).
Halten Sie gedrückt, um den EQ zu öffnen.
3. NAV: Drücken Sie, um den Navigationsmodus zu öffnen.
4. CAM: Drücken Sie, um die Standardkamera anzuzeigen, und drücken Sie erneut, um
die Kameraansicht zu schließen.
5. DAB Drücken Sie, um die DAB-Quelle zu öffnen. In der DAB-Quelle drücken Sie erneut,
um auf UKW umzuschalten.
B 6. ALT Drücken Sie, um die zugewiesene ALT-Kurzdrückfunktion aus den Geräteein-
stellungen auszuführen (siehe Kapitel Geräteeinstellungen).
Halten Sie gedrückt, um die zugewiesene ALT-Langdrückfunktion aus den Gerä-
teeinstellungen auszuführen (siehe Kapitel Geräteeinstellungen).
A 7. BT Drücken Sie, um die Bluetooth-Quelle zu öffnen.
A. RESET Drücken Sie, um einen Power-Reset durchzuführen.
B. MAP MicroSD-Steckplatz für Navigationssoftware (optional, nicht in diesem Set
enthalten).
C. MIC internes Mikrofon für Freisprechfunktionen
D. IR IR-Linse für die Fernbedienung
E Entriegelungs-Nut Wird für Entriegelungstasten verwendet, um das Gerät auszubauen.
22 23HAUPTMENÜ LENKRADFERNBEDINEUNG (OE-MODUS, IR-STALK-SCHNITTSTELLE)
Das XZENT-Gerät ist vorkonfiguriert, mit einer im Set enthaltenen IR-Stalk-Schnittstelle zu kommunizieren,
die es Ihnen ermöglicht, einige der Lenkradtasten Ihres Fahrzeugs zu bedienen.
Bedientasten
A
1. Überspringen Dies sind unterstützte Schaltflächen und lösen dieselben Funktionen aus wie
die UI-Taste der entsprechenden aktiven Quelle.
Sie kann für verschiedene Funktionen auch kurz und lang gedrückt werden.
In der DAB-Quelle beispielsweise führt die kurze Betätigung zu einem
Senderwechsel, während eine lange Betätigung das aktive DAB-Ensemble ändert.
2. Telefon Während eines Anrufes ändert sich die Funktion der .
Diese Tasten dienen je nach Situation zum Abheben und Auflegen oder sind
1 SKIP-Tasten. Bei einem eingehenden Anruf oder einem aktiven Anruf wird die
Telefonfunktionalität der Taste wirksam.
3. Lautstärke Diese Schaltflächen werden unterstützt und ermöglichen es, die Lautstärke
des aktuell aktiven Audiokanals zu ändern.
4. Kamera / Sprache Wenn sich die Taste in Ihrem kompatiblen Fahrzeug befindet,
wird die CAMERA-Ansicht aufgerufen oder geschlossen (wenn die Kamera an
das Gerät angeschlossen ist).
Board/Trip-Computer:
B
Die LFB-Tasten für Fahrt-, Bordcomputer- und Tempomatbetrieb sind den jeweiligen Fahrzeugfunktionen
direkt zugeordnet, d. h. die Funktion dieser Tasten am Lenkrad ist völlig unabhängig von der im Fahrzeug
eingebauten Gerät.
Tasten und Display für die Bedienung des HAUPTMENÜS
Hinweis:
A Uhrzeit und Datum
B Seitenanzeige
Die LFB-bezogenen Funktionen sind nur verfügbar, wenn das Gerät mit der bereitgestellten und
kompatiblen Stalkschnittstelle über IR im Kabel an ein kompatibles FORD-Modell angeschlossen ist.
1. Quellen-Symbol Drücken Sie, um die ausgewählte Quelle zu öffnen.
Um durch die verschiedenen Quellen-Symbole zu blättern, streichen Sie nach links oder rechts. Alternativ
können Sie auch die Pfeiltasten drücken, um durch die verschiedenen Seiten zu blättern.
Um zu diesem Bildschirm zurückzukehren, können Sie die Front-Sensortaste HOME oder die Pfeiltaste
Zurück in der linken oberen Ecke jeder Quelle drücken.
24 25GERÄTEEINSTELLUNGEN
verschieben.
4(c) Equalizer:
1 Drücken Sie, um den EQ zu öffnen. Sie können verschiedene EQ-
Voreinstellungen auswählen oder die Frequenzbänder manuell nach Ihren
Wünschen ändern.
2 Balance und Fader können auch optisch angepasst werden oder LPF,
Subwoofer-Pegel und Loudness können eingestellt werden.
4(d) Navi-Mischer: Drücken Sie den Schalter, um die Mischung von
Navigationssprache und Hintergrundton zu aktivieren oder zu deaktivieren.
4(e) Startlautstärke: Drücken Sie die Taste „Weitere“. Hier können Sie alle
verfügbaren Quellen in Bezug auf die Startlautstärke individuell anpassen.
Sie können wählen, ob Sie die zuletzt verwendete Lautstärke verwenden oder
beim Start eine fest eingestellte Lautstärke haben möchten.
5. TFT Hier können Sie Einstellungen in Bezug auf den Bildschirm vornehmen, z. B.
Helligkeitsmodus und -werte.
5(a) TFT-Helligkeit am Tag: Drücken Sie die Pfeiltasten, um den Wert für den Tag-
Modus einzustellen.
5(b) TFT-Helligkeit in der Nacht: Drücken Sie die Pfeiltasten, um den Wert für den
Nacht-Modus einzustellen.
3 4 5 6 7 5(c) Dimm-Modus: Drücken Sie die Pfeiltasten, um den Wert einzustellen.
Auto: Die Helligkeit wird beim Einschalten der Frontscheinwerfer des Fahrzeugs
(Nacht) automatisch angepasst.
Tag: Die Helligkeit ist dauerhaft auf dem Tageswert.
Bedientasten: Nacht: Die Helligkeit ist dauerhaft auf dem Nachtwert.
1. Zurück Drücken Sie, um zum Startbildschirm zurückzukehren. 5(d) Touchscreen Auto-Standby: Bei eingestellter Leerlaufzeit wird der Bildschirm
2. Listenbereich Der angezeigte Listenbereich ist abhängig von der aktuell ausgewählten Kategorie. ausgeschaltet, wenn er nicht bedient wird (der Ton wird im Hintergrund weiterhin
Um andere Einstellungen zu sehen, können Sie die Liste nach oben und unten wiedergegeben).
scrollen/streichen oder eine andere Kategorie im unteren Bereich auswählen. 6. Kamera Ermöglicht es Ihnen, die Einstellungen der angeschlossenen Rückfahrkamera
3. Allgemein Enthält allgemeine Einstellungen wie Sprache, Datum und Uhrzeit, ALT-Tastenbelegung. anzupassen.
3(a) Drücken Sie Datum, um ein Datum manuell einzustellen (nur möglich, wenn der 6(a) Rückfahrtkamera: Drücken Sie die Pfeiltasten, um den Wert einzustellen.
Synchronisationsmodus auf AUS gesetzt ist). 6(b) Rückfahrkamera Stummschaltung: Drücken Sie diese Taste, um den Wert zu
3(a) Drücken Sie Uhrzeit, um die Uhrzeit manuell einzustellen (nur möglich, wenn ändern (Lautstärke 50 %, Stumm 0 % oder 100 % ohne Stummschaltung).
der Synchronisationsmodus auf AUS gesetzt ist). 6(c) Verzögerung: Drücken Sie die Pfeiltasten, um die Verzögerungszeit zu ändern,
3(c) 12/24: Drücken Sie die Pfeiltasten, um das 12/24h-Format zu ändern. bis sich die Kameraansicht nach Verlassen des Rückwärtsgangs automatisch schließt.
3(d) Zeitzone: Drücken Sie die Pfeiltasten, um eine Zeitzone einzustellen (nur 6(d) Kamerabild: Drücken Sie die Pfeiltasten, um den Wert einzustellen (normal oder
möglich, wenn der Synchronisationsmodus auf AUS gesetzt ist). horizontal gespiegelt).
3(e) DAB+ Zeitsynchronisationsmodus: Drücken Sie den Schalter auf EIN/AUS. 7. Verschiedenes Hier finden Sie Informationen zur Softwaregeräteversion und zum Laden der
3(f) ALT-Kurzdrücken: Drücken Sie die Pfeiltasten, um eine andere Funktion Werkseinstellungen.
zuzuweisen. 7(a) Werkseinstellungen: Drücken Sie die Taste „Weitere“ und bestätigen Sie, um
3(g) ALT-Langdrücken Drücken Sie die Pfeiltasten, um eine andere Funktion einen Werksreset durchzuführen.
zuzuweisen. 7(b) Software-Version Drücken Sie die Taste „Weitere“, um die Softwareversion des
3(h) Piepton: Drücken Sie den Schalter auf EIN/AUS (Aktivieren/Deaktivieren der Gerätesystems anzuzeigen.
Tasten-Pieptöne).
3(i) WebLink: Drücken Sie den Schalter auf AN/AUS.* Hinweis:
3(j) Sprache: Drücken Sie die Pfeiltasten, um die Sprache auszuwählen. * Diese Funktion wird durch ein zukünftiges Software-Update verfügbar werden, falls sie bei der
3(k) Mikrofon: Drücken Sie die Pfeiltaste, um das ausgewählte Mikrofon zu wechseln. Markteinführung nicht auf dem Gerät vorhanden ist.
3(l) Hintergrund: Drücken Sie, um einen anderen Hintergrund auszuwählen.
4. Audio Enthält die Einstellung für Audio- und Sound.
4(a) Balance: Drücken Sie die Pfeiltasten, um die Mitte nach links oder rechts zu
verschieben.
4(b) Fader: Drücken Sie die Pfeiltasten, um die Mitte nach vorne oder hinten zu
26 27DAB-RADIO-QUELLE UKW-RADIO-QUELLE
Sie können die DAB-Quelle unter anderem über die frontseitige DAB-Sensor-Taste oder über das Quelle- Sie können die UKW-Quelle unter anderem über das Quelle-Symbol auf dem Startbildschirm aufrufen. Sie
Symbol auf dem Startbildschirm aufrufen. Sie können auch über die DAB-Taste in der rechten unteren können auch über die UKW-Taste in der rechten unteren Ecke der DAB-Quelle direkt von der DAB- zur
Ecke der UKW-Quelle direkt von der UKW- zur DAB-Quelle wechseln. UKW-Quelle wechseln. Im unteren Bereich können Sie die Kategorie ändern, die auch den Quellen-
Mit der DAB-Quelle können Sie die erweiterten digitalen Radioprogramme genießen, die über den neuen Hauptbereich entsprechend aktualisiert.
DAB+-Standard ermöglicht werden. Im unteren Bereich können Sie die Kategorie ändern, die den Quellen-
Hauptbereich entsprechend aktualisiert.
1
1
2
3 4 5 6 7
2 3 4 5 6
Bedientasten
Bedientasten 1. Zurück Drücken Sie, um zum Startbildschirm zurückzukehren.
1. Zurück Drücken Sie, um zum Startbildschirm zurückzukehren. 2. Einstellungen Mit dem Einstellungsmenü können Sie eine automatische Suche und Speicherung
2. Einstellungen 2(a) DAB-DAB-Service-Verfolgung: Drücken Sie, um die Funktion EIN/AUS zu der Voreinstellungen, eine Änderung des AF-Verhaltens oder des Empfangsmodus
schalten. veranlassen.
2(b) Antennenversorgung: Drücken Sie den Schalter, um die 2(a) Automatisches Speichern: Drücken Sie die Pfeiltasten, um die automatische
12V-Spannungsversorgung für Ihre DAB-Antenne zu aktivieren/deaktivieren. Suche und Speicherung der Voreinstellungen zu starten.
2(c) DAB-Firmware: Zeigt die aktuelle DAB-Firmwareversion an. 2(b) Modus: Drücken Sie die Pfeiltasten, um den DX/LOC-Modus zu ändern.
3. Info In dieser Ansicht sehen Sie die Logos der aktuell abgespielten Sender sowie Bilder 2(c) AF: Drücken Sie um die AF-Funktion (Alternative Frequenzen) EIN-/AUS-zuschalten.
und Text, die vom Sender übertragen werden. 2(d) Antennenversorgung: Drücken Sie den Schalter, um die
Drücken Sie die Pfeiltasten, um den Sender der aktuell ausgewählten Gruppe zu 12V-Spannungsversorgung für Ihre FM-Antenne zu aktivieren/deaktivieren.
wechseln. 3. Skala In dieser Ansicht wird ein Frequenzskalenband mit einer Markierung der aktuell
Halten Sie die Pfeiltasten gedrückt, um zur nächsten möglichen Gruppe zu wechseln. eingestellten Frequenz angezeigt.
Der erste Sender der neuen Gruppe wird automatisch abgespielt. Zwischen den Aufwärts- und Abwärtssuch-Tasten (Pfeiltasten) wird zusätzlich die
4. Liste Die Listenansicht ermöglicht es Ihnen, alle empfangenen Gruppen anzuzeigen und Frequenz angezeigt.
wird regelmäßig aktualisiert. Drücken Sie die Pfeiltasten, um die Aufwärts-/Abwärtssuche zum nächsten
Sie können eine Gruppe auswählen, indem Sie darauf tippen, und es werden die empfangbaren Sender zu starten.
darin enthaltenen Sender angezeigt, die Sie auch direkt antippen können, um sie 4. Info In dieser Ansicht werden Ihnen der Sendername und der empfangene Radiotext angezeigt.
abzuspielen. Zwischen den Aufwärts- und Abwärtssuch-Tasten (Pfeiltasten) wird zusätzlich die
5. Voreinstellung In dieser Ansicht werden die Voreinstellungstasten angezeigt, die als Frequenz angezeigt.
Schnellauswahl- oder Favoriten-Tasten fungieren. Drücken Sie die Pfeiltasten, um die Aufwärts-/Abwärtssuche zum nächsten
Um den aktuellen Sender auf einer Voreinstellungstaste zu speichern, halten Sie empfangbaren Sender zu starten.
diese gedrückt, bis die Taste mit den Senderinformationen aktualisiert wird. 5. Voreinstellung In dieser Ansicht werden die Voreinstellungstasten angezeigt, die als
6. UKW Drücken Sie die Schaltfläche, um direkt zur UKW-Radioquelle zu wechseln. Schnellauswahl- oder Favoriten-Tasten fungieren.
Um den aktuellen Sender auf einer Voreinstellungstaste zu speichern, halten Sie
Hinweise: diese gedrückt, bis die Taste mit den Senderinformationen aktualisiert wird.
Bitte beachten Sie, dass einige Funktionen vom ausgestrahlten Sender und vom Empfang abhängen. 6. TA Drücken Sie, um TA (Verkehrsmeldung, engl. Traffic Announcement) EIN-/AUS-zu-schalten.
7. DAB Drücken Sie, um direkt zur DAB-Radioquelle zu wechseln.
Hinweis:
Dieses Gerät verfügt über einen RDS-Tuner. RDS ist ein System, das zusätzlich zum UKW-Radiosignal
Daten überträgt. Verfügbarkeit und Inhalt der RDS-Daten sind abhängig vom jeweiligen Sender und dessen
Signalstärke. RDS sendet beispielsweise alternative Frequenzen, die Frequenzänderungen ohne Benutzereingriff
28 29USB- / IPOD- / BT- / MUSIK(A/V)-QUELLE
Auf die Quellen USB und iPod kann unter anderem über das Startbildschirm-Symbol und BT-Musik mit
einem angeschlossenen Telefon über die Bluetooth-Quelle zugegriffen werden, um Audio (BT, USB, iPod)
oder Video (nur USB) wiederzugeben. B
Die Wiedergabe von Dateien ist für alle Quellen ähnlich und kann über die Mediaplayer-Oberfläche gesteu- A
ert werden. Um Videos im USB-Modus wiederzugeben, müssen Sie den Standardfilter in der Listenansicht
(4) auf den Videodateityp (B) ändern.
1 2 3 4
Im Listenansichtsmodus (nicht verfügbar in Bluetooth-Musik) können Sie Ihre Mediendateien ähnlich wie
eine Ordner-Datei-Liste durchsuchen. Um Ordner zu öffnen, tippen Sie einfach auf sie, um ihren Inhalt
anzuzeigen, den Sie auch direkt antippen können, um die Wiedergabe zu starten. Es wird mit einem
Wiedergabesymbol und in der unteren Zeile angezeigt. Um eine Ebene zurückzugehen, verwenden Sie
die Taste Zurück (A) oder Sie können zum Videomedientyp (nur USB-Modus) wechseln, indem Sie (B) das
Filtersymbol drücken.
In dieser Hauptansicht werden die Bedienelemente des Mediaplayers angezeigt. Wie üblich können Sie die
Pause-, Fortsetzungs-, Wiedergabe- oder Sprungtasten verwenden, um den nächsten Titel wiederzugeben. Zusätzliche Hinweise zur Videowiedergabe:
Sie können auch die Sonderfunktionen wie Repeat und Shuffle aktivieren. Die Videowiedergabe ist nur möglich, wenn die Handbremse angezogen ist.
Die Wiedergabe erfolgt im Vollbildmodus. Um den Vollbildmodus zu verlassen, drücken Sie einfach den
Bedientasten: Touchscreen-Bereich Ihres Gerätes.
1. Zurück Drücken Sie, um zum Startbildschirm zurückzukehren.
2. EQ Drücken Sie, um die Equalizer-Einstellungen zu öffnen (siehe Kapitel Geräteeinstellungen).
3. Suche Drücken Sie, um die Suche zu öffnen (nicht verfügbar bei Bluetooth-Musik).
4. Liste Drücken Sie, um die Listenansicht zu öffnen (nicht verfügbar bei Bluetooth-Musik).
30 31BLUETOOTH: KOPPELN, VERBINDEN, TELEFONIE-
REN, MUSIK 7. Einstellungen Drücken Sie diese Taste, um die Bluetooth-Einstellungen für erweiterte Optionen
Bei der ersten Benutzung ist die Kategorie (2) aktiv und Sie können Ihr kompatibles Telefon über Scan/Su- wie automatische Verbindung, Einstellungen der automatischen Antwortkontaktliste
che koppeln. Bitte stellen Sie sicher, dass Ihr Telefon sichtbar ist, bis es in der Suchergebnisliste erscheint. und Mikrofoneinstellungen zu öffnen.
Um zu koppeln, tippen Sie auf die Zeile mit Ihrem Telefon aus der Liste und bestätigen Sie das Passwort. 6(a) Automatische Verbindung: Drücken Sie, um die automatische Verbindung
Bitte stellen Sie auch sicher, dass die Berechtigung, z. B. für Kontakte, erteilt bzw. akzeptiert wird. Aktive EIN-/AUS-zuschalten.
oder automatisch verbundene Telefone werden im Statusbereich (A) mit einem aktiven Bluetooth-Symbol, 6(b) Automatische Beantwortung: Drücken Sie, um die automatische Beantwortung
dem Batterie- und Signalstärke-Symbol (falls unterstützt) angezeigt. Im unteren Bereich können Sie eine EIN-/AUS-zuschalten.
andere Kategorie auswählen, die den Hauptansichtsbereich aktualisiert. 6(c) Mikrofonverstärkung: Drücken Sie die Pfeiltasten, um die Werte zu ändern.
6(d) Kontaktreihenfolge: Drücken Sie die Pfeiltasten, um den Werte einzustellen.
1
Bei ein- und ausgehenden oder aktiven Anrufen wechselt das Gerät automatisch in den Vollbildmodus
und zeigt Ihnen den Kontaktnamen oder die Kontaktnummer (falls vorhanden) oder bei unterdrückter
Anruferkennung unbekannt.
Je nach Anrufstatus ( Initiieren, Klingeln, Wählen, Aktiv) können Sie einen Anruf (1) auflegen, ablehnen
oder annehmen. Bei aktivem Anruf können Sie in den Privatmodus (2) oder zu Auto-Lautsprechern
wechseln, das XZENT-Mikrofon (3) stummschalten oder die Tastatur für Anrufoptionen (4) öffnen.
(5) um in den Navimodus zu wechseln.
2 3 4 5 6 7
Bedientasten 1 2 3 4 5
1. Zurück Drücken Sie, um zum Startbildschirm zurückzukehren.
2. Geräte Hier können Sie Ihre gekoppelten Telefone verwalten (manuelles Verbinden/Trennen,
Löschen) oder über die Suche neue Telefone hinzufügen.
Tippen Sie auf die Schaltfläche Verbinden/Trennen, um die Verbindung manuell zu
trennen und ein anderes Telefon anzuschließen.
Tippen Sie auf die Schaltfläche Papierkorb-Symbol, um ein gekoppeltes Telefon zu löschen.
Hinweis: Es ist nur möglich, ein einzelnes Telefon gleichzeitig anzuschließen.
3. Tastenfeld Drücken Sie, um die Wähltastatur mit dem aktiven Telefon zu öffnen.
4. Kontakte Drücken Sie diese Taste, um die Kontaktliste des aktiven Telefons zu öffnen.
Sie können die Synchronisierung manuell wiederholen, falls nicht alle Kontakte ange-
zeigt werden oder dem Telefon neue Kontakte hinzugefügt wurden.
Sie können die Liste durchblättern oder die Suchfunktion nutzen, um einen Kontakt zu suchen.
Ein Kontakt kann wie ein Ordner bedient und mit Antippen geöffnet werden, um seine
enthaltenen Nummern zu öffnen.
Tippen Sie auf die Zeilennummer, um einen Anruf zu starten.
Verwenden Sie die orangefarbene Zurück-Taste oben links in der Listenansicht, um
eine Ebene nach oben zu gelangen.
5. Anrufprotokoll Hier haben Sie eine separate Listenansicht für ausgehende, empfangene, eingehen-
de und verpasste Anrufe.
Sie können auf eine Linie tippen, um einen Anruf zu starten.
6. Musik Drücken Sie, um die Bluetooth-Musikwiedergabe über A2DP zu starten.
Hinweis: Bei einige Smartphones müssen Sie zuerst die Musik-App auf dem Smart-
phone starten.
Die Verwendung des Bluetooth-Musikplayers ist im Kapitel „USB- / iPod- / BT-Musik- /
(A/V)-Quelle“ beschrieben.
32 33NAVIGATIONS-QUELLE ANDROID LINK
Die Navigationsquelle kann unter anderem über das Startbildschirm-Symbol oder die Front-Sensortaste Mit Android Link können Sie Ihr kompatibles Telefon* mit dem XZENT-Gerät verbinden und kompatible
NAV geöffnet werden. Smartphone-Anwendungen im Auto verwenden. Stellen Sie sicher, dass Sie die Android Link-Funktion in
Bitte stecken Sie die microSD-Karte in den NAV-Steckplatz auf der rechten Seite des Gerätes (siehe Kapi- den Systemeinstellungen Ihres XZENT-Geräts aktiviert haben.
tel Frontansicht).
Warnung!
Für den Umgang mit der Benutzeroberfläche der Navigationsquelle steht eine Kurzanleitung zur Verfügung. Bitte beachten Sie, dass es in einigen Ländern illegal ist, ein Smartphone während der Fahrt zu bedie-
Sie können auch ein Navigationshandbuch (PDF) von unserer Website herunterladen. nen. XZENT haftet nicht für Probleme oder die unsachgemäße Verwendung von App-basierten Inhalten.
Bei Nutzung von vernetzten Inhalten sollte Sie den Datentarif Ihres Handys beachten, um zusätzliche
Navigationssoftware und Karten-Updates: Kosten zu vermeiden.
Die Navigationssoftware und Karten auf Ihrer microSD-Karte werden über www.naviextras.com gepflegt
und aktualisiert. Weitere Informationen, Hilfe und Anleitungen zur Installation der Toolbox und zur Durchfüh- 1. Um diese Funktionen nutzen zu können, müssen Sie zunächst die AutoLink Host App aus Ihrem
rung der gewünschten Aktion finden Sie dort. App-Store herunterladen.
2. Starten Sie die AutoLink Host App auf Ihrem Handy.
3. Entsperren Sie Ihr Telefon und verbinden Sie es über USB-1 (normalerweise der OE-USB-An-
schluss neben dem 12V-Anschluss und der Beifahrerairbag-Warnung) mit Ihrem XZENT. Stellen Sie
WEBLINK-QUELLE sicher, dass Ihre XZENT-Einstellung auf AndroidLink gesetzt ist.
4. Drücken Sie das AndroidLink-Startbildschirm-Symbol auf Ihrem XZENT.
Diese Funktion wird durch ein zukünftiges Software-Update verfügbar werden, falls sie bei der Markteinfüh- 5. Bei der ersten Verbindung erlauben / akzeptieren Sie den angeforderten Zugriff und akzeptieren Sie
rung nicht auf dem Gerät vorhanden ist. die Bluetooth-Kopplungsanforderung.
Mit WebLink können Sie Ihr kompatibles Telefon* mit dem XZENT-Gerät verbinden und kompatible Smart-
phone-Anwendungen im Auto verwenden.
Warnung!
Bitte beachten Sie, dass es in einigen Ländern nicht erlaubt ist, ein Smartphone während der Fahrt zu
bedienen. XZENT haftet nicht für Probleme oder die unsachgemäße Verwendung von App-basierten Inhal- A/V-IN-QUELLE
ten. Bei Nutzung von vernetzten Inhalten sollte Sie den Datentarif Ihres Handys beachten, um zusätzliche
Kosten zu vermeiden. Die A/V-IN kann unter anderem über das Startbildschirm-Symbol aufgerufen werden. Hier haben Sie die
Möglichkeit, Audio von einem externen Gerät zu hören, das über eine Audioleitung mit Ihrem XZENT
1. Um diese Funktionen nutzen zu können, müssen Sie zunächst die WebLink Host App aus Ihrem über einen Fahrzeuglautsprecher verbunden ist.
App-Store herunterladen.
2. Starten Sie die WebLink Host App auf Ihrem Handy. Bedientasten
3. Entsperren Sie Ihr Telefon und verbinden Sie es über USB-1 (normalerweise der OE-USB-Anschluss 1. Zurück Drücken Sie, um zum Startbildschirm zurückzukehren.
neben dem 12V-Anschluss und der Beifahrerairbag-Warnung) mit Ihrem XZENT.
4. Drücken Sie das WebLink-Startbildschirm-Symbol auf Ihrem XZENT.
5. Tippen Sie auf das Telefonsymbol auf dem XZENT-Bildschirm und wählen Sie die gewünschte kompa-
tible WebLink-App aus, die gestartet werden soll. 1
Hinweis
Um zu prüfen, ob Ihr iPhone oder Android-Handy kompatibel ist, überprüfen Sie bitte, ob der App-Store
des Handys die offizielle Weblink Host App anbietet. Weitere Informationen finden Sie auf den offiziellen
Webseiten von WebLink (von Abalta) oder XZENT.
34 35You can also read