Vista Plus - Eastern Flooring Products
←
→
Page content transcription
If your browser does not render page correctly, please read the page content below
Vista Plus                                                             INSTALLATION & MAINTENANCE

       PRIOR TO INSTALLATION
MATERIAL REQUIREMENTS:
    • Estimate square footage and add 10%.
    • Select underlayment (over concrete or in moisture prone areas, the underlayment selected
       must act as a vapor barrier). If the product you have selected already has a pre-attached un-
       derlayment, then a 6 mil vapor barrier must be used over concrete or in moisture prone areas.

ACCLIMATION:
Store in the room for 48 hours. The product should be stored in draught-free, dry rooms. For transpor-
tation it is necessary that the packs are protected from the weather.
Storage before installation:
The panels should be stored unopened in the middle of the room. Please store the unopened laminat-
ed flooring packs at a room temperature of at least 64.4°F and a relative humidity of ≤ 60% for mini-
mum of 48 hours.

       INSTALLATION TOOLS
1.   Wood Glue
2.   Spacers
3.   Pull-bar
4.   Circular Saw with a fine-toothed blade
5.   Hammer (min. 1 lb)
6.   Pencil
7.   Straight Edge

       GENERAL GUIDELINES
                             NOTE: Never Use a tapping block or installation kid designed for other
                             laminate floors. Using these tools will damage your floor and void your
                             warranty. This Laminate flooring is designed to be installed floating. Under no
                             circumstances should flooring panels be glued, nailed, screwed or otherwise
                             adhered (e.g. door stopper, closet track) to the subfloor in any way.

                             • The largest possible continuous installation area is 26’ in the direction of
                             the panel width and 26’ in the direction of the panel length.

                                                      Page 1 of 8

Eastern Flooring Products®                  www.EasternFlooringProducts.com                 Last revision: 06/10/2021
Vista Plus                                                            INSTALLATION & MAINTENANCE

                           Larger areas must be separated by expansion joints of at least 1/2”. Lami-
                           nate flooring consists largely of wood. Wood is a hygroscopic material and
                           always adapts to the ambient humidity, which in turn results in a change in
                           dimension.
                           The expansion can reach up to 1/16” on 3’. This fact should be considered
                           from a construction viewpoint when laying the flooring. A minimum distance
                           of 1/2” from the wall must be maintained around the perimeter. Expansion
joints of at least 1/2” must be provided between rooms. These expansion joints can be covered with
special profiles. A distance of 1/2” to fixed installations, e.g. radiators, must also be maintained.

                             • Installation should be carried out at a room temperature of at least 65°F
                             and a floor temperature of at least 59°F. The relative humidity in the room
                             should be 50-60 %. The temperature difference between the flooring panels
                             and the subfloor should not exceed ±3 degrees.

                             • The sub-floor must be absolutely level, dry, clean, and firm. Carpet is not
                             a suitable underlayment. Differences in floor level of more than 3 mm per
                             meter span (1/8” on 3’) must either be sanded down or filled in with suitable
                             floor filling compound. The subfloor has to be absolutely clean before install-
                             ing the laminate and free of any debris.

•   Installation on concrete/mineral subfloors
    As the duration of drying depends on climatic conditions, the stated drying periods are to be con-
    sidered as guidelines. In any case, for safety purposes, two weeks should be added. Absolute
    certainty can only be guaranteed by adequate measuring e.g.
       - Calcium chloride < 3 lb.
       - Relative humidity of 85% or less

•   Installation on wood subfloors
    Wooden constructions must be sufficiently ventilated (4cm²/sup_ ventilation area per each m²/
    sup_ of flooring). Principally sub-floors consisting of wood (chipboard, hardboard and floorboard
    etc.) must not be covered with airtight materials as beneath the covering the microorganisms find
    ideal conditions to exist thereby ruining the floor.
    Since sufficient ventilation must be allowed, in sections of the installation near the wall wooden
    strip must be adjusted to allow for ventilation to pass through floor construction, including after the
    floor is installed. It must be presumed that the existing hollow/space underneath the construction
    will be constantly dry, to guarantee the balance of moisture of the wooden construction indepen-
    dent of the seasons, and thereby PE film as vapor absorption will not be needed.

                                                     Page 2 of 8

Eastern Flooring Products®                 www.EasternFlooringProducts.com                Last revision: 06/10/2021
Vista Plus                                                             INSTALLATION & MAINTENANCE

                             • PE Film
                             A PE film (polyethylene film) or similar of at least 0.2 mm thickness must be
                             laid as a vapor barrier against rising moisture. Allow the PE film to overlap by
                             1”. Use a water resistant tape to tape the overlap joints together. Pull the film
                             1 1/2 - 2” up the wall.

                        • Impact Sound Insulation
                        Apart from the acoustic properties, the impact sound insulation system must
have a sufficient Compressive Strength. We recommend products made of the material XPS (extrud-
ed polystyrene hard foam). A combination of impact sound and vapor barrier can also be used.

•   Laying Direction
    Recommended installation direction is lengthwise to the main light source.
                      Flooring consists of several individual boards. The single planks can always
                      be seen in strong light. The joints are more visible crosswise than lengthwise
                      to the light source. Because of the panel format there are less joints in the
                      length than in the width. This is only recommended because there are also
                      other influences.

                             • Installation in Conjunction with Underfloor Heating
                             This laminate flooring can be installed trouble-free in conjunction with hot
                             water underfloor heating systems.

                             • Panel Mixing
                             Prepare at least 4 packs of flooring. Mix panels from different packs during
                             installation. We recommend alternate fitting of the panels from four different
                             packs at the same time. Keep alternating the panels across the entire floor
                             area. This guarantees the best possible appearance of your flooring product.

• Check for defective panels
Always carefully inspect the panels for damage before installation. Color, decor, clean edgeprocess-
ing and small damages or visual imperfections on the surface. Panels with minor damage can be
used in situations were the panels have to be cut.

The installation has to be done using daylight or equivalent good lighting because it can be possible
that small damages can‘t be recognized. No complaints can be accepted in the case of panels which
have already been used.

                                                      Page 3 of 8

Eastern Flooring Products®                  www.EasternFlooringProducts.com                  Last revision: 06/10/2021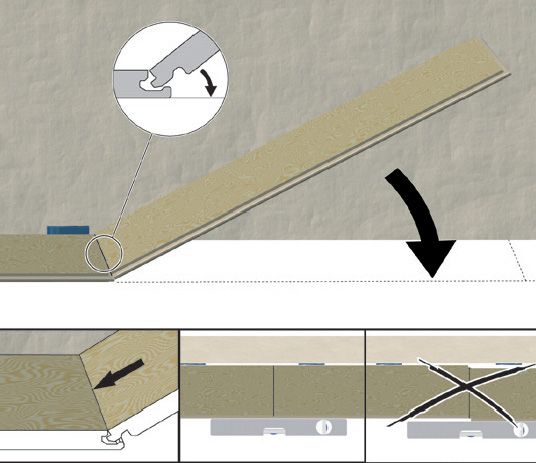
Vista Plus INSTALLATION & MAINTENANCE
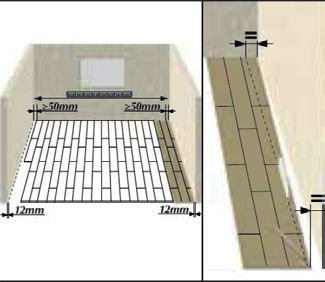
• First panel row parallel towards the wall
Please insure a minimum of > 2’” width of the first and last row. The panels
must follow the course of the wall; unevenness 1/5” must be marked on the
first row of panels using a spacer. The panels have to be sawn lengthways
following the marking. The last row of panels at the opposite wall should not
be less than 2” wide, if so, the width of the first row of panels should be cut
down lengthways to avoid this. Please make sure that there is a min. dis-
tance to the wall of 1/2”. Bear this in mind when calculating the last row.
INSTALLATION ILLUSTRATIONS
Step 1 Installation Illustration
Step 1 Installation Illustration
Step 2 Installation Illustration
STEP 1: Remove the tongue of the first panel row and lay it against the wall. Insert the panel at an
angle of approx. 25° degrees and lower the panel to lock into place. Connect the panels of the first
row on the short side. Insert the panel into the groove of the first panel at an angle of 25° degrees;
and lower the panel to lock it into place. Ensure that the row is straight.
STEP 2: Mark length, of last panel in each row to allow for minimum offset to the following rows. For
accurate cutting of the last panel in the row, rotate this through 180° degrees; and with the pattern side
upwards, place beside the already installed row. Allow for distance from wall at end of panel. Mark out
offcut and saw off. Always saw from the upper surface of the panel (to avoid splintering the edges) only
when using an electric jig saw or a hand-held circular saw should the patterned side be placed facing
downwards. Start each row with the left of the left-over piece from the preceding row. The transverse
shocks must be set in an appropriate offset. Because of the offset there is stability in the lay up.
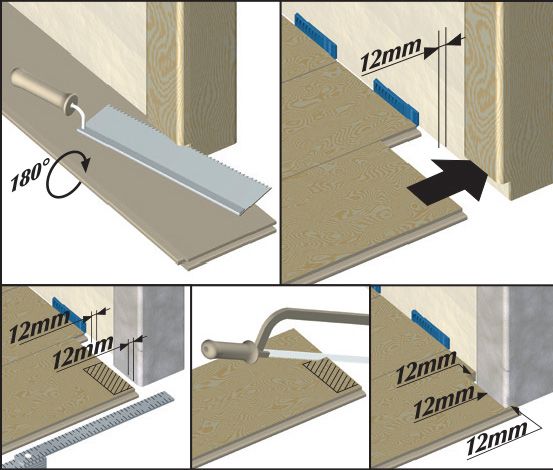
• (Longitudinal connection) Angle / Tap
Place the panel lengthwise at an angle of approx. 25° and angle it in. Shift the panel alread now to
Page 4 of 8
Eastern Flooring Products® www.EasternFlooringProducts.com Last revision: 06/10/2021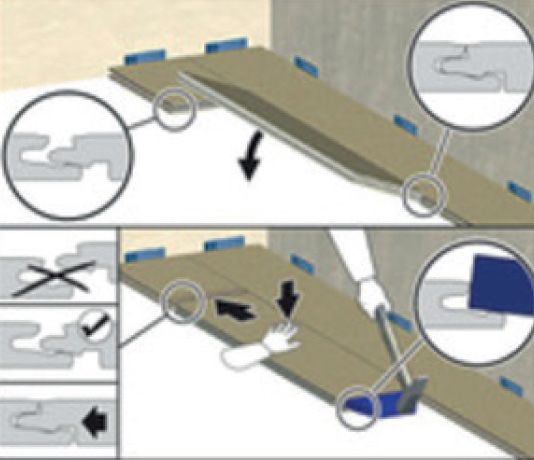
INSTALLATION & MAINTENANCE

              Step 1 Installation Illustration            Step 2 Installation Illustration    Step 3 Installation Illustration

    the short side of the first panel. Push the panel down gently so that the prestressed profile locks in
    neatly. Pay attention to the positioning of the short sides to ensure the profile pieces are perfectly
    aligned. Once the plank is lying flat, place the tapping block on the profile and use a hammer to
    gently tap so that the tongue and groove have a tight connection. Please note that the tapping
    block should be positioned properly on the tongue so damage does not occur.

 • (Diagonal connection) Angle / Tap
   To start the second row, place the plank lengthwise and angle at approx. 25° before dropping the
   plank down. Install the next plank by angling the long side at approx. 25° and dropping down,
   keeping in mind the short side should be 2-3mm away from the end of the previous plank. Pay
   attention to the positioning of the short sides to ensure the profile pieces are perfectly aligned.
   Once the plank is lying flat, place the tapping block on the profile and use a hammer to gently tap
   so that the tongue and groove have a tight connection. Please note that the tapping block should
   be positioned properly on the tongue so damage does not occur.

STEP 3: The panels are laid according to the numbering in the image. (Trim the first row if neces-
sary, as described in Figure 10.) In this sequence, the first 3 rows are laid out in the room. This way
of laying ensures that the rows are connected in straight lines.The pre-installed rows are then pushed
against the wall. The distance between the wall and the panel rows is fixed with space wedges.After
that, the laying can be continued row by row.

STEP 4: Special cases: If you are not able to angle the panels (e.g. under a door frame or low fitted
radiator) cut away the locking edge, Glue and tap the panels tight together. If you are not able to an-
gle the panels (e.g. under a door frame or low fitted radiator) you have to cut away the locking edge
of lip of the bottom groove by using a wood chisel or a small block plane. Run a bead of glue on the
modified tongue and groove. Tap the panels tight together by using a hammer and push block or pull-
bar. If necessary fix it with an adhesive tape.

                                                           Page 5 of 8

Eastern Flooring Products®                       www.EasternFlooringProducts.com                  Last revision: 06/10/2021
INSTALLATION & MAINTENANCE

                   Step 5 Installation Illustration              Step 6 Installation Illustration   Step 7 Installation Illustration

STEP 5: Position the panel row so that a transverse joint coincides with the pipe. Join up the sawn off
piece again tightly behind the heating pipe (using the spacer). Position the panel row so that a trans-
verse joint coincides with the pipe. First cut the panel to the correct length. Then lay the panel section
beside the actual position, measure the recesses with the ruler and draw in.

STEP 6:
 • Installation towards wooden door frames
   Minimum distance 1/2”. Lay a panel next to the door frame (with the patterned side facing down-
   wards) Cut into the door frame with the straight back saw. Then slide the panel under the frame
   with the patterned side upwards Don‘t forget to allow for freedom of movement here to 1/2”.

 • Installation towards metal door frames
   Minimum distance 1/2”.Mark the measurements of the metal door frame on the panel, remember
   the necessary distance 1/2” on each side. Now saw out the marked section. Place the panel and
   make sure, that the freedom of movement is given 1/2”.

STEP 7: Lay a panel exactly on the previous row. Lay a second panel (original width) on the top of it
and draw an exact line for cutting. Cut away excess wood. Join the panel lengthways. Minimum ex-
pansion gap 1/16” on 3’. Measure the exact width of the last panel row. To do this lay a panel on the
previous panel row . Then lay a second panel on the panel to be measured with the tongue to the wall
and use as a straight edge. Cut away excess wood. Minimum expansion gap 1/16” on 3’. Insert the
panel lengthways and lower down.

STEP 8: Continue the installation in this manner until you get to the last row. For the last row, mea-
sure the exact width required. To do this, lay a plank of flooring on the second to last row. Then lay a

                                                                Page 6 of 8

Eastern Flooring Products®                            www.EasternFlooringProducts.com                   Last revision: 06/10/2021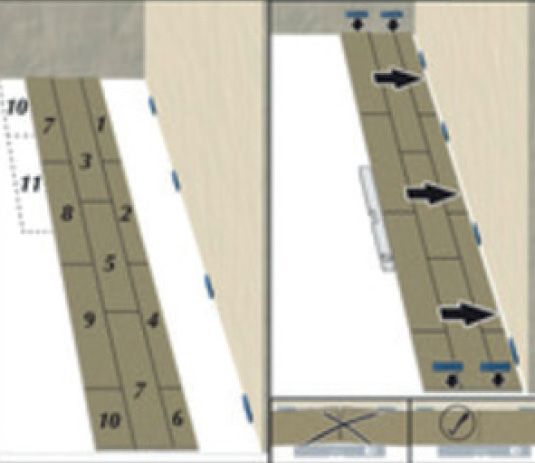
Vista Plus                                                           INSTALLATION & MAINTENANCE

second plank of flooring on top of this plank with the tongue side of the plank touching the wall. This
will allow you to determine the width needed for the final row. Make a mark with a pencil and cut with
a saw along this mark. Expansion gap must be respected!

       HOW TO REPLACE LAMINATE PLANKS
1.       To repair damaged laminate planks, start with drilling a ½” hole on each corner of the damaged
laminate plank. You will want to be as close as possible to the plank end joints. Drill two or three more
holes on each side of the damaged laminate plank approximately 4” to 5” from each other.
2.       Draw a straight line between the holes to prevent mistakes and use it as a cutting guide.
3.       Make sure you stick to the exact depth of the laminate when using the saw so you prevent
cutting into the underlayment or sub-floor which you definitely do not want.
4.       Begin in the center of the laminate plank, cut along the lines to the inner holes and continue to
the holes that you drilled.
5.       Cut out the center piece or lift it out. If necessary, you can use a utility knife to lift it up.
6.       Remove the remaining pieces of the board by rocking them up and down. Be gentle and very
careful during this step because you could cause damage to the laminate floor planks next to the
damaged one. You definitely want to pay attention to the adjoining laminate floor planks.
7.       Make sure the area is cleaned up from any excess. You want it to be nice and clean before you
install the new plank.
8.       Now it comes time for the replacement laminate plank. You have to cut off the tongue on both
sides, the short and long edge of the board. Laminate flooring brands may also require trimming of
the groove along a short edge so the new plank will sit in place. The best tool to do it will be a vibrato-
ry undercut saw.
9.       Now that the damaged laminate plank is out of the way, it is time to install the new laminate
plank. Apply a few drops of glue to the groove of the uncut plank (the one that was connected to the
damaged plank). You should apply glue to all seams and joints but only a few drops. Wipe off any extra
glue that you may have before it dries. If you use too much glue, the ends may swell later. Remember,
only a few drops. Perhaps only three on the short ends and one drop every six inches on the long.
10.      You should place something heavy on the plank and let it dry for the day.

       CARE AND MAINTENANCE
Installation in an area that is susceptible to spills or liquid
If the installation is to take place in an area that is susceptible to spills or liquid getting behind molding
boards, the perimeter of the room must be completely sealed. A 3/8” compressible polyethylene (PE)

                                                    Page 7 of 8

Eastern Flooring Products®                www.EasternFlooringProducts.com                   Last revision: 06/10/2021
INSTALLATION & MAINTENANCE

foam backer rod should be inserted to fill all expansion spaces. The backer rod should be completely
covered with 100% silicone sealant around the entire perimeter of the installation.

An acrylic sealant should not be used. A small silicone bead should be applied where the molding
meets the floor, creating a perimeter barrier to prevent any spills or liquids from getting underneath or
behind the skirting. The same result can be achieved with waterproof skirting. Any fixed objects, door
frames, etc. should be sealed in the same way using a 100% silicone sealant.

Vacuum, dust mop (dry) and when necessary, clean with a MOIST (not wet) cloth or mop. NEVER
USE wet cleaning tools and cleaners, soaps, floor polish, floor cleaning wax, oil soaps, etc. These
products can damage and/or leave a film on the flooring.

TIPS:
• Use felt tip protectors
• Area rug use is recommended
• Keep animal nails trimmed
• Never slide furniture across floor without pads
• Keep floors clean
• Never use water or wet type cleaning tools

PLEASE NOTE: It is normal to have occasional sounds walking over any floating floor since it is not nailed or glued. This
does not diminish the warranty of the product and should be anticipated. Sounds may vary or go away during heating and
cooling seasons throughout the year that relate to the home’s relative humidity fluctuations.

                                                        Page 8 of 8

Eastern Flooring Products®                    www.EasternFlooringProducts.com                        Last revision: 06/10/2021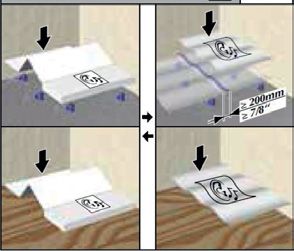
You can also read