Volunteer Manual 2021 - Miracles in Motion
←
→
Page content transcription
If your browser does not render page correctly, please read the page content below
Volunteer Manual
                                2021

Welcome and Overview
Miracles in Motion strives to provide, through horseback riding, therapeutic, instructional, and
recreational benefits to persons with disabilities. Miracles in Motion depends on volunteers to
provide its services. For each rider, there must be a certified instructor, 2 side walkers and 1
horse leader. Thus, your volunteer service makes it possible for Miracles to serve its chosen
community.
Welcome and Overview...............................................................................................................1
Volunteer Information................................................................................................................... 4
   Qualifications:.......................................................................................................................... 4
   Volunteer Roles....................................................................................................................... 4
   Shift Sign-up and Attendance..................................................................................................4
   Policies and Procedures when at Miracles in Motion...............................................................5
       Weather and Cancellation Policies Classes will be canceled:.............................................5
       Appropriate Clothing........................................................................................................... 6
       Parking............................................................................................................................... 6
   Safety...................................................................................................................................... 6
       First Aid Supplies................................................................................................................ 6
       Safety Concerning People..................................................................................................6
   Communicating and Being with People with Disabilities..........................................................7
       People who Use Ambulation Devices.................................................................................7
       People with Speech Challenges.........................................................................................7
       People with Visual Challenges............................................................................................7
Side Walkers................................................................................................................................ 8
   Side Walker Duties The instructor will give side walkers a brief overview of the student they
   are assisting when they meet this student on the first night of class. The instructor
   emphasizes the student’s goals and how the side walker(s) can help the student achieve
   those goals.............................................................................................................................. 8
   Side Walk Checklist.................................................................................................................8
   Fitting Helmets........................................................................................................................ 9
       Mounting Ramp Procedures At the Mounting Ramp...........................................................9
       Mounting the Horse.......................................................................................................... 10
       Standard Mount—leg over croup (the part of the horse’s back behind the saddle)...........10
       Dismount All dismounts are done in the arena, not at the ramp........................................10
       Students must keep helmets on until out of arena............................................................11
       Standard Dismount (leg over croup).................................................................................11
       Crest Dismount (leg over horse’s neck)............................................................................11
   Proper Riding Position........................................................................................................... 11
   Sidewalking Illustrated........................................................................................................... 12
   Holds..................................................................................................................................... 12
       Full Hold........................................................................................................................... 12
   Safety.................................................................................................................................... 13
       Class/Session Procedures for Side Walkers.....................................................................13
Team Lead, Horse Leader, and Barn Assistant.........................................................................14
   Team Lead/Horse Leader/Barn Assistant Checklist..............................................................14
       Before Class:.................................................................................................................... 14
       10-15 minutes before first class........................................................................................15
       During Class/Session:......................................................................................................15
   After Class:............................................................................................................................ 16
    Tack and Adaptive Equipment..............................................................................................16
   English Saddle and Halter.....................................................................................................17
   Putting on the Bridle or Halter...............................................................................................19
   Stirrups and Leathers............................................................................................................ 20
   Putting Stirrups Together.......................................................................................................21
Part of the Horse and Hoof........................................................................................................ 22
Working Safely........................................................................................................................... 23
   Human Behavior around Horses...........................................................................................23

                                                                          Miracles in Motion Volunteer Manual, 2021, page 2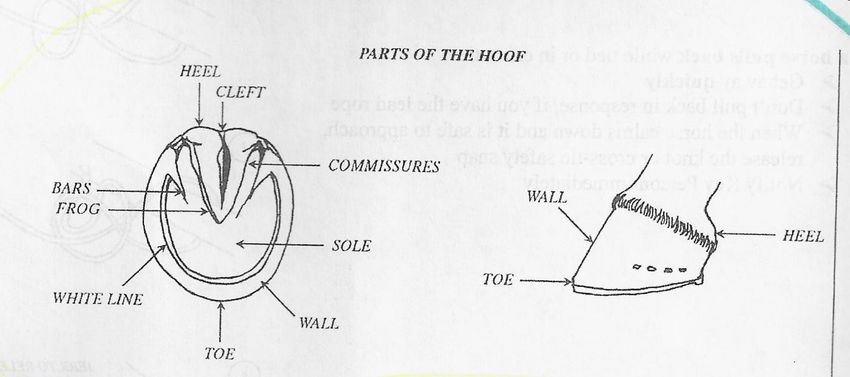
Horse Behavior/Body Language............................................................................................23
  Ears.................................................................................................................................. 23
  Tails.................................................................................................................................. 23
  Legs.................................................................................................................................. 24
  Eyes.................................................................................................................................. 24

                                                                      Miracles in Motion Volunteer Manual, 2021, page 3
Volunteer Information
Below is information about what volunteers roles are as well as guidelines, policies, and
procedures that keep Miracles running smoothly.
Qualifications:
Age Limit: Must be 15 to work in the barn or assist with classes or sessions .
Fitness: Must be able to walk during 2 consecutive, 50-minute classes (therapeutic
riding) or 2-4 consecutive 30-minute hippotherapy sessions.
Chores: Team leads, horse leaders, and barn assistants must be able to complete tasks in
the barn that require lifting, shoveling, carrying out muck, carrying hay, and performing
other duties associated with caring for horses.
Upper Body Strength and Flexibility: Horse leaders and side walkers must be able to
walk and occasionally jog, have the upper body strength and endurance to perform
appropriate holds for therapeutic riding classes or hippotherapy sessions as noted in
“Fitness” above, and assist students in the event of an emergency dismount.
Volunteer Roles
Volunteers who work with horses are horse leaders, barn assistants, or side walkers.
Horse leader—grooms, tacks, leads a horse during class, and cares for the horses after
class, including feeding, checking water.
Barn assistant—helps with horse-related chores including grooming, tacking, and
untacking horses, but does not lead in classes. Barn assistants also do feeding and
watering chores after class.
Side walker—greets students, walks beside and assists student in riding. Responsible for
keeping students safe and helping them as instructed
Active volunteers, those who have a regular weekly chore assignment or volunteer at
least once a week during classes may also request to be an exercise or trail rider.
Volunteers must pass the riding evaluation and then will be authorized to ride specific
horses at specified times. Exercise and trail riding is to improve horse conditioning and to
train for classes.
Shift Sign-up and Attendance
Sign up to volunteer after your have completed hands-on training.
Pick your desired classes or session(s), day(s), and time(s). We ask that you try to commit
to the same time and day for the five to six-week class or sessions to provide continuity
for the student and to ensure that all students will be able to ride.
Miracles in Motion Volunteer Manual, 2021, page 4 Sign up to substitute if you cannot commit to an entire session.
l If you cannot attend a class or scheduled work session, notify your team lead as early as
possible so that a substitute can be found.
l Record your time, including travel to and from Miracles in Volgistics, the volunteer
software Miracles uses. It is important for Miracles to be able to report to funding
agencies the number of volunteers and volunteer hours accumulated.
l You can record your hours through one of two Volgistics systems:
l VicNet, an online system, accessible via a computer, tablet, or phone, to sign-up for
volunteer shifts or record volunteer hours. You log in with the email address
associated with your volunteer record and a password that you set.
l VicTouch, a time clock like system accessible on site. Using your PIN, which is
different than you VicNet password, you can easily clock in and out for your
volunteer roles from the VicTouch kiosk while at Miracles in Motion.
Policies and Procedures when at Miracles in Motion
Children: Volunteer’s children are not allowed to accompany you while volunteering.
Pets: No pets are allowed.
Gum: Students and volunteers may not chew gum.
Smoking: Smoking is not allowed on Miracles property.
Plastic bags: Plastic bags are not allowed on Miracles property
Weather and Cancellation Policies
Classes will be canceled:
l If the temperature or heat index is 90 or above at the time of class.
l If the cold index is 30 or below at the time of class.
l If the National Weather Service has forecasted a warning of lightning, tornados, or severe
winds during the hours of classes for the areas of northwest Johnson, southwest Linn,
southeast Benton, or northeast Iowa counties.
Cancellation Notification
The class PATH instructor in consultation with the Director of Operations will make a
determination at least 2 hours prior to class on possible cancellation of classes. Generally,
class will be cancelled if the heat index is 90 degrees or above at the time of class; if cold
index is 30 degrees or below; or if there is a warning in the area of the farm of lightening,
tornados or severe winds. (The complete text of the weather policy is in the volunteer
manual.)
For Adaptive Riding, the instructor will notify the team leads who will text their horse leads,
sidewalkers and barn assistants. If volunteers are in doubt, please reach out to your team
lead before travel to the farm. The instructor will also notify the parent representative
parentrepmiraclesinmotion@gmail.com who will notify the students/parents/caretakers.
For HPOT, the PATH instructor will notify the team lead and the therapists. The therapists
will notify their clients. Again, if vounteers are in doubt, contact the team lead.
Team leads should have available the phone numbers of their team members for ease in
texting. That information is available in Volgistics or from the volunteer coordinator
(volunteermiraclesinmotion@gmail.com). The schedule for each day lists those volunteers
Miracles in Motion Volunteer Manual, 2021, page 5that will be working that day along with their email and phone number.
Volunteers need to know who their team lead is and how to contact that person.
We do weather drills in AR classes several times over the summer. The basement of the
house, the door next to the bathroom door, is the entrance to our storm shelter.
If you have any questions about this policy, please reach out to the Program Director or
Director of Operations (miraclesinmotion@gmail.com).
If a severe thunderstorm watch or tornado watch is issued, team leaders will attempt to send
volunteers an email of cancellation at least two hours prior to the class start times. If you are
in doubt, call your team lead before you drive to the farm. The instructor will notify
therapists.
If Bad Weather Develops
The instructor will direct everyone to seek shelter in the lower level of the farm house if it is
not safe to leave. The instructor will dismount the students. Side walkers will go with the
students to the emergency shelter. Students will keep helmets on for the emergency. If there
is time, horse leaders will remove halters and other tack, leaving the tack in the arena and
horses loose in the arena. If there is not time to remove all tack, horse leaders will remove
halters, lead rope, and reins.
Appropriate Clothing
Shoes: wear comfortable, closed-toed shoes or boots.
Jewelry: No noisy bracelets, dangling earrings, or other objects which may distract
students..
Temperature: When cool outside, it’s colder in the arena; when it’s hot outside, it’s
hotter in the arena. Dress appropriately.
Pants/shorts:We recommend wearing long pants. Shorts must be at least knee-length.
Parking
Volunteers should park in the lot in front of the house. The student’s families park in the
paved lot adjacent to the arena.
Safety
First Aid Supplies
Human first-aid kit and defibrillator are in front (SW area) of the barn.
Horse first-aid kit is in the tack room in the barn.
Safety Concerning People
Student riders and volunteer’s family members who are children must always be under
adult supervision.
Only qualified volunteers are allowed in pastures with horses.
Miracles in Motion Volunteer Manual, 2021, page 6 Everyone must wear a helmet while mounted, and students must always wear a helmet
when in the horse area of the arena.
To enter the horse barn, volunteers must be accompanied by a qualified volunteer or staff.
Only students and the instructor are allowed on the mounting ramp.
Please limit talking while standing at the rail during classes/sessions.
Communicating and Being with People with Disabilities
l Speak directly rather than through a companion or sign language interpreter.
Offer to shake hands when introduced. People with limited hand use or an artificial limb
can usually shake hands and offering the left hand is acceptable greeting.
If you offer assistance, wait until the offer is accepted. Then listen or ask for instructions.
Treat adults as adults. Address people by their first names only when extending the same
familiarity to all others.
People who Use Ambulation Devices
When speaking with a person, sit down to be at eye level.
Do not lean against or place your hand on someone's wheelchair. Bear in mind that
people with disabilities treat their chairs as extensions of their bodies.
People with Speech Challenges
Listen attentively when talking with people who have difficulty speaking and wait for
them to finish. If necessary, ask short questions that require short answers, or a nod of the
head. Never pretend to understand, instead repeat what you have understood and allow
the person to respond.
Place yourself at eye level when speaking with someone in a wheelchair or on crutches.
Tap a person who has a hearing disability on the shoulder or wave your hand to get his or
her attention. Look directly at the person and speak clearly, slowly, and expressively to
establish if the person can read your lips. If so, try to face the light source and keep hands
away from your mouth when speaking.
If a person is wearing a hearing aid, don't assume that they have the ability to
discriminate your speaking voice.
People with Visual Challenges
Always identify yourself and others who may be with you when meeting someone with a
visual disability. Side walkers should ask how he/she would like you to describe the area
where riding.
Speak in a normal tone of voice.
Relax. Don't be embarrassed if you happen to use common expressions such as "See you
later or "Did you hear about this?" that seem to relate to a person's disability.
When guiding a person who has a visual disability, walk alongside and slightly ahead.
Let the person hold your arm so your body's motion lets the person know what to expect.
On stairs, guide the person's hand to the bannister or handrail. When seating, place the
person's hand on the back of the chair or arm.
Miracles in Motion Volunteer Manual, 2021, page 7Side Walkers
Side walkers (SW) are responsible for the student. Safety is the primary concern. Side walkers
should be aware of where all student’s body parts are (i.e., feet in stirrups, hands holding reins,
trunk sitting straight). Side walkers and horse leaders need to allow students time to process
information and act.
The side walker walks beside a horse, assisting the student as needed for the duration of
class/session. In therapeutic riding, SW reinforces the instructor’s directions. In HPOT, the
therapist provides hands on direction with SW assisting.
When providing physical support to a student, two side walkers provide the same amount of
support to each side of the student’s body. If a side walker’s arm becomes tired or needs to
release an assigned hold for any reason, tell the instructor. The instructor will help adjust or
momentarily take your place (e.g., switch sides, blow your nose, etc.).
Side Walker Duties
The instructor will give side walkers a brief overview of the student they are assisting when they
meet this student on the first night of class. The instructor emphasizes the student’s goals and
how the side walker(s) can help the student achieve those goals.
The instructor will provide side walkers with suggestions on how to assist their students.
Side walkers help students put on helmets. Consult the tack sheet for helmet size for each
rider. See Fitting Helmets below.
Side walker(s) help the instructor by encouraging the student, helping the student focus on
the lesson, assisting in right/left directionality and spatial orientation, and understanding
the instructor's directions.
Since the side walkers are near the student, the student will often want to talk to the side
walker(s) about unrelated topics. Do not ignore direct questions, but redirect the student’s
attention back to the instructor. Excessive talking is one of the biggest distractions in the
arena. Please limit talking to one side walker and to what is pertinent to the lesson.
Side Walk Checklist
Arrive 15 minutes before class/session; check in with the team leader in the barn.
Return to the arena lobby, check class list for student’s name, horse, and helmet size.
Talk with the instructor (AR) or therapist (HPOT) on various needs/questions for
class/session.
Fit helmet for students, allowing the student to do as much as s/he wants.
Help the instructor set up for class (if necessary) and tear down afterwards.
Greet student and parent/family/caregiver.
Remain for the instructor-led discussion after the class.
Help the instructor put equipment away and sweep lobby area, clean bathrooms, and put
dirty laundry in bathroom under the house.
Miracles in Motion Volunteer Manual, 2021, page 8Fitting Helmets
Assist student in getting helmet and put it on, adjusting as necessary. A properly fitted
helmet should be snug but will not leave red marks on the forehead. The well-fitted
helmet should stay on the head when fastened without rocking or moving when the
student looks down or shakes head.
Make sure the helmet has a liner in it.
Place the helmet on the head sliding it front to back. Allow it to rest so there are two
fingers between the eyebrows and the edge of the helmet.
Make sure the helmet is centered correctly.
Place your fingers between the student’s chin and the chin strap and fasten the chin strap.
If there is a laced fastener or knob at the back, undo it before fitting the helmet and re-
adjust it after the helmet is on. Fit may need to be checked periodically. This feature is
designed to keep the helmet from slipping.
Ask the student how the helmet feels. It should be comfortable.
Note: Allow the student to be as independent as possible in all things about the class (e.g.,
putting on helmet, putting foot in stirrup).
Mounting Ramp Procedures
At the Mounting Ramp
When the student goes to mounting ramp, walk into the arena and stand about three feet
away from the horse.
The instructor or therapist may ask you to hold the stirrup for stability and/or help the
student bring her or his leg down.
Miracles in Motion Volunteer Manual, 2021, page 9Mounting the Horse
Standard Mount—leg over croup (the part of the horse’s back behind the saddle)
Student places one hand on saddle and one hand on horse’s neck.
Student places left foot in left stirrup.
Side walker will be on right side holding stirrup to provide saddle stabliity.
Student swings right leg over the back of the horse behind the saddle.
Student gently sits in saddle.
Student puts right foot in right stirrup (may need assistance from side walker).
The instructor or therapist will direct on the type of hold.
Student picks up reins.
Student gives “Walk-on” command (verbal or nonverbal).
As the student says, “Walk On,” and the team moves forward and away from the ramp,
the side walker on the left side moves into position to hold the left leg of the student.
Team leaves mounting ramp.
Lift Mount (used for non-ambulatory students or students with severely limited range of motion)
Instructor places sling around student.
Assistant operates lift control, raising or lowering student when appropriate.
Horse approaches ramp as student begins assent.
Student is positioned over horse and lowered into place.
Side walker on right assists with saddle as directed.
Instructor unhooks sling.
Side walker on right assists in removing sling (sling is pulled down and back).
Instructor pulls sling away from student and horse.
If appropriate, student places feet in stirrups (may need assistance from right side
walker).
Student picks up reins (if appropriate).
Student gives “Walk-on” command.
Team leaves mounting ramp.
If student has two side walkers, side walker on the left side takes position and applies
hold as soon as possible.
Dismount
All dismounts are done in the arena, not at the ramp.
TR students/horses are lined up for dismount in center of arena. HPOT students are
dismounted at the “people door”.
Students are instructed to put reins on the horse’s neck, take their feet out of the stirrups,
and thank their team (side walker, horse leader, and horse—this is very important!
Side walker(s) need to pay special attention as some students may attempt their own
dismount.
Instructor dismounts each student individually. Therapists dismount HPOT students.
Side walker(s) accompany students out of arena, help with removing helmet (if needed)
and returning it to helmet cupboard. Therapists assist HPOT students.
Miracles in Motion Volunteer Manual, 2021, page 10Students must keep helmets on until out of arena.
Standard Dismount (leg over croup)
When the instructor arrives to help dismount, the side walker on horse’s left moves to the
horse’s head and away from the saddle.
Student leans forward.
Student swings right leg over the horse’s croup.
Student slides to the ground with instructor’s support (student’s stomach is next to the
horse).
Crest Dismount (leg over horse’s neck)
When the instructor arrives to help dismount, the side walker on left of horse moves to
the horse’s rump and away from the saddle.
Student brings right leg over crest (horse’s neck).
Side walker on right assists with leg and supporting student’s back, as directed.
Student is facing the instructor and places hands on instructor’s shoulders and slides to
ground with instructor’s support (student’s back is next to the horse).
Once the student is dismounted, escort the student to the people door to rejoin their
parents/guardians.
Proper Riding Position
While we strive for a “proper” position, we may focus on one area for a class, i.e., hand position.
If the instructor is teaching proper hand position, do not distract the student by focusing on
something else. The total picture will come in time.
During horseback riding, the movement of the horse is transmitted to the student. This transfer of
movement is one of the key elements of therapeutic riding. The rhythmic movement of the horse
gently mobilizes joints while demanding coordinated work from the postural muscles of the
student’s neck, back, abdomen and legs. The position of the student on the horse greatly affects
this process. The “ideal” riding position will give the student the most efficient balance and will
allow the student to move in harmony with the horse. The instructor and/or therapist will be
evaluating the Student’s position from all sides.
When viewed from behind, the student should sit as straight as possible. If a student sits to one
side of the saddle, one foot will appear lower than the other. This position will prevent the
student from strengthening muscles evenly. Sometimes the student needs physical assistance of
the instructor and side walkers to reposition in the saddle.
When viewed from the side, the student should sit as straight as possible. Many students will sit
with a “C” curve in the back because of weak trunk muscles or tight leg muscles. Some students
will be able to correct this posture with verbal cues or physical prompts, but endurance may be
limited. Encouraging a lengthened position of the leg will also improve this posture.
Miracles in Motion Volunteer Manual, 2021, page 11Sidewalking Illustrated
SW on right SW on horse’s
of horse holds left side stands
stirrup leather at the horse
as the student leader’s
mount; this shoulder.
keeps the As the horse
saddle from leaves the
shifting on the mounting ramp,
horse’s back. the left SW gets
If needed, SW into position
Sid
helps student and places hold,
put right foot as directed, on
in stirrup.
Holds student.
Instructors/therapists determine the appropriate hold for each student. Holds include a full hold,
ankle hold with hand either on the front or the back of the ankle, arm over thigh only, hand
behind student’s back, or no hold. Always ask if you have a question about what hold to use.
Full Hold
The full hold stabilizes the student’s movement. The arm across
the thigh stabilizes side-to-side movement. A hold on the ankle
stabilizes forward-backward movement. Arm nearest to student
goes across the thigh with hand gripped on saddle, surcingle, or
pad. (This arm should be level and apply even pressure.) The
arm farthest from student holds ankle of student. Do not hold
stirrup leather and do not let hand slide down onto foot as your
hand may be pinched between foot and stirrup.
Back: Full Hold
Fore: Hand behind Student’s back
Full Hold
Full hold
Miracles in Motion Volunteer Manual, 2021, page 12Full Hold No Hold
Safety
Instructor checks helmets before the student mounts.
Instructor checks tack before student mounts and after student mounts.
Class/Session Procedures for Side Walkers
If a student starts to fall, push the student back into the saddle.
If a fall cannot be avoided, perform an emergency dismount.
Only one side walker should talk to student while riding to provide prompts, redirect
attention, and provide encouragement. The instructor may choose which SW will talk to
the rider. The other side walker should remain silent.
When reinforcing instructor directions with students, use positive words/phrases.
If a student’s behavior is harming any person or horse, immediately tell the instructor.
Miracles in Motion Volunteer Manual, 2021, page 13Team Lead, Horse Leader, and Barn Assistant
Horse leaders (HL) and barn assistants (BA) get the horses ready for class. Barn assistants work
only in the barn. During classes and sessions, horse leaders are responsible for the horse and the
team (side walkers) and has little interaction with students during classes/sessions. If there is a
team lead, that person assists with catching, grooming, and tacking horses, including checking
that tack is properly assembled and on the horse. Team leads (TL) will be in the barn during
classes and sessions helping the BA groom and tack and providing any changes of horse or
equipment that the instructor requests.
Horse leaders, team lead, and barn assistants arrive 60 to 90 minutes before class. Team
members will:
Check the class sheet to see which horses will be used
Set up stalls with a handful of grain, clean bedding, and clean water
Catch the horses to be used
Feed and groom the horses
Tack horses and enter the arena10 minutes before the first class starts
During the first class, team leaders and barn assistants tack up any horses not in the first class
and prepare the tack for the other horses for the next class.
When classes are finished, horse leads attend the closing summary session conducted by the
instructor. TL, HL, and BA are responsible for:
Removing tack and putting it away
Lightly grooming the horse
Cleaning the stalls, including emptying the water buckets
Sweeping the aisles and arena lobby area
Recording horse use in the appropriate horse notebook
Team leaders and barn assistants may work on the above tasks while the horse leaders attend the
after-class meeting with the instructor and side walkers.
Team Lead/Horse Leader/Barn Assistant Checklist
Before Class:
Arrive 60-90 minutes before class/session
Check whiteboard and horse notebook for horse updates
Check class list for horses to be used, tack required, and students
Before catching each horse:
Assure stall is clean, remove and replace limed bedding
Fill water buckets in stalls to be used
Set up grain for horses to be used per whiteboard; if no special instructions, horses
receive a handful of grain
Miracles in Motion Volunteer Manual, 2021, page 14 Get grooming bucket.
Catch all horses to be used for class/session from pasture.
Rule of 2: Two horse leads or combination of horse lead & staff enter pasture.
Approach from the side; touch the horse’s shoulder when near.
Loop lead rope around the horse’s neck before putting on halter.
Fold excess lead rope in left hand. Do not coil to avoid pinching if rope is suddenly
tightened.
Lead the horse on his left side.
You walk through the gates and doors, before the horse because you are the leader the
horse is the follower.
Grooming:
In cross ties in aisles or in the stall. If in stall, turn the horse toward the door; and tie a
quick release knot before grooming.
A good grooming is like a massage. Groom safely and make the horse comfortable and
happy. Start with rubber curry, then hard brush, then soft brush. Work top to bottom and
front to back. Keep one hand on horse at all times. Hand on horse can find injuries, hot
spots, etc. Remove dirt from outer surface of hooves. Pick hooves from heel to toe. In fly
season, apply fly spray to towel or brush and then rub into horse’s hair. You can fly
spray the tail for additional benefit.
If the horse does not need to be tacked for the next class, put the horse in his stall,
remove halter and lead, and hang those outside of stall door.
Tack
Get tack from tack room per tack sheet and tack your horse per student class/session.
Girth loosley
After the saddle is on, cross the stirrups over the saddle so they are not dangling.
Hold the lead rope 8-12 inches from the horse’s chin.
10-15 minutes before first class
Warm up horse by walking around in arena. Familiarize the horse with the arena and any
props in arena..
Walk horse to the center of the arena facing the south wall 2-3 minutes before
class/session begins.
Stand facing the horse at a ¾ angle. .
The instructor will check the tack.
Hang stirrups in riding position and move reins up on neck..
During Class/Session:
When called, walk the horse towards the south wall and turn towards the mounting ramp.
Five feet before reaching ramp, turn around facing the horse and walk backwards
between the outer barrier and ramp.
Stop so that student can easily put foot in stirrup.
Stand at a 45-degree angle facing the horse. Keep the horse still while the student mounts.
The instructor will advise if the student is able to say “walk on”. Do not move the horse
until “walk on” is verbalized/motioned by the student, or if unable, per instructor, by you.
When “Walk on” is noted, exaggerate your right leg stepping forward. Gently but firmly
Miracles in Motion Volunteer Manual, 2021, page 15hold lead rope 12-18” from the lead snap on the halter.
Walk the horse toward the “people” door of the arena, following the instructor/therapist’s
instructions.
Toward end of class the instructor will direct the student to guide horse to the center of
the arena facing north. Stop the horse in the center and face him at a 45-degree angle.
HPOT clients usually dismount at the people door on the north side of the arena..
The instructor will come and give dismounting instructions.
Do not move the horse until all students have left the open arena.
After Class:
Put horse in stall or cross ties and remove tack. In stall use quick-release knot.
Brush and rub down horse, including legs.
Optional: Using treat bucket, give horse a few treats.
Return horse to pasture where you caught him, using Rule of 2.
Clean stalls: remove manure, place lime on wet spots, and remove saturated bedding.
Empty water bucket and rehang in stall.
Dump muck tubs.
Replace tack. Put used liners in basket for washing. Lock tack room, and put key away.
Sweep barn aisles and people space, place sweepings in muck buckets-do not push into
stalls.
Shut off all water faucets; remove and store hoses
Hang up all equipment that was used.
Put laundry in basket in tack room.
Turn off fans, lights, and heaters
Record in horse notebook the work done and horse, observations.
Tack and Adaptive Equipment
We teach the balanced-seat method of riding using primarily English tack. However, we
occasionally use Western saddles and sometimes use equipment which has been adapted
to meet the needs of our students. Some students ride use a bareback pad and/or surcingle
hand-hold. MVECS riders primarily use Western tack.
Some students ride using bridles, though most ride in halters with reins attached. Bridles
are earned when the student’s hands develop the necessary sensitivity to the horse. All
horses are ridden with a snaffle bit or a bitless bridle.
All English saddles have Peacock (safety) stirrups that have a rubber band at the front to
allow the foot to come out if the student falls.
Miracles in Motion Volunteer Manual, 2021, page 16English Saddle and Halter
Miracles in Motion Volunteer Manual, 2021, page 17Western Saddle and Bridle
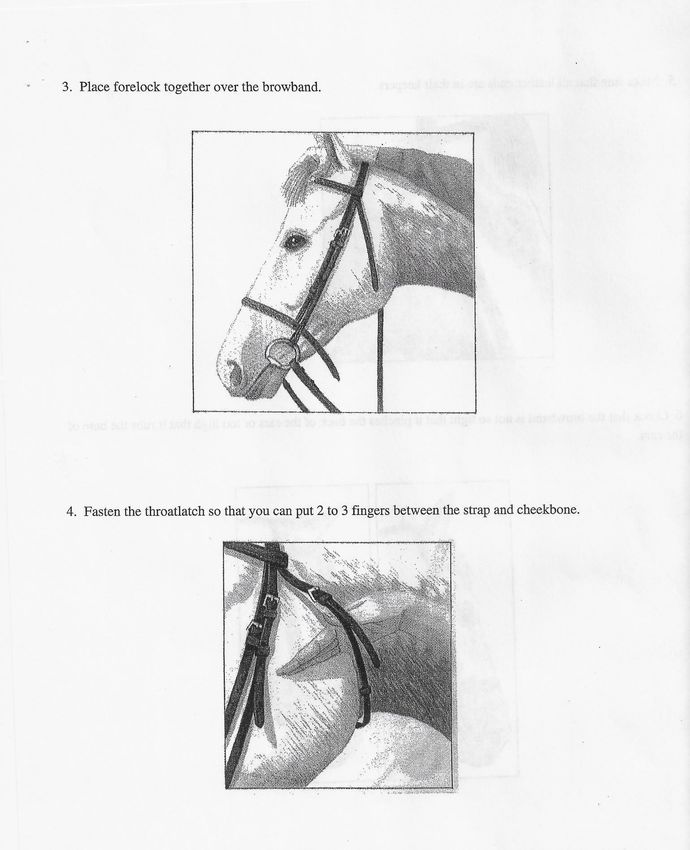
Miracles in Motion Volunteer Manual, 2021, page 18Putting on the Bridle or Halter
1. Hold crownpiece in right hand. Put right hand in position so that nose band is below the
horse’s nose.
2. Pull halter/bridle up with right hand, making sure that cheek piece on off side (right) does not
touch horse’s eye.
Miracles in Motion Volunteer Manual, 2021, page 19Stirrups and Leathers
Miracles in Motion Volunteer Manual, 2021, page 20Putting Stirrups Together
Miracles in Motion Volunteer Manual, 2021, page 21Part of the Horse and Hoof
Miracles in Motion Volunteer Manual, 2021, page 22Working Safely
Human Behavior around Horses
Approach a horse at the shoulder, talking to him as you approach.
When changing sides, walk around the front of the horse (unless grooming in the stall).
Do not walk under a horse’s neck or lead rope.
If your horse becomes difficult to handle, let the Instructor or team lead know
immediately.
Do not pet or lean on the horse during class; he is working.
During non-class or session time, pet the horse on his neck and shoulder; not his face.
If you notice anything which concerns you (i.e., a horse seems listless, is limping, has a
cut, has difficulty breathing, or stumbles), inform the instructor and/or team lead
immediately.
Horse Behavior/Body Language
Horses use body language, subtle expressions and postures to communicate. A horse cannot see
directly in front or directly behind him. If you place yourself in these areas, you are in his blind
spot. Use your voice and touch to let the horse know where you are as you move around him.
Watch his ears, eyes, head, and tail positions for an indication of his demeanor.
While moving around the horse, be calm and confident. Keeping one hand on the horse while
grooming tells the horse where you are.
Ears
A horse's ears receive sound signals and they transmit visual signals.
Pricked ears - startled, vigilant, alert, or merely interested. Most commonly seen during
frontal greetings
Airplane ears - flop out laterally with their openings facing down toward the ground-low
ebb.
Drooped ears hang down loosely on either side of the head - very dozy, in pain and/or
wants to switch off all incoming messages
Drooped backward, ears are stuck out sideways - attention toward back, or
uncomfortable, or annoyed
Pinned ears flattened back against the horse’s head - anger, threat, or intimidate another
horse or a handler. Beware!
Tails
l Tail held high - exuberance and alertness.
l Droopy tail - can mean relaxation, exhaustion, pain, fear and/or submission.
l Stiff fleshy tail base - a very tense or aggressive horse.
l Flicking tail first sideways then vertically - anxious, frustrated, irritated, or confused .
l Rapid swishing/high flick, then slap – angry.
Miracles in Motion Volunteer Manual, 2021, page 23Legs
Pawing the ground - a scraping action of one front leg in which the foot is dragged
backward shows impatience, fear and/or his intent to roll on the ground.
Back leg lift - a more defensive threat acting as a signal a real kick is on the way if
matters get worse.
Knocking and stamping - consists of a raising and lowering of a hind leg which makes a
forcible tapping sound on the ground-a sign of protest.
Eyes
Closed eyes - indicates pain or exhaustion.
Wide with the white showing - fear, anxiety, or apprehension.
Half-closed eyes - peaceful relaxation and submission.
Miracles in Motion Volunteer Manual, 2021, page 24You can also read