With a Rock Wall Dress Up a Block Wall
←
→
Page content transcription
If your browser does not render page correctly, please read the page content below
Dress Up a Block Wall
      with a Rock                                                                      Wall
       Rather than hiding a poured-concrete or block foundation
       with landscape plantings, show it off with stone veneer
                                                               BY CODY MACFIE

 Rubble patterns
 Rubble patterns refer to stonework that looks to be unmanipulated, rather than cut or chiseled.
 Whether the mortar is visible or not, there are a few common patterns for laying up stone.

 Random rubble has no visible             Coursed rubble has a somewhat level          Squared rubble has a level bed
 continuous course or bed lines. The      bed line with every course. The stones       line every third or fourth course.
 stones may fit together tightly but      are of varying sizes, but each large stone
 randomly, as featured in the photo.      defines a level bed line.

86   FINE HOMEBUILDING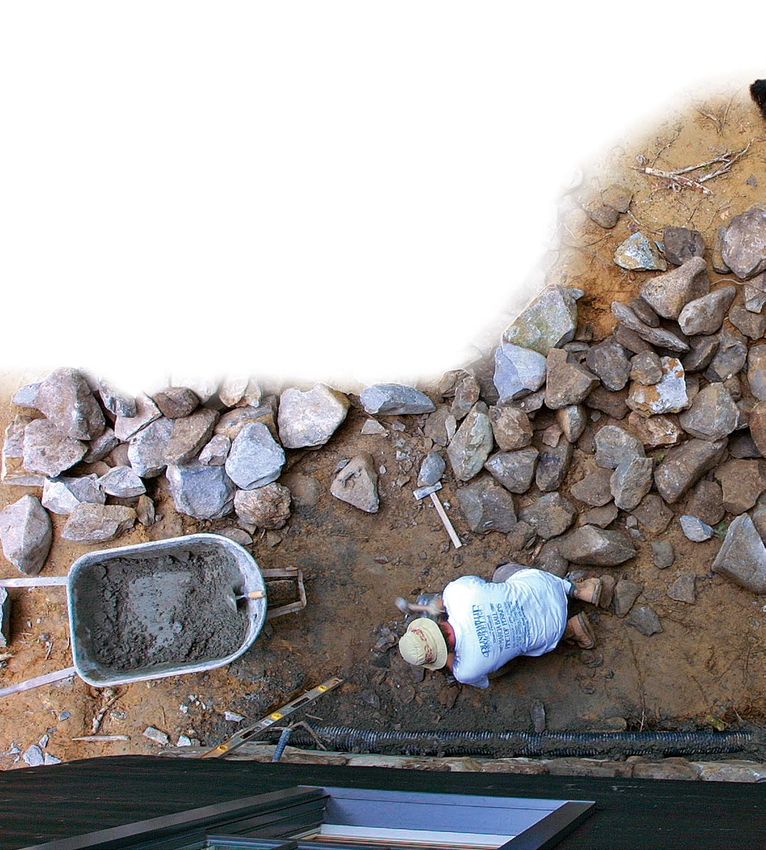
I
Floor framing is cantilevered n the old days, foundations of rock or brick were
6 in. over foundation wall.
the norm. They looked good and were fairly easy to
build. Nowadays, concrete block or poured concrete
is the foundation method of choice because they’re much
faster to build. This newfound speed, however, comes at
an aesthetic cost: Concrete is ugly. But you can make a
plain-looking block wall into a great-looking rock wall
by veneering it with fieldstone. The tools and materials
needed are few, and the payoff is huge.
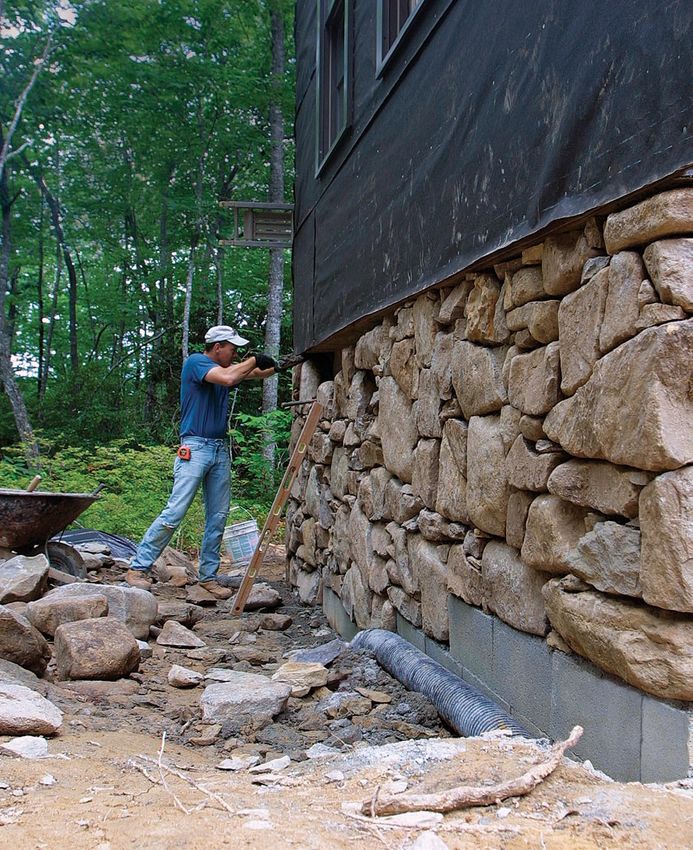
The techniques for veneering are the same for block,
Veneer stone lines up poured concrete, or even a wood-frame wall, as are the
with wall sheathing.
requirements. Make sure you have sufficient support
Mortar fills around and below the stone (a solid footing), and attach the veneer
behind the stones. to the wall with wall ties. If the veneer is a retrofit, you
may need to pour an additional footing, usually about
6 in. wide. And for wood-frame walls, you need to add
If you overhang a moisture barrier, such as peel-and-stick roofing mem-
the floor framing, brane or #30 felt paper, to the wood. Wall ties are easy to
stone veneer can install if you’re laying up a new block wall. For concrete
look structural walls or existing block walls, the ties can be attached with
Stone veneers are a powder-actuated nail gun or with masonry screws.
different from stone Although veneering an entire house is best left to a
foundations in that professional, a short foundation veneer, such as the one
they don’t support the featured here, is certainly bite-size enough for a non-
house. But they’re still
mason to attempt.
heavy, so they require
a footing. Rather than
Tight-fitting, yet unmanipulated
burying your stonework,
though, build up the There are as many varieties of stonework as there are
existing footing with stonemasons, but most can be lumped into a few patterns
concrete block to grade. (sidebar facing page). Much of my work is in a style called
dry stack, which resembles a traditional no-mortar rock
wall. When veneered in the dry-stack style, mortar is
8-in. concrete block packed behind the stones as well as in a thin layer around
with cores filled the stones, but the mortar is not visible. While dry-stack
veneer looks rough and tumble, it’s rather precise. The
stones fit together tightly, yet look unmanipulated. With
jointed-style stonework, you don’t have to be as particu-
Wall ties
lar because the visible mortar around the stones absorbs
the bumps and irregularities.
Blocks are set Good-looking dry-stack veneer is all about tight joints
on footing
almost to grade. that look natural. You can close gaps between stones by
chipping away bumps, by using plugs, or by manipulat-
ing the shape of the stone with a hammer and a blunt
chisel. Large gaps not only look unnatural but also can allow
stones to shift, which creates a weak spot in the wall.
The most important tool is space
Being able to look at all the stones to choose the best size,
shape, or face for each particular spot—especially the
corners—is critical. Because stonework is a mixture of art
and grunt labor, plenty of space allows you to take inven-
tory and set aside key stones, such as corners and caps,
so that you won’t have to switch gears as often. Stopping
Drawings: Toby Welles
the process of laying up stone to haul another load can
be frustrating.
Start by dumping the stone into a large space near the
work area, and shuttle small piles to the wall in a wheel-
FEBRUARY/MARCH 2006 87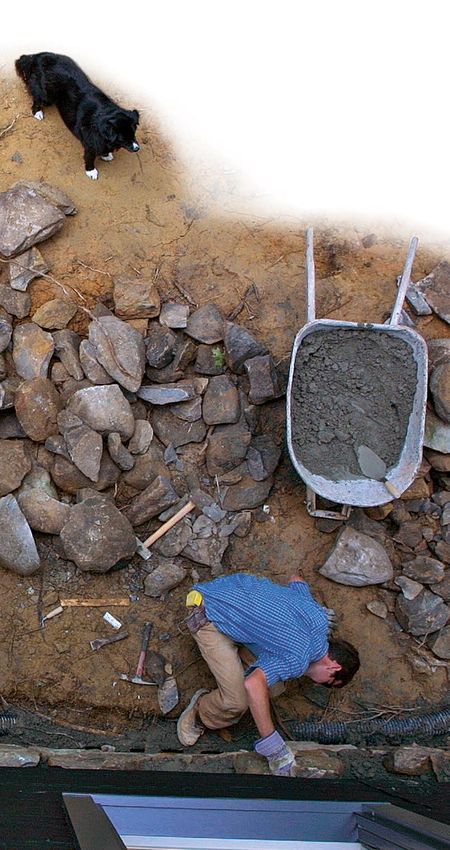
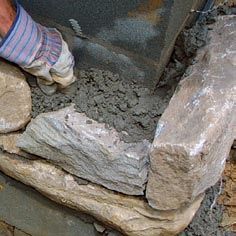
MORTAR BINDS THE WALL
Lay stone on a bed of mortar and pack more
behind. The unseen mortar below, beside, and
behind the stone holds the wall together, but
visible mortar in front will be scratched out.
Trim rock with a blunt hammer. Break bumps off the
back and bottom to improve fit and to reduce the
chances that the stone will move as rocks are piled on
top of each other.
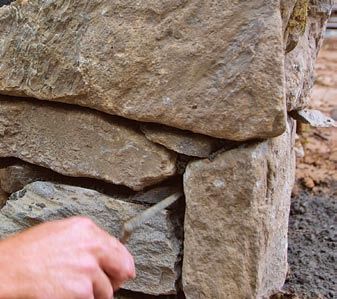
Use shims to set the
stones more securely.
The rock-fragment
shims can be used in
one of two ways: either
as temporary shims
until the mortar sets up
or as permanent plugs
to fill gaps between
stones, giving a tighter
appearance.
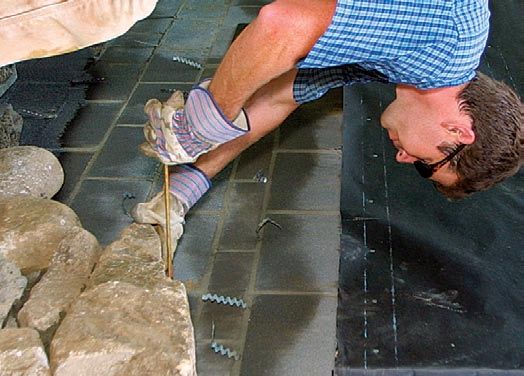
Pack mortar behind the
stones. Mortar holds
the stone in place, and
wall ties embedded into
the mortar tie the stone
veneer to the block wall.
Lay a mortar bed on top
of each stone course for
the next course.
4-ft. level
88 FINE HOMEBUILDING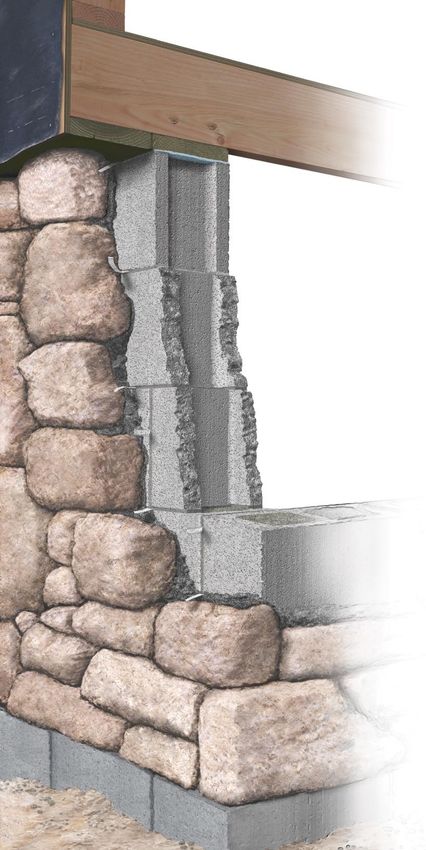
barrow. The other tools you’ll need are a square shovel,         because you can simply measure the same distance from
                           a pointing trowel, a mason’s trowel, a 4-ft. level, a brick      the wall to the face of the stone as you lay them. If the
                           hammer, a 4-lb. rock hammer, a blunt chisel, a plumb             wall is not plumb, then use a level to make sure the stone
                           bob, a tape measure, and a garden sprayer. If the job is         faces are plumb.
                           large, rent a cement mixer.
                                                                                            Mortar holds the stone together
                           Before you start, look up and down                               I measure mortar in batches, or the amount that my mixer
                          Although stone veneer doesn’t support weight, a footing           can mix, that my wheelbarrow can hold, and that I can
                          must support it. Because the footing is below final grade,        maneuver around the site. A full batch fills my mixer. I
                          stacking 6-in. or 8-in. concrete blocks to just below the         mix either a full batch or a half-batch depending on the
                          final grade line and laying stones on the blocks makes            weather, my crew size, and proximity to quittin’ time.
                          sense. Blocks need to be secure to make a solid seat for the      Regardless of whether you use a mixer or a wheelbar-
                          first course of stones, so set them in mortar. If dirt has cov-   row, the recipe is the same: a 3-to-1 mixture of sand to
                          ered the footing, dig it out until the footing is exposed.        portland cement. A full batch in my mixer is a half-bag
               Carpenter’s Verify that the wall to which you are veneering is               of portland cement and 14 shovelfuls of sand. If you mix
               dog        plumb. A plumb wall speeds the veneering process                  in a wheelbarrow, small batches make the mixing much
                                                                                            easier. Whether mixer or wheelbarrow, mix the dry
Cost of                                                                                     ingredients well before adding the water.
materials                                                                                     Dry-stack mortar can be mixed a bit wetter than jointed
The total area of this
                                                                                            style; it should be slightly sticky. To test, take a handful,
cabin’s foundation was                                                                      form it into a loose ball, and throw it into the air. If it stays
400 sq. ft. I expected                                                                      in a ball, you’re ready to go. If it crumbles and doesn’t
about 40% of the                                                                            stay in a ball, slowly add water. Be conservative. There
stone to be egg-                                                                            is probably more water in the mix than you realize, and
shaped or too dense                                                                         if the mix becomes too soupy, you’ll need to add more
to break, so I ordered                                                                      sand and cement. On hot days, mix the mortar a little
extra. I sell leftover                                                                      wet because it tends to dry quickly, especially when sit-
to my landscaper at a                                                                       ting in the sun.
discount.                                                                                     A fast-drying variation of this 3-to-1 recipe is to change
16 tons stone: $1,040
                                                                                            the cement mix from 100% portland to half portland and
                                                                        Mason’s             half type S. Type-S cement is stickier and sets up faster.
8 yards sand: $240                                                      trowel              I use this recipe when I need to be able to build a wall
35 bags cement: $245
                                                                                            higher than 4 ft. or 5 ft. in a single day. The stickier mor-
1,000 wall ties: $68                                                                        tar adheres well to the stone, and it dries within a couple
2 gallons sealer: $86                                                                       of hours.
Total: $1,679
                                                                                            The craft of stonework: cutting and shaping
Mixer rental: $65/day
                                                                                            The difference between a good-looking wall and a mon-
                                                                                            ster has a lot to do with your ability to manipulate a rock.
                                                                                            The tighter the stones fit together, the neater the overall
                                                                                            wall will look. Good masons know how and where to hit
                                                                                            a stone, then where to place it.
      4-lb. rock                                                                              To trim the edges of large stones, use a blunt chisel;
      hammer                                                                                keep the brick hammer sharp for trimming the edges of
                                                                                            smaller stones. If you are unhappy with how the stone
Pointing                                                                                    looks on the wall, take it down and trim it the way you
trowel                                                                                      want it, or simply find another stone.
                                                                                              For a rustic look, minimize surface chiseling; don’t trim
Blunt chisel                                                                                the textured faces you want exposed. On this job, the
                                                                                            homeowners wanted an organic, native stone with a lot
                                                                                            of texture, natural weathered color, rigid lines, and shad-
                                                                                            owed indentations, so I left the faces alone. The sides and
     Brick hammer
                                                                                            tops of the rocks, however, aren’t exposed, so I was fairly
                                                                                            liberal in trimming around the edges.
                                                                                              Without surface chiseling, the face of the wall will vary
                                                                                            somewhat. I set the face of each stone roughly 6 in. from
                                                                                            the block wall. Some surface lumps or dimples will be

                                                                                                                       FEBRUARY/MARCH 2006                89
ALTERNATE THE CORNERSTONES because the homeowners didn’t want the wall to have a
Because cornerstones have two faces exposed, pick them carefully.
formal pattern. Even for a random pattern, though, I fol-
To make a corner strong, the stones should alternate directions.
low a couple of rules.
Rule #1: Always bridge vertical joints with the stones
Build up the corners, then work sideways into the field.
in the next course. Running vertical joints are not pleas-
Keep the rocks plumb. Regardless of how ing to the eye and eventually can crack if the foundation
thick the rocks are, the faces should be in settles or shifts.
the same plane. If the foundation wall is Rule #2: Alternate corners to the left and right as you set
plumb, you can measure to the face of the
rocks consistently. each course. Even with a rustic pattern such as this one,
structure demands that the quoins, or large cornerstones,
alternate. Although I didn’t pull strings from the wall
ends for a straight corner, I did take care to choose cor-
nerstones with faces at right angles to one another.
Cap the wall
Because this veneering project tucks under cantilevered
framing, a perfect cap isn’t as critical. However, if a veneer
projects beyond the siding, a flat cap with the same type
of stone gives the wall a finished look and allows it to
shed water.
If you know the veneer will need a finished cap, make
sure you leave enough room for it. Up to 2 in. more than
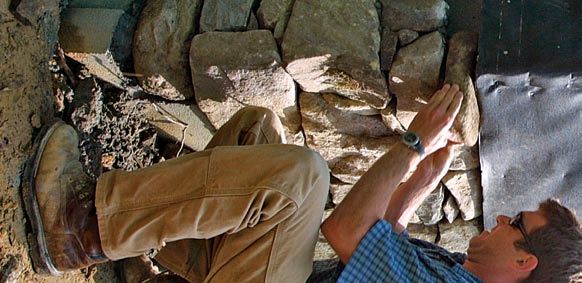
Rake out the semidry mortar. After a
the thickness of the capstones is enough space to angle
few hours, the mortar is dry enough to
remove all that is visible. Use a pointing the stone away from the house to shed water. Tap cap-
trowel and go deep. There should be no stones with a rubber mallet to set them in position. Make
visible mortar in a dry-stack veneer wall. sure the capstones are level. One easy way is to snap a
The capstone takes a little planning. chalkline across the wall before you set the last course
Select the capstones before you place of stone.
the preceding course. Because the siding
will hang down an inch or so, there’s some Finish with a brush and a sealer
wiggle room that can be filled
with mortar. As you lay the stones, packing mortar behind them to set
each one and to hold the wall ties, some mortar will make
its way to the surface cracks. After a couple of hours of
closer or farther. The main body of the stone aligns, and curing, scratch away this excess with a small pointing
the surface irregularities provide texture. trowel. The mortar should crumble and fall out. Scratch-
Because cornerstones have two exposed faces, it’s a good ing too soon may smear cement on the edges of the stones
idea to choose them first. And because the corners dictate or compromise the integral structure of the hidden mor-
the course lines, that’s where I start. After setting a couple tar bed. With dry-stack veneering, you don’t need to fin-
of alternating cornerstones, I lay a long base of horizontal ish the joints, so after scratching out excess mortar, brush
stones before building up. I never build more than 4 ft. the joints with a small broom.
or 5 ft. high in one day without using fast-setting (type S) After a few days, the mortar should be cured fully
mortar. Portland-cement-based mortar won’t cure enough and ready for a waterproofing sealer. I like Sure Klean
to hold the weight. When placing each stone, orient it so Weather Seal Siloxane PD (www.prosoco.com; 800-255-
that the thickest part is on the bottom, which keeps it from 4255). Waterproofing keeps moisture out of the basement
kicking out when weight is stacked on top. Make sure the and also prevents efflorescence. Apply sealant to the stone
stone doesn’t shift before you fill in with cement. And with a garden sprayer. The most important place to seal
don’t trim rocks while they are resting on the wall; trim- is the top of the wall (the cap) because this spot gets the
ming can loosen surrounding stones before they are set. most water.
Long stones make the wall look stronger Cody Macfie, a second-generation stonemason and
Stones often are packaged in similar shapes: long hori- freelance writer, owns Steep Creek Stoneworks in
zontal stones, nuggets, rounded fieldstones, etc. A pat- Brevard, N.C. Photos by Daniel S. Morrison.
tern that I like is a mixture of 20% to 40% fieldstones
and 60% to 80% horizontal stones, but the final pattern
ONLINE EXTRA
is somewhat dependent on how the stoneyard packages
To see a video tip of Cody Macfie breaking and fitting
the stone. For this job, I bought the stone for the project stone, go to www.finehomebuilding.com.
in bulk to get a more random selection of rock shapes
90 FINE HOMEBUILDING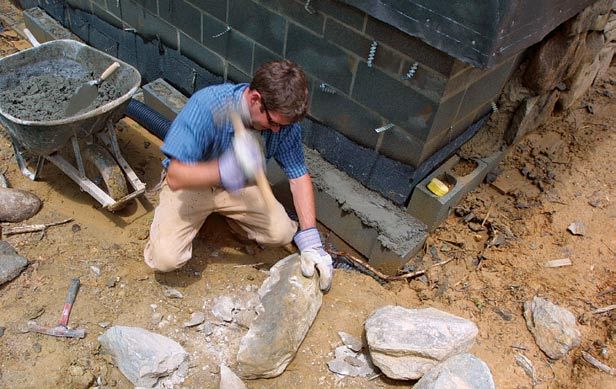
You can also read