www.dualski.com Operating and maintenance manual - Bardum
←
→
Page content transcription
If your browser does not render page correctly, please read the page content below
Operating and maintenance manual

    www.dualski.com
TABLE OF CONTENTS

1     GENERALITIES .......................................................................................................... 3
1.1 Information related to this manual ................................................................................ 3
1.2 Symbols in this manual ................................................................................................ 3
2     PRESENTATION AND INSTRUCTION OF USE ......................................................... 4
2.1 Presentation ................................................................................................................ 4
2.2 Recommendations ....................................................................................................... 5
2.3 Conditions of use ......................................................................................................... 5
2.4 Choosing the right board.............................................................................................. 6
3     ASSEMBLY, SETTINGS AND FUNCTIONNING ........................................................ 7
3.1 Mounting of the frame on the board ............................................................................. 7
3.2 Functioning of the Full-Flex System ............................................................................. 8
3.3 Installation and use of the foot plate............................................................................. 9
  3.3.1   Strap on your toes. .............................................................................................. 9
  3.3.2   Strap on the insteps ............................................................................................12
3.4 Adjusting the ride position ...........................................................................................13
  3.4.1   Setting up the height and seat angle ...................................................................13
  3.4.2   Position of the center of gravity ...........................................................................14
3.5 Mounting the seats .....................................................................................................15
  3.5.1   Generalites .........................................................................................................15
  3.5.2   Set up on the frame : ..........................................................................................15
  3.5.3   Belt set-up (in option) : ........................................................................................16
  3.5.4   Use of the belt (in option) : ..................................................................................17
4     USING THE FRAME ..................................................................................................18
4.1 Essential equipment ...................................................................................................18
4.2 Skicable wakeboarding use ........................................................................................19
4.3 Boat wakeboarding use (salt water or lake) ................................................................19
5     GENERAL DESCRIPTION .........................................................................................20
6     MAINTENANCE .........................................................................................................21
7     DELIVERING AND TRANSPORTING ........................................................................22
8     RECYCLING ..............................................................................................................22
9     CLEANING AND DISINFECTION ..............................................................................22
10    WARRANTY ...............................................................................................................23

                                    This manual refers to Swaik®
                                  Manual version N° SW03-20170512

                    Design, manufacturing, marketing & after-sale services by:

                                          TESSIER SARL
                                        Z.I. François Horteur
                              73660 Saint Rémy de Maurienne – France
                       Tel. +33 (0) 479.83.51.52 Fax. +33 (0) 479.83.51.53
                             info@dualski.com          www.dualski.com

Version SW03-20170512                                                                                                            2
1 GENERALITIES
1.1 Information related to this manual

This operating and maintenance manual gives all the important information about the use of
your TESSIER product. In order to use it the safe way and enjoy all of its performances,
please read carefully this manual and pay attention to the security and maintenance advises.
If you have visual disturbance, you can ask us the pdf version of the manual and zoom it
according to your convenience.

1.2 Symbols in this manual

                    WARNING
                    Indicates a potentially hazardous situation that could result in serious injury if you
                    do not respect the security checks mentioned.

                    CAUTION
                    Indicates a potentially hazardous situation that could result in minor or slight injury
                    if you do not respect the security checks mentioned.

                    IMPORTANT
                    Indicates a potentially hazardous situation that could result in damage of
                    equipment if you do not respect the security checks mentioned.

                    MOUNTING AND SETTINGS INDICATIONS
       or       a   Indicates the key size (a)
                    And the value of the torque – Nm (b) to correctly tighten the screws.
            b

                    GOOD MANIPULATION
                    Indicates the processes to follow in order to operate correctly the manipulation.

                    BAD MANIPULATION
                    Indicates the processes to not follow, shows the wrong way to do the manipulation.

Version SW03-20170512                                                                                    3
2 PRESENTATION AND INSTRUCTION OF USE
2.1 Presentation

TESSIER company designs, manufactures and sells alpine sitski equipment since 1995. The
Swaik® is the first product of the range concerning watersports. The design and
manufacturing quality of the Swaik® is faithful to the other products, which have established
the notoriety of the company.

The Swaik® is available in two different frame heights, it covers all the possible morphologies
and brings wakeboard to lower limbs disabled people. It comes out with water TESSIER
seats specifically adapted for this use.

First frame with a lot of settings, the Swaik® allows each rider to find his specific position. It
enhances comfort and feelings to the sitwakeboarder, because it lets the board free. Its
design with two articulated plates combined with the Full-Flex System, a high precision
mechanism, unleashes the board flex, while keeping an excellent lateral rigidity and a
reactivity that all the riders, beginners as pros, will enjoy.

Version SW03-20170512                                                                           4
2.2 Recommendations

                WARNING
                Rider security depends on his formation level, his wisdom and his protection.
                It is thus important to respect the following points:

       •     Do not begin alone; learn with an association or a competent instructor for wakeboard
             or sit waterski.

       •     It’s required that beginners with Swaik® mustn’t be fastened to their sits.
             At first you need to become completely familiar with this equipment before thinking to
             ride fastened to your seat and with the feet strongly fastened as a consequence (see
             chapter 3.3).
             Before riding fastened, the rider need to master balance in water and learn to swim
             with the Swaik®. The rider must particularly be able to put back his board below him
             when he will be on his side with the board floating on the water
             This movement is essential to prevent any risk of drowning.
             This training must be done near the bank of the water and under the supervision of
             someone who can act quickly if you need help.
             The rider will also need to perfectly know the procedure to unlock the belt. He will also
             be able to do it in the water. (see chapter 3.5.4)

       •     Always keep a security gap so as to control your progression and your trajectory to
             avoid collisions with obstacles or other users.
       •     Wearing the equipment mentioned at chapter 4.1 is strongly recommended.

                IMPORTANT
                                                               ®
                The performance and security of the Swaik depend on its condition. It is thus important
                to look after it correctly and to pay attention to the following points :

       •     Pay attention to your equipment and immediately remedy any malfunction.

       •     Respect the original mounting of the parts in case of repairs. Do not hesitate to contact
             us if needed.

       •     Check the use of the board you use, particularly the mountings (inserts).

2.3 Conditions of use

   •       The Swaik® is a sit wakeboard frame designed for an independent use.
   •       The Swaik® has been designed to use nautical ski cable or wakeboard boats and
           waterski boats.
   •       Anyone using TESSIER products must be correctly retained in the seat. Our 7 sizes
           (children and size 1 to 6) allow fitting most of morphologies. For further information, go to
           chapter 3.5 related to nautical seats.

Version SW03-20170512                                                                                5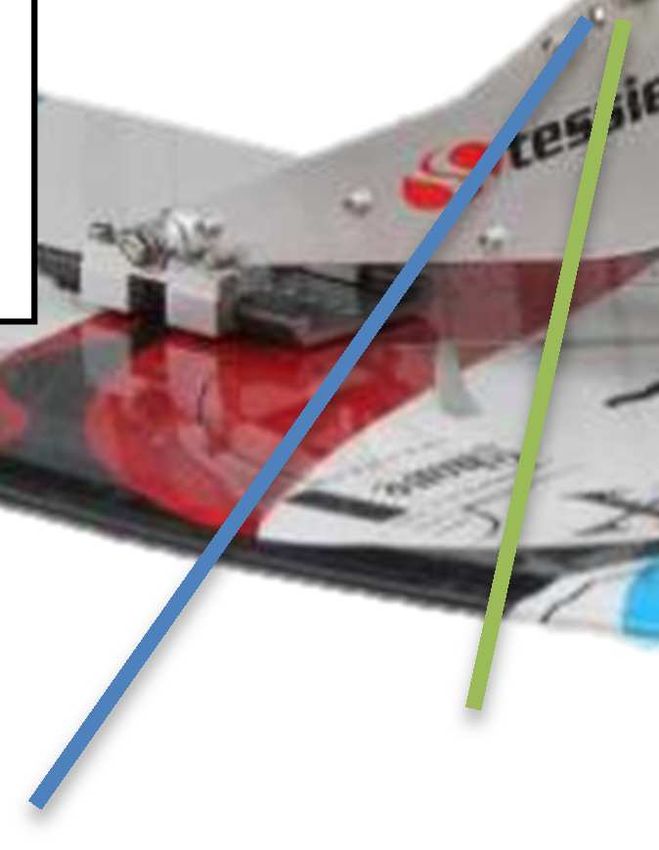
2.4 Choosing the right board

As for a valid person, choosing a board depends on the type of wakeboarding, weight and
level of the rider. A 138 – 143 cm board will satisfy most of the riders. The frame has been
developed to fit on most of the boards of the market, without any modification needed.

Ski cable wakeboarding: Boards with an intermediate/stiff flex will correspond to a ski cable
use of the frame. Fins are prohibited on kickers, we recommend you to get cable specific
boards, or hybrid boards with removable fins. Some riders will enjoy more boat specific
boards, with more rigidity.

Boat wakeboarding: Boards for a boat use are more rigid. A slightly longer board than a
cable board will satisfy you, because being longer and wider; it will help you with trajectory.

         IMPORTANT
         Do not let your board exposed to intense sun ever. That might damage it when you will get
         back to the water.

Version SW03-20170512                                                                                6
3 ASSEMBLY, SETTINGS AND FUNCTIONNING
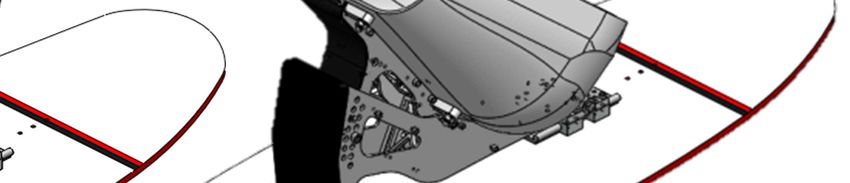
3.1 Mounting of the frame on the board
A fastening kit composed of 4 headless screws 6x30 stainless steel A4, 4 large stainless
steel washers and 4 stainless steel lock nuts are delivered with the frame.
In order to correctly install the frame on the board:
1- Screw the 4 headless screws until the bottom of the insert thread. Use 2 most
opposite inserts as indicated in the sketch above. Tighten moderately by 4 Nm.
3
4
Screw not tightened
enough, and badly
Screws correctly tightened on the board,
positioned on the inserts 1 at the bottom of the insert, on opposite
(too close)
inserts
2- Place the front plate centered
on the inserts (3rd and 7th holes 2
of the plate). This setting
corresponds to the standard
center of gravity.
Plate centered on holes 3 and 7
3- Place the rear rail of the Full- 25mm
mini
Flex System keeping at least 3
25 mm on both sides of the
pads. The position of the rail
relatively to the inserts will
differ according to the board
used.
25mm
mini
4- Place the washers and tighten
moderately the nuts but
enough in a way that the frame
does not get slack anymore, (4 4
Nm maxi). Go to chapter 3.4.2
to balance the center of gravity 10
of the frame.
4
Version SW03-20170512 7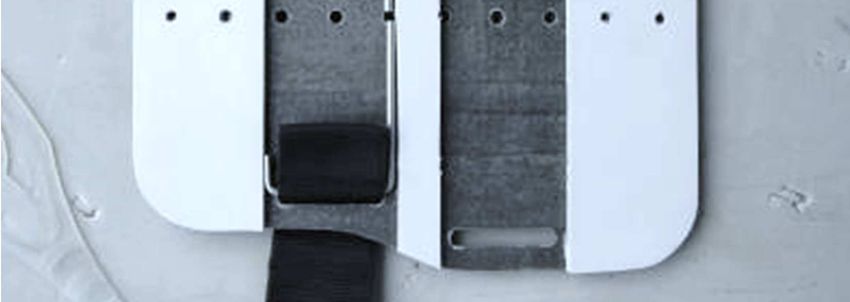
IMPORTANT
            If your board has an important rocker, you will not manage to install the rail if you have
            already completely tightened the screws in the inserts. In this case, untighten one of the
            screws on each insert group, place the front plate and the rail of the Full-Flex System on the
            board and then tighten both screws on the inserts. Go back to operation 4 above.

3.2 Functioning of the Full-Flex System

The performance of the Swaik® is partly obtained thanks to its rear translation mechanism. It
is highly important, added to the maintenance instructions given in chapter 6, to control the
correct functioning of the Full-Flex System before each session. Also check that there is no
dust particle meddled inside the mechanism, and clear with smooth water the pads and the
entire frame after each session in salt water.

It is highly important to install the rail correctly. Respect the distance of 25mm on both sides
of the pads as explained at operation 3.

    Rail correctly placed, gap of
                                                            Rail wrongly placed, pads too
    25mm mini on both sides of
                                                             close to the edge of the rail.
              the pads.

Version SW03-20170512                                                                               8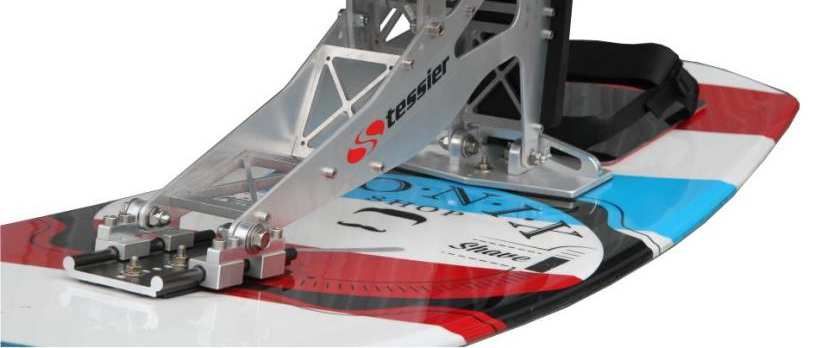
3.3 Installation and use of the foot plate
This foot plate provides you many adjustments in accordance with your morphology and the
rigidity of the support you need.
This foot plate enables you to ride safely when it’s properly adjusted.

According to your practice, the foot plate should:
   - Release your feet in case of fall when the rider is not fastened in his seat.
       (Strap on the toes. See chapter 3.3.1)
   -    Guarantee a good support of the feet for an experienced rider who ride fastened in his
       seat.
       (Strap on the instep. See chapter 3.3.2)

             WARNING
             For your safety, the foot plate adjustment should always enable you to release your feet in
             case of fall if you are not fastened to your seat.

     3.3.1 Strap on your toes.

1-   According to your feet width, insert the straps into the widest openings of the carbon
     plate (wide feet) or into the narrowest side (narrow feet). To do this turn over the plate on
     the board.

                     Strap position for wide feet           Strap position for narrow feet

2-   According to your feet size, note previously the right length of the straps and insert the
     stainless steel pins by their smallest side into the matching opening (position 1 to 4)

Version SW03-20170512                                                                              9
Position 4: (longest strap)

                                                                     Position 3

                                                                     Position 2
                                                                     Position 1: (smallest strap)

          IMPORTANT
             Pay attention to place the longest side of the pins in direction of the tail of the board.
             Take also care to place the pins both side in the same position.

                                                                                                               Tail of the board
                                                 Tail of the board

                  Strap position for wide feet                                    Strap position for narrow feet

3-   Fold correctly straps and pins above the plate.

Version SW03-20170512                                                                                                              10
4- Place the plate in the chosen position and fasten with the 3 screws TBHC 06x16 in the
matching threaded inserts.
5- Place your feet on the foot plate and grip the first band on the front of your feet. This
should be correctly tight. A finger can slip between your feet and the strap to allow you to
pull out your feet in case of fall. Then strap the second band.
In the optimal position, both velcro strips must completely overlap.
Adjust the length of straps by moving the pins position as explained before if necessary.
6- Adjust the rubber heel band. This band must be tight enough to hold correctly your feet
when you will ride, but it must be possible to take your feet off in case of fall.
CAUTION
To control the straps tightness, you must be able to take your feet off the straps
without being obstructed by the front frame. The strap should not be on your
insteps
CAUTION
The neoprene slippers will protect you in case of
falling. The shoes with an edge (as on the picture)
are prohibited because the strap is caught on the
backside edge and prevent from being unfixed
during a fall.
Version SW03-20170512 113.3.2 Strap on the insteps
If you are fastened to your seat, you should not take your feet off frequently.
In this case, you should use the narrowest side of the carbon plate with the straps on your
insteps. See picture below.
Adjust the length of straps by moving the pins position as explained before if necessary.
The rubber heel band must be correctly tight.
WARNING
This adjustment doesn’t allow you to take easily your feet off in case of fall.
This adjustment should be kept for experienced riders fastened to their seats.
See recommendation chapter 2.2
Version SW03-20170512 123.4 Adjusting the ride position
It is essential to feel comfortable according to your morphology and your injury height. The
frame is adjustable via two parameters:
3.4.1 Setting up the height and seat angle
To set up those parameters correctly:
1 – Choose the rear height. This height is
measured from the surface of the board until the 1
bottom of the seat, according to a horizontal. It is
adjusted with the rear points. Use one of the six
holes.
Just approach the screw without tightening them.
2 – Adjust the front points to have a 10mm gap
between the front of the seat and your thighs (you
can slip a finger between the foam cushion and 2
your thighs). Use one of the 7 holes.
Just approach the screw without tightening them.
3 – Check that this seat set up fits you. Re adjust if needed. Finish by tightening the TCHC
8x20 screws with the indicated torque.
13
1 7 6
2 6
3 5 18
4 4
5 3
6 2
1
Rear series
Front series
Two ranges of settings are available on the frame. They correspond to a rotation around the
rear fixation points.
Version SW03-20170512 13Setting up the frame is done according to the morphology of the rider, and his height of
injury. A high height of injury will lead to an important seat angle (chest leaned on the thighs)
while a lower height of injury will need a lower seat angle.
Important seat angle
Low seat angle
3.4.2 Position of the center of gravity
Once you have found your height of ride and your seat angle, the position of the frame on the
board must be adjusted. The setting of the center of gravity is done by moving forward the
frame or going backwards on the inserts. The standard setting has been defined at chapter
3.1.
The following pieces of advice will help you to set up your frame:
Rear CoG position Front
Centered frame : standard
position
Frame excessively moved Frame excessively moved
backward: bouncing on the forward: no problem while riding
water, traction is more important natural, but bouncing on the
on the arms. water while riding fakie. The
frame tips over when going out of
the kicker.
In order to set up correctly the frame, move forward the center of gravity progressively
until you are not disturbed by the bouncing when riding natural.
Important note: For the riders with a high height of injury, who actually ride the chest leaned
on the thighs, moving forward or backward the position of your feet (foot-strap) will change
considerably the position of the center of gravity.
IMPORTANT
Even if the rear mechanism allows the frame sliding, it is essential to move both the
frame and the rail of the Full-Flex System while adjusting the center of gravity. Go to
chapter 3.2
Version SW03-20170512 143.5 Mounting the seats
3.5.1 Generalites
On the Swaik®, it is possible to install two types of seats:
Articulated complete seat Low seat only
Child size until size 6 (7 sizes), with several Same type as the complete without the backrest.
widths and backrest heights. The backrest is
necessary if you have a high height of injury.
Those seats are covered by two parts of foam:
A 15mm-thick foam completely waterproof glued on the sides of the seat and inside the
backrest in the case of articulated seat.
On the bottom of the seat, the same foam with 25mm to provide good shock absorption
and improve comfort. It is glued only on the back of the seat.
3.5.2 Set up on the frame :
Tighten the 4 stainless steel screws TBHC 8x30 as indicated on the sketch.
Set up the seat on the frame.
1 Screw TBHC 8x30
1 large plate Washer
Seat
Frame
1 narrow Washer
1 blind Nut
Tighten correctly with the indicated torque
Version SW03-20170512 153.5.3 Belt set-up (in option) :
WARNING
The belt should be kept only for experienced riders fastened to their seats.
See recommendation chapter 2.2
In general this belt will be set-up to have the unlock strap at right, but it could be reversed if
necessary.
Place the screw TFHC M6x16 and the washer M10 in the hole inside the strap.
Pass the screw throught the hole located on side from inside the seat and press strongly until
the screw goes other outside the seat.
Place the washer M6 on the screw and place the cap nut M6
Tighten the assembly with the indicated torque.
Do the same on the other side
10
4
10
Adjust the belt tilt before tightening. See picture above
Version SW03-20170512 163.5.4 Use of the belt (in option) : Locking procedure Place the female part of the security buckle (red strap side) on the male part. The buckle should automatically be locked with the magnetic zone. Adjust the length by pulling on the black strap end. Unlocking procedure Pull up the unlock red strap The buckle should automatically be unlocked. Version SW03-20170512 17
4 USING THE FRAME

4.1 Essential equipment

In order to be safe and to enjoy wakeboarding, we strongly recommend you to wear during
each session the following equipment:

                                         It will provide you a protection against falls, but also
                       Wakeboarding
                                         during small incidents (collision with a handle of the
                       specific helmet
                                         cable for instance). The ear protections are
                           with ear
                                         mandatory to get your eardrum protected). If not,
                         protections
                                         think about wearing earplugs.
                                         It will allow you to float after a fall. It will also help
                          Life jacket    you to go back to the embankment without wearing
                      (performance 100   you out by swimming.
                             mini)       A life jacket conforms to NF EN ISO12402-4 is
                                         recommended
                                         They will protect your feet against collisions while
                       High neoprene     you will be unfixed. Be aware of not using slippers
                          slippers       with a backside on which the strap of the foot-strap
                                         could be caught and block the unfix (see chapter 3.3)
                                         They will avoid blisters and skin irritation due to the
                                         handle. They also protect you from hitting the board
                           Gloves
                                         of the seat.

                      Swimsuit, under    To avoid irritation with the foams if you have
                          knees          sensitive skin. The swimsuit must cover your knees.

Version SW03-20170512                                                                           18
4.2 Skicable wakeboarding use
Because of the numerous users at the same time, some instructions must be respected while
you are wakeboarding on a cable:
Trajectory: You must always control your trajectory. Pay close attention to other users
in front of you. Just loose the handle instead of brushing past someone else in the
water.
Riding level: Do not cut corners, and try to progress at your own pace. Ask for pieces
of advice to the cable operator before going huge on obstacles which are not adapted
to your level. The frame has been designed to take blows linked to a normal use
(landings, rails, jumps, etc…). If you had to fall on an obstacle, control the global
aspect of your frame, your board and the inserts before going back to the water.
CAUTION
Take note that some obstacles are not accessible to sitwakeboarders. It is your
task to inquire about the possibilities before going to the water.
Fall: In case of a fall get the correct behavior:
1. Keep your head above the water.
2. Tell the operators you are safe by an understandable hand gesture.
3. Go away from the cable trajectory in order not to disturb other users.
4. Go back to the start pontoon by the way the operator has explained you.
CAUTION
Before a new session on a new ski cable, remember inquiring about the security checks
and the behavior to get in case of a fall. Do not hesitate to ask pieces of advice to the
operators and inform them about your level. Do not use boards with fins if you use the
rail or jumps.
IMPORTANT IN SALT WATER
Copiously clean with smooth water immediately after use. Control that there is not
residual salt caught between the articulations, the Full-Flex System and all the
mechanical parts. If this measure is not respected, your frame will be quickly worn out.
4.3 Boat wakeboarding use (salt water or lake)
The same requirements as for cable use are valid. When you will fall, wait for the boat to
come back to pick you.
WARNING
Boat wakeboarding must be done with at least two companions: a boat driver and an
over-eighteen people who will permanently monitor you.
IMPORTANT IN SALT WATER
Copiously clean with smooth water immediately after use. Control that there is not
residual salt caught between the articulations, the Full-Flex System and all the
mechanical parts. If this measure is not respected, your frame will be quickly worn out.
Version SW03-20170512 195 GENERAL DESCRIPTION
4 5
6
7
8
1 2 3
High model frame Low model frame
Nb. PART DESIGNATION QTY
1 Front plate 1
2 High model frame 1
3 Low model frame 1
4 Seat support 1
5 Rear mechanism 1
6 Seat support protection 1
7 Frame protection 1
8 Wakeboard 1
Mounting and adjusting screw set:
Seat fastening (x4) Setting fastening (x4) Board fastening (x4)
Headless screw
Screw TBHC 8x30 Screw TCHC 8x20 SHC 6x30
Stainless steel A4 Stainless steel A4 Stainless steel A4
Large washer L8
Stainless steel A4 Nylstop nut
8 bas ZN200H
Nylstop low nut 6
Narrow washer Z8 ZN200H
Stainless steel A4
Large washer L6
Blind nut Stainless steel Stainless steel A4
Version SW03-20170512 206 MAINTENANCE
Our products are known for their superior quality and reliability. It is one of our priorities to keep
this level high.
However, as any mechanical equipment, it is necessary to pay attention on it. Especially in our
use, the mechanic is put to a severe test. It is hard to make a maintenance plan because the
frequency of use and the level of solicitation of the equipment are always different from one user
to another.
However we are advising to bring us back or send us back the Swaik®:
- Every 500 hours for a normal use (beginners to good riders)
- Every 300 hours for an advanced use (very good riders, competitors, …)
IMPORTANT
If it is impossible to bring us back the equipment, the maintenance has to
be done by a professional mechanic.
We remain at your disposal to give you the necessary mechanical advices.
Between each mechanical check explained above, we recommend a regular maintenance of
the Swaik® by following the points below.
Operation / Frequency Solution / Reparation
Store the Swaik® in a dry place after each
session.
Visual check before each use or after an impact. Contact us if there is a problem.
Check every articulation every 300 hours use or Contact us if there is a problem.
after an impact.
Check the straps of the foot-strap and the ones Contact us if there is a problem.
on the backrest (if optional backrest) each 30
hours use or after an impact.
Clean the frame and the mechanism with smooth Contact us if there is a problem.
water after each session in salt water.
Check the torque of the screws on the inserts, Tighten the screws according to the
and the torque of the nuts on those screws to indicated torque at chapter 3.1
have a good maintain of the frame, before and
after each session.
Version SW03-20170512 217 DELIVERING AND TRANSPORTING
Your new Swaik® has been shipped to you either fully assembled in our workshop or partially
assembled in a packaging with bubble paper.
In order to avoid any damage during transporting, each removable part has been packed
separately.
Unpacking after shipment by TESSIER:
IMPORTANT
Any reclamation concerning the damage during transport can be taken into account if it
has not been mentioned and written to the delivery man.
• Check that the packaging does not have any shock marks.
• Unpack.
• Take out cautiously all the elements of the Swaik® (seat, etc...) of their pack and check
that everything is here.
• Check all the parts to ensure that they do not present any damage sign, scratches, shock
marks, or any default.
• If one of the parts is damaged, contact us immediately.
Casual transport by the user:
We recommend transporting the equipment without removing any parts.
Storage:
After using dry your equipment with a cloth.
When you do not use your frame, it is recommended to store it in a dry place, with a
temperature superior to 0°C.
8 RECYCLING
This product has been shipped by an eco-friendly manufacturer.
Please preserve the environment and recycle this product in end of life to your local
recycling station.
9 CLEANING AND DISINFECTION
Do not use solvent. Only clean with a cloth or with water and neutral soap. Let it dry
naturally, far from hot direct sources.
To disinfect textile products (foams, fabrics, etc…) use any disinfectant type Sanytol.
Version SW03-20170512 2210 WARRANTY TESSIER pays a detailed attention to the quality of manufacture and the reliability of its products. TESSIER guarantees each frame during 3 years, and each component against any material or manufacturing defect (seat, foot-strap) during 1 year. This warranty does not cover: • In the event of non-cleaning with smooth water after used in salt water • In the event of incorrect dismounting and remounting by the customer. • In the event of incorrect maintenance by the customer. • In the event of the installation of parts or accessories not designed for the sold frame or incompatible with this one. • Any consecutive damage or anomaly with an accident, a misuse or negligence. • In the event of a frame modification or modification of its parts. This warranty is expressly limited to the repair or the replacement of a defective element and constitutes the only recourse of the warranty. This warranty applies from the date of purchase. In the event of return of the material, the expenses of routing and return of the material to the TESSIER factory or the approved distributor of the country are the responsibilities of the purchaser. The complaints with the title of this guarantee must be deposited at TESSIER or of an approved retailer. Version SW03-20170512 23
You can also read