12" PIZZA MAKER MAQUINA PARA HACER PIZZA DE 30 CM - MODEL: PP1200 MODELO: PP1200
←
→
Page content transcription
If your browser does not render page correctly, please read the page content below

12” PIZZA MAKER
                                                                MAQUINA PARA
                                                             HACER PIZZA DE 30 CM

                                                                                           MODEL: PP1200
Manual de uso y cuidado.                          Use and Care Manual.                     MODELO: PP1200
Precausiones importantes.                         Important Safeguards.
Este producto es para uso doméstico únicamente.   This product is for domestic use only.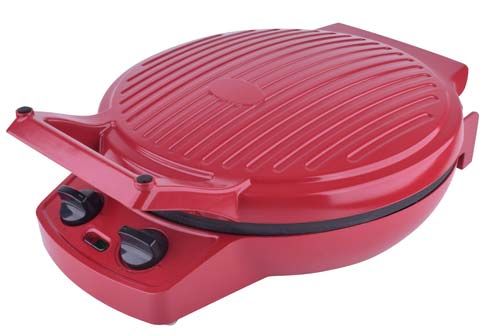
IMPORTANT SAFEGUARDS

When using electrical appliances, basic safety precautions should always be followed to

reduce the risk of fire, electric shock and personal injury.

1. READ ALL INSTRUCTIONS CAREFULLY.

2. Do not touch hot surfaces. Use handles or knobs. Parts become hot during use.

3. To protect against fire, electric shock, and injury to persons, do not immerse cord, plug,

or unit in water or any other liquid.

4. Close supervision is necessary when any appliance is used by or near children.

5. Do not operate any appliance with a damaged cord or plug, or after the appliance

malfunctions or is dropped or damaged in any manner. Return appliance to the nearest

authorized service facility for examination, repair or adjustment.

6. The use of accessory attachments not recommended or sold by the appliance

manufacturer may cause fire, electric shock or injury and is therefore prohibited.

7. Do not use outdoors or for commercial use.

8. Do not allow the cord to hang over the edge of table or counter, or touch hot surfaces

including the stove.

9. Do not place on or near a hot gas or electric burner or in a heated oven.

10. To disconnect appliance, turn the timer control to "OFF". Then remove plug from wall

outlet.

11. Extreme caution must be used when moving an appliance containing hot oil or other

liquids

                                              1
12. Do not use this appliance for other than its intended use.
13. Do not leave appliance unattended while in use.
14. Unplug this appliance from outlet when not in use and before cleaning. Allow to cool
before cleaning.
15. Do not twist, kink or wrap the power cord around the appliance as this may cause the
insulation to weaken and split, particularly in the location where it enters the unit.
SAVE THESE INSTRUCTIONS
HOUSEHOLD USE ONLY
ADDITIONAL IMPORTANT SAFEGUARDS
1. Always place appliance on a heat resistant surface.
2. Use utensils specifically designed for nonstick surfaces to avoid scratching. Never
remove the food item with a cutting device or metal kitchen utensil.
3. When using the appliance, allow four to six inches of space above, behind and on
either side of the appliance for air circulation.
4. Always unplug appliance immediately from outlet when not in use.
5. Always unplug and cool appliance before cleaning and storing.
2POWER CORD
1. A short power-supply cord is provided to reduce the hazard resulting from
entanglement or tripping over a long cord.
2. Extension cords may be used if care is exercised. If it is necessary to use an extension
cord, it should be positioned so that it does not drape over the counter or tabletop where
it can be pulled on by children or tripped over unintentionally.
3. The electrical rating of the extension cord must be the same or more than the wattage
of the appliance (the wattage is shown on the rating label located on the underside or
back of the appliance).
4. Avoid pulling or straining the power cord at outlet or appliance connections.
POLARIZED PLUG
1. Your appliance is equipped with a polarized plug (one blade is wider than the other).
2. To reduce the risk of electrical shock, this plug is intended to fit into a polarized outlet
only one way.
3. If the plug does not fit fully into the outlet, reverse the plug.
If it does not fit, please consult a qualified electrician. Do not attempt to defeat this safety
feature by modifying the plug in any way.
WARNING: Improper use of the power cord may result in electric shock. Consult a
qualified electrician if necessary.
3BEFORE USING YOUR PIZZA MAKER FOR THE
FIRST TIME
Carefully unpack the Pizza Maker and remove all packaging materials from inside and
around the unit. To remove any dust that may have accumulated during packaging, wipe
the cooking plates and the exterior of the unit with a cloth or sponge moistened in warm
water. Dry thoroughly.
WARNING: Do not immerse the unit, cord or plug in water or any other liquid. Do
not pour or run water onto any part of the appliance. Do not use harsh or abrasive
cleansers on any part of the appliance.
To maintain the quality of the nonstick coating on your Pizza Maker we recommended
the following: Using a paper towel, coat the nonstick surface with a small amount of
vegetable oil or a nonstick cooking spray and wipe off excess oil.
Before use, unwind the power cord completely and keep the cord away from the hot
parts of the appliance.
NOTE: During the first use, the unit may emit a small amount of smoke and a slight smell;
this is normal, the unit is burning off the residues from the manufacturing process. The
odor is harmless and should not reoccur after the initial heating.
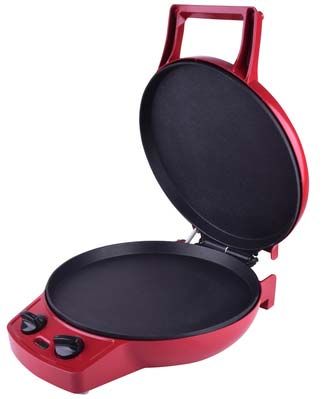
4PARTS OF YOUR PIZZA MAKER
Handle
Timer control: Max 30min
Power‐On indicator light
Ready‐to‐Bake indicator light
Temperature control
Top Nonstick baking plate
Bottom Nonstick baking plate
RATING: 120V, 60Hz, 1440W, AC ONLY
5USING YOUR PIZZA MAKER
Your new Pizza Maker has three temperature settings: 355°F, 385°F and 410°F, and a
timer that goes from 0 to 30 minutes.
1. Place unit on a clean, dry, heat resistant flat surface, such as a table or countertop.
2. To maintain the quality of the nonstick finish on your Pizza Maker we recommend to
use a paper towel or silicone basting brush to coat the nonstick surfaces with a small
amount of vegetable oil or a nonstick cooking spray, then wipe excess oil off.
3. Close the Pizza Maker and plug it into the wall outlet.
4. To preheat the Pizza Maker, set the timer to 10 min and the temperature control to
410°F. The red indicator light (Power-On) illuminates and will stay on while the unit is
active. When the green Indicator Light (Ready-to-Bake) illuminates, it indicates that the
Pizza Maker has finished preheating and is ready to use.
5. After the Pizza Maker is preheated, place your homemade or frozen pizza or other
food on the bottom nonstick baking plate. The green indicator light will turn off. If baking
pizza, you can set the timer to 15min and the temperature control to 410°F. If cooking
other kinds of food, you can set the appropriate time and temperature according to the
recipe.
6. Gently close the lid and let the unit cook. When the set time has been depleted, the
timer will emit a bell sound and the unit will automatically shut off. Your pizza or food is
ready (you can use the tip of a spatula to lift the edge of the pizza to check if the bottom
crust has baked to your preferences). When cooking other kinds of food, it is
recommended to stir or flip the ingredients periodically in order to ensure they are
cooked evenly.
67. To remove the pizza or the other food from the Pizza Maker, use always a heat
resistant plastic, nylon, silicone or wooden spatula. Never use a sharp or metal object, as
this will damage the nonstick coating of the baking plates.
8. The unit opens completely flat (180°) which allows it to be used as a table grill. You
can cook different kinds of food on your Pizza Maker. Set the time and the temperature
required to cook the ingredients thoroughly. If cooking on the bottom baking plate only,
close the lid to shorten total cooking time as the Pizza Maker works more efficiently and
distributes heat more evenly.
9. Remove the plug from the wall outlet, let the Pizza Maker open and allow it to cool
down completely.
10. Clean the Pizza Maker with a damp cloth or soft brush. Never use harsh and
abrasive cleaners, scouring pad or steel wool which can damage the surfaces.
11. Never immerse the Pizza Maker in water or any other liquid.
BAKING ADDITIONAL PIZZAS
1. If baking additional pizzas, keep the Pizza Maker lid closed to retain heat. Always wait
until the green (Ready-to-Bake) Indicator Light illuminates before adding another pizza.
2. Additional pizzas may bake quicker than your first baked pizza as extra heat has been
retained inside your Pizza Maker. It may be necessary to adjust to a shorter baking time.
7CARE AND CLEANING
Always ensure the Pizza Maker is unplugged and cool before moving, cleaning or
storing.
Wipe the baking plates with a clean, damp cloth. If pizza dough still remains on the
nonstick baking plates, pour a small amount of cooking oil on the hardened pizza dough.
Allow the oil to set for 5 minutes, then wipe clean with a paper towel or soft cloth. To
remove stubborn stains, use a soft nylon brush or other cleaning utensil safe for nonstick
surfaces.
WARNING: Do not immerse the unit, cord or plug in water or any other liquid. Do
not pour or run water onto any part of the unit. Do not place in dishwasher. Do not
use harsh or abrasive cleansers on any part of the Pizza Maker.
The exterior of the unit may be wiped clean with a wet cloth. Let dry thoroughly.
Wrap cord around the convenient cord wrapper on the base. Ensure unit is clean and dry
before storing.
8RECIPES
BASIC PIZZA DOUGH Makes 2 thin 12-in crusts
INGREDIENTS
1 pinch of sugar
1 cup lukewarm water (115°F)
1 package active dry yeast
2 ½ to 3 cups all-purpose flour
½ teaspoon salt
2 tablespoons olive oil
PREPARATION
1. Dissolve sugar in water. Sprinkle yeast over water mixture and stir to dissolve.
2. Wait 5 minutes until yeast becomes active and bubbly.
3. Add 2 ½ cups flour to a large mixing bowl, make a well in the center of the flour. Add salt, yeast
mixture and olive oil.
4. Incorporate by hand until getting soft dough.
5. Turn dough onto a lightly floured surface. Knead until smooth and elastic, about 5 to 10
minutes, adding flour gradually as needed.
6. Transfer dough to a large, lightly oiled bowl and coat dough ball with some oil. Cover with
plastic wrap and allow it to rest for approximately 1 hour in a warm place, until the dough doubles
in size.
97. Punch dough down with your fists.
8. Turn dough out onto lightly floured surface, split in half and shape into 2 balls.
9. Cover with a towel and rest 15 to 20 minutes.
10. Roll or stretch dough to a 12-inch diameter.
11. Add pizza sauce, shredded cheese and toppings.
12. Bake on preheated Pizza Maker until crust is crisp and lightly browned.
STORING OPTIONS:
-Store the oiled and wrapped unused dough ball for up to 24 hours in the refrigerator.
One hour before preparing pizza, take dough out of fridge and allow to rest until it reaches room
temperature.
-Freeze the oiled and wrapped unused dough ball in a zippered freezer bag up to 3 months.
PIZZA TOPPINGS:
Spicy sausage, chicken strips, bacon, pepperoni, salami, ham, Italian beef, onions, pesto, black
olives, spinach, artichoke hearts, fresh tomatoes, sundried tomatoes, mushrooms, sweet
peppers, jalapeno peppers, anchovies, pineapple, etc.
10BBQ CHICKEN PIZZA
INGREDIENTS
1 (12-in) unbaked pizza crust
3/4 cup shredded rotisserie chicken
6 tablespoons barbecue sauce, divided
3/4 cup shredded smoked mozzarella cheese
1/2 cup thinly sliced red onion
3/4 cup shredded whole-milk mozzarella cheese
PREPARATION
1. In a small bowl, toss the chicken with half the barbecue sauce; set aside.
2. Brush pizza dough with remaining barbecue sauce and sprinkle with smoked mozzarella
cheese.
3. Add sliced red onions and shredded chicken and top with mozzarella cheese.
4. Bake on preheated Pizza Maker until crust is crisp and lightly browned.
11SUNDRIED TOMATO AND GOAT CHEESE PIZZA
INGREDIENTS
1 (12-in) unbaked pizza crust
2 teaspoons olive oil
3 tablespoons tomato sauce
1 tablespoon tomato paste
1 teaspoon minced garlic
½ cup shredded whole-milk mozzarella cheese
½ cup crumbled goat cheese
½ cup sliced and drained sundried tomatoes
4 tablespoons fresh chopped basil
2 chopped small shallots
6 tablespoons grated parmesan cheese
PREPARATION
1. Brush pizza dough with olive oil.
2. Combine tomato sauce, tomato paste and garlic in a small bowl, And then spread over pizza
dough.
3. Mix cheeses and sprinkle over sauce.
4. Add sundried tomatoes, basil and shallots.
5. Bake in preheated Pizza Maker until crust is crisp and lightly browned
12ROASTED GARLIC WHITE PIZZA
INGREDIENTS
1 (12-in) unbaked pizza crust
1 ½ teaspoons olive oil
½ head garlic, roasted and mashed
6 tablespoons grated parmesan cheese
1 cup shredded fontina cheese*
1/2 cup spinach, frozen, thawed, drained well
6 tablespoons whole-milk ricotta cheese
PREPARATION
1. Brush pizza dough with olive oil.
2. Spread roasted garlic over the dough.
3. Mix fontina and parmesan cheeses and sprinkle over dough.
3. Drop clumps of spinach over the cheese.
4. Add small dollops of ricotta cheese.
5. Bake in preheated Pizza Maker until crust is crisp and lightly browned.
*May substitute for havarti or muenster cheese
13SAUSAGE AND BELL PEPPER PIZZA
INGREDIENTS
1 (12-in) unbaked pizza crust
1½ teaspoons olive oil
1 teaspoon minced garlic
4 tablespoons grated parmesan or romano cheese
1 cup shredded whole-milk mozzarella cheese
1/2 cup shredded provolone cheese
1 cup Italian sausage, cooked and crumbled
1/2 cup red bell pepper julienned
1 cup peeled and diced Roma tomatoes
2 tablespoons chopped fresh oregano leaves (optional)
PREPARATION
1. Brush pizza dough with olive oil and sprinkle with minced garlic.
2. Mix cheeses and sprinkle over dough.
3. Arrange remaining ingredients on cheese mix.
4. Bake in preheated Pizza Maker until crust is crisp and lightly browned.
14PRECAUCIONES IMPORTANTES
Cuando se utilizan aparatos eléctricos, siempre se deben seguir precauciones básicas
de seguridad para reducir el riesgo de incendio, descarga eléctrica y lesiones
personales.
1. LEA ATENTAMENTE LAS INSTRUCCIONES.
2. No toque las superficies calientes, use las asas o las perillas. Las piezas se calientan
durante el uso.
3. Para protegerse contra incendios, descargas eléctricas y lesiones personales, no
sumerja el cable, el enchufe o la unidad en agua ni cualquier otro líquido.
4. Se requiere atenta supervisión cuando cualquier aparato es utilizado por o cerca de
niños.
5. No opere ningún aparato con un cable o enchufe dañado, o después de un mal
funcionamiento, o si se ha caído o dañado de cualquier manera. Devuelva el aparato al
centro de servicio autorizado más cercano para su revisión, reparación o ajuste.
6. Se prohíbe el uso de accesorios no recomendados o vendidos por el fabricante del
aparato porque puede causar un incendio, descargas eléctricas o lesiones.
7. No utilice este aparato al aire libre, es para uso en interiores, únicamente. No es para
uso comercial, es para uso doméstico exclusivamente.
8. No permita que el cable cuelgue sobre el borde de la mesa o mostrador, ni que toque
superficies calientes incluyendo la estufa.
9. No coloque el aparato sobre o cerca de una hornilla de gas o eléctrica o en un horno
caliente.
1510. Para desconectar el aparato, gire el control del temporizador hasta la posición "OFF".
A continuación, desconecte el enchufe del tomacorriente.
11. Tenga mucho cuidado al mover un aparato que contenga aceite caliente u otros
líquidos calientes.
12. No utilice este aparato para otro uso diferente del que se describe en este manual.
13. No deje el aparato desatendido mientras esté en uso.
14. Desenchufe el Pizza Maker del tomacorriente cuando no esté en uso y antes de
limpiarlo. Deje que se enfríe antes de limpiarlo.
15. No retuerza, o enrolle el cable de alimentación alrededor del aparato ya que esto
puede causar que se debilite o rompa el aislamiento, particularmente en el lugar donde
se une con el aparato.
GUARDE ESTAS INSTRUCCIONES
ESTE PRODUCTO ES PARA USO
DOMÉSTICO ÚNICAMENTE
PRECAUCIONES ADICIONALES IMPORTANTES
1. Coloque siempre el Pizza Maker sobre una superficie resistente al calor.
2. Utilice utensilios diseñados específicamente para superficies antiadherentes para
evitar rayones y arañazos. Nunca manipule, ni remueva los alimentos con un utensilio
de corte o afilado.
163. Cuando utilice el Pizza Maker, permita cuatro a seis pulgadas de espacio por encima,
detrás y a cada lado para la circulación de aire.
4. Siempre desconecte el Pizza Maker del tomacorriente cuando no esté en uso.
5. Siempre desenchufe el Pizza Maker y deje que se enfríe completamente antes de
limpiarlo y guardarlo.
CABLE DE ALIMENTACIÓN
1. Se suministra un cable de alimentación corto para reducir el peligro resultante de
enredarse o tropezar con un cable largo.
2. Se puede usar un cable de extensión si se tiene sumo cuidado. Si es necesario
utilizar un cable de extensión, este debe ser colocado de manera que no cuelgue del
mostrador o mesa donde pueda ser jalado por un niño o tropezarse accidentalmente.
3. La clasificación eléctrica del cable de extensión debe ser igual o mayor que la
potencia del aparato (el voltaje se muestra en la etiqueta situada en la parte inferior o
posterior del aparato).
4. Evite tirar o forzar el cable de alimentación, especialmente en las uniones con el
enchufe o con el aparato.
ENCHUFE POLARIZADO
Este aparato está equipado con un enchufe polarizado (una pata más ancha que la otra).
Para reducir el riesgo de descarga eléctrica, este enchufe está diseñado para encajar en
un tomacorriente polarizado de una sola manera.
17Si el enchufe no entra completamente en el tomacorriente, invierta el enchufe. Si no
encaja, consulte a un electricista calificado. No trate de alterar el enchufe de ninguna
manera.
ADVERTENCIA: El uso inadecuado del cable de alimentación puede provocar una
descarga eléctrica. Consulte a un electricista calificado si es necesario.
ANTES DE USAR EL PIZZA MAKER POR
PRIMERA VEZ
Desembale cuidadosamente el Pizza Maker y retire todos los materiales de empaque
del interior y alrededor de la unidad. Para eliminar el polvo que se haya acumulado
durante el embalaje, limpie las placas de cocción y el exterior de la unidad con un paño
o una esponja suave humedecida en agua tibia. Y deje secar por completo.
ADVERTENCIA: No sumerja la unidad, el cable o el enchufe en agua o cualquier
otro líquido. No vierta agua sobre cualquier parte del Pizza Maker. No utilice
limpiadores fuertes o abrasivos en ninguna parte del Pizza Maker.
Para mantener la calidad del recubrimiento antiadherente en su Pizza Maker
recomendamos lo siguiente: recubra la superficie antiadherente con una pequeña
cantidad de aceite vegetal usando una toalla de papel o un aerosol antiadherente para
cocinar y limpie el exceso de aceite. Antes usar, desenvuelva el cable de alimentación
por completo y manténgalo alejado de las partes calientes del Pizza Maker.
18NOTA: Durante el primer uso, la unidad puede emitir una pequeña cantidad de humo y
un ligero olor; esto es normal, la unidad está quemando los residuos del proceso de
fabricación. El olor es inofensivo y no debe volver a ocurrir después del calentamiento
inicial.
ESQUEMA DE PARTES
Manija
Temporizador: Máx 30min
Luz indicadora de Encendido
Luz indicadora de Listo Para Hornear
Control de temperatura
Placa antiadherente superior
Placa antiadherente inferior
CARACTERÍSTICAS: 120V, 60Hz, 1440W
CORRIENTE ALTERNA ÚNICAMENTE
19INSTRUCCIONES DE USO
Su nuevo Pizza Maker tiene tres ajustes de temperatura: 355°F (180°C), 385°F (195°C)
y 410°F (210°C) y un temporizador de 30 minutos.
1. Coloque la unidad sobre una superficie resistente al calor limpia, seca y plana, como
una mesa o mostrador.
2. Para mantener la calidad del recubrimiento antiadherente en su Pizza Maker
recomendamos lo siguiente: recubra la superficie antiadherente con una pequeña
cantidad de aceite vegetal usando una toalla de papel o un aerosol antiadherente para
cocinar y limpie el exceso de aceite.
3. Cierre el Pizza Maker y conéctelo al tomacorriente.
4. Para precalentar el Pizza Maker, ajuste el temporizador a 10 minutos y el control de
temperatura a 410°F (210°C). La luz indicadora roja (encendido) se ilumina, y
permanecerá encendida mientras la unidad esté activa. Cuando luz indicadora verde
(Listo Para Hornear) se ilumina, indica que el Pizza Maker ha terminado el
precalentamiento y está listo para usar.
5. Después de que el Pizza Maker esté precalentado, coloque su pizza casera o
congelada u otra comida en la placa antiadherente inferior. La luz indicadora verde se
apagará. Si hornear pizza, usted puede ajustar el temporizador para 15 minutos y el
control de temperatura a 410 F (210°C). Si cocinar otros tipos de alimentos, se puede
establecer el tiempo y la temperatura adecuada de acuerdo a la receta.
6. Cierre suavemente la tapa y deje que la unidad hornee. Cuando el tiempo
programado se ha agotado, el temporizador emitirá un sonido de campana y la unidad
20se apagará automáticamente. Su pizza o comida debe estar lista (se puede utilizar la
punta de una espátula para levantar el borde de la pizza para comprobar si la corteza
inferior ha horneado a su gusto). Al cocinar otros tipos de alimentos, se recomienda
voltear los ingredientes periódicamente con el fin de que se cocinan uniformemente.
7. Para extraer la pizza o las otras preparaciones del Pizza Maker, utilice siempre un
utensilio resistente al calor de plástico nylon, silicona o madera. Nunca utilice un objeto
afilado o de metal, ya que podría dañar el recubrimiento antiadherente de las placas de
cocción.
8. La unidad se abre completamente plana (180°), lo que permite que sea utilizado como
una parrilla de mesa. Usted puede cocinar diferentes tipos de alimentos en este aparato.
Ajuste el tiempo y la temperatura de acuerdo a los ingredientes, para que se cocinen por
completo. Si se cocina en la placa de cocción inferior únicamente, cierre la tapa para
reducir el tiempo total de cocción ya que el Pizza Maker funciona de manera más
eficiente y distribuye el calor de manera más uniforme.
9. Retire el enchufe del tomacorriente, deje el Pizza Maker abierto y deje que se enfríe
completamente.
10. Limpie el Pizza Maker con un paño húmedo o un cepillo de cerdas suaves. Nunca
use limpiadores abrasivos, ni esponjas ásperas que puedan dañar las superficies.
11. Nunca sumerja el Pizza Maker en agua o cualquier otro líquido.
21PARA HORNEAR PIZZAS ADICIONALES
1. Si desea hornear pizzas adicionales, mantenga la tapa del Pizza Maker cerrada para
retener el calor. Siempre espere hasta que la luz indicadora verde (Listo para hornear)
se ilumine antes de añadir otra pizza.
2. Las pizzas adicionales se pueden hornear más rápido que la primera pizza, porque el
Pizza Maker ha retenido más calor. Puede ser necesario ajustar el temporizador a un
tiempo de cocción más corto.
CUIDADO Y MANTENIMIENTO
Asegúrese siempre de que el Pizza Maker esté desconectado y frío antes de moverlo,
limpiarlo o guardarlo.
Limpie las placas de cocción con un paño limpio y húmedo. Si queda masa de pizza
pegada a las placas de cocción antiadherentes, vierta una poco de aceite de cocina en
la masa de pizza endurecida. Deje que el aceite se asiente durante 5 minutos, luego
limpie con una toalla de papel o un paño suave. Para eliminar las manchas difíciles,
utilice un cepillo de nylon suave seguro para superficies antiadherentes.
ADVERTENCIA: No sumerja el Pizza Maker, el cable o el enchufe en agua o
cualquier otro líquido. No vierta agua sobre ninguna parte de la unidad. No lo
coloque en el lavavajillas. No utilice limpiadores fuertes o abrasivos en ninguna
parte del Pizza Maker.
22El exterior de la unidad se puede limpiar con un paño húmedo y luego secarlo
completamente.
Enrolle el cable alrededor de la base para almacenarlo fácilmente. Asegúrese de que la
unidad esté limpia y seca antes de guardarla.
RECETAS
MASA DE PIZZA BÁSICA Rinde para 2 pizzas delgadas de 30 cm
INGREDIENTES
1 pizca de azúcar
1 taza de agua tibia 46°C (115°F).
1 paquete de levadura seca activa
2 ½ a 3 tazas de harina de trigo tradicional
½ cucharadita de sal
2 cucharadas de aceite de olive
PREPARACIÓN
1. Disuelva el azúcar en el agua y espolvoree la levadura sobre la mezcla de agua y revuelva
para disolver.
2. Espere 5 minutos hasta que la levadura se active y forme burbujas.
3. Añada 2 ½ tazas de harina a un tazón grande para mezclar, haga un hueco en el centro de la
harina, añada la sal, la mezcla de la levadura y el aceite de oliva.
234. Incorpore a mano hasta obtener una masa suave.
5. Ponga la masa sobre una superficie ligeramente enharinada. Amase hasta que esté suave y
elástica, de aproximadamente 5 a 10 minutos, añadiendo harina poco a poco según sea
necesario.
6. Coloque la masa en un recipiente hondo ligeramente engrasado con aceite de oliva y cubra la
masa con un poco más de aceite. Cubra con papel plástico y dejar reposar durante
aproximadamente 1 hora en un lugar cálido, hasta que la masa duplique su tamaño.
7. Golpee la masa con los puños.
8. Ponga la masa sobre una superficie ligeramente enharinada, divídala en dos y forme dos
bolas.
9. Cúbralas con una toalla y déjelas reposar de 15 a 20 minutos.
10. Estire la masa con la ayuda de un rodillo hasta lograr un círculo delgado de 30 cm de
diámetro.
11. Esparza la salsa, el queso y los demás ingredientes.
12. Hornee en el Pizza Maker precalentado hasta que la masa esté crujiente y ligeramente
dorada.
OPCIONES DE ALMACENAMIENTO
- Guarde la bola de masa sin usar engrasada en una bolsa cerrada en el refrigerador por 24
horas máximo. Una hora antes de preparar la pizza, saque la masa del refrigerador y déjala
reposar hasta que alcance la temperatura ambiente.
- Congele la bola de masa sin utilizar en una bolsa con cierre apta para congelador hasta por 3
meses.
24OPCIONES DE INGREDIENTES:
Salchicha italiana picante, tiras de pollo, tocineta, pepperoni, salami, jamón, cebolla, salsa pesto,
aceitunas negras, espinaca, corazones de alcachofas, tomates frescos, tomates secos,
champiñones, pimientos, chiles, jalapeños, anchoas, piña, entre otros.
PIZZA DE POLLO BBQ
INGREDIENTES
1 base de pizza fresca de 30 cm de diámetro
3/4 taza de pollo asado desmenuzado
6 cucharadas de salsa BBQ, dividida
3/4 taza de queso mozzarella ahumado rallado
1/2 taza de rodajas finas de cebolla roja
3/4 taza de queso mozzarella fresco rallado
PREPARACIÓN
1. En un tazón pequeño, mezcle el pollo con la mitad de la salsa BBQ y deje a un lado.
2. Esparza el resto de la salsa BBQ sobre la base de la pizza y espolvoree con el queso
mozzarella ahumado.
3. Agregue las rodajas de cebolla y el pollo y cubra con el queso mozzarella fresco.
4. Hornee en el Pizza Maker precalentado hasta que la masa esté crujiente y ligeramente
dorada.
25PIZZA DE QUESO DE CABRA Y TOMATES SECOS
INGREDIENTES
1 base de pizza fresca de 30 cm de diámetro
2 cucharaditas de aceite de oliva
3 cucharadas de salsa de tomate
1 cucharada de pasta de tomate
1 cucharadita de ajo picado
½ taza de queso rallado mozzarella de leche entera
½ taza de queso de cabra desmenuzado
½ taza de tomates secos en rodajas y escurridos
4 cucharadas de albahaca picada
2 chalotes pequeños picados
6 cucharadas de queso parmesano rallado
PREPARACIÓN
1. Unte el aceite de oliva sobre la masa de pizza con ayuda de una brocha.
2. Mezcle la salsa de tomate, pasta de tomate y el ajo en un tazón pequeño, y luego esparza la
mezcla sobre la masa de pizza.
3. Mezcle los quesos y espolvorear sobre la salsa.
4. Agregue los tomates secados al sol, la albahaca y la cebolla.
5. Hornee en el Pizza Maker precalentado hasta que la masa esté crujiente y ligeramente
dorada.
26PIZZA BLANCA AL AJO
INGREDIENTES
1 base de pizza fresca de 30 cm de diámetro
1 ½ cucharaditas de aceite de oliva
½ cabeza de ajo asado y en puré
6 cucharadas de queso parmesano rallado
1 taza de queso fontina rallado*
1/2 taza de espinacas descongeladas y bien escurridas
6 cucharadas de queso ricotta de leche entera
PREPARACIÓN
1. Unte el aceite de oliva sobre la masa de pizza con ayuda de una brocha.
2. Extienda el ajo asado sobre la masa.
3. Mezcle el queso fontina y el parmesano y espolvoréelos sobre la masa.
3. Distribuya grumos de espinacas.
4. Agregue el queso ricotta por cucharaditas
5. Hornee en el Pizza Maker precalentado hasta que la masa esté crujiente y ligeramente
dorada.
*se puede sustituir por queso havarti o muenster
27PIZZA DE SALCHICHA ITALIANA Y PIMIENTO
INGREDIENTES
1 de base de la pizza fresca de 30 cm de Diámetro
1 ½ cucharaditas de aceite de oliva
1 cucharadita de ajo picado
4 cucharadas de queso parmesano rallado o queso romano
1 taza de queso mozzarella de leche entera rallado
1/2 taza de queso provolone rallado
1 taza de salchicha italiana cocida y desmenuzado
1/2 taza de pimiento rojo cortado en julianas
1 taza tomates tipo Roma pelados y cortados en cubitos
2 cucharadas de hojas de orégano fresco picadas (opcional)
PREPARACIÓN
1. Unte el aceite de oliva sobre la masa de pizza con ayuda de una brocha y espolvoree el ajo
picado.
2. Mezcle los quesos y espolvoréelos sobre la masa
3. Distribuya los demás ingredientes sobre el queso.
4. Hornee en el Pizza Maker precalentado hasta que la masa esté crujiente y ligeramente
dorada.
28You can also read