8" SUPER WOOFER PA0825B - USER MANUAL USER MANUAL - Premium Levella
←
→
Page content transcription
If your browser does not render page correctly, please read the page content below

PA0825B
        8" SUPER WOOFER
WITH BLUETOOTH, USB/SD, FM PLL RADIO, ACTIVE AMPLIFIER,
LED DISPLAY, REMOTE CONTROL AND 3-WAY POWER SOURCE

        USER
          USERMANUAL
              MANUAL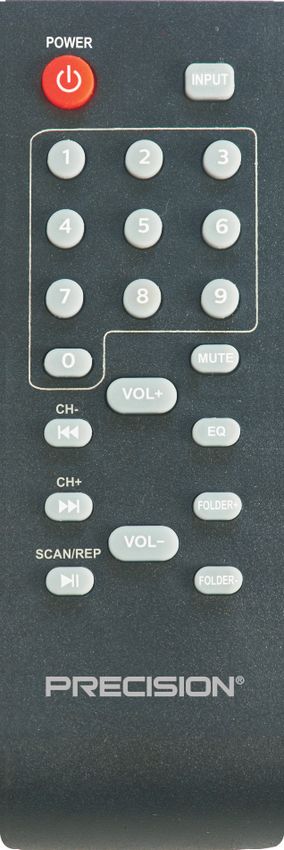
WARNING !
WARNING: TO REDUCE THE RISK OF ELECTRIC SHOCK, DO NOT REMOVE COVER
THIS SPEAKER. NO ADJUSTMENTS INSIDE FOR YOU. ALL SERVICES MUST BE
SUBMITTED TO QUALIFIED PARTY.
• The symbol represented by a ray with arrowhead within an equilateral triangle is intended to
  alert the user to the presence of dangerous voltage within the unit that may be of sufficient
  magnitude to constitute a risk of electric shock people magnitude.
• Users should take extra care when this symbol appears in this manual and should take every
  care described.

The exclamation point within an equilateral triangle is intended to alert the user to the presence
of important instructions for maintenance (services) and the use of this device in this manual.

IMPORTANT SAFETY PRECAUTIONS
 1.Read all instructions before first use.
 2.Keep this manual for future reference.
 3.Obey all alerts.
 4.Follow all instructions.
 5.WARNING: To prevent fire or shock hazard, do not expose this equipment to rain or moisture. Do not
   store and operate this product near liquids.
 6.Clean only with a dry cloth.
 7.Do not store or operate this product near any heat sources such as radiators, heaters
   stoves or other appliances that produce heat. Keep this product in a well ventilated place.
 8.Do not ignore the safety purpose of the polarized or grounding plug. A polarized plug has
   two blades, with one being wider than the other. A grounding plug has two blades plus
   round pin to ground. The wide blade or the third prong is intended to provide security. If the
   provided plug does not fit into your outlet, consult an electrician to replace the outlet.
 9.Protect all wires connected to this unit from being walked on or pinched, particularly at the
   electrical outlet and the point where the cord exits the unit. When unplugging from the electrical outlet,
   grasp the plug and do not pull the cord.
 10.Disconnect the unit during lightning storms or when is not going to be used for a long period.
 11.Keep this unit off when connecting all the devices connected to it.
 12.Connect all your equipment with low volume level. Once all devices are connected, slowly increase the
    volume or level controls to the desired volume.
 13.Before placement, installation, or assembly of any product, inspect all equipment, suspension,
    cabinets, transducers, brackets and associated equipment. Any missing component, corroded,
    deformed, or with non-nominal load can reduce the intensity,
    placement and arrangement of the installation significantly. Any of these conditions can reduce the
    safety of the facility and must be corrected immediately. Use only suitable equipment for the loading
    conditions of the installation. Avoid any possibility of unexpected overload, and never exceed the
    capacity of the material or equipment.
 14.Consult a licensed professional to install the equipment and make sure that all local, regional and
    national regulations related to security are understood and adhered to.
 15.All services should be performed by qualified professionals. Servicing is required when
    the apparatus has been damaged in any way, if the power cord or its plug are damaged, if
    the machine makes contact with liquid, if any object is inserted into the unit, if the unit is
    exposed to rain or moisture, or if the unit does not operate normally, or has bee dropped.

BE SURE TO FULLY CHARGE THE BATTERY THE FIRST TIME TO INCREASE BATTERY
DURABILITY.

                                                   1
FRONT PANEL
                                  1             2     3         4        5

             6                                                                               15           7

        -                 +                                                                       -           +

                                                                                 BT
                                                                                                                  16
                      -           +         -           +       -            +   FULL   -             +
                                                                                 BATT

                                                                                                                  17
                  MIC                 GUITAR
                 INPUT                INPUT
                                                     AUX
                                                    INPUT

                  8           9        10       11 12               13                  14

1. IR remote receiver.
2. Previous Track Button: When on USB/SD/Bluetooth mode, press this button to move
   to the previous track. Hold it down to reduce the volume.
 - When on FM mode, press this button to move to the previous stored channel.
3. Input Mode Button: Press this button to toggle between the various inputs
   (LINE, USB, SD, FM & Bluetooth).
4. Pair & Repeat Button & Play/Pause Button: When on USB/SD mode, press
   this button to pause or play. Hold it down to select the repeat mode for USB/SD.
 - When on Bluetooth mode, press this button to pause, hold it down to disconnect
   pairing then enter pairing mode.
 - When on FM mode, press this button to mute, hold it down for auto scan.
5. Next Track Button: When on USB/SD/Bluetooth mode, press this button to move to
   the next track. Hold it down to increase the volume.
 - When on FM mode, press this button to move to the next stored channel.
6. Guitar Volume Knob: Turn this knob to adjust the volume level of your guitar.
7. Master Level Volume Control: Turn this knob to adjust the master volume.
Note: The light around Guitar & Volume knob will be on when unit is turned on, or
charging if power is off.
8. Microphone Input (1/4"): Connect a microphone to this microphone input
   terminal.
9. Microphone Volume Knob: Turn this knob to adjust the microphone volume
   level of the microphone input.
10. Guitar Input (1/4"): Connect a guitar to this guitar input terminal.

                                                            2
11. Microphone Echo Knob: Use this knob to adjust the echo for the microphone input.
12. AUX (1/8"): This input is designed to connect directly to an Mp3 Player or any other
    stereo level audio device.
13. Bass adjustment: Turn this knob to adjust the bass.
14. USB/SD card port: Connect your USB or SD device here. The speaker will only play
    music files from USB/SD input.
  - Do not connect your computer to this input, as it will not play files directly from a
    computer.
Note: This unit will keep repeating all songs in USB and SD by default.
Important: The USB port is intended only for data transfer only, other devices cannot
be used with this USB connection. The use of USB extension cords is not recommended.
15. Treble adjustment: Turn this knob to adjust the treble.
16. Bluetooth Indicator: Bluetooth indicator will light up solid when connected or flash
    slowly in BT playback, and will flash quickly when pairing.
17. Full Battery: The full battery indicator will light up solid in green when the unit is fully
    charged.

   REAR PANEL

                                       AUX INPUT

                                                                                    1

                                                                                    2
                                                                   ANTENNA

                                                                             BATT
                                                                                    3
                                                       (adaptor)

                                                                                        4
                                         DC 14V

                                 ON

                   6            LED
                               LIGHT                                                    5
                                OFF

                                                   3
1.AUX Input (RCA): The RCA Input is designed to connect directly to a
CD/DVD/TV or any other stereo level audio device. Please note that there
are two LINE (AUX) Inputs, RCA and 1/8”. If both the RCA and 1/8”inputs
are connected, the unit will automatically play from the 1/8” Line input.
2.Antenna is for receiving the FM signal. Before use, extend the telescopic
FM antenna. Pack up the FM antenna to better protect it after use.
3. AC Adaptor: If the unit needs to be charged, connect the adaptor.
4. Power button: There are three possible settings. Setting the unit to BATT will
allow the unit to play using only the internal battery. When set
to AC (adaptor), the unit can also be powered by an external adaptor even if the
battery is dead.
*In AC(adaptor) setting the unit will be charging, but it will do it very slowly. To
charge the unit properly, set the unit to OFF.
5. DC 12V IN is for connecting to a 12V external battery if needed. Make
sure to connect positive to positive (red +) and negative to negative
(black -).
6. LED LIGHT SWITCH: Setting the button to ON will allow the LED light on. When
set to OFF , the LED light will off.
REMOTE CONTROL
1. POWER: Press this button to stand by ON/OFF
the unit. Four dots (- - - -) are displayed when
the unit is in standby.
2. INPUT: Press this button to toggle between the
various inputs: LINE (AUX), USB/SD, FM,
Bluetooth. 3
3. KEY Number for selecting the tracks for
USB/SD or stored channel in FM. 5
4. MUTE: Press this button to mute. 7
5. VOL+: Press this button to increase the volume. 6 10
6. VOL-: Press this button to reduce the volume. 11
7. CH-/ : Press this button to select the previous
track or stored channel for USB/SD/Bluetooth/
FM. When on USB/SD mode, hold this button to
fast backward.
8. CH+/ : Press this button to select the next
track or stored channel for USB/SD/Bluetooth/
FM. When on USB/SD mode, hold this button to
fast to forward.
9. EQ: Press this button to select a different EQ
mode for USB/SD.
410. PREVIOUS/NEXT Folder Button: Press this button to move to the previous/next
folder on USB/SD drive.
11. SCAN, PAIR, REPEAT & PLAY/PAUSE button: Press this button to play or pause
the track on USB/SD/Bluetooth/FM. When on Bluetooth mode, holding it will
disconnect the pairing. Hold it to auto scan in FM. Hold it to select the repeat
modes for USB/SD. This is equivalent to the play/pause key (13) on the main
unit’s rear panel.
MICROPHONE
1. Before powering on the microphone, be sure to set
the Microphone Volume Knob to zero. Once the
Microphone microphone is powered on, slowly increase the
microphone volume.
ON/OFF
2. If you notice static or distortion in the microphone,
check the MIC connection.
3. When not in use, turn off the power of the
microphone.
5DIGITAL DISPLAY
USb Sd n
INPUT MODES: The LED display screen will display the information of input
modes for USB/SD/LINE(AUX)/FM/Bluetooth.
1.When a USB flash drive/SD card is inserted into the USB/SD input, the unit will
automatically switch to USB/SD mode and the display shows USb or Sd.
EQ Mode: EQ modes will display here: Pop, Rock, Jazz, Classic, Normal for
USB/SD.
Repeat Mode: When the USB flash or SD card mode is selected, press the RPT
button (hold play key) to select Repeat Play to repeat folder/one/random/ALL.
2. Track Number: The track number currently playing from the USB/SD will display.
bLUE
3. FM Mode: All FM channels will display here. Hold “PLAY/PAUSE” button for
scanning all channels.
4. Bluetooth Mode: To disconnect pairing, hold the “PLAY/PAUSE” button.
6PAIRING A BLUETOOTH DEVICE
1. Turn on your Bluetooth device.
2. Turn on the speaker to Bluetooth. The unit will automatically go into pairing mode
to search for Bluetooth device. You will know you are in pairing mode when the
LED is flashing quickly.
3. If your Bluetooth device is not able to pair to the unit, disconnect the unit's
previous Bluetooth connections and reset the Bluetooth module by holding play
key.
4. Navigate to your Bluetooth device's setup screen, find "PA0825B" and connect.
5. Bluetooth indicator light will light up steady when connected.
6. To disconnect pairing, hold PLAY/PAUSE button.
Note: You can connect with a smart phone or tablet PC with Bluetooth.
BATTERY
1.This unit is a battery powered PA loudspeaker. Be sure that you have completely
charged the battery prior to first use to maximize the battery's life span. The unit
takes approximately 2 hours to fully charge. The unit will automatically begin
charging once the power cord is connected to a power source and the power
switch is better set to off.
2. Upon completion of the charging, please disconnect the power cable.
3. With standard usage, a fully charged battery can play for about 2.5 hours.
4. Battery can be recharged about 300 times in its life time.
5. When not in use, the speaker should always be set to OFF to prevent the unit from
draining the battery.
6. When the unit is not used for prolonged periods of time, the battery will gradually
lose its power. It is recommended to fully charge the battery regularly.
7CONTROL REMOTO
SPECIFICATIONS
GENERAL
POWER REQUIREMENT: DC 14V 2A
REMOTE CONTROL: DC 3V 1.5V UM4/AAAX2PCS
POWER CONSUMPTION: AC 40W
FM FREQUENCY: 87.5-108MHz
GROSS WEIGHT: 8.2KG
DIMENSIONS: 35.0cm(L) x 37.0cm(W) x 59.5cm(H)
AUDIO SECTION
Output Power 25W (RMS)
ACCESSORIES
Speaker Box (Unit).............................................1
Remote Control (UM4 Battery x2pcs).................1
Wired Microphone............................................ ..1
Instruction Manual............................................ ..1
AC Adaptor..........................................................1
DC Cord..............................................................1
3.5mm to 3.5mm AUX-IN Cable ...................... ..1
RCA to RCA AUX-IN Cable.............................. ..1
Note: Specifications are subject to change for continuous improvement without
prior notice.
8CAUTION:
• The speaker shall not be exposed to dripping or splashing. Do not place objects filled with
liquids on top of it.
• Keep minimum distances of 30 cm around the speaker for the best ventilation.
• Do not cover the ventilation openings with items such as newspapers, tablecloths, curtains,
etc. since these may impede ventilation.
• No naked flame sources, such as lighted candles, should be placed on the apparatus.
• When the mains plug of AC Adaptor is used as the disconnect device, the
disconnect device shall remain readily operable.
• To be completely disconnected the power input, the AC Adaptor shall be disconnected from
the mains completely.
• The AC Adaptor of the speaker should not be obstructed or should be easily accessed during
intended use.
• This speaker is designed to be used in moderate climates.
• Attention should be drawn to the environmental aspects of battery disposal.
• Batteries shall not be exposed to excessive heat such as sunshine, fire or the like.
About Battery Pack:
This unit works on Adaptor or supplied battery pack (Model no: LC18650), DC
11.1V,1.8Ah. Unplug the Adaptor from the AC socket to work on the battery
pack (after fully charged). Plugging the Adaptor while the battery pack is
attached initiates the charging of this battery. When the battery is fully charged the
indicator will turn to green. This playing time may vary with the surrounding
environment, the volume level of the speaker and the battery condition. It is advised
that you wait 10-20 minutes before recharging the battery pack if the unit has shown
lower volume or any distortion during operation.
9PA0825B
SUPER WOOFER DE 8" (20.32cm)
CON BLUETOOTH, USB/SD, RADIO FM PLL, AMPLIFICADOR ACTIVO,
DISPLAY LED, CONTROL REMOTO Y FUENTE DE PODER DE TRES VIAS
MANUAL DE USUARIOADVERTENCIA: PARA REDUCIR EL RIESGO DE DESCARGA ELECTRICA,
NO REMUEVA LA PROTECCIÓN DEL EQUIPO. NO INTENTE HACER
REPARACIONES O MODIFICACIONES AL EQUIPO USTED MISMO. TODOS
LOS SERVICIOS DEBEN SER REALIZADOS POR UN TÉCNICO CALIFICADO.
• El símbolo del triangulo con un rayo en medio sirve para alertar al usuario del posible peligro
que representa el voltaje en el equipo que puede constituir un riesgo de choque eléctrico para
el usuario.
• El usuario deberá tener cuidado con el equipo cada vez que aparece el símbolo en este
manual y deberá seguir las instrucciones dadas.
El símbolo de exclamación en un triangulo sirve para alertar al usuario de importantes
instrucciones para el mantenimiento y el buen uso del equipo.
INSTRUCCIONES IMPORTANTES DE SEGURIDAD
1.Lea todas las instrucciones antes de usar el equipo por primera vez.
2.Guarde este manual para consultas futuras.
3.Obedezca las alertas.
4.Siga todas las instrucciones
5.ADVERTENCIA: Para prevenir el riesgo de fuego o descargas eléctricas, no exponga el
equipo a la lluvia o a la humedad. No almacene ni opere cerca de líquidos.
6.Limpie solamente con un trapo seco.
7.No almacene ni opere el equipo cerca de generadores de calor como radiadores,
calentadores, estufas o cualquier otro equipo que produzca calor. Manténgase en un
ambiente ventilado.
8.No ignore el propósito de seguridad del enchufe polarizado o de conexión a tierra. Un
enchufe polarizado tiene dos clavijas, una más ancha que la otra. Un enchufe de conexión a
tierra tiene dos clavijas, más una clavija redonda a tierra. La hoja ancha o la tercera clavija
son para su seguridad. Si el enchufe suministrado no encaja en su tomacorriente, consulte a
un electricista para reemplazar el tomacorriente.
9.Proteja los cables conectados de ser pisados o doblados, particularmente en los
tomacorrientes y en el punto donde el cable sale de la unidad. Cuando desconecte el equipo
no lo haga halando el cable, hale el enchufe.
10.Desconecte la unidad durante tormentas eléctricas o si no va a ser utilizada por un periodo
largo de tiempo.
11.Mantenga el equipo apagado mientras conecta otros equipos al mismo.
12.Conecte todos los equipos a un nivel bajo de volumen. Una vez estén todos conectados,
aumente lentamente el volumen o los controles para llegar al volumen deseado.
13.Antes de colocar, instalar o montar cualquier equipo, inspeccione todos los equipos, la
suspensión, los transductores, los soportes y el equipo asociado. Cualquier componente
faltante, corroído, deformado, o con carga no nominal puede reducir la intensidad, la
colocación y la disposición de la instalación de manera significativa. Cualquiera de estas
condiciones puede reducir la seguridad de la instalación y debe corregirse
inmediatamente. Utilice solo equipo adecuado para las condiciones de carga de la
instalación. Evite cualquier posibilidad de sobrecarga inesperada, y nunca exceda la
capacidad del material o equipo.
14.Consulte a un profesional calificado para la instalación del equipo y asegúrese que todas
las regulaciones locales, regionales y nacionales sean cumplidas en términos de
seguridad.
15.El servicio técnico debe ser realizado por personal calificado. El servicio se requiere
cuando el equipo ha sido dañado de alguna manera, si el cable o el enchufe se han
dañado, si equipo se ha dañado por contacto con cualquier líquido, si se ha expuesto a la
lluvia o humedad, si el equipo ha caído al suelo o si no funciona con normalidad.
ASEGURESE DE CARGAR COMPLETAMENTE LA BATERÍA LA PRIMERA VEZ PARA
AUMENTAR SU DURABILIDAD.PANEL FRONTAL
1 2 3 4 5
6 15 7
- + - +
BT
16
- + - + - + FULL - +
BATT
17
MIC GUITAR
INPUT INPUT
AUX
INPUT
8 9 10 11 12 13 14
1. Receptor remoto IR.
2. Botón Pista Anterior: Cuando el equipo esta en modo
USB/SD/Bluetooth, presione este botón para moverse a la pista
anterior. Mantengalo presionado hacia abajo para reducir el volumen.
- Cuando esta en modo FM, presione este botón para moverse al canal
almacenado anterior.
3. Botón de Modo de Entrada: Presione este botón para seleccionar
entre las varias entradas (LÍNEA, USB, SD, FM y Bluetooth).
4. Botón Pair & Repeat y Play/Pause: Cuando el equipo está en modo
USB/SD, presione este botón para detenerse brevemente o para
reproducir. Presiónelo hacia abajo para seleccionar los modos de
repetición para USB/SD.
- Cuando está en modo Bluetooth, presione este botón para hacer una
pausa, y presiónelo hacia abajo para desconectar el apareamiento y
entrar en modo apareamiento.
- Cuando está en modo FM, presione este botón para apagar,
presiónelo hacia abajo para la exploración automática de estaciones.
25. Botón siguiente pista: Cuando el equipo está en modo USB/SD/
Bluetooth, presione este botón para moverse a la pista siguiente.
Sujételo hacia abajo para aumentar el volumen.
- Cuando está en modo FM, presione este botón para moverse al
canal almacenado siguiente.
6. Perilla de volumen de la guitarra: Dé vuelta a esta perilla para
ajustar el nivel del volumen de su guitarra.
7. Control de volumen principal: Dé vuelta a esta perilla para ajustar
el volumen principal.
Nota: La luz alrededor de la perilla de la guitarra y del volumen estará
encendida cuando se enciende la unidad, o em modo carga si el
equipo está apagado.
8. Entrada de Micrófono (1/4"): Conecte un micrófono a este terminal
de entrada del micrófono.
9. Perilla de volumen del micrófono: Dé vuelta a esta perilla para
ajustar el nivel del volumen del micrófono.
10. Entrada de Guitarra (1/4"): Conecte una guitarra a esta entrada
para conectar la guitarra.
11. Perilla de eco del micrófono: Utilice esta perilla para ajustar el
eco para la entrada de micrófono.
12. AUX (1/8"): Esta entrada está diseñada para conectar
directamente con un reproductor de Mp3 o cualquier otro
dispositivo audio estéreo.
13. Ajuste de bajo: Dé vuelta a esta perilla para ajustar el bajo.
14. Puerto de la tarjeta USB/SD: Conecte su dispositivo USB o SD
aquí. El altavoz reproducirá solamente archivos de música de la
entrada USB/SD. No conecte su computadora con esta entrada
pues el equipo no reproducirá archivos directamente de una
computadora.
Nota: Esta unidad repetirá todas las canciones en el USB y el SD por
defecto.
Importante: El puerto USB esta diseñado solamente para la
transferencia de datos, otros dispositivos no se pueden utilizar con
esta conexión USB. No se recomienda el uso de cables de extensión
de USB.
15. Ajuste de agudos: Dé vuelta a esta perilla para ajustar los
agudos.
16. Indicador de Bluetooth: El indicador de Bluetooth encenderá
estable cuando el equipo está conectado o parpadeará
lentamente en modo de reproducción de BT, y parpadeara
rápidamente cuando se aparea.
17. Batería llena: El indicador de batería llena se encenderá estable
en verde cuando la unidad se ha cargado completamente.
3PANEL POSTERIOR
AUX INPUT
1
ANTENNA
2
BATT
3
(adaptor)
4
DC 14V
ON
6 LED
LIGHT 5
OFF
1. Entrada AUX. (RCA): La entrada RCA está diseñada para conectar
directamente con un CD/DVD/TV o cualquier otro dispositivo de
audio estéreo. Observe por favor que hay dos entradas: de LÍNEA
(AUX.): RCA y 1/8”. Si ambas entradas, RCA y 1/8” están
conectadas, la unidad automáticamente reproducirá desde la línea
entrada de 1/8”.
2. La antena es para recibir la señal de FM. Antes de utilizar FM,
extienda la antena telescópica de FM. Almacene la antena de FM
para protegerla mejor después de usarla.
3. Adaptador de CA: Si la unidad necesita cargarse, conecte el adaptador.
44. Botón de encendido: Hay tres ajustes. El ajuste de la
unidad a BATTERY Permita que la unidad juegue usando
solamente la batería interna .
Cuando se ajusta en AC (adaptador), la unidad también
puede alimentarse tanto con un adaptador externo como
con una batería interna, incluso si la batería está agotada.
En el ajuste de CA (adaptador) la unidad se cargará, pero lo
hará muy lentamente. A Cargue la unidad correctamente,
apague la unidad.
5. DC 12V IN es para conectar con una batería externa de 12V si es
necesario. Asegúrese de que el positivo (rojo +) se conecta al
positivo y el negativo (negro-) al negativo.
6. INTERRUPTOR DE LUZ DEL LED: La luz LED se iluminará
cuando se encienda la unidad. Cuando la unidad se apaga, la luz
LED se apagará.
1. POWER (encendido): Presione este
botón para poner el equipo en modo
de espera (standby) ON/OFF. La
pantalla mostrará cuatro puntos (- - -
-) cuando se está en modo de espera. 3
2. INPUT (entrada): Presione este
botón para cambiar entre las varias 5
entradas de señal, LÍNEA (AUX.), 7
USB/SD, FM,Bluetooth.
3. Teclas Numéricas: Son para 6 10
11
seleccionar las pistas para el modo
USB/SD o el canal almacenado en
FM.
4. MUTE: Presione este botón para
apagar el sonido.
5. VOL+: Presione este botón para
aumentar el volumen.
6. VOL-: Presione este botón para
reducir el volumen.
7. CH-/ : Presione este botón para seleccionar la pista anterior o el
canal almacenado anterior para USB/SD/Bluetooth/FM. Cuando esté
en modo USB/SD, mantenga presionado este botón para retroceso
rápido.
58. CH+/ :Presione este botón para seleccionar la pista siguiente o el
siguiente canal almacenado para USB/SD/Bluetooth/FM. Cuando
esté en modo USB/SD, mantenga presionado este botón este botón
para avance rápido.
9. EQ: Presione este botón para seleccionar un modo diferente de EQ
para USB/SD.
10. PREVIOUS/NEXT: Presione este botón para moverse a la carpeta
anterior o siguiente en modo USB/SD.
11. SCAN, PAIR, REPEAT & PLAY/PAUSE - Botón de exploración,
aparear, repetir y PLAY/PAUSE: Presione este botón para reproducir
o hacer una pausa en la reproducción de USB/SD/Bluetooth/FM. En
modo Bluetooth, presionarlo desconectará el apareamiento.
Presiónelo para exploración automática en FM. Presiónelo para
seleccionar los modos de repetición para USB/SD. Es equivalente al
botón PLAY/PAUSE (13) en el panel trasero de la unidad principal.
1. Antes de encender el micrófono,
asegúrese de colocar la perilla del
volumen del micrófono en cero.
Una vez que el micrófono se haya
encendido, aumente lentamente el
volumen del micrófono.
2. Si usted nota sonido de estática o
distorsión en el micrófono, verifique
la conexión MIC.
3. Cuando no se esté usando, apague
el micrófono.
6n
MODOS DE ENTRADA: La pantalla LED mostrará la información de
los modos de entrada USB / SD / LINE (AUX) / FM / Bluetooth.
1. Cuando una tarjeta USB flash drive/SD se inserta en la entrada de
USB/SD, la unidad cambia automáticamente al modo USB/SD y la
pantalla muestra USB o Sd.
Modo EQ: se mostrarán los modos de ecualización: Pop, Rock,
Jazz, Clásica, Normal para USB / SD.
Modo de repetición: Cuando se selecciona el modo USB o SD,
presione el botón RPT (mantenga presionada la tecla play) para
seleccionar Repeat Play para repetir los contenidos de
carpeta/una/random/todo.
2. Track Number (Número de pista): Mostrará el número de la pista
del USB / SD.
3. Modo FM: Todos los canales de FM se mostraran aquí. Mantenga
presionado el botón de “PLAY/PAUSE” para explorar todos los
canales.
4. Modo Bluetooth: Para desconectar el apareamiento, mantenga
presionado el botón “PLAY/PAUSE”.
71. Encienda su dispositivo Bluetooth.
2. Coloque el parlante en modo Bluetooth. La unidad entrará
automáticamente en modo de apareamiento para buscar el
dispositivo Bluetooth. Usted sabrá que el dispositivo se ha
conectado cuando el LED parpadea rápidamente.
3. Si su dispositivo Bluetooth no puede aparearse a la unidad,
desconecte las conexiones anteriores de Bluetooth de la unidad y
reajuste el módulo de Bluetooth presionando la tecla PLAY.
4. Vaya a la pantalla de configuración de su dispositivo Bluetooth,
busque “PA0825B" y conéctese.
5. La luz del indicador de Bluetooth se encenderá fija cuando están
conectados.
6. Para desconectar el apareamiento, mantenga presionado el botón
PLAY / PAUSA.
Nota: Se puede conectar con un teléfono inteligente o tablet PC con
Bluetooth
1. Esta unidad es un altavoz PA con batería. Asegúrese de haber
cargado totalmente la batería antes del primer uso para maximizar
la vida de la batería. La unidad toma aproximadamente 2 horas para
cargarse completamente. La unidad comenzará a cargar
automáticamente una vez que el cable eléctrico esté conectado con
una fuente de energía y el interruptor se coloca en apagado.
2. Una vez completada la carga, desconecte el cable de alimentación.
3. Con uso estándar, una batería completamente cargada puede
reproducir por aproximadamente 2.5 horas.
4. La batería se puede recargar cerca de 300 veces en su tiempo de
vida.
5. Cuando no se utilice, el parlante debe siempre mantenerse
APAGADO para evitar que la unidad drene la batería.
6. Cuando la unidad no se utiliza por períodos del tiempo
prolongados, la batería perderá gradualmente su energía. Se
recomienda cargar completamente la batería regularmente.
8GENERAL
REQUERIMIENTOS DE ENERGÍA: DC 14V 2A
CONTROL REMOTO: DC 3V 1.5V UM4/AAAX2 unidades
CONSUMO DE ENERGÍA: AC 40W
FRECUENCIA FM: 87.5-108MHz
PESO BRUTO: 8.2KG
DIMENSIONES: 35cm(L) x37cm(W) x 59.5cm(H)
De potencia de salida 25W(RMS)
Caja del altavoz (unidad)............................1
Control remoto (UM4 batería x2pcs)............. 1
Micrófono con cable.......................................1
Manual de instrucción....................................1
Adaptador de corriente...................................1
Cable de CC.................................................. 1
Cable de AUX-in (3.5mm to 3.5mm)..............1
Cable RCA to RCA AUX-in.............................1
NOTA:
LAS ESPECIFICACIONES ÉSTAN SUJETAS A CAMBIOS PARA
CONTINUA MEJORAS SIN PREVIO AVISO.
9PRECAUCIONES
• El parlante no debe ser expuesto a goteos o salpicaduras. No
coloque objetos que contengan líquidos sobre el aparato.
• Mantenga una distancia mínima de 30 cm alrededor del aparato
para una mejor ventilación.
• No cubra los orificios de ventilación con objetos como periódicos,
manteles, cortinas, etc., ya que éstas pueden impedir la ventilación
• No coloque ninguna fuente de llama sin protección, como velas
encendidas, sobre el aparato.
• Cuando se utiliza el enchufe de red como dispositivo de
desconexión, el dispositivo de desconexión debe permanecer
fácilmente operable.
• Para desconectar completamente la entrada de alimentación,
desconéctela completamente de la red.
• El altavoz no debe estar obstruido o debe ser fácilmente Uso
previsto.
• Este equipo esta diseñado para ser usado en climas moderados.
• Se debe prestar atención a los aspectos ambientales de la
eliminación de baterías.
• Las pilas no deben exponerse a un calor excesivo como el del sol,
fuego o similares.
SOBRE LA BATERÍA:
Esta unidad funciona en el paquete de baterías suministrado
(Modelo no: Lc18650), DC11,1V, 1,8Ah. Desconecte el enchufe de la
CA para trabajar en la batería (después de haber cargado
completamente). Conectando mientras la batería está conectada
inicia la carga de esta batería. Cuando la batería esté
completamente cargada, el indicador cambiará a verde. Este tiempo
de reproducción puede variar con el ambiente circundante, el nivel
de volumen del altavoz y la condición de la batería. Se aconseja
esperar entre 10 y 20 minutos antes de recargar la batería si la
unidad ha mostrado un volumen inferior o alguna distorsión durante
el funcionamiento.
10Aviso de la FCC:
NOTA: :Este equipo se ha probado y se ha encontrado para conformarse
con los límites para un dispositivo digital de la clase B, conforme a la
parte 15 de las reglas de la FCC. NOTA: Este equipo se ha probado y se
ha encontrado para conformarse con los límites para un dispositivo
digital de la clase B, conforme a la parte 15 de las reglas de la FCC.
Este equipo genera aplicaciones y puede irradiar energía de la
radiofrecuencia y, si no instalado y utilizado de acuerdo con las
instrucciones, puede causar interferencia dañosa a las
radiocomunicaciones. Sin embargo, no hay garantía que interferencia
no ocurrirá en una instalación particular. Si este equipo causa
interferencia dañosa a la radio o la recepción de televisión, que puede
ser determinada girando el equipo apagado y, se anima al usuario que
intente corregir la interferencia por una o más de las medidas
siguientes:
---Reoriente o vuelva a poner la antena de recepción.
---Aumente la separación entre el equipo y el receptor.
---Conecte el equipo en un enchufe en un circuito diferente de el con las
cuales el receptor esté conectado.
---Consulte al distribuidor o a técnico experimentado de radio/TV para
la ayuda.
ADVERTENCIA: Los cambios o las modificaciones no no expreso
aprobados por el partido responsable de conformidad podían anular la
autoridad del usuario para funcionar el equipo.
Este equipo se conformó con los límites de la exposición de radiación a
la FCC dispuestos para un ambiente incontrolado. Este equipo se debe
instalar y funcionar con la distancia mínima los 20cm entre el radiador y
su cuerpo.
11You can also read