2018 GUIDE REFERENCE - Mopar
←
→
Page content transcription
If your browser does not render page correctly, please read the page content below

201 8
DURANGO
QUICK
REFERENCE
GUIDE
I N C L U D E S   S R T
VEHICLE USER GUIDE — IF
EQUIPPED
Vehicle User Guide                                 NOTE:                                                   Pre-Installed Features
                                                   Vehicle User Guide features are not available while      • Your User Guide — • Available when
Access your Owner’s Information – right through    the vehicle is moving. If you try to access while the      Updated in          and where you
your Uconnect 4C or 4C NAV touchscreen radio —     vehicle is in motion, the system displays: Feature         real-time           need it
If Equipped                                        not available while the vehicle is in motion.
                                                                                                            • Touchscreen       • Customizable in-
To access the Vehicle User Guide on your                                                                      convenience         terface
Uconnect Touchscreen: Push the Uconnect Apps                                                                • Maintenance       • Multilingual
button, then push the Vehicle User Guide icon on                                                              schedules and
your touchscreen. No Uconnect registration is                                                                 information
required.                                                                                                   • Comprehensive
                                                                                                              icon & symbol
                                                                                                              glossary

                                                                                                           NOTE:
                                                                                                           Uconnect screen images are for illustration pur-
                                                                                                           poses only and may not reflect exact software for
                                                                                                           your vehicle.

      Vehicle User Guide Touchscreen Icon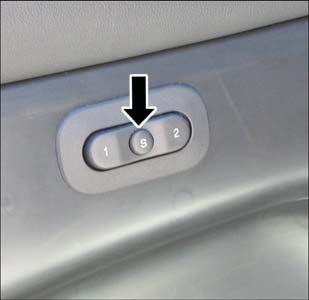
KEY FOB

Key Fob Battery Low                  In case the ignition state does not change with the   NOTE:
                                     push of a button, the key fob may have a low or       The ignition START/STOP button is fixed directly
                                     dead battery. In this situation, a backup method      to the instrument panel and cannot be removed
                                     can be used to activate the ignition. Put the nose    for alternate methods of starting.
                                     side (side opposite of the emergency key) of the
                                                                                           For further information, and applicable warnings
                                     key fob against the ignition START/STOP button
                                                                                           and cautions, please refer to the Owner’s Manual at
                                     and push to operate the ignition.
                                                                                           www.mopar.com/en-us/care/owners-manual.html
                                                                                           (U.S. Residents) or www.owners.mopar.ca (Cana-
                                                                                           dian Residents).

       Low Or Dead Key Fob Battery
           Starting Procedure
PASSIVE ENTRY

Keyless Enter-N-Go — Passive                           To Unlock Using The Driver’s Or        With a valid Keyless Enter-N-Go Key Fob located
                                                                                              outside the vehicle and within 5 ft (1.5 m) of the
Entry                                                  Passenger’s Front Door Handle          driver or passenger side door handle, grab either
The Keyless Enter-N-Go system is an enhance-                                                  front door handle to unlock the door automatically.
ment to the vehicle’s key fob. This feature allows
you to lock and unlock the vehicle’s door(s) and
liftgate without having to press the key fob lock or
unlock buttons.

                                                             Grab The Door Handle To Unlock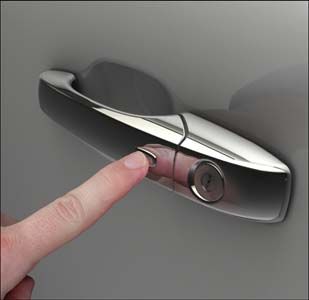
To Lock Using The Driver’s Or
Passenger’s Front Door Handle
• Both front door handles have buttons located
  on the outside of the handle. With one of the
  vehicle's Keyless Enter-N-Go key fobs located
  outside the vehicle and within 5 ft (1.5 m) of
  the driver's or passenger front door handle,
  push the door handle button to lock all four
  doors and liftgate.
• DO NOT grab the door handle when pushing
  the door handle lock button. This could unlock
  the door(s).
                                                   Do NOT Grab Handle When Locking          Push The Door Handle Button To Lock
                                                                                     • After pushing the door handle lock button, you
                                                                                       must wait two seconds before you can lock or
                                                                                       unlock the vehicle. This will allow you to pull on
                                                                                       the vehicle’s door handle to verify that the vehicle
                                                                                       is locked.
                                                                                     For further information, and applicable warnings
                                                                                     and cautions, please refer to the Owner’s Manual at
                                                                                     www.mopar.com/en-us/care/owners-manual.html
                                                                                     (U.S. Residents) or www.owners.mopar.ca (Cana-
                                                                                     dian Residents).
S TA R T I N G A N D O P E R AT I N G
Autostick Paddle Shifters • The transmission will automatically downshift Disabling Autostick Paddle Shifters
as the vehicle slows (to prevent engine lugging)
The shift paddles may be disabled (or re-enabled,
When the gear selector is in the DRIVE position, and will display the current gear.
as desired) using the Uconnect Personal Settings.
the transmission will operate automatically, shift- • The transmission will automatically downshift
ing between the eight available gears. to first gear when coming to a stop. After a stop, For further information, and applicable warnings
the driver should upshift (+) the transmission and cautions, please refer to the Owner’s Manual at
To engage AutoStick, tap one of the steering www.mopar.com/en-us/care/owners-manual.html
as the vehicle is accelerated.
wheel-mounted AutoStick Paddle Shifters (+/–). (U.S. Residents) or www.owners.mopar.ca (Cana-
• You can start out in first or second gear. Tap-
Tapping (–) to enter AutoStick will downshift the ping (+) (at a stop) will allow starting in second dian Residents).
transmission to the next lower gear while using (+) gear. Starting out in second gear is helpful in
to enter AutoStick will retain the current gear. snowy or icy conditions.
When AutoStick is active, the current transmis- • The system will ignore an attempt to upshift at
sion gear is displayed in the instrument cluster. too low of a vehicle speed.
In AutoStick, the transmission will shift up or • Transmission shifting will be more noticeable
down when (+/–) is selected by the driver (using when paddle shift mode is engaged.
the shift paddles) unless an engine lugging or • To disengage Autostick, press and hold the (+)
overspeed condition would result. It will remain in shift paddle until “D” is once again displayed
the selected gear until another upshift or down- in the instrument cluster. You can shift in or out
shift is chosen, except as described below: of the paddle shift mode at any time without
taking your foot off the accelerator pedal.
• In AutoStick, the transmission will remain in
the selected gear even when maximum engine
speed is reached. The transmission will upshift
only when commanded by the driver.Eco Mode Engine Stop/Start System (ESS) — • The transmission is not in a forward gear.
If Equipped • The vehicle has not reached a speed of 5 mph
The Fuel Economy (ECO) mode can improve the (8 km/h) after the previous autostop.
vehicle’s overall fuel economy during normal driv-
The STOP/START system was developed to reduce • Many of these reasons are displayed as a STOP/
ing conditions. emissions and will stop the engine automatically START message in the cluster display within the
Press the “ECO” switch in the center stack of the during a vehicle stop if the required conditions are STOP/START section. The system must be in the
instrument panel to turn the system off. An amber met. “STOP/ START READY” state to autostop. To
light on the switch will indicate that ECO mode is access the STOP/START section of the cluster
Releasing the brake pedal or pressing the accel- display, use the display controls. Refer to the
disengaged. Press the “ECO” switch in the center erator pedal will re-start the engine. “Starting and Operating” section of your Owner’s
stack of the instrument panel a second time to Manual for a complete list of possible events in
How do I manually turn off/on the ENGINE STOP/
turn ECO mode back on. which the engine does not autostop.
START system?
When the Fuel Economy (ECO) mode is engaged, How do I know I am in an autostop?
• Press the STOP/START OFF switch (located on
the vehicle control systems will be able to change the switch bank). The light on the switch will • The engine will shut down, the tachometer will
the following: illuminate when the system is off. The light on move to the zero position and the STOP/START
• The transmission will upshift sooner and down- the switch will turn off when system is on. telltale will illuminate in the instrument cluster.
shift later. What are possible reasons the engine does not How do I start the engine while in an autostop?
• For vehicles equipped with the 5.7L Hemi, autostop?
• While in a forward gear, the engine will start
4 cylinder mode will be enabled under certain • The hood is ajar. when the brake pedal is released or the throttle
conditions. pedal is depressed. The transmission will auto-
• Driver’s door is open.
• The overall driving performance will be more matically re-engage upon engine restart.
• Driver’s seat belt is unbuckled.
conservative.
• Cabin heating or cooling is in process and an NOTE:
acceptable cabin temperature has not been The system will automatically revert to ON at every
achieved. ignition cycle.SPEED CONTROL
Sport Mode Electric Power Steering (EPS) Speed Control
Your vehicle is equipped with a Sport Mode fea- The electric power steering system will give you When engaged, the Speed Control takes over ac-
ture. This mode is a configuration set up for good vehicle response and increased ease of ma- celerator operations at speeds greater than
enthusiast driving. The engine, transmission, and neuverability in tight spaces. The system will vary 25 mph (40 km/h).
steering systems are all set to their SPORT set- its assistance to provide light efforts while parking
tings. Sport Mode will provide improved throttle and good feel while driving. If the electric steering
response and modified shifting for an enhanced system experiences a fault that prevents it from
driving experience, as well the greatest amount of providing assistance, you will still have the ability
steering feel. This mode may be activated and to steer the vehicle manually.
deactivated by pushing the Sport button on the
Alternate electric power steering efforts can be
instrument panel switch bank.
selected through the Uconnect System.
For further information, and applicable warnings
and cautions, please refer to the Owner’s Manual at
www.mopar.com/en-us/care/owners-manual.html
(U.S. Residents) or www.owners.mopar.ca (Cana-
dian Residents).
Speed Control Switches
1 — Push Cancel
2 — Push Set+/Accel
3 — Push Resume
4 — Push On/Off
5 — Push Set-/DecelTo Activate To Resume Speed Adaptive Cruise Control (ACC) —
Push the on/off button. To turn the system off, To resume a previously set speed, push the RES If Equipped
push the on/off button a second time. The system button and release.
should be turned off when not in use. If your vehicle is equipped with Adaptive Cruise
To Increase Speed Control, the controls operate exactly the same as
To Set A Desired Speed
When the Speed Control is set, you can increase the standard cruise control, with one difference.
Turn the Speed Control on. When the vehicle has speed by pushing the SET (+) button. You can set a specified distance you would like to
reached the desired speed, push the SET (+) or maintain between you and the vehicle in front of
SET (-) button and release. Release the accelera- To Decrease Speed
you.
tor and the vehicle will operate at the selected When the Speed Control is set, you can decrease
speed. • If the ACC sensor detects a vehicle ahead, ACC
speed by pushing the SET (-) button. will apply limited braking or acceleration auto-
To Deactivate To Accelerate For Passing matically to maintain a preset following dis-
A soft tap on the brake pedal, pushing the CANC tance while matching the speed of the vehicle
Press the accelerator as you would normally. When ahead.
button, or normal brake pressure while slowing the
the pedal is released, the vehicle will return to the
vehicle will deactivate Speed Control without eras- NOTE:
set speed.
ing the set speed memory. Pushing the on/off Your vehicle will not exceed the cruise speed you
button or turning the ignition switch OFF erases For further information, and applicable warnings have set.
the set speed in memory. and cautions, please refer to the Owner’s Manual at
www.mopar.com/en-us/care/owners-manual.html • If the sensor does not detect a vehicle directly
(U.S. Residents) or www.owners.mopar.ca (Cana- ahead of you, it functions like a standard cruise
control system, maintaining the speed you set.
dian Residents).S A F E T Y F E AT U R E S
Forward Collision Warning With FCW monitors the information from the forward-
looking sensor, as well as the Electronic Brake
Mitigation — If Equipped Controller (EBC) and wheel speed sensors, to
The Forward Collision Warning (FCW) system can calculate the probability of a collision. When the
provide the driver with active braking, audible and system determines that a collision is probable, a
visual warnings (within the instrument cluster dis- warning message (both audible and visual) will be
play) and may apply a brake jerk to warn the driver displayed within the cluster display along with a
when it detects a potential frontal collision. The brake jerk warning (previously enabled in the
warnings and limited braking are intended to pro- Uconnect Settings). When the system senses the
vide the driver with enough time to react and avoid driver applying the brakes to avoid a probable
or mitigate the potential collision. collision, additional brake force will be provided to
the vehicle. When the system determines a colli-
The system status can be selected to: “Off”, “Only sion with the vehicle in front of you is no longer
Warning”, and “Warning & Braking”. “Warning & probable, the warning message will be deacti-
Braking” status with “Medium” sensitivity are the vated.
Adaptive Cruise Switches
default settings, but can be changed within the
1 — Adaptive Cruise Control (ACC) On/Off Uconnect settings under “Safety and Driving As- NOTE:
2 — Distance Setting – Decrease sistance”. The FCW feature can be customized and turned
3 — Distance Setting – Increase off through the Uconnect System touchscreen.
For further information, and applicable warnings
For further information, and applicable warnings and cautions, please refer to the Owner’s Manual at
and cautions, please refer to the Owner’s Manual at www.mopar.com/en-us/care/owners-manual.html
www.mopar.com/en-us/care/owners-manual.html (U.S. Residents) or www.owners.mopar.ca (Cana-
(U.S. Residents) or www.owners.mopar.ca (Cana- dian Residents).
dian Residents).PARKSENSE
LaneSense — If Equipped into the steering wheel at any time. When only a ParkSense Rear Or ParkSense
single lane marking is detected and the driver
The LaneSense system is operational at speeds unintentionally drifts across the lane marking (no Front And Rear Park Assist —
above 37 mph (60 km/h) and below 112 mph turn signal applied), the LaneSense system pro- If Equipped
(180 km/h). The LaneSense system uses a forward vides a visual warning through the instrument
looking camera to detect lane markings and mea- cluster display to prompt the driver to remain • The four ParkSense sensors, located in the rear
sure vehicle position within the lane boundaries. within the lane. When only a single lane marking is fascia/bumper, monitor the area behind the
detected, a haptic (torque) warning will not be vehicle that is within the sensor’s field of view.
Turning LaneSense On Or Off provided. • The six ParkSense sensors, located in the front
The default status of LaneSense is “off”. The fascia/bumper, monitor the area in front of the
NOTE:
LaneSense button is located on the center stack. vehicle that is within the sensors’ field of view.
The LaneSense system can be customized and
LaneSense Warning Message turned off through the Uconnect System touch- • The rear sensors can detect obstacles from
screen. approximately 12 inches (30 cm) up to
The LaneSense system will indicate the current 79 inches (200 cm) from the rear bumper
lane drift condition through the instrument cluster For further information, and applicable warnings
while the vehicle is in REVERSE, while the
display. The instrument cluster display will pro- and cautions, please refer to the Owner’s Manual at
front sensors can detect obstacles from ap-
vide a visual warning depicting the unintentional www.mopar.com/en-us/care/owners-manual.html
proximately 12 inches (30 cm) up to 47 inches
(U.S. Residents) or www.owners.mopar.ca (Cana-
lane departure. (120 cm) from the front fascia/bumper in the
dian Residents).
horizontal direction, depending on the loca-
When both lane markings are detected and the
tion, type and orientation of the obstacle. When
driver unintentionally drifts out of the lane (no turn
an obstacle is detected, a warning will display
signal applied), the LaneSense system provides a
in the instrument cluster and a chime will
haptic warning in the form of torque applied to the
sound (when Sound and Display is selected
steering wheel to prompt the driver to remain
from the Customer Programmable Features
within the lane boundaries. The driver may manu-
section of the Uconnect System screen). As the
ally override the haptic warning by applying torquePARKVIEW
vehicle moves closer to the object, the chime Rear Back-Up Camera — For further information, and applicable warnings
rate will change from single 1/2 second tone, to and cautions, please refer to the Owner’s Manual at
slow, to fast, to continuous. If Equipped www.mopar.com/en-us/care/owners-manual.html
• If the system detects a potential impact with an Your vehicle may be equipped with the ParkView (U.S. Residents) or www.owners.mopar.ca (Cana-
object, the vehicle brakes may be applied. dian Residents).
Rear Back-Up Camera that allows you to see an
For further information, and applicable warnings on-screen image of the rear surroundings of your
and cautions, please refer to the Owner’s Manual at vehicle whenever the gear selector is put into
www.mopar.com/en-us/care/owners-manual.html REVERSE. The ParkView Rear Back-Up Camera
(U.S. Residents) or www.owners.mopar.ca (Cana- image will be displayed on the Uconnect Display,
dian Residents). located on the center stack of the instrument
panel. The ParkView Rear Back-Up Camera is
located on the rear of the vehicle above the rear
license plate.
Rear Camera — Viewing At Speed
When the vehicle is in PARK, NEUTRAL or DRIVE,
the Rear View Camera can be activated with the
“Rear View Camera” button in the Controls menu.
This feature allows the customer to monitor the
area directly behind the vehicle for up to ten
seconds while at speed. If the vehicle speed re-
mains below 8 mph (13 km/h), the Rear View
Camera image will be displayed continuously until
deactivated via the “X” button on the touch-
screen.S E AT S
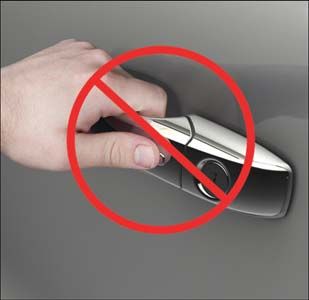
Memory Seats To Set A Memory Position: NOTE:
1. Cycle the vehicle’s ignition to the ON/RUN Memory seats can be programmed/stored while
The memory seat feature allows you to set two the engine is running.
position (Do not start the engine).
different driver’s seating positions (excluding lum-
2. Adjust all memory profile settings. For further information, and applicable warnings
bar position), outside mirrors, radio station preset
and cautions, please refer to the Owner’s Manual at
settings and tilt/telescoping steering column posi- 3. Push and release the S (set) button. www.mopar.com/en-us/care/owners-manual.html
tions (if equipped). The memory seat buttons are
4. Push and release the 1 or 2 button within five (U.S. Residents) or www.owners.mopar.ca (Cana-
located on the driver’s door panel.
seconds. dian Residents).
To Program A Key Fob To The Memory Position:
1. Cycle the vehicle’s ignition to the OFF position.
2. Select the desired memory profile, 1 or 2.
3. Push and release the S (set) button on the
memory switch, then within five seconds,
press and release the 1 or 2 button accord-
ingly.
4. Push and release the lock button on the key fob
within 10 seconds.
Memory Seat ButtonsWINDSHIELD WIPER/ LIGHTS
WA S H E R F E AT U R E S
Wiper/Washer Controls Rain Sensing Wipers Automatic High Beam —
The multifunction lever is located on the left side
This feature senses moisture on the windshield If Equipped
and automatically activates the wipers for the
of the steering column.
driver. The feature is especially useful for road This system automatically controls the operation
splash or overspray from the windshield washers of the headlamp high beams as oncoming vehicles
of the vehicle ahead. Rotate the end of the multi- approach.
function lever to one of four settings to activate • The Automatic High Beam Headlamp Control can
this feature. be turned on or off using the Uconnect System.
For further information, and applicable warnings • Push the turn signal lever away from you.
and cautions, please refer to the Owner’s Manual at • With the headlight switch in the “AUTO” position,
Multifunction Lever www.mopar.com/en-us/care/owners-manual.html the high beams are controlled automatically.
(U.S. Residents) or www.owners.mopar.ca (Cana- • Pull the turn signal lever toward you to manu-
Front Wiper Operation
dian Residents). ally deactivate the system.
The front wipers are operated by rotating a switch,
• To improve system recognition of crossing traffic,
located on the end of the lever.
and to limit use in a residential area, the vehicle
Rear Wiper Operation must be moving at a speed greater than 20 mph
(32 km/h) before the Automatic High Beam
The rear wiper/washer is operated by rotating a Module (AHBM) begins requesting high beam
switch, located on the middle of the lever. activation.
NOTE:
If the windshield or Automatic High Beam Head-
lamp Control mirror is replaced, the mirror must
be re-aimed to ensure proper performance. See a
local authorized dealer.INSTRUMENT CLUSTER SRT DRIVE MODES — IF
D I S P L AY EQUIPPED
Instrument Cluster Display SRT Drive Modes does not match the current drive mode set up, a
message will be displayed indicating which values
Selectable Menu Items Your SRT vehicle is equipped with a Drive Modes are not matching the current mode.
The instrument cluster features a driver interac- feature which allows for coordinating the opera-
Listed below are the available Drive Modes:
tive display that is located in the of the center of tion of various vehicle systems depending upon
the instrument cluster. Pushing the controls on the type of driving behavior desired. The Drive • Track Mode: Selecting “Track” on the touch-
the left side of the steering wheel allows the driver Modes feature is controlled through the touch- screen will activate the configuration for typical
to select vehicle information and Personal Set- screen and may be accessed by performing any of track driving. The Transmission, Stability Con-
tings. Push the up or down arrow buttons to scroll the following: trol, All-Wheel Drive, Steering, and Suspension
through the main menu feature items. To enter the systems are all set to their “Track” settings
• Selecting “Drive Modes” from the “Apps”
submenu’s of a feature menu item push the left or menu. highlighted in red. The Paddle Shifters are
right arrow buttons then push the OK button to enabled.
select or reset the submenu feature items: • Selecting “Drive Modes” from within the Per-
formance Pages menu. • Sport Mode: Selecting “Sport” on the touch-
• Speed- • Vehicle • Driver Assist screen will activate the configuration for typical
ometer Info The SRT Drive Modes main screen displays the enthusiast driving. The Transmission, Stability
• Fuel • Trip • Stop/Start current drive mode and real-time status of the Control, All-Wheel Drive, Steering, and Sus-
Economy vehicle’s performance configuration. The select- pension systems are all set to their “Sport”
• Audio • Naviga- • Screen Setup able Drive Modes are Track, Sport, Auto, Snow, settings highlighted in orange. The Paddle
tion Tow or Custom. Information shown will indicate Shifters are enabled.
the actual status of each system, along with a
• Tow Mode: Selecting “Tow” on the touchscreen
For further information, and applicable warnings vehicle graphic that displays the active drive mode
will activate the configuration for towing a
and cautions, please refer to the Owner’s Manual at status. The color red indicates “Track,” orange
trailer or hauling heavy loads in the cargo area.
www.mopar.com/en-us/care/owners-manual.html “Sport,” yellow “Street,” purple “Tow” and blue Once in this mode, trailer sway control is en-
(U.S. Residents) or www.owners.mopar.ca (Cana- for “Snow.” These features will reset to AUTO abled in the ESC system. The Transmission is
dian Residents). upon an ignition cycle. If the system status shown set to “Tow” setting highlighted in purple. Sta-SIRIUSXM GUARDIAN — IF
EQUIPPED
bility Control is set to “Full” highlighted in • Auto Mode: Auto mode is enabled upon ignition Activation
blue. All-Wheel Drive is set to “50/50” high- on, or by selecting “Auto” on the touchscreen.
lighted in blue. Steering is set to “Sport” high- The Transmission, Stability Control and All- To use SiriusXM Guardian emergency, remote and
lighted in yellow. Suspension is set to “Sport” Wheel Drive modes are set to their “Street” security services, you must activate your SiriusXM
highlighted in orange. Paddle Shifters are settings highlighted in yellow. Steering and Guardian account.
enabled. Suspension can be configured in either the
1. Press the Apps icon on the bottom of your
• Snow Mode: Selecting “Snow” on the touch- “Street,” “Sport,” or “Track” and the Paddle
in-vehicle touchscreen.
screen will activate snow mode for use on loose Shifters may be enabled or disabled while in
traction surfaces. When in Snow mode (de- auto set-up mode. 2. Select the “Activate Services” icon from your
pending on certain operating conditions), the • Custom Mode: Custom Mode may be selected list of apps.
transmission will use second gear (rather than by pushing the “Custom” button on the touch- 3. Select “Customer Care” to speak with a
first gear) during launches, to minimize wheel screen. Custom Mode allows you to create a SiriusXM Guardian Customer Care agent who
slippage. The Transmission is set to “Snow” custom configuration that is saved for quick will activate services in your vehicle, or select
setting highlighted in blue. Stability Control is selection of your favorite settings. While in “Enter Email” to activate on the web.
set to “Full” highlighted in blue. All-Wheel Custom Mode, the All-Wheel Drive, Stability
Drive is set to “50/50” highlighted in blue. Control, Transmission, Steering, and Suspen- Once you have activated your services, you’re only
Steering is set to “Street” highlighted in yellow. sion, settings are shown in their current con- a few steps away from using remote services.
Suspension is set to “Street” highlighted in figuration. While in the Custom Mode screen,
yellow. press the “Custom Set-Up” button on the
touchscreen to access the selectable options.
Select which mode suits your driving needs for
a custom driving experience.
For further information refer to your SRT Drive
Mode Supplement.• Press the “Location” button on the bottom • Customer Care Assistance: Speak with a live
menu bar of the app to bring up a map to locate agent when you press the ASSIST button on
your vehicle or send a location to your your rearview mirror to get Roadside Assistance
Uconnect Navigation, if equipped. or support.
• Press the “Settings” side menu in the upper Remote Services
left corner of the app to bring up app settings
and access the Assist Call Centers. SiriusXM Guardian helps you activate features
from a distance. The remote services are:
For further information:
• Vehicle Finder helps you find where you parked
• U.S. residents visit: siriusxm.com/guardian your car.
• Canadian residents visit: siriusxm.ca/guardian/ • Send & Go allows you to send preset destina-
tions to your navigation system for easy access
Features on the go.
SiriusXM Guardian keeps you connected to your • Remote Door Lock/Unlock lets you unlock or
Mobile App
vehicle. You have access to safety, remote and lock your doors from any distance.
To use SiriusXM Guardian remote services, down- security services. • Remote Horn & Lights allows you to sounds
load the Uconnect Mobile app: your horn and flash your lights to easily find
In-Vehicle Features your car.
• Once downloaded, use your Owner Account
login and password to open the app. SiriusXM Guardian enhances your ownership and • Receive monthly Vehicle Health Reports, and
driving experience by connecting your vehicle to Alerts whenever a problem is detected under
• Include similar language: You will use your an operable network. When connected to an oper- the hood.
SiriusXM Guardian PIN to execute these re- able network, you have access to:
mote services.
• SOS Call: Connect to a live agent who contact
emergency services and stays on the line with
you until help arrives.Security Services Vehicle Finder And Send & Go Send & Go
The Uconnect Mobile App helps you activate fea- Send & Go allows you to search for a destination
Two of the most convenient remote features of the
tures from a distance. The remote services are: on your mobile device and then send the route to
Uconnect Mobile App are Vehicle Finder and
• Receive text or email notifications if your vehi- your vehicle’s built-in navigation system. To send a
Send & Go.
cle's security alarm goes off. navigation route to your vehicle:
Vehicle Finder
• Receive stolen vehicle assistance, using GPS 1. Press the “Location” tab on the Uconnect
technology to help authorities locate your ve- Vehicle Finder allows you to find the location of Mobile App bottom bar.
hicle if it is stolen. your vehicle when you have lost it. You can also 2. Either type in the destination you would like to
sound the alarm and flash the lights to make navigate to, or search through one of the cat-
SiriusXM Guardian remote services can be used finding your vehicle even easier. To find your
with the Uconnect app from virtually anywhere. egories provided.
vehicle:
For further information on SiriusXM Guardian or 3. Select the destination you want to route to
1. Press the “Location” tab on the Uconnect from the list that appears.
the Uconnect Mobile App, refer to your Uconnect Mobile App bottom bar.
Owner’s Manual Supplement. 4. Press the “Send To Vehicle” button, and then
2. Select the “Vehicle” icon to determine the confirm the destination by pressing “Yes,” to
location of your vehicle. send the navigation route to the Uconnect
3. Select the “Find Route” button that appears, Navigation in your vehicle.
once your vehicle is located. 5. Finally, confirm the route inside your vehicle by
4. Select your preferred Navigation App to route a pressing the “Go Now” option on the pop-up
path to your vehicle. that appears on the touchscreen, when the
vehicle is started.DRIVE DODGE MOBILE APP
NOTE: The DRIVE DODGE Application is the essential • Vehicle information such as operating instruc-
The Owner’s Mobile App content is applicable to app for owners of Dodge brand vehicles. The app tions, maintenance, service history, vehicle
vehicles sold in the U.S. market and are not avail- puts driver and lifestyle information right in the controls and emergency procedures.
able from the Canadian App Store or Google Play palm of your hand, anywhere you go. Whether it’s • Find a dealer or an FCA-certified repair facility.
Store. providing information about specific product fea- • Easily document and email an accident report.
tures, taking a tour through your vehicle’s equip-
Key Features ment, staying up to date on your vehicle’s health,
• A parking reminder that allows you to drop a pin
on your location and navigate back to your
• Owner Information For Your Vehicle knowing what steps to take following an accident, vehicle.
or scheduling your next appointment, we know
• Accident Assistant • Contact customer care with one click.
you’ll find the app an important extension of your
• Online Service Scheduling • Access to vehicle heritage, parts, accessories,
Dodge vehicle. Simply download the FREE app,
• Roadside Assistance select your make and model and enjoy the ride. and social media networks.
• Maintenance History • Schedule your next service appointment.
• And More Features/Benefits • Available in English and Spanish.
To get this FREE application, go directly to the • Available for free on iOS and Android smart- *App supports selected vehicles from model year
App Store or Google Play Store and enter the phones and tablets. 2011 to present.
search keyword “Dodge”. • Select Dodge brand vehicles from model year To get this FREE application, go directly to the
2011 to current model year. App Store or Google Play Store and enter the
• You can also add other Chrysler, Jeep, Ram, search keyword “Dodge”.
FIAT or Alfa Romeo vehicles.*
• Easy access to vehicle information anywhere
you go using categories, bookmarks, search
and an A-Z index.Whether it’s providing information about specific
product features, taking a tour through your
vehicle’s heritage, knowing what steps to take
following an accident or scheduling your next appointment,
we know you’ll find the app an important extension of your
Dodge brand vehicle. Simply download the app, select your
make and model and enjoy the ride. To get this app, go
directly to the App Store or Google Play and enter the search
keyword “Dodge” (U.S. residents only). DOWNLOAD A FREE ELECTRONIC COPY
www.dodge.com/en/owners (U.S.) or www.owners.mopar.ca
O F T H E M O S T U P - T O - D AT E O W N E R ’ S
(Canada) provides special offers tailored to your needs, MANUAL, MEDIA AND WARRANTY
customized vehicle galleries, personalized service records BOOKLET BY VISITING:
and more. To get this information, just create an account
and check back often. WWW.MOPAR.COM/EN-US/CARE/OWNERS-MANUAL.HTML
Get warranty and other information online – you can review (U.S. RESIDENTS);
and print or download a copy of the Owner’s Manual,
WWW.OWNERS.MOPAR.CA
QUICK REFERENCE GUIDE
THIRD EDITION
DURANGO
18WD-QRG-AA
Navigation/Uconnect manuals and the limited warranties
provided by FCA US LLC for your vehicle by visiting (CANADIAN RESIDENTS).
www.mopar.com (U.S.) or www.owners.mopar.ca (Canada).
Click on the applicable link in the “Popular Topics” area DODGE.COM (U.S.)
of the mopar.com (U.S.) or owners.mopar.ca (Canada)
homepage and follow the instructions to select the DODGE.CA (CANADA)
applicable year, make and model of your vehicle.
©2017 FCA US LLC. ALL RI GHTS RESERVED.
DODGE I S A REGI STERED TRADEMARK OF FCA US LLC.You can also read