INSTALLATION MANUAL 1050|1150 Premium Series - Insignia ...
←
→
Page content transcription
If your browser does not render page correctly, please read the page content below

www.insigniashowers.com                                                              Last Modified: 16/08/2021

INSTALLATION MANUAL
      1050|1150
    Premium Series
       30 Day Technical Support:
       Call 01908 317512 and request technical support for aiding your
       installation.

       Replacements Parts: Inside of your warranty period visit:

       https://www.insigniashowers.com, click support and make a
       warranty claim.

       Spares/Replacements Parts: Outside of your warranty period visit

       https://www.insigniashowers.com/replacement-parts.html

  ATTENTION INSTALLERS:                                            CHECK ALL CONTENTS BEFORE BUILD COMMENCES. NO RETURNS CAN BE MADE
                                                                    ONCE THE BUILD HAS STARTED AS IT IS DEEMED ACCEPTANCE OF PRODUCT!
 These instructions must be
                                                             WARRANTY REG NO: _______________________
   left with the customer                                    To claim your full 2 year warranty, register your shower within 90 days visit:

                                                             https://www.insigniashowers.com, click support and register for your warranty
www.insigniashowers.com                                Last Modified: 16/08/2021

                                                   Contents
                      Installation Assistance        3          Installing the Door Handles, Seals and Magnets           22
               Thank you for your purchase           4                                       Installing the Roof         23
                           Tips for assembly         5                          Installing the Fixed Glass Panel         24
                Braided Hose QR Code/Link            6                                      Installing the Seals         25
      Electrical/Pressure/Tool requirements          7                               Installing the Accessories          26
                               Box contents          8                              Installing the Door Wheels           27
 Installing the Waste and Levelling the Tray         9                               Water Valve Connections             28
                     Connecting Framework           10                              Control Panel Connections            29
                      Applying RubberGum            11                          Steam Generator Connections              30
Installing the Left Back Panel and Side Panel       12                                 Signing off your shower           32
     Installing the Front Left Corner Upright       13                    Control Panel Operating Instructions           33
Connecting the Framework into the Upright           15                                          Spare Parts List         36
                       Installing the Column        16                    Steam Room & Shower Safety Guide               37
   Installing the Front Right Corner Upright        17                              Steam Room Usage Guide               38
              Installing the Right Side Panel       19                              Bathroom Electrical Zones            39
              Installing the Right Back Panel       21                           WEEE Compliance Statement               41

                                                                                                                              02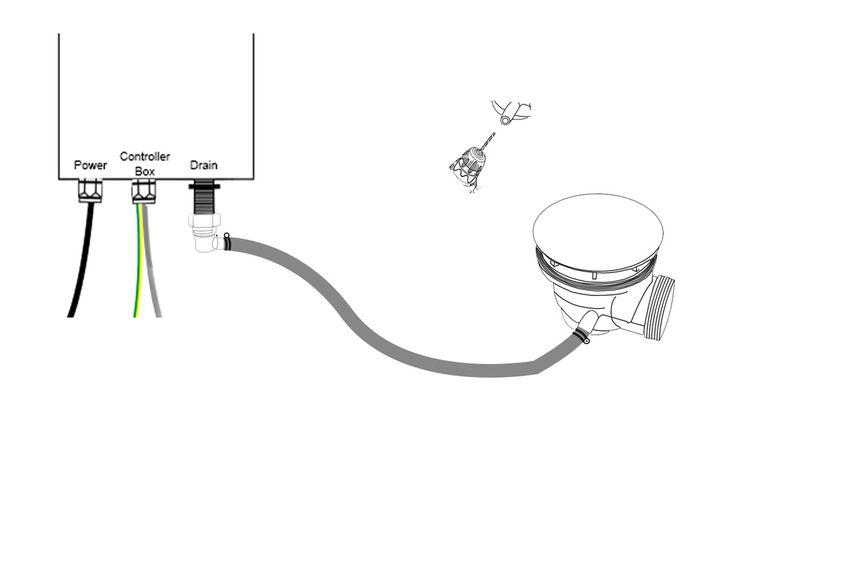
www.insigniashowers.com                                                      Last Modified: 16/08/2021

Installation Assistance
                                             Looking for assistance with the Install?

                                                        GREAT NEWS!
                                       We have our easy to follow Installation videos
                                        live online NOW to make your installation
                                             process easier than ever before!
                                           Simply click the link below and watch the
                                                      installation process.

                                                       Shower Install

                                Please note: this build video is for an Insignia Platinum Shower, however 90%
                                of the process is the same for assembly so it should help you on your way!

                                                                                                          03
www.insigniashowers.com                            Last Modified: 16/08/2021

  Thank you for your recent purchase of an Insignia shower. Please read this booklet
 with great care to ensure you get the best out of your build and have a shower that
    will last for many years to come! Like everything, in order to obtain a first class
product that will serve you well for many years, the effort and correctness put into the
                    assembly will reflect in the quality of your finish.

                                                                                                             04
www.insigniashowers.com                                              Last Modified: 16/08/2021

                      Before we start, here’s our 4 top tips which may assist you...

                                               TIP 1—Building Your Shower
This product is suitable for a DIY build, providing you are confident in your DIY abilities. Please look through this build guide and decide
    on whether you feel confident in undertaking this task. If you are not, seek the services of a professional and show them these
                                                         instructions before hiring.

                                                       TIP 2—Hard Water
                    Due to the nature of this product we highly advise the purchase and fitting of a water softener.
             (Please note: limescale build up may cause damage to your shower and will not be covered under warranty)

                                                       TIP 3—Installation
   These showers are designed to be free standing and movable from their location should you have the need to replace anything.
ALWAYS USE Flexible braided water inlet pipes (not supplied) and not central heating plastic type! Get your WRAS Approved Flexible
                        Braided Hoses here. (www.insigniashowers.com/wras-approved-braided-hoses.html)

                                   NEVER FIX with rigid pipes, NEVER FIX the unit to the wall or floor.

                                                          TIP 4—Sealing
    When using Insignia’s RubberGum, please ensure the product does not come in contact with your silicone as this will cause the
RubberGum to fail and will not adhere as intended. Rubbergum is immediately waterproof and will gain additional strength over time.

                                                                                                                                                      05
www.insigniashowers.com   Last Modified: 16/08/2021

                                                06
www.insigniashowers.com Last Modified: 16/08/2021
Electrical Requirements Pressure/Water Requirements Tools Required
STEAM VERSION We recommend a BAR pressure between 2.5 and 3.4 BAR. If You will require:
you have a combi boiler system no problem should be
Voltage Rating 220-240AC
experienced. If you have a gravity feed older type installation • Scissors • Philips Screwdriver
Frequency Rating 50Hz (hot water tank type usually less than 1 BAR) you will almost
certainly need a pump. We cannot advise on which type of • Knife • Electric Drill
Power Rating 3KW
pump is used, location or design because all house plumbing
• Spirit Level • Safety Gloves
NON-STEAM VERSION layouts vary. This is a job for your installer/plumber. The end
Voltage Rating 100-240AC delivery however must fall within the scope above. • Tape Measure • Safety Glasses
Frequency Rating 50/60Hz Important Note Do not exceed 3.4 BAR pressure under any
circumstances. Warranty is void if so as damage will occur. If
Power Rating 12v DC/1500 mA Parts Required
you have a combi supply, please use a pressure reducing valve
Your electrical contractor should understand ALL legal if required to lower the BAR pressure to the shower.
requirements of connection before undertaking any work • RubberGum (supplied)
or installation.
• Plumbers Mait (not supplied)
UNDER NO CIRCUMSTANCES UNDERTAKE THIS Please Remember that this product is free standing and is
YOURSELF!!! designed to be pulled away from the wall. • Hot and cold isolation valves (not supplied)
Note for electrician: This product comes with 13 amp plug • Suitable McAlpine type 40 mm compression
The waste hose must be of a flexible type (Supplied. Note: Not
(s) fitted with an RCD unit (steam version only). We leave it
suitable for solvent type joints) coupling for waste to house connection.
this way for you to connect it your own way due to
continued additions to current regulations. The water supply pipes must be that of a flexible braided type • 2x Braided hoses (not supplied) Steam version
1) Connect within current laws and IP directives. (not supplied). requires 3. If you haven’t purchased these already,
2) (Preferred) Wire into isolated fused feed connecting simply click the following link below or copy in to
DO NOT OVERTIGHTEN THE BRAIDED HOSES AS IT CAN CAUSE
directly to the house consumer/service box. any web browser. For ease we have listed the
THE CONNECTION TO POP AFTER A FEW WEEKS OF USE.
Always use protection against electrical surge. Your shower required pack below for your install.
should be treated the same as a home computer. A surge Always fit easy to get to isolation taps on both hot and cold
protector should eradicate the possibility of either the • Shower cabins require pack 1
water supply (not supplied). Just like a dishwasher or washing
transformer or control panel being burnt out. Electrical machine, this product MUST be isolated when not in use.
work needs to be signed off by a fully qualified operative by • Shower cabins with steam require pack 2
law. Failure to adhere to this will not only void your
electrical warranty for your shower, but could void your https://www.insigniashowers.com/wras-approved-
house insurance too. braided-hoses.html
07www.insigniashowers.com Last Modified: 16/08/2021
What’s in the Boxes?
Box Contents Quantity Framework Top Rail 1 [ ]
Tray Shower Tray 1 [ ] Bottom Rail 1 [ ]
Waste + Hose 1 [ ] Outer Fixed Uprights 2 [ ]
Glass Shelf 1 [ ] Inner upright post 2 [ ]
Riser Rail for hand shower 1 [ ] Magnetic door seal 1 [ ]
Screw Pack 1 [ ] Rear flap door seal 1 [ ]
Shower hose 1 [ ] Flexible seal (12mm) 1 [ ]
Flexible seal (7mm) 1 [ ]
Glass Room Glass Door 1 [ ]
Framework Securing Clips 4 [ ]
Side Panels 1 [ ]
Roof Roof with fittings 1 [ ]
Column Complete Column 1 [ ]
Hand Shower 1 [ ]
Screw Pack Contents
Product Code Description Quantity
Backwall Left Back Panel 1 [ ]
SP097 Door Handle 1
Pack Right Back Panel 1 [ ]
SP276 Twin Door Wheels Non-Push 2
Font Fixed Panel 1 [ ] SP276A Twin Door Wheels Push button 2
ST8 8mm Screws 12
ST10 10mm Screws 12
ST16 16mm x 3.5mm Screws 8
VERY IMPORTANT
ST16 16mm x 4mm Screws 6
Have you got everything? If not please contact the Insignia directly on 01908 317 512.
Remember NEVER book your tradesman until everything has arrived, been checked and is ST20 or WN20 20mm Nut and Bolt or Wing Nut 12
present. No replacement/missing parts can be obtained free of charge during or after the AMI01 Jubilee Clip (For steam version only) 1
build. Any claims can only be within the timescale permitted (48 hours after delivery) and
always BEFORE build. SW9 Small Washers 20
DB9 Drill Piece 1
08www.insigniashowers.com Last Modified: 16/08/2021
Step 1 — Level the Tray and connecting the waste
Twist to adjust
NOTE: FOR STEAM SHOWERS ONLY:
Check the Spigot is drilled out prior to
fitting. If it isn’t ensure you drill it out!
09www.insigniashowers.com Last Modified: 16/08/2021
Step 2 — Connecting the framework
Framework securing clips x4
1 Wider rail on top Internal View
3
2
Narrow rail at the bottom
10www.insigniashowers.com Last Modified: 16/08/2021
Step 3 — RubberGum the tray
Apply RubberGum to raised
sections of the tray and remove
backing paper.
11www.insigniashowers.com Last Modified: 16/08/2021
Step 4 — Connecting the left back panel to left side panel
ST10 x6
PRESS PANELS
DOWN FIRMLY
ON TO THE
RUBBERGUM.
DO NOT SCREW BACK PANELS TO THE TRAY.
12www.insigniashowers.com Last Modified: 16/08/2021
Step 5 — Connecting the left corner upright to the side panel
Internal View
13www.insigniashowers.com Last Modified: 16/08/2021
Step 5 — Connecting the left corner upright to the side panel continued
ST16 3.5 x3
DB 9
14www.insigniashowers.com Last Modified: 16/08/2021
Step 6 — Connecting the framework into the upright.
ST16 4 x3
DB 9
15www.insigniashowers.com Last Modified: 16/08/2021
Step 7 — Column Connection
or
ST20 x 12 SW9 x 12 WN20 x 12
Rear View (attach nuts and bolts or wing nuts from rear)
Below diagram shows the nut/bolt install
————————
or
————————
16www.insigniashowers.com Last Modified: 16/08/2021
Step 8 — Corner post to framework connection
17www.insigniashowers.com Last Modified: 16/08/2021
Step 8 — Corner post to framework connection continued
ST16 4 x3
DB 9
18www.insigniashowers.com Last Modified: 16/08/2021
Step 9 — Connecting the right side panel
19www.insigniashowers.com Last Modified: 16/08/2021
Step 9 — Connecting the right side panel continued
ST16 3.5 x3
DB 9
20www.insigniashowers.com Last Modified: 16/08/2021
Step 10 — Connecting the right back panel
ST10 x6
or
or
ST20 x 12 SW9 x 12 WN20 x 12
21www.insigniashowers.com Last Modified: 16/08/2021
Step 11 — Fitting door handle, seals and magnets
Slide magnetic seal into channel
Ensure the flat side of the magnet faces
out, towards the door. Once in position
trim down so the roof sits flush.
22www.insigniashowers.com Last Modified: 16/08/2021
Step 12 — Connecting the roof
ST8 x4
1
23www.insigniashowers.com Last Modified: 16/08/2021
Step 13 — Fixed Glass Connection
ST16 3.5 x2
DB 9
24www.insigniashowers.com Last Modified: 16/08/2021
Step 14— Fitting the seals
Fit the seals inside the shower
12mm Seal 12mm
7mm Seal
7mm
25www.insigniashowers.com Last Modified: 16/08/2021
Step 15 — Accessories Installation
Slide cover off
Slide cover off
26www.insigniashowers.com Last Modified: 16/08/2021
Step 16 — Fit top door wheels x 2
Tighten to secure wheels
into door runners.
DO NOT OVERTIGHTEN
Slide cover off
Door
Step 17— Fit bottom door wheels x 2
Slide cover off
Door
Step 18 — Fitting the doors
Slide covers on
27www.insigniashowers.com Last Modified: 16/08/2021
Step 19 — Valve/Water Connections
Monsoon Head
Jets Hand Shower
2 x Washers located on
the back of the valve
Cold Water Inlet Hot Water Inlet
Outlet for Steam
version only
28www.insigniashowers.com Last Modified: 16/08/2021
Step 20 — Touch Control Panel Connections
Steam Version Shower Cabin
Version
Roof Light
Power Supply
Speaker
Antenna
Speaker
29www.insigniashowers.com Last Modified: 16/08/2021
1 Steam Generator Connections (steam version only)
2
The steam generator has 3 connections.
1. Steam Outlet: Connect the white insulated hose to the steam system within your shower as shown in
image A. Make sure these are fitted in the correct position as they are only attached for
transportation reasons only.
2. Water Inlet: When installing the water line for the steam generator, there are 2 options available:
• Purchase Insignia’s WRAS approved braided hoses—different packs are available for different shower
types.
• Install a static water line from the shower valve (middle feed) to the steam generator. Even with a static
water line, flexible hosing will still be required for the hot and cold water feeds. If you choose this option,
please ensure you purchase the correct hose pack from www.insigniashowers.com
3
3. Drain: See next page
A
Steam
Generator
White Insulated Pipe
Steam Pod
30www.insigniashowers.com Last Modified: 16/08/2021
1
Steam Generator Connections (steam version only)
3. Drain: A— Ensure this is facing the steam generator and is tightened fully, then take
the hose connected to the steam drain and trim to a desired length. (Image 1)
Once trimmed, connect the hose to (A) (Image 2) and secure in place with a jubilee clip
A from the screw pack contents.
Drill Out the spigot (Image 3) on the waste and connect a hose from your accessory box
from the spigot (C), to (B) and tighten using the jubilee clip provided.
2
3 NOTE: MUST DRILL OUT
B
C
31www.insigniashowers.com Last Modified: 16/08/2021
Signing off your shower
Now your shower is assembled, there is just few steps before you can sign the shower off.
1. Please ensure ALL the connections are watertight including waste, pre-fitted body jets as clips are only lightly
tightened in place for transit and can be dislodged, internal and external hoses and steam connections (model
dependent)
2. Once you are happy, check the shower functions by switching on the overhead shower and then adjust the
selector knob (top knob) to the hand shower and then onto the body jets. Whilst the water is running, check
external hoses for any signs or water drips or leaks and tighten accordingly.
Please note, when testing the body jets, water will shoot towards the open doors and the user.
3. Do not aim the hand shower directly at the joints of your shower as this does not fall under “normal showering
conditions”. However, due to Insignia’s unique design of the shower tray, water will only leak back in to the tray so you
won’t get flooded.
4. Visually check the water flow in to the waste and adjust the feet of the tray accordingly to ensure the direction
of the water flows towards to the waste to prevent over puddling (a small amount of puddling is normal).
5. Never use the shower until all checks have been made and the installer is 100% happy in the knowledge no hose leaks
are present.
6. Any RubberGum which has squeezed out between the panels and the tray, simply cut off using a sharp, clean knife
blade.
7. Now push the shower from it’s base into it’s final position. NEVER PUSH THE GLASS OR FRAME into its final resting
position.
Happy Showering!
32www.insigniashowers.com Last Modified: 16/08/2021
Control Panel Instructions (steam version only)
Button 1 (Lights)
Once the control panel is switched on, the lights will come on automatically. Press the Light button once and the lights will
start to scroll through the multiple colour options. Then to stop the lights on a specific colour simply press the light button
again on the desired colour. To turn the lights off press the light button again.
Button 2 (Steam)
To start the steam function, simply press the steam button (which looks like a cloud). To set the time and temperature of the
steam session, simply press the mode button (button 3) and then use the arrows to scroll up and down (button 6)
Button 3 (Mode)
This will do nothing on start-up, however it will be your go to button when using steam, radio and Bluetooth options
Button 4 (Padlock)
This is your unlock button. After twenty seconds of inactivity the steam function will lock on the panel. This is done as a
1 3 2 safety feature, so it can’t be accidentally activated. Other buttons will remain functional whilst in this state of ‘lock mode’
Button 5 (Music)
6
Press once for FM Radio and press twice for Bluetooth. For tuning radio stations or connecting Bluetooth, please see the
next page. For volume control, once on the radio or Bluetooth setting press Mode (button 3) then use the left and right
5
arrows to change the volume. The volume is denoted by a number followed by the letters ‘db’
4 7
Button 6 (Left and Right Arrows)
This will do nothing on start-up, however they are multi-functional depending on what setting you are using. When in the
radio setting you can use them to change the station. When using the Bluetooth setting you can skip forward or back tracks
in your playlist. You can also control the volume with these arrows as directed above.
Button 7 (Power)
Press once to turn on the panel. Simply press again to turn it off. When powering down the 03 will automatically start and
last for approximately 10 minutes. After this the screen will power off.
To see our tutorial videos for operating Insignia control panel’s, please search
for “Insignia Showers” on YouTube and find our “Insignia Control Panel”
Playlist, or you can click here
33www.insigniashowers.com Last Modified: 16/08/2021
Control Panel Instructions
Button 1 (Radio Search) Button 6 (Lights)
With the Radio function active, press to allow Press to activate or deactivate
manual searching of a station. the lights.
Button 2 (Mode) Button 8 (Power Button)
Press x1 to turn on the radio (whilst active On/Off.
press and hold to do an auto search for
stations)
Press x2 to activate the Bluetooth
Button 3/7 (Audio Volume)
1 2 Press up or down to increase or decrease the
volume in the cabin. Also use this when manually
3
searching for a radio station.
4 5 Button 4/5 (Skip button)
Press to skip radio station on the radio setting.
8 When the Bluetooth is activated this will skip to
6
7 the next song in your playlist.
To see our tutorial videos for operating Insignia control panel’s, please search
for “Insignia Showers” on YouTube and find our “Insignia Control Panel”
Playlist, or you can click here
34www.insigniashowers.com Last Modified: 16/08/2021
Control Panel Instructions
Connecting to Bluetooth
Step 1 Step 2
To connect a device via Then simply go on your device and pair
Bluetooth, press the music up with the shower which should be
function button twice (which shown as “INS”. Once this is complete
you will hear a beep to signify you’re
looks like a musical note) the
connected and ready to listen to any
control panel will then show
music of your choice.
“INS”.
Tuning your radio channels
Step 1 Step 2 Step 3
To tune your radio channels Then once the radio is on Finally, once the panel has
firstly press the music press and hold the mode finished scrolling then use the left
function button (which looks button until it starts scrolling. and right arrows to cycle through
like a musical note) all the radio stations that were
found.
35www.insigniashowers.com Last Modified: 16/08/2021
Parts List
Part Code Part Description SP337 Insignia Control Panel (non SP300 Waste hose
SP010 Monsoon Shower head -steam version only) SP301 White insulated pipe
SP078 Ozone Module (steam version only) (steam version only)
SP117 Insignia Control Panel
SP002 Round Body Jet (Two Open Ends) (steam version only) SP187 Drain Hose (steam
SP152 Hand Shower version only)
SP002a Round Body Jet (One Open End)
SP234 Vertical steam
SP194 Fixed Glass Seals (12mm)
SP236 Complete riser bar generator/Electric box
SP112 (warranty) Shower holder (for riser bar) SP197 Fixed Glass Seals (7mm)
(steam version only)
SP120 (warranty) Water Inlet (bottom part of riser bar)
SP215 Light diffuser
SP308 Magnetic door seals
SP142 Shower waste
SP040a Multi-coloured LED light SP310 Rear door seals
SP097 Chrome rectangular door handles ring SP173 3 port—3 feed
SP190 Glass Shelf SP407 LeakFree Framework thermostatic valve
Securing Clip (Black) (steam version only)
SP196 Thermo sensor holder (steam version
only) SP407B LeakFree Framework SP089 3 port—2 feed
Securing Clip (Chrome) thermostatic valve (non-
SP072 Door stoppers
steam version only)
SP276 Twin Door Wheels Non-Push SP031 Chrome Knob for
Thermostatic Dial SP095 3 Port Selector Cartridge
SP276A Twin Door Wheels Push Button
SP044 On/Off Water Mixer
SP025 Chrome Knob for Selector/
SP205 Chrome Steam Outlet (steam version Valve
Water Flow Dial
only)
SP182 Vernet Screw Fit
SP116A Water Valve Chrome
SP105 Chrome Flexible Hose Thermostatic Cartridge
Selection Plate
SP243a Fold down seat SP043 Plastic Thermostatic
SP116B Chrome Water Valve
Valve Safety Lock Ring
SP036 Speaker Water Flow Plate
SP085 Speaker Splitter Cable SP116C Chrome Water Valve SP321 LeakFree Column End
SP228 Speaker cover Temperature Selection Caps
Plate
SP211 12V Transformer (non-steam version SP101 UPVC Hose
only)
36www.insigniashowers.com Last Modified: 16/08/2021
Steam Room & Shower Safety Guide
1. Never leave children unattended in the shower or bath.
2. Never bath children (under 12) using whirlpool function if fitted.
3. Regulate the temperature of water before showering.
4. Never allow children to use the steam function. This function is for ADULTS ONLY.
5. Always be aware of the steam outlet position. Never use in close proximity to the person using it.
6. Exit the steam room immediately if feeling dizzy, faint or short of breath.
7. Do NOT use the steam room if you’re pregnant, have a heart condition, have low or high blood pressure. If you’re unsure
consult your GP before use.
8. If you have any underlying health conditions which you feel could be aggravated by using a steam room, consult your GP
before use.
9. If you begin to have any issues with your health after using a steam room, stop immediately and consult your GP regarding
your symptoms before continuing to use.
10. Consult your GP before using the steam room if you’re on medication at all, especially with drowsy side effects.
11. Never use this shower if you have been drinking alcohol or under the influence of other substances.
12. Never use with more than one person unless the shower is designed for this.
13. This product is not to be used for washing/bathing animals.
14. Always turn power supply off after use.
15. Always turn water supply off after use.
16. Ensure room is well ventilated after a steam session by using your bathroom extraction fan or opening a window.
37www.insigniashowers.com Last Modified: 16/08/2021
Steam Room Usage Guide
1. To use the steam room, turn the control panel on. (1)
2. Press the steam button (2) and your generator will be fed with water and the heating
element will begin to heat the water to create steam. (You should be seeing steam from
your outlet in approximately 60-90 seconds)
3. To set the temperature you want the cabin to reach, press the function button (3) once
the steam is active. You will see a small °C to the right of the display. The large number in
the middle of the display can be changed by pressing the arrows (4). The maximum
temperature you can reach is 60°C . The average temperature in a steam room is usually
between approximately 30 to 36°C subject to bathroom ambient air temperature.
2
3 4. To set the length you wish the steam to run for, press the function button again (3) then
use the arrows (4) to set your desired time. The maximum length that can be set is 60
minutes.
4
4
5. Only steam for approximately 10-15 minutes per session at your desired temperature.
Due to temperature, your body can overheat, dehydrate and cause light headedness. This
1 is very important for both your health and wellness.
6. Correct Procedure when using steam is SHOWER FIRST this will open your skins pores and
your shower cabin will be warm on use. Steaming without showering lowers benefits and
not recommended. If you do so NEVER run your steam generation before use to warm
the shower, this can cause damage to operating parts, isn’t safe practice and will not
warm your cabin. NEVER Shower and Steam at the same time.
Before using the steam room, always read the steam room and shower safety guide first.
38www.insigniashowers.com Last Modified: 16/08/2021
Bathroom Electrical Zones
39www.insigniashowers.com Last Modified: 16/08/2021
There are 3 bathroom electrical zones that have been distinguished in the IEE wiring guidelines and these are:
Zone 0 is the area inside a bath, basin or shower. It's characterised as 'any area within a bathroom that can hold water'. Any fitting or electrical appliance
utilised inside zone 0 must be a maximum of 12 volts (SELV) and completely secured against both partial and total submersion in water (minimum of IPX7)
Zone 1 is the region straight above zone 0 to the height of 2.25m from the base of the bath or shower. It covers the width of the shower cabin or length of
the bath. Consider zone 1 to be the ‘splash zone', where a fitting or electrical appliance is probably going to get exceptionally wet, very rapidly, however
would not be totally immersed in water. Any fitting or electrical appliance inside zone 1 must be IPX4 (splash proof) or have a limit of 12v (SELV) with the
transformer situated past zone 2.
Zone 2 is the area extending to 600mm outside of the bath or shower, be that above or to the sides of each. This is commonly the region which is least
likely to get wet however there is a likelihood for it to be splashed. Any fitting or appliance inside zone 2 has to be IPX4 (splash proof) or have a maximum
of 12v (SELV) with the transformer situated past zone 2.
Outside zones (Beyond Zone 2)
At the point where the size of a bathroom goes past zones 0, 1 and 2, portable electrical appliances can be utilised if their cord length doesn't allow them to
be used in zone 2. For example, a hairdryer can be used in the outside zones provided its extended length doesn't enable it to be used in zone 2. Despite
the fact that installing electrical appliances past zone 2 is allowed without an IP number, it is recommended that electrical appliances have some type of
protection from moisture.
The Ingress Protection or IP number denotes the amount of mechanical and moisture protection an electrical appliance has. The ‘IP’ notation is followed by
2 numbers that show a numerical degree of mechanical and moisture protection.
The higher the number, the better the assurance it has against moisture/damage. If an appliance does not have an IP number it should never be used in
zones 0,1,2 or anywhere that has a wet or damp environment.
All electrical circuits inside a bathroom must be protected by an RCD (residual current device), commonly known as a circuit breaker, not surpassing 30mA.
RCD’s ascertain when an electric current is not functioning normally and break the flow of the current if necessary, to guarantee that you are safe whilst
using it.
Precaution should always be taken when introducing any electric appliance into a bathroom. We always advise using a registered bathroom fitter or
electrician.
*The information on this page is for guidance only and you should always refer to the current IEE regulations of a qualified fitter or electrician to guarantee you are aware if the
latest regulations and codes of practice.
40www.insigniashowers.com Last Modified: 16/08/2021
WEEE Compliance Statement
The UK Waste Electrical and Electronic Equipment (WEEE) regulations came into force on 2 January 2007. Under this new legislation, producers of electrical and electronic
equipment (EEE) have to fulfil certain obligations.
Under the WEEE directive Insignia is considered the producer of certain products we supply and in line with the demands of the legislation we are pleased to offer the op-
portunity to return these products to us for treatment and recycling.
Insignia products will generally have an identifying mark and the common crossed out wheelie bin label. We accept returns of all products carrying the Insignia brand. All
other products are either considered outside the scope of WEEE or Insignia is not technically the producer of these products. Insignia also accepts historic like-for-like WEEE
returns. All WEEE returned to Insignia will be recycled in appropriate treatment and recycling centres in accordance with the legislation. If you wish to return any products to
us, please send your item(s) to our head office.
Company Contract No. 326457
WEEE Producer No. CBDU64227
LABELING
Products labelled with the WEEE symbol (a crossed out “waste bin”) indicate that the final user should not discard this product along with other
household waste, but that it must be collected and treated separately.
Returns Address for WEEE
Insignia
9a Deans Road, Old Wolverton, Canon Industrial Park, Milton Keynes, Buckinghamshire, MK12 5NA, UK
EU – Declaration of Performance
Insignia declares that all its products complies with the essential requirements and other relevant provisions of Directive 305/2011/EC. A copy of the
Declaration of performance is available from www.insigniarange.co.uk/ce.aspx
Insignia™ is a registered trademark of Maclean International Ltd, 9a Deans Road, Old Wolverton, Canon Industrial Park, Milton Keynes, Buckinghamshire, MK12 5NA, UK
All images are subject to copyright. Images may not be used in any way shape or form with out written permission from Maclean International Ltd. Images are NOT
permitted to be saved, printed or uploaded. Violation of copyright laws are punishable by law.
41www.insigniashowers.com Last Modified: 16/08/2021
42You can also read