HERO ARM User Manual Version 6.0 - Open Bionics
←
→
Page content transcription
If your browser does not render page correctly, please read the page content below
HERO ARM User Manual Version 6.0
Contents
Contents                                          2

Introduction                                      1

Hero Arm Overview                                 2
   What’s in the Box                              3
   Configurations                                 3

Getting Started                                   5
   When to Use Your Hero Arm                      5
   Putting on your Hero Arm                       6
   Switching on                                   6
   Charging the Battery                           7
   Checking the Battery Status                    8

How to use your Hero Arm                           8
  The Hand Button                                  8
  Notifications/Status                             9
  Controlling the Hand                            10
  Speed Control                                   10
  Controlling the Hand - Single Site Users Only   11

Grip Modes                                        13
   Changing Grips                                 13
   Group 1 - Fist and Hook                        14
      Fist                                        14
      Hook                                        14
   Group 2 - Tripod                               15
      Tripod A                                    15
      Tripod B                                    15
   Group 3 - Pinch                                16
      Pinch A                                     16
      Pinch B                                     16
   Freeze Mode                                    17
   Wrist Rotation                                 17
   Thumb Flexion                                  18
   Calibration                                    19

Covers                                            20

Looking after your Hero Arm                       22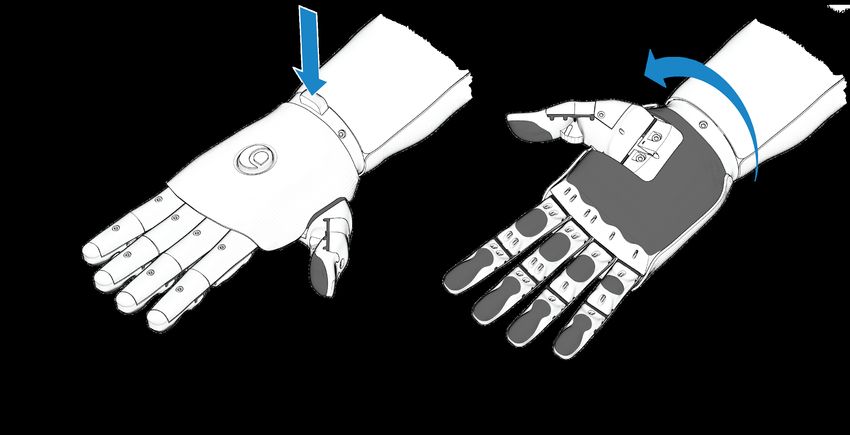
Safety                                            22
   Storage                                           22
   Maintenance                                       22
   Cleaning                                          23
   Growing out of your Hero Arm                      24

Troubleshooting                                      26

Battery                                              27
   How to Store the Battery                          27
   Battery Life                                      27
   Disposal                                          28
   Safety                                            28

Warranty & Returns                                   29

Warnings                                             30

Regulatory Compliance                                31

Symbols                                              32
           CE mark                                   32
           Caution                                   32
           Manufacturer (adjacent to company name)   32
           Refer to instruction manual               32
           Wheelie Bin (WEEE) mark                   32
           Type BF Applied Part                      32
           Class II Equipment                        32
           Rechargeable battery                      33
           Serial Number                             33
           Date of Manufacture                       33
           Use-by-date                               33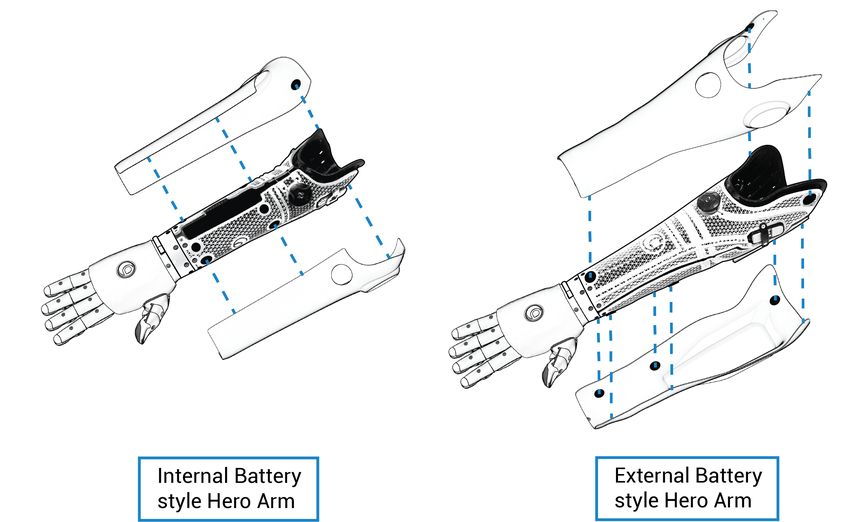
Introduction
Hero Arm is a powered bionic limb controlled by your muscles, with intuitive lifelike
precision. Each Hero Arm is bespoke, perfectly formed just for you, with a breathable
removable socket for enhanced ventilation and ease of cleaning. Powered by
high-performance motors, advanced software and long-lasting batteries, it is
lightweight and stylish.

This manual will give you an overview of how to use and look after your Hero Arm,
and the important safety considerations to take.

To search for a specific word or phrase, hit Ctrl + F (on Windows) or ⌘ Cmd + F (on
Mac).

                                                                                      1
Hero Arm Overview
Note: Your Hero Arm may look slightly different from the version pictured.

                                                                             2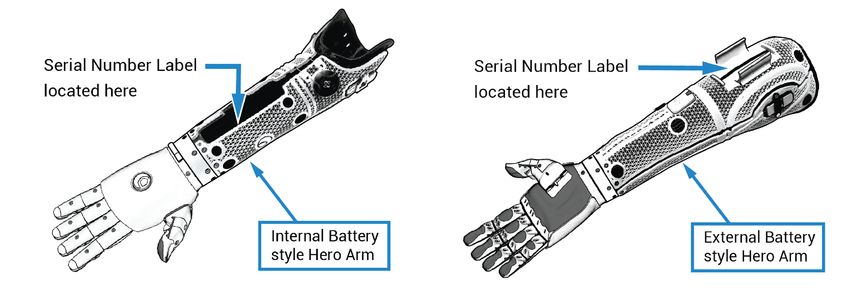
What’s in the Box
1 x Hero Arm
1 x Battery
1 x Battery Charger
1 x Quick Start Guide
1 x Hand Cover
1 x Battery Cover

Configurations
Each Hero Arm is custom built for every individual, and comes in 3 different hand
sizes and 2 different arm layouts. As a result, you may see some differences
between your Hero Arm and the diagrams in this manual.

The Hero Arm comes with either a 3 Motor or 4 Motor Hand depending on the most
suitable size of hand for your arm. The key differences are the reduced size of the 3
Motor version, and the number of tendons.

The 4 Motor versions have 2 tendons on both the index & middle fingers, which
allows them to move independently. On the 3 Motor version, the index & middle
fingers will always move together.

                                                                                        3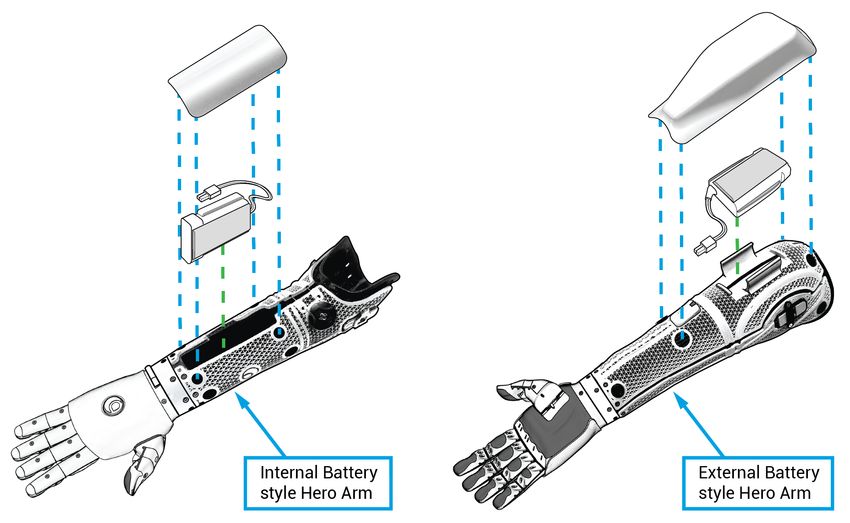
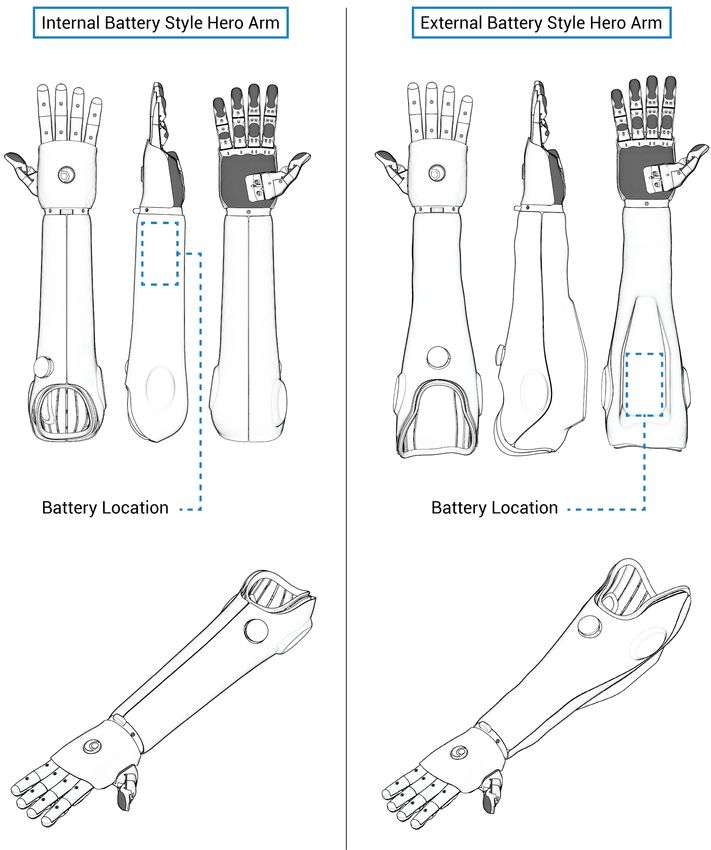
Every socket is designed and 3D printed for each individual based on a 3D scan of
their residual limb, and comes in two different layouts: internal or external battery.
The functionality of both layouts are the same, but they have some noticeable
cosmetic differences as shown below:

                                                                                         4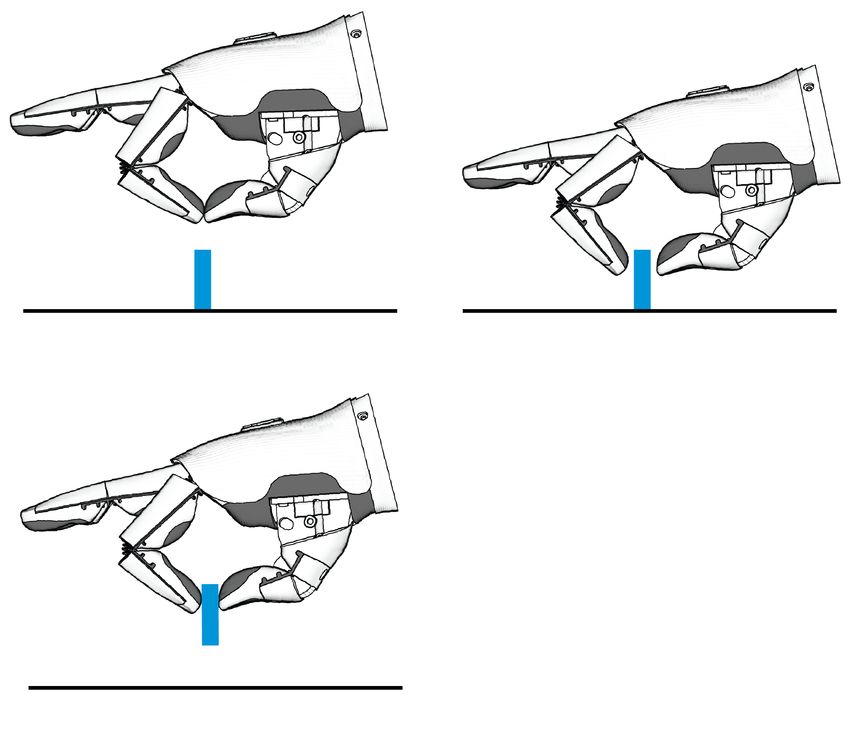
Getting Started
Before putting on your Hero Arm for the first time, please familiarise yourself with
this user manual.

When to Use Your Hero Arm
The Hero Arm is intended to be used for day to day activities that require the use of
one or two hands. It is intended to be used for light to moderate activities such as:
   ● Holding objects such as cups, tools, kitchen utensils, trays, bottles, bags
   ● Performing operations such as opening doors, pressing buttons, getting
       dressed.

The Hero Arm is not intended for use in activities that may result in injury or death to
the user or others as a result of it failing to perform the activity as intended. As such,
activities which are specifically prohibited include:
   ● Driving any form of motor vehicle, aircraft or boat,
   ● the use of firearms, or
   ● use while partaking in contact sports, watersports or extreme sports.

For all other activities, you should assess the impact of the following:
   ● The Hero Arm suddenly ceasing to function (for example if it were to run out
        of battery). Bear in mind that this could leave the device unable to release.
   ● The Hero Arm losing its grip.
   ● The Hero Arm moving unintentionally.
   ● The Hero Arm shifting position on, or coming off your arm.

If the consequence of using the Hero Arm for any of the above activities is injury or
death to yourself or anyone else, the Hero Arm must not be used. In the case of
using the Hero Arm to return to work, you should discuss the above points with your
Health and Safety representative and conduct a formal risk assessment.

You can use your Hero arm above -5 °C (23 °F) and below +50 °C (122 °F). You can
use it at pressures equivalent to altitudes of up to 4000 m (16,400 ft, that’s 600 hPa
to be exact), making it safe to use in the cabin of a commercial airliner. Your Hero
arm is IP20 rated. IP is “Ingress Protection” the first number is a score for solids and
dust, the second is for liquids. IP20 means finger-sized objects and larger can't get
inside it is not waterproof. You should avoid exposing it to any water. If your Hero
Arm does get wet, turn it off, remove the battery and leave it to dry fully. It can be
used in Relative Humidities (RH) between 15% and 90%.

                                                                                         5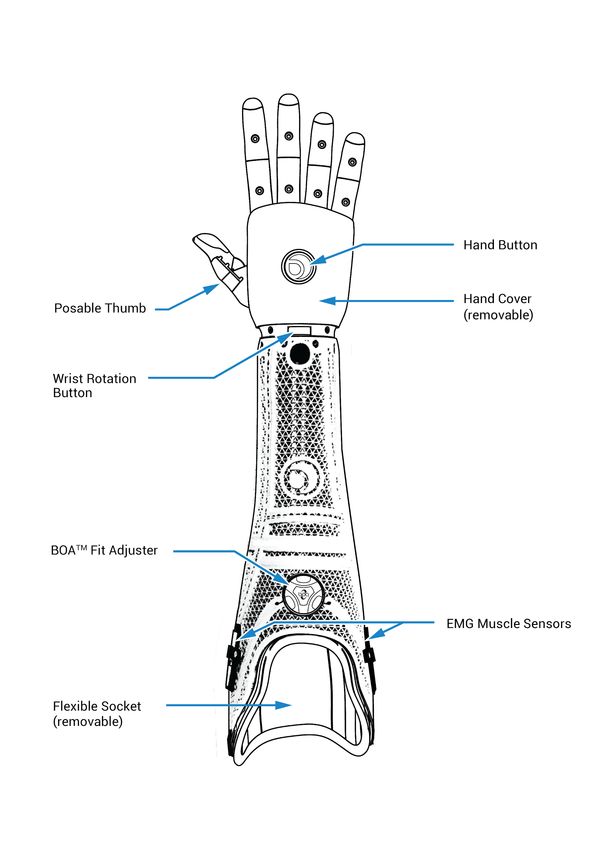
Putting on your Hero Arm
Your Hero Arm has been designed to perfectly fit your arm, and comes with an
adjustable BOA Fit System™ to reach the perfect balance of comfort and secure fit.

You can easily adjust the fit of your Hero Arm throughout the day without removing it,
simply by adjusting the BOA Dial.

Switching on
To switch on your Hero Arm, press the Hand Button for 1 second. The Hand Button
will pulse purple while initialising. Once the arm is on and ready to use, the Hand
Button pulses white.

                                                                                      6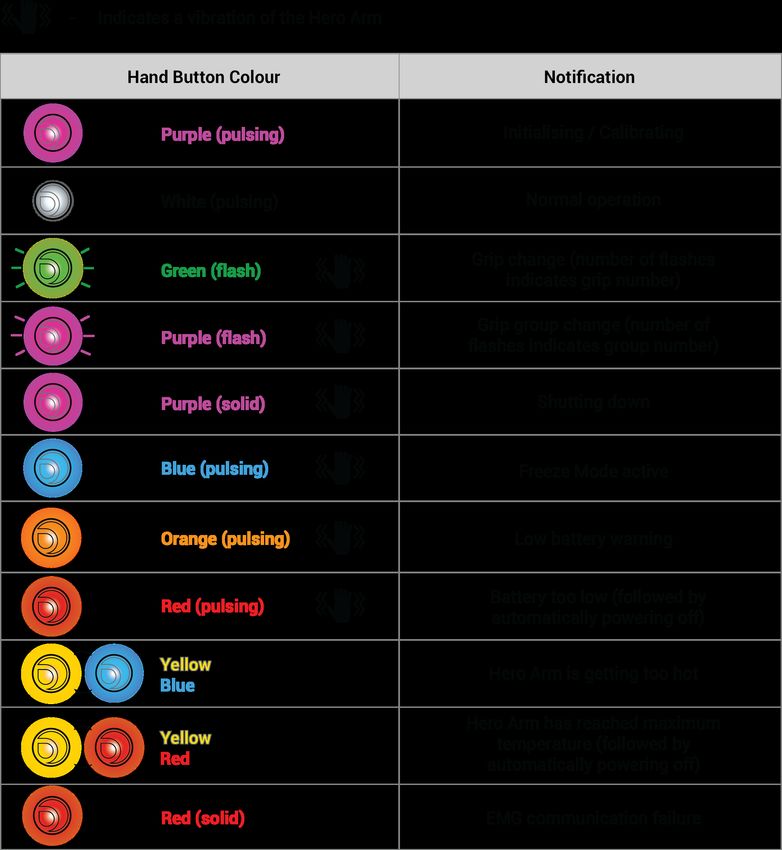
Charging the Battery
Your Hero Arm comes with a battery and Smart Charger. The battery life of your arm
will vary depending on how heavily you use it, but we recommend charging it every
night.

You must remove the battery from the arm before charging. For safety reasons, only
ever charge your battery using the Smart Charger provided with your arm.

Follow the steps below to charge your Hero Arm battery:

   1. Switch off your arm by holding down the Hand Button for 3 seconds
   2. Once switched off, remove the battery cover and unplug the battery, by
      pressing the latch and pulling on the white connector
   3. Remove the battery from the arm by gently pulling on it
   4. Plug the battery into the supplied Smart Charger
   5. Plug the charger into a mains power outlet
   6. The status Hand Button of the Smart Charger will flash to indicate that the
      battery is charging
   7. When the battery is fully charged, the status Hand Button will stop flashing
   8. You can now disconnect the battery from the Smart Charger and reconnect it
      to your Hero Arm

                                                                                     7
Checking the Battery Status
To check the status of the battery, with your Hero Arm switched on, hold the Hand
Button down for 1 second. The battery life is indicated by the colour of the Hand
Button:
How to use your Hero Arm
The Hand Button
The multi-function button on the back of the hand can be used to control a variety of
functions of your Hero Arm:
● Hand On/Off
○ To switch on your Hero Arm, press the button for 1 second.
○ To switch off your Hero Arm, press the button for 3 seconds.
● Change Grip Group
○ Your Hero Arm has multiple grip groups; to change between these,
press the Hand Button for 0.5s. See ‘Grip Modes’ for more information
on grips.
● Check Battery Status
○ Press the Hand Button for 1s, and its colour will change to indicate the
battery level.
8Notifications/Status
The Hero Arm will notify you of a variety of status changes through the Hand Button
colour, vibration, and beeper. These are summarised below (in addition to the battery
level indicators listed in ‘Checking the Battery Status’):
9Controlling the Hand
The Hero Arm comes with an advanced myoelectric, multigrip bionic hand. The EMG
Sensors in the arm detect your muscle movements, and the hand responds for
intuitive control. When being fitted for your Hero Arm, your prosthetist will have
found the optimal location of the EMG Sensors for your muscles.
As standard, the Hero Arm uses two EMG muscle sensors to control the
hand. However, if you only have one suitable muscle site on your residual
limb, your Hero Arm may only use a single EMG sensor. If this is the case,
the way you control the arm will be different. The control scheme for
single-site users is outlined in Controlling the Hand - Single Site Users.
The bionic hand is controlled by tensing the same muscles which are used to open
and close a biological hand. To close the Hero Arm’s hand, and perform the selected
grip, imagine flexing the wrist inwards while pulling the fingers into the heel of the
hand.
To open the hand, imagine extending the wrist with an outstretched palm.
If you are having trouble getting the hand to respond to your muscle movements,
please see the Troubleshooting section on pages 24-25.
Speed Control
The hand will move more slowly when your muscles are tensed gently, and will move
more quickly with a firmer tense. This control can be useful for manipulating small or
delicate objects.
10The information on the following two pages (p11-12) only applies to users
with a single muscle site. For the vast majority of Hero Arm users (with two
muscle sites) the information in Controlling the Hand applies instead.
Controlling the Hand - Single Site Users Only
When you tense the muscles under your sensor, the Hero Arm swaps between
opening, then closing the fingers.
If you tense, the fingers will begin by closing.
If you relax and wait for 1 second, the hand will swap to be ready to open on your
next signal. It will indicate this by flashing blue and vibrating. Tensing now will cause
the fingers to open. Relaxing again will cause the hand to swap back to be ready to
close the fingers.
By alternating backwards and forwards like this, you can pick up and put down
objects.
11The length of the vibration you receive when the hand changes direction provides
non-visual feedback about which direction it will go:
- Shorter pulses mean it has swapped to open next.
- Longer pulses mean it will close next.
When picking up small objects, it’s useful to pre-position the fingers so that they’re
spread just a little bit wider than the object. To do this, choose the grip you want, fully
close the fingers, then open them so that they are slightly wider apart than the
object. The hand will then be ready to close around the object.
Tensing harder causes the fingers to move faster, and tensing softer moves them
more slowly.
Do not attempt to tighten your grip on an object you are holding.
After picking it up, the hand will swap direction to opening, so your next
muscle tense will release it.
To tighten your grip on an object you must put it down (or otherwise
support it), release it with your Hero Arm, then re-grip it from scratch.
12Grip Modes
The Hero Hand has 4 different grip patterns in the 3 motor version, and 6 different
grips in the 4 motor version. These grips are grouped together in pairs to make
switching between them quick and easy.
Changing Grips
To switch between grips within a group, move the hand into the open position, relax,
then hold an open signal for more than a second (see Controlling the Hand).
You will feel a long vibration, and the Hand Button will flash green a number of times
to indicate which grip number you have selected; 1 flash for the 1st grip in the group,
and 2 flashes for the 2nd grip in the group.
To switch between the different groups, press and release the Hand Button.
You will feel a short vibration, and the Hand Button will flash purple a number of
times to indicate which group number you have selected - i.e. 1 flash for group 1, 2
flashes for group 2.
The various grips are described in the following pages.
13Group 1 - Fist and Hook
The primary group contains the Fist and Hook grips:
Fist
This grip is useful for carrying round objects such as bottles or fruit, for holding
utensils and handles, and can also be used for handshakes. First, the thumb closes,
followed by all 4 fingers.
Hook
Similar to the Fist grip, however the thumb remains open while the four fingers close.
This is ideal for carrying a shopping bag or briefcase, and also allows you to do a
“thumbs up” gesture.
14Group 2 - Tripod
The secondary group contains two Tripod Grips. These are useful for picking up and
manipulating small objects, such as car keys, coins, jar lids, pens etc.
Tripod A
The middle and index fingers close to meet the thumb. The ring and little fingers
remain open.
Tripod B
The ring and little fingers close when selecting this grip, and when sending the close
signal, the index and middle fingers then close to meet the thumb. You can make a
“peace” hand signal with this grip.
15Group 3 - Pinch
The final group, only available on the 4 Motor versions of the hand, contains two
Pinch Grips. The Pinch Grips are useful for manipulating small objects or picking
things up off a table such as a coin or pen. The pinch grips work with the thumb
knuckle in both the closed and open positions - if you’re finding it difficult to pick up a
small object, try moving the thumb knuckle (see Thumb Flexion on page 18).
Pinch A
The index finger closes to meet the thumb, all other fingers remain open. You can
make an “A-OK” hand sign with this grip.
Pinch B
When selecting this grip, the middle, ring and little fingers will close, and when
sending the close signal the index finger will then close to meet the thumb. You can
use this grip to point, or do a “come here” gesture.
16Freeze Mode
Freeze Mode can be used with any of the grip patterns to temporarily freeze the
position of the hand and disable the muscle control - this allows you to set a grip
position without worrying about accidentally sending a muscle signal and releasing
your grip. To activate Freeze Mode, hold down the Hand Button for 1 second whilst
tensing the ‘Close’ muscles - the Hand Button will change to light blue (aqua) and
there will be a vibration to indicate Freeze Mode has been activated. Freeze Mode
will remain active until you disable it by pressing the Hand Button.
Wrist Rotation
You can adjust the rotation of the wrist through 180°. To do this, depress the Wrist
Button at the base of the wrist (on the back of the hand), and rotate to the desired
angle. Release the button to lock the wrist in the new position. The wrist can be
locked at any angle within the range of the rotation.
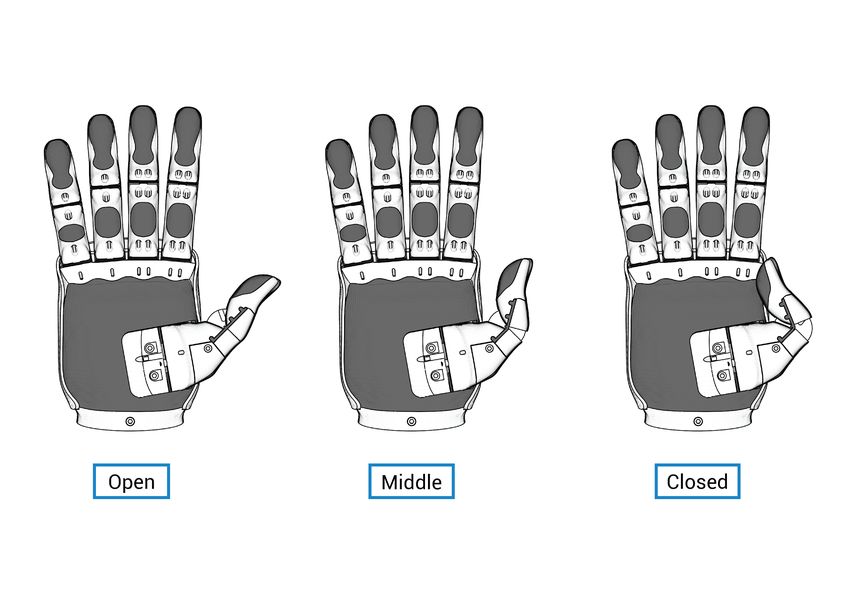
17Thumb Flexion
In addition to the powered movement of the thumb, the knuckle can also be manually
adjusted into either the open, middle or closed position.
Fully closing the thumb makes it easier to pull the Hero Arm through the sleeves of
clothing. The middle thumb position can be useful for picking up small objects:
18Calibration
When you power on your Hero Arm for the very first time, the hand may perform a
calibration routine - this will involve closing each of the fingers and the thumb in
order to check everything is working correctly. It is important that the fingers are not
obstructed during calibration, as this could cause the calibration to fail. The Hand
Button will pulse purple to indicate the hand is calibrating. A successful calibration is
indicated by the Hand Button turning white once the movement of the hand has
stopped.
If the calibration is unsuccessful for some reason, such as an obstruction preventing
the full movement of any of the fingers, the hand will repeat the calibration a second
time - ensure any obstruction is cleared before the process repeats. If any finger fails
calibration, it will remain in the open position and will not respond to muscle inputs.
If you disconnect the battery before powering off the hand, it will need to recalibrate
the next time you power it on. You should therefore always switch off your hand, if it
is working correctly, by holding down the Hand Button, before disconnecting the
battery.
There may be some situations when you want to force the hand to calibrate, such as
if a finger is no longer closing or opening fully - in this scenario it is then acceptable
to disconnect the battery with the hand powered on in order to initiate a calibration.
If your hand repeatedly fails to calibrate, please see the Troubleshooting section of
this manual on pages 24-25.
19Covers
Your Hero Arm can be customised with swappable covers, to match your style or
mood. There are 3 types of cover: hand cover; arm covers (split into two halves) and
battery cover. Each cover is custom designed to fit your Hero Arm perfectly.
The Hero hand has 4 slots which engage the 4 clips on the hand cover.
Engage the clips on one side of the hand first (Clips 1 & 2, or clips 3 & 4).
Then push the cover onto the hand until the other two clips “click” into place.
20Depending on whether you have an internal or external battery style Hero Arm, your
arm covers will look slightly different.
Older versions of the Hero arm use a hook-and-loop pad to attach the covers. To
attach the battery and arm covers, line up the fastening pads on your cover with
those on your arm, and press the cover firmly into place - you should hear a click
when the fastening pads have engaged. To remove the cover, gently pull it free from
your arm.
Newer versions of the Hero arm use magnets to attach the covers. To attach them,
line up the magnets and they should click into place. To remove, gently full the cover
free from your arm.
The magnets are nickel plated. People with a nickel allergy should avoid
direct contact with the magnets on the arm and corresponding metal disks
on the covers.
To ensure your battery is protected, you must wear the battery cover when using the
Hero Arm if not wearing any other arm covers.
For more cover options, and to design your own, go to
https://www.shop.openbionics.com/
21Looking after your Hero Arm
Safety
Although the Hero Arm has been engineered to be strong and robust, you should
treat it as if it were your own limb - please read this section of the manual for general
safety information and guidance on how to care for your arm.
Avoid subjecting your arm to excessive loads or impacts - your safety should not rely
on the arm at any time.
You must always have at least the battery cover on your arm in use.
You should not attempt to lift or carry objects heavier than 8kg.
If you have a particular activity or sport that you want to play whilst wearing your
Hero Arm which might subject it to excessive impacts or force, we would
recommend first discussing this with your prosthetist.
Your Hero Arm can withstand splashes of water (such as light rain), however it is not
water resistant. Do not submerge your Hero Arm in water - it should be protected
from moisture at all times. If any water reaches the internal components of the hand
or arm they are likely to cause damage and eventual failure. Water damage is not
covered by the standard 12 month warranty.
Do not expose it to a naked flame or subject it to excessive heat. If the hand
temperature reaches 50°C, the hand will warn you by flashing the Hand Button yellow
and blue. At 55°C, the Hand Button will flash yellow and red, and you will be notified
with a beep before the hand shuts itself off.
Storage
The Hero Arm can be stored between -25°C and +70°C with the battery removed (see
How to Store the Battery)
The covers have a more limited temperature range and should be kept between -5°C
and 30°C, out of direct sunlight.
Maintenance
Do not attempt any maintenance or modification of your Hero Arm by yourself. If you
think your arm is not functioning as it should, or has been damaged, you can contact
your prosthetist to arrange for repair or replacement.
22Your prosthetist will arrange an appointment with you annually to perform the
required annual maintenance. This allows us to keep your Hero Arm in top condition
throughout its five year service life.
Cleaning
The Hero Arm can be cleaned using alcohol-free antibacterial wipes. In addition, the
flexible internal socket is easily removable from the frame of your Hero Arm to make
cleaning easy. You should clean the flexible socket using warm, soapy water on a
regular basis. The steps below apply to both Internal & External Battery style Hero
Arms.
23Ensure the socket is thoroughly rinsed after washing, and never use anything marked
as irritant to clean the socket (such as bleach), to prevent irritation from residue.
The socket should be thoroughly dried before the next use, the best method for this
is leaving to air dry overnight.
We recommend you clean your socket daily, and the rest of the device as needed. If
you find that you struggle to clean part of your Hero Arm, discuss the matter with
your prosthetist.
Growing out of your Hero Arm
If you are still growing, your Hero Arm may eventually become too small. While the
BOA Fit SystemTM allows you to adjust the tightness of your socket, the length is not
adjustable. This means that when your arm grows in length, the EMG muscle
sensors may no longer be in the correct position relative to your muscle sites, and
your Hero Arm may struggle to detect when you send an open or close signal.
You may also find that it becomes difficult to put your Hero Arm on.
24If you think that you have outgrown your Hero Arm, speak to your prosthetist who
can advise you about a re-fit. You can get your Hero Arm resized for substantially
less than the cost of buying a whole new unit.
Do not dispose of your Hero Arm in the household waste. Arrange with your
prosthetist to have it returned to Open Bionics for disposal.
25Troubleshooting
If you experience any issues with your Hero Arm, please try the following solutions. If
you are unable to solve the problem, please contact your prosthetic provider, or Open
Bionics at support@openbionics.com
Problem Solutions
Fingers are not moving/responding to my Check to make sure the Hand Button is
signals pulsing white to show the hand is on and
ready
Press gently on the back of the EMG
sensors, to make a better skin contact
Check the battery is fully charged and
plugged in correctly
Fingers are not closing/opening fully Try calibrating the the Hero Arm by
disconnecting the battery with the power
still ON (see the Calibration section)
There is a loose tendon attached to one A tendon has become damaged from
of the fingers excessive wear or load, please discuss
with your prosthetist to arrange for your
Hero Arm to be repaired
One finger stays open whilst the other The finger that remains open has likely
fingers/thumb move normally failed calibration. Try calibrating the Hero
Arm by disconnecting the battery with the
power still ON (see the Calibration
section). If this issue continues, contact
your prosthetist
The button is not responding to presses Try disconnecting and reconnecting the
but the arm is on battery
The grip patterns are not performing Try calibrating the the Hero Arm by
normally disconnecting the battery with the power
still ON (see the Calibration section)
Fingers are moving erratically Try cleaning the EMG pads with an
alcohol wipe, remove and reattach your
Hero Arm
26Problem Solutions
Fingers are responding intermittently to Try cleaning the EMG pads with an
signals alcohol wipe, remove and reattach your
Hero Arm
Hand Button is flashing different colours Please see the table in
‘Notifications/Status’ for information on
what the Hand Button colours mean
The Hero Arm has got wet Immediately disconnect and remove the
battery. Dry off any visible water. Leave
the hand to dry completely before trying
to switch on again
Battery
Your Hero Arm comes with a Li-Ion 7.5V 2600mAh battery (Friwo FB2S1P18650-26).
Only use the battery issued with your Hero Arm, or another purchased from the Open
Bionics store. Only charge the battery according to the guidance provided in the
‘Charging the Battery’ section of this manual, using the provided charger.
Do not expose the battery to water, or leave it in an extremely hot environment such
as in a hot car, or exposed to direct sunlight.
Battery performance is dependent on how you use the arm, but also on the
environment - battery performance may decrease in cold temperatures.
How to Store the Battery
If you are not planning on using your Hero Arm or its battery for a long period of time,
we recommend you fully charge the battery before storing it in a cool dry place. To
maintain the battery’s function, you should fully run down and recharge the battery at
least once a year.
Battery Life
The battery life is dependent on use but should last most users a full day. We
recommend you charge it each night.
The battery is expected to last at least one year. If your battery life is too short to get
you through a whole day before this point, it is covered under your Hero warranty.
After a year of use, you will need to contact Open Bionics or your prosthetist to order
a replacement.
27Disposal
This symbol on the battery indicates that it is not to be treated as household waste.
Do not dispose of batteries in a normal bin. This could lead to a fire when the waste
is compacted.
By disposing of the battery correctly, you’ll be helping minimise any negative
consequences for the environment.
Please contact your local authority for information on where you can recycle the
battery. Please recycle old batteries after discharging them.
Safety
Please follow these guidelines in regards to the battery for your Hero Arm
● Do not bend or crush the battery
● Do not pierce the battery
● Do not try and disassemble the battery in any way
● Do not expose to excessive heat or leave in a vehicle
● Do not leave in direct sunlight
● Do not attempt to modify the connector or wiring of the battery in any way
● Do not use a damaged charger with the battery
● Do not use any charger other than the one provided
● Do not attempt to use the battery with any device other than your Hero Arm
● Do not dispose of the battery in regular waste - you must recycle it
● Do not attempt to connect the two terminals of the battery
WARNING:
If you observe any leaking from your battery, or it has swollen in any way, you must:
● Immediately disconnect it from the Hero Arm or Smart Charger
● Move the battery to a safe place and keep a minimum distance for 30 minutes
● Do not attempt to reuse the battery - you must dispose of it according to local
regulations
● Contact your prosthetist to inform them of the situation
28Warranty & Returns
The Hero Arm, its battery and Smart Charger are covered by a standard 12 month
warranty. This guarantees against any manufacturing defects or defects with your
Hero Arm which arise out of normal use.
You can purchase additional warranty packages to extend the length of cover -
please discuss this with your prosthetic provider.
If you think there is a problem with your Hero Arm, please first carefully read through
this manual in case any of your issues are addressed, before contacting
support@openbionics.com or your prosthetic provider.
The warranty does not apply to any components that have been subject to misuse,
excessive loads, subject to water damage, deliberate damage or modification by
uncertified persons unless otherwise permitted in this user manual or given written
permission from Open Bionics Ltd.
Please quote the serial number for your Hero Arm when requesting any warranty
repairs or returns. This can be found on the product information sticker located
under the battery on your arm. When returning your Hero Arm to us, please ensure
you package it appropriately - the original packaging in which you received your arm
is great for this purpose.
29Warnings
There’s a lot to take in in this document, so we’ve pulled out all the warnings in this
document and put them here for your convenience:
● The Hero Arm is not intended for use in activities that may result in injury or
death to the user or others as a result of it failing to perform the activity as
intended.
● The magnets for attaching covers on newer arms are nickel coated. Users
with a nickel allergy should avoid contact with the magnets and
corresponding metal disks on the covers to prevent a reaction.
● You must wear at least battery cover when using the Hero Arm. The batteries
are designed to be tough, but the covers give them a little extra protection
against knocks. Not wearing a cover could mean you need to get a
replacement battery.
● You should not carry objects heavier than 8kg. You could damage your Hero
Arm and the object could fall.
● Your Hero Arm is not water resistant and should be protected from heavy rain
and moisture. Your Hero Arm could get damaged.
● Do not expose the Hero Arm to a naked flame. Your arm won't catch fire, but it
will be burned and disfigured. Plastic fumes should not be inhaled.
● You should not attempt any maintenance or modification of your Hero Arm
(that doesn’t include the covers, customise away!)
● You should clean your Hero Arm with alcohol-free antibacterial wipes on a
regular basis. The flexible socket can be removed and washed with soapy
water.
● Do not dispose of your Hero Arm in household waste. Please return it to Open
Bionics via your prosthetist. It contains electrical components that need to be
recycled properly or they’ll damage the environment.
● Only use the batteries supplied by Open Bionics for the Hero Arm. Other
batteries might damage your Hero Arm, or be damaged by the Hero Arms.
Other batteries may not have all the safety features our does, batteries can
cause fires.
● Do not expose the battery to water, or leave it in an extremely hot environment
such as in a hot car, or exposed to direct sunlight. Doing so could damage the
battery leading to a fire.
● Do not dispose of batteries in household waste. They need to be recycled
properly to avoid damaging the environment. They could also cause a fire.
● See the Battery Safety section for a full list of battery warnings.
30Regulatory Compliance
Open Bionics declares that they meet appropriate European standards for design,
manufacture and supply of prosthetic products and user software.
Continued compliance with the standard is monitored by a programme of internal
and external audits.
All individual products are marked indicating that they comply with the requirements
of Regulation MDR 2017/745 (MDR).
The mark may be applied on packaging, accompanying literature or an
enclosure, rather than the product itself.
The Hero Arm and its associated components listed in this document are covered by
test certificates for:
Applicable standards Applicable EU Harmonised
Legislation
EN 60601-1-1 Regulation MDR 2017/745
EN 60601-1-2
EN 60601-1-6
31Symbols
CE mark
This mark indicates the product conforms with the essential
requirements and provisions of Regulation MDR 2017/745.
Caution
Indicates the need for the user to consult the instructions for use for
important information such as warnings and cautions
Manufacturer (adjacent to company name)
This mark indicates the manufacturer
Refer to instruction manual
Indicates the user must refer to the instruction manual before
operating the device.
Wheelie Bin (WEEE) mark
This mark indicates that the product falls under the WEEE Directive
(2012/19/EU)
Type BF Applied Part
Indicates a type BF (Body Floating) Part complying with IEC 60601-1
Class II Equipment
32Identifies equipment meeting the safety requirements for Class II
equipment according to IEC 61140
Rechargeable battery
This mark indicates that the product is designed to be used with
rechargeable batteries
Temperature Range
This symbol indicates the products temperature range
Serial Number
Indicates the serial number that uniquely identifies the device
Date of Manufacture
Indicates the date the medical device was manufactured
Use-by-date
Indicates the date after which the device is not to be used
33www.openbionics.com
Open Bionics,
Programme,
Tower Lane,
Bristol, UK
BS1 2NB
Email: hello@openbionics.com
Phone: +44 (0)117 428 5752
___________________________________________________________________________________
This document (#d100161) version 1.0 was released 18th May 2018.
Version 2.0 was released on 11th December 2018
Version 3.0 was released on 29th January 2019
Version 4.0 was released on 24th October 2019
Version 5.0 was released on 16th October 2020
Version 6.0 was released on 2nd June 2021
34You can also read