Activate and Setup your Zoom Account - myUSF
←
→
Page content transcription
If your browser does not render page correctly, please read the page content below

1

Activate and Setup your Zoom Account
This guide covers the activation and setup of the USF Zoom account. To start, visit the USF Zoom
site:
 https://usfca.zoom.us/

Click on the link Download Zoom on the upper right
side of the page and then click on the Download link
for Zoom Client for Meetings to download the
application installer. After locating the downloaded installer, double click on the file to install Zoom
on your Mac or PC.

 Instructional Technology and Training                           March 14, 2022
2

Activating your account and your Zoom
Profile
On the https://usfca.zoom.us site, click on Sign In and enter your
USF username and password to login and activate yur account.

Once signed in, check the options to personalize your profile and meeting links. To do this click on
Profile in the left column.

The top section allows you to upload a photo and set your display name as you want it. Click Edit
and make the changes for name, photo and Job information and click Save Changes to finish.

 Instructional Technology and Training                         March 14, 2022
3

 In the section Personal Meeting ID, you can set up a meeting ID which can be used for any scheduled or
 instant meeting. Click on the Edit link and type in the 9 or 10 digit number that will be your Personal
 Meeting ID. Check the box Use Personal Meeting ID for instant meetings. Click Save to finish.

 In the section Personal Link, you can personalize a meeting link to send out that attendees can click on
 to join any of your scheduled or instant meetings. Click on the Customize link to create a personalized
 name for your link. Click Save Changes to finish.

Customize Your Zoom Meeting Settings
Next click on Settings link along the left side of the account page. We won’t be going through
every setting, just the ones that you may want to adjust to fit your account needs.

 Instructional Technology and Training                            March 14, 2022

4

     Settings guide
 On the right side of the settings page are designations of the status of each particular setting.
 Here is a quick guide to the toggles for the settings
  Blue toggle                                   Setting or feature is enabled and can be changed
                                                by each user
  Gray toggle                                   Setting or feature is disabled and can be changed
                                                by each user
  Greyed out blue toggle                        Setting or feature has been enabled and locked
                                                by the administrator
  Greyed out gray toggle                        Setting or feature has been disabled and locked
                                                by the administrator

     Security
 The one setting we want to take look at is the Waiting Room. The default setting is to hold
 everyone in the waiting room when enabled for scheduled or instant meetings. You can customize
 the setting by clicking on the link Edit Options.

In the Options window, you can change the setting to only
hold users not in your account. There are other
customizations to the waiting room that you may want to
enable or adjust depending on your needs. One feature
that you can enable is the ability for people in the waiting
room to reply to the messaging that the hosts and co-hosts
can send to participants in the waiting room. Once you
have made your changes, click the button Continue to
finish.

 Instructional Technology and Training                         March 14, 2022
5

     Schedule Meeting
Here you can set up some default configurations for meetings that you schedule. First, for Host
Video and Participant Video the recommendation is to start with video on and then people can
choose to turn off their camera. For Audio Type, select Telephone and Computer Audio to provide
options for connecting audio to the meeting.

Next if you would like participants to be able to join the meeting before the host, click on the switch
on the right side of the page to turn on the feature. You can then check the box to set a time when
the participants can enter before the start time.

Finally, there are the option to use your Personal Meeting ID or PMI for meetings. The
recommended choices are to enable the PMI (it’s usually defaulted to being on), but to not enable
the use of the Personal Meeting ID when scheduliing a meeting. This defaults scheduled meetings to
create a random ID which is more secure but allows the option to select your PMI for any scheduled
meeting. Finally, enable the choice to use your PMI for any instant meetings. This way if you start
a new meeting from the Zoom app on your computer or mobile device it will default to use your
PMI for that type of unscheduled “instant” meeting.

 Instructional Technology and Training                          March 14, 2022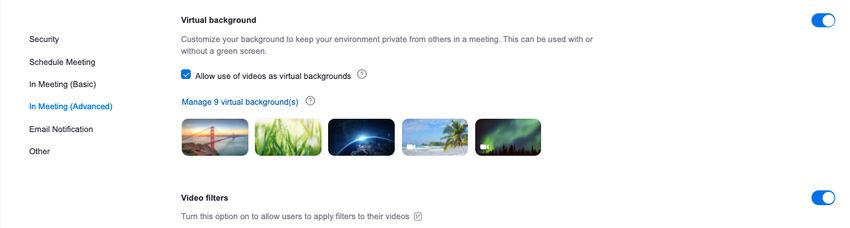
6

     In Meeting (Basic)
In this section, we cover settings for the in meeting tools tht you can set as defaults for all of your
meetings.
Chat
Meeting chat is enabled by default but you can also choose chat permissions as a default for all
meetings including chat behavior, saving of chat by participants and autosaving chats by the
scheduling host.

 Notifications and Sending Files
You can determine how visual and audio notifications will work when participants enter and leave
the meeting. The setting is on by default but you can turn it off completely or change who sees and
hears the notifications. You can also enable the feature to allow everyone in the meeting to be
able to send files through the chat. Note you can only send files to the entire meeting and not to
individuals. You can specify certain file typs (.docx, .pdf) and set a file size limit too.

Polls and Surveys
Polls are enabled by default for all accounts but you can check the box to enable the advanced
polls to have access to a wider range of question types and tools. You can also enable Meeting
Surveys to allow the host to present an end of meeting survey at the end of a presentation or
event.

 Instructional Technology and Training                            March 14, 2022
7

Screen Sharing and Annotation
The screen sharing permissions default to Host Only and it is advisable to keep that setting for
better security and to adjust sharing permissions during the meeting. Annotation is also on by
default so that any participant has the ability to annotate on a shared screen. There is a checkbox
in case you want to limit the annotation to the person who is sharing the screen too.

Slide Control and Reactions
You can enable the feature called Slide Control to provide the ability for participants in turn to
control the movement of slides in Powerpoint or Google Slides shared by the host. You can also
enable Non-verbal feedback to provide participants the ability to show verbal cues to the
presenter like slow down or speed up. Meeting reactions are enabled by default which provides
the raise hand feature as well as emojis to respond visually to questions or prompts.

 Instructional Technology and Training                        March 14, 2022
8

     In Meeting (Advanced)
Breakout Rooms and Closed Captioning
Breakout rooms are enabled by default but you can enable the feature to assign participants to
breakout rooms while schedule, usually referred to as pre-assignment. The checkbox to broadcast
messages to breakout rooms is also on by default. All of the closed captioning options are checked
by default including the option for Live Transcription which provides the ability for the host to turn
on machine generated captions for any meeting.

Virtual Backgrounds and Video Filters
Virtual backgrounds and video filters are on by default and you are able to add additional
images for your virtual backgrounds to be a part of your account.

 Instructional Technology and Training                         March 14, 2022
9
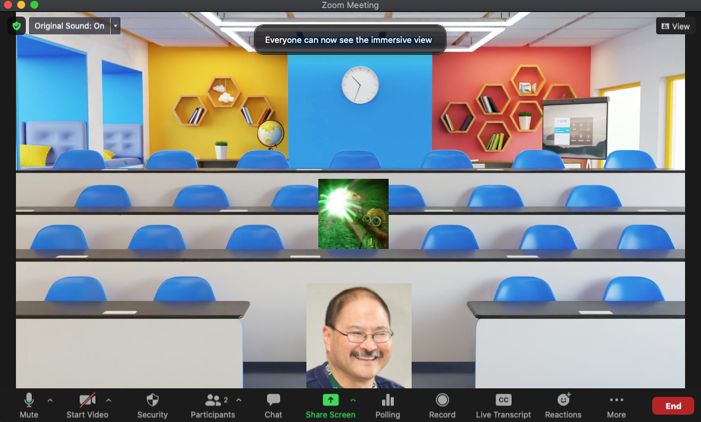
Immersive View and Focus Mode
Enabling immersive View will allow you to place the video thumbnails of the Zoom gallery into a
virtual background like a tiered classroom or table to create the illusion of a real space.
Enabling Focus Mode will allow you to change the meeting views by the participants to see only the
host and co-hosts as well as any participants that have been spotlighted. You can also decide
whether any shred scrren by the participants can be seen by just the host and co-host or by all
participants in the meeting.
Other
Schedule Privilege
If you have a need to have a colleague to be able to schedule Zoom meetings for you, you can
assign them to be authorized to schedule meetings on your behalf. Note that when a scheduler
creates a meeting for you, it will show up in your account and in the account of the scheduler.
Instructional Technology and Training March 14, 2022
10
Customize Your Zoom Recording Settings
Here you can configure your default settings for all of your cloud recordings. To begin, login to
your USF Zoom account at https://usfca.zoom.us and click on Settings on the left side of the page.
Then click on the Recording tab at the top center of the page.
Recording to your Local Computer
In the Local recording section, you can choose to auto save the chat file as well as captions that are
provided by either a 3rd party service or Live Transcription. Finally there is an option to assign a
participant permission to record the meeting to their own computer too.
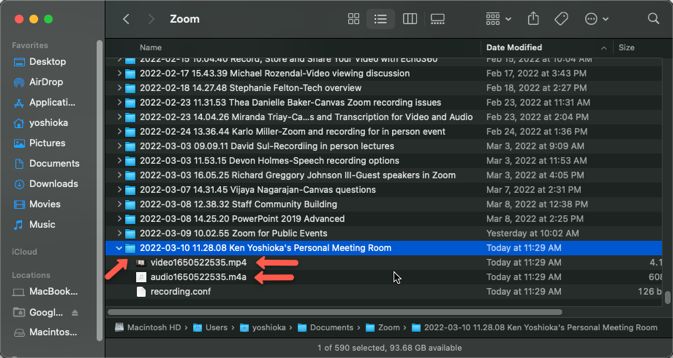
When you record to the local computer, the files are stored in a folder labeled as Zoom In your
Mac or PC’s Documents folder. When the meeting ends, Zoom will convert the Zoom recording to
useable media. Each meeting will have it’s own dated folder with the mp4 video and m4a audio
files.
Instructional Technology and Training March 14, 202211 Recording to the Cloud In the Cloud recording section, the default is to record active speaker with shared screen and to record an audio only file of all the participants. In addition, the chat messages are saved by default and a part of the meeting recording. You can uncheck the save chat messages box to prevent the chat messages from being a part of the recording. You can change the settings to record the gallery view with the shared screen and in addition choose to record the active speaker, gallery and shared screen as separate recordings. The next section is the Advanced cloud recording settings. The default settings are usually fine for most recordings but the one setting you may want to enable is Optimize the recording for 3rd party video editor. This will provide better compatibility with video editors like iMovie and Camtasia. Instructional Technology and Training March 14, 2022
12

Below the Advanced cloud recordings settings section are the recording permissions; all of these
settings can remain in their default selections but you can change the permissions in each recording
before sharing. One important note is that there is a retention policy for all Zoom cloud recordings
and recordings are automatically deleted and sent to the trash after 182 days. After 30 days in
the trash, they are permanently deleted. If you need to keep a recording, then the files need to be
downloaded before permanent deletion.

 Instructional Technology and Training                        March 14, 2022
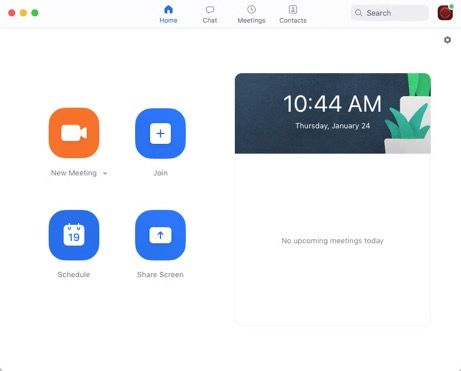
13

Finally launch the Zoom client you installed earlier and
you will view the startup screen. Click Sign In to
continue.

 Click on the icon SSO and enter usfca into the field under Sign In with SSO and click Continue.

 You will be redirected to the USF login page to
 login with your USF username and password to
 sign in to Zoom.

 Once you have signed in, you will see the Zoom
 app window to start, join and schedule meetings.

 Instructional Technology and Training                            March 14, 2022
You can also read