SB168-ES Firmware Update Guide
←
→
Page content transcription
If your browser does not render page correctly, please read the page content below
SB168-ES Firmware Update Guide
Thank you for choosing a Yamaha product.
This guide explains how to update the SB168-ES firmware and its built-in EtherSound module firmware.

■ Precautions (please be sure to read these)
・ The user assumes full responsibility for the update.
・ Update the firmware components one unit at a time.
・ Please note that the device may be damaged if you fail to follow these instructions properly, or turn off
  the device or disconnect the cable while the update is in progress.
・ If the update fails, and the device still does not operate correctly even after you execute the update
  once again, please contact your Yamaha dealer.
・ Yamaha Corporation owns exclusive copyrights for the SB168-ES firmware, its update program, and
  the update guide.
・ AuviTran owns exclusive copyrights for the EtherSound firmware and its update program.
・ It is prohibited to duplicate or modify the firmware, software or guides, in part or in their entirety, without
  permission from the copyright owner.
・ The screen shots in this guide are for use with this update procedure only and may be different from the
  actual screen shots.
・ EtherSound is a registered trademark of Digigram S.A.
・ Windows is a registered trademark of Microsoft ® Corporation in the United States and other countries.
・ The company names and product names in this document are the trademarks or registered trademarks
  of their respective companies.

                                                       1
■ Checking the version number
・ You can determine the SB168-ES firmware version number by the illumination pattern of the INPUT
jack indicators when the power is turned on.
Version Illumination pattern
1.0 Each INPUT jack indicator lights in sequence from INPUT 1 to INPUT 8, and INPUT 16 to
INPUT 9 in parallel.
1.1 or later The number of simultaneous illuminations of all INPUT 1-8 indicators represents the first
digit of the version number. The number of simultaneous illuminations of all INPUT 9-16
indicators represents the fraction number. The version number illumination is repeated
twice.
For example, if the firmware is version 1.1, INPUT 1-8 indicators will light simultaneously
once, then turn off. Then, INPUT 9-16 indicators will light simultaneously twice, then turn
off. (This entire pattern will be repeated twice.)
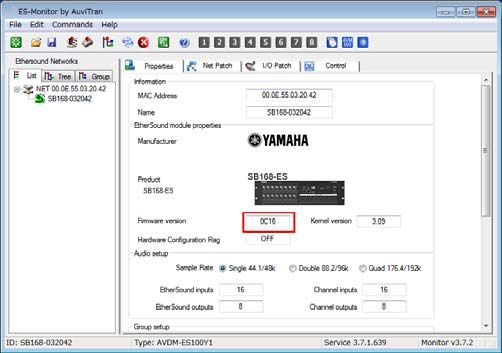
・ You can check EtherSound firmware version using AuviTran AVS-ESMonitor or ES-Firmware Updater
(EtherSound firmware update program).
AVS-ESMonitor ES-Firmware Updater
2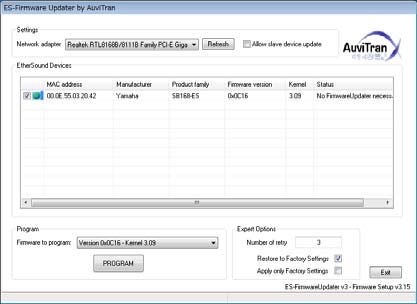
■ Preparing for the update
  You will need the following items ready to execute the update procedure.
  ●    A Windows computer equipped with the following conditions:
      OS                   Windows 7       Ultimate / Professional / Home Premium
                           Windows         Ultimate / Enterprise / Business / Home Premium /
                           Vista           Home Basic
                           Windows XP      Professional SP2or later / Home Edition SP2 or later
      CPU                  Intel Pentium 1.2GHz or Intel Celeron 1.7GHz or higher
      HDD                  250MB or more
      Network connector    An Ethernet connector that supports a data transfer rate of 100Mbps or higher
 ●     An Ethernet cable (CAT5e or higher recommended. Straight or cross.)
 ●     The SB168-ES firmware update program
       Download the latest program from the following URL.
       http://www.yamahaproaudio.com/downloads/
 ●     The EtherSound firmware update program
       Download the latest program from the following URL.
       http://www.auvitran.com/view.php?downloads_updates.php

■ Update procedure sequence
Update each firmware component in the following sequence:
If you plan to update multiple SB168-ES units, repeat the procedure described in “Updating SB168-ES
firmware” and “Updating the EtherSound firmware” for each unit in sequence.
                                     TCP/IP settings of computer

                                   Updating the SB168-ES firmware

                                   Updating the EtherSound firmware

                                                   3
■ TCP/IP settings of computer
Before you update the SB168-ES firmware, you must modify your computer's TCP/IP settings.
After the firmware update procedure is complete, return the TCP/IP settings to their original settings.
Windows Vista / 7
1. Select [Start] → [Control Panel], then click 6. Enter your computer's IP address
or double-click [Network and Sharing "192.168.0.101" into [IP address], and
Center] or [View network status and tasks]. "255.255.255.0" into [Subnet mask].
The "Network and Sharing Center" is displayed.
2. Click [Manage network connection] or
[Change Adapter settings] from the “Tasks”
list located in the left side of “Network and
Sharing Center” window, then double-click
[Local Area Connection].
The "Local Area Connection Status" dialog box will
be displayed.
NOTE
・The "User Account Control" dialog box may
appear. Click [Continue] or [Yes].
・If the "Local Area Connection properties" dialog
box appears, skip ahead to step 4.
3. Click [Properties].
The “Local Area Connection properties” dialog box
will be displayed.
NOTE
・The "User Account Control" dialog box may
appear. Click [Continue] or [Yes].
NOTE
4. Select [Internet Protocol Version 4 ・If you specify other values for the IP address, you
(TCP/IPv4)], then click [Properties]. will be unable to update SB168-ES firmware.
The "Internet Protocol Version 4(TCP/IPv4) Protocol"
dialog box will be displayed.
7. Click [OK].
5. Click [Use the following IP address].
4Windows XP
1. Select [Start] → [Control Panel]. 7. Enter your computer's IP address
The "Control Panel" is displayed.
"192.168.0.101" into [IP address], and
"255.255.255.0" into [Subnet mask].
2. If the control panel appears as category
view, click [Switch to Classic View].
3. Double-click [Network Connections] →
[Local Area Connection].
The "Local Area Connection Status" dialog box will
be displayed.
NOTE
・If the "Local Area Connection properties" dialog
box appears, skip ahead to step 5.
4. Click [Properties].
The "Local Area Connection Properties" dialog box
will be displayed.
5. Select [Internet Protocol (TCP/IP)], then
click [Properties].
The "Internet Protocol (TCP/IP) Properties" dialog
box will be displayed.
6. Click [Use the following IP address]. NOTE
・If you specify other values for the IP address, you
will be unable to update SB168-ES firmware.
8. Click [OK].
5■ Updating the SB168-ES firmware
This section explains how to update the SB168-ES firmware.
Before you start updating the firmware, decompress the downloaded compressed file. Place
“SB168-ES_PROG.bin," "update.exe" and “update.ini” in the same folder.
NOTE
・ For information about messages displayed by the SB168-ES firmware update program, refer to “Error Message List
(SB168-ES Update Program)“ at the end of this guide.
・ Before starting the update program, quit all other programs. While the update is in progress, do not start any other
programs or switch between windows.
・ If your computer enters Sleep or Energy Save mode, data transfer to the device may stop. Therefore, you should disable
these functions to prevent this from happening. We also recommend that you do not use any screen saver or similar
background programs.
1. Connect the NETWORK jack on the rear 4. Double-click [update.exe].
panel of the SB168-ES unit to the Ethernet The SB168-ES Update Program will start up.
jack on the computer using an Ethernet Make sure that the fields in the "File" section indicate
cable. as follows:
file name :SB168-ES_PROG.bin
product name :SB168-ES_PROG
version :Version number to which the
firmware will be updated
2. Make a note of the current settings of the
dip switches located on the front panel of
the SB168-ES.
Write down the current dip switch settings before you
modify them in the next step, since you will need to
return the switches to their original settings in step 8.
3. Set dip switches 5 and 6 (located on the
front panel of SB168-ES) to the down
position (ON), leave dip switches 7 and 8 in
the up position (OFF), then turn on the
power to the SB168-ES.
All +48V indicators will blink and the unit will start up NOTE
in Update mode. ・When running under Windows Vista / 7, the
"User Account Control" dialog box may appear.
Click [Continue] or [Yes].
5. Click the [Connection] button in the
“Connect and Update” column.
The “product name” field will display “SB168-ES,”
and the “version” field will display the version number
of the SB168-ES firmware.
NOTE
・If these fields are empty, your computer may not
be properly connected to the SB168-ES. Please
make sure that the cable is not disconnected or
damaged, that the TCP/IP settings are correct,
and that the SB168-ES has started in Update
mode.
66. Click the [Update] button in the “Connect
and Update” column.
The update operation will begin.
The update will take about 90 seconds. During the
update operation, do not turn off the power to the
unit or disconnect the cable. If update fails due to
disconnection of the power cable during the
update, or due to other reasons, the device may
become inoperative.
7. When the “Connect and Update” section
displays the message “Updating was
completed. Close this Update Program”
click the [X] button in the upper-right corner
of the program window to close the
program.
8. Turn off the power to the SB168-ES, then
return the dip switches to their original
settings.
Return the dip switches back to the settings you
noted in step 2.
Proceed to the update procedure for the EtherSound
firmware.
7■ Updating the EtherSound firmware
This section explains how to update the firmware for the EtherSound module built into the SB168-ES.
NOTE
・For more information on the ES-Firmware Updater, an EtherSound firmware update program, visit the AuviTran SARL
website or refer to the “ES-Firmware Updater USER’S MANUAL” installed during the course of this update.
1. Double-click “AVS-FirmwareUpdater Setup 5. Scroll to the end of the agreement, then
vx.xx.exe” (an update program installer you click [I Agree].
downloaded from the AuviTran website), The ES-Firmware Updater will start up.
then follow the instructions on screen to
NOTE
install the program.
・If a dialog box enabling you to stop the
“vx.xx” represents the version number of the
EtherSound service appears, click [Yes].
ES-Firmware Updater.
NOTE
・When running under Windows Vista / 7, the "User
Account Control" dialog box may appear. Click
[Continue] or [Yes].
・You may be prompted to restart the computer after
the installation is complete. Before proceeding to
step 2, restart the computer.
2. Connect the EtherSound [IN] jack on the
front panel of the SB168-ES unit to the
Ethernet jack on the computer using an
Ethernet cable.
6. For [Network adapter] in the “Settings”
section, select the network adapter for the
Ethernet connector that is connected to the
SB168-ES.
7. Check the box to the left of the device
description listed in the “EtherSound
3. Turn on the power to the SB168-ES. Devices” section.
NOTE
4. Select [Start]→[All programs]→[AuviTran]→ ・If no device is listed, click the [Refresh] button.If
[Firmware Update]→[ES-Firmware Updater]. still no device is listed, your computer may not be
properly connected to the SB168-ES.Please make
A license agreement dialog box will appear. sure that the cable is not disconnected or
damaged, that you have selected the correct
NOTE network adapter, and that the SB168-ES has
・When running under Windows Vista / 7, the started in Normal mode.
"User Account Control" dialog box may appear.
Click [Continue] or [Yes].
8. Select an appropriate firmware component
for [Firmware to program:] in the “Program”
section.
Select firmware version 0x0C16 or later.
89. Click the [PROGRAM] button in the
“Program” section.
The update operation will begin.
The update will take about 3 minutes. During the
update operation, do not turn off the power to the
unit or disconnect the cable. If update fails due to
disconnection of the power cable during the
update, or due to other reasons, the device may
become inoperative.
10. When a “Success!” dialog box appears,
click [OK].
The update is now complete. If a dialog box other
than “Success!” appears, first make sure that the
devices are connected properly, then close the
ES-Firmware Updater without turning off the power
to the SB168-ES. Then, resume the procedure from
step 4.
11. Restart the SB168-ES.
12. Click the [Refresh] button in the “Settings”
section.
The “EtherSound Devices” section will display
information on the SB168-ES that you just restarted.
13. Make sure that the firmware version
displayed in the “EtherSound Devices”
section matches the firmware version to
which you just updated.
If the version numbers do not match, the update
operation may have failed. Try the update operation
again, starting from step 7.
14. Click [Exit].
The ES-Firmware Updater will close.
The EtherSound firmware update is now complete.
9■ Error Message List (SB168-ES Update Program)
Error messages (that consist of an error number and a string in English) for the SB168-ES Update Program
may be displayed on the computer.
This section explains the error numbers, the English strings, and the appropriate action to take.
NOTE
・ If the same error message appears each time you try to update, the device may need repairing, in which case you
should contact your Yamaha dealer.
Number Summary Response
[ERROR:001] - [ERROR:006], An error occurred while communicating with the Make sure that the computer is
[ERROR:101] - [ERROR:107] device. connected to the SB168ES correctly,
then restart the SB168-ES Update
Program and the SB168-ES unit.
(→P.6)
[ERROR:009] The SB168-ES is not engaged in Update mode. First turn off the power to the
SB168-ES, then set dip switches 5 and
6 to the down position (ON) and set dip
switches 7 and 8 to up position (OFF).
Then, turn on the power to the unit. (→
P.5)
[ERROR:108]、[ERROR:109] Information on the SB168-ES could not be The device may need repairing, in
obtained. which case you should contact your
Yamaha dealer.
[ERROR:111] The firmware data file was not found. Place the “SB168-ES_PROG.bin” file in
the folder that contains the
“update.exe” file. (→P.6)
U.R.G., Pro Audio & Digital Musical Instrument Division, Yamaha Corporation
© 2010 Yamaha Corporation
A0
10You can also read