AMERICAN RED CROSS FIRST AID/CPR/AED FOR - SCHOOLS & THE COMMUNITY CERTIFICATION COURSE
←
→
Page content transcription
If your browser does not render page correctly, please read the page content below

AMERICAN
  RED
  CROSS

              CERTIFICATION COURSE


           FIRST
  AID/CPR/AED


                        FOR


       SCHOOLS
  &
  THE
  COMMUNITY


                        1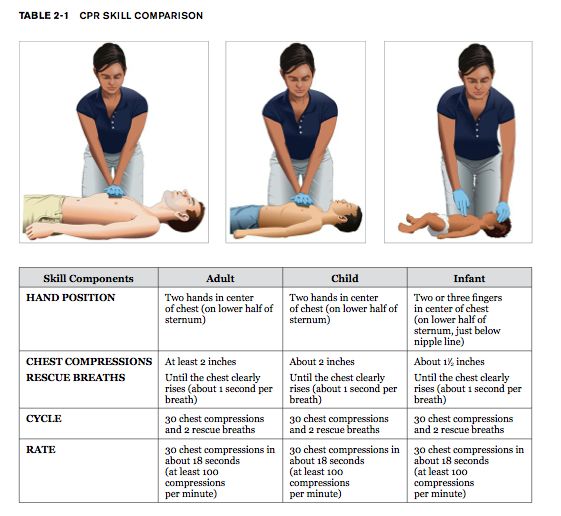
2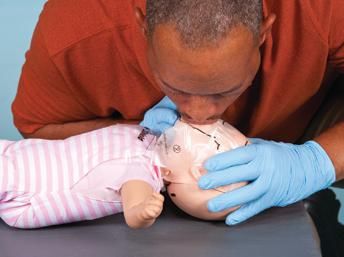
AMERICAN RED CROSS CERTIFICATION COURSE INTRODUCTORY INFORMATION

IMPORTANT
  NOTE:
  THIS
  IS
  A
  RED
  CROSS
  PROGRAM
  WITH
  APPLICABLE
  RED
  CROSS
  STUDENT
  FEES
  FOR
  CERTIFICATION.
  ALL
  FEES
  AND
  DEADLINES

ARE
  THE
  RESPONSIBILITY
  OF
  THE
  STUDENT.
  PLEASE
  BE
  SURE
  TO
  MEET
  ALL
  DEADLINES
  FOR
  FEES
  AND
  TESTING
  TO
  AVOID
  FORFEITURE
  OF
  YOUR

CERTIFICATION
  OPPORTUNITY.


      I.           Health precautions and guidelines during training
                   a.            Cleaning, decontamination and disease transmission
                                  1.     If guidelines are followed, you reduce the risk of disease transmission.
                                  2.     Request a breathing barrier and/or separate manikin…
                                     (a)    If you have an acute condition (cold, sore throat, cuts or sores on hands or
                                            around mouth, etc.)
                                     (b)    If you know you are seropositive (have had a positive blood test) for hepatitis b,
                                            hepatitis c or the human immunodeficiency virus (HIV).
                                     (c)    If you have any type of condition that makes you unusually likely to get an
                                            infection.
                                     (d)    To obtain information about testing for individual health status, visit the CDC
                                            website at: www.cdc.gov/ncidod/diseases/hepatitis/c/faq.htm
                                     (e)    Note: Persons who have had a hepatitis b vaccine will test positive for the
                                            hepatitis antibody. This should not be confused with a positive test for the
                                            hepatitis b surface antigen.
                                  3.     Cleaning guidelines
                                     (a)    Wash your hands thoroughly before participating in class activities involving use
                                            of the manikins and/or AED
                                     (b)    Do not eat, drink, chew gum or use any lip balms while using the manikins
                                     (c)    Clean the manikin properly before use.
                                            (1)      Wipe the manikins face and inner mouth vigorously with a gauze pad
                                                     soaked in a fresh solution of liquid chlorine bleach (one quarter cup
                                                     sodium hypochlorite to one gallon of tap water).
                                            (2)      Allow the surfaces to remain wet for at least 1 minute.
                                            (3)      Wipe dry with a clean paper towel
                                            (4)      Do not place your finger into the mouth of a manikin to demonstrate a
                                                     finger sweep on a choking victim – simulate this skill unless otherwise
                                                     directed by your instructor.
                                  4.     Physical stress and injury
                                     (a)    Successful course completion requires full participation in classroom and skill
                                            sessions, as well as successful performance in skill and knowledge evaluations.
                                     (b)    Due to the nature of the skills in this course, you will be participating in strenuous
                                            activities, such as performing CPR on the floor.
                                     (c)    If you have a medical condition or disability that will prevent you from
                                            participating in the skills practice sessions, please let your classroom teacher know
                                            as soon as possible so that accommodations can be made.
                                     (d)    Be aware that you will not be eligible to receive a course completion certificate
                                            unless you participate fully and meet all course objectives and prerequisites.
      II.          American Red Cross Preparedness Guidelines
                   a.            Have a family disaster plan – both household and individual
                                   1.     Build a home and school disaster supply kit in case you are confined to your home
                                          for an extended period of time due to disaster, storm, etc. and/or are told to
                                          evacuate on short notice
                   b.            Get trained!
                   c.            Volunteer!
                   d.            Give Blood!
                   e.            For more information, visit www.redcross.org


                                                                                                  3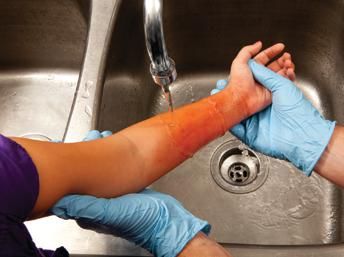
PROCEDURES
FOR
PRACTICAL
AND
WRITTEN
CERTFICATION
EXAM
DAY
1 Arrive
no
later
than
7:15am
in
the
large
gym
on
the
irish
road
side.
2 Arrive
well-‐rested…
you
will
be
taking
tests
that
involve
physical
activity…
sleep
well
the
night
before!
studying
should
be
spread
over
several
weeks
–
not
one
night.
3 Enter
via
the
small
gym
to
the
front
lobby
to
pick
up
registration
materials,
then
proceed
into
the
large
gym
4 What
to
bring:
a. health
notebook
–
no
backpack,
cell
phones,
valuables,
food
or
drink
will
be
permitted
in
the
gymnasium.
b. do
not
store
your
backpack
or
valuables
in
the
locker
room
–
we
cannot
be
responsible
for
the
security
of
your
belongings
as
classes
will
be
using
the
facilities
throughout
the
day.
c. bring
pencil(s)
–
no
pens
permitted
near
the
manikins
d. wear
comfortable
clothing
that
meets
the
school
dress
code.
remember
–
you
will
be
on
the
floor
all
day
and
will
be
working
around
bleach.
you
should
be
wearing
“play
clothes”.
e. do
not
wear
any
lip
products
as
they
will
damage
the
manikins
and
harbor
bacteria
5 Schedule
for
the
day
a. you
will
have
three
scheduled
opportunities
to
hand
in
work
during
the
day.
i. morning
15-‐minute
break
ii. 45-‐minute
lunch
iii. post-‐testing
15
minute
break
6 Notes
on
homework
and
your
classes:
a. you
should
bring
the
homework
due
for
the
day
–
your
teachers
will
be
expecting
it.
you
should
have
made
arrangements
in
advance
for
turning
in
the
work
via
their
classroom,
mailbox,
department
room
or
electronic
submission.
b. you
will
not
need
your
books
for
periods
1-‐5.
depending
on
your
individual
progress,
you
should
return
to
class
some
time
during
periods
6-‐8.
c. you
will
receive
a
pass
to
take
a
break
prior
to
your
return
to
class
in
addition
to
time
to
get
your
cpr
resting
results
immediately.
you
are
to
be
in
class
by
the
time
designated
on
your
pass.
failure
to
do
so
will
result
in
a
disciplinary
referral.
7 The
written
test
will
be
taken
on
the
gym
floor
–
you
will
be
lying
down
–
feel
free
to
bring
a
pillow,
exercise
mat
or
anything
else
that
will
help
you
to
be
comfortable.
8 Please
notify
your
instructor
at
least
one
week
in
advance
of
any
planned
field
trip
or
other
absence
from
school
on
the
certification
days.
failure
to
do
so
may
result
in
us
being
unable
to
accommodate
you
on
another
day
as
the
american
red
cross
requires
a
specific
ratio
of
students
to
instructors
for
our
program
to
be
in
compliance
with
certification
policies.
9 Reminder:
Any
student
who
does
not
attend
certification
will
be
required
to
complete
the
alternative
project
in
order
to
pass
the
course.
This
includes
students
who
are
ill
or
injured
and
unable
to
complete
the
practical
exam!
CERTIFICATION DUE DATES:
FEE AMOUNT: DUE (check payable to CHS)
MY PRACTICAL EXAM DATE
MY WRITTEN EXAM DATE RE-TEST DEADLINE
4
WHY CERTIFICATION?
Certification vs. Good Samaritan Law protection in today’s society
ü What does American Red Cross Certification do for me?
ü What does the Good Samaritan Law state?
ü What would a “reasonable” and “prudent” person do?
1
2
3
4
5
5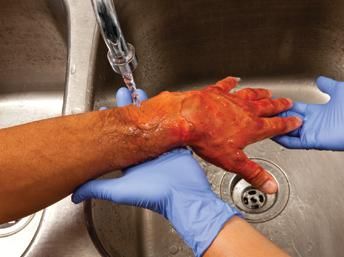
REMEMBER THE RED CROSS MOTTO: “DO NO FURTHER HARM”

                                 C.P.R. ACRONYMS and TERMS to remember

C.P.R.

A.E.D. (p. 29)

E.M.S. (p. 2)

D.N.R. and D.N.A.R.(p. 37) -

         Living Will (p. 37) -

F.A.S.T. (p. 158)

H.A.IN.E.S. Position (p. 19)

R.I.C.E. (p. 135)

I.C.D. (p. )

I.C.E.

EMERGENCY ACTION STEPS

S.I.D.S. (p. 36)

                                                   6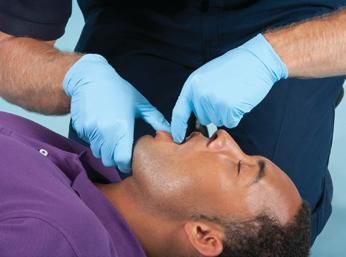
CLASSROOM

  VIDEO

  NOTES

    7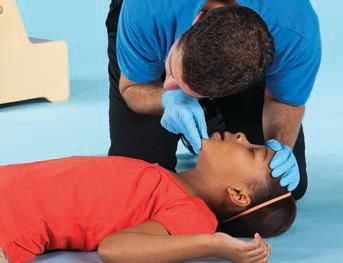
AMERICAN RED CROSS COMMUNITY PRACTICAL EXAM NOTES

SECTION A: BEFORE GIVING CARE AND CHECKING AN INJURED OR ILL PERSON

A1.   INTRODUCTION (2:13) HTTP://INSTRUCTORSCORNER.ORG/MEDIA/VIDEOS/A1.HTML

A2.   WHAT WOULD YOU DO? (1:36) HTTP://INSTRUCTORSCORNER.ORG/MEDIA/VIDEOS/A2.HTML

A3.   CHECKING AN UNCONSCIOUS ADULT AND CHILD (3:36)
      HTTP://INSTRUCTORSCORNER.ORG/MEDIA/VIDEOS/A3.HTML

A4.   CHECKING AN UNCONSCIOUS INFANT (1:51) HTTP://INSTRUCTORSCORNER.ORG/MEDIA/VIDEOS/A4.HTML

A5.   SHOCK (1:52) HTTP://INSTRUCTORSCORNER.ORG/MEDIA/VIDEOS/A5.HTML

                                                          8
SECTION B: CARDIAC EMERGENCIES AND CPR

B1.   RECOGNIZING AND CARING FOR CARDIAC EMERGENCIES (4:28)
      HTTP://INSTRUCTORSCORNER.ORG/MEDIA/VIDEOS/B1.HTML

B2.   CPR ADULT AND CHILD (7:46) HTTP://INSTRUCTORSCORNER.ORG/MEDIA/VIDEOS/B2.HTML

B3.   PUTTING IT ALL TOGETHER: CPR ADULT (2:03) HTTP://INSTRUCTORSCORNER.ORG/MEDIA/VIDEOS/B3.HTML

B4.   CPR INFANT (6:51) HTTP://INSTRUCTORSCORNER.ORG/MEDIA/VIDEOS/B4.HTML

B5.   PUTTING IT ALL TOGETHER: CPR INFANT (1:52) HTTP://INSTRUCTORSCORNER.ORG/MEDIA/VIDEOS/B5.HTML

                                                          9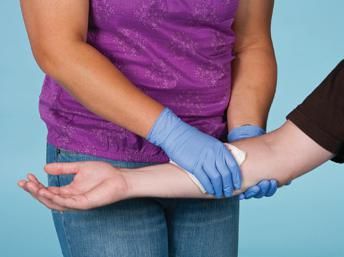
SECTION C: AUTOMATED EXTERNAL DEFIBRILLATOR

C1.   USING AN AED (4:45) HTTP://INSTRUCTORSCORNER.ORG/MEDIA/VIDEOS/C1.HTML

SECTION D: BREATHING EMERGENCIES

D1.   CONSCIOUS CHOKING ADULT AND CHILD (2:25)
      HTTP://INSTRUCTORSCORNER.ORG/MEDIA/VIDEOS/D1.HTML

D2.   CONSCIOUS CHOKING INFANT (1:56) HTTP://INSTRUCTORSCORNER.ORG/MEDIA/VIDEOS/D2.HTML

D3.   UNCONSCIOUS CHOKING ADULT AND CHILD (2:19)
      HTTP://INSTRUCTORSCORNER.ORG/MEDIA/VIDEOS/D4.HTML

                                                          10
SECTION E: FIRST AID
E1. RECOGNIZING SUDDEN ILLNESS (8:27) HTTP://INSTRUCTORSCORNER.ORG/MEDIA/VIDEOS/E1.HTML
E2. PLAYGR0UND PANDMONIUM (1:15) HTTP://INSTRUCTORSCORNER.ORG/MEDIA/VIDEOS/E2.HTML
E3. CONTROLLING EXTERNAL BLEEDING (2:28) HTTP://INSTRUCTORSCORNER.ORG/MEDIA/VIDEOS/E3.HTML
E4. INJURIES TO MUSCLES, BONES AND JOINTS (1:41)
HTTP://INSTRUCTORSCORNER.ORG/MEDIA/VIDEOS/E4.HTML
11SECTION F: FIRST AID
F1. APPLYING A MANUFACTURED TOURNIQUET (1:22)
HTTP://INSTRUCTORSCORNER.ORG/MEDIA/VIDEOS/F0.HTML
F2. ASSISTING WITH AN ASTHMA INHALER (3:08) HTTP://INSTRUCTORSCORNER.ORG/MEDIA/VIDEOS/F1.HTML
F3. ASSISTING WITH AN EPINEPHRINE AUTO-INJECTOR (2:56)
HTTP://INSTRUCTORSCORNER.ORG/MEDIA/VIDEOS/F2.HTML
AUTO-INJECTOR PRACTICE:
F4. BLOODBORNE PATHOGENS TRAINING: PREVENTING DISEASE TRANSMISSION (16:59)
HTTP://INSTRUCTORSCORNER.ORG/MEDIA/VIDEOS/F3.HTML
F5. HANDS-ONLY CPR (1:42) HTTP://INSTRUCTORSCORNER.ORG/MEDIA/VIDEOS/F4.HTML
F6. THE HEART’S ELECTRICAL SYSTEM (5:35) HTTP://INSTRUCTORSCORNER.ORG/MEDIA/VIDEOS/F5.HTML
F7. SPLINTING (5:07) HTTP://INSTRUCTORSCORNER.ORG/MEDIA/VIDEOS/F6.HTML
12MISCELLANEOUS VIDEO NOTES:
13PRACTICAL EXAM READY REFERENCE CARDS
14Adult First Aid/CPR/AED
READY REFERENCE
15
                       CHECKING AN INJURED OR ILL
                       ADULT
                       APPEARS TO BE UNCONSCIOUS

                         TIP: Use disposable gloves and other personal protective
                         equipment and obtain consent whenever giving care.

       AFTER CHECKING THE SCENE FOR SAFETY, CHECK THE PERSON:

         CHECK FOR RESPONSIVENESS
         Tap the shoulder and shout, “Are you OK?”

         CALL 9-1-1
         If no response, CALL 9-1-1 or the local emergency number.
            If an unconscious person is face-down, roll face-up,
            supporting the head, neck and back in a straight line.
         If the person responds, obtain consent and CALL 9-1-1 or the local emergency
         number for any life-threatening conditions.
         CHECK the person from head to toe and ask questions to find out what happened.

         OPEN THE AIRWAY
         Tilt head, lift chin.

                                                    PANEL     2


                                                      16
CHECK FOR BREATHING
CHECK quickly for breathing for no more than
10 seconds.
Occasional gasps are not breathing.
QUICKLY SCAN FOR SEVERE BLEEDING
WHAT TO DO NEXT
Give CARE based on conditions found.
IF NO BREATHING—Go to PANEL 6 or PANEL 7
(if an AED is immediately available).
IF BREATHING—Maintain an open airway and monitor
for any changes in condition.
PANEL 3
17CONSCIOUS CHOKING
CANNOT COUGH, SPEAK OR BREATHE
AFTER CHECKING THE SCENE AND THE INJURED OR ILL PERSON,
HAVE SOMEONE CALL 9-1-1 AND GET CONSENT.
GIVE 5 BACK BLOWS
Give 5 back blows.
Bend the person forward at the waist and
give 5 back blows between the shoulder
blades with the heel of one hand.
GIVE 5 ABDOMINAL THRUSTS
Place a fist with the thumb side against
the middle of the person’s abdomen, just
above the navel.
Cover your fist with your other hand.
Give 5 quick, upward abdominal thrusts.
CONTINUE CARE
Continue sets of 5 back blows and
5 abdominal thrusts until the:
Object is forced out.
Person can cough forcefully or breathe.
Person becomes unconscious.
WHAT TO DO NEXT
IF THE PERSON BECOMES UNCONSCIOUS—CALL 9-1-1, if not already done, and
give care for an unconscious choking adult, beginning with looking for an object
(PANEL 5, Step 3).
PANEL 4
18UNCONSCIOUS CHOKING
CHEST DOES NOT RISE WITH RESCUE BREATHS
AFTER CHECKING THE SCENE AND THE INJURED OR ILL PERSON:
GIVE RESCUE BREATHS
Retilt the head and give another
rescue breath.
GIVE 30 CHEST
COMPRESSIONS
If the chest still does not rise,
give 30 chest compressions.
TIP: Person must be on firm, flat surface.
Remove CPR breathing barrier when giving
chest compressions.
LOOK FOR AND REMOVE
OBJECT IF SEEN
GIVE 2 RESCUE BREATHS
WHAT TO DO NEXT
IF BREATHS DO NOT MAKE THE CHEST RISE—Repeat steps 2 through 4.
IF THE CHEST CLEARLY RISES—CHECK for breathing. Give CARE based
on conditions found.
PANEL 5
19CPR
NO BREATHING
AFTER CHECKING THE SCENE AND THE INJURED OR ILL PERSON:
GIVE 30 CHEST
COMPRESSIONS
Push hard, push fast in the middle of the
chest at least 2 inches deep and at least
100 compressions per minute
TIP: Person must be on firm, flat surface.
GIVE 2 RESCUE BREATHS
Tilt the head back and lift the chin up.
Pinch the nose shut then make a complete
seal over the person’s mouth.
Blow in for about 1 second to make the
chest clearly rise.
Give rescue breaths, one after the other.
Note: If chest does not rise with rescue breaths,
retilt the head and give another rescue breath.
DO NOT STOP
Continue cycles of CPR. Do not stop CPR except in one of these situations:
You find an obvious sign of life, such as breathing.
An AED is ready to use.
Another trained responder or EMS personnel take over.
You are too exhausted to continue.
The scene becomes unsafe.
WHAT TO DO NEXT
IF AN AED BECOMES AVAILABLE—Go to AED, PANEL 7.
IF BREATHS DO NOT MAKE THE CHEST RISE— AFTER RETILTING HEAD—Go to
Unconscious choking, PANEL 5.
TIP: If at any time you notice an obvious sign of life, stop
CPR and monitor breathing and for any changes in condition.
PANEL 6
20AED—ADULT OR CHILD OLDER THAN 8
YEARS OR WEIGHING MORE THAN 55 POUNDS
NO BREATHING
AFTER CHECKING THE SCENE AND THE INJURED OR ILL PERSON:
TIP: Do not use pediatric AED pads or equipment on an adult
or child older than 8 years or weighing more than 55 pounds.
TURN ON AED
Follow the voice and/or visual prompts.
WIPE BARE CHEST DRY
TIP: Remove any medication patches with a gloved hand.
ATTACH PADS
PANEL 7
21PLUG IN CONNECTOR,
IF NECESSARY
STAND CLEAR
Make sure no one, including you, is touching
the person.
Say, “EVERYONE, STAND CLEAR.”
ANALYZE HEART RHYTHM
Push the “analyze” button, if necessary. Let AED analyze the heart rhythm.
DELIVER SHOCK
If SHOCK IS ADVISED:
Make sure no one, including you, is
touching the person.
Say, “EVERYONE, STAND CLEAR.”
Push the “shock” button, if necessary.
PERFORM CPR
After delivering the shock, or if no shock is advised:
Perform about 2 minutes (or 5 cycles) of CPR.
Continue to follow the prompts of the AED.
TIPS:
s )F AT ANY TIME YOU NOTICE AN OBVIOUS SIGN OF LIFE STOP #02 AND MONITOR
breathing and for any changes in condition.
s )F TWO TRAINED RESPONDERS ARE PRESENT ONE SHOULD PERFORM #02 WHILE THE
second responder operates the AED.
PANEL 8
22CONTROLLING
EXTERNAL BLEEDING
AFTER CHECKING THE SCENE AND THE INJURED OR ILL PERSON:
COVER THE WOUND
Cover the wound with a sterile dressing.
APPLY DIRECT PRESSURE
UNTIL BLEEDING STOPS
COVER THE DRESSING
WITH BANDAGE
Check for circulation beyond the injury
(check for feeling, warmth and color).
APPLY MORE PRESSURE AND CALL 9-1-1
If the bleeding does not stop:
Apply more dressings and bandages.
Continue to apply additional pressure.
Take steps to minimize shock.
CALL 9-1-1 or the local emergency number if not already done.
TIP: Wash hands with soap and water after giving care.
PANEL 9
23BURNS
AFTER CHECKING THE SCENE AND THE INJURED OR ILL PERSON:
REMOVE FROM SOURCE OF BURN
COOL THE BURN
Cool the burn with cold running water at least
until pain is relieved.
COVER LOOSELY WITH
STERILE DRESSING
CALL 9-1-1
CALL 9-1-1 or the local emergency number if the burn is severe or other
life-threatening conditions are found.
CARE FOR SHOCK
PANEL 10
24POISONING
AFTER CHECKING THE SCENE AND THE INJURED OR ILL PERSON:
CALL 9-1-1 OR POISON CONTROL HOTLINE
For life-threatening conditions (such as if the person is unconscious or is not breathing,
or if a change in the level of consciousness occurs), CALL 9-1-1 or the local emergency
number.
OR
If the person is conscious and alert, CALL the National Poison Control Center (PCC)
hotline at 1-800-222-1222 and follow the advice given.
PROVIDE CARE
Give CARE based on the conditions found.
HEAD, NECK OR
SPINAL INJURIES
AFTER CHECKING THE SCENE AND THE INJURED OR ILL PERSON:
CALL 9-1-1 OR THE LOCAL EMERGENCY NUMBER
MINIMIZE MOVEMENT
Minimize movement of the head,
neck and spine.
STABILIZE HEAD
Manually stabilize the head in the position in which it was found.
Provide support by placing your hands on both sides of the person’s head.
If head is sharply turned to one side, DO NOT move it.
PANEL 11
25STROKE
FOR A STROKE, THINK F.A.S.T.
AFTER CHECKING THE SCENE AND THE INJURED OR ILL PERSON:
THINK F.A.S.T.
Face— Ask the person to smile.
Does one side of face droop?
Arm— Ask the person to raise both arms.
Does one arm drift downward?
Speech— Ask the person to repeat a simple
sentence (such as, “The sky is
blue.”). Is the speech slurred?
Can the person repeat the sentence
correctly?
Time— CALL 9-1-1 immediately if you
see any signals of a stroke. Try to
determine the time when signals first
appeared. Note the time of onset of
signals and report it to the call taker
or EMS personnel when they arrive.
PROVIDE CARE
Give CARE based on the conditions found.
PANEL 12 Copyright © 2011 by The American National Red Cross
Stock No. 656732
26
Pediatric First Aid/CPR/AED
READY REFERENCE

                  27
              CHECKING AN INJURED
              OR ILL CHILD OR INFANT
              APPEARS TO BE UNCONSCIOUS

               TIPS:
               s Use disposable gloves and other personal protective
                   equipment whenever giving care.
               s   Obtain consent from parent or guardian, if present.

AFTER CHECKING THE SCENE FOR SAFETY, CHECK THE CHILD OR INFANT:

  CHECK FOR RESPONSIVENESS
  Tap the shoulder and shout, “Are you OK?”
     For an infant, you may flick the bottom
     of the foot.

  CALL 9-1-1
  If no response, CALL 9-1-1 or the local emergency number.
     If an unconscious child or infant is face-down, roll face-up, supporting the head,
     neck and back in a straight line.

  If ALONE—Give about 2 minutes of CARE, then CALL 9-1-1.
  If the child or infant responds, CALL 9-1-1 or the local emergency number for any
  life-threatening conditions and obtain consent to give CARE. CHECK the child from
  head to toe and ask questions to find out what happened.

                                          PANEL       2


                                             28
OPEN THE AIRWAY
Tilt head back slightly, lift chin.
CHECK FOR BREATHING
CHECK quickly for no more than 10 seconds.
Occasional gasps are not breathing.
Infants have periodic breathing, so changes
in breathing pattern are normal for infants.
GIVE 2 RESCUE BREATHS
If no breathing, give 2 rescue breaths.
Tilt the head back and lift the chin up.
Child: Pinch the nose shut, then make a
complete seal over child’s mouth.
Infant: Make complete seal over infant’s
mouth and nose.
Blow in for about 1 second to make the
chest clearly rise.
Give rescue breaths, one after the other.
TIPS:
s If you witnessed the child or infant suddenly
collapse, skip rescue breaths and start CPR
(PANEL 7).
s )F THE CHEST DOES NOT RISE WITH RESCUE BREATHS
retilt the head and give another rescue breath.
QUICKLY SCAN FOR SEVERE BLEEDING
WHAT TO DO NEXT
IF THE CHEST STILL DOES NOT CLEARLY RISE AFTER RETILITING HEAD—Go to
Unconscious Choking, PANEL 6.
IF NO BREATHING—Go to CPR, PANEL 7 or AED, PANEL 8 (if AED is immediately
available).
IF BREATHING—Monitor breathing and for any changes in condition.
PANEL 3
29CONSCIOUS CHOKING—CHILD
CANNOT COUGH, SPEAK OR BREATHE
TIP: Stand or kneel behind the child, depending on his or her size.
AFTER CHECKING THE SCENE AND THE INJURED OR ILL CHILD, HAVE SOMEONE
CALL 9-1-1 AND GET CONSENT FROM THE PARENT OR GUARDIAN, IF PRESENT.
GIVE 5 BACK BLOWS
Bend the child forward at the waist and
give 5 back blows between the shoulder
blades with the heel of one hand.
GIVE 5 ABDOMINAL THRUSTS
Place a fist with the thumb side against
the middle of the child’s abdomen, just
above the navel.
Cover your fist with your other hand.
Give 5 quick, upward abdominal thrusts.
CONTINUE CARE
Continue sets of 5 back blows and 5
abdominal thrusts until the:
Object is forced out.
Child can cough forcefully or breathe.
Child becomes unconscious.
WHAT TO DO NEXT
IF CHILD BECOMES UNCONSCIOUS—CALL 9-1-1, if not already done. Carefully
lower the child to the ground and give CARE for an unconscious choking child,
beginning with looking for an object (PANEL 6, Step 3).
PANEL 4
30CONSCIOUS CHOKING—INFANT
CANNOT COUGH, CRY OR BREATHE
AFTER CHECKING THE SCENE AND THE INJURED OR ILL INFANT, HAVE SOMEONE
CALL 9-1-1 AND GET CONSENT FROM THE PARENT OR GUARDIAN, IF PRESENT.
GIVE 5 BACK BLOWS
Give firm back blows with the heel of one hand
between the infant’s shoulder blades.
GIVE 5 CHEST THRUSTS
Place two or three fingers in the center of the
infant’s chest just below the nipple line and
compress the breastbone about 1½ inches.
TIP: Support the head and neck securely when
giving back blows and chest thrusts. Keep the
head lower than the chest.
CONTINUE CARE
Continue sets of 5 back blows and 5 chest thrusts until the:
Object is forced out.
Infant can cough forcefully, cry or breathe.
Infant becomes unconscious.
WHAT TO DO NEXT
IF INFANT BECOMES UNCONSCIOUS—CALL 9-1-1, if not already done. Carefully
lower the infant onto a firm, flat surface and give CARE for an unconscious
choking infant, beginning with looking for an object (PANEL 6, Step 3).
PANEL 5
31UNCONSCIOUS CHOKING—CHILD
AND INFANT
CHEST DOES NOT RISE WITH RESCUE BREATHS
AFTER CHECKING THE SCENE AND THE INJURED OR ILL CHILD OR INFANT:
GIVE RESCUE BREATHS
Retilt the head and give another rescue breath.
GIVE CHEST COMPRESSIONS
If the chest still does not rise, give 30 chest
compressions.
TIP: Child or infant
must be on firm, flat
surface. Remove
CPR breathing barrier
when giving chest
compressions.
LOOK FOR AND REMOVE
OBJECT IF SEEN
GIVE 2 RESCUE BREATHS
WHAT TO DO NEXT
IF BREATHS DO NOT MAKE THE CHEST RISE—Repeat steps 2 through 4.
IF THE CHEST CLEARLY RISES—CHECK for breathing. Give CARE based
on conditions found.
PANEL 6
32CPR—CHILD AND INFANT
NO BREATHING
AFTER CHECKING THE SCENE AND THE INJURED OR ILL CHILD OR INFANT:
GIVE 30 CHEST COMPRESSIONS
Push hard, push fast in the middle of the chest.
Child: Push about 2 inches deep.
Infant: Push about 1½ inches
deep.
Push fast, at least 100
compressions per minute.
TIP: Child or infant must
be on firm, flat surface.
GIVE 2 RESCUE BREATHS
Tilt the head back and lift the chin up.
Child: Pinch the nose shut, then make a complete
seal over child’s mouth.
Infant: Make complete seal
over infant’s mouth and nose.
Blow in for about 1 second to
make the chest clearly rise.
Give rescue breaths, one after
the other.
DO NOT STOP
Continue cycles of CPR. Do not stop CPR except in one of these situations:
You find an obvious sign of life, Another trained responder or EMS
such as breathing. personnel take over.
An AED is ready to use. You are too exhausted to continue.
The scene becomes unsafe.
TIP: If at any time you notice an obvious sign of life, stop
CPR and monitor breathing and for any changes in condition.
WHAT TO DO NEXT FOR CHILD AND INFANT
IF AN AED BECOMES AVAILABLE—Go to AED, PANEL 8.
IF BREATHS DO NOT MAKE CHEST RISE—Give CARE for unconscious choking
(PANEL 6).
PANEL 7
33AED—CHILD AND INFANT YOUNGER
THAN AGE 8 OR WEIGHING LESS THAN 55 POUNDS
NO BREATHING
TIP: When available, use pediatric settings or pads when caring for children and
infants. If pediatric equipment is not available, rescuers may use AEDs configured
for adults.
AFTER CHECKING THE SCENE AND THE INJURED OR ILL CHILD OR INFANT:
TURN ON AED
Follow the voice and/or visual prompts.
WIPE BARE CHEST DRY
ATTACH PADS
If pads risk touching each other,
use front-to-back pad placement.
PLUG IN CONNECTOR,
IF NECESSARY
PANEL 8
34STAND CLEAR
Make sure no one, including you,
is touching the child or infant.
Say, “EVERYONE, STAND CLEAR.”
ANALYZE HEART RHYTHM
Push the “analyze” button, if necessary. Let AED analyze the heart rhythm.
DELIVER SHOCK
IF A SHOCK IS ADVISED:
Make sure no one, including you,
is touching the child or infant.
Say, “EVERYONE, STAND CLEAR.”
Push the “shock” button, if necessary.
PERFORM CPR
After delivering the shock, or if no shock is advised:
Perform about 2 minutes (or 5 cycles) of CPR.
Continue to follow the prompts of the AED.
TIPS:
s )F TWO TRAINED RESPONDERS ARE PRESENT ONE SHOULD PERFORM #02 WHILE
the second responder operates the AED.
s )F AT ANY TIME YOU NOTICE AN OBVIOUS SIGN OF LIFE STOP #02 AND MONITOR
breathing and for any changes in condition.
PANEL 9
35CONTROLLING
EXTERNAL BLEEDING
AFTER CHECKING THE SCENE AND THE INJURED CHILD OR INFANT:
COVER THE WOUND
Cover the wound with a sterile dressing.
APPLY DIRECT PRESSURE
UNTIL BLEEDING STOPS
COVER THE DRESSING
WITH BANDAGE
Check for circulation beyond the injury
(check for feeling, warmth and color).
APPLY MORE PRESSURE AND CALL 9-1-1
If the bleeding does not stop:
Apply more dressings and bandages.
Continue to apply additional pressure.
Take steps to minimize shock.
CALL 9-1-1 if not already done.
TIP: Wash hands with soap and water after giving care.
PANEL 10
36BURNS
AFTER CHECKING THE SCENE AND THE INJURED CHILD OR INFANT:
REMOVE FROM SOURCE OF BURN
COOL THE BURN
Cool the burn with cold running
water at least until pain is relieved.
COVER LOOSELY WITH
STERILE DRESSING
CALL 9-1-1
CALL 9-1-1 or the local emergency number if the burn is severe
or other life-threatening conditions are found.
CARE FOR SHOCK
PANEL 11
37POISONING
AFTER CHECKING THE SCENE AND THE INJURED CHILD OR INFANT:
CALL 9-1-1 OR POISON CONTROL HOTLINE
For life-threatening conditions (such as if the child or infant is unconscious or is not
breathing or if a change in the level of consciousness occurs), CALL 9-1-1 or the
local emergency number.
OR
If conscious and alert, CALL the National Poison Control Center (PCC) hotline at
1-800-222-1222 and follow the advice given.
PROVIDE CARE
Give CARE based on the conditions found.
SEIZURE
AFTER CHECKING THE SCENE AND THE INJURED CHILD OR INFANT:
CALL OR HAVE SOMEONE CALL 9-1-1
REMOVE NEARBY OBJECTS
DO NOT hold or restrain the child or infant.
DO NOT place anything between the teeth or in the mouth.
AFTER SEIZURE PASSES
Monitor breathing and for changes in condition.
WHAT TO DO NEXT
Comfort and reassure the child or infant. If
fluids or vomit are present, roll the child or
infant to one side to keep the airway clear.
Provide CARE based on conditions found.
PANEL 12 Copyright © 2011 by The American National Red Cross
Stock No. 656733
38WRITTEN EXAM
REVIEW
TRAINING MANUAL NOTES
3940
THE BIG PICTURE: REMEMBER YOUR ROLE IN THE EMS SYSTEM

     STEP 1          RECOGNIZE THAT AN EMERGENCY EXISTS

     STEP 2          DECIDE TO ACT

     STEP 3          ACTIVATE THE EMS SYSTEM

     STEP 4          GIVE CARE UNTIL HELP TAKES OVER
                     A.      get consent
                     B.      prevent spread of disease/be prepared/equipment
                     C.      emergency action steps (check-call-care)
                           1. abc’s: airway– breathing-circulation
                           2. be prepared for shock and special situations

               AMERICAN RED CROSS WORKBOOK AND WRITTEN EXAM REVIEW AND FIRST AID OUTLINE

1.            The leading causes of death in the United States are… (p. 1)

              A.     HEART DISEASE -

              B.     SUDDEN CARDIAC ARREST -

              C.     NUMBER ONE CAUSE OF DEATH IN THE U.S.A. -

              D.     DEATHS DUE TO UNINTENTIONAL INJURY -

              E.     NUMBER DISABLED DUE TO UNINTENTIONAL INJURY -

     2.       TO RECOGNIZE AN EMERGENCY WHEN YOU SURVEY THE SCENE, LOOK FOR… (p. 2-3)

              A.     UNUSUAL NOISES -

              B.     UNUSUAL SIGHTS -

              C.     UNUSUAL ODORS -

              D.     UNUSUAL APPEARANCES/BEHAVIORS -

     3.       DECIDING TO ACT: COMMON FACTORS THAT KEEP PEOPLE FROM ACTING ARE… (p. 3-4)

              A.                                                         E.

              B.                                                         F.

              C.                                                         G.

              D.

     4.       TO ACTIVATE THE EMS SYSTEM, YOU CALL… (p. 4)

     5.       GETTING PERMISSION TO GIVE CARE (The Rules of Consent) - (p. 5)

                                                             41
A. CONSCIOUS ADULT –
B. UNCONSCIOUS ADULT –
C. CONSCIOUS MINOR CHILD –
D. UNCONSCIOUS MINOR CHILD –
6. DISEASE TRANSMISSION AND PREVENTION (p. 5, 7-8)
A. HOW DISEASE SPREADS (p. 5)
B. PREVENTION WHILE GIVING CARE (p. 5-6)
C. CLEANING UP BLOOD SPILLS (p. 7)
D. FOCUS ON HIV AND AIDS (p. 8)
7. TO BE PREPARED FOR EMERGENCIES, HAVE/KNOW: (p. 6-7)
A. IMPORTANT MEDICAL INFORMATION
1. FAMILY MEDICAL INFORMATION
2. MEDICAL ID TAG, BRACELET, ETC.
3. HOUSE/APT. # EASY TO READ
4. FIRST AID KIT
5. BE TRAINED AND PREPARED
B. OTHER THINGS YOU CAN DO TO PREPARE FOR EMERGENCIES
1. POISON CONTROL CENTER (p. 6) -
2. EMERGENCY NUMBERS (p. 6) – [9-1-1 vs, 3-1-1 et al.] -
3. I.C.E. CELL PHONES AND TURN GPS TO ‘LOCATION ON’
428. EMERGENCY ACTION STEPS: CHECK-CALL-CARE
A. CHECK the SCENE and the PERSON (p. 8-9) –
1. Is it…
2. Is…
3. How many…
4. Is anyone…
5. What is…
6. Checking Children & the Elderly –
7. Identifying Life-Threatening Conditions –
B. CALL 9-1-1 OR local emergency number (p. 10-11) – LIFE THREATENING CONDITIONS LIST:
*1. 10.
*2. 11.
*3. 12.
*4. 13.
*5. 14.
6. 15.
7. 16.
8. 17.
9. 18.
43C. IF YOU ARE ALONE, ALWAYS ‘CALL FIRST’ FOR… (p. 11)
1.
2.
3.
D. IF YOU ARE ALONE, ALWAYS ‘CARE FIRST’ FOR… (p. 11)
1.
2.
NOTE: “Call First” situations are likely to be cardiac emergencies, where time is a critical factor. “Care First”
situations are often related to breathing emergencies.
E. CARE (p. 11-22) - GENERAL GUIDELINES
a. determine if they are conscious or unconscious and
b. follow appropriate steps below
c. always remember
i. check first for life-threatening conditions
ii. do no further harm
iii. monitor breathing &: consciousness
iv. help them rest comfortably
v. maintain body temperature
vi. reassure person
vii. give any speciic care as needed
viii. transporting the person yourself (details later in this unit)
1. NEVER Transport at person:
a. When…
b. When…
c. If…
F. CARE FOR CONSCIOUS VICTIM: (p. 14-17)
1. INTERVIEWS
a. the person –
b. the bystanders -
c. Interview questions -
1.
2.
3.
4.
442. HEAD-TO-TOE EXAM
G. CARING FOR AN UNCONSCIOUS VICTIM (p. 17-20)
1. AIRWAY –
2. BREATHING - (LOOK, LISTEN, FEEL)
3. CIRCULATION -
H. WHAT TO DO NEXT: (P. 19)
1. IF YOU MUST LEAVE -
a. RECOVERY POSITION (P. 21) -
1. Adult/Child –
2. Infant -
b. H.A.IN.E.S. (p. 19, 21-22)
2. AGONAL BREATHING (p. 19) -
NOTE: USING CPR BREATHING BARRIERS (p. 19) –
11. SPECIAL SITUATIONS (p. 20-21)
A. AIR IN THE STOMACH
A. VOMITING
B. MOUTH-TO-NOSE BREATHING
C. MOUTH-TO-STOMA BREATHING
D. HEAD, NECK, SPINAL INJURIES
E. DROWNING VICTIMS
F. INCIDENT STRESS REACTIONS (p. 22-23) –
4512. GUIDELINES FOR COPING WITH INCIDENT STRESS (p. 23) -
13. TECHNIQUES FOR MOVING AN ILL OR INJURED PERSON
A.
B.
C.
D.
E.
14. TYPES OF NON-EMERGENCY MOVES
A.
B.
15. TYPES OF EMERGENCY MOVES
A.
B.
C.
D.
E. REACHING A PERSON IN THE WATER
1.
2.
3.
16. SHOCK IS… (p. 16)
17. THE SIGNS OF SHOCK ARE… (p. 16)
18. TREATING SHOCK: (p. 16-17)
*GENERAL REMINDER:
“IF THE FACE IS RED, RAISE THE HEAD… IF THE FACE IS PALE, RAISE THE TAIL”
4619. OXYGEN DEPRIVATION (p. 55)
A. 0 MINUTES –
B. 4-6 MINUTES -
C. 6-10 MINUTES -
D. OVER 10 MINUTES -
20. RESPIRATORY DISTRESS (p. 56) –
21. RESPIRATORY ARREST (p. 56) –
23. CAUSES OF RESPIRATORY DISTRESS/ARREST (p. 56) –
24. ASTHMA (p. 56) –
25. C.O.P.D. (p. 56) –
26. OTHER RESPIRATORY CONDITIONS (p. 57-58)
A. EMPHYSEMA
B. CHRONIC BRONCHITIS –
C. ACUTE BRONCHITIS –
D. HYPERVENTILATION –
E. ALLERGIC REACTIONS –
a. ANAPHYLAXIS –
F. CROUP –
G. EPIGLOTTITIS –
27. CAUSES OF CHOKING
A. ADULTS (p. 59) –
B. CHILDREN/INFANTS (p. 59-60) –
C. CHOKING PREVENTION (p. 59) –
28. CARE FOR CHOKING
A. ENCOURAGE COUGHING –
47B. HOW DO I KNOW IF THEY’RE CHOKING?
29. SPECIAL SITUATIONS FOR CONSCIOUS CHOKING ADULT OR CHILD (p. 61-62)
A. LARGE OR PREGNANT PERSON
B. BEING ALONE AND CHOKING
C. A PERSON IN A WHEELCHAIR
30. ASPIRIN AND HEART ATTACK (p. 33)
A. After calling 9-1-1, if a conscious person can answer “NO” to all of the questions below in “2.”,
you may offer him or her two chewable baby aspirins (81mg each) or up to one 5-grain (325mg)
adult aspirin with a small amount of water. Be sure you use only aspirin – not Tylenol,
acetaminophen or nonsteroidal anti-inflammatory drugs (NSAIDs) such as Motrin, Advil or
ibuprofen, Naproxen and Aleve. Do NOT use coated aspirin products or products meant for
multiple uses such as cold, fever and headache.
B. The questions to ask if the person is able to take medicine by mouth…
1. Are you…
2. Do you have…
3. Are you taking any blood thinners such as…
4. Have you been told…
A. If you are unable or unwilling for ANY REASON to perform FULL CPR, give continuous
chest compressions after calling 9-1-1 or the local emergency number. Continue
giving chest compressions until EMS Personnel take over or you notice any obvious
sign of life, such as breathing.
31. THE CARDIAC CHAIN OF SURVIVAL
A.
B.
C.
D.
48USE THE PAGES THAT FOLLOW TO TAKE ANY ADDITIONAL NOTES YOU CHOOSE ON THE FOLLOWING
PAGES FROM THE ONLINE TRAINING MANUAL.
ü NOTES ON CARDIAC DISEASE AND EMERGENCIES (p. 29-43)
ü NOTES ON A.E.D. USE (p. 44-53)
ü NOTES ON BREATHING EMERGENCIES AND CHOKING (p. 54-70)
ü NOTES ON SUDDEN ILLNESSES (p.71-83)
ü NOTES ON ENVIRONMENTAL EMERGENCIES (p. 84-100)
ü NOTES ON SOFT TISSUE INJURIES (p.101- 118)
ü NOTES ON INJURIES TO MUSCLES, BONES & JOINTS (p.119-137)
ü NOTES ON SPECIAL SITUATIONS & CIRCUMSTANCES (p.138 - 150)
ü NOTES ON ASTHMA (p.151- 156)
ü NOTES ON ANAPHYLAXIS & EPINEPHRINE AUTO-INJECTORS (p.157-162)
ü NOTES ON INJURY PREVENTION & EMERGENCY PREPAREDNESS (p. 163 - 171)
ü NOTES ON REMOVING GLOVES and DISEASE PREVENTION (p. 24)
ü NOTES ON CARDIAC DISEASE AND EMERGENCIES (p. 29-43)
49
50
51
52
53
54You can also read