Analyzing game data from the Oculus Rift using Bluemix
←
→
Page content transcription
If your browser does not render page correctly, please read the page content below
Analyzing game data from the Oculus Rift using Bluemix
Guilherme Borges Oliveira (https://www.ibm.com/                                                                           02 August 2014
developerworks/community/profiles/html/profileView.do?
key=34966777-7562-48dd-8c66-c9c5beb5aea8)
Software engineer
IBM

Jordan Boaz Rodrigues (https://www.ibm.com/
developerworks/community/profiles/html/simpleSearch.do?
searchFor=2700077F2U)
Software engineer
IBM

Eduardo Domene, Jr. (https://www.ibm.com/
developerworks/community/profiles/html/simpleSearch.do?
searchFor=2700077F2U)
Software engineer
IBM

Bradley Steinfeld (https://www.ibm.com/developerworks/
community/profiles/html/profileView.do?
key=d8ca4a1d-2a45-498b-a374-075babcb4813)
Software developer
IBM

  Digital game-based learning has proven to be an efficient learning tool because it provides a new and
  interactive environment for the user. The concept can be used in education, training, and even in the
  military. This article describes using the Oculus Rift virtual reality device to implement an educational
  game. Data collected from the device is streamed to a Bluemix server and analyzed. The BlueMix
  application is responsible for storing all the important data from the Oculus Rift, such as the head
  movement, which can be analyzed to provide statistics about the learning rate. This data can also be used
  to create a customized experience for the user, which can apply their own data in different applications.
                                      Sign up for IBM Bluemix™
                                      This cloud platform is stocked with free services, runtimes, and infrastructure to help you quickly
                                      build and deploy your next mobile or web application.

Virtual Reality (VR) is the technology of the moment, and VR devices such as the Oculus Rift have gained
prominence in technology companies, including Sony and Facebook. The way that users interact with VR

© Copyright IBM Corporation 2014                                                                                                    Trademarks
Analyzing game data from the Oculus Rift using Bluemix                                                                              Page 1 of 8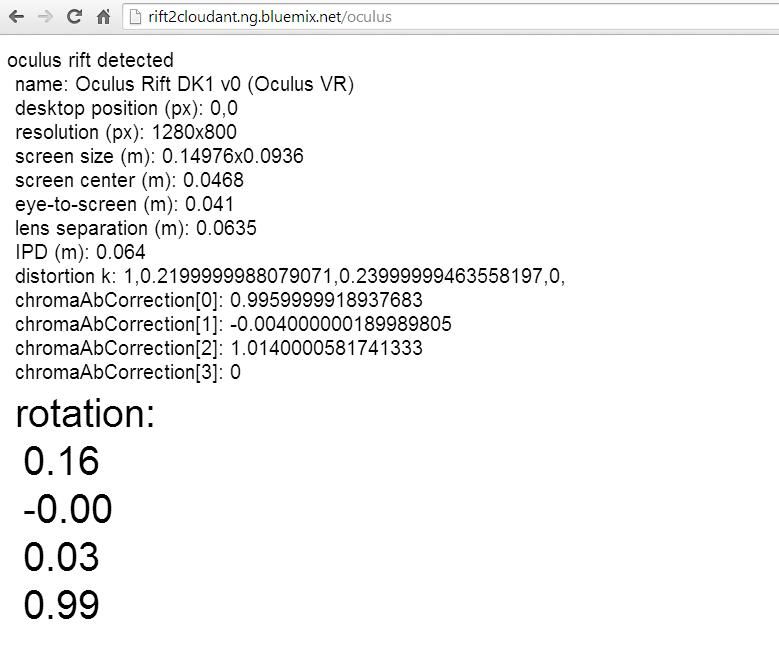
developerWorks®                                                                     ibm.com/developerWorks/

is simple. The device captures movements from the player's head and sends this data to a computer, which
creates an immersive, interactive virtual environment. However, this captured data could be stored for
further analysis, and Bluemix is the perfect platform for the task.

This article describes how to create a simple application using Bluemix and vr.js, a browser plug-in. This
application captures the quaternion positions (x, y, z, and w) from the Oculus Rift and sends it to Cloudant,
a database as a service (DBaaS). You can deploy this application to Bluemix and use it by plugging in the
Oculus Rift and opening a browser.

                                      “ Integrate Node.js, Cloudant, and the Oculus Rift to create a
                                      flexible VR system that can be extended for many new types of
                                      applications. ”

Run the app
Get the code
What you need to build your app
    •   DevOps Services account linked to your IBM ID
    •   Bluemix account
    •   Express framework and nano
    •   Cloudant database
    •   vr.js browser plug-in
    •   Basic understanding of Node.js

Modify and deploy the Node.js app using DevOps and Bluemix
Step 1: Fork this project
Click this article's Get the code button and fork the project on DevOps Services:

   1. Click EDIT CODE (enter your DevOps Services credentials if you're not already logged in).
   2. Click the FORK button on the menu to create a new project.
   3. When you see the prompt, choose a name to give to your new forked repository. We chose
      rift2cloudant.
   4. Check the Deploy to Bluemix feature.
   5. Click SAVE to create a copy of the code into your project and a Git repository.

You can make this project private by clicking the Make it private (not public) checkbox. Leave it
unchecked for now.

Configure host and name for the application
To deploy this code into Bluemix, you need to set up some configurations so you can define a new host and
name for your application.

   1. Click BUILD & DEPLOY.

Analyzing game data from the Oculus Rift using Bluemix                                                Page 2 of 8
ibm.com/developerWorks/                                                                        developerWorks®

   2. In the page that opens, select OFF. You don't want to deploy the changes made in your repository
      automatically.
   3. Click EDIT CODE.
   4. Click manifest.yml.

You need to change the existing host and name to a unique name for your server. We changed the original
host and name designations to rift2cloudant.

Commit changes
Go to the git status page by clicking Git Repository:

Next, stage the modifications to commit and then push them to the repository.

   1. First, in the following text box, type the modifications you made.
   2. Click Select All to add the files to commit
   3.

      Click COMMIT:
   4. Click Push.
   5. Go back to Show Current Folder.
   6. Click DEPLOY.
   7. In the pop-up, press Deploy to deploy the application.

Add a Cloudant service
If the application deploys successfully, you have a new application started within your Bluemix account. To
add a Cloudant service:

   1. Click the new app that appears on your dashboard. You should see a red dot that indicates the app is
      not running.
   2. Click ADD A SERVICE.
   3. Scroll down until you find Cloudant JSONDB and select it.
   4. In the Name field, type cloudant and press Create. If you want to use a different name for the
      Cloudant service, make sure that you also change the code inside the app.js. Look for this code:
        var cloudantServiceName = 'cloudant';

      A pop-up appears and tells you to restart your app.

Analyzing game data from the Oculus Rift using Bluemix                                               Page 3 of 8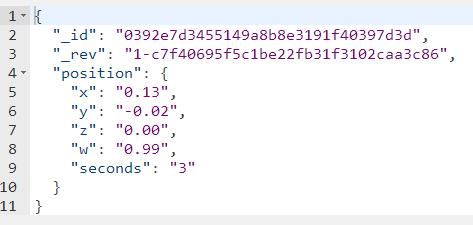
developerWorks®                                                                       ibm.com/developerWorks/

   5. Click OK.

Step 2: Clone and push
You want to keep a local repository of the application so that when you modify the code, you can push the
changes into Bluemix. To begin:

   1. Go to the main page of your project in DevOps Services and copy the git URL:

   2. To clone the project to your computer, open a terminal (if you use Windows, we suggest git bash), type
      git clone and then paste the link that you just copied (for example, git clone https://hub.jazz.net/project.
   3. Go back to your Bluemix account, click in your application, and then open the VIEW QUICK

      START. This window appears:
   4. In a terminal, go to your cloned folder and follow the steps one, two, and three that are listed there.

Push changes to Bluemix
Whenever you want your modifications to be deployed into your application in your Bluemix account, you
need to push the modification.

   1. Open a new terminal.
   2. From inside the cloned repository, type cf push –c "node app.js".

Your application should be working now. A green dot appears beside Running.

Step 3: Preparing the DBaaS (Cloudant)
First, create the Cloudant database. To begin:

   1. Open the Bluemix dashboard, click on your application, and then click on the Cloudant service. A new
      page opens, showing information about the service and how to get started.

Analyzing game data from the Oculus Rift using Bluemix                                                   Page 4 of 8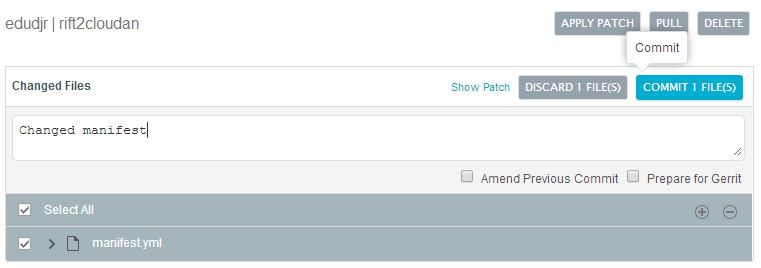
ibm.com/developerWorks/                                                                            developerWorks®

    2. Click LAUNCH to access the service. Make sure that you are in the Databases section (marked in

       orange).
    3. This section displays all your databases. You want to create a new database to be used in your
       application, so click Add New Database.
    4. In the pop-up window, at Name of database, type users to create a database called users.
    5. Next, create a new database called riftbase. Follow the same steps: Click Add New Database and,
       when prompted, type in riftbase.

Step 4: Understand and configure the application
You still need to install the plug-in. First, however, before you go to the application itself, you should
understand the most important sections of the code.

This code is inside the app.js file:
var cloudantServiceName = 'cloudant';

This is where you need to change according to the Cloudant service created a few steps earlier. If you
followed the steps and created a service called Cloudant, you don't need to modify that. Also, you should
have two databases, user and riftbase, created in Cloudant. These databases are invoked in two parts of the
code:
var db = nano.db.use('riftbase');

and
var db = nano.db.use('users');

If you use different names for your databases, you should modify this code.

Sending data to Cloudant
This code, located in app.js, creates a post handler so it can send information to be stored in our Cloudant
database:
app.post('/endpoint', function(req, res){
 res.send(req.body);
 db.insert({position:req.body},function(err, body, header) {
  if (err) {
   res.send("Error creating file");
   return;
  }
    });
});

This post request is triggered every second by a function called myTimer (you can find myTimer inside the
oculus.ejs code, which is the modified raw_data.html code located in the views folder):

Analyzing game data from the Oculus Rift using Bluemix                                                   Page 5 of 8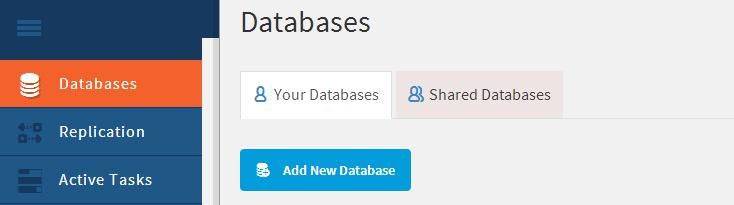
developerWorks®                                                                     ibm.com/developerWorks/

function myTimer() {
 if(state.hmd.present){
  var data = {};
  data.x = state.hmd.rotation[0].toFixed(2);
  data.y = state.hmd.rotation[1].toFixed(2);
  data.z = state.hmd.rotation[2].toFixed(2);
  data.w = state.hmd.rotation[3].toFixed(2);

 data.seconds = (endTime - startTime)/1000;
 data.seconds = (data.seconds).toFixed(0);

  $.post("/endpoint", data, function(response){
   console.log(data);
  });
 }
}

This code for the users page is placed inside app.js. It works by sending a Name and an Age to the users
database on Cloudant:
app.post('/insert',function(req,res){
 var db = nano.db.use('users');
 var name = req.body.name
 var age = req.body.age

 db.insert({name:name,age:age},function(err,body,header){
  if(err){
   console.log(err);
   return res.status(500).send(err.message);
  }
  res.send("Contact was created sucessfully");
  console.log("success");
    });
});

Step 5: Install the vr.js plug-in
The vr.js plug-in lets your Oculus Rift work using the browser (Chrome or Firefox). You need to install the
plug-in to open the main page of your application, but you can still open the users page without it. (The main
and users pages are covered in the following step.)

The code used in this Oculus Rift application is a slight modification of the code that can be found here.

Now, within the app.js file, we can write a get method that renders the oculus page, which uses the vr.js plug-
in:
app.get('/', function (req, res){
   res.render('oculus');
});

Step 6: Run the application
The application has two pages: the main page and the users page.

Main page
When you open the main page of your app, you are sent to a web page showing data captured from the
Oculus Rift that is plugged to the computer. If your Rift is connected, the page should look something like

Analyzing game data from the Oculus Rift using Bluemix                                                 Page 6 of 8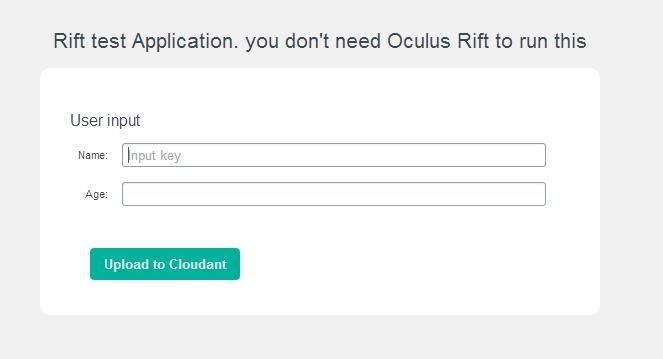
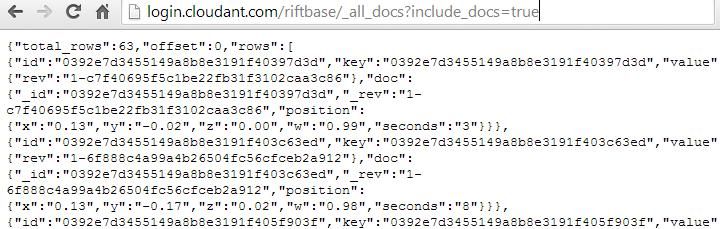
ibm.com/developerWorks/                                                                          developerWorks®

this (be aware that this page uploads the quaternion position to the riftbase database in Cloudant every
second):

The oculus uses the quaternion system, which is the last four-element vector displayed in bold in this page.
The quaternion system is used to encode any rotation in a 3D coordinate system.

You could store any value from this page. In our application, only the last four elements (quaternion values)
are stored. You can check the myTimer function again to understand how we retrieve these values from the
headset and send them with the post method.

READ: More about quaternions
Users page
If you don't have a Rift, or something went wrong and you want to make sure that your application is
working, you can access the users page by adding "/users" to the end of the URL (for example, http://
bluemix.ng.bluemix.net/users). This page is just an example for sending some data to Cloudant; it doesn't
require the Rift. Fill in the boxes and click Upload to Cloudant. Afterwards, check your Cloudant database
to see if your information uploaded successfully.

Step 7: Validate data collection and query data stored in Cloudant
The last thing to do is to check if the data was uploaded to the Cloudant database. To show the complete
document for each database, access the link of your Cloudant database and add this to the URL: _all_docs/?
include_docs=true.

Analyzing game data from the Oculus Rift using Bluemix                                                Page 7 of 8
developerWorks®                                                                  ibm.com/developerWorks/

Similarly, if you click Edit doc:

the data loads in the page:

Conclusion
By integrating technologies such as Node.js, Cloudant, and the Oculus Rift, you created a flexible VR
system that can be extended for many new types of applications. While VR devices provide data about the
player, Bluemix offers many tools to store and analyse it. You can use your imagination and merge different
services like DB2, MySQL, BLU Acceleration, and more.

RELATED TOPICS:               Cloud computing            Node.js

© Copyright IBM Corporation 2014
(www.ibm.com/legal/copytrade.shtml)
Trademarks
(www.ibm.com/developerworks/ibm/trademarks/)

Analyzing game data from the Oculus Rift using Bluemix                                             Page 8 of 8
You can also read