Configuring AWS for Zerto Virtual Replication - VERSION 1 MARCH 2018
←
→
Page content transcription
If your browser does not render page correctly, please read the page content below
Configuring AWS for
Zerto Virtual Replication

                             VERSION 1
                            MARCH 2018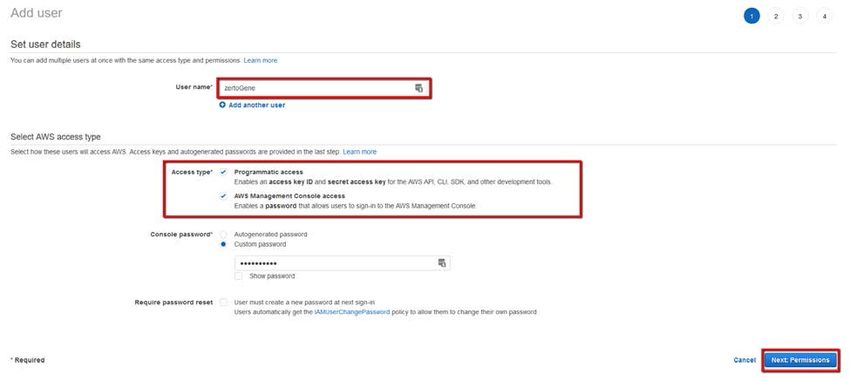
Table of Contents
1. Prerequisites .................................................................................................................................................................. 2
   1.1. AWS Prerequisites .................................................................................................................................................. 2
   1.2. Additional AWS Resources ..................................................................................................................................... 3
2. AWS Workflow .............................................................................................................................................................. 3
3. Setting up the AWS Account ......................................................................................................................................... 4
4. Setup Networking in AWS ............................................................................................................................................. 8
   4.1. Setting up the Virtual Private Cloud (VPC) and VPN Connection ........................................................................... 8
   4.2. Create a Subnet for the Isolated Failover Test Network ...................................................................................... 12
   4.3. Create and Attach Network ACL to Deny Inbound/Outbound Traffic for Isolated Network ............................... 13
   4.4. Configure Security Group for Bi-Directional ZCA  ZVM & VRA Communication ............................................. 16
   4.5. Create an Internet Gateway ................................................................................................................................. 18
   4.6. Update Route Tables to Include the IGW and Subnet for Production ................................................................. 20
5. Deploy the Zerto Cloud Appliance (ZCA) ..................................................................................................................... 22
6. Important Tip: AWS Limits .......................................................................................................................................... 27
   6.1. Installation ............................................................................................................................................................ 27
   6.2. Protection and Recoverability .............................................................................................................................. 27
                 EC2 Limitations Which Affect Protection and Recoverability ....................................................................... 28
                 Networking Limitations Which Affect Protection and Recoverability .......................................................... 28
                 Volume Limitations Which Affect Protection and Recoverability ................................................................. 28
                 Import Instance Limitations Which Affect Protection and Recovery ............................................................ 28
   6.3. To Request an AWS Limit Increase ....................................................................................................................... 29

                                                                                                                                                                    PAGE 1 OF 31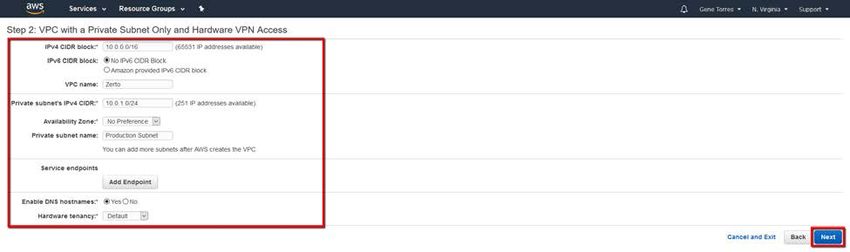
1. Prerequisites
The following prerequisites for AWS should be met in order to ensure functionality when replicating from or to an
on-premises environment. This guide assumes you have already deployed ZVR (ZVM and VRAs) in the on-premises
environment.
1.1. AWS Prerequisites
• AWS Account with full access to EC2 and S3
• S3 (Amazon Simple Storage Service):
o There is no pre-requisite other than access to S3. ZVR will automatically create an S3 bucket upon
installation using the account set up.
• VPC (Virtual Private Cloud):
o When you create an AWS account, AWS will provision a default VPC for you. This can be used, or a
new VPC can be created, one per division or department as needed.
• VPN Connection to your Datacenter
• Subnet(s) within VPC:
o You should create a subnet for the ZCA, which will communicate back to your on-premises
environment for replication and management traffic.
o Create a failover test subnet, which will provide an isolated environment for failover testing. This
should be isolated, and we will use AWS Network ACLs to make sure of that.
o Create a live failover/move subnet, which will contain the proper route(s) back to the on-premises
environment for normal production functionality and access.
• Security Group(s):
o Create any necessary security group(s) required for the following:
ZCA to on-premises ZCM and VRAs
Any additional security group(s) will depend on customer’s requirements.
PAGE 2 OF 31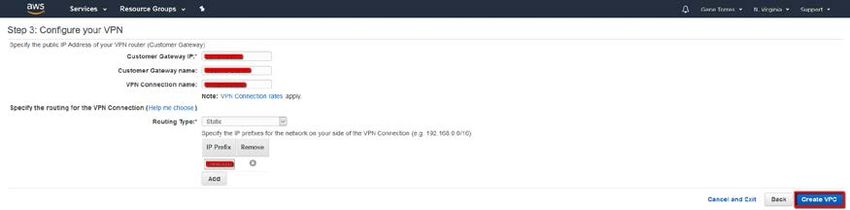
1.2. Additional AWS Resources

    •   Create an AWS Account
    •   AWS Identity and Access Management
    •   Introduction to Amazon S3 (Simple Storage Service)
    •   Amazon Virtual Private Cloud – VPCs and Subnets
    •   Security Groups for your VPC
    •   AWS Simple Monthly Calculator
    •   AWS VPN Connections

2. AWS Workflow

The following diagram will guide you through the steps required to prepare the AWS environment for Zerto
deployment. For additional information on the details of each step, refer to the Additional AWS Resources links in
the previous section of this document.

                                                                                                          PAGE 3 OF 31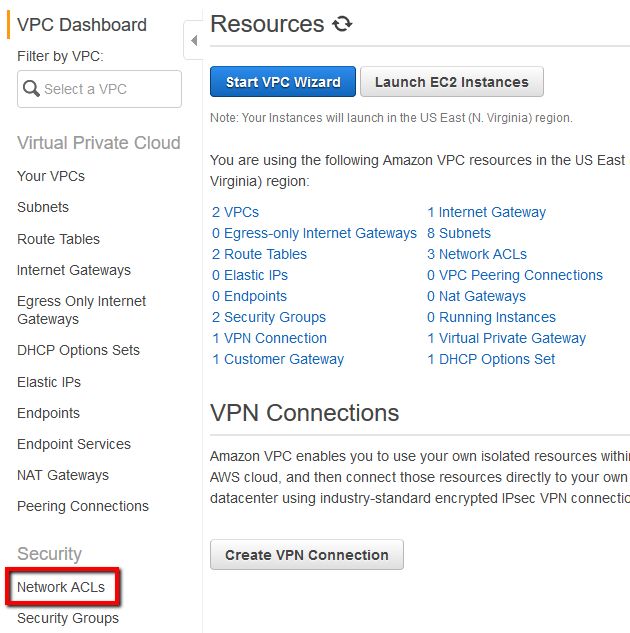
3. Setting up the AWS Account
For more information, see the Zerto Virtual Replication AWS Enterprise Guidelines technical documentation. The
steps below will walk you through setting up the AWS Account.
Note: Do not use the root account or provide access to the root account to normal users who the admin/engineer
that will be setting up AWS for Zerto Virtual Replication.
Once you are logged in to AWS, create an IAM user who will have access to set up and deploy the ZCA.
To do this:
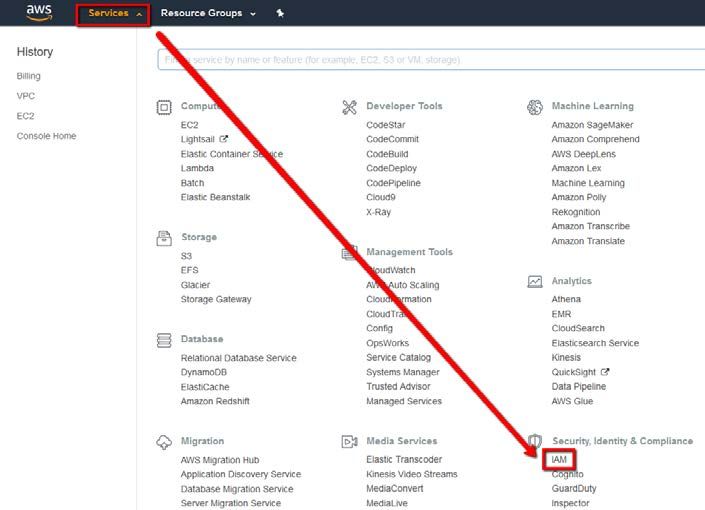
1. Click on the Services menu, then click on IAM under Security, Identity & Compliance.
PAGE 4 OF 31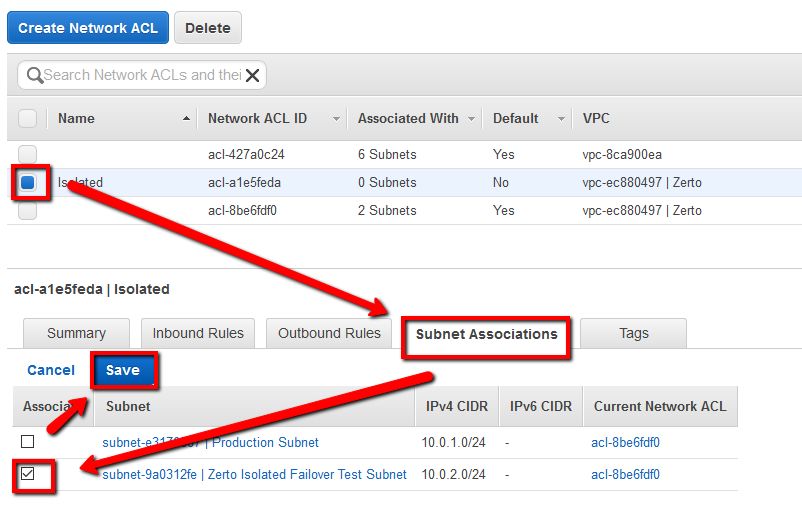
2. Click on Users and then click Add User

 AWS User Requirements

 Access to AWS                                    •   AWS Access key ID
                                                  •   AWS secret access key

 Permission to use both S3 and EC2                •   Importing data from S3 to EC2

                                              This means that he Zerto Cloud Appliance (ZCA)
                                              user(s) must have AmazonS3FullAccess and
                                              AmazonEC2FullAccess permissions, which can
                                              be set within the IAM service interface.

3. Provide a User Name
4. For Access type, select Programmatic Access and AWS Management Console Access.

                                                                                               PAGE 5 OF 31
5. Set a password according to your preference (autogenerated or custom), password reset requirements, then
   click the Next: Permissions button.

6. Click on the Attach existing policies directly button.

                                                                                                 PAGE 6 OF 31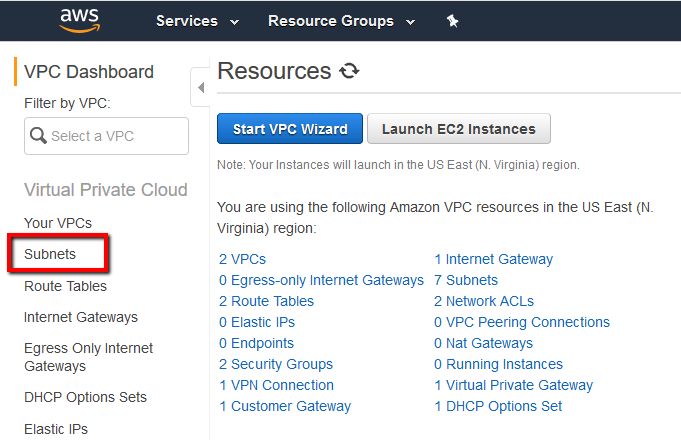
7. Under the Policy type, use the filter box, and type AmazonS3FullAccess AmazonEC2FullAccess (type both,
   with a space between them), select the checkboxes next to both policies that are returned, then click the
   Next: Review button.

8. Review the summary, then click Create User.

                                                                                                    PAGE 7 OF 31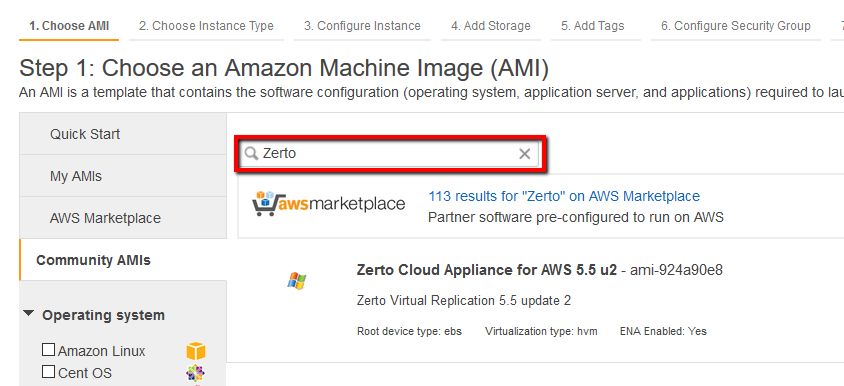
9. On the final screen, take note of the Access key ID and Secret access key. Additionally, if you want to save
       this information, click on the Download .csv button to save a copy locally. You will need this information
       when you deploy Zerto in AWS, so be sure you do not lose it. Once you’ve saved the information needed,
       click Close.

4. Setup Networking in AWS

AWS creates a network that is usable by default, however, if you prefer to set the network up to your specifications,
the following section below will guide you through that procedure.

For more information about Virtual Private Cloud and subtopics, refer to the information in the Additional AWS
Resources section at the beginning of this document.

 4.1. Setting up the Virtual Private Cloud (VPC) and VPN Connection

AWS creates a VPC for customers by default, but if preferred, the following steps will walk through setting a new one
up with a VPN connection that meets your requirements.

Before you begin, be sure that you are in the correct AWS Region.

The region selector can be found at the top right of the AWS interface next to your account name. Whenever
creating any services in AWS, be sure to verify that the region is correct, as some services can be region specific,
while some are global, such as IAM.

Additionally, to set up the VPN connection back to your datacenter, you will need to know the connection details.

                                                                                                              PAGE 8 OF 31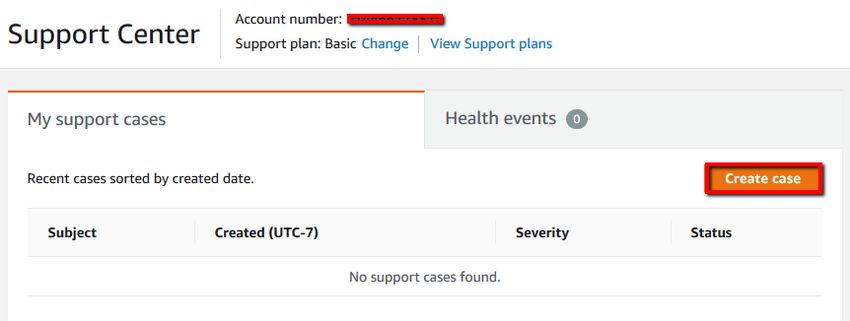
1. In the AWS Management Console, go to Services > Networking & Content Delivery > VPC

                                                                                         PAGE 9 OF 31
2. To begin, click on the Start VPC Wizard button.
3. Select VPC with a Private Subnet Only and Hardware VPN Access, then click the Select button.
PAGE 10 OF 314. Accept the default IPv4 CIDR block for the VPC and Private Subnet, or change the IP Scheme if you prefer,
provide a VPC name, select whether or not to enable DNS hostnames (enables an auto-assigned public DNS
name to instances created within the VPC), then click Next.
For this documentation, I have selected to use the default IP addresses provided by the VPC creation wizard.
Please note that if you want to also add another private subnet to provide a failover test isolation network, you will need to do that
after the VPC is created.
5. To configure the VPN, enter the details of the following, then click Create VPC. It may take a few minutes
before this step completes.
a. Customer Gateway IP
b. Customer Gateway Name
c. VPN Connection Name
d. Routing Type
6. Once the VPC and VPN creation have completed, you will get a screen telling you that the VPC was
successfully created.
PAGE 11 OF 314.2. Create a Subnet for the Isolated Failover Test Network
To be able to run failover tests without affecting production, you will need to create an isolated network for failover
testing. The steps below will walk through creating a new subnet in the VPC you previously created, which will allow
for failover testing.
1. In the AWS Management Console, go to Services > Networking & Content Delivery > VPC
2. In the VPC Dashboard, click on Subnets on the left.
3. Click Create Subnet.
PAGE 12 OF 314. In the Create Subnet dialog box, provide:
a. Name for the Subnet – use something friendly that makes it easy to determine what that subnet is
used for, i.e. Zerto Isolated Failover Test Subnet.
b. Select the VPC you want this to reside in (Should be the same one as you previously created above).
c. Select the Availability zone, or leave as “No Preference.”
d. Input the IPv4 CIDR block you want to use for the subnet (i.e. 10.0.2.0/24)
5. Once you’ve input all values required, click the Yes, Create button.
4.3. Create and Attach Network ACL to Deny Inbound/Outbound Traffic for
Isolated Network
Creating a Network ACL will enable you to prevent any network traffic from flowing into and out of the isolated
network. Once created, you will attach it to the subnet you created as the Isolated Failover Test Subnet.
1. In the VPC Dashboard, under Security, click on Network ACLs
PAGE 13 OF 312. Click the Create Network ACL button.
3. Enter a Name for the ACL (i.e. Isolated), select the VPC you want to attach it to, then click the Yes, Create
button.
PAGE 14 OF 314. Select the Isolated ACL you created and you will see a set of tabs below, one of them being named Subnet
Associations. Click on that tab. Additionally, if you click the Inbound and Outbound rules tabs, you will see
that they are both set to Deny. This is what we want.
5. Click the Edit button, select the Isolated Failover Test Subnet, then click Save.
PAGE 15 OF 314.4. Configure Security Group for Bi-Directional ZCA ZVM & VRA
Communication
In this section, we will create a security group that will provide proper access between on-premises ZVM(s), VRA(s),
and the ZCA in AWS. Note that we will not attach this to anything until the ZCA has been built.
For firewall ports required for AWS, refer to the Zerto Virtual Replication AWS Enterprise Guidelines technical
documentation.
1. In the AWS Management Console, go to Services > Compute > EC2
2. In the EC2 Dashboard, go to Network & Security, then click on Security Groups.
PAGE 16 OF 313. Click on the Create Security Group button.
4. Provide the following information:
a. Security Group Name
b. Description
c. VPC
5. Click on the Inbound tab and add the following rules. For security reasons, do not use “Anywhere” as the
source:
Type Protocol Port Range Source Description
Custom TCP Rule TCP 9669 Use CIDR or IPs See documentation
Custom TCP Rule TCP 9180 Use CIDR or IPs See documentation
Custom TCP Rule TCP 443 Use CIDR or IPs See documentation
Custom TCP Rule TCP 4005-4009 Use CIDR or IPs See documentation
6. Click on the Outbound tab and add the following rules. For security reasons, do not use “Anywhere” as the
destination:
PAGE 17 OF 31Type Protocol Port Range Destination Description
Custom TCP Rule TCP 9669 Use CIDR or IPs See documentation
Custom TCP Rule TCP 9180 Use CIDR or IPs See documentation
Custom TCP Rule TCP 443 Use CIDR or IPs See documentation
Custom TCP Rule TCP 4005-4009 Use CIDR or IPs See documentation
7. Click the Create button. Before you can assign the security group, you’ll need to deploy the ZCA, and the
next section will cover that.
4.5. Create an Internet Gateway
Creating an Internet Gateway for your VPC is what will provide the route (which you will have to then create in the
next section) that gives you the ability to remotely connect to your instance(s). If you don’t perform this step, and
the next one (Route Table Attachment), you will not be able to remotely connect to your instance, so this is
important.
1. In the AWS Management Dashboard, to go Services > Networking & Content Delivery > VPC.
PAGE 18 OF 312. On the left, under Virtual Private Cloud, select Internet Gateways.
3. Click the Create Internet Gateway button. Note that I’ve already created one called Zerto-IGW.
4. Provide a name for the Internet Gateway, then click the Create button.
PAGE 19 OF 314.6. Update Route Tables to Include the IGW and Subnet for Production
After you’ve created the IGW (Internet Gateway), you will need to attach it to the route table for your VPC, and also
attach the production subnet to the route table. We’ll do that in this section.
1. From the VPC Dashboard, under Virtual Private Cloud, click on Route Tables.
2. Select the route table for the VPC you built for this. Note that when you select the route table, the bottom of
the window shows you tabs labeled: Summary, Routes, Subnet Associations, Route Propagation, Tags.
PAGE 20 OF 313. Click on the Routes tab, then click on the Edit button.
4. Click the Add another route button.
5. In the destination, enter: 0.0.0.0/0. For the target, select the IGW you just created, then click the Save
button.
6. Now, click on the Subnet Associations tab.
PAGE 21 OF 317. Click on the Edit button.
8. Select your “Production Subnet”, then click the Save button.
5. Deploy the Zerto Cloud Appliance (ZCA)
Before starting this procedure, make sure you’re in the correct AWS Region.
1. In the AWS Management Console, go to Services > Compute > EC2.
PAGE 22 OF 312. Click on the Launch Instance button.
3. On the left, click on Community AMIs.
4. In the search box, type Zerto, which will return the Zerto Cloud Appliance for AWS 5.5 u2 AMI.
PAGE 23 OF 315. Click Select.
6. At minimum, select the m4.xlarge type instance as per the Zerto Virtual Replication AWS Enterprise
Guidelines documentation, then click the Next: Configure Instance Details button.
7. Configure instance details as required, then click the Next: Add Storage button. Hint: For the Auto-assign
Public IP section, select Enable if you want to be able to reach this instance from the Internet. Note that you
will need to set a security group entry to allow inbound RDP (TCP 3389) in order to access it.
PAGE 24 OF 318. Select storage options, then click the Next: Add Tags button.
9. Add a tag, with the Key as Name and the Value as Server Name or Friendly Identifier. This will help you
identify the instance in the EC2 instance listing, instead of having to remember an instance identifier that is
auto-generated by AWS.
10. Click Next: Configure Security Group.
11. Select the radio button beside Select an existing security group and select the Security Group you previously
created that contains the inbound and outbound rules for the instance. If you remember earlier when
creating the security group, we didn’t attach it to anything because we needed to build the instance first.
This is where you are attaching the security group to the instance.
12. Click the Review and Launch button.
PAGE 25 OF 3113. Review the instance settings and if everything looks good to you, click the Launch button.
14. When the popup is displayed to Select an existing key pair or create a new key pair, select Create a new key
pair, name it, and be sure to Download Key Pair and save it to a safe place, because you will need this to
connect to the instance once it has launched.
15. After you have downloaded the Key Pair, click the Launch Instances button.
PAGE 26 OF 3116. You can review the instance status from the EC2 > Instances dashboard:
17. As soon as the instance is created, you can select it, and use the Connect button to download an RDP file and
obtain the password, using the .pem file you saved in step 14.
18. Once you’ve established connectivity to your ZCA via RDP and your VPN is functional, you can proceed to
install the Zerto Virtual Replication for AWS (ZCA) and pair your sites.
6. Important Tip: AWS Limits
6.1. Installation
Be aware of Default AWS limitations which may affect Installation:
• When using S3, by default, there is a limit of 100 buckets that can be created per account.
6.2. Protection and Recoverability
The following limitations are in place by default for EC2 and VPCs. It is advised to request those limits be lifted in the
event you feel you may exceed any of them. To for more information about AWS Default Limits or to request limit
increases, refer to the AWS Service Limits documentation.
The section following the information below will walk you through requesting an AWS Limit increase.
The following information is from the Zerto Virtual Replication AWS Enterprise Guidelines:
PAGE 27 OF 31EC2 Limitations Which Affect Protection and Recoverability
• On-Demand instances: 20 per region per account
o Instance types are also limited per region, many of them are 20 instances per region per account.
• Refer to the AWS documentation for limitation information.
Networking Limitations Which Affect Protection and Recoverability
• Network interfaces per region: 350
• NICs per instance: Depends on instance size, refer to the AWS documentation for limits on each instance size.
Volume Limitations Which Affect Protection and Recoverability
• EBS disks per account: 5000
• Total volume storage of Magnetic volumes: 20TiB
• Maximum EBS volume size – magnetic type:
o Min: 1 GiB
o Max: 1024 GiB
Import Instance Limitations Which Affect Protection and Recovery
• Concurrent Import-Instance tasks: 5 tasks per account
PAGE 28 OF 316.3. To Request an AWS Limit Increase
If you will encounter any of the limits which affect installation or protection and recoverability, you can request a
limit increase. For more information, visit: AWS Service Limits
To request a limit increase, follow the steps below:
1. Go to: AWS Support Center
2. Click on the Create Case button.
PAGE 29 OF 313. Fill in the following values:
a. Regarding: Service Limit Increase
b. Limit Type: Select a limit type that you need increased
c. Fill out the Request details.
d. Click the Add another request button to include additional service limit increases.
e. Use Case Description: Provide a description for your use case/requirement for the service limit
increase(s)
f. Select your support language
g. If this is an urgent request: Select Phone
h. Enter your country/region.
i. Enter your phone number to be contacted at.
j. Click the Submit button.
PAGE 30 OF 31You can also read


