Portable MP3 Player User's Guide - Safety
←
→
Page content transcription
If your browser does not render page correctly, please read the page content below
MP3-128 LCD
                    MP3-256 LCD
                    MP3-512 LCD

Portable MP3 Player
User's Guide
Safety

Introduction

Installing the MP3 Player

Transfer data to and from the MP3 Player

Listening to your WMA/MP3 music

MP3 Player Controls

LCD Display

Voice Recorder

Advanced Settings

Upgrade the Firmware

Removing the MP3 Player from your computer

Trouble Shootings
Specifications
Safety
Listening to loud sounds for prolonged periods may permanently damage your hearing. Before
putting on the headphones, place them around your neck and turn the volume down. Then put
the headphones on and slowly increase the volume until you find a comfortable listening level.
Introducing the MP3 Player
The MP3 Player incorporates a portable WMA/MP3 Player, Voice Recorder and USB 2.0 Mass
Storage Device.
MP3 Player Features:
• WMA/MP3 player.
• Synchronous lyric display with WMA/MP3 music.
• Voice recorder.
• USB mass storage device.
• Integrated USB connector.
• Backlit display.
• Superb audio quality.
• No cable required.
• Requires 1 AAA / LR03 battery (supplied).
System support:
• Supports Windows Me/2000/XP.
Note for Windows Me/2000/XP users: Installation of the MP3 Player drivers is required
only if you wish to upgrade the firmware of the player.
Note for Windows 2000 users: Windows Service Pack 3 must be installed before installing
MP3 Player drivers.
• Supports Windows 98 SE after installation of drivers (see below).
• Supports Mac OS X (version 10.2.6 or above) without driver.
Note:
• To minimize static electricity, avoid operating the player in an extremely dry environment.
• Under the environment with electrostatic discharge, the product may malfunction and
requirement user to reset the product.Installing the MP3 Player
Installation of drivers for computers using Windows Me/2000/XP is not necessary.
Note for Windows Me/2000/XP users: Installation of the MP3 Player drivers is required only if you
wish to upgrade the firmware of the player.
Note for Windows 2000 users: Windows Service Pack 3 must be installed before installing MP3
Player drivers.
Windows 98 SE users will need to install the MP3 Player on their system:
Insert the CD-ROM and the menu will appear.
1. Click the Setup Driver Button to begin the installation.
2. Follow the screen instructions to complete the installation
Or
1. Click the View Manual Button to browse the manual.
2. In the manual, click on the link below to open the folder containing the MP3 Player
installation program.
3. Click on the Setup icon to begin the installation.
4. Follow the screen instructions to complete the installation.
Transfer data to and from the MP3 Player.
1. Make sure that the MP3 Player is turned off.
2. Remove the USB port cover & disconnect the
earphone.
3. Plug the MP3 Player into the USB port of your
computer. The built- in LCD displays "READY",
indicating that the MP3 Player is in USB mode. The
MP3 Player is then automatically recognized (in 'My
Computer') as a removable media device.
4. Transfer files to or from the internal Flash RAM using
Windows explorer.
5. Unplug the MP3 Player from your computer,
WMA/MP3 files can now be listened to and all data
stored can be transferred to another computer.Listen to WMA/MP3 music files with the MP3 Player
1. Follow the instructions for the transfer of data to and from the MP3 Player to copy
WMA/MP3 music files to the MP3 Player.
2. Install 1 AAA/LR03 battery into the battery compartment.
3. Connect the supplied earphones to the earphone socket.
4. Press the Play button.
5. Use the MP3 Player controls to adjust playback and volume level to listen to your
WMA/MP3 music.
Note: Installing the battery:
1. Push and slide out the battery compartment door
2. Install the battery.
Lyric display function
The MP3 Player supports lyric files in LRC format.
1. Prepare a MP3 or WMA music, for example, happymusic.mp3;
2. Download a lyric file from internet. The lyric file must have an extension file name LRC.
For example, happymusic-2004.lrc.
3. Rename the lyric file. For example, happymusic.lrc. It is to make sure the lyric filename is
same as the corrosponding music filename.
4. Copy the lyric file & music file to the MP3 player.
5. Disconnect the MP3 player.
6. Use Skip buttons to select the music file, for example, abc.mp3. Press Play button to play.
7. The LRC icon would appears, and the lyric would display Synchronously on LCD while the
music is being playback.
The MP3 player supports LRC format only.
If the lyric does not synchronize with the music, please download one better lyric file from internet
and try again.
Make sure the MP3 music and LRC file is located in same directory and the filename is same. If not,
the MP3 player can not recognize the lyric file.MP3 Player Controls
A. USB Port Cover
B. Headphone Socket
C. A-B / Menu Button
D. Skip Next / Fast
Forward
E. Skip Previous / Fast
Rewind
F. Power Off/Stop
G. Power On/Play/Pause
H. Hold Switch
I. Volume Down
J. Volume Up
K. Micropho ne
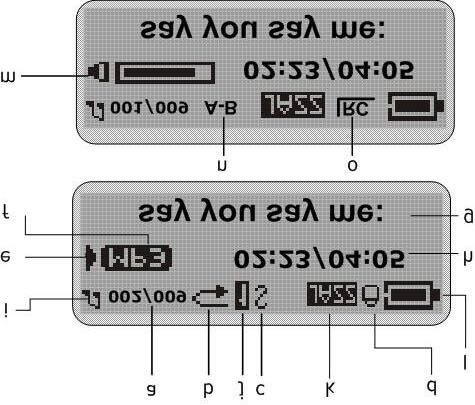
LCD Display
a. Track Number / Total
Tracks
b. Repeat all
c. Shuffle
d. Hold
e. Play/Pause/Stop/Rec.
f. Music Type
g. ID3 Tag (track name)
display
h. Elapsed Time/ Track
Time
i. Music Mode/ Voice
Mode
j. Repeat one
k. Equaliser
l. Battery Indicator
m. Volume
n. A-B Repeat
o. Lyric display
functionVoice Recorder Record voice 1. Select Record in the LCD menu list to begin recording. 2. Press the Stop or Menu button to stop the recording and enter Voice mode. The voice recording will have been saved as a file named Vxxx.WAV in the Voice folder. Note: the LCD display will read MEMORY FULL when all available memory has been used. Playback voice This operation is similar to the playback of music. 1. Select Voice in the LCD menu to enter Voice mode. 2. Select a recording to listen to by pressing the Skip buttons. 3. Press the Play button to playback the recording. Hold Function Use the Hold function to deactivate the MP3 Player controls (to avoid accidental activation). 1. To activate the Hold function, slide the Hold switch. 2. Slide the Hold switch back to turn off the Hold function. Note: The MP3 Player will turn off automatically if the hold switch ison when turning on the power.
Advanced Settings

To navigate the settings menu.

   1. Press & hold the A-B/Menu button and release it
      to enter the settings menu.
   2. Press the Skip buttons to choose a setting.
   3. Press the A-B/Menu button to select that setting.
   4. After setting is finished, press & hold the A-
      B/Menu button and release it to exit the Menu.

Equalizer Setting

The Equalizer (Eq) setting is to adjust the music playback effect. There are six Eq presets available:
Normal, X-Bass, Rock, Jazz, Classical and Pop.

   1. Select Equalizer in the settings menu.
   2. Press the Skip buttons to select a preset Eq.
   3. Press the A-B/Menu button to activate.

Play mode Setting

The available Play modes are:

   •   Normal
   •   Repeat Track
   •   Repeat All
   •   Shuffle
   •   Shuffle Repeat

   1. In the settings menu, select Play Mode.
   2. Press the Skip buttons to select a play mode.
Adjust LCD Contrast
To adjust the LCD contrast
1. In the settings menu, select Contrast.
2. Press the Skip buttons to adjust the contrast
level.
3. Press the A-B/Menu button to go back to setting
menu.
Backlight
To adjust the backlight
1. In the settings menu, select Back Light.
2. Press the Skip buttons to adjust the delay before
the backlight is switched off.
Note: Selecting "Disable" would turn off the backlight.
Selecting "On" will turn on the backlight.
Power Savings
Use the Power Saving function to automatically turn the
MP3 Player off after a predetermined length of
inactivity.
1. In the settings menu, select Power Savings.
2. Press the Skip buttons to select time.
Note: Selecting "Disable" will not turn off the MP3
Player automatically.Record Settings
A high record sampling frequency brings an increase in sound quality but also a corresponding
increase in memory usage.
1. In the settings menu, select Record settings.
2. Press the Skip buttons to select "Source". Press the A-B/Menu button repeatedly to select a
record source in which to change its sampling frequency or recording format settings.
3. Press the Skip buttons to select "Encoder". Press the A-B/Menu button repeatedly to select a
recording format.
4. Press the Skip buttons to select "Rate". Press the A-B/Menu button repeatedly to cycle
through the available Recording Sampling Frequencies.
5. Press the Skip buttons to select "Exit" and press the A-B/Menu button to exit the Record
Setting menu.
Sampling Frequency Maximum Recording Time per 128MB
8000 Hz 8 hours
11025 Hz 5.8 hours
16000 Hz 4 hours
22050 Hz 2.9 hours
32000 Hz 2 hours
Note: The recording format options in "Encoder" are different. User need not to change this setting.
Load default
To reset all setting to factory default setting,
1. In the settings menu, select "Load default"
2. Press the A-B/Menu button. The default settings are loaded to the MP3 Player.Erasing files
Warning: Erased files cannot be recovered.
1. Stop pla yback or recording before attempting to erase files.
2. Press and hold the A- B/Menu button and release it to enter menu and select Erase Files.
3. There are two options to choose from. To erase music files, select Music. To erase voice
recordings, select Voice.
4. You will be asked if you are sure you want to erase the listed music file or voice memo.
5. If you are sure you want to erase the listed file, press the Skip buttons to choose Yes. Then
press the A-B/Menu button to confirm.
6. The file is erased. Another file will be listed on the screen and you will be asked again if you
want to erase this file.
7. When you have finished erasing the file, the player will automatically exit to Erase Files
screen.
8. Select Exit to take you back to the menu list.
About
Information is available regarding the firmware version, built- in memory size and free memory size.
1. Select About in menu list.
2. The firmware version and Internal Media info appears.
3. Press the Skip buttons to read the Free memory space.
4. Press A-B/Menu button to exit to menu list screen.Upgrade the Firmware
The firmware in the player can be updated through the Firmware Download utility running on your
PC. To update the firmware, run the Firmware Download utility. The MP3 Player driver must be
installed to use the Software Utility.
1. Plug the MP3 Player into the USB port of your computer. The built- in LCD will display
"READY", indicating that the MP3 Player is in USB mode.
2. To run the Player Update utility go to: Start > Programs > SigmaTel MSCN Audio Player >
Firmware Download.
3. Check the Current Firmware Version and Upgrade Firmware Version. If you are sure it is
the correct version to update, click on the Start button.
4. The firmware will be transferred to the player. Please wait until it has finished.
5. Click on the Close button to exit.
Format Data Area option: When not selected (default): Updates the firmware only. If
selected( recommended): Updates the firmware and formats the storage space.
To Format the MP3 Player
1. Connect the MP3 Player to the computer.
2. Format the MP3 Player (removable disk) using the Windows format tool.
Note: Do not select NTFS from the File System menu. Otherwise, the MP3 Player can not
work and you will need to format it again.
Removing the MP3 Player from your computer
Windows Me, 2000 & XP user:
1. Click on the Safely Remove Hardware icon in the taskbar (next to the clock).
2. Click on Safely remove USB Mass Storage Device.
3. Wait until a Safe to Remove Hardware message is displayed.
4. Remove the MP3 Player.
Windows 98/98SE user:
1. Please wait until the player LCD displays "IDLE" for a moment.
2. Remove the MP3 Player.Trouble Shootings
Q The LCD displays nothing after turning on the MP3 player.
A 1 Check to see if the battery has been inserted.
2 Check to see if the battery needs replacing cleck to see that the battery has been inserted correctly.
3 If it still does not work, go to next step.
Put the player in recovery mode
1 Take out the battery from the battery compartment.
2 Press and hold the play button. Do not release it until step 4.
3 Plug the MP3 player into the USB port of your computer.
4 Hold for 5 seconds and release the play button.
5 Leave the MP3 player in the USB port for the next step.
Refresh the firmware
1 On your computer run the Firmware Download utility go to:
Start > Programs > SigmaTel MSCN Audio Player > Firmware Download
2 The utility will start to search the MP3 player. Please wait until the Firmware Download window appears.
3 Select "Format Data Area".
4 Click on the Start button to start.
5 The firmware will be transferred to the player. Please wait until it has finished.
6 Click on the Close button to exit.
Note: If the utility can not find the MP3 player even after searching for several minutes, please cancel the searching, and redo the
steps from step 1 and make sure that the MP3 player is put into Recovery mode.
Q The LCD displays "Error! Reformat media" and power off.
A
If you format the MP3 player to NTFS format, it will show "Error! Reformat media" and power off. You must reformat it to FAT or
FAT32 format in Windows Explore.
Q Why can't I play DRM protected files?
DRM-protected files will only play if you copy them to the player through Windows Media Player or through the music
A management software provided by the online music store where you purchased the files.MP3 Player Specifications
• Internal Memory
o Built-in 128MB, 256 MB, 512 MB or 1 GB (6 MB reserved for firmware and system
management)
• Interface
o USB
• Power
o 1 x AAA Battery
o Battery continuous playing time: Up to 8 hours
• Equaliser
o Normal, XBass, Rock, Jazz, Classical, Pop
• Display
o 128 x 32 dots Dot-matrix LCD with backlight
o ID3 Tag display
• Controls
o Power On / Play / Pause
o Stop / OFF
o Skip Next
o Skip Previous
o A-B/Menu button
o Volume +
o Volume -
o Hold Switch
• Processor
o 75 MIPS DSP
• Audio Playback
o Windows Media Audio (WMA)
o MPEG Audio Layer 3 (MP3)
• Voice Recording
o ADPCM encoding
o 8 KHz to 32 KHz sampling rate
o Each 128 MB memory provides about 8 hours recording (at default setting, 8 KHz)
• Signal to Noise Ratio
o > 90 dB
• Frequency Response
o 20 Hz ~ 20 kHz
• Output
o < 11 mW (each output)
• Total Harmonic Distortion Output
o 0.01% ~ 0.5%
• Ports
o USB Port
o Phone Out
• Firmware
o Flash based. User upgradeable.
This symbol on the product or in the instructions means that your electrical and electronic equipment
should be disposed at the end of its life separately from your household waste. There are separate
collection systems for recycling in the EU.
For more information, please contact the local authority or your retailer where you purchased the product.You can also read