Pearson Collections 2018: Tutorial - Higher Education
←
→
Page content transcription
If your browser does not render page correctly, please read the page content below
Pearson Collections 2018: Tutorial
Table of Contents

Table of Contents

Overview and Access

Using Collections
   Help and Support for Collections

Searching for Content

Building a Collection
   Adding Your Own Content to Your Collection
   Assembling Content
       Parts
       Pricing
       Sharing the Collection
   Cover & Printing
       Book Cover
       Title Page
       Table of Contents
       Print Options
   Course Information
       Course
       Notes and Course Bundles
   Review and Submit

Delivery Timelines & Important Notes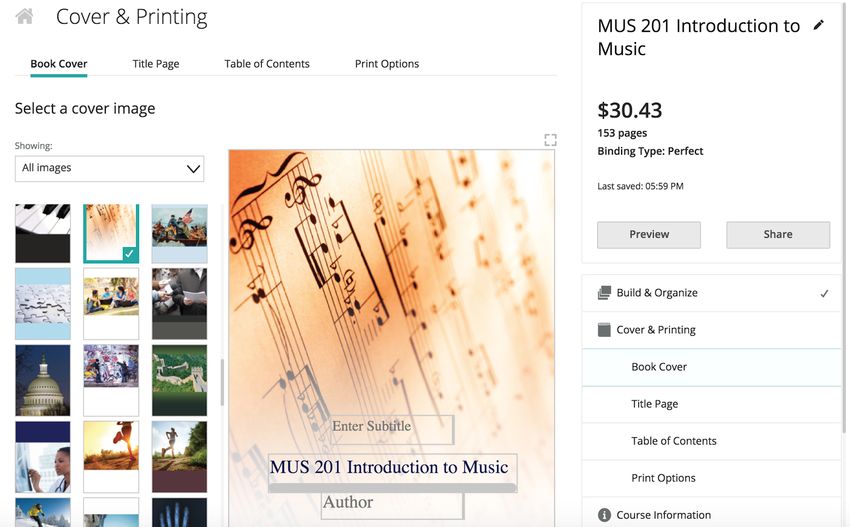
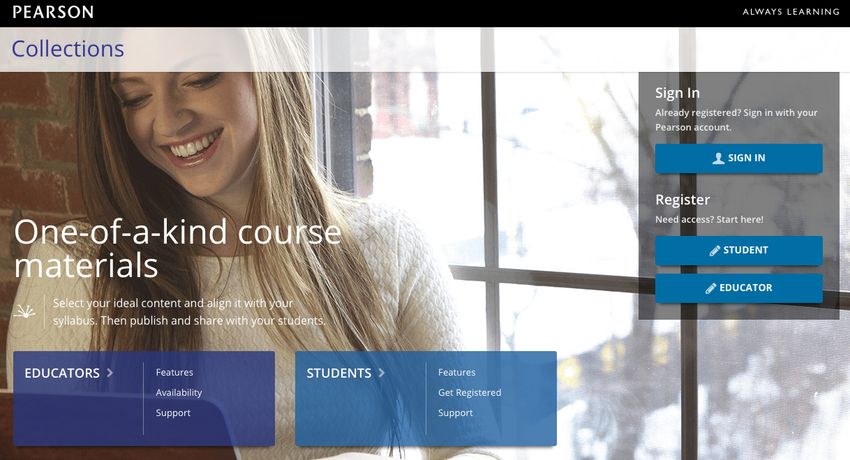
Overview and Access Welcome to Pearson Collections, a new application designed to enable instructors to create a customized collection of course materials using Pearson content, thirdparty literature readings, business cases, and instructors’ own original content that can be delivered as a fully digital eBook or print book to match your course. To log in, go to www.pearsonhighered.com/collections and click on “Sign In”. This page has links to features, design services and other information of interest to instructors. Click “Sign In” and then log on with your MyLab/Mastering account credentials (NOTE: If you need an educator access code, please contact your Pearson Representative to obtain an access code for MyLab/Mastering and Collections). Once you have an access code, click on the “Educator” button. Once you are registered, click “Sign In” to access Collections.
Using Collections

The “My Collections” page is your Collections home page. If this is your first time accessing
Collections, you will notice that we have added a “test” or “dummy” Collection to your account
for you to experiment with, and possibly learn from. Aside from this “dummy” Collection we’ve
created for you, there are no actual live Collections in your account until you click to “Create
New Collection”.

The “Options” menu on each Collections project, allows you to edit, share, copy, or delete the
Collection.

Clicking on each Collection’s image will allow you to edit the Collection, if it has not been
submitted yet. If the Collection has been submitted, clicking on the image will allow you to
preview the finalized, submitted Collection.
Help and Support for Collections

If you need help at any point while using Collections, click on the small “question mark” icons
that are displayed at the top of each Collections page.

The help topics are specific to each page. Clicking the help icon on the “My Collections” page
will have different topics than the “Build & Organize” page, for example.

Pearson Tech Support is also available, via our Educator Support page. Click on the “Visit
Pearson Support” link to contact tech support.
Searching for Content
You will need to create a new project in Collections in order to search and add content to your
project. Click on “+ Create New Collection” or on the turquoise “New Collection” button to get
started.

                                                   or

Select “Print” to create a printed textbook, or “Digital” to create an eBook and click “OK”
(Collections Digital eBooks are available in the United States, only).

On the Build & Organize page, click the pencil icon next to “Untitled Collection” to title your new
Collection. To begin adding content, enter an ISBN, title, author name or any other keywords
you would like to search in the search bar under “Add Content”.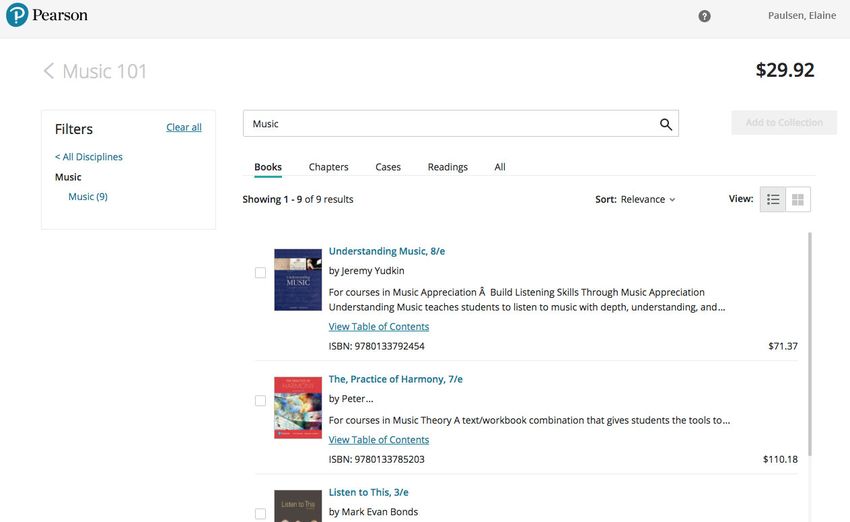
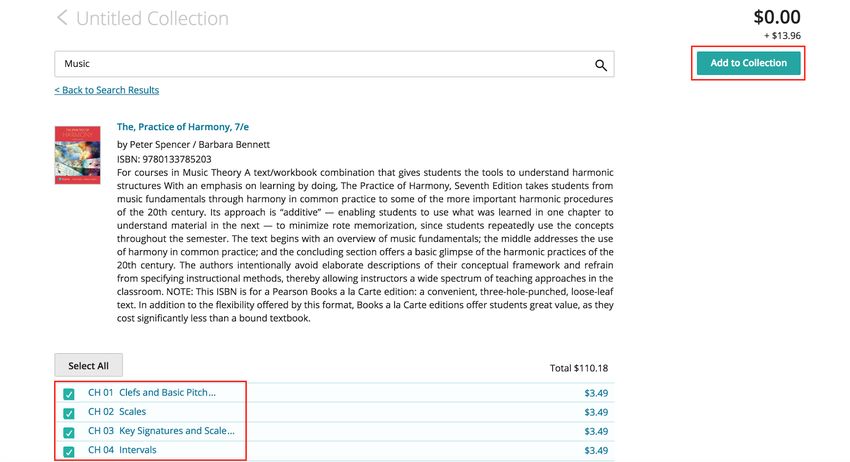
In this example, I’ve searched using the keyword “Music”.

When viewing results in the “Books” tab, click on the “View Table of Contents” link to see all of
the book’s available chapters.

In this next example, I have now selected the first four chapters of this book, to add to my
Collection. The total price of the chapters you have selected will display at the top right of the
page, below the current cost of chapters already in your Collection. In my example, I have not
yet added any chapters so my Collection cost is currently $0.00, and $13.96 is the total of the
four chapters I have selected. Click “Add to Collection” to add these chapters to your book.

Search Tip: If you’re searching for a specific title or phrase, try wrapping the search words in
quotations, such as “The Practice of Harmony”. Wrapping a title or phrase in quotations will
search for just the entire specific term or phrase, rather than searching for all words in the
phrase, separately.

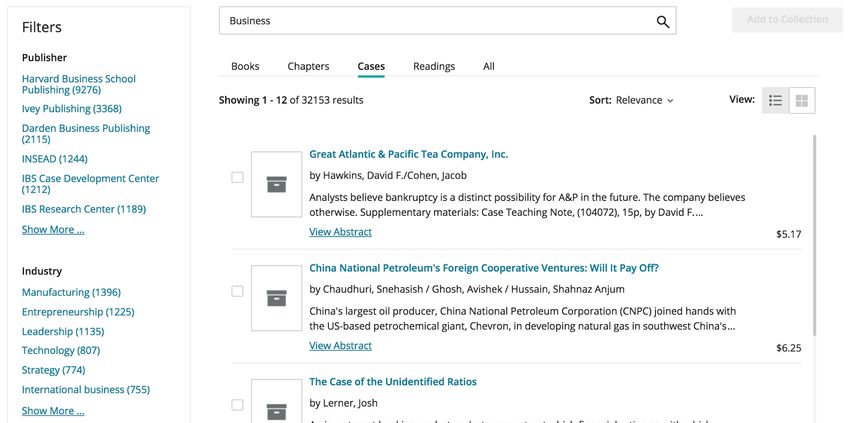
Of note: for business disciplines, we have thousands of business cases available, by publishers
such as Ivey and Harvard, which can be added to your Pearson Collection.
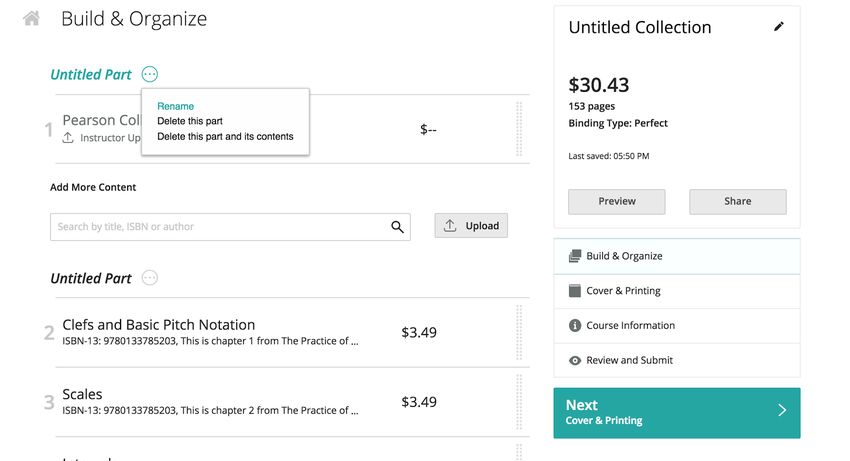
Building a Collection Now that we’ve searched for and selected content, it’s time to build a Collection. Here’s how it’s done. After clicking “Add to Collection” from your search, you will be automatically directed to the Build & Organize page where you can reorder chapters, add Parts, upload content, and further customize your book. Note, if you haven’t already, this is a good time to give your Collections project a title by clicking the little pencil next to where you see “Untitled Collection”. At any point, you can use the righthand menu to navigate to other areas of your project, such as picking cover art or entering course information. To reorder your book’s chapters, you can click the bar on the right of each chapter to drag and drop the content where you’d like it to appear. Tip: To reorder multiple chapters at once, hold the “Shift” key, or the “Ctrl” key (PC) / “Command” key (Mac), while you click on each chapter. This will allow you to select multiple chapters at once, and move them the same way you’d move a single chapter. If you hover in between chapters, you will see “+Content” and “+Part” buttons appear. Click “+Part” to add a “Part” section or “+Content” to insert new content between items.
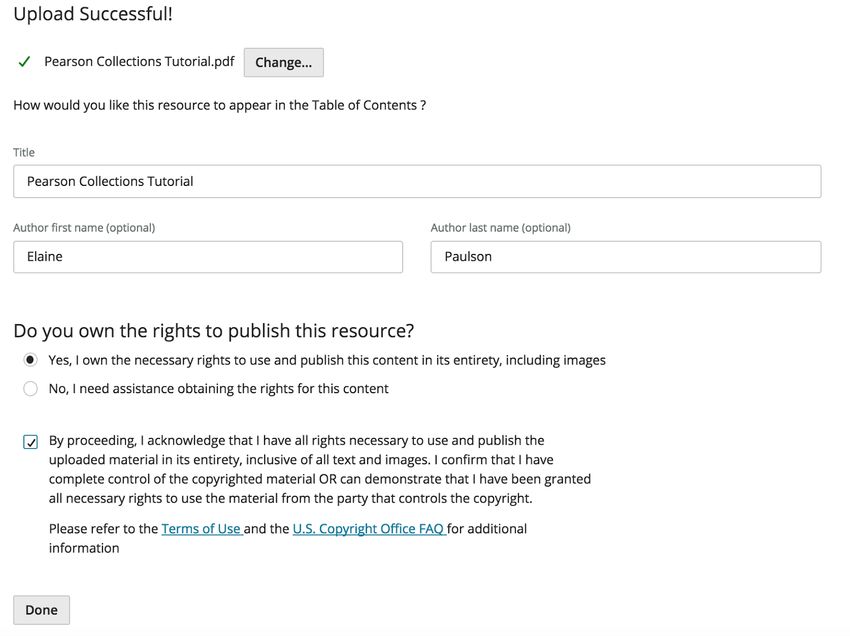
Adding Your Own Content to Your Collection

To upload your own content to your Collection, select the “Upload” button after clicking
“+Content”, or at the bottom of the screen.

You can now upload a PDF file from your computer. Click “Browse” to locate your PDF file from
your computer. Then, click “Upload” to upload your PDF file.

After uploading your file, you must confirm that you are the sole owner of the content you have
uploaded. It is extremely important that you are the sole owner of all material in the content you
are uploading, including any images or quotations in the material. By selecting “Yes”, you are
confirming that there are no other people, organizations, or other parties who have any
copyright or ownership of any part of the content you are adding to your Collection.

Note: if you do not own the rights to all of the content or are unsure, you can select “No” and our
team will assist with reviewing the content to determine if we need to clear rights to use the
content. If rights clearance requires Pearson to pay the rightsholders fees for use of the content,
note that the price of your Collection or the minimum enrollment may change. Our team will be
in touch if this becomes the case.
Click “Done” and your uploaded content will now display on the Build & Organize page.
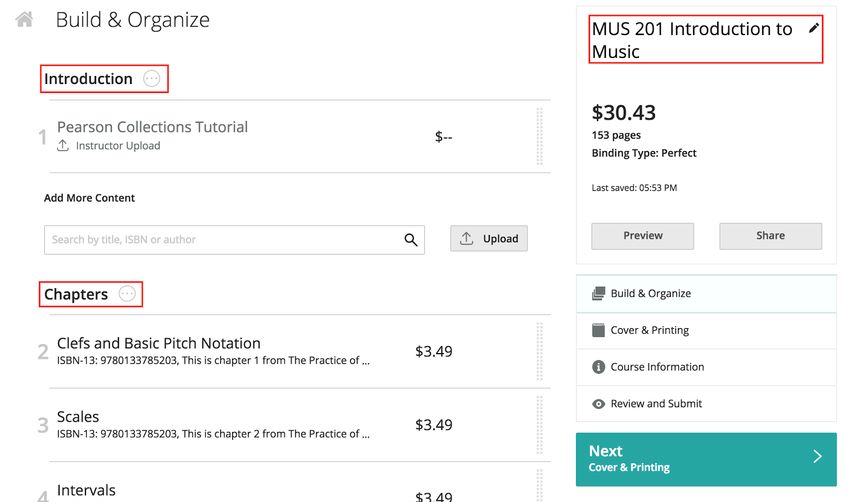
Assembling Content

Parts
Now that I’ve added chapters from the books I would like, and uploaded my own content, I’m
going to create separate book “Parts” for my introduction and my book’s chapters. I hover in
between chapters and click “+Part”. This gives me two parts which I now need to title, or
rename.

Here is how my Collection looks now that I’ve named my Collection “MUS 201 Introduction to
Music” and labeled my Parts “Introduction” and “Chapters”.
Here’s another example where I’m building a book that contains one part for “Chapters” and
another part for “Cases”.

Pricing
The price and total page count are displayed at the right side of the page, and the total price is
calculated from the cumulative price of all of the resources in the Collections book.

The minimum price for a print book in Collections is $15 (USD) and $19.50 (CAD). The
minimum number of pages allowed in a Collections print book is 100 pages, and the maximum
number of pages allowed is 1200 pages.

Note: For projects using NCCER content, the minimum price is $20 (USD) and $26 (CAD).

Sharing the Collection
You can share the entire Collection, or just share a PDF of the cover and table of contents. Note
that sharing the entire Collection will allow the person you share it with to edit the Collection. An
automatic email will be created and sent to the person that you’re sharing with; you can edit the
message in the box near the bottom of the Share dialog window. When sharing an entire
Collection, you will only be able to share it with people who have registered and accessed
Collections. The person you share it with will need to login to Collections to view and edit the
project. If you share the Collection with a person who is not yet registered for Collections, the
person will receive an email which prompts them to register prior to being able to access the
shared Collection.
Cover & Printing Book Cover For Digital Collections, select the cover image you want to display in your digital collection tile. For Print Collections, select the cover art and add your own text to the cover. Tip: there is a dropdown menu to help you find covers recommended for specific discipline areas. You can change the font type, size, alignment, and color for up to four fields. You can resize the width of each text box if there is not enough room for your text, and you can move the text placement anywhere you like.
Title Page
Click “Next” to view your title page. Note that the text you put on the cover will automatically
populate on the title page, but if you change any text on the title page it will not change the text
on the cover.

IMPORTANT NOTE: The Title is the only required field; a project cannot be submitted as
“Untitled Collection” on either the Cover or Title page. If you leave any other of the cover text
fields blank those fields will not appear on your final cover. At the end of the process, during
“Review and Submit”, you will be able to preview the final cover.

Table of Contents
Next, preview and confirm your table of contents. You can select to display three different
chapter prefixes for your table of contents. You can also edit the names of your parts here.
Print Options In this section, you’ll select the type of binding for your book, and request desk copies. Select your binding type from the drop down menu at the lefthand side of the screen. Note that the “default” binding type for Collections book is a perfect binding. Other options are available including plastic coil and looseleaf. Plastic coil and/or binder ready (threeholepunch) add an additional cost. Perforation is available for all binding types except for binderready (threeholepunch).
You can request a desk copy to be sent to yourself or another instructor. Fill out the information
in the desk copy section, including the address you would like the desk copy to be sent to. Note
that desk copies ship to you after the book order is placed and printed. Desk copies do not ship
in advance of book orders being placed.

Course Information

Course
Next, provide all the information about your course. Collections minimum estimated enrollment
is 10 students. Note that when you enter your institution’s zip or postal code, a list of institutions
will automatically populate based on the zip or postal code you’ve entered.
Notes and Course Bundles Click “Leave Notes” button to enter freeform text for any special requests, such as requesting a preprinting, an evaluation copy, or if there is a special price request for your project. “Course Bundles” allows you to request that a print book be packaged with another Pearson product, such as a MyLab or Mastering access card, a Revel access card, or another Pearson book. Note that you must have the correct ISBN for the other product in order to proceed with requesting a bundle.
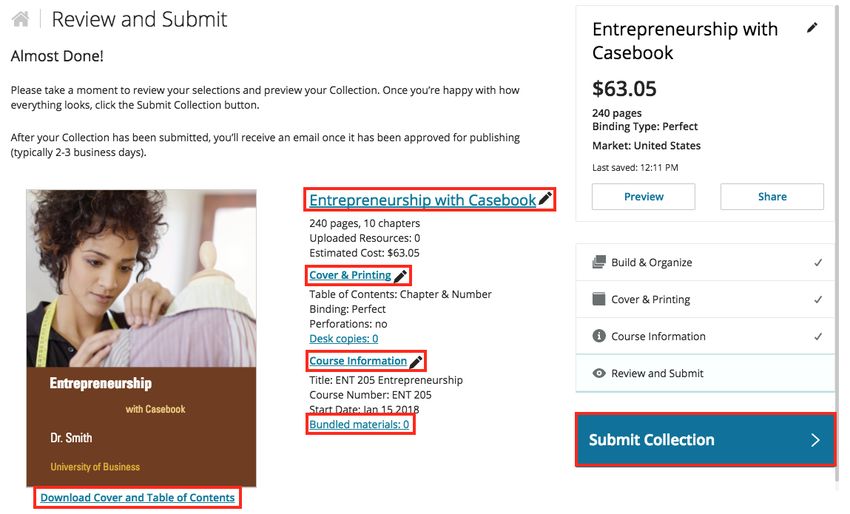
Review and Submit
This is the final step when creating your Collections book. Review your cover and the summary
of your Collection. You can jump quickly back to any of the other sections to edit them if needed.
When you have verified that all of the information is correct, click the big blue “Submit
Collection” button to submit your project to our Operations team who will approve and complete
the project.
Delivery Timelines & Important Notes IMPORTANT NOTE: It’s extremely important that all of the information for your Collections book is accurate and correct, prior to clicking the big blue button to “Submit Collection”. Once you click “Submit Collection”, you will no longer be able to edit the Collection. Our Operations team will approve and prepare your project for fulfillment. You will see the ISBN for your custom book immediately after clicking “Submit Collection”, and your book will be ready for bookstore ordering within 1 to 2 business days. Our team will contact you if there are any questions about your book. The typical delivery time for a print book is three weeks from the point that the bookstore places an order for the book. Bundles can take up to an additional two weeks. Because Collections books print “on demand” meaning the printer prints the book upon receiving an order from the bookstore it’s extremely important that your bookstore places the order for the book as early as possible prior to class start date; ideally at least four weeks prior to class start for standalone books, and six weeks prior for bundles. NOTE about Digital Collections (eBooks) United States, only: Digital Collections (eBooks) will be fulfilled via an email to you; the email will include instructions for bookstores to order access codes, as well as instructions for students explaining how to access the eBook. The eBook access is a single link where students click to first purchase access or register an access code, and instructions for how to access the eBook once registered. The bookstore can order access codes via our ordering system, or the students can purchase via credit card, depending on your specific access needs. © 2017 Pearson Education. All rights reserved.
You can also read