REALDEVICEMAP DOCUMENTATION - U'REALDEVICEMAP CONTRIBUTORS' - JAN 15, 2019 - READ THE DOCS
←
→
Page content transcription
If your browser does not render page correctly, please read the page content below

RealDeviceMap Documentation

       [u’RealDeviceMap Contributors’]

                              Jan 15, 2019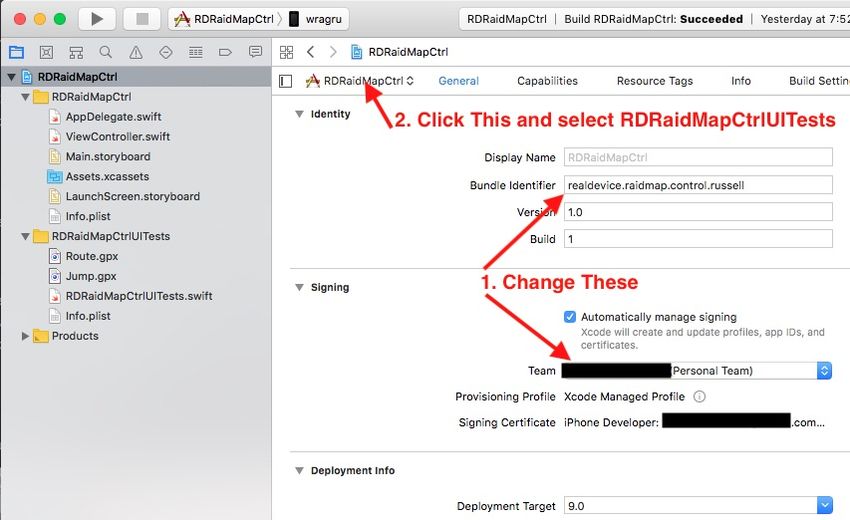
Contents

1   RealDeviceMap                                                                                                                                                                                                      3
    1.1 Requirements      .   .   .   .   .   .   .   .   .   .   .   .   .   .   .   .   .   .   .   .   .   .   .   .   .   .   .   .   .   .   .   .   .   .   .   .   .   .   .   .   .   .   .   .   .   .   .    3
    1.2 Installation .    .   .   .   .   .   .   .   .   .   .   .   .   .   .   .   .   .   .   .   .   .   .   .   .   .   .   .   .   .   .   .   .   .   .   .   .   .   .   .   .   .   .   .   .   .   .   .    3
    1.3 Map Images        .   .   .   .   .   .   .   .   .   .   .   .   .   .   .   .   .   .   .   .   .   .   .   .   .   .   .   .   .   .   .   .   .   .   .   .   .   .   .   .   .   .   .   .   .   .   .    5
    1.4 Updating . .      .   .   .   .   .   .   .   .   .   .   .   .   .   .   .   .   .   .   .   .   .   .   .   .   .   .   .   .   .   .   .   .   .   .   .   .   .   .   .   .   .   .   .   .   .   .   .    6
    1.5 Dashboard .       .   .   .   .   .   .   .   .   .   .   .   .   .   .   .   .   .   .   .   .   .   .   .   .   .   .   .   .   .   .   .   .   .   .   .   .   .   .   .   .   .   .   .   .   .   .   .    6
    1.6 Develop . . .     .   .   .   .   .   .   .   .   .   .   .   .   .   .   .   .   .   .   .   .   .   .   .   .   .   .   .   .   .   .   .   .   .   .   .   .   .   .   .   .   .   .   .   .   .   .   .   12
    1.7 Deploy . . .      .   .   .   .   .   .   .   .   .   .   .   .   .   .   .   .   .   .   .   .   .   .   .   .   .   .   .   .   .   .   .   .   .   .   .   .   .   .   .   .   .   .   .   .   .   .   .   12

2   RealDeviceMapUI                                                                                                                                                                                                   15
    2.1 Requirements . . . . . . . . . . . . . . . . . . . . . . . . . . . . . . . . . . . . . . . . . . . . . . .                                                                                                    15
    2.2 Device Setup . . . . . . . . . . . . . . . . . . . . . . . . . . . . . . . . . . . . . . . . . . . . . . .                                                                                                    16
    2.3 Installation . . . . . . . . . . . . . . . . . . . . . . . . . . . . . . . . . . . . . . . . . . . . . . . .                                                                                                  16

                                                                                                                                                                                                                       i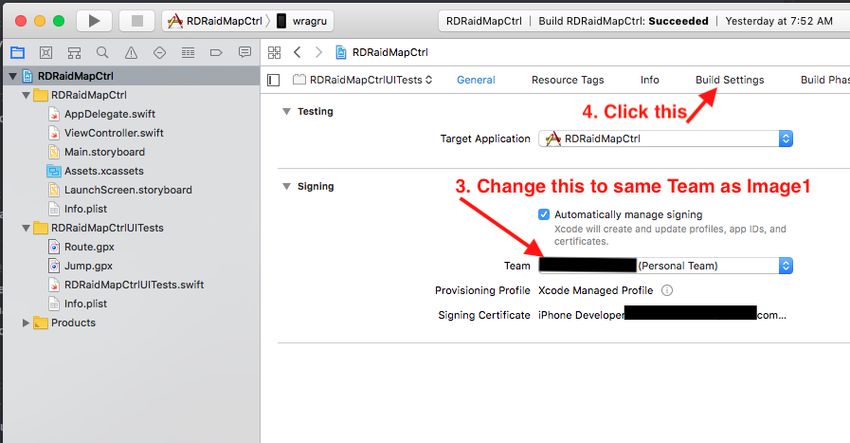
ii
RealDeviceMap Documentation

The contents of this repo is a proof of concept and is for educational use only!
RealDeviceMap is a Leaflet/OSM based Frontend with backend features. It includes a JSON and Protobuf parser for
Pokemon Go Data Objects. It also includes a basic proof of concept Instance and Device Manager.

Contents                                                                                                     1
RealDeviceMap Documentation

2                             Contents
CHAPTER          1

                                                                                          RealDeviceMap

This documentation covers the setup and configuration of RealDeviceMap (RDM).
Beta features will also be covered in this documentation and will be noted accordingly.

1.1 Requirements

RealDeviceMap can run anywhere and doesn’t need to be run on MacOS. It doesn’t even need to run in the same
network, so you can run RDM on a VPN or similar.

    • Docker (and docker-compose if not included already)
    • At least one RealDeviceMapUI Device-Controller
    • (optional) Existing MySQL Database, or you can use the included database included in the docker.

1.2 Installation

This guide assumes you have the requirements installed.

     • RDM Setup Process
     • What Next?

1.2.1 RDM Setup Process

    • Create a new folder for your compose files and RealDeviceMap:

                                                                                                              3
RealDeviceMap Documentation
mkdir compose/rdm
• Switch into that folder:
compose/rdm
• Get the composer file:
wget https://raw.githubusercontent.com/123FLO321/RealDeviceMap/master/docker-
˓→compose.yml
• Edit the file:
nano docker-compose.yml
• If you are using the RDM included docker database
– Edit the values for ‘DB_USERNAME‘ & ‘DB_PASSWORD‘ and ‘MYSQL_USER
MYSQL_PASSWORD‘. Recommend using ‘rdmuser‘ as the username and a secure password.
The username and password should match in both sections.
– Edit the value for ‘MYSQL_ROOT_PASSWORD‘ to a secure password for the root user.
– Everything else can stay at default
– if you run a database on port 3306 already (and not using it for this project):
* edit 3306:3306 to 3307:3306 for example. The db will then be accessible on the host (localhost) at
port 3307
– Start the docker Database Server:
docker-compose up -d db
• If you are using an existing database
– Edit the values for ‘DB_HOST‘, ‘DB_DATABASE‘, ‘DB_USERNAME‘ & ‘DB_PASSWORD‘ to match
your existing database configuration.
– Remove or comment out the following lines/sections from the document:
depends_on:
- db
...
db:
image: mysql
command: --character-set-server=utf8mb4 --collation-server=utf8mb4_
˓→unicode_ci
container_name: realdevicemap-db
restart: unless-stopped
environment:
MYSQL_ROOT_PASSWORD: YourStrongRootPassw0rd!
MYSQL_DATABASE: rdmdb
MYSQL_USER: rdmuser
MYSQL_PASSWORD: YourStrongPassw0rd!
ports:
- 3306:3306
volumes:
(continues on next page)
4 Chapter 1. RealDeviceMapRealDeviceMap Documentation
(continued from previous page)
- data:/var/lib/mysql
# - /etc/localtime:/etc/localtime:ro
• Start the RealDeviceMap Server (don’t add -d the first time so we can get the token):
docker-compose up rdm
• Visit http://localhost:9000 (or whatever the server ip/hostname to your VPN is) and create an admin account
with the access-token you see in the output of that command
• The map will start at 0,0 (blue ocean)
• Click Dashboard -> Settings and edit the start location
• RDM is now running on your system
• (you can now press Ctrl-C to stop in attached mode and start it again with:
docker-compose up -d rdm
1.2.2 What Next?
• Setup Map Images
• Setup one or more RealDeviceMap-UIControl Device Controllers
1.3 Map Images
This guide assumes you have a working RDM installed.
• On Linux
• On MacOS
• On Windows
• Example Images
1.3.1 On Linux
• find the volume name (usually named rdm_images or realdevicemap_images):
docker volume ls
• find it’s “Mountpoint” (probably something like /var/lib/docker/volumes/rdm_images/_data):
docker volume inspect rdm_images
• add images to egg, gym, pokemon, pokestop and unkown_egg in there
• restart rdm to create raid images from the compose/rdm folder:
1.3. Map Images 5RealDeviceMap Documentation
docker-compose down && docker-compose up -d
1.3.2 On MacOS
• stop rum docker-compose down
• edit docker-compose.yml
• change
images:/perfect-deployed/realdevicemap/resources/webroot/static/img
to
/absolut/path/to/images:/perfect-deployed/realdevicemap/resources/webroot/static/
˓→img
• go to that folder (e.g.: /absolut/path/to/images)
• add images to egg, gym, pokemon, pokestop and unkown_egg in there
• restart rdm to create raid images (from the compose/rdm folder):
docker-compose down && docker-compose up -d
1.3.3 On Windows
• (todo)
1.3.4 Example Images
• example images can be found here (extract all contents from example images into the volume path) (Icons by
Icons8)
1.4 Updating
1.4.1 Updating with docker-compose
docker-compose pull
docker-compose down
docker-compose up -d
1.5 Dashboard
This documentation covers the setup and configuration of RealDeviceMap (RDM).
Beta features will also be covered in this documentation and will be noted accordingly.
6 Chapter 1. RealDeviceMapRealDeviceMap Documentation
1.5.1 Settings
General
• Page Name: The name of your map, will be shown on the top left of the browser.
Map
• Start Latitude\Longitude: This will be the center of the map when you first open it up.
• Start Zoom: Starting zoom level of your map (default‘: 14)
Pokemon
• Default time left on new pokemon (in seconds): If you are doing 10 minute rounds on your instances this could
be set to 1200 (20 minutes)
• Default time left on re-seen pokemon (in seconds):
Webhook
• URLs (separated by “;”): List any webhooks that you want RDM to send data to here.
• Send Delay:
Misc
• Max Pokemon ID: Maximum Pokemon ID that RDM is setup to recognize
• Locale:
Enable Clearing of removed Pokestops/Gyms (Beta)‘: RDM will automatically clear any pokestops that are not
found/possibly removed or turned into a gym.
Enable Register‘:
1.5.2 Devices
This is where all your devices that you setup with RealDeviceMapUI-Control will appear.
You will also need to have atleast one instance setup before you can assign a device.
Device Table
• UUID: The unique name you set in config.swift for the listed device.
• Username: A username will only be populated if you are runing AccountManager for the listed device.
• Instance: The name of the assigned instance for the listed device.
• Host: The RDM assigned IP:Port of the listed device.
• Last Seen: The last time RDM had communication with the listed device.
1.5. Dashboard 7RealDeviceMap Documentation
Assign Instance
• Select Instance: Select the Instance you want this device to run.
1.5.3 Accounts
If you have accounts added, the top of this page will give you information on how they are being used or what condition
they are in.
Add Accounts
• Account Level: The level of the accounts to be imported.
• Accounts: A list of accounts to import. Can be in either the following formats:
username1,password1
username2,password2
username3,password3
username4 password4
username5 password5
username6 password6
1.5.4 Instances
• Create a new Instance
• Mapping Tools
• Scan Area Examples
Instances control the devices. Each Instance has a specific scheduler type. Instances can have multiple devices
asigned to it.
Create a new Instance
• Open RDM in the Webbrowser and login as admin
• Go to Dashboard -> Instances and click “Add New Instance”
• Scheduler Types:
– Circle Pokemon Scans for Pokemon (Nearby) at exactly the coords specified
* Name: A unique name of the Instance
* Timezone offset: Not used
* Min Level: Minimum worker level
* Max Level: Maximum worker level
8 Chapter 1. RealDeviceMapRealDeviceMap Documentation
* Scan Area: List of Lat,Lon that the worker will teleport to to scan for Pokemon.
* Notes: The worker will stay at each location for approximately 20 seconds and then move on to the
next lat,lon
– Circle Raid Scans for Raids at exactly the coords specified
* Name: A unique name of the Instance
* Timezone offset: Not used
* Min Level: Minimum worker level
* Max Level: Maximum worker level
* Scan Area: List of Lat,Lon that the worker will teleport to to scan for Raids.
* Notes: The worker will stay at each location for approximately 10 seconda and then move on to the
next lat,lon
– Auto Quest Scans all pokestops in the geofence for quests
* Name: A unique name of the Instance
* Timezone offset: Your timezone offset from GMT in seconds. (ie. if you are GMT-8 do -8*3600=-
28800). This is used to auto clear your database quests at midnight local time.
* Min Level: Minimum worker level
* Max Level: Maximum worker level
* Scan Area: This scheduler type requires your database to be populated with pokestops already and
then uses geofences to pull the pokestops. Geofences should be populated like
* Notes: You can use multiple geofences for this instance.
– Pokemon IV Scans pokemon for IV’s
* Name: A unique name of the Instance
* Timezone offset: Not used
* Min Level: Minimum worker level (You probably want this set to 30)
* Max Level: Maximum worker level (You probably want this set to 40)
* Scan Area: This instance uses geofences like above.
* Pokemon IDs: List from highest priority to lowest of the pokemon you want to scan for IVs.
* Notes: Put the highest priority IDs at the beginning, things like Tyranitar, Dragonite, etc. but also put
other IDs after so the IV workers are always working. If a high priority pokemon spawns it will jump
to the top of the list.
• Save the Instance
• Start the Device Controler for that device one
• Go to Dashboard -> Devices and click “Asign Instance” for that new device
• Select the instance and click “Assign”
• Your device should now start scanning
1.5. Dashboard 9RealDeviceMap Documentation
Mapping Tools
• RDM Tools
• https://jennerpalacios.github.io/PoGoMappingTool/
• https://www.mapdevelopers.com/draw-circle-tool.php
• https://thermoscookies.github.io/rdmsort/
Scan Area Examples
Geofence Example: (for Auto Quest and Pokemon IV)
[Geofence 1]
48.3515038749951,-123.4311030273437
48.2711288926114,-123.4489558105469
48.2125948327425,-123.3569453125
48.2775269919901,-123.1619379882812
48.3451150449351,-123.258068359375
[Geofence 2]
48.3861721206049,-122.7980158691406
48.2802687893262,-122.818615234375
48.333247949859,-122.9449580078125
Fig. 1: Geofence 1
Fig. 2: Geofence 2
Circle List Example: (for Circle Pokemon and Circle Raids)
10 Chapter 1. RealDeviceMapRealDeviceMap Documentation
32.30280417394316,-64.78238582611085
32.30287672107444,-64.77191448211671
32.2958756553048,-64.78732109069826
32.296165865665564,-64.77667808532716
32.30229634239795,-64.79234218597414
Fig. 3: Circle List
1.5.5 Auto-Assignments
This is how RDM handles scheduling.
Add New Assignment
• Select Target Device: Choose which device you want to set a scheduled task for.
• Select Destinaction Instance: Choose which instance you want the device to run.
• Time (Emtpy for “On Complete”): What time (in 24 hour format) do you want the chosen device to run the
chosen instance
– On Complete could be used to auto switch to the ‘On Complete‘ Pokemon Circle task after the Auto Quest
task is completed.
1.5.6 Users
Not yet implemented.
1.5.7 Groups
Not yet implemented.
1.5.8 Clear All Quests
This is where you can clear all the quests in your database when quest changes are made midday.
1.5. Dashboard 11RealDeviceMap Documentation
1.6 Develop
• Install Requirements
• Generate the Xcode Project
• Configure Xcode Project
1.6.1 Install Requirements
• Xcode 9+: From App Store
• MysqlClient 5.7: brew install mysql@5.7 && brew link mysql@5.7 --force
• ImageMagick: brew install imagemagick
1.6.2 Generate the Xcode Project
• Run this in the RDM folder: swift package generate-xcodeproj
1.6.3 Configure Xcode Project
• Open the newly generated .xcodeproj file.
• Open Product -> Scheme -> Edit Scheme. . .
• Select Run -> Arguments
• Add this enviroment variable: PROJECT_DIR=${PROJECT_DIR}
• Add other enviroment variables like DB_PASSWORD etc.
• Click Close
• Now you can use the Run button to debug RDM (Breakpoints etc. also work)
1.7 Deploy
• Build realdevicemap/realdevicemap docker image
• Use the new tag in the .yml
1.7.1 Build realdevicemap/realdevicemap docker image
Run this in the RDM folder: sh .jenkins/build.sh new-tag
12 Chapter 1. RealDeviceMapRealDeviceMap Documentation 1.7.2 Use the new tag in the .yml Edit docker-compose.yml and change latest to new-tag 1.7. Deploy 13
RealDeviceMap Documentation

14                            Chapter 1. RealDeviceMap
CHAPTER         2

                                                                                RealDeviceMapUI

Instructions for RDMUI and RDMUI Beta

2.1 Requirements

   • MacOS (real or VM) with Xcode (10.1 recommeneded)
   • Homebrew:

     /usr/bin/ruby -e $(curl -fsSL https://raw.githubusercontent.com/Homebrew/install/
      ˓→master/install)

   • Cocoa Pods:

     sudo gem install cocoapods

   • Pyton Request via pip2:

     pip2 install requests

   • Iphone with one of the following installed: | The following tow apps are 3rd party apps. We do not own
     these apps and do notsupport them in any way. | Use of PoGo++ and iSpoofers may be in violation of
     Niantic TOS and either or both apps may be in violation of applicable laws. Use them at your own risk!
   • iSpoofer
   • Poke++ with mapping subscription

                                                                                                        15
RealDeviceMap Documentation
2.2 Device Setup
2.2.1 Setting up Poke++
• Must be activated with a mapping subscription
• Fake Location: On
• Time to Save Location: Startup/Forever
• URL: http://localhost:8080/data (yes always localhost!)
• Frequency (Seconds): 0
• Send Raw Protos: On
• Fake Location Fetch: On
• URL: http://localhost:8080/loc (yes always localhost!)
2.2.2 Setting up iSpoofer
• Must be on mapping version with a activated subscription
• Fake Location: On
• URL: http://localhost:8080/data (yes always localhost!)
• URL: http://localhost:8080/loc (yes always localhost!)
2.3 Installation
This guide assumes you have the requirements installed and a device setup.
If you want to run multiple devices, follow these instructions for each device in a new folder.
2.3.1 Setting up the Xcode project
• Clone the project:
git clone https://github.com/123FLO321/RealDeviceMap-UIControl
tip if you will be running multiple devices you should name this folder something recognizable ie:
git clone https://github.com/123FLO321/RealDeviceMap-UIControl iphoneSE1
• Go into that folder:
cd RealDeviceMap-UIControl
or
cd iphoneSE1
• Run (go grab a coffee while you run this the first time):
pod install
16 Chapter 2. RealDeviceMapUIRealDeviceMap Documentation
• Open the Xcode Project (open RealDeviceMap-UIControl.xcworkspace)
• Open RealDeviceRaidMap-UIControl -> RealDeviceMap-UIControl -> config.swift
• Edit UUID to be something unique (ie iphoneSE1). This will be how you identify which phone is which in your
dashboard later on.
• Edit backendURLBaseString to your server where RDM is running on. It needs to acces the WebHook server
by default running at port 9001.
• If you want to use AccountManager add the following line:
var enableAccountManager = true
• Check if you can acces that url on your phone. If it says “File / does not exist” it works.
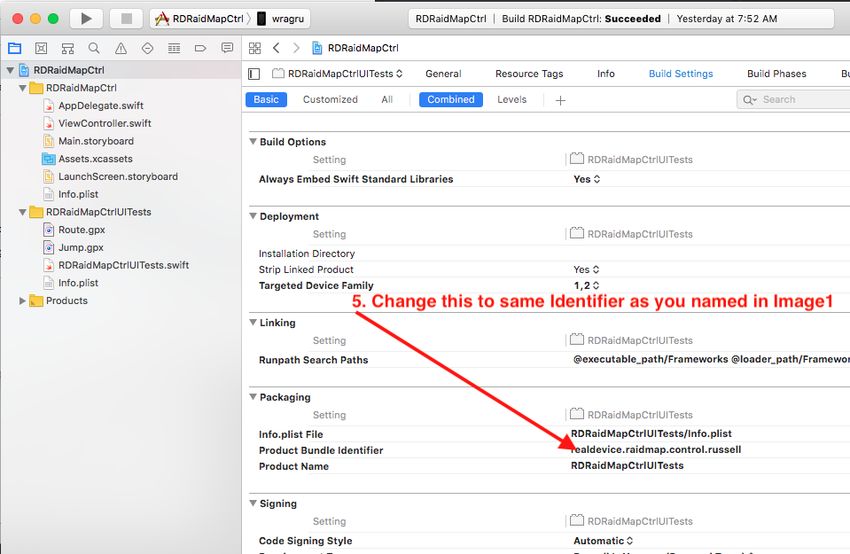
• Fix code signing issues and bundle id conflicts:
2.3. Installation 17RealDeviceMap Documentation
• Close Xcode and edit run.py
• Edit ‘device_id‘ to match your devices UUID (not the same as in config.swift above)
– get the UUID in Xcode with Window -> Devices and Simulators -> Devices -> Your Device -> Identifier
• Now start run.py with python2:
python2 run.py
• It should now take a couple minutes to build and eventually open Pogo. If you get device is not asigned to an
instance follow the Instances instructions.
18 Chapter 2. RealDeviceMapUIYou can also read