Get to Know Photoshop Elements 2019 - What's what and what it does - Muvipix.com
←
→
Page content transcription
If your browser does not render page correctly, please read the page content below
The Muvipix.com Guide to Adobe Photoshop Elements 2019

                                                                  The Welcome Screen
                                                    Quick, Guided and Expert Editing
                                                                    Guides and Rulers
                                                    The Photoshop Elements Toolbox
                                                                         The Panel Bin
                                                                        The Photo Bin
                                                           What’s New in Version 2019?

Chapter 2

Get to Know Photoshop Elements 2019
What’s what and what it does

Welcome to Photoshop Elements – a terri�c, affordable
photo retouching application and graphics editor that just
seems to get better and more feature-packed with every
generation!

This is a program that seems to offer more wonderful
surprises the deeper you dig into it. It provides not only
the obvious tools for cleaning, stylizing and creating
images, but also lots of not-so-obvious tools for managing
your image �les, outputting a variety of print projects and
even sharing your work online.

In this chapter, we’ll look at the various workspaces in
Photoshop Elements – and then we’ll dig deeper, looking
at the tools Adobe has added in its 2019 version to make
the program even more fun to use.

                                                                                   13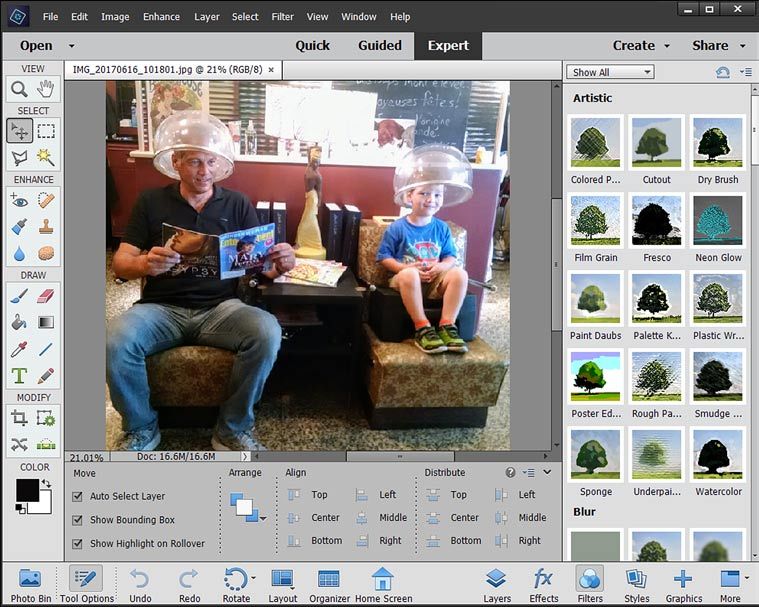
CHAPTER 2                                                                                                                                                                              The Welcome Screen
                                                                                                                                                                    Get to Know Photoshop Elements 2019

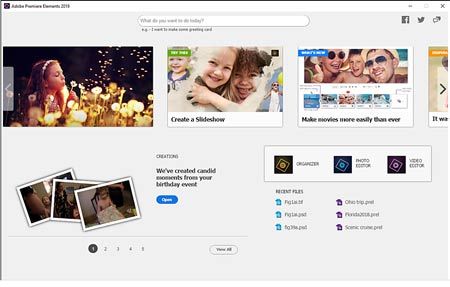
     The Elements Hub
     Whenever you launch Photoshop Elements, you’ll be greeted by the Elements Hub, a screen
     offering tips, tutorials and links to your Elements programs and projects.

     A key feature of the Hub is very intuitive help search tool. Type a brief description of what
                                                                                                        The Editor workspace
     you’d like to do into the search box along the top of the screen and the Hub will suggest a list   The Editor workspace in Photoshop Elements 2019 is actually several photo editing
     of related tutorials and helps (including some by yours truly!).                                   workspaces, each with its own set of tools and features. Its three main workspaces can be
                                                                                                        accessed by clicking on the tabs at the top center of the interface.
     Another key feature of the Elements Hub is something Adobe calls Auto Creations.
     Whenever your computer is up and running, the Organizer’s Auto Analyzer will be working              • In the Quick Edit workspace, you’ll �nd a simpli�ed set of tools for cleaning up or
     in the background, looking for opportunities for Photoshop Elements and, if it’s installed,            enhancing your photos. We’ll show you how to use the tools in this workspace in
     Premiere Elements to assemble your recently saved video �les and still photos into                     Chapter 3.
     slideshows, movies and photo projects. (For more information on how the Auto Analyzer                • In the Guided Edit workspace, the program walks you, step by step, through the
     works, see page 220.)                                                                                  editing process. The Guided Edit tools can do some pretty advanced things too! Not
     Your latest Auto Creation will appear in the lower left of the Elements Hub. To see the                only can Guided Edits walk you through simple clean-up of your photo, but they
     complete set, click the View All button. On the screen that opens, you’ll have the option of           can also take you through some pretty high-level photo tricks, like creating a photo
     opening an Auto Creation in one of the Elements programs or throwing it in the trash.                  that seems to be standing on a re�ective surface, an image with a Tilt-Shift effect
                                                                                                            applied and a photo in which someone seems to be popping right out of the frame!
     To return to the Hub click the Back button at the top of the Auto Creations panel.                     We’ll show you how these cool edits work in Chapter 4.
                                                                                                          • The Expert Edit workspace (illustrated above) includes a comprehensive photo
                                                                                                            editing and graphics creation Toolbox. This is likely where you’ll do most of your
     Auto Creations                                                                                         “serious” editing. It most closely resembles the workspace in the professional version
     Note that the Auto Analyzer only works when your computer is up and running. It is                     of Photoshop. Needless to say, it’s the workspace most of this book is about.
     not able to analyze your media and Premiere Elements is not able to generate Auto                  Additionally, the Editor workspace shares a number of tools for creating fun photo pieces
     Creations when your computer is asleep or hibernating. Also, if you have a large number            with the Elements Organizer under the Create and Share tabs in the upper right of the
     of photos and/or videos on your hard drive, it may take several days for your initial set of       interface. We discuss these tools and how to use them in Chapter 16, Create Fun Pieces
     Auto Creations to generate.                                                                        and Chapter 17, Share Your Photos and Videos.

14                                                                                                                                                                                                     15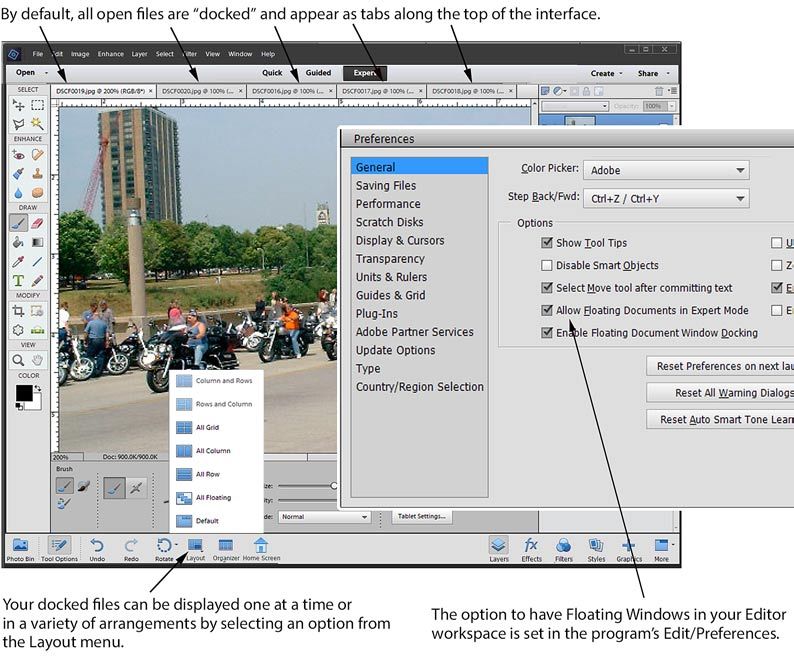
CHAPTER 2                                                                                                                                                   The Expert Editor Workspace
                                                                                                                                                   Get to Know Photoshop Elements 2019

            The Expert Edit Workspace
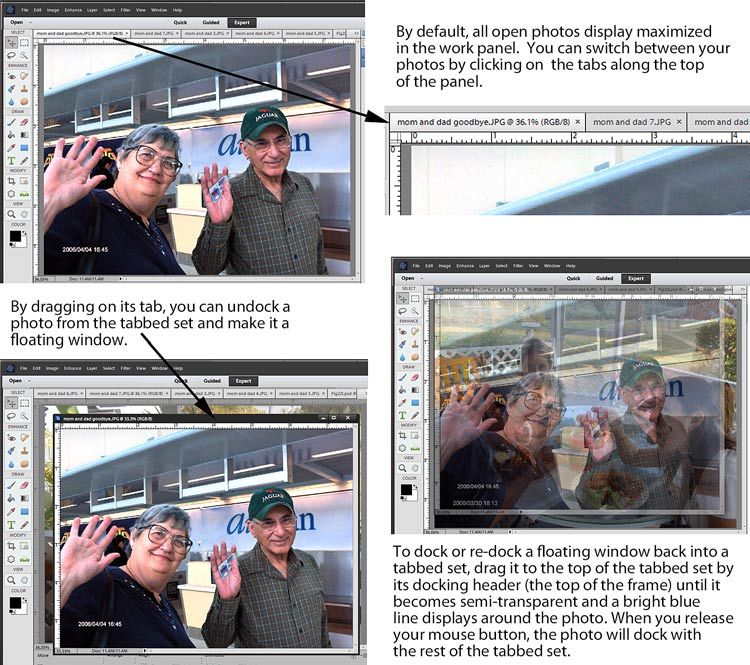
            The Expert Edit workspace is modeled after the interface in the               For instance, when your �les are displayed as �oating windows, you can copy images,
            professional version of Photoshop.                                            portions of images and even entire layers from one image �le to another simply by
                                                                                          dragging these elements from one open �le to another.
            As illustrated at the top of the facing page, in Photoshop Elements, you
            have the option of displaying your open photo and image �les as a single      As in the illustration above, there are two ways to switch between displaying your
            tabbed set, each photo �lling the Editor workspace panel and each open �le    photos as a docked, tabbed set and displaying them as �oating windows:
            represented by a tab at the top of the workspace – or displaying your open      • Set the Layout menu to All Floating. When you click on the Layout button and
            photos as �oating windows, a stack of open �les that you can drag into any        select All Floating, all of your photo �les will display as �oating windows.
            position around your computer desktop as you edit them.
                                                                                            • Undock a photo from the tabbed set by dragging on its tab. When you pull the
            To �oat your windows, you must have Enable Floating Documents checked             photo �le by its tab from the others in a tabbed set, it becomes a �oating window.
            on the General screen under Edit/Preferences, as in the illustration above.   Floating windows, by the way, always �oat over tabbed photo �les. This means that, in
            The option to display your �les in either mode – as well as a number of       order to get to the photos in your tabbed, docked set, you may have to either minimize
            optional tabbed arrangements – is found under the Layout menu button.         any �oating windows or drag them out of the way.

                        The Layout menu button appears along the bottom of the            To dock or re-dock a photo into a tabbed set, simply drag the �oating window by its
                        interface, as seen in the illustration.                           docking header (the top of the window) to the top of the Editor workspace. When the
                                                                                          photo �le becomes semi-transparent (as illustrated above) release your mouse button
                         As many veteran Photoshop users know, there are advantages       and the photo will dock to the tabbed set.
            to displaying your photos as �oating windows rather than a tabbed set.

16                                                                                                                                                                                   17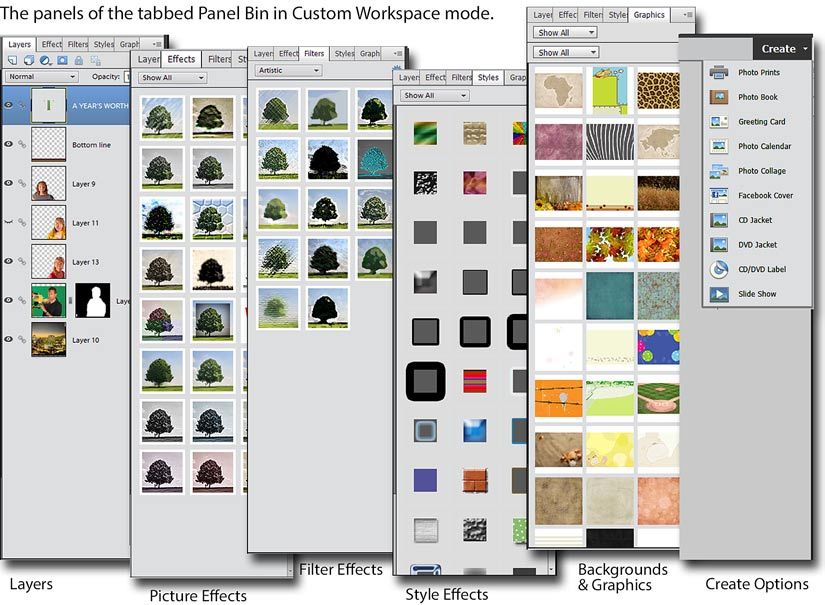
CHAPTER 2                                                                                                                                                     Guides, Rulers and the Toolbox
                                                                                                                                                        Get to Know Photoshop Elements 2019

                                                                                             When you �rst open the program’s
                                                                                             Expert edit workspace, this Panel Bin
                                                                                             will be in Basic Workspace mode. In
                                                                                             Basic Workspace mode, you can view
                                                                                             the Layers, Effects, Filters, Styles or
                                                                                             Graphics panels in this bin by clicking
                                                                                             on the buttons in the lower right of the
                                                                                             program’s interface.

                                                                                             If you click on the arrow to the right
                                                                                             of the More button, you will �nd the
                                                                                             option to set the Panel Bin to Custom Workspace, which opens the Layers, Effects and
                                                                                             Graphics panels (and their respective sub-panels) in the Panel Bin in a tabbed set, as
            Guides and Rulers                                                                illustrated below

            Optionally, Photoshop Elements will display Guides over your image �les.         You can click and drag on any tab in the Panel Bin to make its panel a separate, �oating
            These horizontal and vertical lines don’t show up on your �nal piece, of         panel. (It’s common for experienced Photoshop Elements users to make the Layers panel
            course. But they can be a great help for placing elements and text and           a �oating panel so that it is always available.)
            ensuring that they are properly lined up.
                                                                                             Clicking directly on the More button will open an additional bundle of tabbed panels,
            The program can also display Rulers which, like Guides, can be very              including Info, Navigation, History, etc. These panels can likewise be accessed by clicking
            helpful in measuring and placing your imagery.                                   on the appropriate tab or, by dragging on the tab, can be made a separate, �oating panel.

            To display Rulers, select the option from the Photoshop Elements View            We take a close up look at the Effects, Filters and Styles panels in Chapter 11, starting on
            menu.                                                                            page 157.

            To create a new Guide, click and drag onto your photo from one of the
            Rulers running along the tops and sides of your image �les. (Drag from
            the Ruler along the top of your photo to create a horizontal guide or from
            the Ruler along the left of your photo to create a vertical guide.)

            To toggle between displaying and hiding the guides on your image �les,
            press Ctrl+; on a PC or +; on a Mac or select the option from the View menu.

            The Toolbox
            Along the left side of this workspace is the program’s Toolbox (as
            illustrated on the left). The tools in this panel serve a number of functions,
            from selecting areas in your image �le to creating graphics and text to
            patching and cloning areas of your images. As each tool is selected, that
            tool’s individual settings are displayed in the Tool Options Bin that runs
            along the bottom of the editing workspace.

            We’ll spend considerable time getting to know the tools in the Toolbox
            and how to use their settings and options in Chapter 5, Get to Know the
            Photoshop Elements Toolbox.

            The Panel Bin
            To the right of the editing workspace is a column known as the Panel Bin,
            which includes a number of tools and panels that vary, depending on
            whether you’re in Quick Edit, Guided Edit or Expert mode.

18                                                                                                                                                                                          19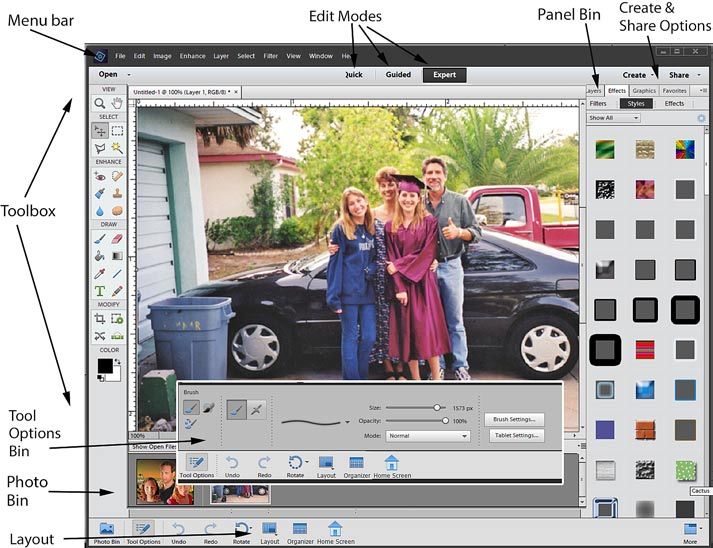
CHAPTER 2                                                                                                                              What’s New in Photoshop Elements 2019?
                                                                                                                                              Get to Know Photoshop Elements 2019

            The Photo Bin
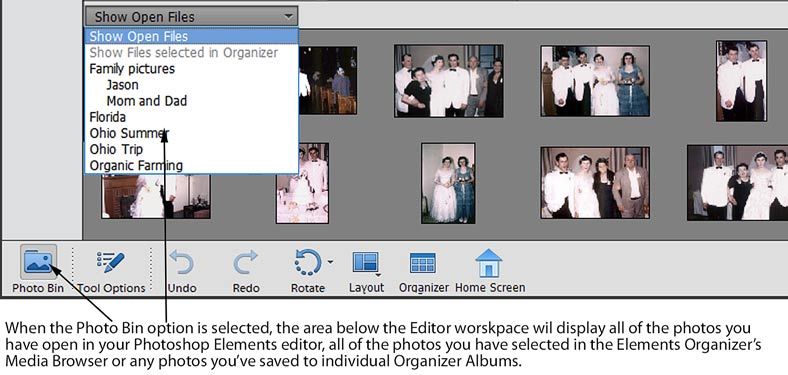
            Running along the bottom of the Editor workspace and sharing space
            with the Tool Options Bin is a small but powerful panel known as the
            Photo Bin.

            When the Photo Bin button is selected in the lower left of the
            program’s interface, all photos and image �les you have open in your
            Editor workspace will appear as thumbnails in this bin.

            To open a �le in your Photo Bin in the Editor workspace, double-click
            on its thumbnail in the Photo Bin.                                          What’s new in Photoshop Elements 2019?
            Although this is the default and most common way to use the Photo           Adobe continues to build out the world’s most popular consumer photo
            Bin, it is certainly not its only function. The Photo Bin also interfaces   editor with a couple of performance enhancements and several new
            with a number of other workspaces.                                          Guided Edits.

            To access and change the Photo Bin’s display options, click on the bin’s    The Elements Hub
            drop-down menu, which reads Show Open Files by default, as in the           When you �rst launch Photoshop
            illustration above.                                                         Elements (or Premiere Elements),
              Show Open Files. Displays, as thumbnails, all of the image �les you       you’ll be greeted by the all-new
                currently have open in your Editor workspace.                           Elements Hub.

              Show Files Selected in the Organizer. If you have both Photoshop          The Hub is not only a launching pad
                Elements and the Elements Organizer open, and you have �les             for opening your photo and video
                selected in the Organizer’s Media Browser, selecting this option        projects, but it offers you access to
                displays those �les in the Photo Bin. These photos or image �les        Adobe’s latest tips and tutorials. A
                can then be launched in the Editor workspace by double-clicking         search box at the top of the panel
                on them.                                                                can help you quickly locate tutorials
              Organizer Albums. If you’ve created Albums in the Organizer (see          for a speci�c task (including many by
               Chapter 15, Manage Your Files with The Organizer), you can               the author of this very book).
               select the option to display the photos in a particular Album.

20                                                                                                                                                                            21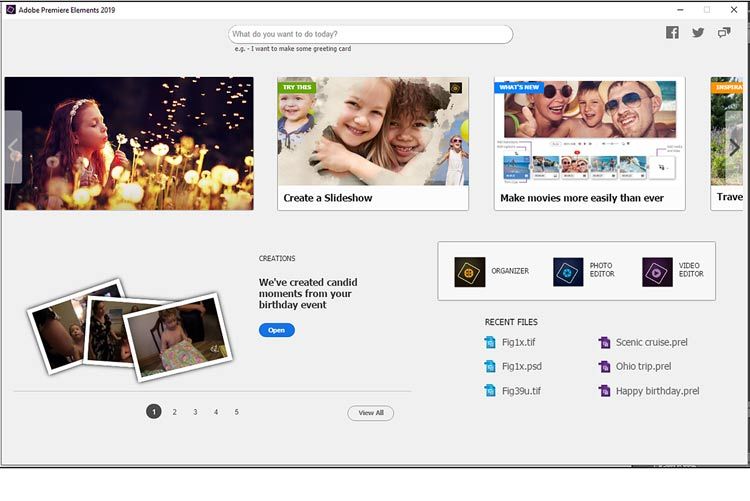
CHAPTER 2                                                                                                                                           What’s New in Photoshop Elements 2019?
                                                                                                                                                           Get to Know Photoshop Elements 2019

            Additionally, a link on this panel opens a library of Auto Creations, slideshows and
            video projects created automatically by the Elements programs based on media           Need some Basic Training?
            identi�ed by the Auto Analyzer.

            We discuss the Elements Hub in more detail on page 14.                                 Need more help learning the basics of Photoshop Elements?

                                                                                                   Check out my free tutorial series Basic Training for Photoshop
            New Guided Edits                                                                       Elements at Muvipix.com.
            In Photoshop Elements 2019, Adobe
            continues to expand its library of                                                     This simple, eight-part series will teach you the basics of photo
            Guided Edits – with step-by-step                                                       resolution and show you how to adjust lighting and correct color in
            instructions for creating cool photo                                                   your photos, work with layers, add effects, scan your pictures and
            effects.                                                                               even share your photos and videos online. And, yes, it’s absolutely
                                                                                                   free!
            The new Meme Creator walks you
            through the process of creating photo                                                  To see the series, just go to http://Muvipix.com and type “Basic
            and text graphics, perfect for posting                                                 Training for Photoshop Elements” in the product search box and
            to social media. The Partial Sketch                                                    then click the magnifying glass button. (We also offer Basic Training
            shows you how to make an area of                                                       tutorials for other products, including Premiere Elements.)
            your photo look like an artist’s sketch.                                               And while you’re there, why not drop by the Community Forum and
            The Text and Border Overlay                                                            say hi! We’d love to have you become a part of our growing city.
            Guided Edit walks you through                                                          Hope to see you there!
            the process of creating a custom                                                       If you’d like to see tutorials of some of the program’s latest
            graphic overlay for your photo.                                                        features, check out our book page at Muvipix.com/pe2019.php.
            Multi-Photo Text drops your photos
            into your custom text for a unique
            graphic composition.

            We browse the entire Guided Edits
            library and focus on a couple of its
            coolest edits in Chapter 4.

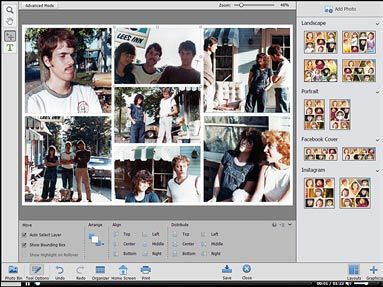
            New Photo Collage
            The old semi-automatic Photo
            Collage tool has been completely
            re-designed into a workspace in
            which you can drop your photos
            into a number collage templates,
            giving you much more control over
            the look and design of your collage.

            We look deeper at this cool new
            tool on page 243 of Chapter 16,
            Create Fun Pieces.

            HEIF support
            The Mac version of Photoshop Elements 2019 also includes the ability to edit the new
            iPhone High Efficiency Image Format (aka .heic �les), a format using a compression
            system that promises smaller photo �les without compromising image quality.

22                                                                                                                                                                                         23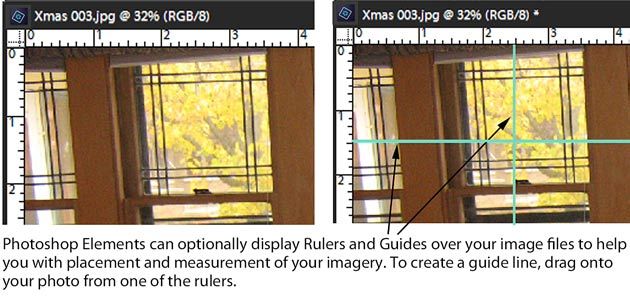
You can also read


