800 MHz Radio Training - Base Station
←
→
Page content transcription
If your browser does not render page correctly, please read the page content below
800 MHz Radio Training

Portables     Base Station
Advantage of 800 MHZ Radio
           System
  Definitions and Concepts
       Radio Etiquette
       Plain Language
Advantages of 800 MHZ
Radios

• Allows DPH to communicate with
  staff, other state agencies, and
  hospitals
• Can create zones by putting select
  talk groups together

                                       3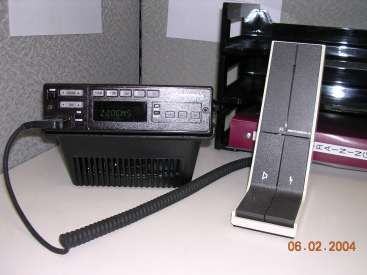
Definitions and Concepts
• Talk Group—New term for channel
   – May need to change talk group to talk with other
     partners
• Zone—Contains up to 16 talk groups (channels)
  usually with a common theme, e.g. Public Health,
  Fire Service, EMS, National Guard
   – May need to change talk group to talk with other
     partners
• Site—Location of a radio tower
   – The closer you are to a tower the better your radio
     reception and transmissions should be

                                                        4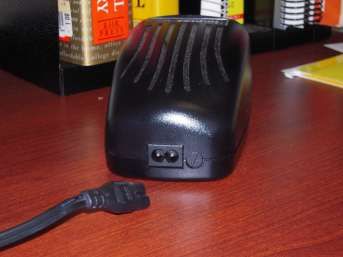
Definitions and Concepts

• Encryption—Electronic method of
  scrambling a radio signal for
  privacy

                                    5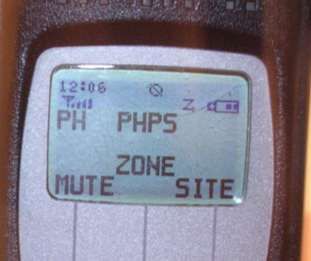
Scanning
• Why
   – Scanning allows you to listen to more than one talk group
     at a time.
• Who
   – During an emergency, the Logistics Section will designate
     who can scan.
   – For example, the EMS Group in the Operations Section may
     be allowed to scan to get an idea of patient load in
     hospitals and the types of emergencies (trouble breathing,
     chest pains, stomach problems, etc.) being taken to the
     hospitals.
• Why not Everyone
   – The problem with scanning is you can miss a message.
   – The Logistics Section assigns you a talk group during an
     emergency.
   – You need to stay on this talk group unless you are told to
     change to talk to other partners.
                                                              6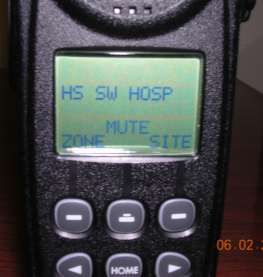
Talking on a Radio
• Think before you speak
  – Compose your message before you speak
  – Makes for shorter and quicker transmissions
• Talk slowly
  – Words can become garbled when speaking
    fast
  – May be asked to repeat message if it is not
    understood
  – May tie up a talk group (channel) longer than
    necessary if message is not understood

                                                    7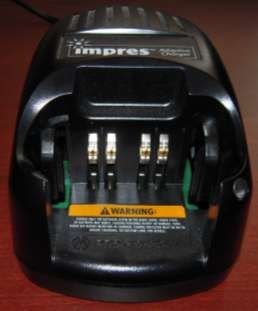
Talking on a Radio
• Enunciate your words
  – Not enunciating words can cause confusion
  – Letters like “P” and “B;” “C” and “S” may
    sound the same when transmitted on a radio
  – Spell words to clarify, if necessary
  – Repeat numbers over 9 as single digit
    numbers, e.g., 152 would be repeated as one,
    five, two
• Always sound professional
  – You never know who is listening

                                               8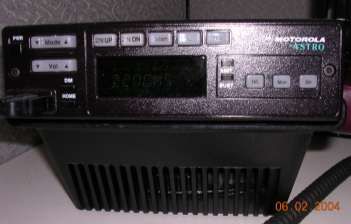
Talking on a Radio
• Use radio designations
  – A radio designation typically assigned by
    a person’s position
  – If person is relieved, you could call the
    wrong individual

                                          9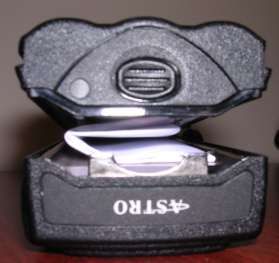
Talking on a Radio
• More about radio designations
  – A radio designation may be assigned for daily
    (normal) use, e.g., DPH 5, Preparedness 20, etc.
  – During an emergency, a radio designation is
    typically assigned based a person’s position not
    his/her normal use, e.g., Preparedness 20 may
    become EMS Group Supervisor, PHPS Base may
    become SHOC Base, etc.
• Do not say, “Preparedness 20 to
  Preparedness 21, Tim.” Person should
  know his/her radio designation.

                                                10
Talking on a Radio
• No slang
– Slang terms are not consistent
throughout the country
– Using slang can cause confusion when
giving a message
11Plain Radio Language
Responding
• Use plain language to avoid
confusion
• Examples:
– Responding—Going to an assigned
location or emergency scene
– En Route—Going to a scene or location
– On Location—At assigned location
– Prepare to Copy—Prepare to copy a
message or assignment
– Received—Acknowledgement that a
message has been received
12Removing and Installing
the BatteryBattery Installation
• Turn radio
upside down
• At a slight
angle, push top
of battery into
top of radio
• Push bottom of
the battery
down until it
clicks in place
14Battery Removal
• Turn radio
upside down
Operating Your XTS 3000
• Push on the
Portable Radio
release in the
lower center
of the battery
• Lift battery
• Pull battery
out
15IMPRES Adaptive Charger
SystemIMPRES Adaptive Charger
System
• A fully automated battery care
system
• Pocket accommodates either a
radio with battery attached or
battery alone
• Charger can drain and recharge the
battery at the same time
• Charger can determine the life left
in the battery
17Parts of a Charger
1. Indicator Light
2. Pocket
2 1
18Charging the Battery
• Battery charges best at room
temperature
• Prior to charging the battery
attached to a radio, turn the radio
off
19Initialization
• Data contained in the IMPRES
battery must be fully initialized by
the charger the first time the
battery is charged
• Process is indicated by the Steady
Yellow light on the charger
20Initialization (Cont.)
• Process is automatic, including:
– Initial reconditioning of the battery
– Automatically begins recharging upon
completion of reconditioning
– Time to initialize the battery takes
approximately 12 hours to complete
• Do not remove the battery from the
charger until the Steady Green light
is on
21Charging Procedure
• Plug the charger
end of the power
supply cord (1)
into the back of
the charger (2)
1 2
22Charging Procedure
(Cont.)
• Insert IMPRES battery, or a radio
with battery attached (Note:
Remember to turn off radio) into the
charger’s pocket by:
– Aligning the groove on each side of
the battery with the corresponding
raised rail on each side of the
charger pocket
23Charging Procedure
(Cont.)
– Pressing the battery toward the rear of the
pocket
– Sliding battery into charger pocket ensuring
complete contact between the charger and
battery contacts
• To remove a radio or IMPRES battery
use two hands to remove a radio or
battery from the charger pocket
– One hand to hold and support the charger
– One hand to remove the battery or radio
24Charging Indicators
• Battery properly seated into the
pocket when the charger indicator
illuminates
– Indicates charger recognized the
presence of battery
• Next slide defines the meaning of
each indicator light
25Charging Indicators (Cont.)
• Single Green Blink
– Charger successfully powered up
• Steady Red
– Battery in rapid charge mode
• Blinking Green
– Battery completed rapid charge
(>90% available capacity)
– Battery in Top-Off charge (trickle
charge)
26Charging Indicators (Cont.)
• Steady Green
– Battery fully charged
• Blinking Yellow
– Battery recognized by charger and
waiting to charge
• Either the battery voltage is too low or the
battery temperature is too low or too high
• When condition corrected, the batter
automatically begins charging
27Charging Indicators (Cont.)
• Blinking Red
– Battery cannot be charged
– Battery not making proper contact
in the pocket
• Steady Yellow
– Battery in recondition or initialization
mode
– Length of time the battery remains in
the charger depends upon the state of
charge remaining in the battery
28Charging Indicators (Cont.)
• Steady Yellow (Cont.)
– Fully charged batteries require more
time to recondition (8 to 12 hours)
than fully discharged batteries
• Blinking Red/Green
– Battery fully charged
– Battery continues to be usable, but
may be nearing the end of its rated
service life
29Charging Indicators Note
• Blinking Red/Green
– Contact the Public Health
Preparedness Logistics Section at
302-857-5900 to request a battery
replacement
30Troubleshooting
• No charger LED indication
– What it means
• Charger contact is not being made.
• No power to the charger
– What to do
• Check that the radio with battery, or the
battery alone, is inserted correctly
• Make sure that the power cord is securely
plugged in, and that there is power to the
outlet
• Replace fuse (in back of charger) Contact
PHPS 302-857-5900 for assistance
31Troubleshooting (Cont.)
• Blinking Red Indication
– What it means
• Charger contact is not being made.
• Battery is not chargeable
– What to do
• Remove and reseat the radio with battery
or battery into the charger pocket.
• Remove power from the battery charger
and, using a clean dry cloth, clean the gold
metal charging contacts of both the battery
and the charger
• Replace battery
32Troubleshooting (Cont.)
• Blinking Yellow Indication
– What it means
• Battery is waiting to charge. The battery
temperature may be below 5ºC (41ºF) or
above 40ºC (104ºF) or the battery voltage
may be lower than the predetermined
threshold level for rapid charging.
– What to do
• When the condition is corrected, the
battery will begin charging automatically.
33Troubleshooting (Cont.)
• Experience problem you cannot
solve or need radio and/or battery
replacement, contact the Public
Health Preparedness, Logistics
Branch at 302-857-5900
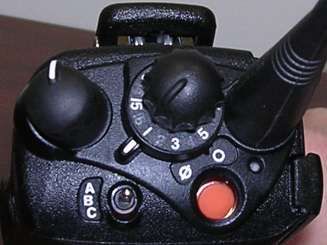
34Common Portable Radio Controls
Common Portable Radio Controls
    Top

                  • 1—On/Off/Volume
4             2     Knob
                  • 2—Talk Group Selector
1
                  • 3—A-B-C Switch
                  • 4—Encryption On/OFF
                    Switch
    3             • 5—Orange Button
          5

                                     36
Common Portable Radio Controls
Left Side Key and Buttons
• 1—Not used
1 • 2—Turns light on and off
2 on display screen
3 • 3—Used to find a tower
with the best signal (Hold
until radio is done
4 searching)
• 4—Push-to-Talk button
37Transmitting on Portable
Radio
• 4—Press the large black push-
to-talk (PTT) switch
• Wait for a "beep" sound
4 – Steady tone is a busy signal
– Hold the PTT switch until you
hear a “beep,” then speak
• Talk about 2” to 3” away from
the grated (#5) area just
above the display screen
5
• Release PTT when done talking
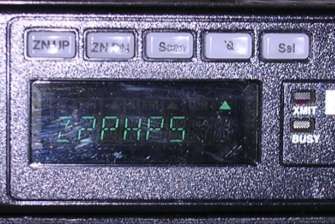
38XTS 3000 Portable Radio Screen
XTS 3000 Portable Radio
Screen and Soft Keys

            • A—Indicates zone and talk
    A         group (channel)
               – First two letters indicate zone
               – Group of letters after zone
                 indicates talk group (channel)
            • Key 1—Used to change zones
            • Key 2—Turns the “MUTE” on
              and off (Note: The microphone
1   2   3     is not muted)
            • Key 3—Used to lock or unlock
              onto a specific radio tower
4   5   6   • Keys 4 & 6—Used to move to
              different zones
            • Key 5—Used to lock into a zone
                                             40
Operating Your XTS 5000
Portable RadioXTS 5000 Portable Radio
Keys
• 1—Used to lock into a
zone
• 2—Navigation wheel used
to move between zones
• 3—Not used
1 2 3
42XTS 5000 Portable Radio
Screen
1 2 3 4 5 • 1—Time of day
• 2—Signal strength (not
reliable)
• 3—Encryption on/off
6
(circle with a line through
it indicates encryption on)
• 4—Indicates radio
scanning
7 8 9 • 5—Indicates battery
strength
43XTS 5000 Portable Radio
Screen
• 6—Indicates zone and talk
1 2 3 4 5 group (channel)
– First two letters indicate zone
– Group of letters after zone
indicates talk group (channel)
6 • 7—Turns “MUTE” on and off
(Note: Does not silence the
microphone)
• 8—Allows the zone to be
changed
7 8 9
• 9—Used to lock or unlock onto
a specific radio tower
44Using a Speaker/Mic
Types of Speaker/Mics

  Standard      Command
                          46
Standard Speaker/Mic
1 • No
– Volume Control
– Talk Group
2 (channel) Selector
– Orange Button
3 • 1—Microphone
• 2—Push-to-Talk
(PTT) Switch
• 3—Speaker
47Command Speaker/Mic
3 • 1—Volume Down
• 2—Volume Up
4 • 3—Talk Group
(channel) Selector (not
1 2 interconnected with
talk group (channel)
6 selector on radio)
5 • 4—Orange Button (Not
Used)
• 5—Speaker
• 6—Microphone
48Command Speaker/Mic
• 1—Push-to-Talk
button
• 2—Turns light on and
1
off on display screen
• 3—Used to find a
2 tower with the best
3 signal (Hold until
radio is done
searching)
49Transmitting Using
Speaker/Mic
• Press the black (PTT) on
the side of the
microphone.
• Wait for a "beep" sound
– Steady tone is a busy
tone
– Hold the PTT button until
you hear “beep,” then
talk
• Talk about 2” to 3” away
from the front of the
speaker/mic
• Release PTT when done
talking
50Operating Your Base Station/Mobile Radio
Base Station/Mobile Radio
    Controls
        3         • 1—Push the button
                    with “PWR” over it to
1                   turn radio on
                  • 2—Set the “VOL” by
                    pressing the up arrow
2                   to increase or down
              4     arrow to decrease
                  • 3—Use the “MODE”
              5     button to change the
                    talk group by pressing
                    the up or down arrow

                                       52
Base Station/Mobile Radio
Controls
3
• 4—Push “DIM” to
1 dim the display on
the screen
2 • 5—Push “HOME”
4 to lock a zone in
place
5
53Base Station/Mobile Radio
Controls
7 8 9 • 6—Sets radio to assigned
6 zone by pressing the “ZN
DN” or the “ZN UP”
button
• 7—Sets the radio to
“SCAN”
• 8—Turns encryption on
and off (“On” indicated
by arrow under button)
• 9—Selects talk group
(channel) when setting
up scan
54Base Station Radio
Controls
• 10—Light indicting
10 11 radio is
transmitting
• 11—Light indicates
a busy signal
• 12—Horn/Lights—
Not Used
12 13 14 • 13—Squelch
Control—Not Used
• 14—Site Lock—Not
Used
55Transmitting on a Base
Station/Mobile Radio
• Face the front of the microphone
• Press and hold the key with
lightening bolt (red circle)
• Wait for a "beep" sound
– Steady tone is a busy signal
– Hold the lightening bolt key until
you hear a "beep" then speak
• Talk towards the top of the
microphone about 2” to 4” away
(blue circle)
• Release the lightening bolt key
when done talking
56Using the Belt Clip
Connecting Belt Clip to
Battery—Battery Orientation

    Front         Back
                              58
Connecting Belt Clip
to Battery
1 • 1—Belt clip battery
lock
2 • 2—Belt clip tabs
• 3—Battery slots
3
59Connecting Belt Clip
to Battery
1 • 1—Slide Tab A into
Slot A
2 (Tab • 2—Push belt clip
A) down until you
hear the belt clip
lock onto the
battery
3 (Slot
A)
60Removing Belt Clip
From Battery
1 • 1—Push metal tab
at the top of the
2 (Tab battery
A) • 2—Pull the belt
clip up until it
completely slides
out of Slot A
3 (Slot
A)
61Troubleshooting the Radio
Portable Radio
 Out of Range Signal

• Check the site is not “Locked”
  – “Unlock” site if it is
  – Keep radio in “Unlocked” status unless
    directed otherwise during an event
• Radio may be out of range of
  Delaware’s 800 MHZ system
  – May occur between 20 and 25 miles
    from Delaware borders

                                         63
Portable Radio
Low Hum Signal
• No talk group (channel)
programmed in that part of a zone
64Portable Radio
“Chirp” Signals
• Battery low
– Recharge or replace battery
65Thank You for Attending
66You can also read