Marvell WM-SDK DevKIt Quick Start Guide - 15 January 2014
←
→
Page content transcription
If your browser does not render page correctly, please read the page content below
Marvell WM-SDK DevKIt
  Quick Start Guide
    15 January 2014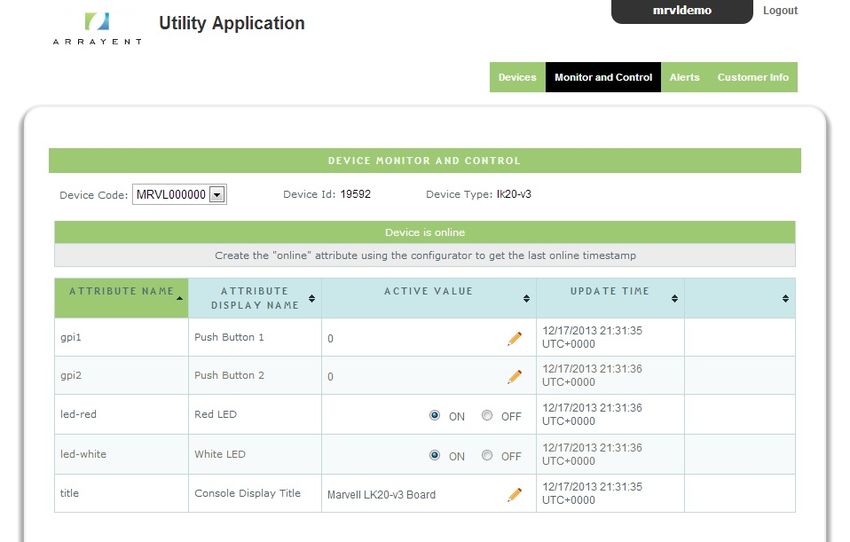
1. Overview ................................................................................................................... 1
    1. Audience and Scope .......................................................................................... 1
2. Note on DevKit Credentials and Environment ........................................................... 2
    1. Users Who Receive Explicit Credentials from Arrayent ..................................... 2
    2. Users Who Discover the Sample App via a SDK .............................................. 2
    3. Shared Credentials Reference ........................................................................... 2
3. Setup ......................................................................................................................... 4
    1. Hardware and Software Requirements .............................................................. 4
    2. Adding Arrayent Sample Application Code to WM-SDK .................................... 4
    3. Modifying the Arrayent Sample App Configuration ............................................ 5
    4. Building WM-SDK and the Arrayent Sample App .............................................. 6
    5. Configuring Wi-Fi Access Point Credentials ...................................................... 6
    6. Troubleshooting .................................................................................................. 7
4. Monitoring and Controlling Your Development Board ............................................... 8
    1. Arrayent Sample App Information ...................................................................... 8
    2. Logging In to the Arrayent Utility Tool ............................................................... 8
    3. Adding the Development Board to Your User Account ...................................... 9
    4. Remotely Controlling the Development Board's LEDs ....................................... 9
    5. Remotely Monitoring the Development Board's Push Buttons ......................... 10
5. Next Steps ............................................................................................................... 11
6. Revision History ...................................................................................................... 12

                                                                iii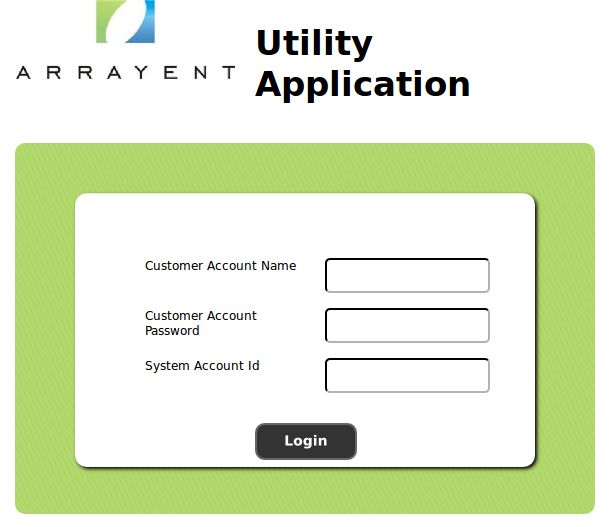
Chapter 1. Overview
In this guide you learn how to:

• add the Arrayent sample application and library to your SDK

• build and load the Arrayent sample app onto your development board

• monitor and control your development board over the Internet, using one of Arrayent's
  web apps

1. Audience and Scope
This document is roughly split into two major sections: setting up the application, and
monitoring/controlling the development board using Arrayent's web application.

The sections of this document that pertain to building and loading the sample application
onto a development board are primarily intended for embedded developers. For these
sections we assume that you are familiar with your platform's SDK. You should be able
to build and execute the other sample applications in your SDK before attempting to use
the Arrayent sample application.

Once the development board has been loaded with the sample application, the workflow
for monitoring and controlling the board with a web app is simple and straightforward.
These sections are suitable for anybody who wants to see a live demo of the development
board connecting to the Internet. You do not need to be technically trained to complete
this part of the guide.

                                           1
Chapter 2. Note on DevKit Credentials
and Environment
At various times in this guide, we will refer to "device credentials" and "user account cre-
dentials". Arrayent distributes this information in various ways depending upon the context
of our engagement with you, so please read the section below that applies to you so that
you know where to get this information.
1. Users Who Receive Explicit Credentials from Arrayent
If you have received explicit instructions from Arrayent that lists out your user and device
credentials, then you should use those values whenever this guide prompts you for that
information. We typically distribute this information in a dedicated document, with a title
like "DevKit Account Information", or you may have received it via an automated email
after filling out a form.
2. Users Who Discover the Sample App via a SDK
If you discovered the Arrayent sample app through your platform's SDK, please note the
following. The Arrayent sample application ships with a set of hard-coded device creden-
tials and account credentials. We have provided these shared credentials as a conve-
nience for those users who just want to quickly try out the application for five or ten min-
utes. However, this can create problems if two or more users try to use the application
at the same time. These problems could manifest in a variety of ways. You might send a
command to your development board, and it doesn't successfully propagate to the board.
Or your board may have trouble connecting. Or you may see LEDs turning on and off,
even though you're not doing anything!
If you see these problems, or if you plan on using the demo for extended periods of time,
then you should request a set of unique credentials from Arrayent. Fill out the form below,
and we'll email you your unique credentials. Once you receive those unique credentials,
you should use those credentials whenever we ask for your device or user credentials.
http://devkit.arrayent.com/wifi/register.html
3. Shared Credentials Reference
For your convenience, here are the shared credentials that are hard-coded in the sample
app.
• Device Name (DEVICE_NAME): MRVL000000
• Device Password (DEVICE_PASSWORD): B8
• Device Key (DEVICE_AES_KEY): 1D4DD4CE456D4D8E47A7EBC98A7F394E
2• Product ID (PRODUCT_ID): 2018
• Product Key (PRODUCT_AES_KEY): 5EB97485085FAB10C14D92CDC2675D78
• Customer Account Name: mrvldemo
• Customer Account Password: u9mwx8$D
• System Account ID: 2018
3Chapter 3. Setup
This section explains how to get the Arrayent sample application into your WM-SDK tree,
build the application, and download the application onto your development board.
1. Hardware and Software Requirements
The Arrayent DevKit for the Marvell WM-SDK platform was built with the following com-
bination of hardware and software. We cannot guarantee that the Arrayent library and
sample application will work with any other combination:
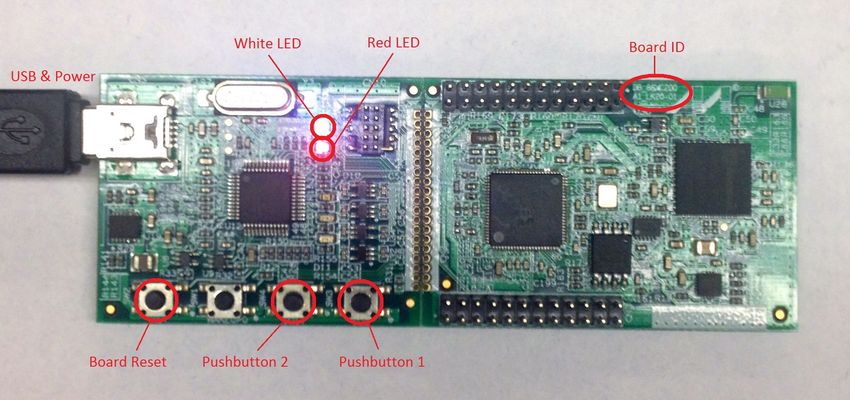
• Lark-mini Development Board v3 (DB-88MC200-A1-LK20-01)
• WM-SDK v2.11.87 (wmsdk_bundle-2.11.87.tar.gz)
Please take time to get familiar with this hardware and software before attempting to com-
plete this section. We recommend building the sample applications provided in the WM-
SDK bundle and running the "helloworld" application. This verifies that the Linux or Cyg-
win installation, ARM toolchain, Marvell tools, and OpenOCD are all properly installed and
functioning.
2. Adding Arrayent Sample Application Code to WM-SDK
Starting with a clean, unpackaged version of the WM-SDK software tree, complete the
following procedure.
Note
All examples below are for basic guidance. The exact syntax of each command
may vary depending on your environment.
1. Unpack the WM-SDK Bundle. Example:
tar zxvf wmsdk_bundle-2.11.87.tar.gz
2. Change directories to the base of the WM-SDK Bundle and run the make all com-
mand. Example:
cd wmsdk_bundle-2.11.87
make all
3. Download or copy the Arrayent archive into the base directory. Example:
cp ~/aca-mrvl-wmsdk-1.1.0.tar .
4. Unpack the Arrayent archive. Example:
4tar xvf aca-mrvl-wmsdk-1.1.0.tar
The following files should be extracted into the appropriate WM-DSK locations.
wmsdk-2.11.87/external/aca/source/include/aca.h
wmsdk-2.11.87/external/aca/source/libaca.a
wmsdk-2.11.87/external/aca/source/license.txt
wmsdk-2.11.87/external/aca/Makefile
wmsdk-2.11.87/external/Makefile
sample_apps/aca_demo/Makefile
sample_apps/aca_demo/src/board.c
sample_apps/aca_demo/src/main.c
sample_apps/Makefile
sample_apps/toolchains/gnu/rules.mk
3. Modifying the Arrayent Sample App Configuration
This section only applies to DevKit users who have received a set of unique device cre-
dentials. If you are using the shared credentials that are hard-coded in the sample app,
you can skip this section.
If you are using unique device credentials, then you need to modify some configuration
parameters in the main.c file of the Arrayent sample application. Open up the sample
application, find the following configuration parameters, and adjust them accordingly.
• Set DEVICE_NAME to your Device Name. This is part of the device's unique credentials.
• Set DEVICE_PASSWORD to your Device Password. This is part of the device's unique
credentials.
• Set DEVICE_AES_KEY to your Device Key. This is part of Arrayent's protocol for secur-
ing device communications.
• Set PRODUCT_AES_KEY to your Product Key. This is part of Arrayent's protocol for
securing device communications.
• Set PRODUCT_ID to your Product ID. This is a mechanism that Arrayent uses to identify
product classes.
5•
4. Building WM-SDK and the Arrayent Sample App
At this point you should be able to build the entire WM-SDK and corresponding sample
apps directory. Follow this procedure to load the Arrayent sample app onto your devel-
opment board.
1. Open up a serial console and connect to the port which your target board is connected
on. You will need this later. For now, the serial console output will help you monitor
the progress of downloading the Arrayent sample app onto the target board.
2. Build the WM-SDK for the development board. Example:
cd wmsdk_bundle-2.11.87/wmsdk-2.11.87/
make BOARD_FILE=wmsdk-2.11.87/src/boards/lk20-v3.c
If successful, you will see output similar to the following:
############################################
WMSDK build is ready!
Now, you may build applications as:
# cd /path/to/sample_apps/
# make SDK_PATH=/path/to/wmsdk-2.11.87
############################################
3. Download the aca_demo application onto your development board using your
OpenOCD On-Chip Debugger.
cd ../wmsdk-2.11.87/tools/mc200/OpenOCD
ramload.sh ../../../../sample_apps/aca_demo/bin/aca_demo.axf
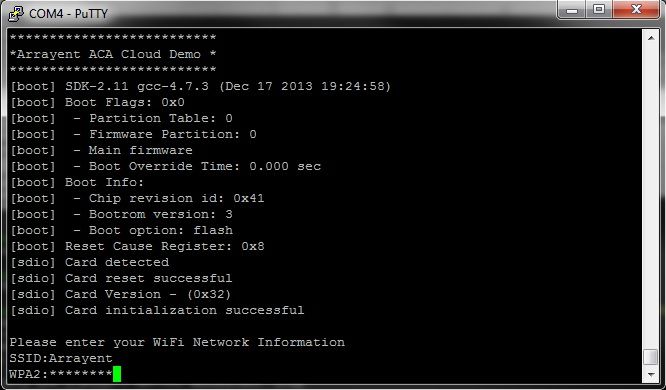
5. Configuring Wi-Fi Access Point Credentials
Now, you need to manually configure your development board to connect to your Wi-Fi
Access point.
1. Open up your serial console.
2. You should see a prompt asking for Wi-Fi Network information.Enter your network
name (SSID) and password.
6Once connected you should see the message Connected to Arrayent Cloud!
6. Troubleshooting
This section lists out some common problems encountered after building and downloading
the sample app.
Table 3.1. WM-SDK Sample App Troubleshooting
Issue Comment
Warn: connecting to "ACA Demo WiFi" The development board has failed to con-
failed nect to your Wi-Fi Access Point. Check your
Wi-Fi credentials or signal strength.
Sending property failed This will occasionally happen when the con-
nection to the Arrayent Cloud is temporarily
lost. In most cases the app will just retry un-
til successful.
Initializing Arrayent daemon failed! Trouble connecting to the Arrayent Cloud. If
you are using unique credentials, make sure
that there are no errors in your credential
values.
7Chapter 4. Monitoring and Controlling
Your Development Board
Now comes the fun part: remotely monitoring and controlling your development board with
a web app.
1. Arrayent Sample App Information
While completing the next chapter you will need the following information. Make a book-
mark or jot this information down so that it is readily available to you as you complete
the next chapter.
• Device Type: lk20-v3
• LED Attribute Names: led-red, led-white. When controlling the LEDs on your de-
velopment board using the Arrayent Utility Tool, these are the attributes that are asso-
ciated to the LEDs.
• Push Button Attribute Names: gpi1, gpi2. When pushing down on the push buttons
of your development board, these are the attributes that will change in real-time.
2. Logging In to the Arrayent Utility Tool
To access the Arrayent Utility Tool, do the following:
1. Open a web broswer.
2. Type in the URL to the Arrayent Utility Tool. If Arrayent provided you a specific URL
for accessing the Utility Tool, then enter that URL. Otherwise, use the default URL,
which is:
8https://devkit-api.arrayent.com:8081/Utility
3. Enter your Customer Account Name, Customer Account Password, and System Ac-
count ID and click Login.
3. Adding the Development Board to Your User Account
Next, let's make sure that your device credentials have been added to your account. If
they haven't, we'll add them to your account right now.
1. Click the Devices tab.
2. Check the Device Code column. You're looking for the Device Name that Arrayent
has allocated to you. If it is there, you can skip this section.
3. If it's not listed, then click the Add button. Enter your Device Name, Device Password,
and Device Type. Click the Save button when finished.
4. Remotely Controlling the Development Board's LEDs
In this section, you learn how to use the Utility Tool to remotely send a command to your
development board.
91. Go to the Monitor and Control page by clicking on the Monitor and Control tab.
2. If you have multiple devices added to your account, click the Device Code: dropdown
menu and select your device from that list. You are looking for the Device Name that
Arrayent has assigned to you.
3. Find the attributes that correspond to the LEDs on your development board. The
exact names of these attributes were listed in the beginning of this chapter. Click the
ON and OFF buttons to toggle the LEDs on and off.
5. Remotely Monitoring the Development Board's Push Buttons
1. You should still be on the Monitor and Control page. If you're not, go there by clicking
on the Monitor and Control tab.
2. Find the attribute(s) that correspond to the push button(s) of your development board.
The exact names were listed in the beginning of this chapter.
3. Press the push buttons. Look at the Arrayent Utility Tool. You should see the values
of the attributes change in real-time. The attributes function as counters. Every time
that you push a push button, the counter increments by one.
10Chapter 5. Next Steps
In this guide you learned how to build and load the Arrayent sample application, and then
monitor and control a development board running the Arrayent sample app via a web
application.
1. Read the Arrayent Architecture Overview to get an understanding of the end-to-end
system which enables your devices to connect to the Internet.
2. Learn how to create a device data model in the Arrayent Cloud, so that you can build
a data model that is meaningful to your particular product.
3. Read the API reference documentation and study the Arrayent sample application to
understand how to build a host application that interfaces with an Arrayent Endpoint.
4. Build your new connected product host application.
5. Monitor and control your new connected product using the Arrayent Utility Tool.
11Chapter 6. Revision History
Table 6.1. Marvell WM-SDK DevKit Quick Start Guide Revision History
Date Description
2014-01-15 Adding missing signup form for receiving
unique device and user credentials. When
preparing the sample app, added note about
building the WM-SDK bundle with make
all.
2014-01-06 Removing unnecessary step from "Building
WM-SDK and Arrayent Sample App" sec-
tion that explains how to build sample apps
directory. The previous make command al-
ready builds this automatically.
2013-12-19 Initial publication.
12You can also read