USER'S GUIDE AUDRIGA GROUPWARE MIGRATION FROM GSUITE TO AMAZON WORKMAIL - Version
←
→
Page content transcription
If your browser does not render page correctly, please read the page content below
USER’S GUIDE
AUDRIGA GROUPWARE MIGRATION FROM GSUITE TO AMAZON WORKMAIL

Version   1.3

File      2019-05 gsuite to workmail guide.docx

Date      17.05.2019

Contact   https://www.groupware-migration.com/en/contact/contact.html
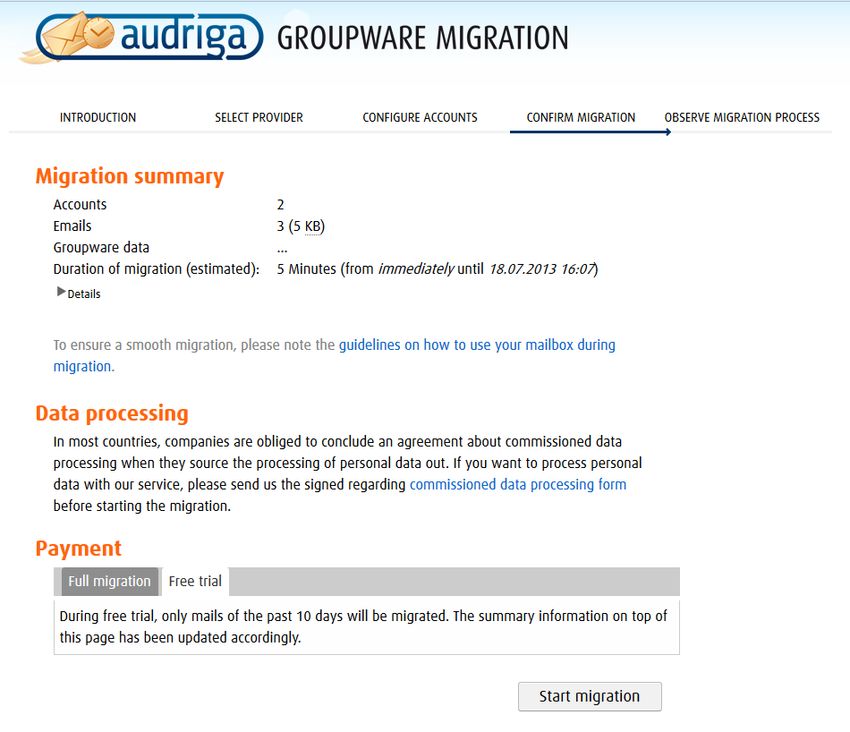
TABLE OF CONTENTS

Audriga Migration Service for Emails and Groupware ............................................................................................ 3

Specifications of GSuite which you should be aware of ......................................................................................... 3

What data can be migrated / limitations ................................................................................................................ 3

   What can be migrated ........................................................................................................................................ 4

   What cannot be migrated ................................................................................................................................... 4

   EWS Limitations .................................................................................................................................................. 4

   Amazon WorkMail specific limitations................................................................................................................ 4

   Specific limitations .............................................................................................................................................. 4

Preparation ............................................................................................................................................................. 5

   Create new Amazon WorkMail mailboxes .......................................................................................................... 5

   Authorize Audriga to access your Data on GSuite .............................................................................................. 7

   Create special email group.................................................................................................................................. 8

Using an Amazon WorkMail Admin for the Migration............................................................................................ 8

   Using Admin credentials to access Amazon WorkMail ....................................................................................... 8

Configure a Migration with Audriga Migration Service .......................................................................................... 9

   Selecting current and new Provider .................................................................................................................... 9

Adding Accounts for Migration ............................................................................................................................. 10

   Adding single GSuite Accounts.......................................................................................................................... 10

   Adding single Amazon WorkMail Accounts ...................................................................................................... 11

   Adding multiple Accounts ................................................................................................................................. 12

Start the Migration ............................................................................................................................................... 14

Free Trial ............................................................................................................................................................... 14

Monitor Migration Status ..................................................................................................................................... 14

Delta Migration for Domain Transfer.................................................................................................................... 16
AUDRIGA MIGRATION SERVICE FOR EMAILS AND GROUPWARE

The Audriga Migration Service allows the content of mailboxes to be copied from your current hosting
provider to a new hosting provider in an easy, fast, and secure way. A migration can be configured on
a self-service website, which can be accessed with most common web browsers (e.g. IE, Firefox, Safari
or Chrome). No software needs to be installed on your machine. The service connects to your mailbox
in a similar way as your e-mail clients do. Emails, attachments, folders and depending on the involved
systems also contacts, task, notes and calendar data are being copied to the destination account. The
data in the source mailbox will not be deleted or altered in any way. To configure a migration, only
three simple steps in our self-service portal have to be completed. After the migration has started, its
status can be continuously monitored on the website.

SPECIFICATIONS OF GSUITE WHICH YOU SHOULD BE AWARE OF

GSuite uses some concepts, which differ from other traditional email and groupware solutions and you
need to take them into account, when configuring a migration:

    •   GSuite uses labels instead of folders. You can use labels to organize your email into categories,
        like work, family, or any other category. They work like folders, but you can add more than
        one to a message. Audriga Migration Service is going to copy the messages with multiple labels
        into multiple folders (corresponding to the labels) in Amazon WorkMail.
    •   GSuite allows for ca. 2.5 GB mail traffic per day. Beyond this limit, an account may be blocked
        for 24 hours. While our service respects this limit (which results in a slower migration) we
        cannot completely rule out problems. You should not extensively access your account with
        other devices during the migration process (e.g., mobile phone synchronization or other email
        clients).
    •   Messages without labels are being archived into the “All mail” tab in Gmail. You can find them
        by searching for “has:nouserlabels” in Gmail. Audriga Migration Service will migrate these
        messages into a folder called “All mail” in Amazon WorkMail. If you want to have them
        migrated into another folder, you will need to assign them the corresponding labels.
    •   “All mail” serves another purpose besides holding the archived messages and that is keeping
        a copy of each labeled message. Audriga Migration Service will migrate each labeled message
        into the corresponding to the label folder in Amazon WorkMail, but will exclude it from the
        “All mail” folder in order to save storage.

WHAT DATA CAN BE MIGRATED / LIMITATIONS

The migration from GSuite to Amazon WorkMail is done by using the Google APIs and IMAP to access
data at Google and the EWS protocol to write items into Amazon Workmail.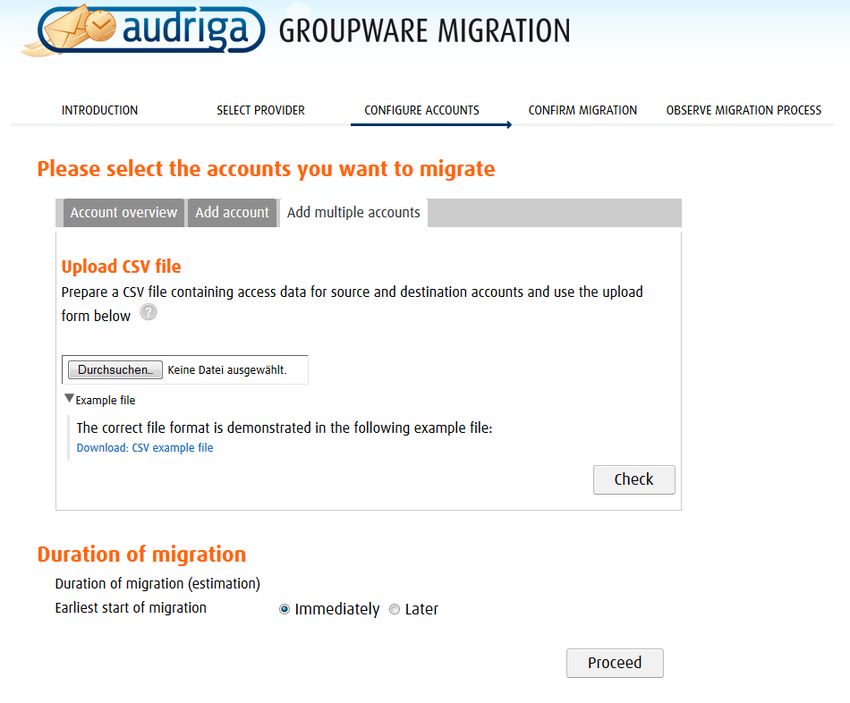
What can be migrated
Migration of user mailboxes incl.

    •   Emails
    •   Contacts
    •   Calendars
    •   Tasks

What cannot be migrated
    •   Public folders
    •   Archives
    •   Journals
    •   Filters (Inbox Rules)
    •   Signatures
    •   User Configuration
    •   Distribution Lists
    •   Permissions

EWS Limitations
    •   The owner of the mailbox will become the organizer for each of his appointments
    •   Meeting participant status (accepted or declined) will not be migrated
    •   The service tries to resolve system internal addresses e.g. X500 addresses and replace them
        with valid email addresses. If it is not possible, the addresses will be removed.
    •   The service also filters invalid entries like non-valid URLs in Website fields which are not
        accepted by the destination platform.

Amazon WorkMail specific limitations

    •   Emails with attachments can only migrated when attachment size is smaller than 23 Mbytes.
    •   Contact profile pictures will be copied as attachments of contacts but will not be shown as
        profile picture.
    •   Distribution lists cannot be migrated.
    •   No duplicate detection for note items.

Specific limitations
Certain limitations may apply due to the specific combination of the source and the destination. This
includes:

    •   Display of certain email messages (special MIME formats) may differ on the destination side
    •   Mapping of item properties (e.g., if not supported by the destination)
    •   Mapping of folder permissions

If in doubt, we recommend migrating a few mailboxes initially to check the results.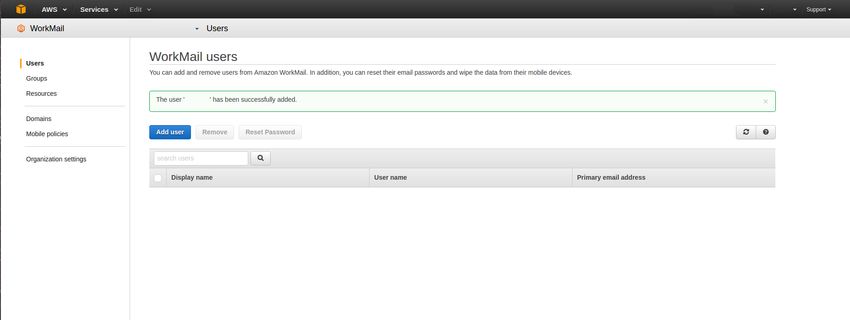
PREPARATION

Before the migration you need new (or already provisioned) Amazon WorkMail mailboxes. Make sure
you have the access credentials (login names and passwords) of the mailboxes, which should be
migrated for both GSuite and Amazon WorkMail. We recommend that you assign temporary
passwords for the migration. When migrating multiple mailboxes, the best practice is to start with one
mailbox first and migrate the remaining ones afterwards.

Create new Amazon WorkMail mailboxes
You can add a new mailbox to Amazon WorkMail by doing the following steps:

Note: You may also refer to the admin guide for Amazon WorkMail:

http://docs.aws.amazon.com/workmail/latest/adminguide/add_new_user.html

    1. Enter the Admin Console of Amazon WorkMail and go to Users. Click on Add user to start
       creating a new user:

    2.   Proceed by clicking on Create.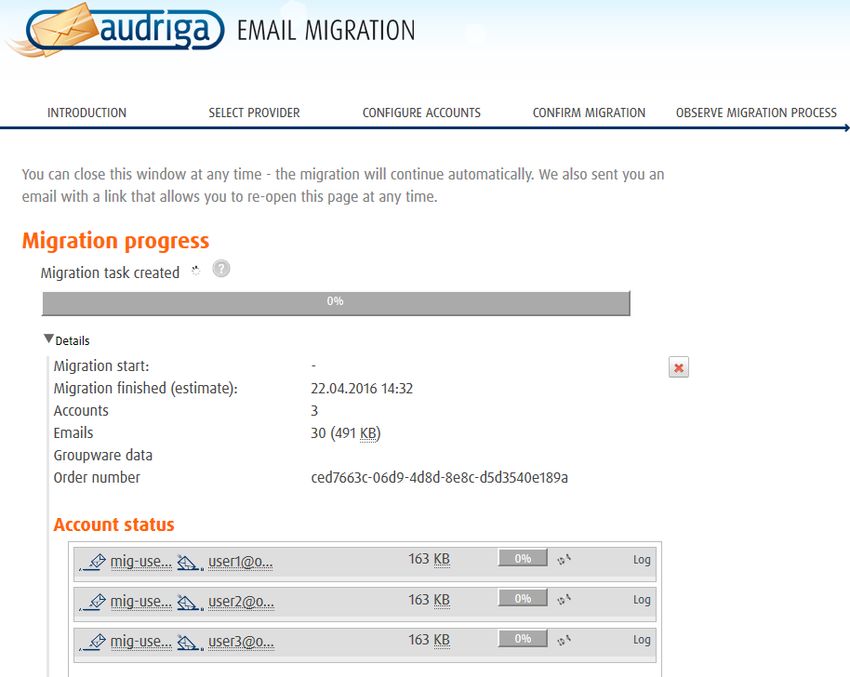
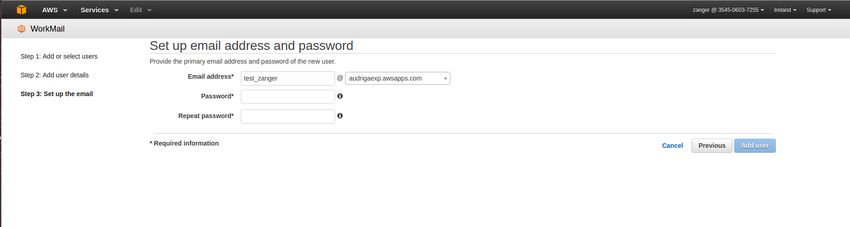
3. Enter the details for the new user and click on Next step:

4. Enter a password for the user and click on Add user to complete the process. We suggest
   that you choose a temporary password, which the user can change after the migration.

5. Click on Add user to finish the process. The user has now been successfully added:
Authorize Audriga to access your Data on GSuite

Audriga Migration Service uses the OAuth 2.0 protocol to access to data in Google services like mails,
contacts or calendars. You can authorize audriga API client to access your user data without your
users having to individually give consent or their passwords. The process needs to be completed
before starting the migration.

You can read more about OAuth 2.0 here:

https://developers.google.com/identity/protocols/OAuth2

You can authorize audriga API client by following these steps:

    1. Log-in to your GSuite Admin console(https://admin.google.com)
    2. Go to Security -> Show more -> Advanced Settings -> Manage API client access
    3. Enter the Audriga API Client into Client Name field:
       Audriga API Client: 39101422369-
       d4nu925gmj04tt5c607alri12s3d2k9o.apps.googleusercontent.com
    4. Copy and paste these scopes into API Scopes field separating them with a comma:

https://www.googleapis.com/auth/gmail.readonly,
https://www.googleapis.com/auth/gmail.settings.basic,
https://www.googleapis.com/auth/gmail.settings.sharing,
https://apps-apis.google.com/a/feeds/emailsettings/2.0/,
https://www.google.com/m8/feeds,
https://www.googleapis.com/auth/contacts.readonly,
https://www.googleapis.com/auth/calendar.readonly,
https://www.googleapis.com/auth/tasks.readonly,
https://www.googleapis.com/auth/drive.readonly,
https://www.googleapis.com/auth/admin.directory.user.readonly,
https://www.googleapis.com/auth/admin.directory.userschema.readonly,
https://www.googleapis.com/auth/admin.directory.group.readonly,
https://www.googleapis.com/auth/admin.directory.orgunit.readonly,
https://www.googleapis.com/auth/admin.directory.domain.readonly,
https://www.googleapis.com/auth/admin.directory.resource.calendar.readonly,
https://www.googleapis.com/auth/apps.groups.settings,
https://www.googleapis.com/auth/userinfo.email,
https://www.googleapis.com/auth/userinfo.profile

    5. Click on Authorize to complete the process.

You should now see something like this: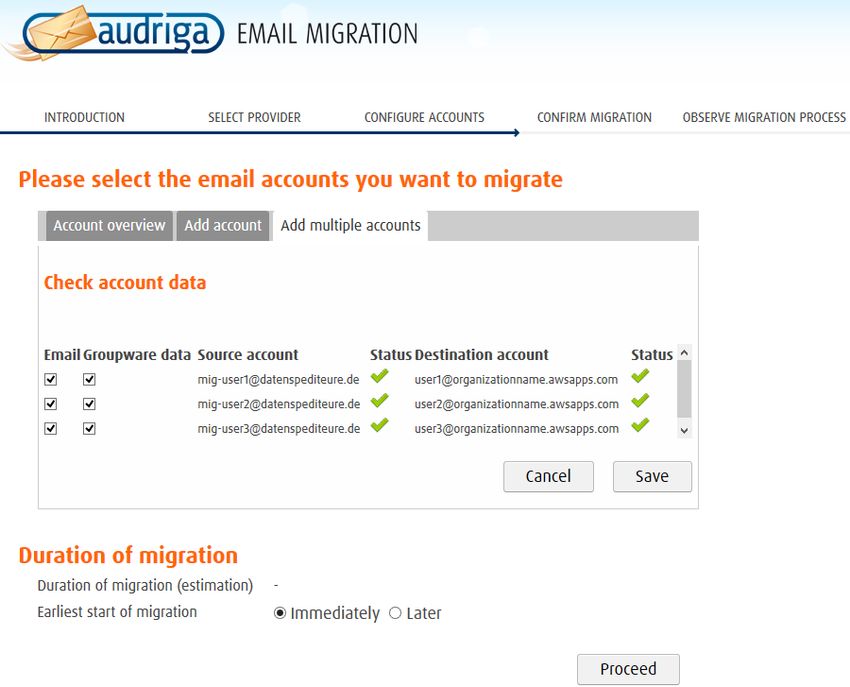
Create special email group

For security reasons an email group must be created containing "j3dwmd" or "audriga" plus any
secret. This group email address is used as the password in the audriga Migration Service.

Group email address must contain "j3dwmd" or "audriga"

    1. Log-in to your GSuite Admin console(https://admin.google.com)
    2. From the dashboard, click Groups (If not available, click on MORE WIDGET)
    3. Click at the bottom of the page.

    4. Enter the following details in the Create new group box:
           o A name for the group.
           o An email address for your new group. If your organization's GSuite account has
                multiple domains, select the appropriate domain from the drop-down list. Group
                email address must contain "j3dwmd" or "audriga" + any additional secret e.g.
                audriga-test@my-domain.com
    5. Click Create. You'll be taken to the group's page in the Admin console.

You can read more about Google Groups here: https://support.google.com/a/answer/33343?hl=en

USING AN AMAZON WORKMAIL ADMIN FOR THE MIGRATION

For your Amazon WorkMail mailboxes you can either use the username and password of each user
or you can use a single admin user to access all of them. Keep reading this chapter if you wish to set
up an admin account for the migration. If you however want to use credentials of each user, just skip
to the next chapter.

Using Admin credentials to access Amazon WorkMail

    1. Log-in to your Amazon WorkMail Admin Console and go to Organization settings: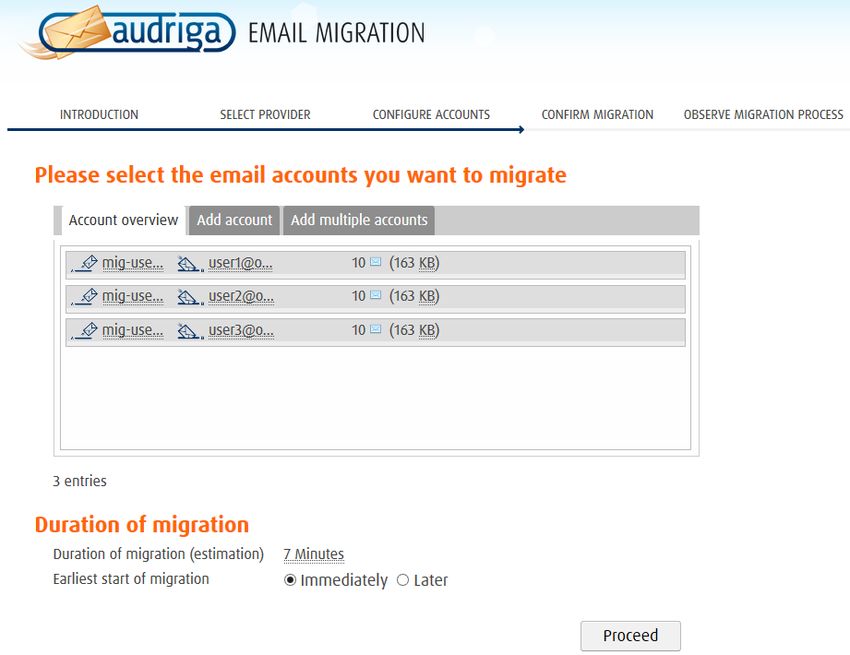
2. Under Mailbox migration click on Edit to grant a user with admin access for the migration:
3. Click on Select user and a list with your users will pop up. Select the user, which will be used
as Admin during the migration and click on Select user to close the window:
4. Click on Save to complete the process. The user will now be listed under Mailbox
permissions:
CONFIGURE A MIGRATION WITH AUDRIGA MIGRATION SERVICE
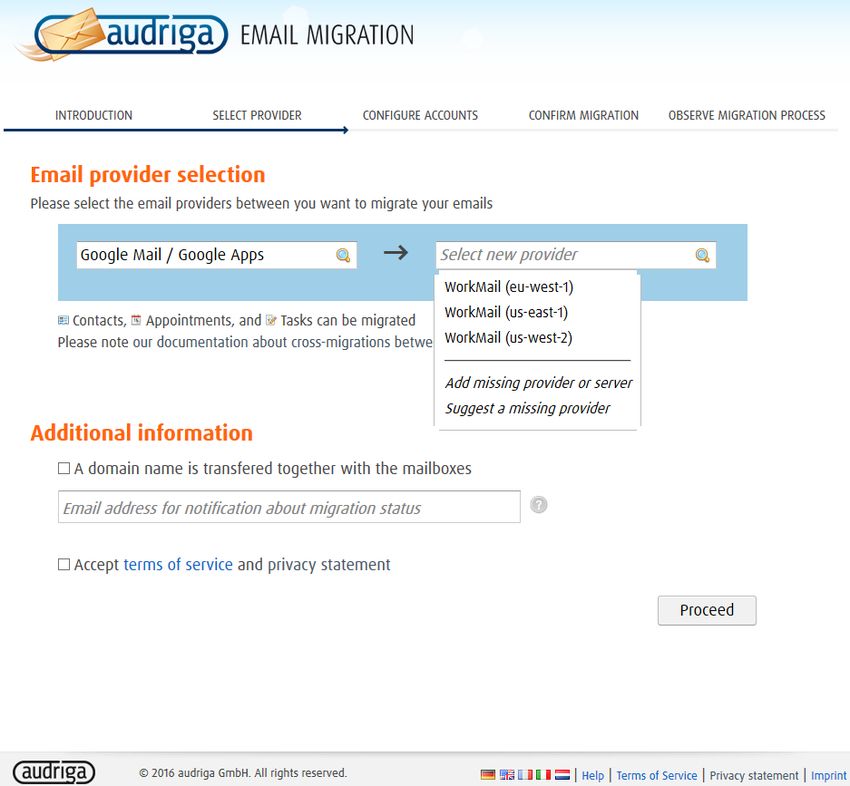
Selecting current and new Provider
In the Provider selection screen, choose Google Mail / GSuite as your current provider and Amazon
WorkMail as your new provider: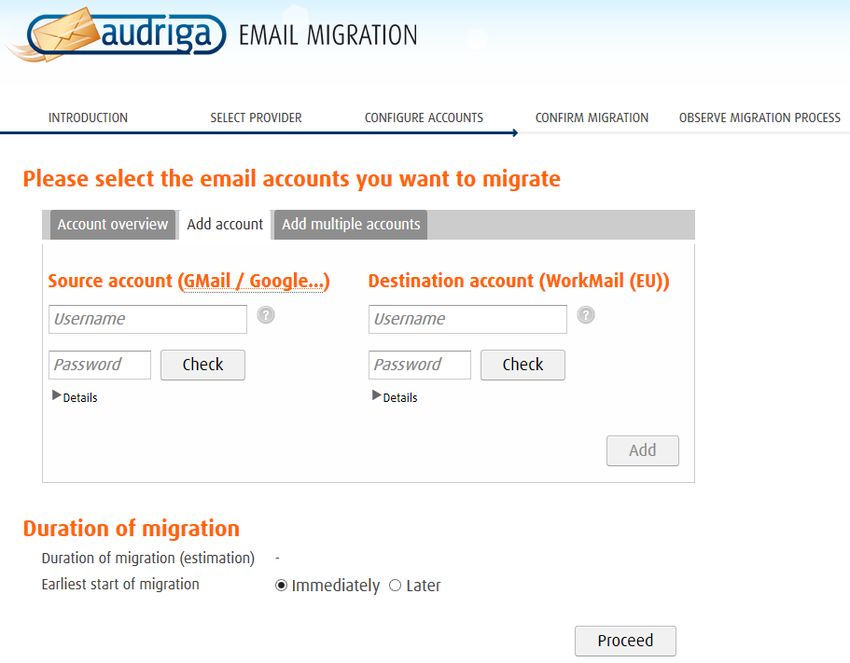
Hint: you may need to start typing Google Mail / GSuite for it to appear in the list.

ADDING ACCOUNTS FOR MIGRATION

For your Amazon WorkMail accounts we recommend that you use an admin user with access to all
users’ mailboxes (see chapter “USING AN AMAZON WORKMAIL ADMIN FOR THE MIGRATION”). You
can also use the username and password of each mailbox alternatively.

You do not need user passwords for the GSuite admin and users, since we will be accessing them via
our Client API, which you need to authorize (see chapter “Authorize Audriga to access your data”).

Two options of adding user exist. You can either add single accounts one by one or you can add
multiple accounts using a CSV-File. Keep reading for a detailed overview.

Adding single GSuite Accounts

Enter the username of the admin in the username field and user’s username under Details. Enter the
special group email address as password e.g. audriga-test@my-domain.com form the example
above
Click on check to verify the credentials. If the data is correct, a green check will appear   . If the
credentials are incorrect, a red cross will be displayed   .

Adding single Amazon WorkMail Accounts

Enter the admin credentials in the corresponding fields and a user mailbox under Details (email
address). Alternatively you can also use the credentials of each user mailbox. In that case leave
Details empty.
Adding multiple Accounts

Choose add multiple accounts if you want to add users using a CSV-File. Add a maximum of 50
mailboxes per CSV-File for an optimal performance.

Prepare a text file with all of the account credentials. An example file is provided in the dialog.
For the GSuite accounts leave the password field empty:
All accounts entered will be listed in account overview. The migration service will try to check
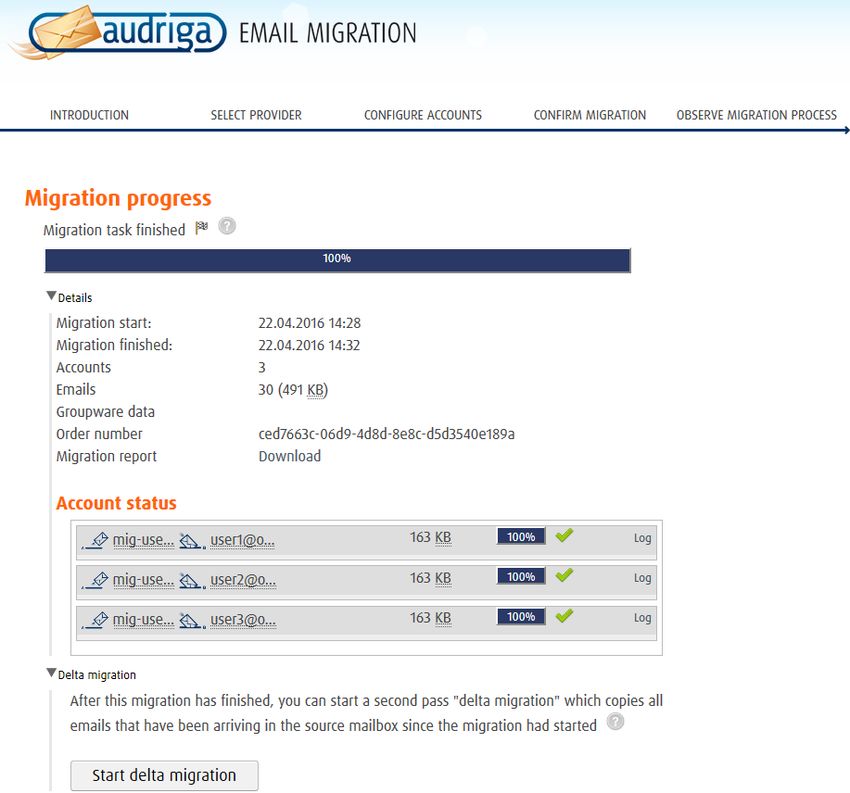
whether there is sufficient free space in the destination account.Note: this check may take a while for larger mailboxes. If you do not want to wait, you can proceed with the configuring of the migration. START THE MIGRATION On the next screen, you will see a summary of the migration, including the number of accounts and the amount of data. Even if the analysis of the source account is not yet completed you can proceed and start the migration. In order to start the migration, you will need to provide a valid migration voucher code if this voucher was not a part of the URL you called to start this website. FREE TRIAL A free trial migration transfers the email and groupware from the last 10 days. To start a trial migration, please click on Free trial: The migration summary will be adjusted. To start the trial migration, click on Start migration MONITOR MIGRATION STATUS We are going to send you status emails for migration job submission, migration start and end to the email address you have entered during the configuration, so that you can easily keep track and monitor your migration. Once the migration has been started, you do not need to leave the status
page open, since you can always re-open it with the link you will receive at the migration’s start.

Click on Details to get further information about the migration.

It may take some time until the migration progress. A migration may take a couple of hours for large
amounts of data. You can safely close the status website and shut down your computer – the
migration will continue automatically. You will also receive status emails when the migration starts
and finishes which include a link to the status website. You can open the status website anytime by
clicking on this link.

For each account, you can access a detailed log. It lists detected duplicates or encountered errors
(e.g., if e-mails cannot be transferred due to size limitations of your provider).
DELTA MIGRATION FOR DOMAIN TRANSFER

When transferring a domain to your new provider or updating the MX record to point to your new
provider for some time emails may still be routed to the old provider due to DNS caching issues. In
order to transfer these mails into your new account after the domain transfer/DNS change is
effective, we offer a delta migration feature. To start a delta migration, click start delta migration
after the initial migration has finished, plus additional time for the DNS cache propagation
(recommended time: 24 h - 48 h). All emails which arrived in the old account after the initial
migration finished will now be copied. You will again receive notification emails about the status of
your delta migration.
You will again receive notification emails about the status of your delta migration.

Note: A delta migration is only possible if the migration service can still access the mailboxes at your
source provider after the domain is transferred. This is not possible with all providers. Please check
with your provider for further details.
You can also read