Manual: PlagScan Plugin in Moodle 2.X and 3.X for the Administrator - Version: March 2020
←
→
Page content transcription
If your browser does not render page correctly, please read the page content below
Manual:
PlagScan Plugin in Moodle 2.X and 3.X for
the Administrator

Version: March 2020
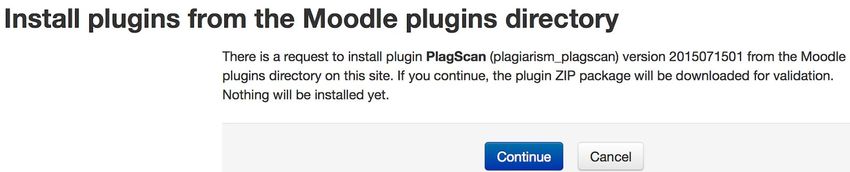
Table of Contents

Phase 1: Registration
  Step 1: Choose the user category “organization”

Phase 2: Installation of the PlagScan plugin in Moodle
  Step 1 of 6: Installation and configuration
     Method 1: Installation via Moodle plugins directory
     Method 2: Installation via Upload
  Step 2 of 6: Confirm the installation and update the Moodle database
  Step 3 of 6: Generate API key
  Step 4 of 6: Setup ‘Callback URL’
  Step 5 of 6: Configuration of the PlagScan plugin
  Step 6 of 6: Check the Callback configuration

Phase 3: Configuration

Requirements

                                                                         1
Phase 1: Registration
Your PlagScan access
There are two options for your organization to use the PlagScan plagiarism checker. Because
PlagScan is available for almost every browser you can imagine, you can call it “Software as a
Service” (SaaS).
Access to your internal PlagScan can be integrated into your existing learning management
system (LMS), content management system (CMS) or intranet via API and plugin
(PlagScan-in-a-BOX - you can find detailed information here). You can also use this service in a
browser interface, the Plagiarism Portal, on our server (PlagScan as a Webservice).
Please note:
The following instructions involve both access options.
Step 1: Choose the user category “organization”
(in case you haven’t already registered on the organization tab)
2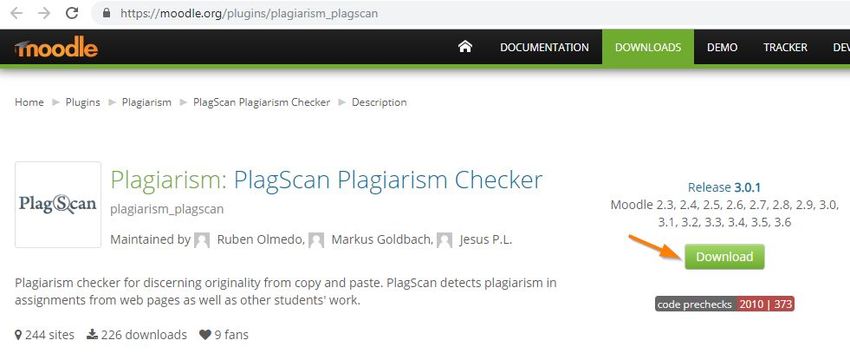
Phase 2: Installation of the PlagScan plugin in Moodle
Step 1 of 6: Installation and configuration
1. Login in to Moodle with your administrator account and click on “Site administration”.
2. Now go to “Plugins” and click on “Install plugins”.
NOTE: Now you can choose to install the Moodle plugin by browsing t he plugin directory
dding the ZIP folder downloaded from PlagScan.
or manually a
3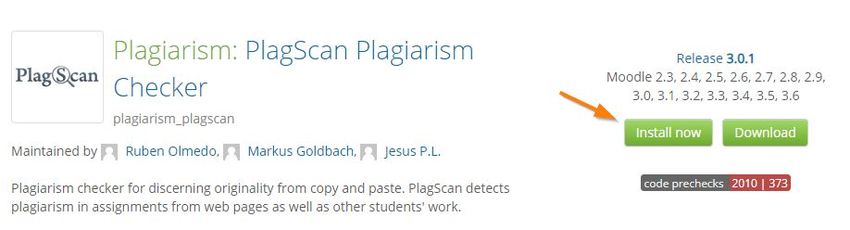
Method 1: Installation via Moodle plugins directory
1. Click the button “Install plugins from the Moodle plugins directory”.
2. Log in with your Moodle.org account.
4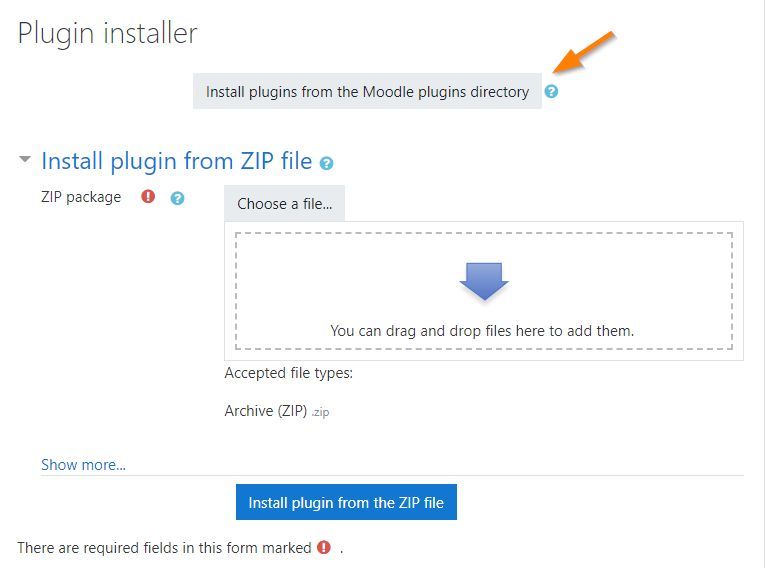
3. Search in the plugin directory by entering ‘plagscan’ to the search field at
https://moodle.org/plugins/ and Choose the PlagScan entry.
4. Click “Install now”.
5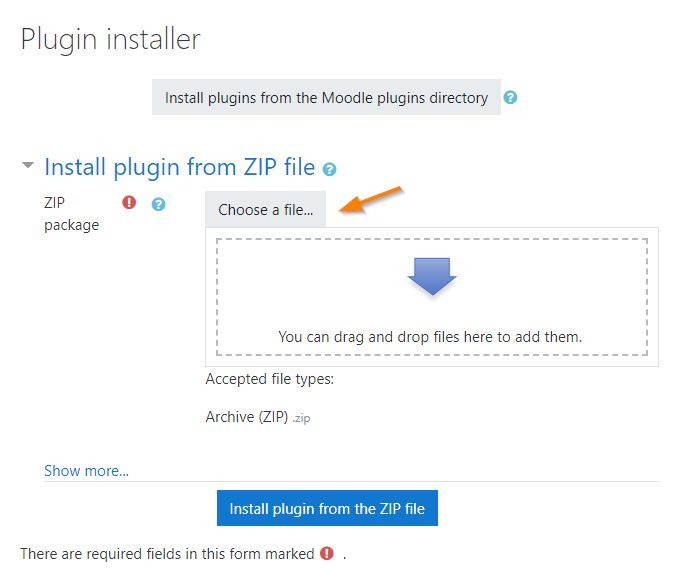
5. Choose your Moodle URL on the next page and click “Install now” again to start the
installation.
6. Now you see an explanation that first the ZIP file is downloaded but not being started yet.
Click ‘Continue’.
6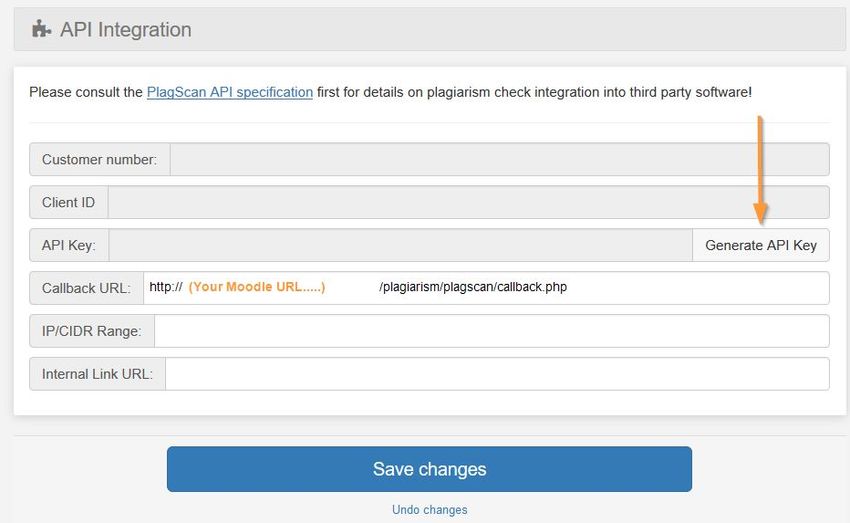
Method 2: Installation via Upload
1. Download the PlagScan plugin zip from the Moodle Plugin Directory.
2. Click on “Choose a file ...”
7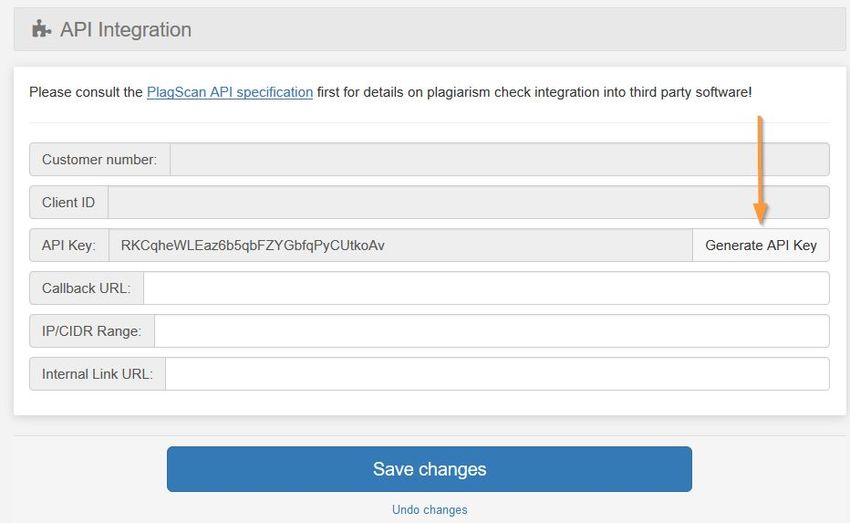
3. Click on “Upload a file” then click on “Choose a File”. You can now choose the
downloaded PlagScan plugin ZIP folder from your hard drive and click “Upload this file”.
NOTE: Alternative: You may also ‘drag and drop’ t he PlagScan plugin ZIP file into the shown
field.
8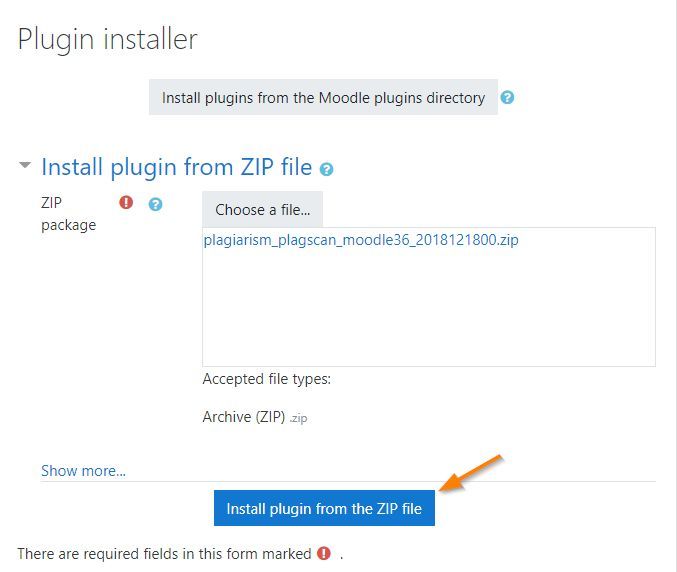
4. Start installation by clicking “Install plugin from the ZIP file”.
5. An information page regarding the plugin is shown. Click “Continue” to follow with the
installation.
9Step 2 of 6: Confirm the installation and update the Moodle database
1. Confirm the installation by clicking “Upgrade Moodle database now”.
2. You will be notified regarding the successful installation. Click “Continue” to finish.
10Step 3 of 6: Generate API key
1. In order to use the Moodle plugin, it is necessary to generate an API Key. Please log in to
your account (which you created in Phase 1) in the PlagScan portal and select
“Administration” or you can go directly by clicking on the link here and log in.
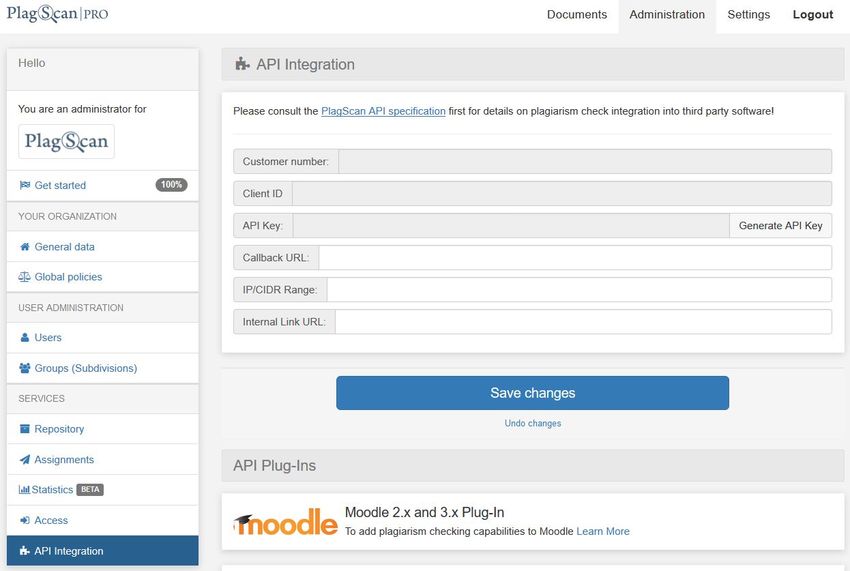
2. On the left hand side select “API Integration”.
113. Now you are in the PlagScan API integration page.
4. Click on the button “Generate API Key” so you can copy and paste the key to your
Moodle plugin configuration later.
12Step 4 of 6: Setup ‘Callback URL’
1. You are required to enter a Callback URL, which informs Moodle about a successful
plagiarism check. Navigate to your Moodle Dashboard and copy the Moodle URL from
your browser’s address bar (without /my/).
132. Navigate back to the “API Integration” menu in your PlagScan account and paste the
Moodle URL you just copied into the field called “Callback URL”. Add the following part
after the Moodle URL:
/plagiarism/plagscan/callback.php
3. Note down your “Client ID” for later use.
4. Click on “Save changes”.
NOTE: Only change the orange Text.
14Step 5 of 6: Configuration of the PlagScan plugin
1. Go to the “Site administration” menu and then click on “Advanced features”.
2. Tick the checkbox for “Enable plagiarism plugins” and “save changes” at the bottom.
3. In the “Site administration” menu go to “Plugins” scroll down to “Plagiarism” and
then click on “PlagScan”
4. Activate the checkbox “Enable PlagScan”, enter your account data API key and Client
ID (find your Client ID in the API integration menu in your PlagScan account) and save
your changes. Click on “Save changes” at the bottom of the form.
NOTE: in the next step we will check the callback, please ignore the message in this step.
NOTE: in P hase 3 Configuration you can configure and see what means all the possibilities in our
configuration.
15Step 6 of 6: Check the Callback configuration
The Callback setup is essential for working with the PlagScan plugin on your Moodle platform.
The Callback URL is used to send the moodle plugin information about the status of the file as
well as report and update it on the Moodle database.
Since the call to the Callback is made via HTTP/HTTPS, in order for it to work properly it is
necessary to have the ports 80 and 443 opened.
On plugin configuration page, just before the “Enable plugin” button, there is a message like this:
1. Please click on the “Check the callback configuration” to confirm your callback URL is
properly set.
If everything is correct and working, a message will appear at the top of the page:
Also the message will change.
2. The plugin is now ready to work!There is no need to click on “Save changes” again.
16Phase 3: Configuration
You can adjust the following settings in the PlagScan plugin. The Plugin settings are found at:
Site administration - Plugins - Plagiarism - PlagScan
You can read explanations about the settings in the following table.
Settings Explanation
Report language Choose the language you prefer for your reports.
Email policy The contact policy for your new plagiarism reports (please make sure
to check your spam folder for emails from report@plagscan.com):
● Don’t email reports: reports are collected in the document
manager only and are not emailed.
● Email all reports: all reports are emailed immediately after the
analysis.
● Email only if a red level is indicated: Only reports that show
an elevated (red) plagiarism level is emailed to you.
Data policy Regulates the data you want to compare your documents with and if
you want to allow others (other than web sources) to compare with
yours. (When possible plagiarism is detected, other users will not be
able to see your full document, but are able to contact you!)
More information about the PlagScan database and share policies
● Compare with web sources: Your documents are checked
against internet sources.
● Check against my documents: your documents are checked
against your other documents.
● Check against my documents in the repository: your
documents are checked against other documents that are in
your repository.
● Check against my organization repository: your documents
are checked against other documents in the organization
repository, The organization repository includes your own
documents and the documents from other users in your
organization.
● Check against the PlagScan Prevention Tool: documents are
checked against all texts from cooperating publishers and users
on PlagScan with the same setting.
17Students can refuse ● No: PlagScan cannot be deactivated by the student when they
permission to upload uploads his documents to an assignment.
to PlagScan ● Yes: Students can decide to switch off the PlagScan analysis so
it won’t be started after uploading documents.
Student Disclosure Text that will be displayed to all students on the file upload page.
Allow categories Here you can type in the category names of the courses to work with
PlagScan. Leave blank if you wish PlagScan to work with all courses,
or specify only some categories if you wish to exclude some courses
from working with PlagScan. Categories can be assigned when
creating or editing a course.
Non-disclosure ● If you would like to use Non-disclosure document, enter a new
documents email address which is not related to a preexisting PlagScan
account.
● All submission for the non-disclosure assignment will be
uploaded into a separate account. No other organisation-users
will be able to compare these documents anymore.
Auto save document When, if ever, should data such as documents and reports be
removed:
● Never delete: Unless manually deleted, keep data forever. This
option only available if you have purchased the Power User
package or if you are affiliated with an organization which
already has a subscription.
● After one week: Delete data one week after upload.
● After three months: Delete data 90 days after upload.
● After six months: Delete data 180 days after upload.
Docx option For Word docx type documents suspicious passages can be
highlighted directly in the original document. You can choose one of
the following options:
● Generate and email Word docx report: Highlighting is added
to the Word docx document and, if email policy is activated, the
result is emailed together with the report.
● Generate only Word docx report: A Word docx document with
highlighting is generated but not emailed. You can download it
from PlagScan
Note: Generated Word docx files are removed after seven
days.
● Do not generate Word docx report: Only plain text is
extracted and can be checked. This makes for faster
processing. However, images and other non-text data are lost.
18Hide plagiarism If you change this number you hide all the sources with a % under
sources below (%) this number.
Associate uploaded IMPORTANT: Please decide how you want data to be organized in
files with the PlagScan backend before you start using PlagScan in Moodle:
● The main PlagScan account: All documents are assigned to
the administrator account. Administrator account can be used by
multiple people.
If you enable this option, it is mandatory that you enter
the email of the administrator in the “Admin email” box.
● Individual teacher accounts: Documents are deposited in
separate, individual teacher accounts. Selecting this option will
unlock the additional “To your PlagScan settings” elaborated in
our manual for teachers and instructors. “Activation of the
PlagScan Plugin” which will enable teachers to set their own
PlagScan setting preferences that will override the General
settings selected within this section.
Admin Email IMPORTANT: This has to be set only if the option ‘Associate
uploaded files with’ is set as ‘The main PlagScan account’
The email from the PlagScan admin account goes here.
PlagScan Server IMPORTANT: Please do NOT modify this option unless you have
a PlagScan-in-a-BOX. This option is only important for customers
with a PlagScan BOX.
If you are a PlagScan-in-a-BOX customer, please enter your server
host name in this field and add /v3 at the end.
Wipe PlagScan User This is a link to wipe the PlagScan plugin user cache table. This was
Cache added due to some user related inconsistency problems with the
PlagScan plugin and the PlagScan servers.
PlagScan support may require you to use this link for solving some
inconsistency problems. Otherwise is not necessary to use this.
19PlagScan default This shows a set of default settings related to the assignments where
settings for PlagScan will be activated. These settings are set as default settings
assignments when an assignment is created. Users creating assignments will be
able to change the settings according to their needs:
● Ignore self matches: Checking this option will not flag the
same participant’s content across multiple submission
attempts within the plagiarism report.
● Exclude from repository: Checking this option will exclude
all the documents submitted for this assignment from the
repository.
● Enable PlagScan for Online Text Submission: Checking
this option enables the user to submit online text to be
checked for plagiarism as a normal file/document within the
assignment.
● Share results with Students:
○ You can allow students to never see their results.
○ To always share them with the students.
○ To share them after the first due date.
○ The next option “share these results” will let you
decide what results you want to share.
● Share these results: This allows students to see only the
PlagLevel or the full report along with the PlagLevel in their
overview.
20Requirements
● The PlagScan plugin uses ‘Adhoc Task’ from Moodle, which are used to run background
tasks, so it requires the Moodle cron to be configured correctly.
Here is the official documentation for Moodle Cron
● The PlagScan plugin receives callbacks requests from PlagScan servers to update
information or receive notifications (file submitted, report generated, and more).
As mentioned in the Step 4 of 6: Setup ‘CallBack URL’, it is necessary to set up the
callback URL, but also make sure this URL is accessible and accept incoming
connections from PlagScan.
Currently all notification communication is bundled and will come from IPs 136.243.25.50,
144.76.58.15 and 148.251.180.22
More information here
We are looking forward to receiving your feedback at pro@plagscan.com. If anything is missing
in this tutorial on how to get started with the PlagScan plugin for Moodle, do not hesitate to
contact us. We always strive to improve our service and appreciate your help!
Thanks,
Your PlagScan-Team
© 2020 PlagScan GmbH. All rights reserved.
PlagScan GmbH
Subbelrather Straße 15
50823 Cologne
Germany
21You can also read