Login and Moodle Orientation - May 2021 - Portage College
←
→
Page content transcription
If your browser does not render page correctly, please read the page content below
Login and Moodle
      Orientation
             May 2021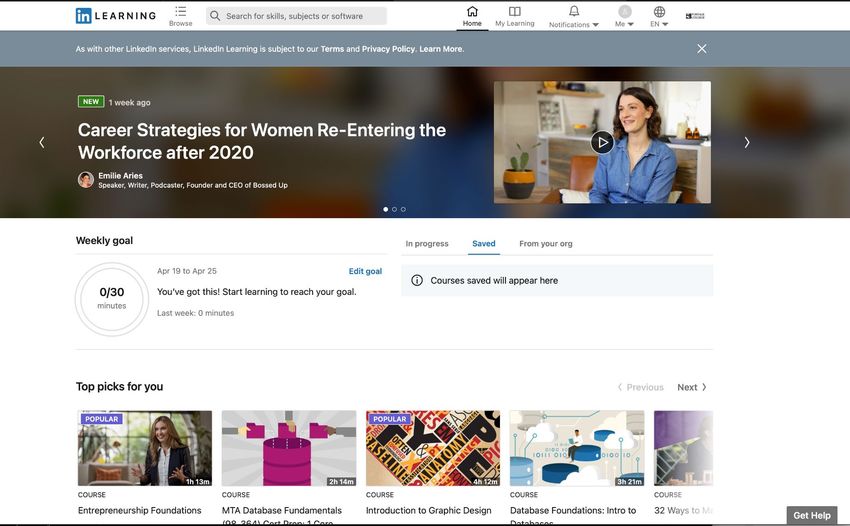
Logging In And Accessing Moodle First time logging in on campus (slides 3-6) First time logging in from home Moodle – Dashboard Collaborate Ultra Moodle – how to upload an assignment PaperCut Microsoft Office 365 Linkedin Learning Submitting a technical support ticket Portage College YouTube channel Connecting to WiFi

First Time Logging In On Campus
At the login screen enter your User name and initial Password
(see below).
User name – this is your student ID number
i.e. 160213
Initial password – this is
# + first initial + last initial + @ + year of birth
For example a student named John Wick with
a student ID of 123456
born in 1996 will have an initial password of: #jw@1996
You will now be prompted to change your password.
First Time Logging In On Campus
You will now be prompted to change your password.
After you change your password, you will be
prompted to log in again to confirm the changes.
Your new password must be 8 characters long. You
cannot use any of your 5 previous passwords.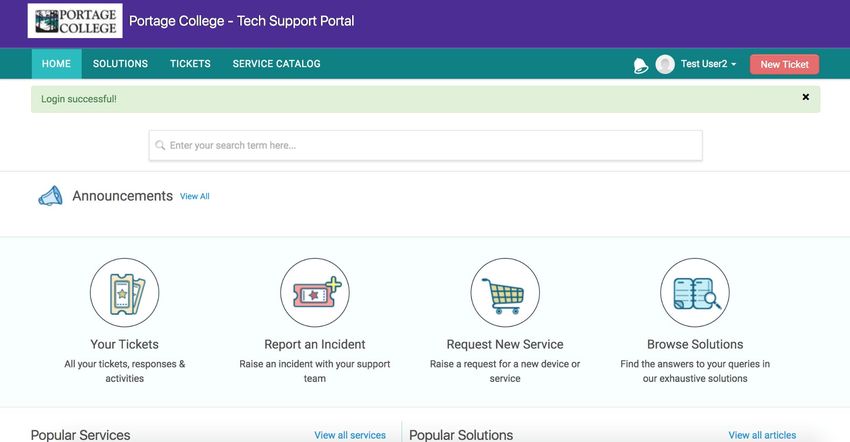
First Time Logging In On Campus
Next you will be prompted to answer two security questions.
Choose two different
questions from the drop
down menus and enter
your responses in the
“Your Answer” fields.
Click Save when done.
Tip: For security
reasons, try to use two
questions that you have
not used for any other
account(s).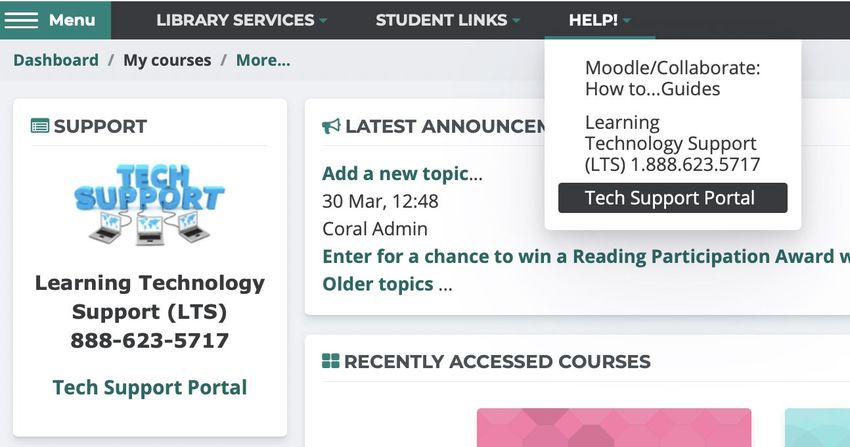
First Time Logging In On Campus
You will be prompted to login again. At the login screen you must select the
OTP method.
From the drop down menu choose:
“OneLogin Security Questions”
160987
From the drop down menu choose
“OneLogin Security Questions”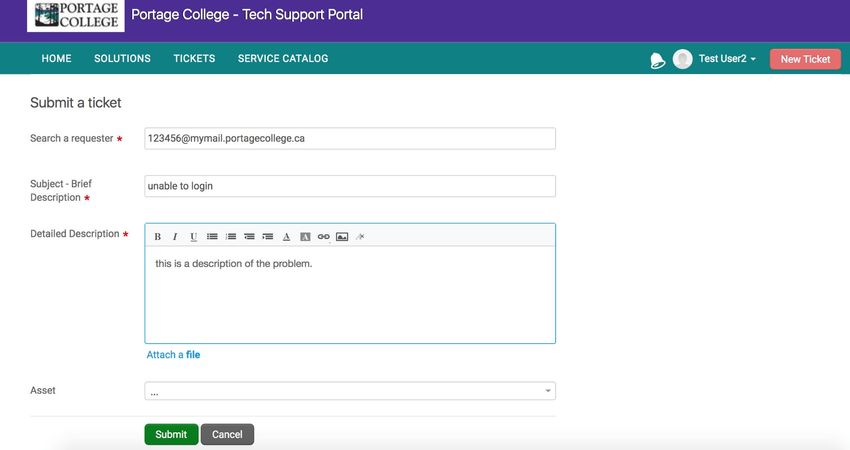
First Time Logging In From Home
Go to: www.portagecollege.ca
(you can also go directly to the login page: portagecollege.onelogin.com).
Scroll down and click on
From the next screen, click on again.
Username is your student ID number i.e. 123456.
Initial password is # + first initial + last initial + @ + year of birth.
For example, a student named Taylor Swift with a student ID of 123456
born in 1989 will have an initial password of: #ts@1989
You will now be prompted to change your password.
The new password must be 8 characters long.
You cannot use any of your 5 previous passwords.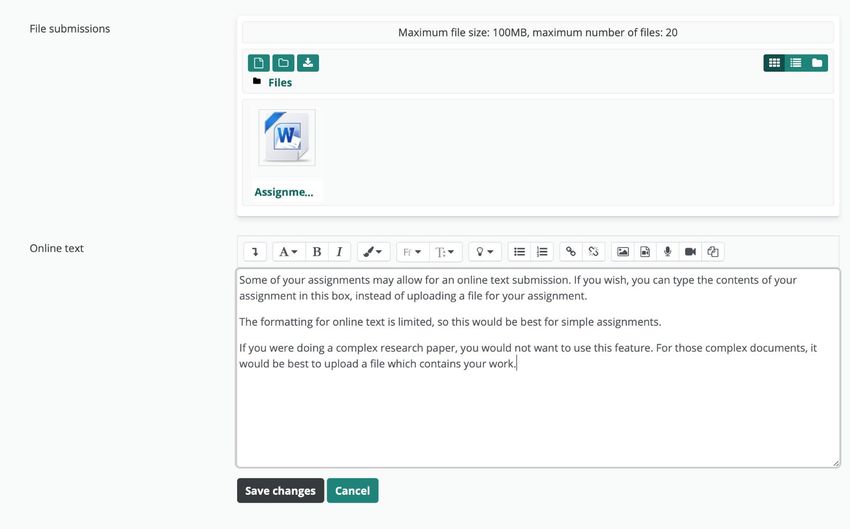
First Time Logging In From Home &
Security Setup
1. Click Begin Setup   2. Choose your Authentication Factor by clicking
                       on the + next to the method you would like to use.
                       (OneLogin Protect requires an app to be installed
                       on your mobile device.)
First Time Logging In From Home
& Security Setup
1. Choose your first      2. Provide an answer             3. Choose your second   4. Provide the answer
question.                 that will be easy to             question.               for this second
                          remember.                                                question.

                       Tip: For security reasons, try to
                       use two questions that you have
                            not used for any other
                                 account(s).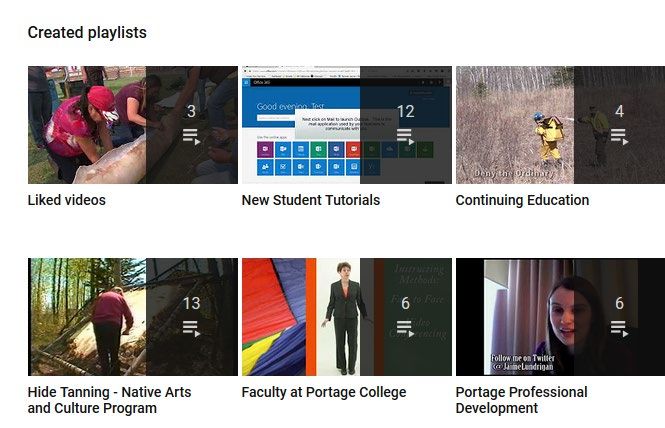
First Time Logging In From Home
& Security Setup
You will now be prompted to change your
password
After you change your initial password you
will be prompted to login again to confirm the
changes.
Look for the word Match! to confirm that the
New Password matches what is retyped in the
Confirm New Password field.
If you don’t see Match! You will have to try again.Forgot Your Password?
If you have forgotten your password you can reset it
Click on FORGOT PASSWORD at the login screen
You will be asked to enter your college user ID
You will be asked to choose your authentication factor
In this example, One Login Security Questions was the
authentication factor used; therefore, the user was asked
to answer their security questionsMoodle
Moodle To access Moodle, from your portal page click on the Portage Moodle icon.
Policy acceptance forms
When you login to Moodle you will be presented with our student policies. The
Student Registration and Student Information Technology Responsibilities
policies are mandatory. The Photo Release policy is optional. After completing
these policies you will see your Moodle dashboard.Policy acceptance forms Select “Next”
Policy acceptance forms Select “Next”
Policy acceptance forms
Check the boxes next to the policies to accept. Choose to agree or decline the
Photo Release policy. Select “Next” to complete the policy agreementsMoodle Dashboard Moodle messages
can be access here.
If you Down Arrow: Scroll to the bottom of the page
need help Envelope: Opens mail app
File: Opens your Word, Excel and PowerPoint
with Tree: Takes you to the Portage website
Moodle. LinkedIn: Opens your LinkedIn Learning account
YouTube: Opens YouTube
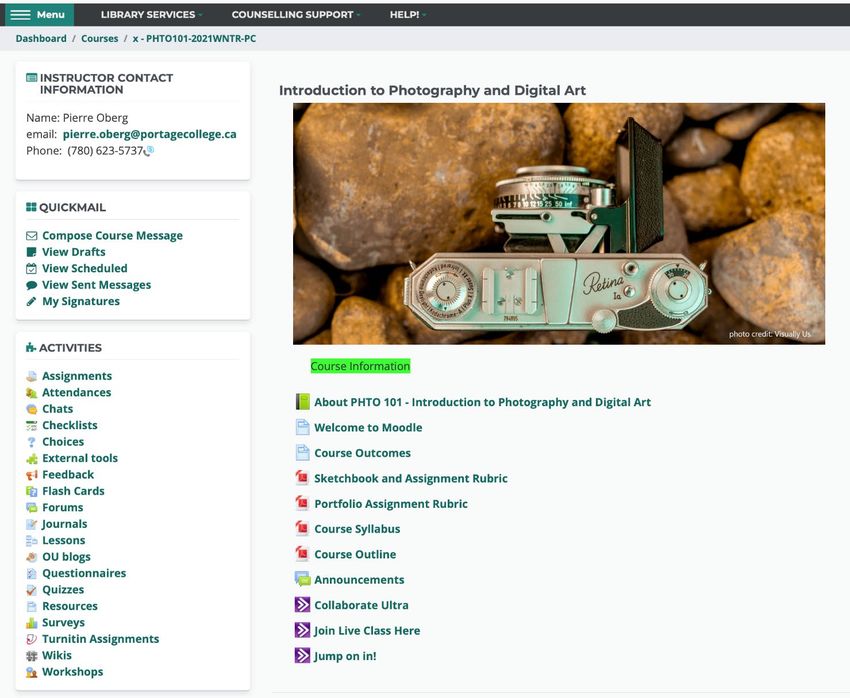
All your courses are You can customize these
located in the Course blocks. Your Dashboard
Overview. may look slightly different
than the default
Online tutoring.Moodle Dashboard cont.
If you click on the
menu button, the
navigation block will
appear in the pop-out
menu on the left.
Always check the Latest
Announcements block
for important site
information.Moodle Dashboard cont. This block has quick links to self-enroll
courses. Moodle - Student Resources
can be referenced at any time.
Click this button, to change
which courses will appear.
All: Shows both previously
taken AND current courses.
Click the Tech
In progress: Shows courses
Support image to
you are currently taking.
place a support
Future: Will show you the
ticket.
courses that are registered
in but have not yet started.
Past: Will show you the
courses previously taken.
Starred: Will display
courses that you have
chosen as your favourite(s).
Removed from view: Will
show courses you have
previously removed from
your list.Collaborate Ultra
Collaborate Ultra: joining a session.
From your Moodle course page click on the Collaborate activity.
The session may be named differently
By your instructor; however, the icon
will always remain the same for your
live or recorded classes.Collaborate Ultra: joining a session cont.
Once you have selected a session, this
pop-out menu will appear. Click “Join
session” to join.
Choose the session you wish to join.
For example: Week 1 ClassesCollaborate Ultra: joining a session cont.
Click on the purple
icon to have access to
the chat menu and
settings.Collaborate Ultra Viewing A Recording.
From your course page click on the collaborate link
Click on the three bar drop down menu located on the left
Select the Recording options. All the course recordings
will be shownMoodle Uploading an Assignment
Uploading An Assignment To Moodle

                            The Assignment Activity is identified by
                                 a hand holding a piece of paper.

                                 Locate your
                                assignment
                              within your course
                               and click on this
                                     icon
Uploading An Assignment To Moodle cont.
Read the instructions carefully on
what is required to complete the
assignment.
Submission due date.
Click the Add submission
button when you are ready to
upload your file.Uploading An Assignment To Moodle
Next you will be prompted to upload your file. There are two ways to do this.
Once your file
has been
uploaded, it
will appear in
this box.
1. You can drag your file into this area.
Alternatively, click on the file or folder icon
to open the file picker. Your
instructor may
enable online
text
submissions
Click on
Choose file to
select the
document to
be uploaded.
Note: You
must type a Once you are satisfied with your file upload or
name in the online text submission, click Save changes to
save as box. proceed to the submission screen.Uploading An Assignment To Moodle
Click Edit submission to make changes to your text or
choose a different file.
If you choose to abandon this submission, click Remove
submission to delete it.
There may be a time limit on this in some courses.
Otherwise click Submit
assignment. Once you have read this statement and
agreed to it, click to place a checkmark in the
box, then click continue.Uploading An Assignment To Moodle You will receive a confirmation of your file submission.
Papercut – Printing
Paper Cut: Adding More Money
Note: Paper Cut is not accessible through the SSO portal, you must login directly
through the Paper Cut utility. Printing is only available through a college
computer. You can purchase more Paper Cut credits from the book store.
1. From the bottom right hand corner 3. Once logged in click on Redeem
of the screen (thin clients) click the two Card in the side bar and enter the code
small up arrows from your paper cut card into the card
number box.
Then click on the Press Redeem Card when done.
2.Click on Details to bring up the login screen
and login with your Portage College credentials.Office 365
Office 365
Your Portage College email address is:
Your student ID # @ mymail.portagecollege.ca
For example 123456@mymail.portagecollege.ca
Your instructors will use this email address for online communications.
To access the mail application Outlook go to your portal page and click on
Office 365. If you are already in Moodle, click on the envelope icon in the
upper right corner of the menu bar to open your email.Office 365
Note: The first time you login to O365, a tutorial will appear that will show you
about the apps and features available.Office 365
This is the Office 365 main page. From here you can access your student mail
account as well the online version of productivity apps, such as Word, Excel and
PowerPoint.
Additionally, you can install the whole office 365 suite on up to 5 computers.
Both macOS and Windows are supported.
Click the Install Office button
to show this menu, then click
Office 365 apps to begin the
process
Note: If you already have Office on
your computer, you must first
uninstall your current version before
proceeding.
You always have access to Office 365
online even if you don’t install the
desktop version.Linkedin Learning
Linkedin Learning
in LEARNING is a fantastic resource that provides training on a wide variety of
software applications as well as tutorials on other topics you might find interesting,
like digital photography. If you need a little brushing up on your Microsoft Word or
Excel skills, Linked in Learning is the place to go. You can access the site from your
computer or mobile device.
in LEARNING is available through your Student Portal page. Follow the directions
below to get started.
Click the Linkedin
Learning link to begin.LinkedIn Learning cont.
When Linkedin Learning first loads, you will be presented with a screen that gives
you the option to Connect your Linkedin account, or continue without one.
In our example, we will choose “Continue without Linkedin”
When your account is setup, click “Sounds good” to proceed.LinkedIn Learning cont. Choose 3 topics that you are interested in, then click continue. Next choose your weekly learning goal, then click set goal. Once your goals have been set up you can click Start learning to load the main page.
LinkedIn Learning cont.
To log out of Linked in,
You will now be logged in to the Linkedin Learning site. click here.
For assistance with Linkedin Learning, click on the Get Help button.Submitting a Technical Support Ticket
Submitting a Technical Support Ticket
To submit a ticket, click on the Tech Support Portal.
Directly from
Moodle.
From the OneLogin
portal.Submitting a Technical Support Ticket
To Open a ticket click on New Ticket.
Click here to
create a new
ticket.Submitting a Technical Support Ticket
Fill in the required fields and click Submit.
Include your full course name and a
number where you can be reached.
Once a ticket is submitted,
you will receive a
You can also attach a screen shot.
confirmation e-mailChecking your opened Ticket
ON the main page, click on this icon:
All of your tickets
will appear hereChecking for solution
ON the main page, click on this icon:
The Solutions
Page will be
presented with
various solutions to
common issues and
questions. Just click
on a subject line to
read the proposed
solution.Portage College YouTube Channel
You can also find some How To Video’s on our YouTube Channel.
https://www.youtube.com/user/EddieRocksPC/featured
From our YouTube channel click on
Playlists or you can access it directly from
Moodle.Portage College YouTube Channel
Next click on New
Student Tutorials
to begin viewing the The existing playlist includes:
recordings.
• First Time User Log In Setup
• Tech Support portal
• Accessing Office 365
• Moodle Profile
• Accessing Moodle quiz
• Using
Moodle messaging
• Collaborate Ultra
• Papercut
• LinkedIn LearningStaff and Student Access to Wireless
Network.
Portage College provides wireless internet access at all Enter your Portage College username and password,
campuses for Staff/Student personal devices. You may and click on continue. Wait for the progress bar to
only connect 5 devices at a time. complete at the bottom of the page.
To connect, please select the WIFI network Portage-
Internet (Portage-Internet is a secure
network) and if a browser window does not pop-
up, open an internet browser following the
appropriate instructions below.
You will now have access to the internet.Adding Your Gaming Console or Media
Player in Portage College Housing.
Residents will need to be registered on the Wi-Fi network prior to attempting to add other devices.
In order to connect a gaming console to the Portage-Internet, the console must be registered. Please use a registered
device to navigate to: “https://pf.portagecollege.ca/device-registration” and use the following directions.Removing Registered Devices From Your
Student Wi-Fi Profile
If you are unsuccessful at registering your personal device to Portage College’s Wi-Fi, you may have too many personal devices
currently registered. Please note that you are allowed to register 5 personal devices under your Portage College student ID.
To unregister a device or multiple devices that are currently registered under you student ID, please complete the following
steps:
Please use a registered device to open a web browser window and navigate to:
https://pf.portagecollege.ca/device-registration.
< Review your listed, registered devices. Select
the device(s) you wish to 'Unregister' >Removing Registered Devices From Your
Student Wi-Fi Profile
If you are unsuccessful at registering your personal device to Portage College’s Wi-Fi, you may have too many personal devices
currently registered. Please note that you are allowed to register 5 personal devices under your Portage College student ID.
To unregister a device or multiple devices that are currently registered under you student ID, please complete the following
steps:
Please use a registered device to open a web browser window and navigate to:
https://pf.portagecollege.ca/device-registration.
the device(s) you wish to 'Unregister' >You can also read