WebACD Inbox User Guide - for Support Center - Version 3.5
←
→
Page content transcription
If your browser does not render page correctly, please read the page content below
WebACD Inbox User
              Guide
              for Support Center

Version 3.5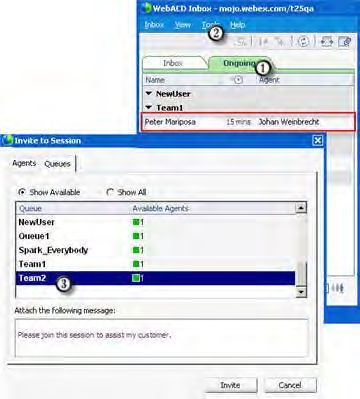
Copyright
© 1997–2010 Cisco and/or its affiliates. All rights reserved. WEBEX, CISCO, Cisco WebEx, the CISCO logo, and the Cisco WebEx
logo are trademarks or registered trademarks of Cisco and/or its affiliated entities in the United States and other countries. Third-party
trademarks are the property of their respective owners.

U.S. Government End User Purchasers. The Documentation and related Services qualify as "commercial items," as that term is
defined at Federal Acquisition Regulation ("FAR") (48 C.F.R.) 2.101. Consistent with FAR 12.212 and DoD FAR Supp. 227.7202-1
through 227.7202-4, and notwithstanding any other FAR or other contractual clause to the contrary in any agreement into which the
Agreement may be incorporated, Customer may provide to Government end user or, if the Agreement is direct, Government end user
will acquire, the Services and Documentation with only those rights set forth in the Agreement. Use of either the Services or
Documentation or both constitutes agreement by the Government that the Services and Documentation are commercial items and
constitutes acceptance of the rights and restrictions herein.

Last updated: 042310

www.webex.com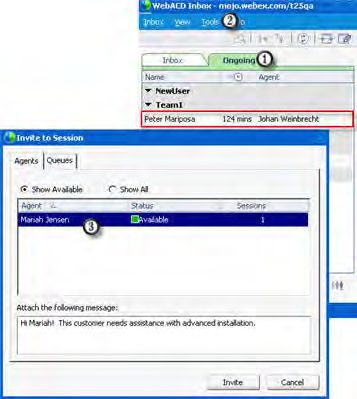
Table of Contents
Chapter 1 Setting up WebACD Inbox .......................................................................... 1

     Downloading WebACD ............................................................................................. 2

          Entering your account information ...................................................................... 2

     Working with queues ................................................................................................. 4

          Viewing your assigned queues ........................................................................... 4

          Viewing ongoing support sessions...................................................................... 5

     Setting your preferences ........................................................................................... 5

          Setting global inbox start-up preferences ........................................................... 6

          Setting individual Inbox preferences ................................................................... 6

Chapter 2 Handling WebACD queues ....................................................................... 11

     Starting WebACD .................................................................................................... 11

     Customizing your view ............................................................................................ 12

          Viewing customer details .................................................................................. 13

     Managing your work flow ........................................................................................ 14

          Accepting the next request automatically ......................................................... 14

          Changing your status ........................................................................................ 14

          Handling your personal queue .......................................................................... 15

          Getting more details about your customer ........................................................ 16

          Inviting other agents to join your session .......................................................... 17

                                                                                                                           i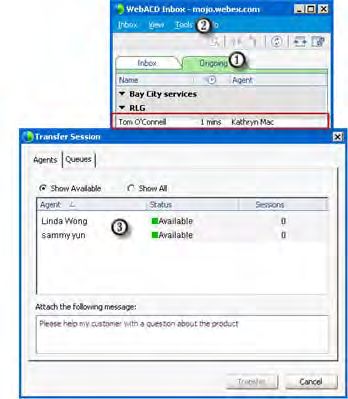
Transferring a session to another agent ........................................................... 18

            Adding and removing URLs (sites) ................................................................... 20

            Troubleshooting accounts ................................................................................. 22

Index ............................................................................................................................. 23

ii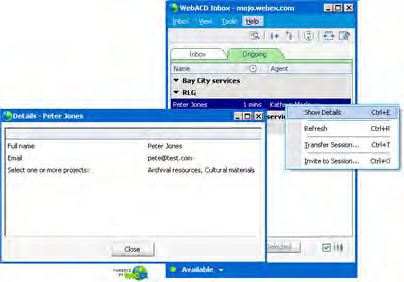
1
Setting up WebACD Inbox
Chapter 1
Using WebACD, you have quick and easy access to customer requests.
WebACD provides a number of tools that help you respond to requests from
customers and clients. For instance, your site administrator may assign a pool of
agents to a queue to handle questions about a product that has one or more features, or
your site administrator can assign agents in one or more queues to support particular
products.
Before you can begin to assist customers, you must first install and set up WebACD
Inbox.
Download WebACD More… (on page 2)
Set up your accounts More… (on page 2)
Set your global and individual preferences
More… (on page 5)
1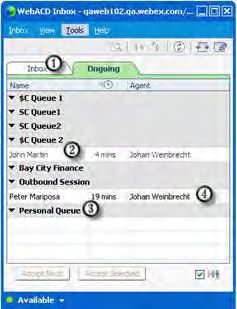
Chapter 1: Setting up WebACD Inbox
Downloading WebACD
To download WebACD
1 Go to your WebEx Meeting Center site.
2 On the left navigation bar, under Support, click Downloads.
3 Under WebEx WebACD Inbox and Monitor, click Download now.
4 Follow the installation instructions.
The Account Setup window appears.
You do not need to enter http://
when you enter your site URL
More… (on page 2)
Entering your account information
WebACD uses your WebEx site URLs to identify you and route requests to you. The
first time you download WebACD Inbox, you provide a URL and your username and
password.
Your site administrator or manager supplies you with the details you need to get
started in responding to requests in your assigned queues:
account names (URLs) for the sites you work with
your username
your password
You enter this information once, your queues become available, and you are set up to
handle calls immediately. Once you are in a session, other features allow you to invite
a customer or another colleague to join the session, or to transfer the session to one or
more agents.
2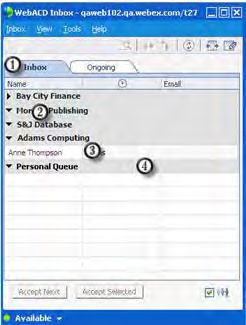
Chapter 1: Setting up WebACD Inbox
You do not need to enter http://
when entering your site URL.
After you enter your site URL, username and password, you log in automatically to
your WebACD Inbox.
As a WebACD agent, you can view incoming
customer requests, and session activity on
ongoing support sessions in queues assigned
to you by your administrator.
You can view incoming customer requests
for your queues in the Inbox tab. More…
(on page 4)
You can view ongoing support sessions in
the Ongoing tab. More… (on page 5)
Tip: As a shortcut to WebACD, you can double click the WebACD icon on the Windows taskbar
to show one or more Inboxes:
If you have only one Inbox, WebACD immediately shows it.
If you have multiple Inboxes, WebACD displays a dialog box with a list of Inboxes.
3
Chapter 1: Setting up WebACD Inbox
Working with queues
As a WebACD agent, you can view incoming customer requests, and session activity on ongoing support sessions in
queues assigned to you by your administrator.
You can view incoming customer requests for your queues in the Inbox tab. More… (on page 4)
You can view ongoing support sessions in the Ongoing tab. More… (on page 5)
Viewing your assigned queues
The Inbox tab displays any incoming requests from customers waiting in your
queues.
Incoming requests appear in two types of queues:
Assigned queue—requests from customers to the support center. More… (on page
14)
Personal queue—requests from customers to you personally. More… (on page 15)
Inbox tab
List of assigned queues
Customer waiting in this queue
Your personal queue
4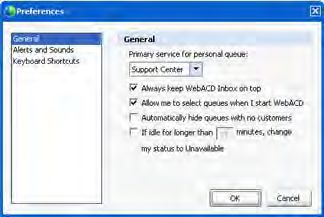
Chapter 1: Setting up WebACD Inbox
Viewing ongoing support sessions
The Ongoing tab displays all customers in current support sessions for each queue
assigned to you.
In addition, you can view current outbound support sessions—support sessions that
are started by you or other representatives to contact and assist customers.
List of assigned queues
support session currently in progress in this queue
Your personal queue
Support session started by a representative to assist a
customer
Setting your preferences
Set up WebACD to match your work style.
With one or more inboxes, you can get a fast start by having having all inboxes
launch when you start your computer, or you can start inboxes individually
yourself. More… (on page 6)
For each inbox you maintain, you can set individual preferences. More… (on page
6)
5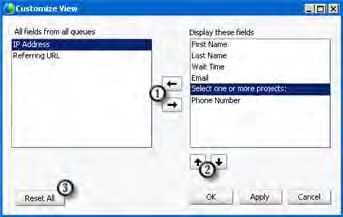
Chapter 1: Setting up WebACD Inbox

Setting global inbox start-up preferences
             To set global preferences
             1   Go to the Windows taskbar.
             2   Right-click the WebACD icon.

                                                    WebACD Inbox icon on the Windows taskbar

                                                    Choose preferences

             The Preferences dialog appears.

                                                               If you have elected to start WebACD
                                                               automatically, you can specify what tools
                                                               you want to show at startup.
                                                               WebACD saves your username and
                                                               password and supplies them to the
                                                               WebACD Inbox when you start your
                                                               computer.

Setting individual Inbox preferences
             If you want to set preferences for an individual WebACD inbox, open the Preference
             dialog box for that WebACD Inbox.

             To set individual inbox preferences
             1   On the menu bar of the WebACD Inbox, click Inbox, then choose Preferences....
                 The Preferences dialog box appears.
             2   Select the preferences you want to include.
                 You can change your individual Inbox preferences at any time.

6
Chapter 1: Setting up WebACD Inbox
You can set individual Inbox
preferences as follows:
General More… (on page 7)
Alerts and Sounds More…
(on page 8)
Keyboard Shortcuts More…
(on page 8)
General Preferences
You can set the following general preferences for any individual WebACD Inbox:
Preference Description
Primary service for personal If your company uses WebACD for both Support Center and WebEx
queue Sales Center sessions, select the service for which you will be
monitoring queues.
Always keep WebACD Inbox If you have a lot of applications open on your desktop, have
on top WebACD move your Inbox so it is always on top and visible.
Allow me to select queues Select specific queues you want to view each time you start your
when I start WebACD Inbox.
If you do not select this option, the Inbox shows the queues you
selected the previous time you launched WebACD.
Automatically hide queues Opt to see only queues with customers. If you select this option, and
with no customers a customer joins a "hidden" queue, that queue becomes visible.
If idle for more than X Sets status to "Unavailable" automatically.
minutes, change my status
If you forget to set your status manually (for example, "out to lunch"
to Unavailable
or "away from my desk"), the Inbox sets your status to unavailable
on your behalf. Enter the number of minutes you want to wait before
WebACD displays "Unavailable" as your status.
7Chapter 1: Setting up WebACD Inbox
Alerts and Sounds Preferences
You can set alerts and sound preferences for any individual WebACD Inbox. These
preferences take effect when a customer joins one of your queues.
Preference Description
Blink window if minimized Causes Inbox icon to blink.
If you have minimized the Inbox, its icon blinks on the taskbar at
the bottom of the desktop
Bring window to front Displays your Inbox on top of other applications.
If your Inbox is hidden behind other application windows, it
appears on top of other windows.
Play sound Select a sound to play each time a customer joins.
Click Browse to select a different file. You must select a file with
a .wav extension.
Click the Play button to listen to the sound.
Keyboard Shortcuts preferences
Use the preset keyboard shortcuts or set your own.
To set keyboard shortcuts:
1 On the menu bar of the WebACD Monitor, click Monitor, then choose
Preferences.
The Preferences dialog appears.
2 Click Keyboard Shortcuts.
The Keyboard Shortcuts pane appears.
Preference Description
Enable keyboard Use the key combinations (either preset or the alternative you have set)
shortcuts as shortcut keys.
Use combinations of these special keys (the Ctrl, Alt, or Shift key) to
Control form different shortcuts, if you do not want to use the preset key
combinations.
Alt
Type the letter or symbol in the box next to the Set Key button.
Shift
Note You enable all or no shortcut keys.
8Chapter 1: Setting up WebACD Inbox
92
Handling WebACD queues
Chapter 2
WebACD Inbox is flexible in meeting your needs for viewing, managing, and
monitoring your queues and service requests.
WebACD Inbox What you can do
receive customer requests automatically
More… (on page 14)
customize your view to see as much or as
little customer details as you like More…
(on page 16)
use your personal queue to allow
customers to reach you for follow-up
assistance More… (on page 15)
get help from another agent in assisting a
customer More… (on page 17)
transfer a request to another agent
More… (on page 18)
add additional WebACD Inboxes to
manage requests from other sites (URLs)
More… (on page 20)
understand errors with accounts you have
set up More… (on page 22)
Starting WebACD
If you chose not to have your Inbox start automatically when you start your computer,
you can easily launch it from the Windows taskbar.
11Chapter 2: Handling WebACD queues
To open your WebACD Inbox:
1 Go to the Windows taskbar.
2 Right-click the WebACD icon.
On the pop-up menu,
choose Show WebACD
Inbox
One of the following occurs:
Your inbox appears, with the list of queues you have selected to view
A dialog box appears with a list of your available inboxes. Select one or more
Inboxes for viewing.
Tip: As a shortcut to WebACD, you can double click the WebACD icon on the Windows taskbar
to show one or more Inboxes:
If you have only one Inbox, WebACD immediately shows it.
If you have multiple Inboxes, WebACD displays a dialog box with a list of Inboxes.
Customizing your view
At times, you may want to check the traffic in other queues; at other times, you may
want to see just the details about your current session. WebACD has features that
allow you to see as much detail as you need for your current task.
To see all customers in all queues:
On the View menu, choose Expand All.
To hide the list of customers waiting in your queues:
On the View menu, choose Collapse All.
12Chapter 2: Handling WebACD queues
Viewing customer details
You can choose which details about customers you want to view in the Inbox tab of
your WebACD Inbox.
To select the information you want to see in your Inbox tab:
1 On the View menu, choose Customize View.
2 Using the arrows, select the fields you want to see.
Use these arrows to select the
fields you want to view.
Use these arrows to change the
order of fields in the Inbox.
Click Reset All to display the
default settings.
This example shows how the selected fields appear on the Inbox tab.
Column views
set in the
Customize
View dialog box
To display all columns in your Inbox tab:
On the View menu, choose Show All Fields.
Tip: To quickly see all details about a customer, right-click the customer in your inbox and
choose Show Details.
13Chapter 2: Handling WebACD queues
Managing your work flow
WebACD provides a number of features for managing incoming support requests:
accept customer requests automatically and speed up service in your queue
More… (on page 14)
switch your status between Available and Unavailable to manage traffic flow to
your queue More… (on page 14)
use your personal queue to help customers reach you on ongoing support issues
More… (on page 15)
View more detailed information about your customer More… (on page 16)
invite another agent to join your session to assist your customer More… (on page
13)
transfer a customer session to another agent for handling More… (on page 18)
Accepting the next request automatically
If you want to move quickly to the next customer, you can set your Inbox to "Auto-
Accept" the next request. After you complete a support session, WebACD detects that
you are available and displays a message, letting you know that a customer is waiting
in one of your queues. Simply click Yes to accept the new request. No need to check
your queue; your new session starts immediately.
To "Auto-Accept" requests:
On the Inbox menu, choose Auto-Accept ON.
If you do not respond to the message or you click No, WebACD sends this request to
other agents who are available.
Changing your status
If you are not able to handle requests, you can keep customers from waiting in your
queue by setting your status to "Unavailable."
To switch your status between "Available" and "Unavailable:"
On the Inbox menu, choose Change My Status > Unavailable.
To switch back, on the Inbox menu, choose Change My Status > Available.
14Chapter 2: Handling WebACD queues
Handling your personal queue
Your personal queue facilitates handling issues that require your staying in contact
with a particular customer. This queue is very useful if a customer needs to get in
touch with you personally to close an issue or receive follow-up assistance. When you
determine that a customer may need to contact you on an ongoing support issue, you
provide your personal URL to that customer.
WebACD creates this URL for you automatically, using the site name and your
account name. Requests sent to your personal queue receive a higher priority than
requests in your other queues. You have one personal queue per site.
To view and copy your personal queue URL:
1 On the Inbox menu, choose Personal Queue URL.
A dialog box appears with the URL customers can use to contact you directly.
An example of a personal queue URL
2 Click Copy to Clipboard.
3 Paste the URL in a chat or other message and send it to your customer.
If the customer needs to contact you personally, he or she can paste this URL into a
browser window. More… (on page 15)
How WebACD manages requests in your personal queue
When a customer needs to contact you on an ongoing issue, the customer can paste
your personal queue URL into a browser window. The session request form displays
and the customer types the requested information, such as name and email address.
15Chapter 2: Handling WebACD queues
If a customer contacts you using your
personal URL, WebACD routes the request to
your personal queue and asks if you want to
accept, hold, or reject the request.
Option Action
WebACD displays the request immediately
Accept
Note This option only appears if your status is Available
Hold If you are busy, WebACD places this request at the top of your queue
Reject WebACD displays the Leave a Message form to customer
Getting more details about your customer
To find out more about a customer, right-click on his or her name in the queue. The
details page displays with the information typed on the entry form.
Right click on the
customer name and
then choose Show
Details.
16Chapter 2: Handling WebACD queues
Inviting other agents to join your session
If you need information or assistance from other agents, you can reach them quickly.
You can invite all agents assigned to a queue or invite particular agents from among
those available for that queue.
To invite all agents assigned to one queue:
On the Ongoing tab, select
the session for which you need
assistance.
On the Tools menu, choose
Invite to Session.
On the Queues tab, select
the queue of agents to invite to
this session.
Optional. Type a personal
message.
Your message can be up to
345 characters long.
You may only request agents in one queue to join.
Any available agent in the queue you have selected may join the session.
Agents with the Auto-Accept option can join from the message box that appears.
Tip: If you started the support session, select it from the Outbound queue, which lists sessions
started by you and other support representatives.
17Chapter 2: Handling WebACD queues
To invite one or more specific agents to join your session:
On the Ongoing tab, select
the session for which you need
assistance.
On the Tools menu, choose
Invite to Session.
On the Agents tab, select the
agent, or agents, to invite to this
session. Use the Shift key with
your mouse to select multiple
agent names.
Optional. Type a personal
message.
Your message can be up to
345 characters long.
Any available agent you have selected may join the session.
Agents with the Auto-Accept option can join from the message box that appears.
Tip: If you started the support session, select it from the Outbound queue, which lists sessions
started by you and other support representatives.
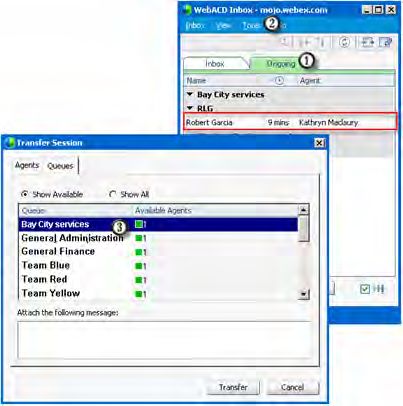
Transferring a session to another agent
You can use WebACD tools to transfer a customer session to one or more specific
agents or you can transfer the session to a queue of agents. Along with the session
transfer, you can include a message providing some relevant information about the
customer's request for assistance.
18Chapter 2: Handling WebACD queues
To transfer a session to all agents assigned to one queue:
On the Ongoing tab,
select the session to be
transferred.
On the Tools menu,
choose Transfer Session.
On the Queues tab,
select the queue you want
to transfer this session to.
Optional. Type a
personal message.
Your message can be
up to 345 characters
long.
Any available agent in the queue you have selected may accept this request.
Agents with the Auto-Accept option can accept the request from the message box
that appears.
After an agent accepts your request, your session closes.
Tip: If you started the support session, select it from the Outbound queue, which lists sessions
started by you and other support representatives.
19Chapter 2: Handling WebACD queues
To transfer a session to a specific agent:
On the Ongoing tab, select
the session to be transferred.
On the Tools menu, choose
Transfer Session.
On the Agents tab, select one
or more agents to transfer this
session to.
Optional. Type a personal
message.
Your message can be up to
345 characters long.
The agent responds to your request using the page WebACD displays.
Agents with the Auto-Accept option can accept the request from the message box
that appears.
If your request is not answered or refused, you may send a request to another agent.
Your session remains open until an agent accepts your request.
Tip: If you started the support session, select it from the Outbound queue, which lists sessions
started by you and other support representatives.
Adding and removing URLs (sites)
You may need to take requests from more than one site (URL). Your site
administrator sets up the queues for these added sites. You must add these URLs as
accounts in your WebACD Inbox. WebACD displays an Inbox for each valid URL.
20Chapter 2: Handling WebACD queues
To add a new URL (Account) to monitor:
1 Go to the Windows taskbar.
2 Right-click the WebACD icon.
Choose Accounts Setup to add or remove
accounts
3 In the Accounts Setup dialog box, click the Plus (+)button below the Accounts
box.
4 Type the site URL.
Your site administrator provides the site URL. This URL is also the Account
name and contains "webex" as part of it.
5 Type your user name and password for this site.
6 Click Add.
WebACD checks the information you have entered. If the URL and other details
are correct, this account is added. The queues you have been assigned to handle
appear automatically the first time you sign in to this new site.
The account name and the site
URL are the same.
If you no longer handle requests for a particular account (URL), you can remove it
from your WebACD Inbox.
21Chapter 2: Handling WebACD queues
To remove an account (URL):
1 Go to the Windows taskbar.
2 Right-click the WebACD icon.
Choose Accounts Setup to add or remove
accounts
3 In the Accounts Setup dialog box, select the account (URL) you want to delete.
4 click the Minus (—) button below the Accounts box.
5 Click Yes to confirm that you want to delete the account.
Troubleshooting accounts
If you see an account name in red on your list of accounts, WebACD has found a
problem with this account. To diagnose the problem, select the account. WebACD
displays the error message and some tips and information to help you resolve the
problem with this account.
22Index
A I
accounts • 20, 22 inviting • 17
adding new URLs • 20 other agents to join session • 17
removing URLs from Inbox • 20
troubleshooting • 22
M
adding • 20
new URLs (accounts) for requests • 20
alerts and sounds • 8
setting • 8
auto-accepting requests • 14 managing • 15
overview • 14 personal queue with WebACD • 15
setting up • 14
C O
Ongoing tab • 5
changing • 14 opening • 17
status to Available • 14 session to other agents • 17
status to Unavailable • 14 overview • 4, 5, 13, 14, 15
copying • 15 customizing Inbox • 13
personal queue URL • 15 managing work flow • 14
customers • 13 personal queue • 15
viewing details • 13 preferences • 5
customizing WebACD Inbox • 13 working with queues • 4
overview • 13
G P
password • 2
getting assistance • 17, 18 entering • 2
asking other agents to join session • 17 personal queue • 15
transferring request to specific agent • 18 managing with WebACD • 15
transferring session to other agents in queue • 18 overview • 15
personal URL • 15
overview • 15
preferences • 5, 7, 8
overview • 5
23setting alerts and sounds • 8 troubleshooting • 22
setting general • 7 accounts • 22
Q U
queues • 4, 5, 15 URLs • 15, 20
personal • 15 adding new (accounts) • 20
viewing assigned • 4 for personal queue • 15
viewing ongoing • 5 username • 2
viewing personal • 4 entering • 2
working with • 4
R W
WebACD Inbox • 2, 4, 5, 11, 13
removing • 20 customizing • 13
URLs (accounts) from Inbox • 20 downloading • 2
requests • 14 Inbox tab overview • 4
accepting automatically • 14 Ongoing tab overview • 5
managing • 14 starting manually • 11
WebEx site URL • 2
entering • 2
S
work flow • 14
managing • 14
selecting • 13
details to view • 13
session • 5, 17, 18
inviting other agents to • 17
transferring • 18
transferring to a specific agent • 18
viewing ongoing • 5
status • 14
changing to Available • 14
changing to Unavailable • 14
T
transferring • 18
request to a specific agent • 18
session to other agents in queue • 18
24You can also read