Privileged Remote Access 21.2 Access Console User Guide
←
→
Page content transcription
If your browser does not render page correctly, please read the page content below
Privileged Remote Access 21.2
                                 Access Console User Guide

©2003-2021 BeyondTrust Corporation. All Rights Reserved. Other trademarks identified on this page are owned by their respective owners. BeyondTrust is not a chartered bank or trust company, or   TC:8/30/2021
depository institution. It is not authorized to accept deposits or trust accounts and is not licensed or regulated by any state or federal banking authority.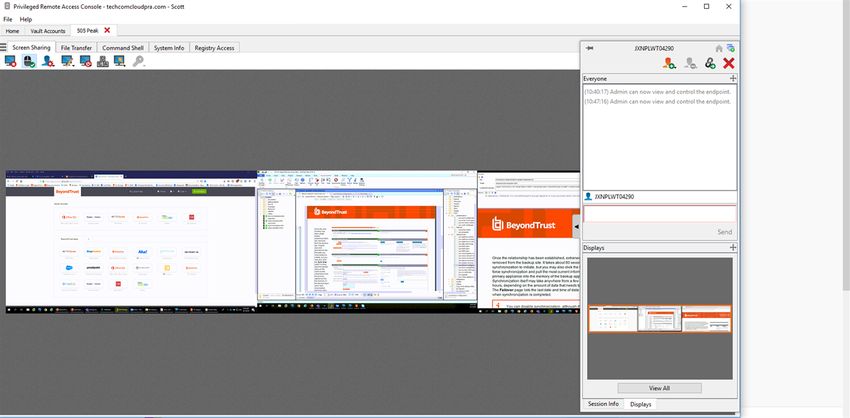
PRIVILEGED REMOTE ACCESS 21.2
ACCESS CONSOLE USER GUIDE
Table of Contents
BeyondTrust Access Console 4
Install the Access Console 5
Log into the PRA Access Console 6
Access Console User Interface 8
Change Settings and Preferences in the Access Console 9
Jump Interface: Use Jump Items to Access Remote Systems 12
Copy Jump Items 12
Jump to a Jump Item 12
Use Jump Clients to Access Remote Endpoints 17
Use Remote Jump for Unattended Access to Computers on a Separate Network 21
Use Local Jump for Unattended Access to Computers on Your Local Network 23
Use RDP to Access a Remote Windows Endpoint 25
Use VNC to Access a Remote Windows Endpoint 29
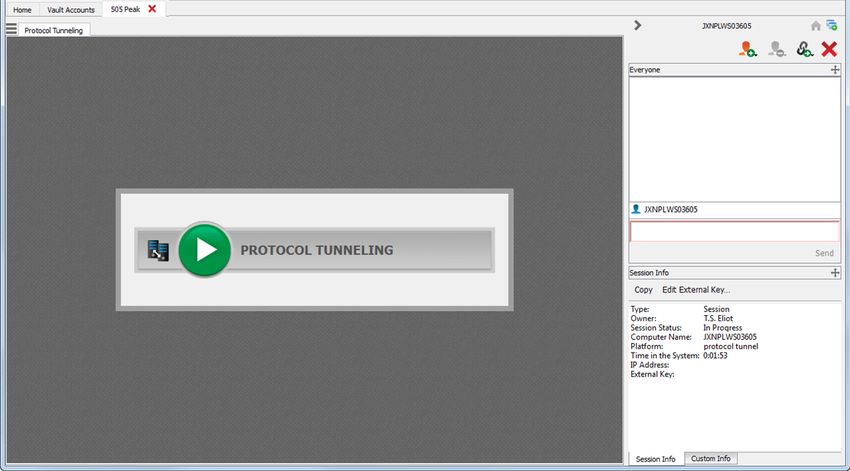
Use a Protocol Tunnel Jump to Make a TCP Connection to a Remote System 31
Use Shell Jump to Access a Remote Network Device 34
Use a Web Jump to Access Web Services 37
Create a Web Jump Shortcut 37
Use a Web Jump Shortcut 39
Use Credential Injection 40
Access Toolset 41
Access Session Overview and Tools 41
Log Into Remote Systems Using Credential Injection from the Access Console 43
Control the Remote Endpoint with Screen Sharing 48
Use Annotations to Draw on the Remote Screen of the Endpoint 51
View Multiple Monitors on the Remote Endpoint 53
File Transfer to and from the Remote Endpoint 55
Open the Command Shell on the Remote Endpoint Using the Access Console 57
View System Information on the Remote Endpoint 58
Access the Registry Editor on the Remote Endpoint 60
Session Management and Team Collaboration 62
View Active Access Sessions 62
SALES: www.beyondtrust.com/contact SUPPORT: www.beyondtrust.com/support DOCUMENTATION: www.beyondtrust.com/docs 2
©2003-2021 BeyondTrust Corporation. All Rights Reserved. Other trademarks identified on this page are owned by their respective owners. BeyondTrust is not a chartered bank or trust company, or TC: 8/30/2021
depository institution. It is not authorized to accept deposits or trust accounts and is not licensed or regulated by any state or federal banking authority.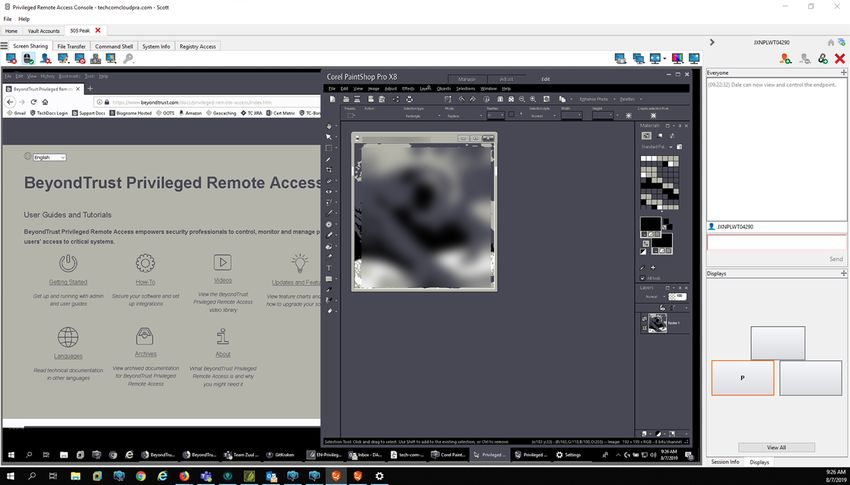
PRIVILEGED REMOTE ACCESS 21.2
                                                                                                                                                                  ACCESS CONSOLE USER GUIDE

                                      Use the Dashboard to Administer Team Members                                                                                               63
                                          Chat with Other Users                                                                                                                  64
                                          Share your Screen with Another User                                                                                                    65
                                          Share a Session with Other Users                                                                                                       67
                                          Chat with Other Users During a Shared Session                                                                                          68
                                          Use Extended Availability to Remain Accessible when Not Logged In                                                                      69

                                          Invite an External User to Join an Access Session                                                                                      70
                                      Ports and Firewalls                                                                                                                        71

SALES: www.beyondtrust.com/contact             SUPPORT: www.beyondtrust.com/support                 DOCUMENTATION: www.beyondtrust.com/docs                                                                   3
©2003-2021 BeyondTrust Corporation. All Rights Reserved. Other trademarks identified on this page are owned by their respective owners. BeyondTrust is not a chartered bank or trust company, or   TC: 8/30/2021
depository institution. It is not authorized to accept deposits or trust accounts and is not licensed or regulated by any state or federal banking authority.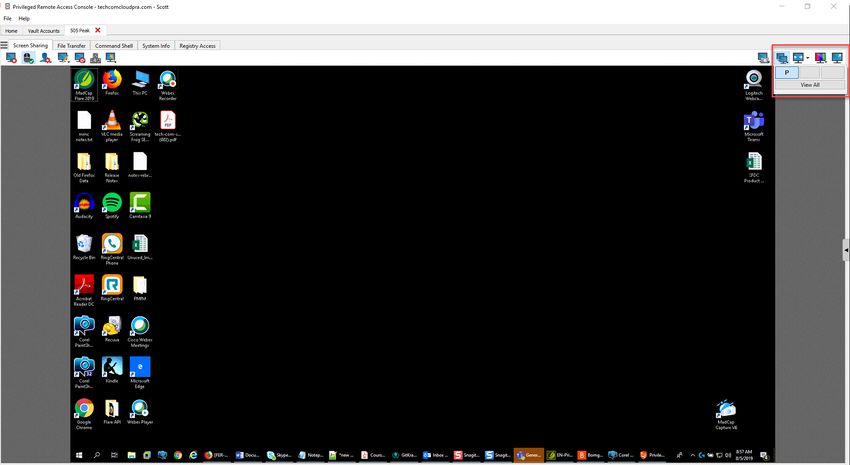
PRIVILEGED REMOTE ACCESS 21.2
                                                                                                                                                                  ACCESS CONSOLE USER GUIDE

      BeyondTrust Access Console
      This guide is designed to help you install the BeyondTrust access console onto your computer and understand the features of the solution.
      BeyondTrust Privileged Remote Access enables you to access remote endpoints by connecting to them through the BeyondTrust
      Appliance B Series.
      Use this guide only after an administrator has performed the initial setup and configuration of the B Series Appliance as detailed in the
      BeyondTrust Appliance B Series Hardware Installation Guide. Once BeyondTrust is properly installed, you can begin accessing your
      endpoints immediately. Should you need any assistance, please contact BeyondTrust Technical Support at
      www.beyondtrust.com/support.

SALES: www.beyondtrust.com/contact             SUPPORT: www.beyondtrust.com/support                 DOCUMENTATION: www.beyondtrust.com/docs                                                                   4
©2003-2021 BeyondTrust Corporation. All Rights Reserved. Other trademarks identified on this page are owned by their respective owners. BeyondTrust is not a chartered bank or trust company, or   TC: 8/30/2021
depository institution. It is not authorized to accept deposits or trust accounts and is not licensed or regulated by any state or federal banking authority.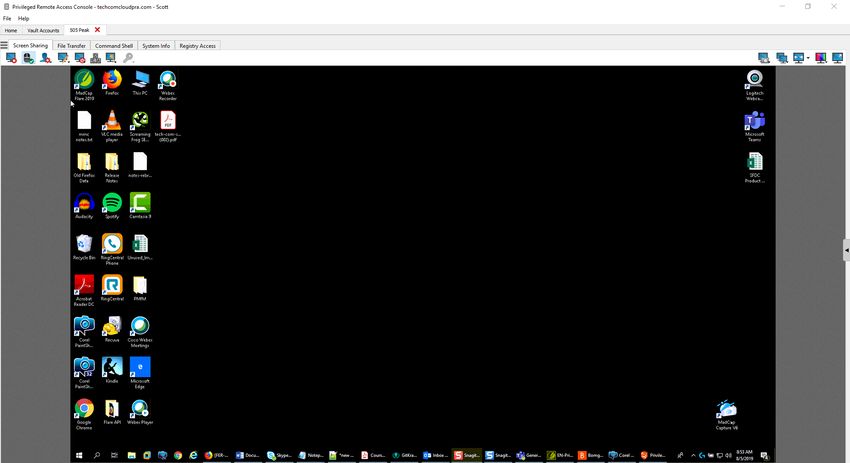
PRIVILEGED REMOTE ACCESS 21.2
                                                                                                                                                                  ACCESS CONSOLE USER GUIDE

      Install the Access Console
      In any web browser, go to the URL of your B Series Appliance followed by /login and enter the username and password set by your
      administrator. You may be prompted to change your password the first time you log in.
      From the My Account page, download and install the BeyondTrust access console. The option defaults to the appropriate installer for
      your operating system.

                   Note: On a Linux system, you must save the file to your computer and then open it from its downloaded location. Do not use
                   the Open link that appears after downloading a file from some browsers.

      When the installation wizard appears, follow the instructions to install the software. After installing the access console, you can choose
      Run BeyondTrust Access Console Now and/or Run at Startup. Then click Finish.

                   Note: If you choose Run BeyondTrust Access Console Now during installation, a login prompt appears on your screen.

SALES: www.beyondtrust.com/contact             SUPPORT: www.beyondtrust.com/support                 DOCUMENTATION: www.beyondtrust.com/docs                                                                   5
©2003-2021 BeyondTrust Corporation. All Rights Reserved. Other trademarks identified on this page are owned by their respective owners. BeyondTrust is not a chartered bank or trust company, or   TC: 8/30/2021
depository institution. It is not authorized to accept deposits or trust accounts and is not licensed or regulated by any state or federal banking authority.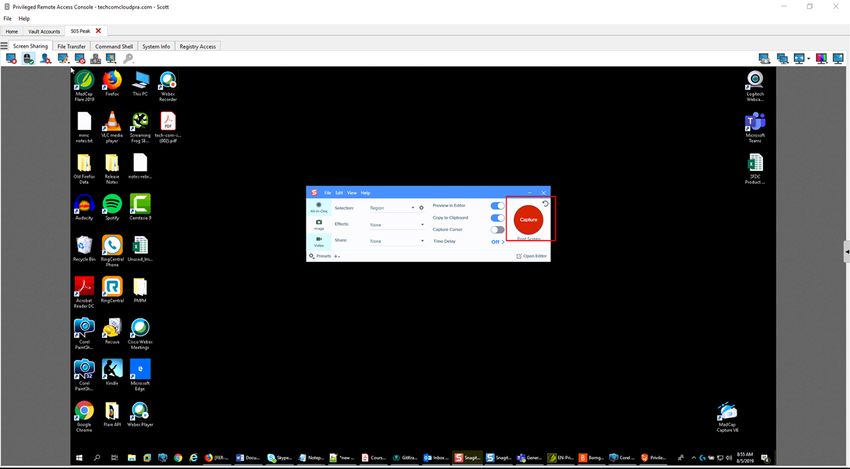
PRIVILEGED REMOTE ACCESS 21.2
                                                                                                                                                                  ACCESS CONSOLE USER GUIDE

      Log into the PRA Access Console
      After installing the BeyondTrust console, launch the access console from its
      directory location as defined during installation.

                   Note: By default, in Windows, you can access the console from
                   Start Menu > All Programs > Bomgar >
                   access.example.com, where access.example.com is the
                   hostname of the site from which you downloaded the console.

      If the Login Agreement has been enabled, you must click Accept to
      proceed.
      At the prompt, enter your username and password.
      If two-factor authentication is enabled for your account, enter the code from the authenticator app.

                   Note: If more than one language is enabled for your site, select the language you want to use from the dropdown menu.

                   Note: Users who receive email codes to log in are automatically upgraded to two-factor authentication (2FA), although they
                   may continue to use email codes until they register an app. Once they begin to use 2FA, the email code option is permanently
                   disabled.

      Alternatively, if your administrator has configured a Kerberos server to
      enable single sign-on, you can log into the console without entering your
      credentials. The access console remembers the last used login
      mechanism, whether it used local credentials, Kerberos, or another security
      provider.
      Invited users can also enter a session key to join a shared session on a
      one-time basis.

      Check Enable Saved Logins to have the console save your username and
      password. This option can be enabled or disabled from /login >
      Management > Security.
      Once you log in, the console opens, and a BeyondTrust icon appears in your computer's system tray.

                   Note: Your administrator may require you to be on an allowed network to log in to the console. This network restriction may
                   apply the first time you log in or every time. This restriction does not apply to access invites.

SALES: www.beyondtrust.com/contact             SUPPORT: www.beyondtrust.com/support                 DOCUMENTATION: www.beyondtrust.com/docs                                                                   6
©2003-2021 BeyondTrust Corporation. All Rights Reserved. Other trademarks identified on this page are owned by their respective owners. BeyondTrust is not a chartered bank or trust company, or   TC: 8/30/2021
depository institution. It is not authorized to accept deposits or trust accounts and is not licensed or regulated by any state or federal banking authority.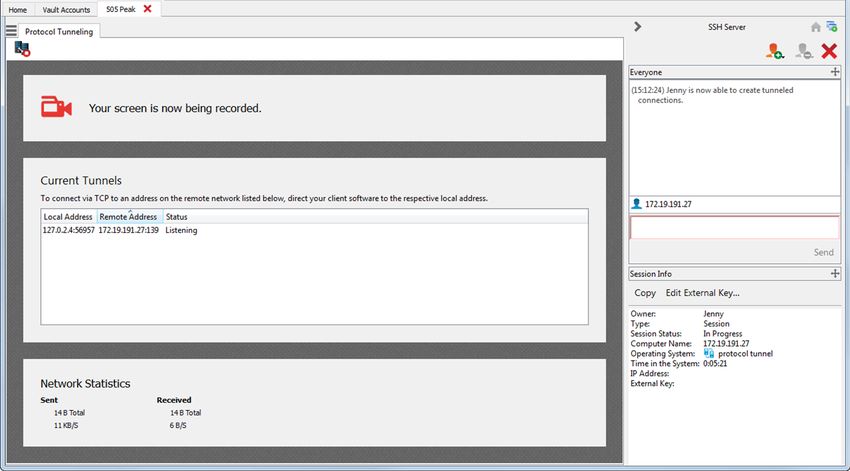
PRIVILEGED REMOTE ACCESS 21.2
                                                                                                                                                                  ACCESS CONSOLE USER GUIDE

                   Note: If you forget your password, go to /login and click the
                   Forgot Your Password? link. This is an option that is set by your
                   administrator. If you do not have this option, please contact your
                   administrator.

      If you lose your connection, the access console attempts to reconnect for
      60 seconds. If your connection is restored within this time, your access
      console reopens, restoring all of your open sessions. If the connection
      cannot be restored within this time, you are prompted to retry login or quit.
      If you are logged into the access console in one location and then log in
      from another, your open sessions are maintained.

                   Note: To log in with an account already in use and forcibly close the connection on the other system, the setting Terminate
                   Session If Account Is In Use must be checked on the /login > Management > Security page.

      After an upgrade or at first launch of the desktop access console, a What's New dialog appears automatically upon login for all non-
      invited users. This dialog may be viewed at any time through the Help menu (Help > What's New) and shows new release information for
      current and past releases. This is a roaming preference per account, so the dialog appears just once regardless where a user signs in
      from.

                   For more information, please see the following:
                       l  On setting up the login agreement, please see Site Configuration: Set HTTP Ports, Enable Prerequisite Login
                          Agreement at https://www.beyondtrust.com/docs/privileged-remote-access/getting-started/admin/site-
                          configuration.htm
                          l   On invited users, Invite an External User to Join an Access Session at https://www.beyondtrust.com/docs/privileged-
                              remote-access/getting-started/access-console/access-invite.htm

SALES: www.beyondtrust.com/contact             SUPPORT: www.beyondtrust.com/support                 DOCUMENTATION: www.beyondtrust.com/docs                                                                   7
©2003-2021 BeyondTrust Corporation. All Rights Reserved. Other trademarks identified on this page are owned by their respective owners. BeyondTrust is not a chartered bank or trust company, or   TC: 8/30/2021
depository institution. It is not authorized to accept deposits or trust accounts and is not licensed or regulated by any state or federal banking authority.
PRIVILEGED REMOTE ACCESS 21.2
                                                                                                                                                                  ACCESS CONSOLE USER GUIDE

      Access Console User Interface
      The access console contains several panels, providing tools and information about sessions.

      Sessions: Manage multiple remote sessions at the same time.

      Queues: Queues list sessions currently running as well as requests to share sessions with any member of a team. Details about the
      remote system being accessed appear in this section.
      Dashboard: Privileged users can view and monitor ongoing sessions and teammates of a lower role, providing administrative oversight to
      help manage staff.
      Jump Item Interface: Installed Jump Clients and Jump shortcuts appear here, grouped according to who can access them.
      Chat: Chat with other logged in users. You also can share your screen with a team member without requiring a session.

SALES: www.beyondtrust.com/contact             SUPPORT: www.beyondtrust.com/support                 DOCUMENTATION: www.beyondtrust.com/docs                                                                   8
©2003-2021 BeyondTrust Corporation. All Rights Reserved. Other trademarks identified on this page are owned by their respective owners. BeyondTrust is not a chartered bank or trust company, or   TC: 8/30/2021
depository institution. It is not authorized to accept deposits or trust accounts and is not licensed or regulated by any state or federal banking authority.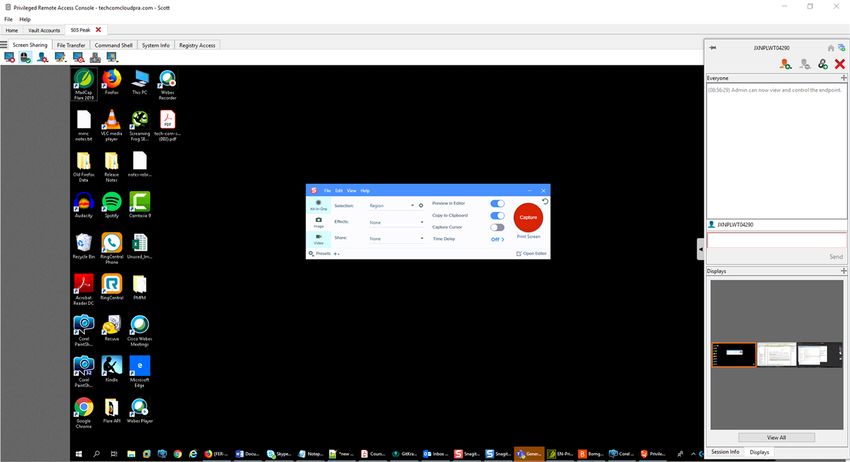
PRIVILEGED REMOTE ACCESS 21.2
                                                                                                                                                                  ACCESS CONSOLE USER GUIDE

      Change Settings and Preferences in the Access Console
      Click on File > Settings in the upper left-hand corner of the console to configure your
      preferences.
      In general, you may configure the console settings according to your preferences. However,
      your BeyondTrust administrator may choose to manage your settings, enforcing those
      managed settings if desired.

      If your BeyondTrust administrator has changed and applied the default settings, then you will
      see a Settings Changed alert the next time you log into your console. Click View Settings
      to open your settings window to view the changes, or click OK to acknowledge the changes.

      Changing Settings

                   Note: These instructions assume you are allowed to choose the settings used in your console. Settings enforced by your
                   administrator appear marked with an asterisk and grayed out, and they are not locally configurable. Please see your
                   administrator or the administrative guide access console settings topic for more information.

      The Access Console Settings window includes a Restore Defaults
      button in the lower left-hand corner of the window which returns all of your
      settings to the BeyondTrust default settings or to the default settings
      applied by your administrator if any have been set. An alert dialog asks you
      to confirm that you wish to change to the defaults. Click Cancel if you wish
      to return to your locally saved preferences.

                   Note: If any of the defaults are forced by your administrator, you are unable
                   to configure them.

      From the Global Settings section, you may choose to enable or disable
      spell check for chat. Currently, spell check is available for US English only.

      Choose if you want the session menu icon to display, if the sidebar can be
      detached, and if the widgets on the session sidebar can be rearranged and
      re-sized.

SALES: www.beyondtrust.com/contact             SUPPORT: www.beyondtrust.com/support                 DOCUMENTATION: www.beyondtrust.com/docs                                                                   9
©2003-2021 BeyondTrust Corporation. All Rights Reserved. Other trademarks identified on this page are owned by their respective owners. BeyondTrust is not a chartered bank or trust company, or   TC: 8/30/2021
depository institution. It is not authorized to accept deposits or trust accounts and is not licensed or regulated by any state or federal banking authority.
PRIVILEGED REMOTE ACCESS 21.2
                                                                                                                                                                  ACCESS CONSOLE USER GUIDE

      Choose your alert settings for chat messages. When you receive a chat
      message, you can choose to hear a sound and to see the application icon
      flash.
      If you would like to upload a custom sound for chat messages, click the […]
      button and select a WAV file on your computer. The file can be no larger
      than 1MB.
      Choose if the team chat should include status messages, such as users
      logging in and out, or only chats sent between team members.

      Choose if you want to receive pop-up notifications for messages received in
      a team chat and/or in a session chat.

      Choose if you want to hear an audible alert when another user requests to
      share a session with you. If you would like to upload a custom sound for
      shared sessions, click the […] button and select a WAV file on your
      computer. The file can be no larger than 1MB.
      You also can choose to receive pop-up notifications for certain events.
      These notifications will appear independent of your console and on top of
      other windows. Set where you wish to see pop-ups and how long they
      should display.

      Choose if you want to automatically start screen sharing when you begin a
      session.
      You can choose to open sessions as tabs in the console or to automatically
      detach sessions into new windows.

SALES: www.beyondtrust.com/contact             SUPPORT: www.beyondtrust.com/support                 DOCUMENTATION: www.beyondtrust.com/docs                                                                  10
©2003-2021 BeyondTrust Corporation. All Rights Reserved. Other trademarks identified on this page are owned by their respective owners. BeyondTrust is not a chartered bank or trust company, or   TC: 8/30/2021
depository institution. It is not authorized to accept deposits or trust accounts and is not licensed or regulated by any state or federal banking authority.
PRIVILEGED REMOTE ACCESS 21.2
ACCESS CONSOLE USER GUIDE
Set the default quality and size for a screen sharing session. When screen
sharing starts, you can automatically enter full screen mode, which in turn
can automatically collapse the chat bar.
Also when screen sharing starts, the remote system can automatically have
its display, mouse, and keyboard input restricted, providing a privacy
screen.
Select the default RDP display size for all RDP sessions.
An option allows you to open a PRA connection expanded across all the
monitors on the client computer regardless of the client monitor
configuration. With this feature, you can fully utilize all the monitors
connected to the client computer, therefore being able to adjust screen
sizing and scaling during an RDP session across multiple monitors.
If you want to use your own RDP tool, check Open remote RDP Sessions
with an External Tool.
For easier access to screenshots you capture from the console, set the default directory where you will save your console-captured
remote screenshots.
For easier file transferring, set the default directory from which you wish to start browsing your local file system.
Set the number of lines to save in the command shell history.
If you want to use your own SSH tool, check Open Shell Jump Sessions with an External Tool.
SALES: www.beyondtrust.com/contact SUPPORT: www.beyondtrust.com/support DOCUMENTATION: www.beyondtrust.com/docs 11
©2003-2021 BeyondTrust Corporation. All Rights Reserved. Other trademarks identified on this page are owned by their respective owners. BeyondTrust is not a chartered bank or trust company, or TC: 8/30/2021
depository institution. It is not authorized to accept deposits or trust accounts and is not licensed or regulated by any state or federal banking authority.PRIVILEGED REMOTE ACCESS 21.2
ACCESS CONSOLE USER GUIDE
Jump Interface: Use Jump Items to Access Remote Systems
The Jump interface appears in the bottom half of the access console, listing the Jump Items available to you. The list may contain both
active and passive Jump Clients, as well as Jump shortcuts for Remote Jumps, Local Jumps, RDP sessions, VNC sessions, Protocol
Tunnel Jumps, Shell Jumps, and Web Jumps.
Jump Items are listed in Jump Groups. If you are assigned to one or more Jump Groups, you can access the Jump Items in those groups,
with the permissions assigned by your admin. Selecting a Jump Group and then clicking Create auto-selects that Jump Group in the Jump
Item configuration window.
Your personal list of Jump Items is primarily for your individual use, although your team leads, team managers, and users with permission
to see all Jump Items may have access to your personal list of Jump Items. Similarly, if you are a team manager or lead with appropriate
permissions, you may see team members' personal lists of Jump Items. Additionally, you may have permission to access Jump Items in
Jump Groups you do not belong to and personal Jump Items for non-team members.
Copy Jump Items
Jump Items can be copied and can belong to multiple Jump Groups. This includes Jump Client items, providing administrators with the
ability to set separate policies and group permissions without requiring an additional Jump Client installation on the target endpoint. Users
with the appropriate permissions see the option to Copy Jump Items in the Access Console by right-clicking the item. Users can perform
this function on multiple Jump Items as well.
This feature enables admins and users to effectively manage different policies for Jump Items and Jump Clients without the need to create
a new Jump Item. This functionality enables users to limit the number of clients necessary to enable Jump Client sessions, and limits
manual administrative tasks when defining access pathways for users.
Jump to a Jump Item
Browse through groups for the computer you wish to access. To facilitate
browsing the Jump Items list, you may drag the columns into any order you
wish, and then sort a column by clicking the column header. The access
console remembers the column order and the sort order the next time the
access console is launched.
In addition to browsing for Jump Items, you can search based on multiple
fields. Enter a string in the search field and then press Enter. To change the
fields you are searching, click on the magnifying glass and check or
SALES: www.beyondtrust.com/contact SUPPORT: www.beyondtrust.com/support DOCUMENTATION: www.beyondtrust.com/docs 12
©2003-2021 BeyondTrust Corporation. All Rights Reserved. Other trademarks identified on this page are owned by their respective owners. BeyondTrust is not a chartered bank or trust company, or TC: 8/30/2021
depository institution. It is not authorized to accept deposits or trust accounts and is not licensed or regulated by any state or federal banking authority.PRIVILEGED REMOTE ACCESS 21.2
ACCESS CONSOLE USER GUIDE
uncheck any of the available fields. Searchable fields include Comments, Console User, Domain, FQDN, Group, Hostname/IP, Jump
Method, Last Accessed, Name, Private IP, Public IP, Status, Tag, and Workgroup.
Once you have found the computer you wish to access, double-click the entry, or select the entry and click the Jump button. This attempts
to start a session with the remote computer.
You may programmatically connect to a Jump Item directly from your systems management or ticketing tool. If your search results in only
one Jump Item, the session starts immediately. If multiple Jump Items are returned, select one of the Jump Items listed in the selection
window and click OK.
Note: For details about scripting, see Access Console Scripting and Client Scripting API at
www.beyondtrust.com/docs/privileged-remote-access/how-to/integrations/api/client-script.
If a Jump Policy is applied to the Jump Item, that policy affects how and/or when a Jump Item may be accessed.
Schedule
If a Jump Policy enforces a schedule for this Jump Item, an attempt to
access the Jump Item outside of its permitted schedule prevents the Jump
from occurring. A prompt informs you of the policy restrictions and provides
the date and time when this Jump Item is next available for access.
Notification
If a Jump Policy is configured to send a notification on session start or end, then an attempt to access a Jump Item alerts you that an email
will be sent. You can choose to proceed with the Jump and send a notification, or you can cancel the Jump.
Ticket ID
If a Jump Policy requires entry of a ticket ID from your external ITSM or ticket ID system before the Jump can be performed, a dialog
opens. In the dialog, enter the ticket ID you need, authorizing access to this Jump Item.
SALES: www.beyondtrust.com/contact SUPPORT: www.beyondtrust.com/support DOCUMENTATION: www.beyondtrust.com/docs 13
©2003-2021 BeyondTrust Corporation. All Rights Reserved. Other trademarks identified on this page are owned by their respective owners. BeyondTrust is not a chartered bank or trust company, or TC: 8/30/2021
depository institution. It is not authorized to accept deposits or trust accounts and is not licensed or regulated by any state or federal banking authority.PRIVILEGED REMOTE ACCESS 21.2
ACCESS CONSOLE USER GUIDE
Authorization
If a Jump Policy requires authorization before the Jump can be performed,
a dialog opens. In the dialog, enter the reason you need to access this
Jump Item. Then enter the date and time at which you wish authorization to
begin, as well as how long you require access to the Jump Item. Both the
request reason and the request time are visible to the approver and help
them decide whether to approve or deny access.
When you click OK, an email is sent to the addresses defined as approvers for this policy. This email contains a URL where an approver
can see the request, add comments, and either approve or deny the request.
If a request was approved by one person, a second can access the URL to override approval and deny the request. If a request was
denied, then any other approvers accessing the site can see the details but cannot override the denied status. If a user has already joined
an approved session, that access cannot be denied. Although other approvers can see the email address of the person who approved or
denied the request, the requester cannot. Based on the Jump Policy settings, an approved request grants access either to any user who
can see and request access to that Jump Client or only to the user who requested access.
In the Jump interface, the Jump Item's details pane displays the status of any authorization requests as either pending, approved,
approved only for a different user, or denied. When an approver responds to a request, a pop-up notification appears on the requester's
screen alerting them that access has been either approved or denied. If the requester has a configured email address, an email
notification is also sent to the requester.
When a user Jumps to a Jump Item which has been approved for access, a notification alerts the user to any comments left by the
approver.
When approval has been granted to a Jump Item, that Jump Item becomes available either to any user who can see and request access to
that Jump Item or only to the user who requested access. This is determined by the Jump Policy.
Note: While multiple requests may be sent for different times, the requested access times cannot overlap. If a request is
denied, then a second request may be sent for the same time.
SALES: www.beyondtrust.com/contact SUPPORT: www.beyondtrust.com/support DOCUMENTATION: www.beyondtrust.com/docs 14
©2003-2021 BeyondTrust Corporation. All Rights Reserved. Other trademarks identified on this page are owned by their respective owners. BeyondTrust is not a chartered bank or trust company, or TC: 8/30/2021
depository institution. It is not authorized to accept deposits or trust accounts and is not licensed or regulated by any state or federal banking authority.PRIVILEGED REMOTE ACCESS 21.2
ACCESS CONSOLE USER GUIDE
Revoking an Access Approval Request
Permission to revoke approved access requests is controlled by Jump
Policy. In the /login web management interface, go to Jump > Jump
Policies. Under Jump Approval you have two options:
l Anyone Permitted to Request
l Requester Only
If the Jump Policy is set to Requester Only, and an Access Request is
presently approved for User A, User B is asked to create a new Access
Request if they attempt to Jump to the Jump Item, since that request does
not apply to them. Additionally, if User B attempts to cancel the Access
Approval Request, the option is grayed out. The only user who can cancel
the approved request is User A, because they are the approved user for the
request.
SALES: www.beyondtrust.com/contact SUPPORT: www.beyondtrust.com/support DOCUMENTATION: www.beyondtrust.com/docs 15
©2003-2021 BeyondTrust Corporation. All Rights Reserved. Other trademarks identified on this page are owned by their respective owners. BeyondTrust is not a chartered bank or trust company, or TC: 8/30/2021
depository institution. It is not authorized to accept deposits or trust accounts and is not licensed or regulated by any state or federal banking authority.PRIVILEGED REMOTE ACCESS 21.2
ACCESS CONSOLE USER GUIDE
However, if the Jump Policy is set to Anyone Permitted to Request, and
an Access Request is presently approved for User A, User B is allowed to
start a new session with the Jump Item if they attempt to Jump to it. In
addition, anyone with permission to access the Jump Item is allowed to
cancel / revoke the request.
SALES: www.beyondtrust.com/contact SUPPORT: www.beyondtrust.com/support DOCUMENTATION: www.beyondtrust.com/docs 16
©2003-2021 BeyondTrust Corporation. All Rights Reserved. Other trademarks identified on this page are owned by their respective owners. BeyondTrust is not a chartered bank or trust company, or TC: 8/30/2021
depository institution. It is not authorized to accept deposits or trust accounts and is not licensed or regulated by any state or federal banking authority.PRIVILEGED REMOTE ACCESS 21.2
ACCESS CONSOLE USER GUIDE
Use Jump Clients to Access Remote Endpoints
To access an individual Windows, Mac, or Linux computer that is not on an accessible network, install a Jump Client on that system from
the /login > Jump > Jump Clients page. Jump Clients appear in the Jump interface along with Jump Item shortcuts.
Use a Jump Client
To use a Jump Client to start a session, select the Jump Client from the Jump interface and click the Jump button.
Note: Jump Items can be set to allow multiple users to simultaneously access the same Jump Item. If set to Join Existing
Session, other users are able to join a session already underway. The original owner of the session receives a note indicating
another user has joined the session, but is not allowed to deny them access. For more information on simultaneous Jumps,
please see Jump Item Settings at www.beyondtrust.com/docs/privileged-remote-access/getting-started/admin/jump-
items.htm.
Sort Jump Clients
Browse through groups for the computer you wish to access. To facilitate
browsing the Jump Items list, you may drag the columns into any order you
wish, and then sort a column by clicking the column header. The access
console remembers the column order and the sort order the next time the
access console is launched.
Search for a Jump Client
In addition to browsing for Jump Items, you can search based on multiple fields. Enter a string in the search field and then press Enter. To
change the fields you are searching, click on the magnifying glass and check or uncheck any of the available fields. Searchable fields
include Comments, Console User, Domain, FQDN, Group, Hostname/IP, Jump Method, Last Accessed, Name, Private IP, Public
IP, Status, Tag, and Workgroup.
Jump Client Details Pane
When you select a Jump Client, a details pane appears to the right of the Jump interface. Which details are shown here is determined by
the Jump Client Statistics setting in the /login interface as well as by the remote operating system.
If a Jump Client goes offline and does not reconnect to the B Series Appliance for the number of days set by the Jump Client Settings in
the /login interface, it is labeled as lost. No specific action is taken on the Jump Client. It is labeled as lost only for identification purposes,
so that an administrator can diagnose the reason for the lost connection and take action to correct the situation. In the details pane, the
scheduled deletion date appears should the Jump Client not come back online.
After a software update, Jump Clients update automatically. The number of concurrent Jump Client upgrades is determined by settings on
the /login > Jump > Jump Clients page. If a Jump Client has not yet been updated, it is labeled as Upgrade Pending, and its version
and revision number appear in the details pane. While you can modify an outdated Jump Client, you cannot Jump to it. Attempting a Jump
does, however, move that Jump Client to the front of the upgrade queue.
SALES: www.beyondtrust.com/contact SUPPORT: www.beyondtrust.com/support DOCUMENTATION: www.beyondtrust.com/docs 17
©2003-2021 BeyondTrust Corporation. All Rights Reserved. Other trademarks identified on this page are owned by their respective owners. BeyondTrust is not a chartered bank or trust company, or TC: 8/30/2021
depository institution. It is not authorized to accept deposits or trust accounts and is not licensed or regulated by any state or federal banking authority.PRIVILEGED REMOTE ACCESS 21.2
ACCESS CONSOLE USER GUIDE
Wake-On-Lan (WOL)
Wake-On-Lan (WOL) allows you to remotely turn on or wake up machines configured for WOL from BeyondTrust. In a configured
environment, customers can power off their machine but still receive BeyondTrust support, if needed.
Note: WOL is not a BeyondTrust technology. The BeyondTrust software integrates with existing WOL systems. To use WOL
through BeyondTrust, the system must have WOL enabled, and the network must allow WOL packets to be sent.
To enable support for WOL in BeyondTrust, turn on the WOL setting in the administrative /login interface under Jump > Jump Clients.
When enabling the WOL option, keep the following items in mind:
l WOL does not work for wireless clients. A wired network connection is required.
l WOL is supported by the underlying system hardware, which is independent of the installed OS.
l WOL is supported only by active Jump Clients. Passive Jump Clients, Jumpoints, and Local Jump from representative consoles
do not support WOL.
To wake an active Jump Client using WOL, right-click an existing Jump Client from within the rep console. Attempt to wake the system by
clicking the Attempt to wake up Jump Client option.
The wake option is only available when selecting a single Jump Client. It is not available when multiple Jump Clients are selected.
WOL packets are sent from other Jump Clients residing on the same network as the target machine. When an active Jump Client is
installed or checks-in, it registers its network information with the B Series Appliance, and the B Series Appliance uses this information to
determine which Jump Clients are on the same network.
Once attempting to wake up a selected Jump Client, the WOL option greys out for 30 seconds before it can attempt to send another wake
up request. If no other Jump Clients are available on that same network to send WOL packets to the target machine, the rep receives a
message indicating that no other Jump Clients are available on the network. When sending a WOL packet, the rep has an advanced
option to provide a password for WOL environments requiring a secure WOL password. A WOL packet is a one-way packet, and no
confirmation of success is given to the rep besides seeing the client come online in the rep console.
SALES: www.beyondtrust.com/contact SUPPORT: www.beyondtrust.com/support DOCUMENTATION: www.beyondtrust.com/docs 18
©2003-2021 BeyondTrust Corporation. All Rights Reserved. Other trademarks identified on this page are owned by their respective owners. BeyondTrust is not a chartered bank or trust company, or TC: 8/30/2021
depository institution. It is not authorized to accept deposits or trust accounts and is not licensed or regulated by any state or federal banking authority.PRIVILEGED REMOTE ACCESS 21.2
ACCESS CONSOLE USER GUIDE
Copy Jump Items
Jump Items can be copied and can belong to multiple Jump Groups. This includes Jump Client items, providing administrators with the
ability to set separate policies and group permissions without requiring an additional Jump Client installation on the target endpoint. Users
with the appropriate permissions see the option to Copy Jump Items in the Access Console by right-clicking the item. Users can perform
this function on multiple Jump Items as well.
This feature enables admins and users to effectively manage different policies for Jump Items and Jump Clients without the need to create
a new Jump Item. This functionality enables users to limit the number of clients necessary to enable Jump Client sessions, and limits
manual administrative tasks when defining access pathways for users.
Jump Client Properties
Organize and manage existing Jump Items by selecting one or more Jump
Items and clicking Properties.
Note: To view the properties of multiple Jump Items, the items selected must be all the same type (all Jump Clients, all
Remote Jumps, etc.).
Enter a Name for the Jump Item. This name identifies the item in the session tabs. This string has a maximum of 128 characters.
Change a Jump Client's mode from the Connection Type dropdown. Active Jump Clients send statistics to the B Series Appliance on a
defined interval. Passive Jump Clients send statistics to the B Series Appliance once a day or upon a manual check in.
Note: This feature is available only to customers who own an on-premises B Series Appliance. BeyondTrust Cloud customers
do not have access to this feature.
Based on the options your administrator sets, these statistics may include the remote computer's logged-in console user, operating
system, uptime, CPU, disk usage, and a screen shot from the last update.
Move Jump Items from one Jump Group to another using the Jump Group dropdown. The ability to move Jump Items to or from different
Jump Groups depends upon your account permissions.
Further organize Jump Items by entering the name of a new or existing Tag. Even though the selected Jump Items are grouped together
under the tag, they are still listed under the Jump Group in which each is pinned. To move a Jump Item back into its top-level Jump Group,
leave this field blank.
SALES: www.beyondtrust.com/contact SUPPORT: www.beyondtrust.com/support DOCUMENTATION: www.beyondtrust.com/docs 19
©2003-2021 BeyondTrust Corporation. All Rights Reserved. Other trademarks identified on this page are owned by their respective owners. BeyondTrust is not a chartered bank or trust company, or TC: 8/30/2021
depository institution. It is not authorized to accept deposits or trust accounts and is not licensed or regulated by any state or federal banking authority.PRIVILEGED REMOTE ACCESS 21.2
ACCESS CONSOLE USER GUIDE
Jump Items include a Comments field for a name or description, which makes sorting, searching, and identifying Jump Items faster and
easier.
To set when users are allowed to access this Jump Item, if a notification of access should be sent, or if permission or a ticket ID from your
external ticketing system is required to use this Jump Item, choose a Jump Policy. These policies are configured by your administrator in
the /login interface.
Choose a Session Policy to assign to this Jump Item. The session policy assigned to this Jump Item has the highest priority when setting
session permissions. The ability to set a session policy depends on your account permissions.
Choose an Endpoint Agreement to assign to this Jump Item. Depending on what is selected, an endpoint agreement is displayed. If
there is no response, the agreement is automatically accepted or rejected.
If you no longer need access to a remote system, select the Jump Item and click Remove, or right-click on the Jump Item and select
Remove from the menu. You may select multiple Jump Items to remove them all at the same time.
Note: If the remote user manually uninstalls a Jump Client, the deleted item is either marked as uninstalled or completely
removed from the Jump Items list in the access console. If the Jump Client cannot contact the B Series Appliance at the time it
is uninstalled, the affected item remains in its offline state. This setting is available at /login > Jump > Jump Clients. If a
Jump Client goes offline and does not reconnect to the B Series Appliance for 180 days, it is automatically uninstalled from the
target computer and is removed from the Jump interface.
SALES: www.beyondtrust.com/contact SUPPORT: www.beyondtrust.com/support DOCUMENTATION: www.beyondtrust.com/docs 20
©2003-2021 BeyondTrust Corporation. All Rights Reserved. Other trademarks identified on this page are owned by their respective owners. BeyondTrust is not a chartered bank or trust company, or TC: 8/30/2021
depository institution. It is not authorized to accept deposits or trust accounts and is not licensed or regulated by any state or federal banking authority.PRIVILEGED REMOTE ACCESS 21.2
ACCESS CONSOLE USER GUIDE
Use Remote Jump for Unattended Access to Computers on a Separate Network
Remote Jump enables a privileged user to connect to an unattended remote computer on a network outside of their own network. Remote
Jump depends on a Jumpoint.
A Jumpoint acts as a conduit for unattended access to Windows and Linux computers on a known remote network. A single Jumpoint
installed on a computer within a local area network is used to access multiple systems, eliminating the need to pre-install software on
every computer you may need to access.
Note: Jumpoint is available for Windows and Linux systems. Jump Clients are needed for remote access to Mac computers.
To Jump to a Windows computer without a Jump Client, that computer must have Remote Registry Service enabled (disabled
by default in Vista) and must be on a domain. You cannot Jump to a mobile device, though Jump Technology is available from
mobile BeyondTrust consoles.
Create a Remote Jump Shortcut
To create a Remote Jump shortcut, click the Create button in the Jump interface. From the dropdown, select Remote
Jump. Remote Jump shortcuts appear in the Jump interface along with Jump Clients and other types of Jump Item
shortcuts.
Organize and manage existing Jump Items by selecting one or more Jump Items and clicking Properties.
Note: To view the properties of multiple Jump Items, the items selected must be all the same type (all Jump Clients, all
Remote Jumps, etc.).To review properties of other types of Jump Items, please see the appropriate section in this guide.
Enter a Name for the Jump Item. This name identifies the item in the
session tabs. This string has a maximum of 128 characters.
From the Jumpoint dropdown, select the network that hosts the computer
you wish to access. The access console remembers your Jumpoint choice
the next time you create this type of Jump Item. Enter the Hostname / IP of
the system you wish to access.
Move Jump Items from one Jump Group to another using the Jump Group
dropdown. The ability to move Jump Items to or from different Jump Groups
depends upon your account permissions.
Further organize Jump Items by entering the name of a new or existing
Tag. Even though the selected Jump Items are grouped together under the
tag, they are still listed under the Jump Group in which each is pinned. To
move a Jump Item back into its top-level Jump Group, leave this field blank.
Jump Items include a Comments field for a name or description, which
makes sorting, searching, and identifying Jump Items faster and easier.
To set when users are allowed to access this Jump Item, if a notification of access should be sent, or if permission or a ticket ID from your
external ticketing system is required to use this Jump Item, choose a Jump Policy. These policies are configured by your administrator in
the /login interface.
Choose a Session Policy to assign to this Jump Item. The session policy assigned to this Jump Item has the highest priority when setting
session permissions. The ability to set a session policy depends on your account permissions.
SALES: www.beyondtrust.com/contact SUPPORT: www.beyondtrust.com/support DOCUMENTATION: www.beyondtrust.com/docs 21
©2003-2021 BeyondTrust Corporation. All Rights Reserved. Other trademarks identified on this page are owned by their respective owners. BeyondTrust is not a chartered bank or trust company, or TC: 8/30/2021
depository institution. It is not authorized to accept deposits or trust accounts and is not licensed or regulated by any state or federal banking authority.PRIVILEGED REMOTE ACCESS 21.2
ACCESS CONSOLE USER GUIDE
Choose an Endpoint Agreement to assign to this Jump Item. Depending on what is selected, an endpoint agreement is displayed. If
there is no response, the agreement is automatically accepted or rejected.
Use a Remote Jump Shortcut
To use a Jump shortcut to start a session, simply select the shortcut from the Jump interface and click the Jump button.
A dialog box opens for you to enter administrative credentials to the remote computer in order to complete the Jump. The administrative
rights must be either a local administrator on the remote system or a domain administrator.
The client files are pushed to the remote system, and a session attempts to start.
Note: Jump Items can be set to allow multiple users to simultaneously access the same Jump Item. If set to Join Existing
Session, other users are able to join a session already underway. The original owner of the session receives a note indicating
another user has joined the session, but is not allowed to deny them access. For more information on simultaneous Jumps,
please see Jump Item Settings at www.beyondtrust.com/docs/privileged-remote-access/getting-started/admin/jump-
items.htm.
SALES: www.beyondtrust.com/contact SUPPORT: www.beyondtrust.com/support DOCUMENTATION: www.beyondtrust.com/docs 22
©2003-2021 BeyondTrust Corporation. All Rights Reserved. Other trademarks identified on this page are owned by their respective owners. BeyondTrust is not a chartered bank or trust company, or TC: 8/30/2021
depository institution. It is not authorized to accept deposits or trust accounts and is not licensed or regulated by any state or federal banking authority.PRIVILEGED REMOTE ACCESS 21.2
ACCESS CONSOLE USER GUIDE
Use Local Jump for Unattended Access to Computers on Your Local Network
Local Jump enables a privileged user to connect to an unattended remote computer on their local network. Within the local area network,
the BeyondTrust user's computer can initiate a session to a Windows system directly without using a Jumpoint, if appropriate user
permissions are enabled. A Jumpoint is needed only when the BeyondTrust user's computer cannot access the target computer directly.
Note: Local Jump is only available for Windows systems. Jump Clients are needed for remote access to Mac computers. To
Jump to a Windows computer without a Jump Client, that computer must have Remote Registry Service enabled (disabled by
default in Vista) and must be on a domain.
Create a Local Jump Shortcut
To create a Local Jump shortcut, click the Create button in the Jump interface. From the dropdown, select Local
Jump. Local Jump shortcuts appear in the Jump interface along with Jump Clients and other types of Jump Item
shortcuts.
Organize and manage existing Jump Items by selecting one or more Jump Items and clicking Properties.
Note: To view the properties of multiple Jump Items, the items selected must be all the same type (all Jump Clients, all
Remote Jumps, etc.).To review properties of other types of Jump Items, please see the appropriate section in this guide.
Enter a Name for the Jump Item. This name identifies the item in the
session tabs. This string has a maximum of 128 characters.
Enter the Hostname / IP of the system you wish to access.
Move Jump Items from one Jump Group to another using the Jump Group
dropdown. The ability to move Jump Items to or from different Jump Groups
depends upon your account permissions.
Further organize Jump Items by entering the name of a new or existing
Tag. Even though the selected Jump Items are grouped together under the
tag, they are still listed under the Jump Group in which each is pinned. To
move a Jump Item back into its top-level Jump Group, leave this field blank.
Jump Items include a Comments field for a name or description, which
makes sorting, searching, and identifying Jump Items faster and easier.
To set when users are allowed to access this Jump Item, if a notification of access should be sent, or if permission or a ticket ID from your
external ticketing system is required to use this Jump Item, choose a Jump Policy. These policies are configured by your administrator in
the /login interface.
Choose a Session Policy to assign to this Jump Item. The session policy assigned to this Jump Item has the highest priority when setting
session permissions. The ability to set a session policy depends on your account permissions.
Choose an Endpoint Agreement to assign to this Jump Item. Depending on what is selected, an endpoint agreement is displayed. If
there is no response, the agreement is automatically accepted or rejected.
Use a Local Jump Shortcut
To use a Jump shortcut to start a session, simply select the shortcut from the Jump interface and click the Jump button.
SALES: www.beyondtrust.com/contact SUPPORT: www.beyondtrust.com/support DOCUMENTATION: www.beyondtrust.com/docs 23
©2003-2021 BeyondTrust Corporation. All Rights Reserved. Other trademarks identified on this page are owned by their respective owners. BeyondTrust is not a chartered bank or trust company, or TC: 8/30/2021
depository institution. It is not authorized to accept deposits or trust accounts and is not licensed or regulated by any state or federal banking authority.PRIVILEGED REMOTE ACCESS 21.2
ACCESS CONSOLE USER GUIDE
A dialog box opens for you to enter administrative credentials to the remote computer in order to complete the Jump. The administrative
rights must be either a local administrator on the remote system or a domain administrator.
The client files are pushed to the remote system, and a session attempts to start.
Note: Jump Items can be set to allow multiple users to simultaneously access the same Jump Item. If set to Join Existing
Session, other users are able to join a session already underway. The original owner of the session receives a note indicating
another user has joined the session, but is not allowed to deny them access. For more information on simultaneous Jumps,
please see Jump Item Settings at www.beyondtrust.com/docs/privileged-remote-access/getting-started/admin/jump-
items.htm.
SALES: www.beyondtrust.com/contact SUPPORT: www.beyondtrust.com/support DOCUMENTATION: www.beyondtrust.com/docs 24
©2003-2021 BeyondTrust Corporation. All Rights Reserved. Other trademarks identified on this page are owned by their respective owners. BeyondTrust is not a chartered bank or trust company, or TC: 8/30/2021
depository institution. It is not authorized to accept deposits or trust accounts and is not licensed or regulated by any state or federal banking authority.PRIVILEGED REMOTE ACCESS 21.2
ACCESS CONSOLE USER GUIDE
Use RDP to Access a Remote Windows Endpoint
Use BeyondTrust to start a Remote Desktop Protocol (RDP) session with remote Windows and Linux systems. Because remote desktop
protocol sessions are proxied through a Jumpoint and converted to BeyondTrust sessions, users can share or transfer sessions, and
sessions can be automatically audited and recorded as your administrator has defined for your site. To use RDP through BeyondTrust,
you must have access to a Jumpoint and must have the user account permission Allowed Jump Methods: RDP via a Jumpoint.
Note: You can use your own RDP tool for remote RDP sessions. For more information, please see Change Settings and
Preferences in the Access Console at https://www.beyondtrust.com/docs/privileged-remote-access/getting-started/access-
console/settings.htm.
Create an RDP Shortcut
To create a Microsoft Remote Desktop Protocol shortcut, click the Create button in the Jump interface. From the
dropdown, select Remote RDP. RDP shortcuts appear in the Jump interface along with Jump Clients and other types
of Jump Item shortcuts.
Organize and manage existing Jump Items by selecting one or more Jump Items and clicking Properties.
Note: To view the properties of multiple Jump Items, the items selected must be all the same type (all Jump Clients, all
Remote Jumps, etc.).To review properties of other types of Jump Items, please see the appropriate section in this guide.
Enter a Name for the Jump Item. This name identifies the item in the
session tabs. This string has a maximum of 128 characters.
From the Jumpoint dropdown, select the network that hosts the computer
you wish to access. The access console remembers your Jumpoint choice
the next time you create this type of Jump Item. Enter the Hostname / IP of
the system you wish to access.
Provide the Username to sign in as, along with the Domain.
Select the Quality at which to view the remote screen. This cannot be
changed during the remote desktop protocol (RDP) session. Select the
color optimization mode to view the remote screen. If you are going to be
primarily sharing video, select Video Optimized; otherwise, select Black
and White (uses less bandwidth), Few Colors, More Colors, or Full
Color (uses more bandwidth). Both Video Optimized and Full Color
modes allow you to view the actual desktop wallpaper.
To start a console session rather than a new session, check the Console
Session box.
If the server's certificate cannot be verified, you receive a certificate
warning. Checking Ignore Untrusted Certificate allows you to connect to the remote system without seeing this message.
Note: When RemoteApp or BeyondTrust Remote Desktop Agent is selected in the SecureApp section, the Console Session
checkbox is unchecked. Remote applications cannot run in a console session on a RDP server.
SALES: www.beyondtrust.com/contact SUPPORT: www.beyondtrust.com/support DOCUMENTATION: www.beyondtrust.com/docs 25
©2003-2021 BeyondTrust Corporation. All Rights Reserved. Other trademarks identified on this page are owned by their respective owners. BeyondTrust is not a chartered bank or trust company, or TC: 8/30/2021
depository institution. It is not authorized to accept deposits or trust accounts and is not licensed or regulated by any state or federal banking authority.PRIVILEGED REMOTE ACCESS 21.2
ACCESS CONSOLE USER GUIDE
To get more detailed information on the RDP session, check Session Forensics. For this feature to work, you must select an
RDP Service Account for the Jumpoint being used. When checking this setting, the following reminder displays:
Enabling this feature requires the RDP server to be configured to receive the monitoring agent and an RDP Service Account to be
configured with this Jumpoint If these requirements are not met, all attempts to start a session will fail.
Note: The RDP Service Account setting must not use a local admin account, and must use a domain admin account with
minimum privileges including access to create remote services and access remote file systems.
When Session Forensics is checked, the following additional details are logged:
l Focused window changed event
l Mouse click event
l Menu opened event
l New window opened event
To start a session with a remote application, configure the SecureApp section. The following dropdown options are available:
l None: When accessing a Remote RDP Jump Item, no application is launched.
l RemoteApp:The user can configure an application profile or command argument which executes and opens an application on a
remote server. To configure, select the RemoteApp option and enter the following information.
o Remote App Name: Enter the name of the application you wish to connect to.
o Remote App Parameters: Enter the profile details or command line arguments needed to open the application.
l BeyondTrust Remote Desktop Agent: This option facilitates passing parameters through an agent in order to launch
applications on a remote host. To configure, select the BeyondTrust Remote Desktop Agent option and enter the following
information:
o Executable Path: Enter the path of the application the agent will connect to.
o Parameters: Enter any parameters that you could normally type from a command line when launching the app on the
remote system.
For more information on Session Forensics and RDP Service Account, please see Jumpoint: Set Up Unattended Access to a
Network > RDP Service Account at https://www.beyondtrust.com/docs/privileged-remote-access/getting-
started/admin/jumpoint.htm.
Inject Credentials
The option to Inject Credentials will be available when the BeyondTrust Remote Desktop Agent type is selected. This option facilitates
passing parameters as well as credentials through an agent in order to launch applications on a remote host. The first set of credentials
are in the Jump definition and are the credentials for the user account you'll use to log into the remote system. There is a secondary
prompt for additional credentials, either manually provided or from a password vault. These secondary credentials are made available to
the command line you define through the %USERNAME% and %PASSWORD% macros (additional macros shown below). This allows
you to pass additional credentials to the application you are launching (e.g., SQL Server Management Studio). To configure, select the
BeyondTrust Remote Desktop Agent: option and enter the following information:
l Enter the Executable Path and Parameters as described above.
l Target System: Enter the name of the system running the application.
l Credential Type: Enter the credential type as defined by the credential management system. (e.g. SQL)
SALES: www.beyondtrust.com/contact SUPPORT: www.beyondtrust.com/support DOCUMENTATION: www.beyondtrust.com/docs 26
©2003-2021 BeyondTrust Corporation. All Rights Reserved. Other trademarks identified on this page are owned by their respective owners. BeyondTrust is not a chartered bank or trust company, or TC: 8/30/2021
depository institution. It is not authorized to accept deposits or trust accounts and is not licensed or regulated by any state or federal banking authority.PRIVILEGED REMOTE ACCESS 21.2
ACCESS CONSOLE USER GUIDE
Macro Name Result
%USERNAME% username
%USERPRINCIPLENAME% username@domain
%DOWNLEVELLOGONNAME% domain\username
%DOMAIN% domain
%PASSWORD% password
%PASSWORDRAW% password (without any attempt to escape special characters)
%TARGETSYSTEM% supplied target system value; in the case of SQL Server, this would be the SQL
Server name.
%APPLICATIONNAME% optional application name; in the case of SQL Server, this can be hard-coded to
"SQL Server" or something similar.
Note: The BeyondTrust Remote Desktop Agent option requires a BeyondTrust Remote Desktop Agent to be
preconfigured on the target system. This agent can be downloaded from the My Account page in the /login interface. It is
neither version nor site-specific, and thus the same agent may be used for as many applications as the admin wishes to
support. Once the agent is installed, you can then use BeyondTrust to create RDP Jump Items that are configured to use the
BeyondTrust Remote Desktop Agent option to launch any application installed on the remote system.
Note: SecureApp relies on publishing applications using Microsoft RDS RemoteApps. Please refer to the Microsoft
documentation for publishing applications.
Move Jump Items from one Jump Group to another using the Jump Group dropdown. The ability to move Jump Items to or from different
Jump Groups depends upon your account permissions.
Further organize Jump Items by entering the name of a new or existing Tag. Even though the selected Jump Items are grouped together
under the tag, they are still listed under the Jump Group in which each is pinned. To move a Jump Item back into its top-level Jump Group,
leave this field blank.
Jump Items include a Comments field for a name or description, which makes sorting, searching, and identifying Jump Items faster and
easier.
To set when users are allowed to access this Jump Item, if a notification of access should be sent, or if permission or a ticket ID from your
external ticketing system is required to use this Jump Item, choose a Jump Policy. These policies are configured by your administrator in
the /login interface.
For more information about contained database users, please see Contained Database Users - Making Your Database
Portable at docs.microsoft.com/en-us/sql/relational-databases/security/contained-database-users-making-your-database-
portable.
Use an RDP Shortcut
To use a Jump shortcut to start a session, simply select the shortcut from the Jump interface and click the Jump button.
SALES: www.beyondtrust.com/contact SUPPORT: www.beyondtrust.com/support DOCUMENTATION: www.beyondtrust.com/docs 27
©2003-2021 BeyondTrust Corporation. All Rights Reserved. Other trademarks identified on this page are owned by their respective owners. BeyondTrust is not a chartered bank or trust company, or TC: 8/30/2021
depository institution. It is not authorized to accept deposits or trust accounts and is not licensed or regulated by any state or federal banking authority.You can also read