TURNINGPOINT POWERPOINT POLLING FOR - PC USERGUIDE
←
→
Page content transcription
If your browser does not render page correctly, please read the page content below
TurningPoint PowerPoint Polling for
PC
User Guide

TurningPoint PowerPoint Polling for PC                                                                                                   2

© 2015 Turning Technologies, LLC. All rights reserved.
Portions Responsive Innovations, LLC, Microsoft Corporation
No part of this document may be reproduced or transmitted in any form or by any means, electronic or mechanical, for any purpose,
without the express written permission of Turning Technologies, LLC. All rights reserved.

Turning Technologies, LLC, 255 West Federal Street, Youngstown, OH 44503 USA.
TurningPoint® is a registered trademark of Turning Technologies, LLC. Other trademarked product names mentioned in this manual
are owned by their respective companies.
The following regulatory statements apply to radio frequency and infrared transmitters and receivers mentioned in this manual,
including the ResponseCard RF, ResponseCard RF LCD, ResponseCard IR, ResponseCard XR, ResponseCard NXT, QT Device,
CPS IR, CPS Pulse, CPS Spark, Gen 2, PRS RF, PRS IR, DualBoard, Touch Board, Touch Board Plus, MeetingBoard, SchoolBoard,
iPannel, Mobi, MobiView, MobiKWIK, Mobi Learner, Mobi 360 and their respective receivers.

FCC Statement
This device complies with part 15 of the FCC Rules. Operation is subject to the following two conditions: (1) This device may not
cause harmful interference, and (2) this device must accept any interference received, including interference that may cause
undesired operation.
Changes or modifications not expressly approved by the party responsible for compliance could void the user’s authority to operate
the equipment.

IC Statement
This device complies with Industry Canada licence-exempt RSS standard(s). Operation is subject to the following two conditions: (1)
this device may not cause interference, and (2) this device must accept any interference, including interference that may cause
undesired operation of the device.
Le présent appareil est conforme aux CNR d'Industrie Canada applicables aux appareils radio exempts de licence. L'exploitation est
autorisée aux deux conditions suivantes : (1) l'appareil ne doit pas produire de brouillage, et (2) l'utilisateur de l'appareil doit accepter
tout brouillage radioélectrique subi, même si le brouillage est susceptible d'en compromettre le fonctionnement.

turningtechnologies.com

TurningPoint PowerPoint Polling for PC                    3

Contents
   CONTENTS                                                3
   ABOUT                                                   6
    Welcome to TurningPoint 5!                             6
    What’s New in TurningPoint 5                           6
    Technical Requirements                                 8
      Requirements for Software and Hardware               8
      Compatible Devices                                   8
    Getting Started                                        9
      Download and Setup                                   9
         Downloading TurningPoint                          9
         Opening TurningPoint (Zipped File)                9
         Installing TurningPoint (EXE File)                10
         Configuring Automatic Updates                     10
      Device Setup                                         11
         Changing the Channel on the Receiver              11
         Locking the Receiver Channel                      12
         Setting Up ResponseWare                           13
         Testing the Polling Connections                   15
         Pairing a PresenterCard                           16
   BEFORE THE PRESENTATION                                 18
    Inserting a Polling Slide                              18
    Question Types and Options                             19
      Multiple Choice                                      19
      Short Answer                                         20
      Numeric Response                                     21
      True/False                                           22
      Matching                                             23
      Essay                                                24
      Demographic Assignment                               25
      Priority Ranking                                     26
    Creating Participant Lists                             27
      Manually Creating a Participant List                 27
      Downloading a Participant List from an Integration   28
   DURING THE PRESENTATION                                 30
    Opening the PowerPoint Polling Environment             30
    Resetting a PowerPoint Polling Session or Charts       30
    Running a Slide Show                                   31
    Saving a PowerPoint Polling Session                    32
   AFTER THE PRESENTATION                                  33
     Generating Reports                                    33
     Results Manager                                       34
       Overview                                            34

turningtechnologies.com
TurningPoint PowerPoint Polling for PC                                           4

           Opening the Results Manager Overview                                   35
           Adding a Manual Grade Column                                           37
           Reordering the Session Columns                                         37
           Overwriting Session Scores                                             37
        Sessions                                                                  38
           Excluding a Session                                                    38
           Setting Session Performance Points                                     39
           Setting Attendance Points                                              39
        Participants                                                              39
           Editing Participant Information                                        40
           Viewing Grade Overview Information                                     40
           Removing a Participant from a Single Session                           41
           Removing a Participant from the Participant List via Results Manager   42
           Deleting a Removed Participant from Results Manager                    42
           Viewing Removed Participants                                           43
           Reinstating a Participant                                              44
        Devices                                                                   44
           Saving Device IDs from the Real-Time Registration Tool                 45
           Adding or Removing Devices                                             45
           Assigning an Unassigned Device                                         46
           Viewing the Grade Overview for Unassigned Devices                      47
           Assigning a Single Session to a Participant                            47
        Export                                                                    48
           Exporting a Participant Report                                         48
           Exporting a Session to an Export Scheme                                49
           Exporting the Results Manager Overview                                 49
        Integrations                                                              50
           Updating Participant Lists from an LMS                                 50
           Exporting Sessions to an LMS Integration                               50
        Archiving                                                                 51
           Archiving a Participant List                                           51
           Restoring an Archived Participant List                                 52
   ADDITIONAL TOPICS                                                              53
    The PowerPoint Polling Showbar                                                53
    Slide Types and Slide Preferences                                             54
    Objects                                                                       61
       Inserting a Correct Answer Indicator                                       61
       Inserting a Chart/Changing the Chart Type                                  63
       Inserting an Animated Chart                                                64
       Inserting a Countdown Timer                                                66
       Inserting a Grid                                                           67
       Inserting a Prompt                                                         69
       Inserting a Response Counter                                               70
       Inserting Stats                                                            71
    Individual Session Management                                                 73
       Importing Sessions                                                         73

turningtechnologies.com
TurningPoint PowerPoint Polling for PC       5

       Merging Sessions                       73
     Preferences                              74
       Opening the TurningPoint Preferences   75
       Software                               75
         Administration                       76
         Shortcut Keys                        77
       Connections                            77
         Response Devices                     78
         PresenterCard                        78
         PresenterWare                        79
         RemotePoll                           79
         RemotePoll Monitor                   79
       PowerPoint                             79
         Charts                               80
         Questions                            81
         Competitions                         83
         Presentation                         84
   CONTACT US                                 85
   GLOSSARY                                   86

turningtechnologies.com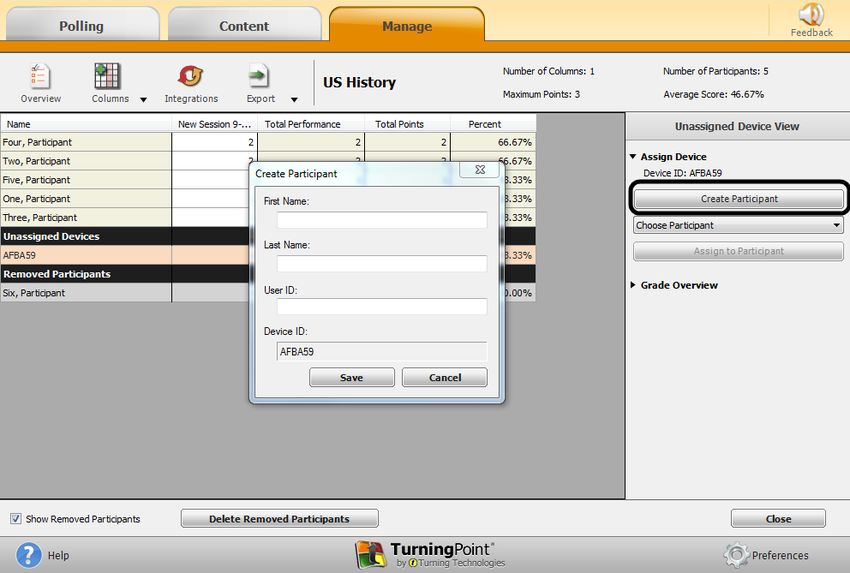
TurningPoint PowerPoint Polling for PC                                                                                        6

About
This chapter covers the following topics:

   Welcome to TurningPoint 5!
   What’s New in TurningPoint 5
   Technical Requirements
   Getting Started

Welcome to TurningPoint 5!
TurningPoint combines all of the Turning Technologies legacy applications into one, user-friendly interface. Content creation,
participant lists, data management (Results Manager) and reports are in one central location. All three polling environments:
PowerPoint Polling (formerly TurningPoint), Anywhere Polling (formerly TurningPoint Anywhere) and Self-Paced Polling
(formerly TurningKey) are included.

Existing content such as question lists, participant lists and session files can be imported directly into the new software.

What’s New in TurningPoint 5
TurningPoint is Turning Technologies’ first, truly cross-platform, poll in ANY environment application.

    l   Simplifies user workflow and user experience for all current applications by consolidating them into one central interface

A robust HTML content editor that supports pictures, special characters, subscripts and superscripts

An equation editor

Simplifies the ability to create question lists for use in all three polling environments

Simplifies the ability to create, import and export participant lists from the new participant list editor

    l   Drag and drop functionality for CSV and TXT files
    l   Copy and paste functionality for Mac and PC
    l   Quickly import files downloaded from specific gradebooks and Learning Management Systems

A newly enhanced area to manage aggregate session data (formerly ResultsManager)

    l   Customized view by toggling data options
    l   Update participant lists downloaded from Learning Management Systems, export both single session and cumulative
        grade columns

Device and data manipulation, allowing different devices to be used for individual sessions

A report interface that consolidates the 32 reports, traditionally available from Turning Technologies, into six new
customizable reports

    l   Available for all environments: PowerPoint Polling, Anywhere Polling and Self-Paced Polling
    l   Reports are customized by toggling information on and off in the data view

turningtechnologies.com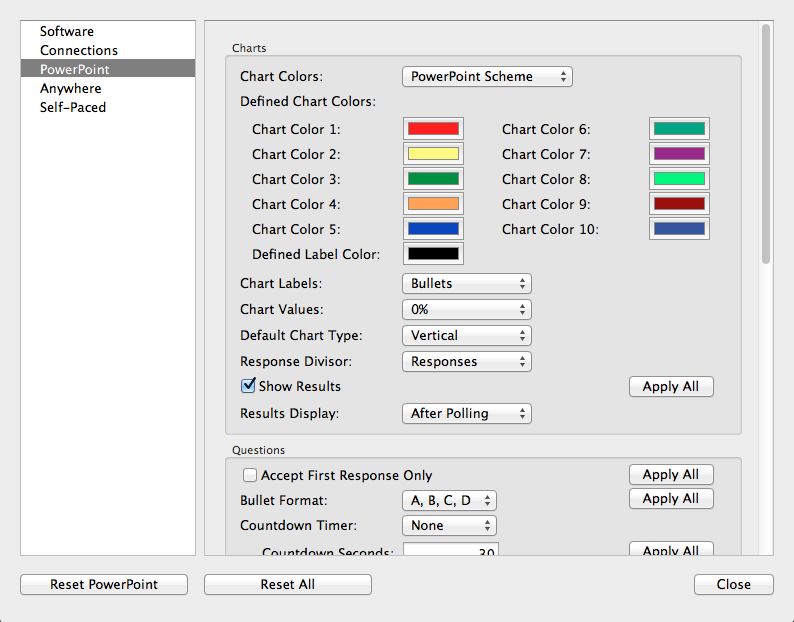
TurningPoint PowerPoint Polling for PC                                             7

    l   All reports can be easily printed without formatting
    l   Export results to Excel, CSV and HTML for sharing and manual manipulation

turningtechnologies.com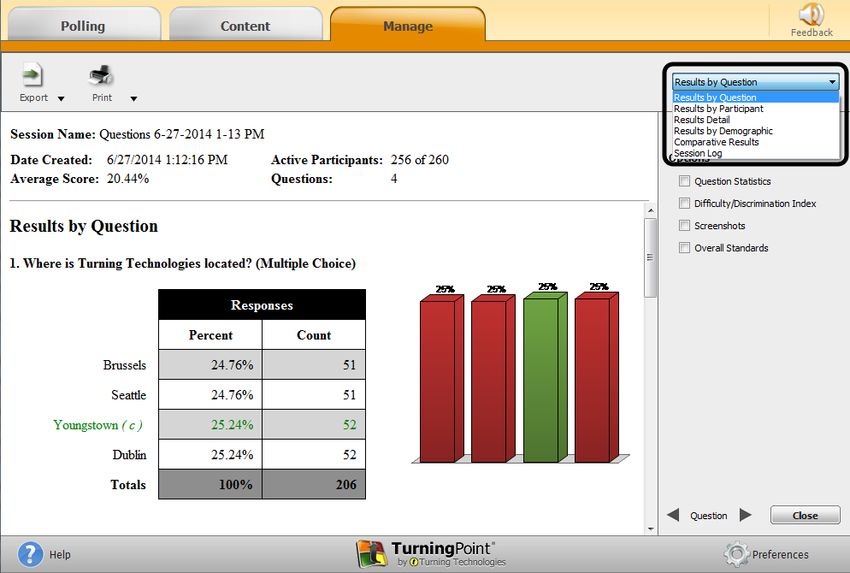
TurningPoint PowerPoint Polling for PC                                                                                8

Technical Requirements
TurningPoint is designed to function on most computers; however, there are some basic hardware and software requirements.

Requirements for Software and Hardware
The following software and hardware specifications are required before using TurningPoint:

    l   Microsoft Windows® XP, Vista, 7 or 8
    l   Microsoft Office® 2003, 2007, 2010 or 2013 (for PowerPoint Polling and viewing exported reports in Excel)
    l   Microsoft .NET 3.5 SP1
    l   Intel or AMD 2GHz processor
    l   512 MB RAM
    l   120 MB hard disk space
    l   1024 x 768 at 32-bit color or higher resolution, 100%DPI
    l   Standard USB 2.0 port (for USB-based hardware devices)
    l   Ethernet or 802.11 compatible wireless network card required if ResponseWare is in use
    l   Adobe® Flash® Player (for Animated 2D/3D charts)
    l   Adobe® Acrobat® Reader (for printing)
    l   Java™ 7 or later (for importing RTF, DOC, DOCX and QTI documents and exporting reports to Excel and CSV)

Compatible Devices
The following devices are compatible with TurningPoint:

    l   ResponseCard IR, RF and RF LCD (PowerPoint Polling and Anywhere Polling)
    l   ResponseCard XR and NXT (PowerPoint Polling, Anywhere Polling and Self-Paced Polling)
    l   QT Device (PowerPoint Polling, Anywhere Polling and Self-Paced Polling)
    l   PresenterCard (PowerPoint Polling and Anywhere Polling)
    l   ResponseWare (PowerPoint Polling and Anywhere Polling)
    l   PresenterWare (PowerPoint Polling and Anywhere Polling)

turningtechnologies.com
TurningPoint PowerPoint Polling for PC                                                                                    9

Getting Started
To get started with TurningPoint, the software must be downloaded from www.turningtechnologies.com/downloads.
Uninstalling previous versions of Turning Technologies software is not necessary; however, only one version of the software
should be open at any given time.

This section covers the following topics:

   Download and Setup
   Downloading TurningPoint
   Opening TurningPoint (Zipped File)
   Installing TurningPoint (EXE File)
   Configuring Automatic Updates
   Device Setup
   Changing the Channel on the Receiver
   Locking the Receiver Channel
   Setting Up ResponseWare
   Testing the Polling Connections
   Pairing a PresenterCard

Download and Setup
TurningPoint can be downloaded through the Turning Technologies website. After it has been downloaded, the file will need to
be unzipped or installed depending on the version that was downloaded.

This section covers the following topics:

   Downloading TurningPoint
   Opening TurningPoint (Zipped File)
   Installing TurningPoint (EXE File)
   Configuring Automatic Updates

Downloading TurningPoint
The TurningPoint software is accessible through the Turning Technologies website.

Prerequisites

Please verify that your computer meets the Technical Requirements on page 8 before downloading TurningPoint.

    1 Go to www.turningtechnologies.com/downloads.
    2 Click TurningPoint and then click the link to download the PC version.
      Release notes are available in PDF format to the right of the download link.
    3 Enter the required information and click Submit.
    4 Click the link to start the download.
    5 Save the file to a specified location.

Opening TurningPoint (Zipped File)
The zipped file must be extracted before TurningPoint can be opened.

turningtechnologies.com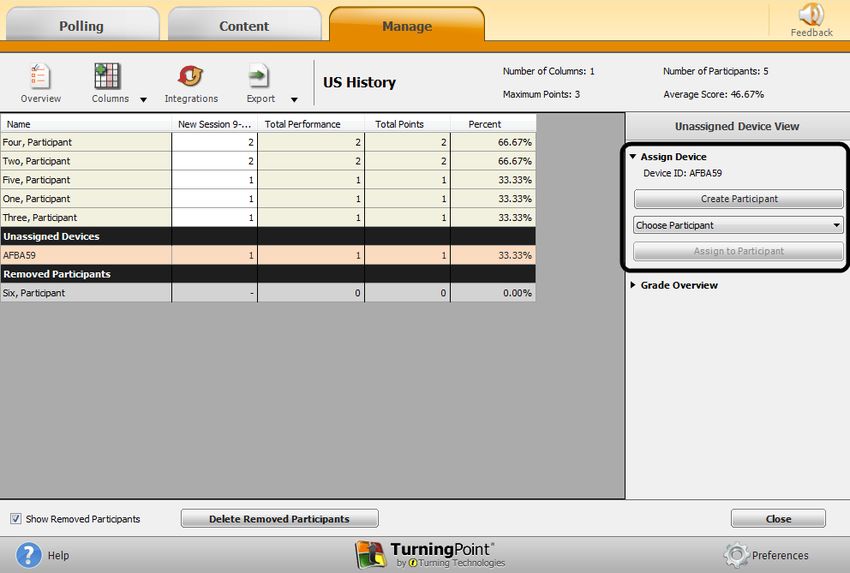
TurningPoint PowerPoint Polling for PC                                                                                    10

    1 Double-click the downloaded ZIP file.
    2 Select the desired folder location and click Unzip.
    3 Open the unzipped folder and double-click TurningPoint.exe.

                     TIP
                     Create a shortcut for TurningPoint.exe on the desktop for quicker access to the application.
                     DO NOT remove any files from the Application folder. The application will not function
                     properly if files are removed.

Installing TurningPoint (EXE File)
The Extraction Wizard installs the software onto your computer if the “install” version of TurningPoint was downloaded from the
Turning Technologies website.

    1 Double-click the downloaded setup file.
    2 Click Next.
      A window opens and displays the license agreement. Read the license agreement on the screen or click the Print button
      to send the text to a printer.
    3 Select the radio button labeled I accept the terms in the license agreement if you accept the terms.
    4 Click Next.
    5 Enter the name and organization in the fields provided and click Next.
      A window opens and displays a message that the computer is ready to install TurningPoint.
    6 Click Install.
      The computer installs TurningPoint and displays the Finish button on the page when the process is complete.
    7 Click Finish.
      Select the Launch TurningPoint checkbox to immediately open the application, or double-click the TurningPoint shortcut
      on the desktop to open the application.

Configuring Automatic Updates
Automatic updates provides users the option to update the software without first uninstalling it.

              IMPORTANT
              An internet connection must be available to check for software updates.

    1 Open TurningPoint.

turningtechnologies.com
TurningPoint PowerPoint Polling for PC 11
2 Click the TurningPoint logo located at the bottom of the Dashboard.
The About TurningPoint window is displayed.
3 Click Check For Updates.
If an update is available, TurningPoint will download the
update.
4 Optionally, check the box to automatically check for
updates.
NOTE
TurningPoint will check for updates each time
the application is opened. You may
experience a slight lag between the
application and the Turning Technologies server.
To turn off automatic updates, click the Preferences icon in the lower right corner of the Dashboard. Select
Software from the left menu and uncheck Automatically Check for Updates.
Device Setup
Participants interact with TurningPoint through clickers (ResponseCards) that communicate through a receiver or the internet
with web enabled devices (ResponseWare).
This section provides instructions for:
Changing the Channel on the Receiver
Locking the Receiver Channel
Setting Up ResponseWare
Testing the Polling Connections
Pairing a PresenterCard
Changing the Channel on the Receiver
When the receiver is plugged in, it is automatically recognized by the computer. The default channel on the receiver is set to
41. Changing the channel allows multiple receivers to accept different sets of responses when in close proximity of one
another. The ResponseCards need to be set to the same channel as the receiver when polling.
1 Plug in the receiver and open TurningPoint.
2 Click the channel number below Receiver.
The Preferences window opens.
turningtechnologies.comTurningPoint PowerPoint Polling for PC 12
3 Select the channel number from the drop-down menu under ResponseCard Channels.
4 Click Close to return to the TurningPoint Dashboard.
Next Steps
Once the receiver has been setup, it is possible to begin Testing the Polling Connections on page 15. To test the polling
connections, the ResponseCards need to be set to the same channel as the receiver.
Locking the Receiver Channel
Administrators have the ability to lock the channel to prevent users from changing channels in shared environments.
1 Open TurningPoint as the Administrator.
2 Click the Preferences icon in the
bottom right corner.
3 Select Connections from the left panel.
4 Under the ResponseDevices section,
select the desired channel and, optionally,
select Force Channel Change. The
Force Channel Change option, if selected,
allows the receiver channel to be
maintained once selected.
5 Click Lock Receiver Channels.
6 Click Close.
NOTE
To remove the channel lock,
run TurningPoint as the
Administrator and select
Unlock Receiver Channels.
turningtechnologies.comTurningPoint PowerPoint Polling for PC 13
Setting Up ResponseWare
ResponseWare must be enabled for participants to use ResponseWare as a response device.
NOTE
ResponseWare is a virtual response solution that allows participants to respond through web-
enabled devices and applications available for smart phones and tablets. If you do not have a
ResponseWare account, skip this task.
1 Click Click to Connect below ResponseWare.
The ResponseWare window opens.
2 Enter your ResponseWare Username and password in the fields provided.
3 If connecting through a proxy server on a PC:
a Check the box labeled I connect to the internet through a proxy server.
b Click Settings.
The Proxy Settings window opens.
turningtechnologies.comTurningPoint PowerPoint Polling for PC 14
c Select Automatically detect proxy settings or Manually configure proxy settings.
Manually configure proxy settings requires the proxy server address and port number to be entered in the
boxes provided.
d If required, enter the Authentication Information in the fields provided.
e Click Test to test the connection to the proxy server.
f Click Save to save the settings and close the proxy settings window.
4 Select one of the following options:
l Allow Guests - Allows participants who do not have a Participant ResponseWare account to attend the
session.
l Require Login - Participants must log into the session with their Participant ResponseWare account.
Optionally, select Do not prompt participants to enter user information. If checked, participants will not be
prompted to enter their user information prior to joining the session.
Optionally, enter the Reserved Session ID in the box provided.
NOTE
A reserved Session ID can be created through a Presenter ResponseWare account.
5 Click Login.
The License Agreement window opens the first time ResponseWare is enabled on a computer.
a Select the box labeled I have read both the Privacy Statement and the Terms of Use Agreement.
b Click Accept to accept the license agreement.
The ResponseWare window opens. The Session ID and connection information is displayed.
turningtechnologies.comTurningPoint PowerPoint Polling for PC 15
6 Click Close.
NOTE
It is possible to switch between polling environments without logging out of the current
ResponseWare session. Participants do not need to log out and join a new session.
The ResponseWare window does not need to be open for ResponseWare to be enabled. ResponseWare will remain
enabled until TurningPoint is closed. The next time the application is opened, you will need to login with your
ResponseWare credentials.
Testing the Polling Connections
The polling test is used to ensure that each response device can communicate with TurningPoint.
turningtechnologies.comTurningPoint PowerPoint Polling for PC 16
Prerequisites
Ensure the receiver is properly installed (if using
ResponseCards) and the compatible response
device to be tested is available.
1 If using ResponseCards, plug in the
receiver, open TurningPoint and click the
channel number below Receiver. If using
ResponseWare, open TurningPoint and
click the Session ID below
ResponseWare.
The Preferences window opens.
2 Click Test.
The Polling Test window opens.
There are three columns in the polling test window.
l Device ID - Displays the Device ID of the response device. A count of the devices that have responded are also
displayed next to the Device ID column header.
l Source - Displays the serial number of the receiver.
l Response - Displays the response sent from the response device.
3 Press a button on the response device.
For ResponseCard users, if the receiver and response device are set to the same channel, the response will appear in
the polling test. For ResponseWare users, the ResponseWare Device ID will appear in the polling test.
4 Click Close when finished with the polling test.
5 Click Close on the Preferences window.
Pairing a PresenterCard
A PresenterCard must be paired with TurningPoint before it can be used as a presentation device. If you do not have a
PresenterCard, skip this task.
turningtechnologies.comTurningPoint PowerPoint Polling for PC 17
1 Plug in the receiver and open
TurningPoint.
2 Click the channel number below
Receiver.
The Preferences window opens.
3 Verify that the PresenterCard is
programmed to the same channel as the
receiver.
To change the channel on the
PresenterCard:
a Press the Channel button on the
PresenterCard.
b Use the Back or Forward buttons
to select the correct channel
number.
c Press Channel to save the new
channel number.
4 Scroll to the PresenterCard section and click Change next to PresenterCard Device ID.
The Pair PresenterCard window opens.
5 Press any button on the PresenterCard.
The Device ID of the PresenterCard is displayed next to Detected Device ID.
6 Click Save.
The PresenterCard can now be used with the PowerPoint Polling and Anywhere Polling environments.
For information on how to configure the programmable buttons, see PresenterCard on page 78.
turningtechnologies.comTurningPoint PowerPoint Polling for PC 18
Before the Presentation
This chapter covers the following topics:
Inserting a Polling Slide
Question Types and Options
Creating Participant Lists
Inserting a Polling Slide
Creating content in PowerPoint is similar to the way content was created in previous versions of TurningPoint software.
1 From the TurningPoint ribbon/toolbar, click the New icon and select a slide type.
Office 2007/2010/2013
Office 2003
Office 2011
turningtechnologies.comTurningPoint PowerPoint Polling for PC 19
There are 10 slide types available. For more information, see Slide Types and Slide Preferences on page 54. For
information on how to change the chart type, see Inserting a Chart/Changing the Chart Type on page 63.
2 Enter the question text and answer text if available.
3 Repeat steps 1 and 2 as many times as needed to create the PowerPoint Polling presentation.
4 When finished, save the PowerPoint presentation.
Enhance the presentation by adding Objects on page 61 or Competition slides to help increase participation. Also, try using the
Tools available on the TurningPoint ribbon/toolbar.
Question Types and Options
The following sections explain each question type, how to set correct answers and the available question options.
There are several question types available:
Multiple Choice
Short Answer
Numeric Response
True/False
Matching
Essay
Demographic Assignment
Priority Ranking
Multiple Choice
A multiple choice question may have up to 10 answer options.
Prerequisites
A new question list must be created or opened for editing. To open a question list for editing, select the Content tab, select a
question list and click Edit Question List on the Question List Overview screen.
1 Select a question from the question list.
2 Select Multiple Choice from the Question Type drop-down menu.
3 Select the number of possible answer choices from the Choices drop-down menu.
4 Enter the correct answer in the box provided.
NOTE
Each correct answer choice needs to be separated by a semicolon. For example, “a; c; d”.
Correct answers may also be assigned by selecting Correct from the drop-down menu next
to the answer choice bullet in the scoring options.
5 Adjust the Question, Polling and Scoring options as necessary.
Question Options
l Anonymous - A question marked anonymous does not track participant list information when polling.
turningtechnologies.comTurningPoint PowerPoint Polling for PC 20
l Bullet Format - The bullet format for the answer choices can be changed from the drop-down menu.
l Multiple Responses - Multiple responses allow participants to send more than one response to a question.
When this box is checked the following options may be set: Number of Responses, Allow Duplicates and All or
Nothing Scoring.
Polling Options
l Show Results - When checked, the chart is displayed after polling is closed.
l First Response Only - When checked, TurningPoint only accepts the first response sent by each participant.
l Correct Answer Indicator - A correct answer indicator allows participants to view the correct answer(s) after
polling has been closed.
l Countdown Timer - A countdown timer provides participants with a visual cue that polling is about to close as it
counts down to zero. When the countdown expires, the countdown timer disappears and polling is automatically
closed.
l Response Grid - A response grid displays participant names by default. As participants respond, the
corresponding box changes color. If polling with an auto list, it is recommended to change the response grid text
to Device ID Only. As participants respond, a Device ID appears in the box.
Scoring Options
l Correct Point Value - The point value of the correct answer(s) can be set by entering a value in the box
provided.
l Incorrect Point Value - The point value of the incorrect answer(s) can be set by entering a value in the box
provided.
l Speed Scoring - When checked, point values will decrease relative to the time polling is kept open.
l Show Advanced Scoring - When checked, the answer value and the point value are both displayed. The point
value can be changed by entering a new value in the box provided.
Next Steps
Now that the question type and options have been defined, the question and answer text may be edited. For more information,
see Editing Question List Content.
Short Answer
A short answer question requires participants to respond with a phrase. Only participants using a ResponseCard XR,
ResponseCard NXT or ResponseWare may respond to a short answer question.
NOTE
A short answer response can have up to 160 characters in the PowerPoint and Anywhere Polling
environments. In the Self-Paced Polling environment, a short answer response can have up to 16
characters.
Prerequisites
A new question list must be created or opened for editing. To open a question list for editing, select the Content tab, select a
question list and click Edit Question List on the Question List Overview screen.
1 Select a question from the question list.
2 Select Short Answer from the Question Type drop-down menu.
turningtechnologies.comTurningPoint PowerPoint Polling for PC 21
3 Enter a keyword(s) for the correct answer in the box provided.
Multiple keywords should be separated with a semicolon.
NOTE
The following symbols are supported:
ResponseCard NXT as of firmware version 1.0.1:
.,‘“?@ #$%^&*()_+-=/[]{}√£€E
ResponseCard XR as of firmware version 1.2.1:
.,+-*/%()^@ !&E√€
4 Adjust the Question, Polling and Scoring Options as necessary.
Question Options
l Anonymous - A question marked anonymous does not track participant list information when polling.
Polling Options
l Show Results - When checked, the chart is displayed after polling is closed.
l First Response Only - When checked, TurningPoint only accepts the first response sent by each participant.
l Show Correct Keyword - After polling closes, the correct keyword(s) is displayed on the slide.
l Countdown Timer - A countdown timer provides participants with a visual cue that polling is about to close as it
counts down to zero. When the countdown expires, the countdown timer disappears and polling is automatically
closed.
l Response Grid - A response grid displays participant names by default. As participants respond, the
corresponding box changes color. If polling with an auto list, it is recommended to change the response grid text
to Device ID Only. As participants respond, a Device ID appears in the box.
Scoring Options
l Correct Point Value - The point value of the correct answer(s) can be set by entering a value in the box
provided.
l Incorrect Point Value - The point value of the incorrect answer(s) can be set by entering a value in the box
provided.
l Speed Scoring - When checked, point values will decrease relative to the time polling is kept open.
l Answer Value - The answer value can be set by selecting Correct or No Value from the drop-down box.
l Correct Keyword(s) - Multiple keywords should be separated with a semicolon.
l Enforce Capitalization - When checked, the participant response must have proper capitalization to receive
credit.
Numeric Response
A numeric response question requires participants to respond with a numeric value. Only participants using a ResponseCard
XR, ResponseCard NXT or ResponseWare may respond to a numeric response question.
NOTE
A numeric response can have up to 16 characters in all three polling environments.
Prerequisites
turningtechnologies.comTurningPoint PowerPoint Polling for PC 22
A new question list must be created or opened for editing. To open a question list for editing, select the Content tab, select a
question list and click Edit Question List on the Question List Overview screen.
1 Select a question from the question list.
2 Select Numeric Response from the Question Type drop-down menu.
3 Enter a value for the correct answer in the box provided.
4 Optionally, enter a minimum and maximum value in the boxes provided. All responses within this range will be marked
correct.
5 Adjust the Question, Polling and Scoring Options as necessary.
Question Options
l Anonymous - A question marked anonymous does not track participant list information when polling.
Polling Options
l Show Results - When checked, the chart is displayed after polling is closed.
l First Response Only - When checked, TurningPoint only accepts the first response sent by each participant.
l Show Correct Answer - After polling closes, the correct answer is displayed on the slide.
l Countdown Timer - A countdown timer provides participants with a visual cue that polling is about to close as it
counts down to zero. When the countdown expires, the countdown timer disappears and polling is automatically
closed.
l Response Grid - A response grid displays participant names by default. As participants respond, the
corresponding box changes color. If polling with an auto list, it is recommended to change the response grid text
to Device ID Only. As participants respond, a Device ID appears in the box.
Scoring Options
l Correct Point Value - The point value of the correct answer(s) can be set by entering a value in the box
provided.
l Incorrect Point Value - The point value of the incorrect answer(s) can be set by entering a value in the box
provided.
l Speed Scoring - When checked, point values will decrease relative to the time polling is kept open.
l Answer Value - The answer value can be set by selecting Correct or No Value from the drop-down box.
l Acceptable Value - Enter a specific value in the box provided.
l Acceptable Range - If a specific value is not required for a correct answer, a range can be set. Enter a minimum
value and a maximum value in the boxes provided.
Next Steps
Now that the question type values have been defined, the question text may be edited. For more information, see Editing
Question List Content.
True/False
A true/false question requires participants to respond with 1/A for true or 2/B for false.
Prerequisites
A new question list must be created or opened for editing. To open a question list for editing, select the Content tab, select a
question list and click Edit Question List on the Question List Overview screen.
turningtechnologies.comTurningPoint PowerPoint Polling for PC 23
1 Select a question from the question list.
2 Select True/False from the Question Type drop-down menu.
3 Select True, False or No Correct as the correct answer.
4 Adjust the Question, Polling and Scoring Options as necessary.
Question Options
l Anonymous - A question marked anonymous does not track participant list information when polling.
l Bullet Format - The bullet format for the answer choices can be changed from the drop-down menu.
Polling Options
l Show Results - When checked, the chart is displayed after polling is closed.
l First Response Only - When checked, TurningPoint only accepts the first response sent by each participant.
l Correct Answer Indicator - A correct answer indicator allows participants to view the correct answer(s) after
polling has been closed.
l Countdown Timer - A countdown timer provides participants with a visual cue that polling is about to close as it
counts down to zero. When the countdown expires, the countdown timer disappears and polling is automatically
closed.
l Response Grid - A response grid displays participant names by default. As participants respond, the
corresponding box changes color. If polling with an auto list, it is recommended to change the response grid text
to Device ID Only. As participants respond, a Device ID appears in the box.
Scoring Options
l Correct Point Value - The point value of the correct answer(s) can be set by entering a value in the box
provided.
l Incorrect Point Value - The point value of the incorrect answer(s) can be set by entering a value in the box
provided.
l Speed Scoring - When checked, point values will decrease relative to the time polling is kept open.
l Select True or False as the correct answer. A value of No Correct can also be selected if there is no correct
answer.
Next Steps
Now that the question type and options have been defined, the question and answer text may be edited. For more information,
see Editing Question List Content.
Matching
Matching questions may have up to 10 answer choices. To set up a matching question, a list of matches is paired with a list of
choices. Participants submit the choices in the order they correspond to the matches.
Matching questions are NOT supported in the PowerPoint Polling environment.
Prerequisites
A new question list must be created or opened for editing. To open a question list for editing, select the Content tab, select a
question list and click Edit Question List on the Question List Overview screen.
1 Select a question from the question list.
2 Select Matching from the Question Type drop-down menu.
turningtechnologies.comTurningPoint PowerPoint Polling for PC 24
3 Select the number of matches from the Matches drop-down menu.
4 Select the number of choices from the Choices drop-down menu.
5 Enter the correct answers in the box provided.
NOTE
Each correct answer choice needs to be separated by a semicolon. For example, “a; c; d”.
Correct answers may also be assigned by selecting the correct answer choices that
corresponds to the matched item.
6 Adjust the Question, Polling and Scoring Options as necessary.
Question Options
l Anonymous - A question marked anonymous does not track participant list information when polling.
l Bullet Format - The bullet format for the answer choices can be changed from the drop-down menu.
l All or Nothing Scoring - When checked, the participant must choose each correct answer to receive points.
Polling Options
l Show Results - When checked, the chart is displayed after polling is closed.
l Countdown Timer - A countdown timer provides participants with a visual cue that polling is about to close as it
counts down to zero. When the countdown expires, the countdown timer disappears and polling is automatically
closed.
l Response Grid - A response grid displays participant names by default. As participants respond, the
corresponding box changes color. If polling with an auto list, it is recommended to change the response grid text
to Device ID Only. As participants respond, a Device ID appears in the box.
Scoring Options
l Correct Point Value - The point value of the correct answer(s) can be set by entering a value in the box
provided.
l Incorrect Point Value - The point value of the incorrect answer(s) can be set by entering a value in the box
provided.
l Speed Scoring - When checked, point values will decrease relative to the time polling is kept open.
l Show Advanced Scoring - When checked, the answer value and the point value are both displayed. The point
value can be changed by entering a new value in the box provided.
Next Steps
Now that the question type and options have been defined, the question and answer text may be edited. For more information,
see Editing Question List Content.
Essay
Only participants using a ResponseCard XR, ResponseCard NXT or ResponseWare may respond to an essay question.
NOTE
An essay response can have up to 160 characters in all three environments.
Prerequisites
turningtechnologies.comTurningPoint PowerPoint Polling for PC 25
A new question list must be created or opened for editing. To open a question list for editing, select the Content tab, select a
question list and click Edit Question List on the Question List Overview screen.
1 Select a question from the question list.
2 Select Essay from the Question Type drop-down menu.
3 Adjust the Question and Polling Options as necessary.
Question Options
l Anonymous - A question marked anonymous does not track participant list information when polling.
Polling Options
l First Response Only - When checked, TurningPoint only accepts the first response sent by each participant.
l Countdown Timer - A countdown timer provides participants with a visual cue that polling is about to close as it
counts down to zero. When the countdown expires, the countdown timer disappears and polling is automatically
closed.
l Response Grid - A response grid displays participant names by default. As participants respond, the
corresponding box changes color. If polling with an auto list, it is recommended to change the response grid text
to Device ID Only. As participants respond, a Device ID appears in the box.
Scoring Options
l TurningPoint does not score essay slides. Manual score adjustments can be made in Results Manager.
Next Steps
Now that the question type has been defined, the question text may be edited. For more information, see Editing Question List
Content.
Demographic Assignment
A demographic assignment question may have up to 10 answer choices. A demographic assignment question can also be
used to assign participants to teams for competitions.
Prerequisites
A new question list must be created or opened for editing. To open a question list for editing, select the Content tab, select a
question list and click Edit Question List on the Question List Overview screen.
1 Select a question from the question list.
2 Select Demographic Assignment from the Question Type drop-down menu.
3 Select the number of possible answer choices from the Choices drop-down menu.
4 Adjust the Demographic, Question and Polling Options as necessary.
Demographic Options
l Demographic Grouping - Categorize the demographic options for easier reporting.
l Use in Competition - The answer options become teams and can be used in team competitions. When
unchecked, the slide is no longer considered a Team Assignment slide.
l Save to Participant List - The competition information is saved to the current participant list.
Question Options
l Bullet Format - The bullet format for the answer choices can be changed from the drop-down menu.
turningtechnologies.comTurningPoint PowerPoint Polling for PC 26
Polling Options
l Show Results - When checked, the chart is displayed after polling is closed.
l First Response Only - When checked, TurningPoint only accepts the first response sent by each participant.
l Countdown Timer - A countdown timer provides participants with a visual cue that polling is about to close as it
counts down to zero. When the countdown expires, the countdown timer disappears and polling is automatically
closed.
l Response Grid - A response grid displays participant names by default. As participants respond, the
corresponding box changes color. If polling with an auto list, it is recommended to change the response grid text
to Device ID Only. As participants respond, a Device ID appears in the box.
Next Steps
Now that the question type has been defined, the question and answer text may be edited. For more information, see Editing
Question List Content.
Priority Ranking
Priority ranking questions may have up to 10 answer choices. Items are ranked by the participants and then scored based on
response weights.
Prerequisites
A new question list must be created or opened for editing. To open a question list for editing, select the Content tab, select a
question list and click Edit Question List on the Question List Overview screen.
1 Select a question from the question list.
2 Select Priority Ranking from the Question Type drop-down menu.
3 Select the number of choices and number of responses from the drop-down menus.
4 Adjust the Question, Polling and Scoring Options as necessary.
Question Options
l Anonymous - A question marked anonymous does not track participant list information when polling.
l Bullet Format - The bullet format for the answer choices can be changed from the drop-down menu.
l Response Limit - The response limit dictates the number of answer choices a participant can select for a
specific question.
l Allow Duplicates - When checked, participants are permitted to select the same answer choice more than
once.
l Response Weights - Set the value for each response by selecting a value from the drop-down menu or enter a
value from 0 to 99999. Repeat for the remaining answers.
Polling Options
l Show Results - When checked, the chart is displayed after polling is closed.
l Countdown Timer - A countdown timer provides participants with a visual cue that polling is about to close as it
counts down to zero. When the countdown expires, the countdown timer disappears and polling is automatically
closed.
l Response Grid - A response grid displays participant names by default. As participants respond, the
corresponding box changes color. If polling with an auto list, it is recommended to change the response grid text
to Device ID Only. As participants respond, a Device ID appears in the box.
turningtechnologies.comTurningPoint PowerPoint Polling for PC 27
Next Steps
Now that the question type and options have been defined, the question and answer text may be edited. For more information,
see Editing Question List Content.
Creating Participant Lists
Participant lists can be created by entering the participant information into TurningPoint or by downloading the information from
a Learning Management System (LMS).
This section covers both methods for creating a participant list.
Manually Creating a Participant List
Downloading a Participant List from an Integration
Manually Creating a Participant List
Participant lists created in TurningPoint can be used for PowerPoint Polling, Anywhere Polling and Self-Paced Polling.
1 Select the Manage tab.
2 Click the Participant List drop-down menu and select New.
The Create Participant List window opens.
3 Name the participant list, select the Create Manually radio button and click Create List.
The Participant List Editor is displayed.
4 Select a cell and enter the participant information
relevant to that particular category. For example,
enter the participant’s last name under the Last
Name column.
TIP
If there is a CSV or TXT file that
already contains the participant
information, drag and drop the file into
the Participant List Editor. For more
information, see Importing a CSV or
TXT File.
It is also possible to copy and paste
text from an Excel file directly into the
Participant List Editor.
turningtechnologies.comTurningPoint PowerPoint Polling for PC 28
5 Press Enter on the keyboard to add another participant.
6 When finished, click Save and Close to save the participant list and return to the Participant List Overview screen.
Next Steps
To edit existing participant list information, see Modifying Participant Lists .
Downloading a Participant List from an Integration
Participant information can be imported from a student roster in a Learning Management System (LMS).
NOTE
Importing from an LMS can only be used if the integration has been installed on the LMS server.
Please contact your IT Department to confirm that the LMS integration is installed and configured
to operate with TurningPoint.
To import a participant list with an exported file from an Integration, see
Importing Participant Lists.
1 Select the Manage tab.
2 Click the Participant List drop-down menu and select New.
The Create Participant List window opens.
3 Select the Download from Integration radio button and click Create
List.
The Connect to Integration window opens.
4 Select the Integration from the Integration drop-down
menu.
5 Enter the Server Address, Username and Password in
the appropriate fields.
6 If applicable, select the Institution from the Select an
Institution drop-down menu.
7 Click Connect.
Optionally, click Remember this information to have the
Integration, Server Address and User Name stored for
future use.
The Import Participant List window opens.
8 Select the course or courses to import. Optionally, select the Select All checkbox to import all courses.
9 Click Import.
A confirmation box of the import is displayed.
10 Click OK.
The participant list is added to the left panel of the Participant List
Overview screen.
11 Select the participant list to view the participant information.
Next Steps
To edit participant list information, see Modifying Participant Lists.
turningtechnologies.comTurningPoint PowerPoint Polling for PC 29
WARNING
DO NOT alter the User ID when editing a participant list from an LMS. Editing the User ID may
cause errors when uploading the results to the LMS.
turningtechnologies.comTurningPoint PowerPoint Polling for PC 30
During the Presentation
This chapter covers the following topics:
Opening the PowerPoint Polling Environment
Resetting a PowerPoint Polling Session or Charts
Running a Slide Show
Saving a PowerPoint Polling Session
Opening the PowerPoint Polling Environment
The PowerPoint Polling environment is embedded directly into PowerPoint.
1 Open TurningPoint.
2 Optionally, select a participant list, question list or PowerPoint presentation from the left panel.
If using a question list, TurningPoint will automatically parse the content into PowerPoint slides. This may take a few
moments if there are a large number of questions in the question list. For more information on participant lists, see
Participant Lists. For more information on question lists, see Question Lists.
3 Click PowerPoint Polling.
PowerPoint opens with TurningPoint.
Office 2007/2010/2013
Office 2003
Next Steps
Polling slides can be created directly in PowerPoint. There are also tools available for enhancing the presentation. For more
information, see Content.
Resetting a PowerPoint Polling Session or Charts
The reset function in TurningPoint allows users to prepare the presentation for polling.
WARNING
Once the reset function has been performed, it cannot be undone.
turningtechnologies.comTurningPoint PowerPoint Polling for PC 31
1 Click the Reset icon on the TurningPoint ribbon/toolbar.
2 Select one of the following options:
l Session - All of the results from the session file will be reset and all of the participant data will be removed.
l Selected Charts (Slides) - Selected chart(s) will be reset but the session data and participant information will
NOT be removed. When the presentation is run, the previous session data will also be stored in the session file.
3 If Session was selected in the previous step, click Save or Don’t Save to save the current session data.
Next Steps
Now that the session or charts have been reset, a new session can be run. For more information on running a session, see
Running a Slide Show on page 31.
Running a Slide Show
Use the PowerPoint Slide Show functionality to run the polling presentation.
Prerequisites
To poll in PowerPoint, a presentation with polling slides or a question list is required. To track results based on participants, a
participant list is also required. For more information on creating a PowerPoint Polling presentation, see Content.
1 Plug in the receiver or establish a ResponseWare session.
NOTE
For information on how to establish a ResponseWare session, see Setting Up
ResponseWare on page 13.
2 Open TurningPoint and select a participant list and a question list, or a PowerPoint presentation, if applicable.
3 Click PowerPoint Polling.
The TurningPoint Dashboard closes and PowerPoint opens. If using a question list, TurningPoint will automatically
parse the content into polling slides. This may take a few moments if there are a large number of questions in the
question list.
4 Open the PowerPoint presentation that contains the question slides if a question list has not been chosen.
5 Select the TurningPoint ribbon/toolbar.
6 Verify the correct participant list is loaded and Live Polling is selected in the Polling drop-down box.
7 Start the Slide Show.
8 Depending on the Polling Options selected during content creation, the slide may need to be advanced to open polling.
Press the spacebar, enter/return key or down arrow to advance the slide. If using a mouse, a mouse click also
advances the slide. Alternatively, a PresenterCard may be used to advance slides and control polling. For more
information on PresenterCard, see Pairing a PresenterCard on page 16.
9 Continue until the Slide Show is finished.
Next Steps
Now that the Slide Show is finished and the results have been gathered, the session data needs to be saved in order to
generate reports and manage results.
For more information on saving session files, see Saving a PowerPoint Polling Session on page 32.
turningtechnologies.comTurningPoint PowerPoint Polling for PC 32
Saving a PowerPoint Polling Session
Saving the session data enables a user to generate reports and manage results.
Prerequisites
An audience must be polled with a PowerPoint presentation that contains polling slides.
1 From the TurningPoint ribbon/toolbar, click the Save icon and select Save Session.
WARNING
Saving the PowerPoint presentation through PowerPoint does NOT save the session data!
2 Session files should be stored in the default save location. If the session is saved in another location, it will then need to
be placed in the TurningPoint Sessions folder or manually imported into TurningPoint.
3 Name the session file and click Save.
4 Close PowerPoint to return to the TurningPoint Dashboard.
Next Steps
Now that the session has been saved, reports can be generated and the results can be managed. For more information on
managing results, see Individual Session Management on page 73 or Results Manager on page 34. For more information
on generating reports, see Reports.
turningtechnologies.comTurningPoint PowerPoint Polling for PC 33
After the Presentation
This chapter covers the following topics:
Generating Reports
Results Manager
Generating Reports
There are six types of session reports (Results by Question, Results by Participant, Results Detail, Results by Demographic,
Comparative Results and Session Log Report). Each report can be customized by selecting the data options on the right side
of the reports window.
1 From the Manage tab, select a session from the left panel.
The Session Overview screen is displayed.
2 Click Reports at the bottom of the Session Overview screen.
TIP
Double-clicking the session name will also open the reports window.
turningtechnologies.comTurningPoint PowerPoint Polling for PC 34
3 Select the report type from the drop-down menu in the upper right corner.
The report session header appears on all reports. The session header includes the session name, date created, active
participant count, average score and the question count.
NOTE
The calculation for the average score is the sum of the total points for each active participant
divided by the number of active participants.
For more information about the types of reports available, see Reports.
Results Manager
In Results Manager, all session files are associated with a participant list that resembles a gradebook.
Results Manager, a session manager designed like a gradebook, organizes session files associated with a participant list.
Participant and session data can be viewed as well as edited within Results Manager.
This section covers the following topics:
Overview
The Results Manager Overview screen displays all of the sessions associated with a participant list. The top right of the
screen displays the participant list name, number of columns, number of participants, maximum points and average score.
Participant names (last name, first name) are displayed in the first column. The User ID is displayed if the participant list does
not contain first and last names. The Device ID is displayed if the participant list does not contain names or User IDs.
Columns with a white background represent individual sessions or manual columns. Columns with a shaded background are
compiled by TurningPoint and can be hidden. Session columns are arranged by the order in which they were added to the
TurningPoint Sessions folder. The sessions are arranged alphabetically if several sessions are added to the Sessions folder at
once. In Results Manager, columns may be manually reordered, if necessary.
turningtechnologies.comTurningPoint PowerPoint Polling for PC 35
The Overview panel on the right changes depending on the area selected in the Results Manager Overview. Each category can
be expanded to reveal additional options.
TurningPoint automatically saves any changes made within Results Manager.
This section covers the following topics:
Opening the Results Manager Overview
Adding a Manual Grade Column
Reordering the Session Columns
Overwriting Session Scores
Opening the Results Manager Overview
The Overview screen displays options that can be changed to reflect different data sets. TurningPoint remembers your Results
Manager display options.
1 From the Manage tab, select a participant list and click Results Manager.
The Results Manager screen is displayed.
turningtechnologies.comTurningPoint PowerPoint Polling for PC 36
2 Expand the View Options category in the Overview panel on the right and adjust the options as necessary.
l Show All Columns - Click the button to display all possible columns on the
Results Manager screen.
l Performance Points - Check or uncheck the boxes to show or hide
performance points Per Session, Total or Possible columns.
l Attendance Points - Check or uncheck the boxes to show or hide attendance
points Per Session, Total or Possible columns.
l Total Points Possible - Check or uncheck the box to show or hide the Total
Points Possible column.
l Benchmark - Check or uncheck the box to show or hide the Benchmark
column.
l Performance Scale - Check or uncheck the box for the Performance Scale
column. For instructions on how to set the Performance Scale, see step 4.
3 Expand the Attendance category.
IMPORTANT
Attendance points are not applied to a session unless the session has
been viewed in Results Manager.
l Attendance Points - Attendance points are awarded to participants for
responding to a certain percentage of questions within a session. The points are
added to the total participant score. Enter the attendance points in the box
provided.
l Session Threshold - The session threshold is the percentage of questions a participant is required to answer to
earn attendance points. Enter the session threshold in the box provided.
4 Expand the Benchmarks category.
l Benchmark - A benchmark is a standard by which a grade can be measured.
Benchmarks can be set for all sessions in the Overview. A participant falling below the
benchmark will display the percentage in red, and a participant falling at or above the
benchmark will display the percentage in green.
l Performance Scale - A performance scale can be set to display a text or numeric
value equal to how the participant has performed across all sessions. The default is set
to view as an educational grading scale, but can be adjusted to fit other purposes.
Default values can be restored at any time by clicking Restore Defaults. Any changes
will be lost and replaced with the default values.
turningtechnologies.comTurningPoint PowerPoint Polling for PC 37
NOTE
If the lower value of a range is adjusted, the upper value of the range below will automatically
adjust. Additional ranges can be added by entering a number greater than zero for the lowest
range value.
Adding a Manual Grade Column
Manual grade columns can be added for assignments that were not conducted in one of the three polling environments. These
values will be added to overall average scores and will be included in the export options.
1 From the Manage tab, select a participant list and click Results
Manager.
2 Select a column (by selecting the column header), click the Columns
icon and select Add Manual Column.
The Manual Column window is displayed.
3 Enter the column name, date, performance points value and
attendance points value.
4 Click Add.
5 Double-click a cell in the new column to manually enter the participant’s grade.
Reordering the Session Columns
A user can reorder the Results Manager session columns to fit specific needs. The course must contain more than one
session.
1 From the Manage tab, select a participant list and click
Results Manager.
2 Click the Columns icon and select Reorder Grade
Columns.
The Reorder Grade Columns window is displayed.
3 Use the up and down arrows to reorder the sessions.
Alternatively, sessions can be dragged and dropped into
place or sorted by clicking on the column headers.
4 Click Save to apply the changes.
The sessions now appear in user defined order.
TIP
The sessions will also reflect the new order in
the Manage tab under the associated
participant list.
Overwriting Session Scores
Results Manager allows users to manipulate scores when needed. This is useful if grading on a curve or if a new score needs
entered for a specific participant.
turningtechnologies.comYou can also read