Anatomy of a Food Photograph - by Harriet Harcourt for Activity & Nutrition Aotearoa - Activity and Nutrition ...
←
→
Page content transcription
If your browser does not render page correctly, please read the page content below
Anatomy of a Food Photograph
by Harriet Harcourt
for Activity & Nutrition Aotearoa

 ©
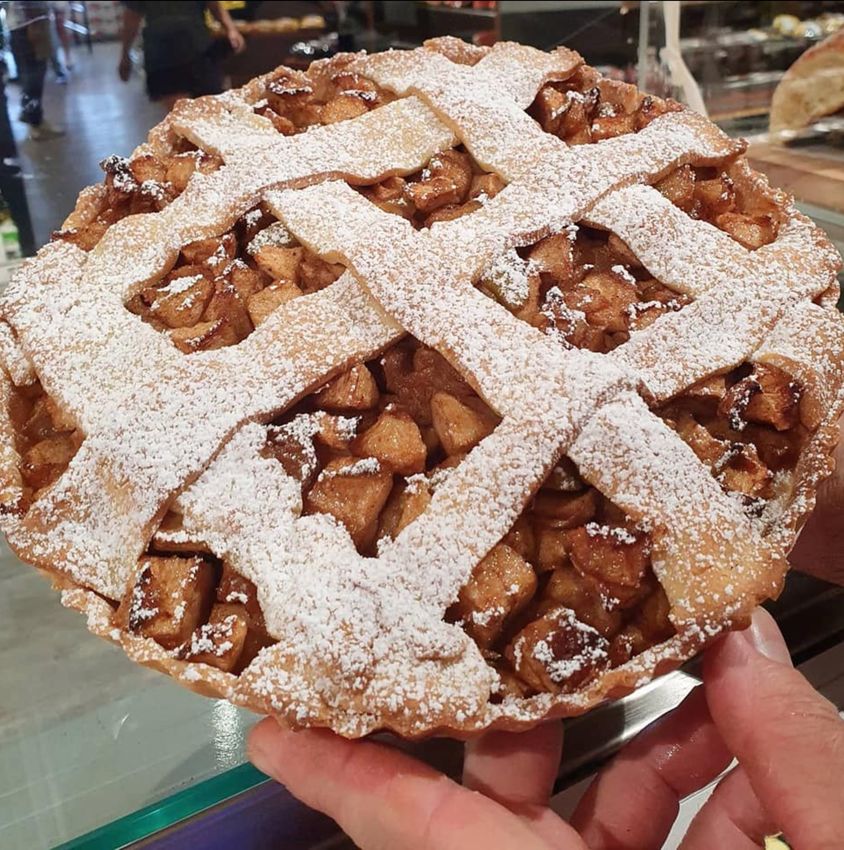
Life is uncertain, shoot dessert first!

This is a screen grab of a social media post by a local business
selling gourmet foods; according to their caption this is one of
their signature dishes.

• The light is flat and unfriendly, with hard shadows
• The pie is out of focus
• The board is sucking the colour out of the pie
• The chocolate drops are irrelevant
• It’s a hot mess (in my opinion)

Let’s see what we can do - I’m going to recreate their image my
way..

 Image reproduced with permission of the owner
• Neutral props bring out the
 colour of the pie
• Side light from window
• Light bounced in from right
 using a piece of white
 foamboard, so shadows are
 softer
• Ice cream has texture – it
 doesn’t need the chocolate
 drops
• Mint stays for pop of colour,
 but less of it
• Some crumbly, flaky bits
 retained but the filling is still
 exposed
• Tells the story (delicious
 dessert ready to be
 devoured)

Which one would you buy?
one of these things is not like the other one..

• Their “signature product” again – but I found them all in the
 freezer.

• They should be walking out the door fresh - they actually taste
 great (and I’m fussy about pastry!).

• The background is distracting; one suggestion if they had
 really wanted to post the picture immediately would be to hold
 it out in front of them so the chef’s jacket or an apron was the
 background. This would add to the story of inhouse fresh-
 baked pie. (Watch out for grubby hands and nails!).

• A good example of why is is worth taking a bit of time to get a
 better shot.

 Image reproduced with permission of owner
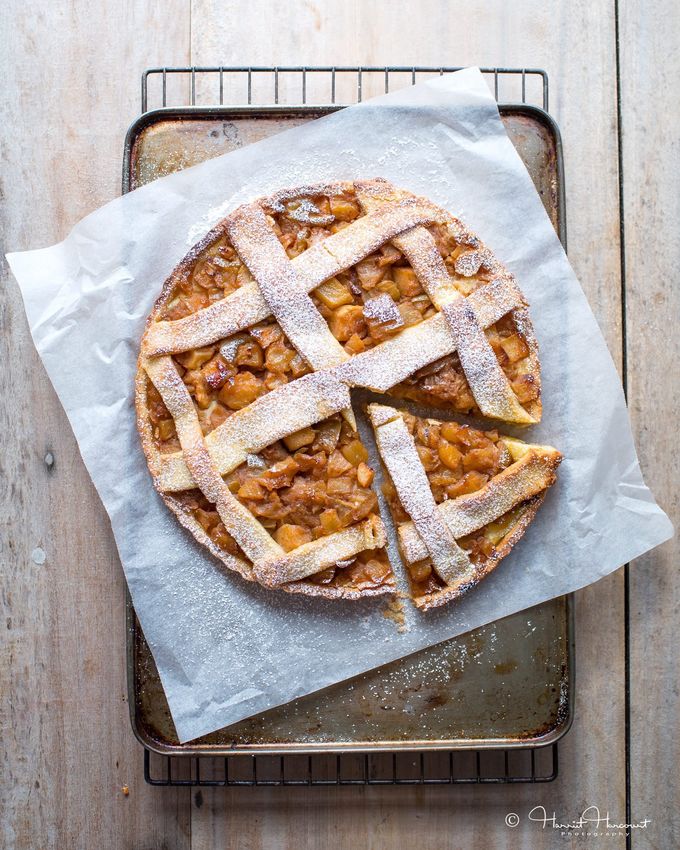
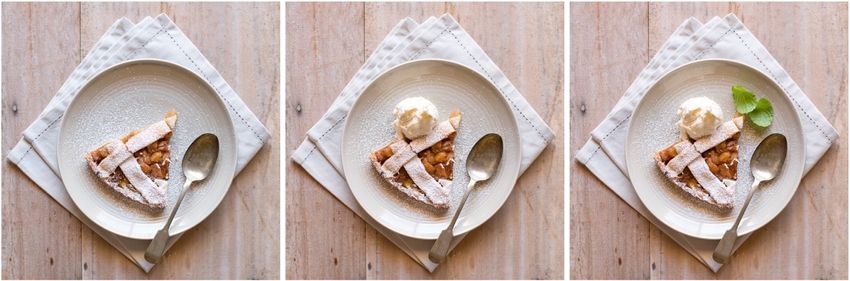
Spiced Apple Pie

• Neutral colours & minimal props
• Baking tray gives a sense of scale
• Window light from the top of the frame
• One cut piece makes the shape more interesting
• Looks fresh, warm and inviting
• Shot from above makes texture visible
• Rectangular props give nice counter-balance to round
 pie

Before & after

Behind the scenes

• Natural light from side
 Fancy diffuser
• Diffuser to spread light evenly
 One or two bowls to
 choose from
• Note use of special diffuser stand

• White foamboard reflector –
 more about that later

Next.. noodling around
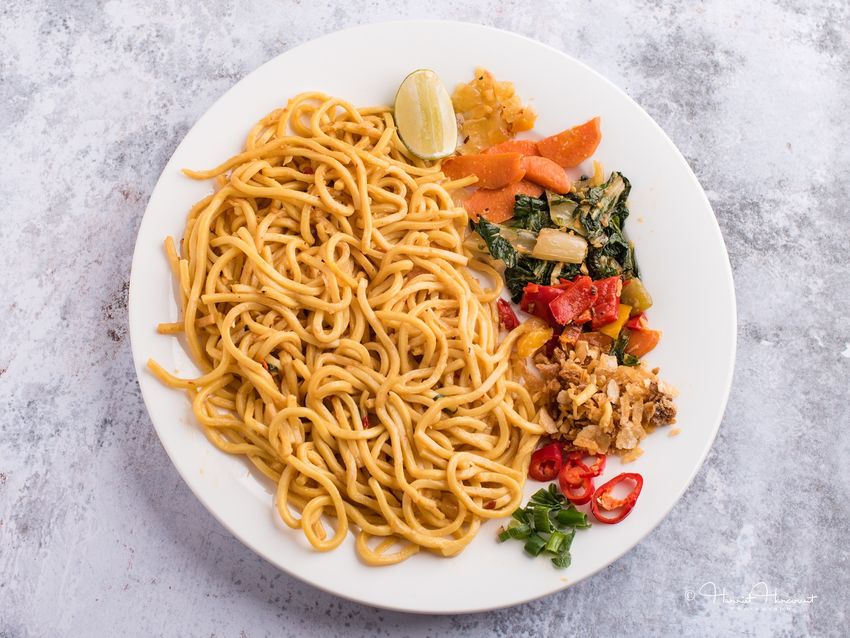
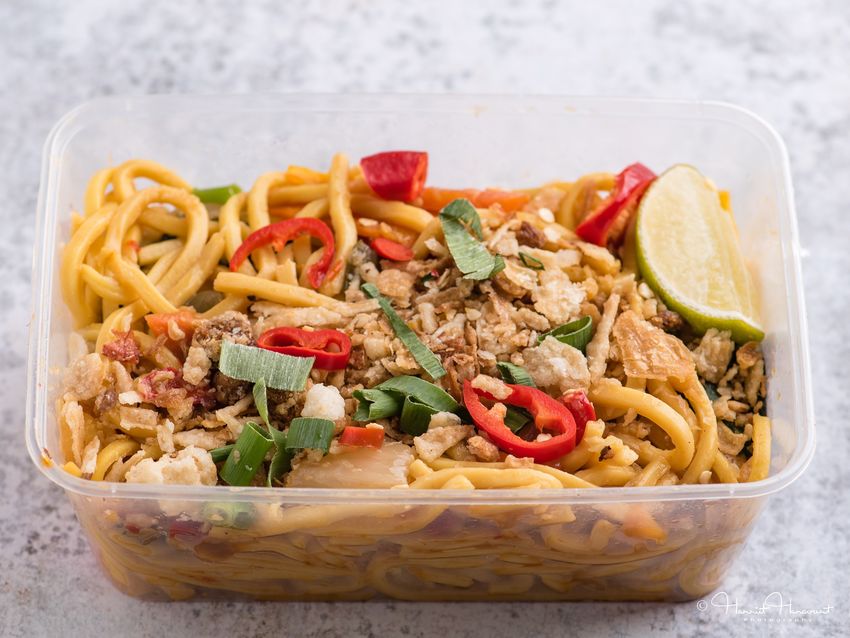
Hokkien Noodles

 • an example of a take home ready-
 meal in need of some TLC for
 product shot
 • first, I took all the bits out to see
 what I had to work with – we’ll get to
 that in a second..
 • I reassembled the noodles in the
 container so that more pieces of
 vegetable were visible, and the
 noodles had a nice shape (not too
 many ends showing)
 • next, I added freshly cut garnishes –
 spring onion, chilli and lime
 • finally, a dab of oil on some of the
 vegetables and noodles for shine
 and a sprinkle of fried shallots
 • let’s see how that worked out..
“deconstructed”
et voilà!

• reassembled
• freshly cut garnishes
• touches of oil for highlights
• still edible!
Let’s see that again
No shaving cream was used in the following scenes..
Thai Beef Salad

• ready meal in takeaway container with lid
 removed
• brief is a simple serving suggestion type
 of shot for social media
• not very inspiring?
• separate components
• give the herbs & salad a water bath and
 spin
• cut some new red onion
• this time we’ll use some simple props..
Making the process part of the story..

• tease out the noodles so they’re visible

• rinse the meat under the tap to make it look
 moist and pink again (and get rid of the dried
 shallot crumbs).

• use the sauce to garnish and add shine

• fluff up the herbs & salad

• added bonus, nice action shot

• Shot from ¾ angle, overhead would work too
Thai Beef Salad

• everything used from the
 container as purchased, apart
 from fresh red onion and dried
 shallots

• could add cutlery and/or napkin
 (if you want to be authentic,
 don’t use chopsticks – Thai food
 is eaten with a spoon & fork)

• Normally, if I had been shooting
 this for a client, I would have
 topped up the chilli sauce in the
 bowl.
Before & after..
Let’s walk through a whole shoot now..
Some of the prepared
elements – ready to stand in
while I set up the rest of the
scene

 Assorted napkins ready to audition

 Beginning the process.. puts everything in, takes most of it out again
Is this going to add anything?

NO!!
But this has to go – it’s too dark

Definite improvement – leaning towards all neutral props and make food colours pop
Maybe?
 Yeah, nah – not today
Also, no.. thanks
 anyway

Oh, I like you better!
Even more neutral!
 Why are you still here?

Relocated
Oh, hello pop of colour!
 YES!!

 Maybe, but you’ll need some
 ice and lemon if you’re staying
Changed my mind, you’re out

So now I want to fiddle with the layout some more
Nearly there..
Oh wait – change of plate!
Actual food!
Tweaking..

 You need to go

 Not liking this weird sausage angle..
Much better! :D
Further over on the plate

 I remembered
 to fill it!
OK, all good to go.. or are we?

 Sausies look dull and fatty
 (because they are cold)

 (Plate is now higher in the frame too)
All fixed.. NOW we are good to go
Well, there’s no going back now, but we’re not there yet..
Getting there.. But I feel like I could go a bit further
Nice, but what the heck – let’s go for broke!
Now I’m happy – it’s all connected
Be careful when adding pepper – it can look like dirt..
Has this water drop been bugging anyone else
 the whole way through?

 One final, tiny tweak
Notes:

• All the food was cold except the
 gravy which was just warm enough
 to pour.

• Sausages, tomatoes & carrots
 given a little dab of oil with a soft
 paintbrush to make them shine.

• The line through the wooden surface
 is not something I would normally
 leave – it’s good to see the things
 you shouldn’t do as well!

• I feel like I’ve achieved my aim of
 making the food really pop, and all
 the props are taking a back seat.

• The light was positioned at the top
 of the frame, and I had a reflector at
 the bottom of the frame.
 (I started out with the intention of
 shooting this in natural light, but we
 were just getting into the tail end of
 Cyclone Seroja and it got rather dark
 in my little room).

• From “Go” to “Whoa” this took me
 about 1½ hours to style and shoot
 on my own – that’s not counting the
 food prep.

• There are already things about this
 that I would change – but sometimes
 you just have to stop!

• Yes, I heated it all up and we had it
 for dinner. Sometimes I wouldn’t
 recommend eating the food on a
 shoot if it has been sitting
 around/handled a lot. Mediterranean Lamb Sausages with Mash, Scorched Cherry Tomatoes, Roasted Dutch Carrots & Gravy
So, what bits and bobs do I need for all of this?

• Obviously, a camera of some sort – the best camera is the one you have on hand at the time.

• Yes, this includes your ‘phone – one of the first pictures I sold was taken on my mobile.

• (Because of the broad nature of this presentation I’m not going to get too deeply into the specifics of camera gear – that’s for another time)

• But for those of you who are really interested:
 I shoot with a Nikon D750 camera, and I have prime lenses (28mm, 35mm, 50mm, 85mm portrait, 105mm macro)

• There are much cheaper and simpler cameras that you can take great pictures with, and there are considerably more expensive and sophisticated
 cameras than what I use: it’s how you use them that counts.

Also, diffusers, reflectors and a baby food styling kit: here’s where you can lift your game a little by having on hand some of the basics…
Here’s what using a reflector will do for your image

• A reflector does not have to be a fancy piece of expensive photographic equipment.
• For these photos I used the lid of a polystyrene box and an A clamp from Bunnings to keep it upright (behind the scenes pic to follow)
• Other simple reflectors can be concocted from white foamboard, foil from the kitchen drawer and mirrors, to name a few

 identical set up

 photos taken
 moments apart

 identical edits

 Light coming from the window on the left Reflector placed to the right to bounce light into the shot

 Let’s see how that looks from “behind-the-scenes..
• Working inside in open shade
 with the light coming from the
 window on the left.

 • Light being reflected into the
 right side of the picture with a
 highly sophisticated piece of
 equipment: the lid from a
 polystyrene box and an A clamp
 from Bunnings as a base.

 • Fancy bought diffuser (not in
 place) - with its cover on it
 becomes a reflector.

 • Camera is tethered to laptop, no
 diffuser in use at this point

 • Baking paper and masking tape
 are a thing too.

 • Dirty windows (clutching at straws
 now!)

(Note to self: ask beloved to clean the windows)
Identical setup in the window – the
 sun has moved further in now..

 I actually quite like the mixed effect
 on the left, but it isn’t always helpful

 Having placed a diffuser in between
 my subject and the window you can
 see it has evened out the light
 considerably.

And here’s the effect that a diffuser can have on your picture (don’t try the scented kind – it won’t work)
Reflectors:

 5-in-1 collapsible reflector

Polystyrene box lid Foil

 White Foam Core Mirror
 (2 pieces taped together to make mini V-flat)

 Foil cake thing-ys
Diffusers:

 Trusty loved one demonstrating in
 Quite literally, Mum’s old net
 curtain from Wellington! garden
 Diffusion paper
 (workout optional)

 Baking paper No. 5 of the 5-in-1 reflector,
 actually a diffuser

 Reflectors:
Baby food styling kit:

 Brush – useful to brush off crumbs etc, apply oil
 to give shine

The three things I
don’t leave home
without – whether I’m
the photographer or
stylist, or both.

 Water spritzer – adds moisture, freshness & shine
 when oil isn’t appropriate

 Tweezers: the number one useful tool for removing specks or crumbs,
 adding specks or crumbs, adding tiny herbs, and generally not
 mucking up delicate adjustments where your big fingers are likely to!
Props and surfaces:

For this presentation I deliberately used very simple everyday
props for my example photos: a cooling rack, baking tray, baking
paper, basic crockery & cutlery..

As a professional I have a huge collection of props, and there is
always the temptation to use something because you just bought
it/it’s your new favourite thing/it’s your old favourite thing/it’s
cool..

One word: DON’T!

OK, two words: PLEASE DON’T!

Unless it makes sense and adds something to the story, leave it A few examples of how people, bodies and
 hands can make great backdrops/props
out!
Which leads me to garnishes; always use edible garnishes that
relate to the food you are showcasing - if it’s not in the
dish/doesn’t make sense – please don’t do it!!
(Reminds me of that time I was catering, and I saw an elderly gent
carefully spooning some pot pourri onto his plate – yikes!)

Also, props are probably optional or unnecessary for a lot of you
– the best prop or backdrop available may be a willing hand
model, an already set table in a restaurant, a graffitied wall,

These can also give context and a sense of scale.
About Harriet Harcourt:

Harriet Harcourt is a seasoned food professional with more than 30 years’ experience.

A Cordon Bleu graduate, Harriet’s culinary skills and experience span a wide spectrum of activities across the
food industry. This includes food styling, catering, film catering, demonstrating, recipe & product development,
food columnist, and blogger.

Harriet was the food technician for “The Lord of the Rings” Trilogy, “King Kong” and “Avatar”; designing and
creating props food as part of those stories filmed in New Zealand. (This included major scenes involving huge
volumes of food, as well as producing ‘identical’ food items in two different scales when required.)

After moving to Western Australia, Harriet added photography to her skill set and has since been steadily
building a client base which includes the New York Times along with iconic West Australian brands Mrs Mac’s,
Fogarty Wine Group, Clancy’s Fish Pubs, WA Potatoes, and many others.

In April 2021 she won the Marks & Spencer Food Portraiture category in the Pink Lady® Food Photographer of
the Year Awards; an international competition that attracted over 10,000 entries from 80 countries this year.

 Please note: No part of this document may be re-published, copied or distributed without the prior written consent of the copyright owner, Harriet Harcourt
 ©Harriet Harcourt 2021
You can also read