Android Device User Manual - Version: 3.1.2 - August 2013 www.oncaring.com
←
→
Page content transcription
If your browser does not render page correctly, please read the page content below
Android Device
               User Manual
                   Version: 3.1.2

August 2013
www.oncaring.com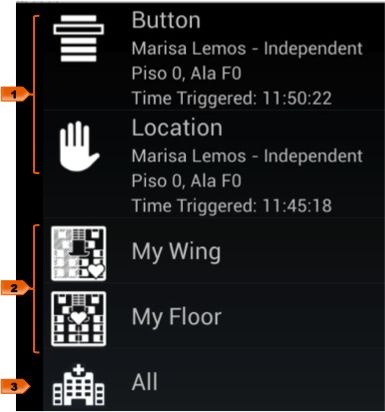
Table of Contents:
Introduction .................................................................................................... 3

Caregiver Android device ............................................................................. 4

 Alarms ..................................................................................................................... 5

 Patients ................................................................................................................... 7

 Users ....................................................................................................................... 8

 Settings ................................................................................................................... 9


August 2013
www.oncaring.com                                                                                              Page 2 of 9
Introduction
  This document describes in detail how one of the components of the onAll
system works in particular for one type of device – the caregiver android
device.
  The following diagram describes the flow of information and interaction
between the main elements of the system and identifies where the caregiver
device intervenes.

   The caregiver device is one essential part of the workflow.
   As described in the Platform User Interface Manual, there are two types of
caregiver devices: the badge or tag and the android device.
   Common to both device types, is the possibility of the care provider to
receive the customer’s alarms and resolve them.
   In the specific case of the Android device it offers some other functionalities
that otherwise could only be done via the Web Platform. In the following
sections you will be able to learn about all of the supported actions on this
device type.

August 2013
www.oncaring.com                                                     Page 3 of 9
Caregiver Android device
   This device is an android smartphone with the onAll-caregiver application
installed. Right now, the minimum requirement for the Android OS to run this
app is version 3.0 (Honeycomb).
   For further details about the app installation and configuration, please refer
to the Installation Manual.
   The onAll-caregiver app is automatically launched once installed by the
Administrator, no there is no action to start using it, just turn on the mobile
phone and the app should appear in the screen.

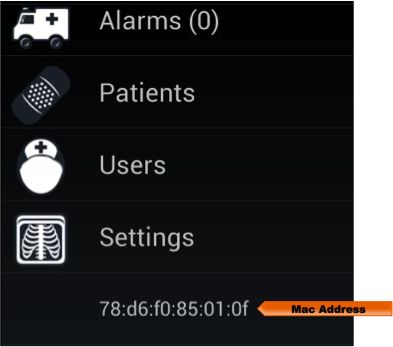
   It shows a menu with four options: Alarms, Patients, Users and Settings.
   Right after the menu, there is an identification string (named mac address)
that is the id of the device. It will be through this id that the sensor will be
identified in the Web Platform in order to be assigned or un-assigned.

August 2013
www.oncaring.com                                                    Page 4 of 9
Alarms
   This menu option shows inside the brackets the total number of active
alarms.

   Clicking on it you get the list of the active alarms assigned to the user of
the Android device.
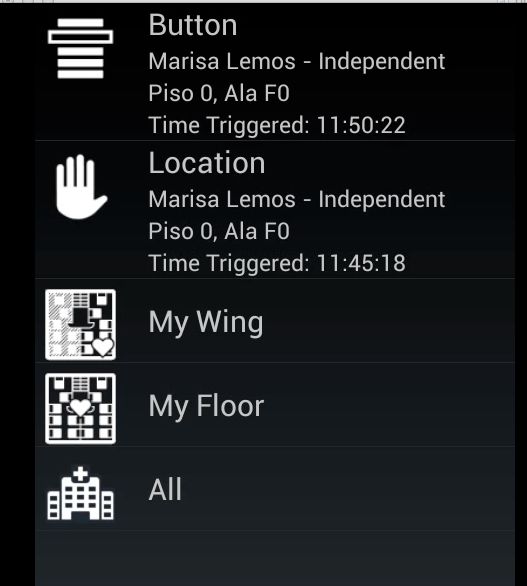
   In the following example there is a non-authorized location alarm from the
customer “Marisa Lemos” raised in the location “Piso 0, Ala F0” at “11:45” and
there is a button alarm from the same customer and in the same location 5
minutes after (1).

   You can filter the alarms by the location where they were raised: in the
Wing or Floor the caregiver is in (2), or you can go back to list all active alarm
in the institution (3).

August 2013
www.oncaring.com                                                     Page 5 of 9
To handle an alarm, click on it:

  You will get the list of possible actions:
    • Resolve the alarm – you will be asked to document the alarm and
        you should add further information about the event, for instance the
        description of the situation and the actions that were taken to
        resolve it.
    • Document – allows the caregiver to enter a comment about the
        alarm without closing it, the alarm will be kept as active and
        appearing in the list of alarms.
    • Mark as false alarm – the alarm will be resolved and marked as a
        false event.
    • Suspend alarm – you will be asked to document in order to justify
        the suspension of alarms for that customer. Only the caregiver with
        profile Nurse can temporarily suspend the alarms of a customer. In
        certain situations (going to physical therapy, taking bath, etc.) it can
        be useful to suspend the alarms generation for a customer. By
        suspending alarms, the client will be "on escort" mode, not being
        generated new alarms until a caregiver decides to resume them
        again. Once it is resumed, the system recovers the ability to
        generate alarms to that customer.
    • Show location – to see the position of the customer in the facility’s
        map.

August 2013
www.oncaring.com                                                   Page 6 of 9
Patients
Clicking on the option Patients on the main menu, you get some options to
filters the customers that you want to access:
• My Wing – customers located on the same wing as the caregiver is
in at that moment.
• My Floor – customers located on the same floor as the caregiver is
in at that moment
• All – the list of the active customers registered in the system that
have a device associated and are not in escort mode, i.e.,
customers that are being monitored.
• Unassigned Patients – list all the customers that do not have a
device assigned, which means that are customers that are not being
monitored.
• Escorted Patients – list all the customers that have alarms
generation suspended. By clicking their names you will have an
option to resume the alarms. Only nurses can resume customers’
alarms.
Note: Information about discharged customers cannot be accessed on the
android device, only through the Web Platform.
When you select one customer from the lists My Wing, My Floor or All, you
will be able to perform some actions like:
• Show the location where the customer is in the facility’s map. This
option is only available to nurses.
• Suspend the alarm generation for that customer - you will be
asked to document to justify the suspension of alarms for that
customer. This option is only available to nurses.
• Insert vital signs -
Allows to manually register values
of temperature, blood pressure,
blood glucose and heart rate.
Select the value from the dialog
box that has the possible selection
values and click Validate (or
cancel to abandon the action).
Once a value is validated it will be
seen in the list, you can enter the
other indicators values and then
click the Submit Values in order to
register them in the system
associated to that customer and
with the timestamp. This option is
only available to nurses.
August 2013
www.oncaring.com Page 7 of 9Users
The Users option from the main menu, allows you to access the list of
caregivers that are in the same wing or floor as you or to the entire list of
caregivers in the facility.
If you click on one of the caregivers from the chosen list, you will be able
to:
• Show the location where the caregiver is in the facility’s map.
• Place a VoIP call – allow you to make a phone call to that
caregiver’s device using Skype, which is a tool that has to be
installed in the mobile phone. The account used by Skype to place
the call will need to be defined on the workstation on the user profile.
• Place a video call to that caregiver’s device –also using Skype.
August 2013
www.oncaring.com Page 8 of 9Settings
The Settings option from the main menu, allows the Administrator user to
configure some parameters of the application.
In order to have access to the configuration setup you need to know the
access code (pin). Usually only the Administrator knows this pin because the
configuration setup is a technical operation.
There are two setups that can be done via this menu:
1. onAll generic configuration
• Hostname
• Port
• Connection Timeout
• Retry
• Alive
• Wi-Fi Scan – for location purposes
• Wi-Fi Update - time to send Wi-Fi scans for location updates
• Rest Settings
o Port
o Timeout
• Movement Settings
o Use Motion – if enabled allows the device motion to
trigger actions
o Location Threshold - The lower the value the more
frequent locations updates due to location will happen
2. Ekahau configuration:
• Hostname
• Ekahau Location Port
• RTLS
o Username and Password
o RTLS Port
o Connection Timeout
The onAll-caregiver app should not be turned off by the caregiver and that
is the reason the Close Application action is only available on the Settings
menu after the pin code is entered, validating if the person handling the
device is an Administrator.
August 2013
www.oncaring.com Page 9 of 9You can also read


