AWS CLOUDSHELL USER GUIDE - AWS CLOUDSHELL: USER GUIDE
←
→
Page content transcription
If your browser does not render page correctly, please read the page content below
AWS CloudShell
                                        User Guide

AWS CloudShell: User Guide
Copyright © Amazon Web Services, Inc. and/or its affiliates. All rights reserved.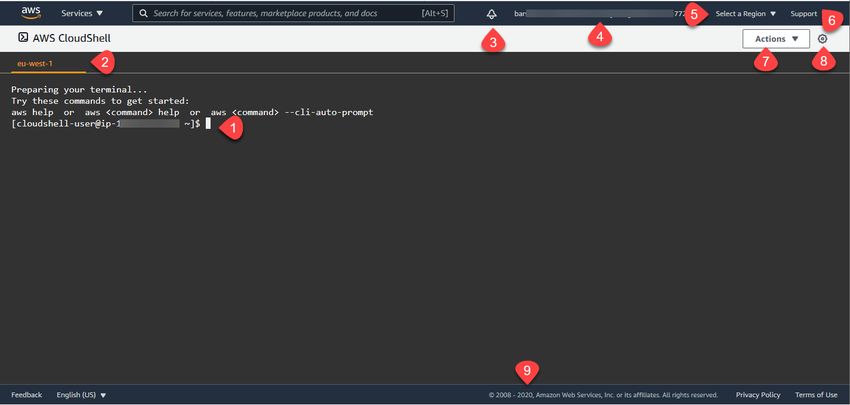
AWS CloudShell User Guide

Amazon's trademarks and trade dress may not be used in connection with any product or service that is not
Amazon's, in any manner that is likely to cause confusion among customers, or in any manner that disparages or
discredits Amazon. All other trademarks not owned by Amazon are the property of their respective owners, who may
or may not be affiliated with, connected to, or sponsored by Amazon.

AWS CloudShell User Guide

Table of Contents
  What is AWS CloudShell? .................................................................................................................... 1
        AWS CloudShell features ............................................................................................................. 1
               AWS Command Line Interface ............................................................................................. 1
               Shells and development tools .............................................................................................. 1
               Persistent storage .............................................................................................................. 2
               Security ............................................................................................................................ 2
               Customization options ........................................................................................................ 2
        Pricing ...................................................................................................................................... 2
        How do I get started? ................................................................................................................. 3
        Key AWS CloudShell topics .......................................................................................................... 3
        FAQs ......................................................................................................................................... 3
               How do I start with AWS CloudShell? ................................................................................... 3
               What permissions do I need to access AWS CloudShell? .......................................................... 4
               Which AWS Regions is AWS CloudShell available in? ............................................................... 4
               What types of shell can I use in AWS CloudShell? ................................................................... 4
               What web browsers can I use with AWS CloudShell? ............................................................... 4
               What software is pre-installed on my shell environment? ........................................................ 4
               Can I install software that's not available in the shell environment? .......................................... 5
               Can I restrict the actions that users can perform in AWS CloudShell? ........................................ 5
               How can I move data from my home directory if I want to change the AWS Region where I'm
               using AWS CloudShell? ....................................................................................................... 5
  Getting started tutorial ....................................................................................................................... 6
        Prerequisites .............................................................................................................................. 6
        Contents ................................................................................................................................... 6
        Step 1: Sign in to AWS Management Console ................................................................................ 7
        Step 2: Launch AWS CloudShell, select a Region, and choose a shell. ................................................ 8
        Step 3: Upload a file to AWS CloudShell ....................................................................................... 9
        Step 4: Edit your file's code and run it from the command line ....................................................... 10
        Step 5: Use AWS CLI to add the file as an object in an Amazon S3 bucket. ....................................... 11
        Related topics .......................................................................................................................... 12
  Tutorials .......................................................................................................................................... 13
        Tutorial: Copying multiple files .................................................................................................. 13
               Uploading and downloading multiple files using Amazon S3 .................................................. 13
               Uploading and downloading multiple files using zipped folders .............................................. 15
        Tutorial: Using CodeCommit ...................................................................................................... 16
               Prerequisites .................................................................................................................... 16
               Step 1: Create and clone a CodeCommit repository .............................................................. 16
               Step 2: Stage and commit a file before pushing it to your CodeCommit repository .................... 17
        Tutorial: Creating presigned URLs ............................................................................................... 18
               Prerequisites .................................................................................................................... 18
               Step 1: Create an IAM role to grant access to Amazon S3 Bucket ............................................ 18
               Generate the presigned URL .............................................................................................. 19
  Working with AWS CloudShell ........................................................................................................... 21
        Launching AWS CloudShell ........................................................................................................ 21
        Navigating the AWS CloudShell interface .................................................................................... 21
        Choosing shells ........................................................................................................................ 22
        Working in AWS Regions ........................................................................................................... 22
               Specifying your default AWS Region for AWS CLI ................................................................. 23
        Working with files and storage .................................................................................................. 23
        Starting and ending shell sessions .............................................................................................. 25
  Working with AWS services ................................................................................................................ 27
        AWS CLI command line examples for selected AWS services ........................................................... 27
               DynamoDB ...................................................................................................................... 27
               AWS Cloud9 .................................................................................................................... 28

                                                                         iii
AWS CloudShell User Guide
Amazon EC2 .................................................................................................................... 28
S3 Glacier ........................................................................................................................ 28
AWS Elastic Beanstalk CLI ......................................................................................................... 28
Amazon ECS CLI ....................................................................................................................... 29
AWS SAM CLI ........................................................................................................................... 29
Customizing AWS CloudShell ............................................................................................................. 30
Splitting the command line display into multiple tabs ................................................................... 30
Changing font size ................................................................................................................... 30
Changing the interface theme ................................................................................................... 30
Using Safe Paste for multiline text ............................................................................................. 31
Security ............................................................................................................................................ 2
Data protection ........................................................................................................................ 32
Data encryption ............................................................................................................... 33
Identity and access management ............................................................................................... 33
Audience ......................................................................................................................... 34
Authenticating with identities ............................................................................................ 34
Managing AWS CloudShell access and usage with IAM policies ............................................... 35
Logging and monitoring ............................................................................................................ 39
Monitoring activity with CloudTrail ..................................................................................... 39
AWS CloudShell in CloudTrail ............................................................................................. 39
Compliance validation ............................................................................................................... 40
Resilience ................................................................................................................................ 40
Infrastructure security ............................................................................................................... 41
Configuration and vulnerability analysis ...................................................................................... 41
Security best practices .............................................................................................................. 41
AWS CloudShell compute environment ............................................................................................... 42
Compute environment resources ................................................................................................ 42
Pre-installed software ............................................................................................................... 42
Shells .............................................................................................................................. 42
AWS command line interfaces (CLI) .................................................................................... 43
Runtimes and AWS SDKs: Node.js and Python 3 ................................................................... 44
Development tools and shell utilities .................................................................................. 45
Installing AWS CLI to your home directory .................................................................................. 48
Installing third-party software on your shell environment .............................................................. 49
Modifying your shell with scripts ................................................................................................ 50
Deleting your home directory .................................................................................................... 50
Troubleshooting ............................................................................................................................... 52
Unable to launch AWS CloudShell with message "Unable to start the environment. You don't have
access permissions. Ask your IAM administrator for access to AWS CloudShell." ................................. 52
Unable to access AWS CloudShell command line. ......................................................................... 52
Unable to ping external IP addresses. ......................................................................................... 52
"There were some issues preparing your terminal" error. ................................................................ 53
Supported browsers .......................................................................................................................... 54
Supported Regions ........................................................................................................................... 55
Limits ............................................................................................................................................. 56
Persistent storage ..................................................................................................................... 56
Monthly usage ......................................................................................................................... 56
Concurrent shells ..................................................................................................................... 56
Shell sessions ........................................................................................................................... 57
Network access and data transfer ............................................................................................... 57
Restrictions on system files and page reloads .............................................................................. 57
Document history ............................................................................................................................. 58
ivAWS CloudShell User Guide
AWS CloudShell features
What is AWS CloudShell?
AWS CloudShell is a browser-based, pre-authenticated shell that you can launch directly (p. 3)from
the AWS Management Console. You can run AWS CLI commands against AWS services using your
preferred shell (Bash, PowerShell, or Z shell). And you can do this without needing to download or install
command line tools.
When you launch AWS CloudShell, a compute environment (p. 42) that's based on Amazon Linux 2
is created. Within this environment, you've access to an extensive range of pre-installed development
tools (p. 42), options for uploading and downloading files (p. 23), and file storage that persists
between sessions (p. 2).
(Try it now: Tutorial: Getting started with AWS CloudShell (p. 6).)
AWS CloudShell features
AWS Command Line Interface
You launch AWS CloudShell from the AWS Management Console, and the AWS credentials you used to
sign in to the console are automatically available in a new shell session. This pre-authentication of AWS
CloudShell users allows you to skip configuring credentials when interacting with AWS services using
AWS CLI version 2 (pre-installed on the shell's compute environment).
For more information on interacting with AWS services using the command-line interface, see Working
with AWS services in AWS CloudShell (p. 27).
Shells and development tools
With the shell that's created for AWS CloudShell sessions, you can switch seamlessly between your
preferred command-line shells (p. 22). More specifically, you can switch between Bash, PowerShell,
and Z shell. You also have access to pre-installed tools and utilities such as git, make, pip, sudo, tar, tmux,
vim, wget, and zip.
1AWS CloudShell User Guide
Persistent storage
The shell environment is pre-configured with support for leading software languages, enabling you to
run Node.js and Python projects, for example, without first having to perform runtime installations.
PowerShell users can use the .NET Core runtime.
Files created in or uploaded to AWS CloudShell can also be committed to a local repository before being
pushed to a remote repository managed by AWS CodeCommit.
For more information, see AWS CloudShell compute environment: specifications and software (p. 42).
Persistent storage
When using AWS CloudShell you have persistent storage of 1 GB for each AWS Region at no additional
cost. The persistent storage is located in your home directory ($HOME) and is private to you. Unlike
ephemeral environment resources that are recycled after each shell session ends, data in your home
directory persists between sessions.
For more information about the retention of data in persistent storage, see Persistent storage (p. 56).
Security
The AWS CloudShell environment and its users are protected by specific security features such as IAM
permissions management, shell session restrictions, and Safe Paste for text input.
Permissions management with IAM
Administrators can grant and deny permissions to AWS CloudShell users using IAM policies.
Administrators can also create policies that specify at a granular level the particular actions those users
can perform with the shell environment. For more information, see Managing AWS CloudShell access and
usage with IAM policies (p. 35).
Shell session management
Inactive and long-running sessions are automatically stopped and recycled. For more information, see
Shell sessions (p. 57).
Safe Paste for text input
Enabled by default, Safe Paste is a security feature that asks you to verify that multiline text that you're
about to paste into the shell doesn't contain malicious scripts. For more information, see Using Safe
Paste for multiline text (p. 31).
Customization options
Your AWS CloudShell experience can be customized by changing screen layouts (multiple tabs), text
sizes, and light/dark interface themes. For more information, see Customizing your AWS CloudShell
experience (p. 30).
You can also extend your shell environment by installing your own software (p. 49) and modifying
start-up shell scripts (p. 50).
Pricing
AWS CloudShell is an AWS service that's available at no additional charge. You pay for any other AWS
resources that you run with AWS CloudShell. Standard data transfer rates also apply.
For more information, see Limits and restrictions for AWS CloudShell (p. 56).
2AWS CloudShell User Guide
How do I get started?
How do I get started?
To start working with the shell, sign in to the AWS Management Console and choose AWS CloudShell
from the home page.
For a walkthrough of signing in to the AWS Management Console and performing key tasks with AWS
CloudShell, see Tutorial: Getting started with AWS CloudShell (p. 6).
Key AWS CloudShell topics
• Tutorial: Getting started with AWS CloudShell (p. 6)
• Working with AWS CloudShell (p. 21)
• Working with AWS services in AWS CloudShell (p. 27)
• Customizing your AWS CloudShell experience (p. 30)
• AWS CloudShell compute environment: specifications and software (p. 42)
AWS CloudShell FAQs
Answers to frequently asked questions about this AWS service.
• How do I start with AWS CloudShell? (p. 3)
• What permissions do I need to access AWS CloudShell? (p. 4)
• Which AWS Regions is AWS CloudShell available in? (p. 4)
• What types of shell can I use in AWS CloudShell? (p. 4)
• What web browsers can I use with AWS CloudShell? (p. 4)
• What software is pre-installed on my shell environment? (p. 4)
• Can I install software that's not available in the shell environment? (p. 5)
• Can I restrict the actions that users can perform in AWS CloudShell? (p. 5)
• How can I move data from my home directory if I want to change the AWS Region where I'm using
AWS CloudShell? (p. 5)
How do I start with AWS CloudShell?
You can launch AWS CloudShell with a single click from the AWS Management Console. All that's
required to get started is to sign in to the console using your AWS or IAM credentials at https://
console.aws.amazon.com/console/home.. You can choose the AWS CloudShell link on the home page or
enter "CloudShell" in the Find Services box.
3AWS CloudShell User Guide
What permissions do I need to access AWS CloudShell?
For more information, see Tutorial: Getting started with AWS CloudShell (p. 6).
Back to list of FAQs (p. 3)
What permissions do I need to access AWS
CloudShell?
Because you access AWS CloudShell from the AWS Management Console, you must be an IAM user who
can provide a valid account alias or ID, user name, and password.
To launch AWS CloudShell from the console, you need to have the IAM permissions provided by an
attached policy. For more information, see Managing AWS CloudShell access and usage with IAM
policies (p. 35).
Back to list of FAQs (p. 3)
Which AWS Regions is AWS CloudShell available in?
For a list of supported AWS Regions and associated service endpoints, see the AWS CloudShell page in
the Amazon Web Services General Reference.
What types of shell can I use in AWS CloudShell?
You can choose to run commands using the Bash shell, PowerShell, or the Z shell. To switch to a specific
shell, at the command prompt just type the name of the shell program:
• bash: Use the Bash shell
• pwsh: Use PowerShell
• zsh: Use the Z shell
Back to list of FAQs (p. 3)
What web browsers can I use with AWS CloudShell?
AWS CloudShell supports the three latest versions of Google Chrome, Mozilla Firefox, Microsoft Edge,
and Apple Safari.
Back to list of FAQs (p. 3)
What software is pre-installed on my shell
environment?
With the shell that's created for AWS CloudShell sessions, you can switch seamlessly between their
preferred command-line shells (p. 22) (Bash, PowerShell, and Z shell). They also have access to pre-
installed tools and utilities such Make, pip, sudo, tar, tmux, Vim, Wget and Zip.
The shell environment is pre-configured with support for leading software languages. You can use it
to run Node.js and Python projects, for example, without first having to perform runtime installations.
PowerShell users can use the .NET Core runtime.
Files created using the shell or uploaded with the shell interface can be added to a version-controlled
repository managed using a pre-installed version of Git.
4AWS CloudShell User Guide
Can I install software that's not
available in the shell environment?
For more information, see Pre-installed software (p. 42).
Back to list of FAQs (p. 3)
Can I install software that's not available in the shell
environment?
Yes. AWS CloudShell users have sudo privileges so they have administrative rights to install software
from the command line. For more information, see Installing third-party software on your shell
environment (p. 49).
Back to list of FAQs (p. 3)
Can I restrict the actions that users can perform in
AWS CloudShell?
Yes. For example, you can allow users to access AWS CloudShell but prevent them from uploading
or downloading files within the shell environment. You can also even completely prevent them from
accessing AWS CloudShell. For more information, see Managing AWS CloudShell access and usage with
IAM policies (p. 35).
Back to list of FAQs (p. 3)
How can I move data from my home directory if I
want to change the AWS Region where I'm using AWS
CloudShell?
To move your AWS CloudShell data from one AWS Region to another, you can download the contents
of your home directory in Region A to your local machine and then upload from your local machine to
the home directory in Region B. For more information on the options available, see Tutorial: Copying
multiple files between your local machine and AWS CloudShell (p. 13).
Back to list of FAQs (p. 3)
5AWS CloudShell User Guide
Prerequisites
Tutorial: Getting started with AWS
CloudShell
This introductory tutorial shows you how to launch AWS CloudShell and perform key tasks using the
shell command line interface.
First, you'll sign in to the AWS Management Console and launch AWS CloudShell in a new browser
window. You'll then select an AWS Region and a shell type to work with.
Next, you'll create a new folder in your home directory and upload a file to it from your local machine.
You'll work on that file using a pre-installed editor before running it as a program from the command
line. Finally, you'll call AWS CLI commands to create an Amazon S3 bucket and add your file as an object
to it.
Prerequisites
IAM permissions
The quickest way to obtain permissions for AWS CloudShell is to attach the following AWS managed
policy to your IAM identity (user, role, or group):
• AWSCloudShellFullAccess: Provides users with full access to AWS CloudShell and its features.
For this tutorial, you also interact with AWS services (in this case, creating an Amazon S3 bucket
and adding an object to it.) So your IAM identity requires a policy that grants, at a minimum, the
s3:CreateBucket and s3:PutObject permissions.
For more information, see Amazon S3 Actions in the Amazon Simple Storage Service User Guide.
Exercise file
This exercise also involves uploading and editing a file that's then run as a program from the command
line interface. Open a text editor on your local machine and add the following code snippet:
import sys
x=int(sys.argv[1])
y=int(sys.argv[2])
sum=x+y
print("The sum is",sum)
Save the file with the name add_prog.py.
Contents
• Step 1: Sign in to AWS Management Console (p. 7)
• Step 2: Launch AWS CloudShell, select a Region, and choose a shell. (p. 8)
• Step 3: Upload a file to AWS CloudShell (p. 9)
6AWS CloudShell User Guide
Step 1: Sign in to AWS Management Console
• Step 4: Edit your file's code and run it from the command line (p. 10)
• Step 5: Use AWS CLI to add the file as an object in an Amazon S3 bucket. (p. 11)
Step 1: Sign in to AWS Management Console
This step involves entering your IAM user information to access the AWS Management Console. If you're
already in the console, skip to step 2 (p. 8).
• You can access the AWS Management Console by using an IAM users sign-in URL or going to the
main sign-in page.
IAM user sign-in URL
• Open a browser and enter the following sign-in URL, replacing account_alias_or_id with
the account alias or account ID provided by your administrator:
https://account_alias_or_id.signin.aws.amazon.com/console/
• Enter your IAM user name and password and choose Sign in.
Main sign-in page
• Open https://aws.amazon.com/console/.
• If you haven't signed in previously using this browser, the main sign-in page appears. Choose
IAM user, enter the account alias or account ID, and choose Next.
7AWS CloudShell User Guide
Step 2: Launch AWS CloudShell,
select a Region, and choose a shell.
• If you already signed in as an IAM user before. Your browser might remember the account
alias or account ID for the AWS account. If so, enter your IAM user name and password and
choose Sign in.
Note
You also have the option of signing in as a root user. This identity has complete access to all
AWS services and resources in the account. We strongly recommend that you don't use the
root user for everyday tasks, even administrative ones. Instead, adhere to the best practice
of using the root user only to create your first IAM user.
Step 2: Launch AWS CloudShell, select a Region,
and choose a shell.
In this step, you launch AWS CloudShell from the console interface, choose an available AWS Region, and
switch to your preferred shell (Bash, PowerShell, or Z shell).
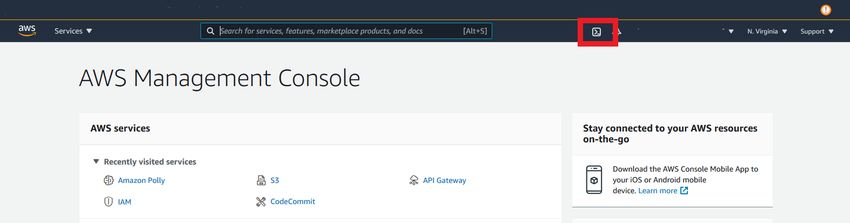
1. From the AWS Management Console, you can launch AWS CloudShell by choosing the following
options available on the navigation bar:
• Choose the AWS CloudShell icon.
• Start typing "cloudshell" in Search box and then choose the CloudShell option.
8AWS CloudShell User Guide
Step 3: Upload a file to AWS CloudShell
When AWS CloudShell launches in a new browser window for the first time, a welcome panel
displays and lists key features. After you close this panel, status updates are provided while the shell
configures and forwards your console credentials. When the command prompt displays, the shell is
ready for interaction.
Note
If you encounter issues that prevent you from successfully launching or interacting
with AWS CloudShell, check for information to identify and address those issues in
Troubleshooting AWS CloudShell (p. 52).
2. To choose an AWS Region to work in, go to the Select a Region menu and select a supported AWS
Region (p. 55) to work in. (Available Regions are highlighted.)
Important
If you switch Regions, the interface refreshes and the name of the selected AWS Region
is displayed above the command line text. Any files that you add to persistent storage are
available only in this same AWS Region. If you change Regions, different storage (and files)
are accessible.
3. To choose a pre-installed shell to work with, enter its program name at the command line prompt:
Bash
bash
If you switch to Bash, the symbol at the command prompt updates to $.
Note
Bash is the default shell that's running when you launch AWS CloudShell.
PowerShell
pwsh
If you switch to PowerShell, the symbol at the command prompt updates to PS>.
Z shell
zsh
If you switch to Z shell, the symbol at the command prompt updates to %.
Step 3: Upload a file to AWS CloudShell
This step walks you through the process of uploading a file and then moving it to a new directory in your
home directory.
1. To check your current working directory, at the prompt enter the following command:
pwd
When you press Enter, the shell returns your current working directory. For example: /home/
cloudshell-user.
9AWS CloudShell User Guide
Step 4: Edit your file's code and
run it from the command line
2. To upload a file to this directory, go to Actions and select Upload file from the menu.
The Upload file dialog box displays.
3. Choose Browse.
4. In your system's File upload dialog box, select the text file you created for this tutorial
(add_prog.py) and choose Open.
5. In the Upload file dialog box, choose Upload.
A progress bar tracks the upload. If the upload is successful, a message confirms that add_prog.py
was added to the root of your home directory.
6. To create a directory for the file, enter the make directories command: mkdir mysub_dir.
7. To move the uploaded file from the root of your home directory to the new directory, use the mv
command:
mv add_prog.py mysub_dir.
8. To change your working directory to the new directory, enter cd mysub_dir.
The command prompt updates to indicate you've changed your working directory.
9. To view the contents of the current directory, mysub_dir, enter the ls command.
The contents of the working directory, including the file you just uploaded, are listed.
Step 4: Edit your file's code and run it from the
command line
This step demonstrates how to use the pre-installed Vim editor to work with a file. You then run that file
as a program from the command line.
1. To edit the file you uploaded in the previous step, enter the following command:
vim add_prog.py
10AWS CloudShell User Guide
Step 5: Use AWS CLI to add the file
as an object in an Amazon S3 bucket.
The shell interface refreshes to display the Vim editor.
2. To edit the file in Vim, press the I key. Now edit the contents so the program adds up three numbers
instead of two:
import sys
x=int(sys.argv[1])
y=int(sys.argv[2])
z=int(sys.argv[3])
sum=x+y+z
print("The sum is",sum)
Note
If you paste the text into the editor and have the Safe Paste feature (p. 31) enabled, a
warning is displayed. Multiline text that's copied can contain malicious scripts. With Safe
Paste, you can verify the complete text before it's pasted in. If you're satisfied that the text
is safe, choose Paste.
3. After you edited the program, press Esc to enter the Vim command mode. Then, enter the following
command to save the file and exit the editor:
:wq
Note
If you're new to Vim, you might initially find it challenging to switch between command
mode (used when saving files and exiting the application) and insert mode (used when
inserting new text). As a friendly point of reference, to enter insert mode, press I, and, to
enter command mode, press Esc. For more information about Vim and other tools available
in AWS CloudShell, see Development tools and shell utilities (p. 45).
4. Back in the main command line interface, run the program and specify three numbers for input:
python3 add_prog.py 4 5 6
The command line displays the program output: The sum is 15.
Step 5: Use AWS CLI to add the file as an object in
an Amazon S3 bucket.
In this step, you create an Amazon S3 bucket and then use the PutObject method to add your code file
as an object in that bucket.
Note
In most cases, you can use a service such as CodeCommit (p. 16) to commit a software file
into a version-controlled repository. This introductory tutorial uses Amazon S3 for storage to
show how easy it is to use AWS CLI in AWS CloudShell. Using this method, you don't need to
download or install any additional resource. Moreover, because you're already authenticated
within the shell, you don't need to configure credentials before making calls.
1. To create a bucket in a specified AWS Region, enter the following command:
aws s3api create-bucket --bucket insert-unique-bucket-name-here --region us-east-1
Note
If you're creating a bucket outside of the us-east-1 Region, add create-bucket-
configuration with the LocationConstraint parameter to specify the Region. For
example:
11AWS CloudShell User Guide
Related topics
$ aws s3api create-bucket --bucket my-bucket --region eu-west-1 --create-bucket-
configuration LocationConstraint=eu-west-1
If the call is successful, the command line displays a response from the service similar to the
following output:
{
"Location": "/insert-unique-bucket-name-here"
}
Note
If you don't adhere to the rules for naming buckets (using only lowercase letters, for
example), the following error is displayed: An error occurred (InvalidBucketName) when
calling the CreateBucket operation: The specified bucket is not valid.
2. To upload a file and add it as an object to the bucket that was just created, call the PutObject
method:
aws s3api put-object --bucket insert-unique-bucket-name-here --key add_prog --body
add_prog.py
If the object is successfully uploaded to the Amazon S3 bucket, the command line displays a
response from the service similar to the following output:
{
"ETag": "\"ab123c1:w:wad4a567d8bfd9a1234ebeea56\""
}
The ETag is the hash of the object that's been stored. It can be used to check the integrity of the
object uploaded to Amazon S3.
Related topics
• Working with AWS services in AWS CloudShell (p. 27)
• Tutorial: Copying multiple files between your local machine and AWS CloudShell (p. 13)
• Tutorial: Using CodeCommit in AWS CloudShell (p. 16)
• Working with AWS CloudShell (p. 21)
• Customizing your AWS CloudShell experience (p. 30)
12AWS CloudShell User Guide
Tutorial: Copying multiple files
AWS CloudShell tutorials
The following tutorials show you how to perform tasks using AWS CloudShell.
Topics
• Tutorial: Copying multiple files between your local machine and AWS CloudShell (p. 13)
• Tutorial: Using CodeCommit in AWS CloudShell (p. 16)
• Tutorial: Creating a presigned URL for Amazon S3 objects using AWS CloudShell (p. 18)
Tutorial: Copying multiple files between your local
machine and AWS CloudShell
Using the CloudShell interface, you can upload or download a single file between your local machine and
the shell environment at a time. To copy multiple files between CloudShell and your local machine at the
same time, use one of the following options:
• Amazon S3: Use S3 buckets as an intermediary when copying files between your local machine and
CloudShell.
• Zip files: Compress multiple files in a single zipped folder that can be uploaded or downloaded using
the CloudShell interface.
Note
Because AWS CloudShell doesn't allow incoming internet traffic, it's currently not possible to
use commands such as scp or rsync to copy multiple files between local machines and the
CloudShell compute environment.
Uploading and downloading multiple files using
Amazon S3
Prerequisites
To work with buckets and objects, you need an IAM policy that grants permissions to perform the
following Amazon S3 API actions:
• s3:CreateBucket
• s3:PutObject
• s3:GetObject
For a complete list of Amazon S3 actions, see Actions in the Amazon Simple Storage Service API
Reference.
Upload multiple files to AWS CloudShell using Amazon S3
1. In AWS CloudShell, create an S3 bucket by running the following s3 command:
aws s3api create-bucket --bucket your-bucket-name --region us-east-1
13AWS CloudShell User Guide
Uploading and downloading
multiple files using Amazon S3
If the call is successful, the command line displays a response from the S3 service:
{
"Location": "/your-bucket-name"
}
2. Next, you need to upload the files in a directory from your local machine to the bucket. You have
two options for uploading files:
• AWS Management Console: Use drag-and-drop to upload files and folders to a bucket.
• AWS CLI: With the version of the tool installed on your local machine, use the command line to
upload files and folders to the bucket.
Using the console
• Open the Amazon S3 console at https://console.aws.amazon.com/s3/.
(If you're using AWS CloudShell, you should already be logged in to the console.)
• In the Buckets list, choose the name of the bucket that you want to upload your folders or
files to.
• In a window other than the console window, select the files and folders that you want to
upload. Then, drag and drop your selections into the console window that lists the objects in
the destination bucket.
The files you chose are listed on the Upload page.
• Select the check boxes to indicate the files to be added.
• Choose Upload to add the selected files to the bucket.
Note
For information about the full range of configuration options when using the console,
see How do I upload files and folders to an S3 bucket? in the Amazon Simple Storage
Service User Guide.
Using AWS CLI
Note
For this option, you need to have the AWS CLI tool installed on your local machine and
have your credentials configured for calls to AWS services. For more information, see
the AWS Command Line Interface User Guide.
• Launch the AWS CLI tool and run the following aws s3 command to sync the specified
bucket with the contents of the current directory on your local machine:
aws s3 sync . s3://your-bucket-name
If the sync is successful, upload messages are displayed for every object added to the bucket.
3. Next, return to the AWS CloudShell command line and enter the following command to synchronize
the directory in the shell environment with the contents of the S3 bucket:
aws s3 sync s3://your-bucket-name .
If the sync is successful, download messages are displayed for every file downloaded from the
bucket to the directory.
14AWS CloudShell User Guide
Uploading and downloading
multiple files using zipped folders
Note
With the sync command, only new and updated files are recursively copied from the source
directory to the destination.
Download multiple files from AWS CloudShell using Amazon S3
1. Using the AWS CloudShell command line, enter the following aws s3 command to sync an S3
bucket with contents of the current directory in the shell environment:
aws s3 sync . s3://your-bucket-name
If the sync is successful, upload messages are displayed for every object added to the bucket.
2. Now you need to download the contents of the bucket to your local machine. Because the Amazon
S3 console doesn't support the downloading of multiple objects, you need to use the AWS CLI tool
that's installed on your local machine.
From the command line of the AWS CLI tool, run the following command:
aws s3 sync s3://your-bucket-name .
If the sync is successful, the command line displays a download message for each file updated or
added in the destination directory.
Note
For this option, you need to have the AWS CLI tool installed on your local machine and have
your credentials configured for calls to AWS services. For more information, see the AWS
Command Line Interface User Guide.
Uploading and downloading multiple files using
zipped folders
With the zip/unzip utilities, you can compress multiple files in an archive that can be treated as a single
file. The utilities are pre-installed in the CloudShell compute environment.
For more information about pre-installed tools, see Development tools and shell utilities (p. 45).
Upload multiple files to AWS CloudShell using zipped folders
1. On your local machine, add the files to be uploaded to a zipped folder.
2. Launch AWS CloudShell and then choose Actions, Upload file.
3. In the Upload file dialog box, choose Select file and choose the zipped folder you just created.
4. Next, in the Upload file dialog box, choose Upload to add the selected file to the shell environment.
5. Next, in the CloudShell command line, run the following command to unzip the contents of the zip
archive to a specified directory:
unzip zipped-files.zip -d my-unzipped-folder
Download multiple files from AWS CloudShell using zipped folders
1. In the CloudShell command line, running the following command to add all the files in the current
directory to a zipped folder:
15AWS CloudShell User Guide
Tutorial: Using CodeCommit
zip -r zipped-archive.zip *
2. Next, choose Actions, Download file.
3. In the Download file dialog box, enter the path for the zipped folder (/home/cloudshell-user/
zip-folder/zipped-archive.zip, for example) and choose Download.
If the path is correct, a browser dialog offers the choice of opening the zipped folder or saving it to
your local machine.
4. On your local machine, you can now unzip the contents of the downloaded zipped folder.
Tutorial: Using CodeCommit in AWS CloudShell
CodeCommit is a secure, highly scalable, and managed source control service that hosts private Git
repositories. Using AWS CloudShell, you can work with CodeCommit on the command line using git-
remote-codecommit. This utility is pre-installed in the AWS CloudShell compute environment and
provides a simple method for pushing and pulling code from CodeCommit repositories. It does this by
extending Git. For more information, see the AWS CodeCommit User Guide.
This tutorial describes how to create a CodeCommit repository and clone it to your AWS CloudShell
compute environment. This tutorial also shows how you can stage and commit a file to your cloned
repository before pushing it to the remote repository that's managed in AWS Cloud.
Prerequisites
For information about the permissions that an IAM user requires to use AWS CloudShell, see the
prerequisites section in the Getting started tutorial (p. 6). You also need IAM permissions to work with
CodeCommit.
In addition, before starting you should have the following:
• A basic understanding of Git commands and version control concepts
• A file in the home directory of your shell that can be committed to the local and remote repositories.
In this tutorial, it's referred to as my-git-file.
Step 1: Create and clone a CodeCommit repository
1. In the AWS CloudShell command line interface, enter the following codecommit command to
create a CodeCommit repository called MyDemoRepo:
aws codecommit create-repository --repository-name MyDemoRepo --repository-description
"My demonstration repository"
If the repository is successfully created, the command line displays the service's response:
{
"repositoryMetadata": {
"accountId": "111122223333",
"repositoryId": "0dcd29a8-941a-1111-1111-11111111111a",
"repositoryName": "MyDemoRepo",
"repositoryDescription": "My demonstration repository",
"lastModifiedDate": "2020-11-23T20:38:23.068000+00:00",
"creationDate": "2020-11-23T20:38:23.068000+00:00",
16AWS CloudShell User Guide
Step 2: Stage and commit a file before
pushing it to your CodeCommit repository
"cloneUrlHttp": "https://git-codecommit.eu-west-1.amazonaws.com/v1/repos/
MyDemoRepo",
"cloneUrlSsh": "ssh://git-codecommit.eu-west-1.amazonaws.com/v1/repos/
MyDemoRepo",
"Arn": "arn:aws:codecommit:eu-west-1:111111111111:MyDemoRepo"
}
)
2. Using the command line, create a new directory for your local repository and make it your working
directory:
mkdir my-shell-repo
cd my-shell-repo
3. Now clone the remote repository using the git clone command. (As you're working with git-
remote-codecommit, use the HTTPS (GRC) URL style).
git clone codecommit::eu-west-1://MyDemoRepo
If the repository is successfully cloned, the command line displays the service's response:
Cloning into 'MyDemoRepo'...
warning: You appear to have cloned an empty repository.
4. To navigate to the cloned repository, use the cd command:
cd MyDemoRepo
Step 2: Stage and commit a file before pushing it to
your CodeCommit repository
1. Add a file called my-git-file to the MyDemoRepo folder using either a Vim editor or the file
upload feature of AWS CloudShell. To learn how to use both, see the Getting started tutorial (p. 6).
2. To stage your file in the repository, run the git add command:
git add my-git-file
3. To check that the file has been staged and is ready to be committed, run the git status command:
git status
my-git-file is listed as a new file and displays in green text, indicating it's ready to be committed.
4. Now commit this version of the staged file to the repository:
git commit -m "first commit to repo"
Note
If you're asked for configuration information to complete the commit, use the following
format:
$ git config --global user.name "Jane Doe"
$ git config --global user.email janedoe@example.com
17AWS CloudShell User Guide
Tutorial: Creating presigned URLs
5. Last, to sync your remote repository with the changes made in your local one, push the changes to
the upstream branch:
git push
Tutorial: Creating a presigned URL for Amazon S3
objects using AWS CloudShell
This topic shows you how to create a presigned URL to share an Amazon S3 object with others. Because
object owners specify their own security credentials when sharing, anyone who receives the presigned
URL can access the object for a limited time.
Prerequisites
• IAM user with access permissions provided by the AWSCloudShellFullAccess policy.
• For IAM permissions required to create a presigned URL, see Share an object with others in the Amazon
Simple Storage Service User Guide.
Step 1: Create an IAM role to grant access to Amazon
S3 Bucket
1. To get your IAM details that can be shared, call the get-caller-identity command from AWS
CloudShell:
aws sts get-caller-identity
If the call is successful, the command line displays a response similar to this:
{
"Account": "123456789012",
"UserId": "AROAXXOZUUOTTWDCVIDZ2:redirect_session",
"Arn": "arn:aws:sts::531421766567:assumed-role/Feder08/redirect_session"
}
2. Take the user information that you obtained in the previous step, and add it to an AWS
CloudFormation template. This template creates an IAM role. This role grants your collaborator
least-privilege permissions for the shared resources.
Resources:
CollaboratorRole:
Type: AWS::IAM::Role
Properties:
AssumeRolePolicyDocument:
Version: 2012-10-17
Statement:
- Effect: Allow
Principal:
AWS: "arn:aws:iam::531421766567:role/Feder08"
Action: "sts:AssumeRole"
Description: Role used by my collaborators
MaxSessionDuration: 7200
18AWS CloudShell User Guide
Generate the presigned URL
CollaboratorPolicy:
Type: AWS::IAM::Policy
Properties:
PolicyDocument:
Version: 2012-10-17
Statement:
- Effect: Allow
Action:
- 's3:*'
Resource: 'arn:aws:s3:::shared-bucket-for-my-cool-startup'
Condition:
StringEquals:
s3:prefix:
- "myfolder/*"
PolicyName: S3ReadSpecificFolder
Roles:
- !Ref CollaboratorRole
Outputs:
CollaboratorRoleArn:
Description: Arn for the Collaborator's Role
Value: !GetAtt CollaboratorRole.Arn
3. Save the AWS CloudFormation template in a file called template.yaml.
4. Now use the template to deploy the stack and create the IAM role by calling the deploy command:
aws cloudformation deploy --template-file ./template.yaml --stack-name CollaboratorRole
--capabilities CAPABILITY_IAM
Generate the presigned URL
1. Using your editor in AWS CloudShell, add the following code. This code creates a URL that provides
federated users with direct access to the AWS Management Console.
import urllib, json, sys
import requests
import boto3
import os
def main():
sts_client = boto3.client('sts')
assume_role_response = sts_client.assume_role(
RoleArn=os.environ.get(ROLE_ARN),
RoleSessionName="collaborator-session"
)
credentials = assume_role_response['Credentials']
url_credentials = {}
url_credentials['sessionId'] = credentials.get('AccessKeyId')
url_credentials['sessionKey'] = credentials.get('SecretAccessKey')
url_credentials['sessionToken'] = credentials.get('SessionToken')
json_string_with_temp_credentials = json.dumps(url_credentials)
print(f"json string {json_string_with_temp_credentials}")
request_parameters = f"?
Action=getSigninToken&Session={urllib.parse.quote(json_string_with_temp_credentials)}"
request_url = "https://signin.aws.amazon.com/federation" + request_parameters
r = requests.get(request_url)
signin_token = json.loads(r.text)
request_parameters = "?Action=login"
request_parameters += "&Issuer=Example.org"
request_parameters += "&Destination=" + urllib.parse.quote("https://us-
west-2.console.aws.amazon.com/cloudshell")
19AWS CloudShell User Guide
Generate the presigned URL
request_parameters += "&SigninToken=" + signin_token["SigninToken"]
request_url = "https://signin.aws.amazon.com/federation" + request_parameters
# Send final URL to stdout
print (request_url)
if __name__ == "__main__":
main()
2. Save the code in a file called share.py.
3. Last, run the following from the command line to retrieve the ARN of the IAM role from AWS
CloudFormation. Then, use it in the Python script to obtain temporary security credentials:
ROLE_ARN=$(aws cloudformation describe-stacks --stack-name CollaboratorRole --query
"Stacks[*].Outputs[?OutputKey=='CollaboratorRoleArn'].OutputValue" --output text)
python3 ./share.py
The script returns a URL that a collaborator can click to take them to AWS CloudShell in AWS
Management Console. The collaborator has full control over the myfolder/ folder in the Amazon
S3 bucket for the next 3,600 seconds (1 hour). The credentials expire after an hour. After this time,
the collaborator can no longer access the bucket.
20AWS CloudShell User Guide
Launching AWS CloudShell
Working with AWS CloudShell
This topic describes how you can access AWS CloudShell, navigate the shell interface, choose a shell type,
work with file uploads and downloads, and manage your shell sessions.
Launching AWS CloudShell
You can launch AWS CloudShell from the AWS Management Console using either one of the following
two methods:
1. Choose the AWS CloudShell icon on the console navigation bar.
2. Start typing "cloudshell" in the Find Services box and then choose the CloudShell option.
Navigating the AWS CloudShell interface
The following screenshot indicates several key AWS CloudShell interface features. You use these features
when you use the command line, use file upload/download tools, customize your shell environment, and
access user assistance.
1. AWS CloudShell command line interface that you use to run commands using your preferred
shell (p. 22). The current shell type is indicated by the command prompt.
2. The AWS Region where AWS CloudShell is currently running.
21AWS CloudShell User Guide
Choosing shells
3. The Notification link, which provides access to your Personal Health Dashboard and event logs.
4. The name and account ID of the current AWS CloudShell user (blurred here). You can use this menu to
view account information, switch roles, and sign out of AWS.
5. The Region selector that allows you to choose which AWS Region your shell environment runs in. For
more information, see Supported AWS Regions for AWS CloudShell (p. 55).
6. The Support menu, which you use to access user-assistance resources, including documentation and
training.
7. The Actions menu, which provides options for changing the screen layout (p. 30), downloading and
uploading files (p. 23), and restarting your AWS CloudShell (p. 25).
8. The Preferences option, which you can use to customize your shell experience (p. 30). You do this
by changing text size and switching the interface's color theme.
9. The bottom bar, which has options to provide feedback, access localized versions of the interface, and
learn about our privacy policy and terms of use.
Choosing your shell
The following shells are pre-installed and ready for use in AWS CloudShell: the Bash shell, PowerShell,
and the Z shell. For information about the versions pre-installed in your shell environment, see the shells
table (p. 42) in the AWS CloudShell compute environment (p. 42) section.
You can identify the shell that you're currently in by the command prompt:
• $: Bash shell
• PS>: PowerShell
• %: Z shell
To switch to a new shell, enter the shell's program name at the command line prompt:
• bash: Bash
• pwsh: PowerShell
• zsh: Z shell
Working in AWS Regions
The current AWS Region that you're running in is displayed above the command line interface.
You can choose an AWS Region to work in by selecting one from the Region selector. After you change
Regions, the interface refreshes as your shell session connects to a compute environment that's running
in the selected Region.
22AWS CloudShell User Guide
Specifying your default AWS Region for AWS CLI
Important
You have persistent storage of 1 GB for each AWS Region. The persistent storage is located in
your home directory ($HOME). Therefore, the personal files, directories, programs, and scripts
that are stored in your home directory in one AWS Region. Moreover, they are different from
those that are located in the home directory and stored a different Region.
Long-term retention of files in persistent storage is also managed on a per-Region basis. For
more information, see Persistent storage (p. 56).
Specifying your default AWS Region for AWS CLI
You can use environment variables to specify configuration options and credentials required to access
AWS services using AWS CLI. The environment variable that specifies the default AWS Region for your
shell session is set when you launch AWS CloudShell from a specific Region in the AWS Management
Console or when you choose an option in the Region selector.
Because environment variables have precedence over AWS CLI credentials files that are updated by
aws configure, you can't run that command to change the Region that's specified by the environment
variable. To change the default Region for AWS CLI commands, assign a value to the AWS_REGION
environment variable. In the examples below, you can replace us-east-1 with your choice of Region.
Bash or Zsh
$ export AWS_REGION=us-east-1
Setting the environment variable changes the value used until the end of your shell session, or until
you set the variable to a different value. You can make the variables persistent across future sessions
by setting them in your shell's startup script.
PowerShell
PS C:\> $Env:AWS_REGION="us-east-1"
If you set an environment variable at the PowerShell prompt, it saves the value for only the duration
of the current session. Alternatively, you can set the variable for all future PowerShell sessions by
adding it to your PowerShell profile. See the PowerShell documentation for more information about
storing environment variables or persisting them across sessions.
To confirm that you've changed the default Region, you can display the current AWS CLI configuration
data by running the following command:
aws configure list
Note
For specific AWS CLI commands, you can override the default Region using the command line
option --region. For more information, see Command line options in the AWS Command Line
Interface User Guide.
Working with files and storage
Using AWS CloudShell's interface, you can upload files to and download files from the shell environment.
To ensure any of the files you add are available after your session ends, you should know the difference
between persistent and temporary storage:
23You can also read