Privilege Management for Mac 21.1 Administration Guide
←
→
Page content transcription
If your browser does not render page correctly, please read the page content below
Privilege Management for Mac 21.1
                              Administration Guide

©2003-2021 BeyondTrust Corporation. All Rights Reserved. Other trademarks identified on this page are owned by their respective owners. BeyondTrust is not a chartered bank or trust company, or depository   TC:2/23/2021
institution. It is not authorized to accept deposits or trust accounts and is not licensed or regulated by any state or federal banking authority.
PRIVILEGE MANAGEMENT FOR MAC 21.1
ADMINISTRATION GUIDE
Table of Contents
Privilege Management for Mac Introduction 6
Install the Privilege Management Policy Editor 7
Install the Privilege Management for Mac Client 8
Install Privilege Management for Mac 8
Uninstall Privilege Management for Mac 9
Upgrade the Privilege Management Mac Client 10
Launch the Privilege Management Policy Editor 11
Navigate the Privilege Management Policy Editor 11
Automatic Save 11
Policies and Templates 12
Users 12
Policies 12
Edit Group Policy 12
Privilege Management Settings 12
Create 13
Delete 13
Export 13
Import 13
Import Template 13
Digitally Sign 14
Save Report 14
Set Challenge/Response Shared Key 14
Show Hidden Groups 14
View 14
License 14
Privilege Management for Mac Response Code Generator 15
Templates 15
macOS QuickStart 15
QuickStart Policy Summary 16
macOS Workstyles 16
macOS Application Groups 18
SALES: www.beyondtrust.com/contact SUPPORT: www.beyondtrust.com/support DOCUMENTATION: www.beyondtrust.com/docs 2
©2003-2021 BeyondTrust Corporation. All Rights Reserved. Other trademarks identified on this page are owned by their respective owners. BeyondTrust is not a chartered bank or trust company, or depository TC: 2/23/2021
institution. It is not authorized to accept deposits or trust accounts and is not licensed or regulated by any state or federal banking authority.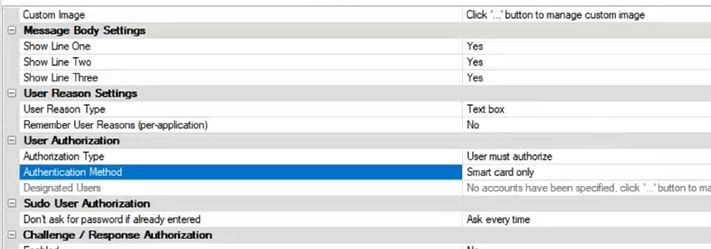
PRIVILEGE MANAGEMENT FOR MAC 21.1
ADMINISTRATION GUIDE
macOS Messages 18
Customize the QuickStart Policy 19
Mac Specific 19
Multiple Mac Policies 19
Mac Application Templates 19
Mac Audit Logs 19
Unified Logging 21
Add Privilege Management for Mac Settings to a Mac Client Computer 23
Mac Sudo Command Arguments Not Supported 23
Use Centrify 24
Third Party Licensing Information 24
Privilege Management for Mac Policies 25
Workstyles 26
Workstyle Wizard 26
Create Workstyles 27
Disable or Enable Workstyles 28
Workstyle Precedence 28
Workstyle Summary 28
Overview 29
Application Rules 29
Filters 30
Account Filters 30
Computer Filters 31
Application Groups 31
Create Application Groups 32
View or Edit the Properties of an Application Group 32
Delete an Application Group 32
Duplicate an Application Group 32
Rule Precedence 33
Application Definitions 33
Application Requests Authorization 33
Command Line Arguments 34
File or Folder Name Matches 35
SALES: www.beyondtrust.com/contact SUPPORT: www.beyondtrust.com/support DOCUMENTATION: www.beyondtrust.com/docs 3
©2003-2021 BeyondTrust Corporation. All Rights Reserved. Other trademarks identified on this page are owned by their respective owners. BeyondTrust is not a chartered bank or trust company, or depository TC: 2/23/2021
institution. It is not authorized to accept deposits or trust accounts and is not licensed or regulated by any state or federal banking authority.PRIVILEGE MANAGEMENT FOR MAC 21.1
ADMINISTRATION GUIDE
File Hash (SHA-1 Fingerprint) 35
File Version Matches 36
Parent Process Matches 36
Publisher Matches 37
Source 38
URI 38
Install Action Matches 39
Delete Action Matches 39
Management of Disk Mounted Images 39
Configuration of the defendpoint.plist File 39
Management of System Applications 41
Manage the Privilege Management Finder Extension 42
Insert a Binary 42
Insert a Bundle 43
Insert a Package 43
Insert a Script 44
Insert a Sudo Command 46
Sudo Switches 46
Edit -e Switch 47
Insert a System Preference Pane 47
Insert Applications from Templates 48
Use the Add Apps to Template Menu 48
Messages 48
Create Messages 49
Message Name and Description 49
Message Design 49
Message Header Settings 50
User Reason Settings 51
User Authorization 51
Sudo User Authorization 51
Challenge / Response Authorization 52
Image Manager 52
Message Text 53
SALES: www.beyondtrust.com/contact SUPPORT: www.beyondtrust.com/support DOCUMENTATION: www.beyondtrust.com/docs 4
©2003-2021 BeyondTrust Corporation. All Rights Reserved. Other trademarks identified on this page are owned by their respective owners. BeyondTrust is not a chartered bank or trust company, or depository TC: 2/23/2021
institution. It is not authorized to accept deposits or trust accounts and is not licensed or regulated by any state or federal banking authority.PRIVILEGE MANAGEMENT FOR MAC 21.1
ADMINISTRATION GUIDE
Challenge / Response Authorization 54
Mac Deployment 57
Add Privilege Management for Mac Settings to a Mac Client Computer 57
Mac Policy Structure and Precedence 57
Audits and Reports 59
Events 59
Use Smart Card Authentication 60
Troubleshoot 62
Check Privilege Management for Mac is Installed and Functioning 62
Check Settings are Deployed 62
Check Privilege Management for Mac is Licensed 62
Check Workstyle Precedence 62
SALES: www.beyondtrust.com/contact SUPPORT: www.beyondtrust.com/support DOCUMENTATION: www.beyondtrust.com/docs 5
©2003-2021 BeyondTrust Corporation. All Rights Reserved. Other trademarks identified on this page are owned by their respective owners. BeyondTrust is not a chartered bank or trust company, or depository TC: 2/23/2021
institution. It is not authorized to accept deposits or trust accounts and is not licensed or regulated by any state or federal banking authority.PRIVILEGE MANAGEMENT FOR MAC 21.1
ADMINISTRATION GUIDE
Privilege Management for Mac Introduction
Privilege Management for Mac combines privilege management and application control technology in a single lightweight agent.
This scalable solution allows global organizations to eliminate admin rights across the entire business.
Actionable intelligence is provided by an enterprise class reporting solution with endpoint analysis, dashboards, and trend data for
auditing and compliance.
Achieve Least Privilege on Mac
There are many functions that require an admin account to run. While most Mac users typically use an admin account to gain the
flexibility they need, this represents a large security risk in the enterprise. Privilege Management for Mac allows users to log in with
standard user accounts without compromising productivity or performance, by allowing the execution of approved tasks, applications
and installations as required, according to the rules of your policy.
Empower Users and Gain Control
Allow and block the use and installation of specific binaries, packages, and bundles. By taking a simple and pragmatic approach to
allowlisting, you can gain greater control of applications in use across the business. This immediately improves security by
preventing untrusted applications from executing.
Unlock Privileged Activity
Even privileged applications and tasks that usually require admin rights are able to run under a standard user account. With Privilege
Management for Mac, you can unlock approved system preferences such as date and time, printers, network settings, and power
management without needing admin credentials.
Take a Pragmatic Approach with Broad Rules
Broad catch-all rules provide a solid foundation, with exception handling options to handle unknown activity. Define the application
and set its identification options such as filename, hash, publisher, or URI. Then assign the application to the users who require
enhanced rights and set up any additional options, such as end user messaging and auditing.
Achieve Compliance
You will have the knowledge to discover, monitor, and manage user activity from the entire enterprise, drawing upon actionable
intelligence to make informed decisions. Graphical dashboards with real-time data will provide a broad range of reports to aid
troubleshooting and provide the information you need to proactively manage your policy on an ongoing basis.
Apply Corporate Branding
You can add your own branding to messages and prompts, with reusable messaging templates that make it easy to improve the end
user experience. You have control over text configuration.
Customizable Messaging
Working seamlessly with macOS, Privilege Management for Mac can suppress standard, restrictive messages and allows you to
create your own customized authorization prompts to handle exceptions and enable users to request access. Set up access request
reasons, challenge / response codes, or password protection to add additional security layers, or simply improve prompts to reduce
helpdesk inquiries.
SALES: www.beyondtrust.com/contact SUPPORT: www.beyondtrust.com/support DOCUMENTATION: www.beyondtrust.com/docs 6
©2003-2021 BeyondTrust Corporation. All Rights Reserved. Other trademarks identified on this page are owned by their respective owners. BeyondTrust is not a chartered bank or trust company, or depository TC: 2/23/2021
institution. It is not authorized to accept deposits or trust accounts and is not licensed or regulated by any state or federal banking authority.PRIVILEGE MANAGEMENT FOR MAC 21.1
ADMINISTRATION GUIDE
Simple, Familiar Policy Design
Firewall-style rules based on application groups make set up and management simple. Using the same Privilege Management
interface and client as for Windows, you can create flexible Workstyles based on the requirements of individuals and groups of users.
Install the Privilege Management Policy Editor
Using an administrator account, log into the Windows computer where you want to manage Privilege Management for Mac.
Note: Ensure you have the relevant Group Policy management tools installed on the desktop or server where you will
install Privilege Management Policy Editor.
To install Privilege Management Policy Editor, run the appropriate installation package:
l For 32-bit (x86) systems, run PrivilegeManagementPolicyEditor_x86.exe.
l For 64-bit (x64) systems, run PrivilegeManagementPolicyEditor_x64.exe.
Install Privilege Management Policy Editor:
1. The installation will detect if any prerequisites are needed. Click Install to install any missing prerequisites. This may take a
few minutes.
2. Once the prerequisites have been installed, the Welcome dialog box appears. Click Next to continue.
3. After reading the license agreement, select I accept the terms in the license agreement and click Next.
4. Enter your name and the name of your organization, and click Next.
5. If you want to change the default installation directory, click Change and select a different installation directory. Click Next.
6. If you are only managing Windows machines with Privilege Management and want to evaluate it for use with McAfee ePolicy
Orchestrator, check the McAfee ePolicy Orchestrator Integration box. Otherwise, leave it unchecked and click Next.
7. Click Install to start installing Privilege Management Policy Editor.
8. Once installed, click Finish. Privilege Management Policy Editor has now been successfully installed.
Note: To use the Event Import Wizard, you must install the Microsoft SQL Server Native Client. For installation instructions
and to download this component, please see Installing SQL Server Native Client at https://docs.microsoft.com/en-
us/sql/relational-databases/native-client/applications/installing-sql-server-native-client.
SALES: www.beyondtrust.com/contact SUPPORT: www.beyondtrust.com/support DOCUMENTATION: www.beyondtrust.com/docs 7
©2003-2021 BeyondTrust Corporation. All Rights Reserved. Other trademarks identified on this page are owned by their respective owners. BeyondTrust is not a chartered bank or trust company, or depository TC: 2/23/2021
institution. It is not authorized to accept deposits or trust accounts and is not licensed or regulated by any state or federal banking authority.PRIVILEGE MANAGEMENT FOR MAC 21.1
ADMINISTRATION GUIDE
Install the Privilege Management for Mac Client
The Privilege Management for Mac client enables Privilege Management settings to be applied to Mac computers.
To install Privilege Management for Mac, download and run the client installer package (*.pkg).
Privilege Management for Mac may be installed manually, but for larger installations we recommend you use a suitable third party
software deployment system.
Note: There is no license to add during the client installation, as this is deployed with the Privilege Management
Workstyles, so the client may be installed silently.
Install Privilege Management for Mac
To upgrade to Privilege Management for Mac, we recommend the following order of operations:
1. Update System Preferences to enable system extensions using the configuration profile (.mobileconfig file) provided by
BeyondTrust with your MDM.
2. Upgrade the Privilege Management for Mac client.
Note: If you do not use an MDM, then update System Preferences after upgrading the client.
MacOS System Settings
Privilege Management for Mac client uses system extensions for application control where available.
Configure the following macOS system settings for Privilege Management for Mac:
l System extensions require authorization
l System extensions require Full Disk Access permission
A macOS configuration profile (.mobileconfig file) is available with the Privilege Management for Mac download to apply these
settings. For convenience, we recommend importing the configuration profile into MDM to enable the new functionality.
The best way to configure the system settings is using the configuration profile provided by BeyondTrust. Optional ways are provided
below.
Authorization
There are two ways to configure authorization on the system extensions:
l Manually: Configure Security & Privacy in System Preferences.
l MDM: Use the BeyondTrust configuration profile provided in the installer download. Alternatively, Apple provides MDM
settings to auto authorize system extensions on a system.
For more information, please see SystemExtensions at
https://developer.apple.com/documentation/devicemanagement/systemextensions.
SALES: www.beyondtrust.com/contact SUPPORT: www.beyondtrust.com/support DOCUMENTATION: www.beyondtrust.com/docs 8
©2003-2021 BeyondTrust Corporation. All Rights Reserved. Other trademarks identified on this page are owned by their respective owners. BeyondTrust is not a chartered bank or trust company, or depository TC: 2/23/2021
institution. It is not authorized to accept deposits or trust accounts and is not licensed or regulated by any state or federal banking authority.PRIVILEGE MANAGEMENT FOR MAC 21.1
ADMINISTRATION GUIDE
Full Disk Access
The system extensions need to be granted Full Disk Access in Security & Privacy in System Preferences:
For more information, please see Change Privacy preferences on Mac at https://support.apple.com/en-gb/guide/mac-
help/mh32356/mac.
Uninstall Privilege Management for Mac
Note: The uninstall scripts must be run from their default locations.
Uninstall Privilege Management
To uninstall Privilege Management locally on a Mac, run the following command:
sudo /usr/local/libexec/Avecto/Defendpoint/1.0/uninstall.sh
Uninstall the Privilege Management ePO Adapter
To uninstall the Privilege Management ePO Adapter locally on a Mac, run the following command:
sudo /usr/local/libexec/avecto/ePOAdapter/1.0/uninstall_epo_adapter.sh
Uninstall Privilege Management and the Privilege Management ePO Adapter
To uninstall Privilege Management and the Privilege Management ePO Adapter locally on a Mac, run the following command.
sudo /usr/local/libexec/avecto/ePOAdapter/1.0/uninstall_epo_deployment.sh
Uninstall the Mac Adapter
To uninstall the Mac adapter, run the following command. After running the uninstall script some related directories remain if they are
not empty, such as /Library/Application Support/Avecto/iC3Adapter.
sudo /usr/local/libexec/Avecto/iC3Adapter/1.0/uninstall_ic3_adapter.sh
Remove the Privilege Management Policy
To remove the policy once you have uninstalled Privilege Management, run the following command:
sudo rm -rf /etc/defendpoint
Note: Do not remove the Privilege Management policy unless you have already uninstalled Privilege Management.
SALES: www.beyondtrust.com/contact SUPPORT: www.beyondtrust.com/support DOCUMENTATION: www.beyondtrust.com/docs 9
©2003-2021 BeyondTrust Corporation. All Rights Reserved. Other trademarks identified on this page are owned by their respective owners. BeyondTrust is not a chartered bank or trust company, or depository TC: 2/23/2021
institution. It is not authorized to accept deposits or trust accounts and is not licensed or regulated by any state or federal banking authority.PRIVILEGE MANAGEMENT FOR MAC 21.1
ADMINISTRATION GUIDE
Note: The uninstall scripts must be run from their default locations.
Upgrade the Privilege Management Mac Client
This process applies to PMC. For ePO, you can manage the upgrade through ePO Server.
To upgrade Privilege Management for Mac:
1. Uninstall Privilege Management (or unload daemon).
2. Install the new version of Privilege Management for Mac.
3. Install the new version of the PMC Mac adapter.
Your events for PMC are migrated as part of this process.
SALES: www.beyondtrust.com/contact SUPPORT: www.beyondtrust.com/support DOCUMENTATION: www.beyondtrust.com/docs 10
©2003-2021 BeyondTrust Corporation. All Rights Reserved. Other trademarks identified on this page are owned by their respective owners. BeyondTrust is not a chartered bank or trust company, or depository TC: 2/23/2021
institution. It is not authorized to accept deposits or trust accounts and is not licensed or regulated by any state or federal banking authority.PRIVILEGE MANAGEMENT FOR MAC 21.1
ADMINISTRATION GUIDE
Launch the Privilege Management Policy Editor
The Privilege Management Policy Editor is accessed as a snap-in to the Microsoft Management Console (MMC.exe).
From your administrator account, run MMC.exe. Type MMC into the Search Box from the Start Menu and press the Enter key.
We will now add Privilege Management for Mac as a snap-in to the console.
1. Select File from the menu bar and select Add/Remove Snap-in.
2. Scroll down the list and select the Privilege Management Settings snap-in. Click Add and then click OK.
3. Optionally, select File > Save as and save a shortcut for the snap-in to the desktop as Privilege Management.
4. Select the Privilege Management Settings node in the left-hand pane and select the operating system node to display the
main screen in the details pane.
Navigate the Privilege Management Policy Editor
The left-hand pane containing the Privilege Management Settings item
is referred to as the tree pane. The folders beneath Privilege
Management Settings in the tree pane are referred to as nodes. The
middle pane, which displays content relevant to the selected node, is
referred to as the details pane.
If you expand the Privilege Management Settings node, you will see three nodes:
l Windows: Create Privilege Management for Windows endpoints.
l OS X: Create Privilege Management for macOS endpoints.
l Licensing: Manage Privilege Management licenses.
If you expand the OS X node you will see three nodes:
l Workstyles: Assign privileges to applications.
l Application Groups: Define logical groupings of applications.
l Messages: Define end user messages.
Once a Workstyle has been created and selected in the tree pane, the Workstyle tabs will be displayed in the details pane.
Automatic Save
By default, the Privilege Management Settings editor will automatically save any changes back to the appropriate GPO or local XML
file if you are using the standalone console.
Automatic saving can be disabled, by deselecting the Auto Commit Settings menu option on the Privilege Management Settings
node, but is not recommended unless you have performance issues. If you deselect the Auto Commit Settings option, then you must
select the Commit Settings menu option to manually save any changes back to the GPO. The Auto Commit Settings option is
persisted to your user profile, so it will be set for all future editing of Privilege Managementfor Mac settings.
SALES: www.beyondtrust.com/contact SUPPORT: www.beyondtrust.com/support DOCUMENTATION: www.beyondtrust.com/docs 11
©2003-2021 BeyondTrust Corporation. All Rights Reserved. Other trademarks identified on this page are owned by their respective owners. BeyondTrust is not a chartered bank or trust company, or depository TC: 2/23/2021
institution. It is not authorized to accept deposits or trust accounts and is not licensed or regulated by any state or federal banking authority.PRIVILEGE MANAGEMENT FOR MAC 21.1
ADMINISTRATION GUIDE
Policies and Templates
A Privilege Management for Mac policy is made up of one or more items from the following groups. Each of these groups can be a
node in Privilege Management Settings:
l Workstyles: A Workstyle is part of a policy. It's used to assign application rules for users. You can create Workstyles by using
the WorkStyle Wizard or by importing them.
l Application Groups: Application Groups are used by Workstyles to group applications together to apply certain Privilege
Management for Mac behavior.
l Messages: Messages are used by Workstyles to provide information to the end user when Privilege Management for Mac has
applied certain behavior you have defined and needs to notify the end-user.
Users
Disconnected users are fully supported by Privilege Management for Mac. When receiving policies from McAfee ePO, Privilege
Management for Mac automatically caches all the information required to work offline, so the settings will still be applied if the client is
not connected to the corporate network. Any changes made to the policy will not propagate to the disconnected computer until the
McAfee Agent reestablishes a connection to the ePO Server.
Policies
Privilege Management for Mac policies are applied to one or more endpoints. The Policy Summary screen summaries for the
number of Workstyles, Application Groups, and Messages in the policy. As this is a blank policy, all summaries will be zero.
Each item summary includes an Edit button, which allows you to jump to that section of the policy.
Privilege Management for Mac incorporates an autosave, autosave recovery, and concurrent edit awareness feature to reduce the
risk or impact of data loss and prevent multiple users from overwriting individual polices.
A Privilege Management for Mac template is a configuration that is merged with your existing policy. A template also consists of any
number of Workstyles, Application Groups, Content Groups, Messages, and Custom Tokens.
Edit Group Policy
To edit policy, we recommend you use the Group Policy Management snap-in. Once you have installed the Privilege Management
Policy Editor, the Privilege Management for Mac settings are available in the Group Policy Management snap-in. The Group Policy
Management snap-in can be accessed from the Microsoft Management Console or Group Policy Management editor.
Note: If you want to create local policy to administer your endpoints, you can use the Privilege Management snap-in in the
Microsoft Management Console or the Local Group Policy Editor. This will create a local policy only.
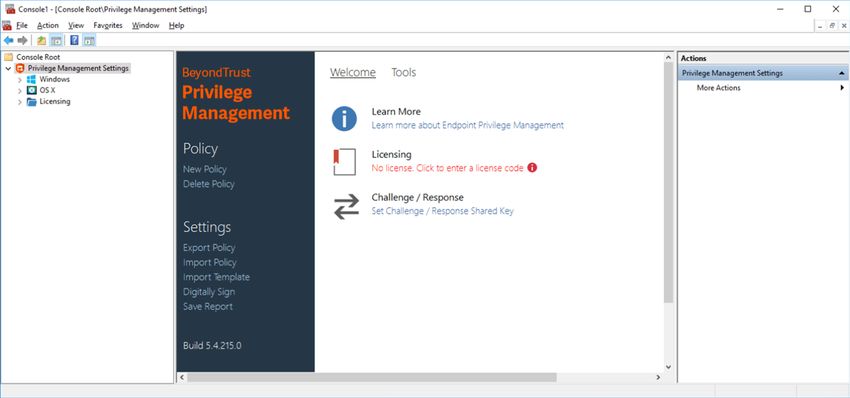
Privilege Management Settings
You can right-click on the Privilege Management Settings node to access the following commands.
You can click Tools in the right-hand panel to access the Response Code Generator.
By default, Auto Commit Settings is selected. This means any changes made here are saved and applied using group policy.
Alternatively, you can clear Auto Commit Settings and select Commit Settings when you specifically want those settings to apply.
SALES: www.beyondtrust.com/contact SUPPORT: www.beyondtrust.com/support DOCUMENTATION: www.beyondtrust.com/docs 12
©2003-2021 BeyondTrust Corporation. All Rights Reserved. Other trademarks identified on this page are owned by their respective owners. BeyondTrust is not a chartered bank or trust company, or depository TC: 2/23/2021
institution. It is not authorized to accept deposits or trust accounts and is not licensed or regulated by any state or federal banking authority.PRIVILEGE MANAGEMENT FOR MAC 21.1
ADMINISTRATION GUIDE
For more information, please see "Privilege Management for Mac Response Code Generator" on page 15.
The following options are also available:
Create
Creates a new Privilege Management for Mac policy. This will delete any existing policy for all operating systems. If you have an
existing policy, you are prompted to remove all existing settings when you click Create. Click Yes to delete your existing policy and
create a new one or No to keep your existing policy.
Delete
Deletes your existing Privilege Management for Mac policy. You are prompted to remove all existing settings when you click Delete.
Click Yes to delete your existing policy or No to keep your existing policy.
Delete Items and Conflict Resolution
Some items within Privilege Management Settings are referenced in other areas, such as Application Groups and Messages. These
items can be deleted at any time, and if they are not referenced elsewhere, they delete without any further action required.
When an item is deleted, Privilege Management Policy Editor will check for any conflicts which may need to be resolved. If the item
you attempt to delete is already in use elsewhere in your settings, then a conflict will be reported and must be resolved.
You can review each detected conflict and observe the automatic resolution which will take place if you proceed. If more than one
conflict is reported, use the Next conflict and Previous conflict links to move between conflicts.
If you want to proceed, click Resolve All to remove the item from the areas of your Privilege Management Settings where it is
currently in use.
Export
Privilege Management for Mac policies can be imported to and exported from Group Policy as .XML files, in a format common to other
editions of Privilege Management, such as the Privilege Management ePO Extension. This allows for policies to be migrated and
shared between different deployment mechanisms.
To export a policy, click Export and give the file a name. Click Save.
Import
Privilege Management for Mac policies can be imported to and exported from Group Policy as .XML files, in a format common to other
editions of Privilege Management, such as the Privilege Management ePO Extension. This allows for policies to be migrated and
shared between different deployment mechanisms.
To import a policy, click Import, navigate to the policy XML you want to import, and click Open.
Import Template
Allows you to import template policies.
SALES: www.beyondtrust.com/contact SUPPORT: www.beyondtrust.com/support DOCUMENTATION: www.beyondtrust.com/docs 13
©2003-2021 BeyondTrust Corporation. All Rights Reserved. Other trademarks identified on this page are owned by their respective owners. BeyondTrust is not a chartered bank or trust company, or depository TC: 2/23/2021
institution. It is not authorized to accept deposits or trust accounts and is not licensed or regulated by any state or federal banking authority.PRIVILEGE MANAGEMENT FOR MAC 21.1
ADMINISTRATION GUIDE
For more information, please see "Templates" on page 15.
Digitally Sign
You can digitally sign the Privilege Management for Mac settings. Privilege Management for Mac can audit the loading of any valid
policy.
Save Report
You can obtain a report of your Windows policy which can be saved locally, if required.
Set Challenge/Response Shared Key
This allows you to set the Challenge/Response Shared Key for the policy. This is encrypted once you have set it. This key is then
required by the Challenge/Response generator to generate response codes. The only way to change the Challenge/Response
Shared Key is by setting a new one.
Show Hidden Groups
You can show or hide application groups in Privilege Management for Mac.
To show groups that have been hidden by default, right-click on the Privilege Management Settings node and select Show Hidden
Groups. You can hide the groups again by clearing Show Hidden Groups.
View
This allows you to view the Workstyles Editor (default).
You can review each detected conflict and observe the automatic resolution which will take place if you proceed. If more than one
conflict is reported, use the Next conflict and Previous conflict links to move between conflicts.
If you want to proceed, click Resolve All to remove the item from the areas of your Privilege Management Settings where it is
currently in use.
License
Privilege Management for Mac requires a valid license code to be entered in the Privilege Management Policy Editor. If multiple
Privilege Management for Mac policies are applied to an endpoint, you need at least one valid license code for one of those policies.
For example, you could add the Privilege Management for Mac license to a Privilege Management for Mac policy that is applied to all
managed endpoints, even if it doesn't have any Workstyles. This ensures all endpoints receive a valid Privilege Management license
if they have Privilege Management for Mac installed. If you are unsure, then we recommend you add a valid license when you create
the Privilege Management for Mac policy.
Insert a License
1. Click No License. Click to enter a license code to enter a license if one doesn't already exist, or Valid License if you want to
enter an additional license code.
SALES: www.beyondtrust.com/contact SUPPORT: www.beyondtrust.com/support DOCUMENTATION: www.beyondtrust.com/docs 14
©2003-2021 BeyondTrust Corporation. All Rights Reserved. Other trademarks identified on this page are owned by their respective owners. BeyondTrust is not a chartered bank or trust company, or depository TC: 2/23/2021
institution. It is not authorized to accept deposits or trust accounts and is not licensed or regulated by any state or federal banking authority.PRIVILEGE MANAGEMENT FOR MAC 21.1
ADMINISTRATION GUIDE
2. Paste your Privilege Management for Mac license code and click Add. The license details are shown.
Privilege Management for Mac Response Code Generator
The Response Code Generator allows you to generate a response code using the PGChallengeResponseUI utility.
To generate a Response Code from Privilege Management Settings:
1. Click the Tools link from the right-hand panel of Privilege
Management Settings.
2. Click Launch Response Code Generator.
3. Enter your shared key and the challenge code. The response
code is shown in the third text field.
Templates
Templates can be imported into your Privilege Management for Mac settings. You can choose to merge them into your existing policy;
otherwise, the template overwrites your existing policy.
macOS QuickStart
The QuickStart for macOS policy contains Workstyles, Application Groups, and Messages configured with Privilege Management for
Mac and Application Control. The QuickStart policy has been designed from BeyondTrust’s experiences of implementing the solution
across thousands of customers, and is intended to balance security with user freedom. As every environment is different, we
recommend you thoroughly test this configuration to ensure it complies with the requirements of your organization.
This template policy contains the following elements:
Workstyles
l All Users
l High Flexibility
l Medium Flexibility
l Low Flexibility
Application Groups
l (Default) Authorize - Delete from /Applications
l (Default) Authorize - Install to /Applications
l (Default) Authorize - System Trusted
l (Default) General - Any Application
SALES: www.beyondtrust.com/contact SUPPORT: www.beyondtrust.com/support DOCUMENTATION: www.beyondtrust.com/docs 15
©2003-2021 BeyondTrust Corporation. All Rights Reserved. Other trademarks identified on this page are owned by their respective owners. BeyondTrust is not a chartered bank or trust company, or depository TC: 2/23/2021
institution. It is not authorized to accept deposits or trust accounts and is not licensed or regulated by any state or federal banking authority.PRIVILEGE MANAGEMENT FOR MAC 21.1
ADMINISTRATION GUIDE
l (Default) General - Any Applications Requiring Authorization
l (Default) Passive - System Trusted
l Any Other Sudo Commands
l Authorize - High Flexibility
l Authorize - Controlled OS Functions
l Authorize - General Business Applications
l Authorize - Low Flexibility
l Authorize - System Preferences
l Authorize Sudo Commands - General
l Authorize Sudo Commands - High Flexibility
l Block - Applications
l Block - Delete from /Applications
l Block - Installation to /Applications
l Passive - General Business Applications
Messages
l Allow Authorize (Delegated Authorizer)
l Allow Authorize (User Authorizer)
l Allow Message (Audit)
l Allow Message (Enter Reason)
l Allow Message (with Challenge)
l Block (OK)
l Block - Delete (OK)
l Block - Installation (OK)
l Delete Message (Audit)
l Install Message (Audit)
QuickStart Policy Summary
By using and building on the QuickStart policy, you can quickly improve your organization's security without having to monitor and
analyze your users' behavior first and then design and create your Privilege Management for Mac configuration.
After the QuickStart policy has been deployed to groups within your organization, you can start to gather information on your users'
behavior. This will provide you with a better understanding of the applications being used within your organization, and whether they
require admin rights, need to be blocked, or need authorization for specific users.
This data can then be used to further refine the QuickStart policy to provide more a tailored Privilege Management for Mac solution for
your organization.
macOS Workstyles
The QuickStart policy contains four Workstyles that should be used together to manage all users in your organization.
SALES: www.beyondtrust.com/contact SUPPORT: www.beyondtrust.com/support DOCUMENTATION: www.beyondtrust.com/docs 16
©2003-2021 BeyondTrust Corporation. All Rights Reserved. Other trademarks identified on this page are owned by their respective owners. BeyondTrust is not a chartered bank or trust company, or depository TC: 2/23/2021
institution. It is not authorized to accept deposits or trust accounts and is not licensed or regulated by any state or federal banking authority.PRIVILEGE MANAGEMENT FOR MAC 21.1
ADMINISTRATION GUIDE
All Users
This Workstyle contains a set of default rules that apply to all standard users regardless of what level of flexibility they need.
The All Users Workstyle contains rules to:
l Block any applications that are in the Block Applications group.
l Allow BeyondTrust Support tools.
l Allow standard Windows functions, business applications, and applications installed through trusted deployment tools to run
with admin rights.
l Allow approved standard user applications to run passively.
l Allow and authorize the install and delete of bundles to the /Applications/ directory.
High Flexibility
This Workstyle is designed for users that require a lot of flexibility such as developers.
The High Flexibility Workstyle contains rules to:
l Allow known allowed business applications and operating system functions to run.
l Allow users to run signed applications with admin rights.
l Allow users to run unknown applications with admin rights once they have confirmed the application should be elevated.
l Allow applications in the Add Admin – High Flexibility group to run with admin rights.
l Allow unknown business application and operating system functions to run on-demand.
Medium Flexibility
This Workstyle is designed for users that require some flexibility such as sales engineers.
The Medium Flexibility Workstyle contains rules to:
l Allow known allowed business applications and operating system functions to run.
l Allow users to run signed applications with admin rights once they have confirmed the application should be elevated.
l Prompt users to provide a reason before they can run unknown applications with admin rights.
l Allow applications in the Add Admin – Medium Flexibility group to run with admin rights.
l Allow unknown business application and operating system functions to run on-demand.
l Restricted OS functions that require admin rights are prevented and require support interaction.
Low Flexibility
This Workstyle is designed for users that don't require much flexibility such as helpdesk operators.
The Low Flexibility Workstyle contains rules to:
l Prompt users to contact support if a trusted or untrusted application requests admin rights.
l Prompt users to contact support if an unknown application tries to run with support authorization.
l Allow known approved business applications and operating system functions to run.
SALES: www.beyondtrust.com/contact SUPPORT: www.beyondtrust.com/support DOCUMENTATION: www.beyondtrust.com/docs 17
©2003-2021 BeyondTrust Corporation. All Rights Reserved. Other trademarks identified on this page are owned by their respective owners. BeyondTrust is not a chartered bank or trust company, or depository TC: 2/23/2021
institution. It is not authorized to accept deposits or trust accounts and is not licensed or regulated by any state or federal banking authority.PRIVILEGE MANAGEMENT FOR MAC 21.1
ADMINISTRATION GUIDE
macOS Application Groups
The application groups prefixed with (Default) or (Recommended) are hidden by default and do not need to be altered.
l (Default) Authorize - System Trusted: Contains operating system functions that are authorized for all users.
l (Default) General - Any Application: Contains all application types and is used as a catch-all for unknown applications.
l (Default) General - Any Application Requiring Authorization: This group contains applications types that request admin
rights.
l (Default) Passive - System Trusted: This group contains system applications that are allowed for all users.
l Any Other Sudo Commands: Contains all sudo commands and is used as a catch-all for unknown sudo commands.
l Authorize - High Flexibility: Contains the applications that require authorization that should only be provided to the high
flexibility users.
l Authorize - Controlled OS Functions: This group contains OS functions that are used for system administration and trigger an
authorization prompt when they are executed.
l Authorize - General Business Applications: Contains applications that are authorized for all users, regardless of their
flexibility level.
l Authorize - Low Flexibility: Contains the applications that require authorization that should only be provided to the low
flexibility users.
l Authorize - System Preferences: This group contains system preferences that trigger an authorization prompt when they are
executed.
l Authorize Sudo Commands: General. Contains sudo commands that are allowed for all users.
l Authorize Sudo Commands: High Flexibility. Contains sudo commands that should only be provided to the high flexibility
users.
l Block - Applications: This group contains applications that are blocked for all users.
l Passive - General Business Applications: This group contains applications that are allowed for all users
macOS Messages
The following messages are created as part of the QuickStart policy and are used by some of the application rules:
l Allow Authorize (Delegated Authorizer): Asks the user to enter the username and password of another user before the
application is authorized to run.
l Allow Authorize (User Authorizer): Asks the user to enter their password before the application is authorized to run.
l Allow Message (Audit): Asks the user to confirm that they want to proceed to authorize an application to run.
l Allow Message (Enter Reason): Asks the user to provide a reason and enter their password before the application is
authorized to run.
l Allow Message (with Challenge): Presents the user with a challenge code and asks them to obtain authorization from the
support desk. Support can either provide a response code or a designated, authorized user can enter their login details to
approve the request.
l Block (OK): Warns the user that an application has been blocked.
SALES: www.beyondtrust.com/contact SUPPORT: www.beyondtrust.com/support DOCUMENTATION: www.beyondtrust.com/docs 18
©2003-2021 BeyondTrust Corporation. All Rights Reserved. Other trademarks identified on this page are owned by their respective owners. BeyondTrust is not a chartered bank or trust company, or depository TC: 2/23/2021
institution. It is not authorized to accept deposits or trust accounts and is not licensed or regulated by any state or federal banking authority.PRIVILEGE MANAGEMENT FOR MAC 21.1
ADMINISTRATION GUIDE
Customize the QuickStart Policy
Before deploying the QuickStart policy to your users, you need to make some company-specific customizations to the standard
template.
At a minimum you need to:
l Configure the users or groups that can authorize requests that trigger messages.
l Customize the messaging with you company logo and wording
l Assign users and groups to the high, medium, and low flexibility Workstyles.
l Populate the Block Applications application group with any applications you want to block for all users.
l Set your shared key so you can generate a Privilege Management for Mac Response code.
Mac Specific
Multiple Mac Policies
For Mac estates being managed by ePO, multiple policies being applied simultaneously is supported, for example:
l epo.xml
l epo001.xml
l epo002.xml
In the example above, if the policy precedence is set for ePO policies, then rules processing will first check the rules in epo.xml. If no
rules are found for the process in this policy, then it will go through the epo001.xml. Each policy is processed in an alpha-numeric/C
locale order. This continues until the process hits a rule or the dppolicyserverd reads all of the policies without finding a match.
If multiple policies are loaded, only one of them requires a Privilege Management for Mac license. We recommend you do not use
multiple licenses in this configuration. Each policy can have a different Challenge-Response key.
Copy and pasted policies with altered rules are still processed, the dppolicyserverd log outputs whether it replaced GUIDs when
loading them into memory if it was a duplicate.
Mac Application Templates
Privilege Management for Mac ships with some standard application templates to simplify the definition of applications that are part of
the operating system. The standard application templates are split into categories:
l System Preference Panes
l Bundles
l Binaries
Each category then has a list of applications for that category. Picking an application will cause the application to be prepopulated
with the appropriate information.
Mac Audit Logs
How to log events to a file:
1. When Privilege Management for Mac is installed, it checks to see if the following path and file is present. If it's not, it creates it:
/var/log/defendpoint/audit.log
SALES: www.beyondtrust.com/contact SUPPORT: www.beyondtrust.com/support DOCUMENTATION: www.beyondtrust.com/docs 19
©2003-2021 BeyondTrust Corporation. All Rights Reserved. Other trademarks identified on this page are owned by their respective owners. BeyondTrust is not a chartered bank or trust company, or depository TC: 2/23/2021
institution. It is not authorized to accept deposits or trust accounts and is not licensed or regulated by any state or federal banking authority.PRIVILEGE MANAGEMENT FOR MAC 21.1
ADMINISTRATION GUIDE
2. This file cannot be edited during output. If this file is deleted, Privilege Management for Mac recreates it dynamically. If the
folder structure is deleted, Privilege Management for Mac recreates it when the endpoint is restarted.
3. This log file can be viewed in the macOS Console for all versions from /var/log in the side
bar. You can also view the log output in real-time if required.
4. The log file is maintained by the core macOS service newsyslog. The newsyslog.conf file contains various log files and
associated settings and is maintained by the core macOS. The newsyslog.conf file is located at /etc/newsyslog.conf.
Note: This part of the set up must be done by a user who can write to this location or by using a mobile device
management (MDM) solution.
5. In the newsyslog.conf file, the settings are outlined and have column headers:
l logfilename
l mode
l count
l size
l when
l flags
6. For the purposes of the maintenance of the audit.log file, you must populate the logfilename, mode, count, size and/or when,
and flags attributes in the newsyslog.conf file.
l logfilename: Path and filename
l mode: File mode. For example, settings for read/write for each user type (POSIX file permissions)
l count: Count for amount of archived files (count starts from 0)
l size: Threshold for log size in KB
SALES: www.beyondtrust.com/contact SUPPORT: www.beyondtrust.com/support DOCUMENTATION: www.beyondtrust.com/docs 20
©2003-2021 BeyondTrust Corporation. All Rights Reserved. Other trademarks identified on this page are owned by their respective owners. BeyondTrust is not a chartered bank or trust company, or depository TC: 2/23/2021
institution. It is not authorized to accept deposits or trust accounts and is not licensed or regulated by any state or federal banking authority.PRIVILEGE MANAGEMENT FOR MAC 21.1
ADMINISTRATION GUIDE
l when: Threshold for log size in terms of time. For example, new log everyday at X, or every month
l flag: Instruction for processing the archived/turn-over file. This is most likely to be JN or ZN
An example of a line in the newsyslog.conf for Privilege Management for Mac:
/var/log/defendpoint/audit.log 644 5 1000 * JN
This indicates that:
l The filename is audit.log
l It can be viewed by all user types but can only be edited by the root user
l It has an archive count of 5 (6 archived files, not including the current log)
l It has a threshold of 1MB for turn-over/archiving
l It doesn't have a date turn over
l For archiving, files are to be compressed into a bzip file
Note: The threshold relies on the newsyslog service. This service is "low" priority in macOS and only reads the .conf file
approximately every 30mins. Using the example line above, the log can become greater than 1MB prior to the service
reading the newsyslog.conf file due to it being a ‘threshold’ value, rather than each log file being of equal size.
7. Once you have applied the newsyslog.conf by adding the audit.log line to it, you can run sudo newsyslog -nv in the
Terminal to see the state of the logging, when the next roll over is, and whether there are any syntax issues.
Unified Logging
Unified logging is available in macOS 10.12 and later and supersedes Apple System Logger (ASL). Prior to macOS 10.12, log
messages were written to specific disk locations. Unified logging means the log messages are stored in memory or in a data store
and can viewed in the Console application and the log command line tool.
To view the debug logs of a process on the endpoint:
1. Open the Console app. By default, debug and info messages are not displayed. You can select an event in the main window
to view the logs for it.
2. Click Now in the top left of the tool bar to see new messages in real time.
3. Select Actions > Include Info Messages and Actions > Include Debug Messages to add these to the log.
4. Using the search bar on the top-right, you can enter the name of a process that you want to filter on. For example,
defendpointd for Privilege Management for Mac or PMCAdapter for PMC Adapter log messages.
5. You can further manipulate the filter from the search bar or by right-clicking on the process and selecting an additional filter
option.
For more information about unified logging, please see Logging at https://developer.apple.com/documentation/os/logging.
Obtain Debug Logs from the Endpoint
Unified logging does not store info or debug strings on the hard disk. They are only displayed while the Console application is open.
You must use the log config command to create plist files for each Privilege Management for Mac daemon and change the logging
file. These plists are created in the /Library/Preferences/Logging directory.
SALES: www.beyondtrust.com/contact SUPPORT: www.beyondtrust.com/support DOCUMENTATION: www.beyondtrust.com/docs 21
©2003-2021 BeyondTrust Corporation. All Rights Reserved. Other trademarks identified on this page are owned by their respective owners. BeyondTrust is not a chartered bank or trust company, or depository TC: 2/23/2021
institution. It is not authorized to accept deposits or trust accounts and is not licensed or regulated by any state or federal banking authority.PRIVILEGE MANAGEMENT FOR MAC 21.1
ADMINISTRATION GUIDE
Note: In lieu of using the method below, you can obtain debug logs from the endpoint using the CaptureConfig utility.
Please contact BeyondTrust Technical Support to obtain it.
1. To create plists and change the logging level for the Privilege Management for Mac daemons, run the following commands in
the terminal:
sudo log config --subsystem com.avecto.defendpointd --mode persist:debug
sudo log config --subsystem com.avecto.custodian --mode persist:debug
sudo log config --subsystem com.avecto.dppolicyserverd --mode persist:debug
sudo log config --subsystem com.avecto.Defendpoint --mode persist:debug
2. Once these commands have been run, you have two options:
l Obtain a centralized log you can send to BeyondTrust Technical Support. This is the recommended approach.
IMPORTANT!
You would ideally collect the logs into a central log file using the following command, however this logs every process on the
endpoint, not just the Privilege Management for Mac processes.
sudo log collect —-last
Note: You must replace the value with an integer and then append m for months, h for hours, or m for minutes
depending on how long it took to replicate the issue. This will produce a .logarchive file in the current user's directory.
l Alternatively, you can create a log for each Privilege Management for Mac daemon by using the following commands.
This process outputs .log files in the user's home directory that can be edited or moved as required. As this information
is split across multiple log files, it is not the recommended approach, however it can be used when the first approach is
not viable.
log show --predicate 'subsystem == "com.avecto.custodian"' --style json --debug --last 1h >
~/Documents/Custodian.logarchive
log show --predicate 'subsystem == "com.avecto.defendpointd"' --style json --debug --last 1h >
~/Documents/defendpointd.logarchive
log show --predicate 'subsystem == "com.avecto.dppolicyserverd"' --style json --debug --last 1h >
~/Documents/dppolicyserverd.logarchive
log show --predicate 'subsystem == "com.avecto.Defendpoint"' --style json --debug --last 1h >
~/Documents/Defendpoint.logarchive
Note: We strongly recommend you delete the .plists after use and disable debug level of logging persistence, especially
on an SSD.
SALES: www.beyondtrust.com/contact SUPPORT: www.beyondtrust.com/support DOCUMENTATION: www.beyondtrust.com/docs 22
©2003-2021 BeyondTrust Corporation. All Rights Reserved. Other trademarks identified on this page are owned by their respective owners. BeyondTrust is not a chartered bank or trust company, or depository TC: 2/23/2021
institution. It is not authorized to accept deposits or trust accounts and is not licensed or regulated by any state or federal banking authority.PRIVILEGE MANAGEMENT FOR MAC 21.1
ADMINISTRATION GUIDE
Anonymous Logging
By default, Privilege Management for Mac will include user and computer specific information in all audit events. You can set your
application rules to not log this information for events associated with your rules by setting the Raise an Event option to On
(Anonymous) on each rule.
You can also set whether user or computer information is kept anonymous for audit events that are not associated with a rule, such as
events raised for having an invalid license.
To enable anonymous auditing for events not associated with a rule, edit the following section in the defendpoint.plist configuration
file:
AnonymousLogging
true
To disable anonymous auditing for events not associated with a rule, edit the following section in the defendpoint.plist configuration
file:
AnonymousLogging
false
Add Privilege Management for Mac Settings to a Mac Client Computer
Privilege Management for Mac settings are stored in the file /etc/defendpoint/local.xml, and can be overwritten with an exported XML
file from the MMC. To prevent any invalid permissions being applied, we recommend this file be replaced using the following
command. In this example, the source XML file is located on your Desktop:
sudo cp ~/Desktop/local.xml /etc/defendpoint/local.xml
Privilege Management for Mac will apply the new settings immediately, and does not require any restart.
Note: If all policies are deleted, the local.xml policy is regenerated. The regenerated local.xml policy will not contain any
license or rules.
Mac Sudo Command Arguments Not Supported
The following arguments are not supported by Privilege Management for Mac when you're using sudo:
Option (single Option (double
Description
dash) dash)
-A --askpass use a helper program for password prompting
-C num --close-from=num close all file descriptors >= num
-E --preserve-env preserve user environment when running command
-g group --group=group run command as the specified group name or ID
-H --set-home set HOME variable to target user's home dir
-h host --host=host run command on host (if supported by plugin)
-K --remove-timestamp remove timestamp file completely
-k --reset-timestamp invalidate timestamp file
SALES: www.beyondtrust.com/contact SUPPORT: www.beyondtrust.com/support DOCUMENTATION: www.beyondtrust.com/docs 23
©2003-2021 BeyondTrust Corporation. All Rights Reserved. Other trademarks identified on this page are owned by their respective owners. BeyondTrust is not a chartered bank or trust company, or depository TC: 2/23/2021
institution. It is not authorized to accept deposits or trust accounts and is not licensed or regulated by any state or federal banking authority.PRIVILEGE MANAGEMENT FOR MAC 21.1
ADMINISTRATION GUIDE
Option (single Option (double
Description
dash) dash)
-l --list list user's privileges or check a specific command; use twice for longer format
-n --non-interactive non-interactive mode, no prompts are used
-P --preserve-groups preserve group vector instead of setting to target's
-p prompt --prompt=prompt use the specified password prompt
-U user --other-user=user in list mode, display privileges for user
-u user --user=user run command (or edit file) as specified user name or ID
-v --validate update user's timestamp without running a command
Use Centrify
If you are using Centrify to bind MacOS endpoints to Active Directory, contact BeyondTrust Technical Support for assistance.
Third Party Licensing Information
We use the following third party software:
l Qt
l Sudo
l SwiftyJSON
Sudo Copyright Notice
Sudo is distributed under the following license:
Copyright (c) 1994-1996, 1998-2019
Todd C. Miller
Permission to use, copy, modify, and distribute this software for any purpose with or without fee is hereby granted, provided that the
above copyright notice and this permission notice appear in all copies.
THE SOFTWARE IS PROVIDED "AS IS" AND THE AUTHOR DISCLAIMS ALL WARRANTIES WITH REGARD TO THIS SOFTWARE
INCLUDING ALL IMPLIED WARRANTIES OF MERCHANTABILITY AND FITNESS. IN NO EVENT SHALL THE AUTHOR BE LIABLE
FOR ANY SPECIAL, DIRECT, INDIRECT, OR CONSEQUENTIAL DAMAGES OR ANY DAMAGES WHATSOEVER RESULTING
FROM LOSS OF USE, DATA OR PROFITS, WHETHER IN AN ACTION OF CONTRACT, NEGLIGENCE OR OTHER TORTIOUS
ACTION, ARISING OUT OF OR IN CONNECTION WITH THE USE OR PERFORMANCE OF THIS SOFTWARE.
Sponsored in part by the Defense Advanced Research Projects Agency (DARPA) and Air Force Research Laboratory, Air Force
Materiel Command, USAF, under agreement number F39502-99-1-0512.
SALES: www.beyondtrust.com/contact SUPPORT: www.beyondtrust.com/support DOCUMENTATION: www.beyondtrust.com/docs 24
©2003-2021 BeyondTrust Corporation. All Rights Reserved. Other trademarks identified on this page are owned by their respective owners. BeyondTrust is not a chartered bank or trust company, or depository TC: 2/23/2021
institution. It is not authorized to accept deposits or trust accounts and is not licensed or regulated by any state or federal banking authority.PRIVILEGE MANAGEMENT FOR MAC 21.1
ADMINISTRATION GUIDE
Privilege Management for Mac Policies
A Privilege Management for Mac policy is built up with the following optional components:
l Workstyles: A Workstyle is part of a policy. It's used to assign application rules for users. You can create Workstyles using the
WorkStyle Wizard or by importing them.
l Application Groups: Application Groups are used by Workstyles to group applications together to apply certain Privilege
Management for Mac behavior.
l Messages: Messages are used by Workstyles to provide information to the end user when Privilege Management for Mac has
applied certain behavior you have defined and needs to notify the end-user.
Note: Using .MPKG (multiple package) format or launching multiple .PKG files at once is not supported and is blocked by
Privilege Management for Mac.
Note: Mac Policies are not applied to the root user.
For more information, please see the following sections:
l "Workstyles" on page 26
l "Application Groups" on page 31
l "Messages" on page 48
SALES: www.beyondtrust.com/contact SUPPORT: www.beyondtrust.com/support DOCUMENTATION: www.beyondtrust.com/docs 25
©2003-2021 BeyondTrust Corporation. All Rights Reserved. Other trademarks identified on this page are owned by their respective owners. BeyondTrust is not a chartered bank or trust company, or depository TC: 2/23/2021
institution. It is not authorized to accept deposits or trust accounts and is not licensed or regulated by any state or federal banking authority.You can also read