Tanium Incident Response User Guide - Version 5.9.4 April 21, 2021 - Tanium Incident Response User Guide
←
→
Page content transcription
If your browser does not render page correctly, please read the page content below
Tanium™ Incident Response User
Guide
Version 5.9.4

April 21, 2021
The information in this document is subject to change without notice. Further, the information provided in this document
is provided “as is” and is believed to be accurate, but is presented without any warranty of any kind, express or implied,
except as provided in Tanium’s customer sales terms and conditions. Unless so otherwise provided, Tanium assumes no
liability whatsoever, and in no event shall Tanium or its suppliers be liable for any indirect, special, consequential, or
incidental damages, including without limitation, lost profits or loss or damage to data arising out of the use or inability to
use this document, even if Tanium Inc. has been advised of the possibility of such damages.

Any IP addresses used in this document are not intended to be actual addresses. Any examples, command display
output, network topology diagrams, and other figures included in this document are shown for illustrative purposes only.
Any use of actual IP addresses in illustrative content is unintentional and coincidental.

Please visit https://docs.tanium.com for the most current Tanium product documentation.

This documentation may provide access to or information about content, products (including hardware and software),
and services provided by third parties (“Third Party Items”). With respect to such Third Party Items, Tanium Inc. and its
affiliates (i) are not responsible for such items, and expressly disclaim all warranties and liability of any kind related to
such Third Party Items and (ii) will not be responsible for any loss, costs, or damages incurred due to your access to or
use of such Third Party Items unless expressly set forth otherwise in an applicable agreement between you and Tanium.

Further, this documentation does not require or contemplate the use of or combination with Tanium products with any
particular Third Party Items and neither Tanium nor its affiliates shall have any responsibility for any infringement of
intellectual property rights caused by any such combination. You, and not Tanium, are responsible for determining that
any combination of Third Party Items with Tanium products is appropriate and will not cause infringement of any third
party intellectual property rights.

Tanium is committed to the highest accessibility standards to make interaction with Tanium software more intuitive and
to accelerate the time to success. To ensure high accessibility standards, Tanium complies with the U.S. Federal
regulations - specifically Section 508 of the Rehabilitation Act of 1998. We have conducted third-party accessibility
assessments over the course of product development for many years, and most recently a comprehensive audit against
the WCAG 2.1 / VPAT 2.3 standards for all major product modules was completed in September 2019. Tanium can make
available any VPAT reports on a module-by-module basis as part of a larger solution planning process for any customer
or prospect.

As new products and features are continuously delivered, Tanium will conduct testing to identify potential gaps in
compliance with accessibility guidelines. Tanium is committed to making best efforts to address any gaps quickly, as is
feasible, given the severity of the issue and scope of the changes. These objectives are factored into the ongoing
delivery schedule of features and releases with our existing resources.

Tanium welcomes customer input on making solutions accessible based on your Tanium modules and assistive
technology requirements. Accessibility requirements are important to the Tanium customer community and we are
committed to prioritizing these compliance efforts as part of our overall product roadmap. Tanium maintains
transparency on our progress and milestones and welcomes any further questions or discussion around this work.
Contact your sales representative, email Tanium Support at support@tanium.com, or email accessibility@tanium.com to
make further inquiries.

Tanium is a trademark of Tanium, Inc. in the U.S. and other countries. Third-party trademarks mentioned are the
property of their respective owners.

© 2021 Tanium Inc. All rights reserved.

 © 2021 Tanium Inc. All Rights Reserved                                                                                Page 2
Table of contents
  Incident Response overview                                   8

    Incident Response                                          8

    Index                                                      8

    Live Response                                              8

    Quarantine                                                 9

    Integration with Detect                                    9

  Getting started                                          10

  Incident Response requirements                           11

    Tanium dependencies                                    11

    Third-party software requirements                      11

    Endpoints                                              12

       Supported operating systems                         12

       Disk space requirements                             12

    Host and network security requirements                 12

       Ports                                               12

       Security exclusions                                 12

       Internet URLs                                       14

    User role requirements                                 14

  Installing Incident Response solutions                   17

    Install Tanium Incident Response                       17

       Before you begin                                    17

       Import the Tanium Incident Response solution        17

       What to do next                                     18

    Install Index                                          18

       Obtain the Tanium Index solution                    18

       What to do next                                     18

    Install Quarantine                                     18

© 2021 Tanium Inc. All Rights Reserved                Page 3
Import the Tanium Quarantine solution 19
What to do next 19
Upgrading Incident Response 20
Upgrade Tanium Incident Response 20
Before you begin 20
Import Tanium Incident Response updates 20
Upgrade IR solutions 20
Upgrade Tanium Index 21
Preserve configuration files 21
Recreate content and deploy tools 21
Preserve configuration files before upgrading Live Response 22
Deploying IR tools 23
Before you begin 23
Updating scheduled actions 23
Verify that IR tools are deployed on the endpoints 23
Using IR sensors and packages 24
About deploying parameterized sensors as actions 24
Before you begin 25
Deploy a parameterized sensor as an action 25
Reference: IR sensors and packages 26
Copying IR data to a central location 27
Before you begin 27
Set up a copy location and service account 27
Copy location file transfer methods 27
Configure the Copy Tools packages 28
Open the package to edit 28
Update package timeouts 28
Save the package 28
Target endpoints 28
Copy with the general purpose action 29
© 2021 Tanium Inc. All Rights Reserved Page 4Copy by IR Job ID 30
File copy results 30
Indexing file systems 31
Overview 31
Perform initial inventory 31
Detect file system changes 31
Compute file hashes 32
Calculate magic number 32
Client system requirements 33
Operating system 33
Disk space 33
CPU usage 33
Before you begin 33
Deploy Index tools to endpoints 34
Verify deployment on endpoints 34
Customize Index endpoint settings 35
Start indexing 37
Check Index status 37
Query indexed files 37
Find files in a blacklist 38
Troubleshoot 39
Index not running 39
Files and directory paths reported by Index are different compared to other methods 39
Hard links not recorded 39
Performing reindexing message 39
Missing hash or magic number for file 40
Reference: Log settings 40
Log level 40
Log file rotation 41
Dump (.dmp) files 41
© 2021 Tanium Inc. All Rights Reserved Page 5Collecting data with Live Response 42
Before you begin 42
Configure a copy location and endpoints 42
Configure the Live Response package 43
Edit the Live Response package 44
Update the transfer configuration files 44
(Optional) Update collector configuration 44
(Optional) Set default values 45
Collect data from endpoints 45
Collect logs 46
Reference: Transfer configuration 46
View supported protocols and options for file transfers 47
S3 protocol file transfer parameters and example 47
SCP protocol file transfer parameters and example 48
SFTP protocol file transfer parameters and example 49
SMB protocol file transfer example 50
Reference: Collector configuration 50
Global Settings 50
Scripts 52
Modules 52
Default data modules 53
Extended data modules 54
Files 54
File properties 55
Regular expressions and environment variables 55
Isolating endpoints 58
Before you begin 58
Endpoint operating system requirements 59
Supported Windows versions 59
Supported Linux OS versions 59
© 2021 Tanium Inc. All Rights Reserved Page 6Supported Mac OS versions 59
Configure Windows endpoints 60
Check that the IPsec Policy Agent service is running on the endpoints 60
(Windows XP only) Deploy quarantine tools 60
Configure Linux endpoints 60
Verify that endpoints are not using Network Manager 60
Configure Mac endpoints 61
Test quarantine on lab endpoints 61
Remove quarantine 62
Create custom quarantine rules 62
Options for deploying custom quarantine rules and options 63
Reference: Custom rules and options 63
Custom rules format 63
Quarantine options 64
Configuration file format 64
Options 65
Reference: Custom rules examples 65
Example for Custom Quarantine Rules field 65
taniumquarantine.dat sample file 66
© 2021 Tanium Inc. All Rights Reserved Page 7Incident Response overview
Tanium™ Incident Response consists of several solutions that you can deploy to manage incidents across the enterprise.
Incident Response
With the core Incident Response (IR) solution, you deploy a set of IR tools to each endpoint. With these tools on the
endpoints, you can:
l Scope and hunt for incidents across the enterprise by searching for evidence from live system activity and data
at rest with simple natural language queries.
l Examine and parse dozens of forensic artifacts on Windows, Mac, and Linux systems.
l Identify outliers and anomalies by collecting and comparing data across systems in real time.
l Build saved queries and dashboards to continuously monitor endpoints for malicious activity aligned to key
phases of the intrusion lifecycle.
Do not install Tanium Incident Response or deploy Incident Response tools when Tanium Threat
Response is imported.
More information:
l Install Tanium Incident Response on page 17
l Deploying IR tools on page 23
l Using IR sensors and packages on page 24
Index
Index the file systems on Tanium Client endpoints that are running Windows, Linux, or macOS operating systems. File
system inventory, hashes, and magic numbers are recorded in an SQLite database for investigation of threat indicators.
More information:
l Install Index on page 18
l Indexing file systems on page 31
Live Response
Configure what information to collect from suspicious Windows, Linux, and macOS endpoints for further forensic
analysis and data correlation. Investigate potentially compromised systems with a customizable and extensible
framework.
More information:
© 2021 Tanium Inc. All Rights Reserved Page 8l Installing Incident Response solutions on page 17
l Collecting data with Live Response on page 42
Quarantine
Isolate targeted machines from communicating with unapproved network addresses or IP ranges by applying network
quarantine. You can apply a quarantine to Windows, Linux, and macOS endpoints that show evidence of compromise or
other suspicious activity. You can use Tanium Quarantine to apply, remove, and test for quarantine.
More information:
l Install Quarantine on page 18
l Isolating endpoints on page 58
Integration with Detect
In cases where a wider search or a search for a large or dispersed data set is required, you can integrate Tanium™
Detect into the hunt. For example, to exhaustively search for hundreds of hashes, or to perform recursive searches in
nested directories, use Detect to create a custom IOC intel document for quick scans or background scans. For more
information about Detect, see the Tanium Detect User Guide.
© 2021 Tanium Inc. All Rights Reserved Page 9Getting started
1. Install Tanium™ Incident Response solutions.
More information: Installing Incident Response solutions on page 17
2. Deploy IR tools to the endpoints that are running Tanium Client.
More information: Deploying IR tools on page 23
3. Use IR sensors to scope and hunt incidents, examine forensic artifacts, collect real time data, and monitor
endpoints for malicious activity.
More information: Using IR sensors and packages on page 24
4. Index operating systems.
Use the Tanium Index solution to index the local file systems on Tanium Client endpoints that are running Windows
or Mac OS X operating systems. After the file systems are indexed, you can use sensors to query specific file
attributes, such as path, hash, and modified dates.
More information: Indexing file systems on page 31
5. Collect files from endpoints.
1. Move a set of arbitrary files. You can define this list of files with a comma-separated list.
More information: Copying IR data to a central location on page 27
2. With Live Response, you can configure what files and what destinations you want to use to collect data
from endpoints.
More information: Collecting data with Live Response on page 42
6. Isolate endpoints.
You can apply a quarantine on endpoints that show evidence of compromise or other suspicious activity. When
applied, the endpoint cannot communicate with any resource other than the Tanium Server.
More information: Isolating endpoints on page 58
© 2021 Tanium Inc. All Rights Reserved Page 10Incident Response requirements
Review the requirements before you install and use Incident Response.
Tanium dependencies
Component Requirement
Platform Version 7.2 or later.
Tanium Client Any supported version of Tanium Client. For the Tanium Client versions
supported for each OS, see Tanium Client Management User Guide: Client
version and host system requirements.
If you use a client version that is not listed, certain product features might
not be available, or stability issues can occur that can only be resolved by
upgrading to one of the listed client versions.
License The license for Incident Response includes the following solutions:
l Tanium Incident Response
l Tanium Quarantine (Quarantine)
l Tanium Live Response (Live Response)
l Tanium Index (Index)
l Windows Security Patch Management (for more information, see Tanium
Knowledge Base)
Tanium™ Trace Version 2.3.2.0004 or later is required for real-time events on Linux
endpoints with Tanium Index 2.0.0 or later.
Third-party software requirements
For Tanium Incident Response, the required third-party software is installed automatically.
However, the IR Gatherer solution has third-party software requirements that are not installed automatically. The
related documentation includes instructions to download the software and include it in packages that are distributed to
the endpoints.
© 2021 Tanium Inc. All Rights Reserved Page 11Endpoints
Supported operating systems
The following endpoint operating systems are supported by Incident Response, Copy tools, Quarantine, Index, and Live
Response:
l Windows (A minimum of Windows 7 with SP1 or Windows Server 2008 R2 with SP1 is required. Windows 7
Service Pack 1 requires Microsoft KB2758857.)
l macOS (macOS 10.14 (Mojave) or later is required for Tanium Incident Response 4.5.3 or later and Tanium Index
2.3.2 or later)
l Linux
See the documentation for each IR solution for specific version numbers.
Disk space requirements
Index requires 1 GB free space. For other solutions, the required disk space is minimal.
Host and network security requirements
Specific ports and processes are needed to run Incident Response.
Ports
The following ports are required for IR communication.
Source Destination Port Protocol Purpose
Live Response Tanium Client 443 (S3), 22 TCP Outbound connections over ports
(SFTP/SCP), or depending on how the collected
445 (SMB) data is being transferred.
Configure firewall policies to open ports for Tanium traffic with TCP-based rules instead of application
identity-based rules. For example, on a Palo Alto Networks firewall, configure the rules with service
objects or service groups instead of application objects or application groups.
Security exclusions
If security software is in use in the environment to monitor and block unknown host system processes, your security
administrator must create exclusions to allow the Tanium processes to run without interference.
© 2021 Tanium Inc. All Rights Reserved Page 12Incident Response security exclusions
Target Device Notes Process
Windows x86 or \Tools\IR\TaniumPersistenceAnalyzer.exe
x64 endpoints
\Tools\EPI\TaniumExecWrapper.exe
\Tools\IR\TaniumExecWrapper.exe
\Tools\IR\TanFileInfo.exe
\Tools\IR\TaniumHandle.exe
\Tools\IR\TanListModules.exe
\Tools\EPI\TaniumEndpointIndex.exe
\Tools\IR\PowerForensics\PowerForensics.dll
1 \Downloads\Action_nnn\Winpmem.gb414603.exe
1 \Downloads\Action_nnn\TaniumFileTransfer.exe
7.2.x clients, 3 \Python27\TPython.exe
7.4.x clients, 3 \Python38\TPython.exe
7.4.x clients \Python38\*.dll
macOS /Tools/EPI/TaniumExecWrapper
endpoints
/Tools/IR/TaniumExecWrapper
/Tools/EPI/TaniumEndpointIndex
1 ,2 /Downloads/Action_nnn/surge-collect
1 ,2 /Downloads/Action_nnn/surge.dat
1 /Downloads/Action_nnn/osxpmem.app/osxpmem
1 /Downloads/Action_nnn/taniumfiletransfer
7.2.x clients /python27/python
7.4.x clients /python38/python
© 2021 Tanium Inc. All Rights Reserved Page 13Incident Response security exclusions (continued)
Target Device Notes Process
Linux x86 or x64 /Tools/EPI/TaniumExecWrapper
endpoints
/Tools/IR/TaniumExecWrapper
/Tools/EPI/TaniumEndpointIndex
1 ,2 /Downloads/Action_nnn/surge-collect
1 ,2 /Downloads/Action_nnn/surge.dat
1 /Downloads/Action_nnn/linpmem-.bin
1 /Downloads/Action_nnn/taniumfiletransfer
7.2.x clients /python27/python
7.4.x clients /python38/python
1 = Where nnn corresponds to the action ID.
2= Exception is required if Volexity Surge is used for memory collection.
3 = TPython requires SHA2 support to allow installation.
Internet URLs
If security software is deployed in the environment to monitor and block unknown URLs, your security administrator
must whitelist the following URL:
l content.tanium.com
User role requirements
Incident Response Advanced user role permissions
Permission Content Set for Incident Response Incident Incident Response Read
Permission Administrator Response User Only User
Ask Dynamic Questions * * *
Read Action Incident Response
Read Package Incident Response *
Read Saved Question Incident Response *
© 2021 Tanium Inc. All Rights Reserved Page 14Incident Response Advanced user role permissions (continued)
Permission Content Set for Incident Response Incident Incident Response Read
Permission Administrator Response User Only User
Read Sensor Incident Response *
Write Action Incident Response
Write Action for Saved Incident Response
Questions
Write Package Incident Response
Write Saved Question Incident Response
Write Sensor Incident Response
‡ To install IR solutions, you must have the Import Signed Content micro admin permission (Tanium Core Platform 7.4
or later) or the reserved role of Administrator.
* Requires permissions for the Interact module to ask questions, see results, and drill-down to endpoints.
Index Advanced user role permissions
Permission Content Set for Permission Index Administrator Index User Index Read Only User
Ask Dynamic Questions * * *
Read Action Index
Read Package Index *
Read Saved Question Index * *
Read Sensor Index * *
Write Action Index
Write Action for Saved Questions Index
Write Package Index
Write Saved Question Index
Write Sensor Index
© 2021 Tanium Inc. All Rights Reserved Page 15‡ To install IR solutions, you must have the Import Signed Content micro admin permission (Tanium Core Platform 7.4 or later) or the reserved role of Administrator. * Requires permissions for the Interact module to ask questions, see results, and drill-down to endpoints. © 2021 Tanium Inc. All Rights Reserved Page 16
Installing Incident Response solutions
Install Tanium Incident Response
Use the Tanium™ Incident Response solution to scan and hunt for incidents, examine forensic artifacts, and collect
system data for analysis.

               Do not install Incident Response if you have installed Tanium Threat Response.

Note: The procedures and screen captures that are in the documentation are for Version 7 and later. Version 6
procedures and screens might vary.

Before you begin
      l    To use Autoruns content, download the latest version of Autoruns.zip file from Autoruns for Windows. Upload
           this file during the import of the solution.

      l    You must be assigned the Administrator reserved role to import a Tanium solution module or content pack.

Import the Tanium Incident Response solution
 1.       From the Main menu, go to Administration > Configuration > Solutions.

 2.       In the Incident Response section, click Import Version.

 3.       Review the list of categories, dashboards, saved questions, saved actions, packages, sensors, and content set
          roles.

 4.       Upload the Autoruns.zip file.

                     Uploading the Autoruns.zip file is required for the Autoruns content to work properly.

 5.       Complete the import.

 © 2021 Tanium Inc. All Rights Reserved                                                                           Page 17
1. For platform version 6.5 and 7.0, click Proceed with Import
2. For platform version 7.1.314.3071 and later, enable Include content set overwrite and click Import.
For more information, see the Tanium Core platform User Guide: Align content for modules.
6. Verify that the IR sensors and packages were installed.
a. From the Main menu, click Administration > Content > Packages.
b. Search for Incident Response .
c. From the Main menu, click Administration > Content > Sensors.
d. In the Category column, click the menu button and create a filter that contains Incident Response .
What to do next
Deploy the IR tools to the endpoint. For more information, see Deploying IR tools on page 23.
You can also install other IR solutions.
Install Index
Tanium Index is a solution that runs locally on endpoints to gather, compute, and provide information that is useful to
detect and investigate threat indicators for files at rest. Index is optimized to minimize endpoint resource utilization and
work with journaling file systems when available. The solution performs the following actions:
l Indexes local file system
l Computes file hashes
l Records file attributes and magic numbers
Obtain the Tanium Index solution
To obtain the Tanium Index solution, send an email to support@tanium.com.
After you import Tanium Index, the Index sensors, packages, and scheduled actions are viewable in the console.
What to do next
By default, the actions to distribute Index to the endpoints are disabled. Enable the Deploy Distribute Tanium Endpoint
Index Tools scheduled action to distribute Index endpoint tools your endpoints. Then, create the custom configuration
file and enable the Distribute Tanium Endpoint Index Config action with the new file. For more information about
enabling Index on the endpoints, see Indexing file systems on page 31.
Install Quarantine
Tanium Quarantine is a collection of packages and sensors that you can use to isolate endpoints that show evidence of
compromise or other suspicious activity. You can use Quarantine to apply, remove, and test for quarantine. Quarantine
is supported on Windows, Linux, and Mac OS X endpoints.
© 2021 Tanium Inc. All Rights Reserved Page 18Import the Tanium Quarantine solution
Install the Tanium Quarantine solution by importing the associated content from the Tanium Solutions page.
1. From the Main menu, go to Administration > Configuration > Solutions.
2. In the Tanium Content section, select the Quarantine row and click Import Solution.
3. Review the list of saved actions, packages, and sensors and click Proceed with Import.
4. When the import is complete, you are returned to the Solutions page. Verify that the values in the Available
Version and Imported Version columns match.
What to do next
For more information about Quarantine, see Isolating endpoints on page 58.
© 2021 Tanium Inc. All Rights Reserved Page 19Upgrading Incident Response
You can upgrade the Tanium™ Incident Response module, or any of the individual solutions.
Upgrade Tanium Incident Response
Before you begin
l To use Autoruns content, download the latest version of Autoruns.zip file from Autoruns for Windows. Upload
this file during the import of the solution.
l You must be assigned the Administrator reserved role to import a Tanium solution module or content pack.
Import Tanium Incident Response updates
1. If re-importing Incident Response, notify Tanium users not to use Incident Response until the re-import process
finishes. Otherwise, the users might lose work in progress.
2. From the Main Menu, go to Administration > Configuration > Solutions.
3. In the Incident Response section, click Upgrade to Version.
4. Review the list of saved actions, packages.
1. For platform version 6.5 and 7.0, click Proceed with Import
2. For platform version 7.1.314.3071 and later, enable the Include content set overwrite checkbox and click
Proceed with Import.
For more information, see the Tanium Core platform User Guide: Align content for modules.
Uploading the Autoruns.zip file is required for the Autoruns content to work properly.
5. To confirm the upgrade, return to the Tanium Solutions page and check the Installed version for Incident
Response.
Upgrade IR solutions
Before you run an upgrade, you might want to back up configuration files that are not preserved during the upgrade
process for Index and Live Response. For more information, see Upgrade Tanium Index on page 21 and Preserve
configuration files before upgrading Live Response on page 22.
1. Notify Tanium users not to use Incident Response until the upgrade process finishes. Otherwise, the users might
lose work in progress.
2. From the Main Menu, go to Administration > Configuration > Solutions.
3. In the Tanium Content section, select the row and click Upgrade Solution.
© 2021 Tanium Inc. All Rights Reserved Page 204. Review the list of saved actions, packages.
1. For platform version 6.5 and 7.0, click Proceed with Import
2. For platform version 7.1.314.3071 and later, enable the Include content set overwrite checkbox and click
Proceed with Import.
For more information, see the Tanium Core platform User Guide: Align content for modules.
Uploading the Autoruns.zip file is required for the Autoruns content to work properly.
5. When you are returned to the Solutions page, check the installed version of the solution.
Upgrade Tanium Index
Before and after upgrading Index, there are some additional steps to take.
Preserve configuration files
The custom Index config.ini file in the configuration packages is not preserved when you upgrade the Index solution.
You must back up the file before upgrading, and re-add the file to your packages after the upgrade.
1. Save your custom config.ini file.
2. Delete any scheduled actions that are going to distribute the config.ini file.
1. Deploy Distribute Tanium Endpoint Index Tools
2. Deploy Distribute Tanium Endpoint Index Tools for Mac
3. Deploy Distribute Tanium Endpoint Index Config
4. Deploy Distribute Tanium Endpoint Index Config for Mac
3. Upgrade the Tanium Index solution. For more information, see Upgrade IR solutions on page 20.
4. Edit the appropriate Index packages to include the custom config.ini file.
5. Create new scheduled actions to distribute the updated packages.
For more information about editing packages to distribute a custom config.ini file, see Customize Index endpoint
settings on page 35.
Recreate content and deploy tools
After upgrading, you must update the Tanium components that reference Index content.
1. Delete and recreate any saved questions that reference Index sensors.
2. Delete and recreate any scheduled actions that reference Index packages or sensors.
3. If not completed already, re-deploy endpoint tools.
© 2021 Tanium Inc. All Rights Reserved Page 214. (Optional) To capture all hard links on Windows endpoints, initiate a reindex of the file system.
a. Deploy the Delete Tanium Endpoint Index database package.
b. Use the appropriate saved action to start indexing.
For Windows endpoints, typically a reindex occurs only if Index has lost its place in the file system; otherwise,
Index only checks for new information. For Mac endpoints, deployment causes the directory scan to start from the
beginning.
Preserve configuration files before upgrading Live Response
Before you upgrade Live Response, download any customized configuration files. These files are not preserved when
you upgrade.
Alternatively, you can host any customized configuration files in a remote location and attach the files to the package.
1. Open the Live Response - Windows package.
2. Download all customized collection and transfer configuration files, such as Custom_Collection.json,
SCP.json, and any SSH/Amazon S3 private key files.
3. Upgrade the Live Response solution. For more information, see Upgrade IR solutions on page 20.
4. Open the Live Response - Windows package again.
5. Upload the customized configuration files to the package.
6. Create new scheduled actions to distribute the updated packages.
© 2021 Tanium Inc. All Rights Reserved Page 22Deploying IR tools
The IR tools are a package that is deployed on the endpoint. The package includes scripts and utilities that enable the
functionality of IR module. The tools must be fully deployed for IR to function.
For Windows, the Distribute Incident Response Tools package is automatically deployed to endpoints by a scheduled
action that is enabled by default. Unless you want to make changes to the package or action schedule, no action is
required.
Before you begin
The Tanium Incident Response solution must be installed. For more information, see Install Tanium Incident Response on
page 17.
Updating scheduled actions
You can enable, disable, or edit the scheduled actions that deploy IR tools. When the scheduled action is enabled, the
IR tools are distributed to any endpoints that do not have them already installed. The frequency of the distribution is
defined in the scheduled action.
1. From the Main Menu, click Actions > Scheduled Actions.
2. Search for the action Distribute Incident Response Tools, Distribute IR Tools (Mac), or Distribute IR tools
(Linux).
3. To change the schedule for the action, click Edit.
4. To enable the action, select the row and click More > Enable Action.
Verify that IR tools are deployed on the endpoints
To check that IR tools are deployed on the endpoints, you can ask the question: Incident Response - Tools
Version from all machines .
© 2021 Tanium Inc. All Rights Reserved Page 23Using IR sensors and packages
Use IR sensors for rapid response to and scoping of incidents. Incident response can require computationally-intensive
hashing algorithms and extensive file system scans. For this reason, IR sensors are written with a narrow scope to
minimize processing and retrieve specific information within seconds. Few search operations are recursive and most
sensors perform a hexadecimal search or hash match a single file and target a single directory. This strategy takes
advantage of the Tanium linear chaining topology to rapidly deliver critical information at enterprise scale.
About deploying parameterized sensors as actions
Sensors that require extensive computational resources across the security enterprise, for example, sensors that hash
files and perform binary searches, are deployed as actions. Deploying parameterized sensors as actions increases the
speed of larger tasks, including:
l Searching across directories for binary data
l Matching the hash values of files across many directories
l Hashing and matching executables and their loaded modules
Actions are not processed one at a time. Short actions run at the same time as longer actions. Because they are not
strictly queued, shorter actions are not delayed by the execution of more extensive actions.
Actions do not time out. Because the processing time of an action depends on the nature of the task, an action is
considered complete when the job begins. The results, however, might not be immediately available.
When you deploy the action, you must provide an IR job ID. Then, you can view results files from Windows-based
endpoints with the Incident Response Job Results sensor by specifying the job ID as a parameter. You can retrieve
and copy job results files to a central location by using one of the platform-specific collection actions.
Use Cases for IR content
Task Question Package /
Sensor
Retrieve a list of all running processes on all Get Running Processes with Hash from all Sensor:
endpoints with their hashes machines Running
Processes
with Hash
Retrieve the currently running processes matching a Get MD5 Hash Match Files Executing from Package:
specific MD5 hash all machines Incident
Response -
MD5 Hash
Match Files
Executing
© 2021 Tanium Inc. All Rights Reserved Page 24Use Cases for IR content (continued)
Task Question Package /
Sensor
Display IR job results in Tanium Console Get Incident Response Job Results from all Sensor:
machines Incident
Response
Job Results
Copy IR job results for Windows-based endpoints Get Has Incident Response ID Files from Package: IR
to a central location all machines Gatherer -
Collect Info
to Central
Server
Before you begin
l The Tanium Incident Response solution must be installed. For more information, see Install Tanium Incident
Response on page 17.
l The IR tools must be deployed to the endpoints. For more information, see Deploying IR tools on page 23.
Deploy a parameterized sensor as an action
1. Identify the endpoints that you want to target.
a. Ask a question to return a set of endpoints.
b. Select the endpoints and click Deploy Action.
© 2021 Tanium Inc. All Rights Reserved Page 252. Specify the parameterized sensor.
a. Type the name of the parameterized sensor in the Deployment Package field.
For example, type: Incident Response - Search for Files .
b. Specify parameters for the sensor.
For the Incident Response - Search for Files sensor, indicate a Pattern of files to match and the IR Job ID.
The IR Job ID can be any value that you choose. Use this value to get the results of the action.
The value must be unique. If two actions share the same job ID, the files identified by those
actions might be destroyed. Remember the value so that you can retrieve the job results later.
c. Complete deployment of the action. Click Deploy Action.
3. Get the results of the parameterized sensor action.
a. Ask the question: Get Incident Response Job Results from all machines
b. Specify the Incident Response Job ID.
The value for the job ID is the same value that you specified when you deployed the action.
c. Click Go.
Reference: IR sensors and packages
For details about the parameters for each IR sensor and package, see Tanium Support Knowledge Base: Tanium IR
Reference (login required).
© 2021 Tanium Inc. All Rights Reserved Page 26Copying IR data to a central location
Tanium™ Incident Response includes Tanium Copy Tools. Use these tools to copy files that you specify from endpoints
to a central location. When you run a Copy action, you must specify the target endpoints for the operation and the
method of transport.
Before you begin
l IR must be installed on the server. For more information, see Install Tanium Incident Response on page 17.
l IR tools must be deployed the endpoints. For more information, see Deploying IR tools on page 23.
Set up a copy location and service account
You must have a server location to which you are copying the IR data.
Assign write-only access to the account used by IR Gatherer when performing copy operations. Read
and append access for this account are not necessary and present a security risk due to IR Gatherer
operating in a potentially hostile environment.
The accounts used for file transfer should expire as soon as possible after use because log data might
include the user names and passwords for these access accounts.
Copy location file transfer methods
The following methods of transfer are available:
File Transfer Protocol (FTP) / Secure Copy Protocol (SCP)
Requires a user account limited to write access. Do not assign read, append and delete permissions to the user.
An account that expires soon after creation is preferred.
Secure File Transport Protocol (SFTP)
Requires a user account limited to write access. Do not assign read, append and delete permissions. An account
that expires soon after creation is preferred.
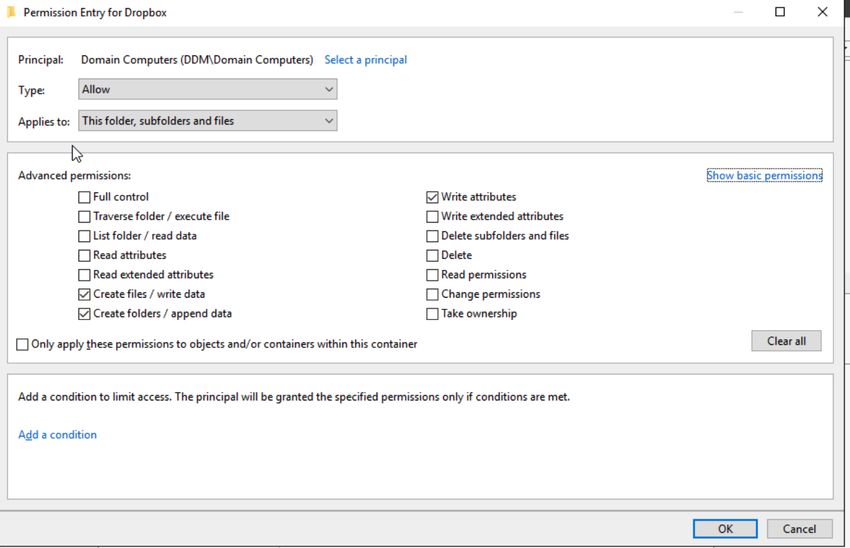
Server Block Message (SMB) Protocol
(Windows only) A \\server\share location, ideally a Distributed File System (DFS) location, that allows write
access to the Domain Computers group. Do not enter user name and password information for the SMB transfer
type.
© 2021 Tanium Inc. All Rights Reserved Page 27Configure the Copy Tools packages
You can customize settings in the Copy Tools - Copy Files to Central Location and Copy Tools - Copy Files to Central
Location (Mac/Linux) packages that are applied any time that package is deployed as an action.
Open the package to edit
From the Main menu, click Content > Packages. Type copy in the search box.
Select the package that you want to update and click Edit.
Update package timeouts
When you deploy a Copy Tools package as an action on endpoints, the minimum expiration time for the action is the sum
of the Command Timeout and Download Timeout values. You can change the default values to increase or decrease
the timeout when you deploy the action.
Field Description
Command The interval of time, in minutes, before the package command expires.
Timeout
By default, the command times out after 15 minutes.
Download The interval of time, in minutes, before the download operation times out.
Timeout
By default, the download operation times out after 10 minutes.
Ignore Enable locked clients to run actions that include this package. For more information about the Action Lock setting,
Action Lock see Tanium Knowledge Base: Action Lock.
Save the package
After you configure other settings and parameters, click Save.
Target endpoints
To target endpoints, you can ask a question, then drill down and deploy an action to a set of endpoints. When you are
targeting endpoints, be careful not to overload the copy location. Verify that the count field in the results for your
endpoint targeting is not too high. For more information about targeting endpoints, see Tanium Interact User Guide:
Using Deploy action.
© 2021 Tanium Inc. All Rights Reserved Page 28Copy with the general purpose action
1. Use the Copy Tools - Copy Files to Central Location and Copy Tools - Copy Files to Central Location
(Mac/Linux) actions for general purpose copy operations of a comma-separated list of files to be copied from the
specified endpoints.
2. Choose the transfer method, and specify the server and login information for your copy location. If you are using
the SMB transfer method, do not enter user name or password information.
3. In the File Paths field, indicate a comma-separated list of absolute paths to files that you want to copy from each
endpoint.
4. Choose a setting for how often the copy operation runs to prevent the copy destination from being overloaded.
Choose from one of the following settings:
1. Random Wait Time in Seconds field: Enter the maximum number of seconds to wait before sending the
files. The actual time when the endpoint runs the action is a random wait time between zero (no delay) and
the specified count of seconds. For best results, as the number of endpoints in the security network
increase, increase the maximum number of seconds that are specified.
2. Schedule Deployment section: Use the Distribute over time option to randomize the package copy
© 2021 Tanium Inc. All Rights Reserved Page 29process to smooth the distribution and avoid spikes in traffic. 5. Click Show Preview to Continue to preview the targeted endpoints on which you are deploying the action. 6. Click Deploy Action. Copy by IR Job ID For file copy operations that are required after an incident, use the Incident Response - Copy IR Results to Central Location action. This action requires an IR job ID. Use the IR job ID that was created during the deployment of any IR packages that require the use of an IR job ID. For more information about IR job IDs, see About deploying parameterized sensors as actions on page 24. File copy results Both actions copy the specified files to a directory in the copy destination, for example: /YYYY-MM-DD-hh-mm-ComputerName/. is the value of the Remote Root Directory field and are the files that you specified in the File Paths field. The copied files retain the original directory structure. © 2021 Tanium Inc. All Rights Reserved Page 30
Indexing file systems
Tanium Index 2.5.12

Use Tanium™ Index to index the local file systems on Tanium Client endpoints that are running Windows, Linux, and
macOS operating systems. Index is optimized to minimize endpoint resource utilization and work with journaling file
systems, when available. The solution indexes local file systems, computes file hashes, and gathers file attributes and
magic numbers. This information is recorded in an SQLite database for detection and reporting of threat indicators for
files at rest.

Overview
Index creates and maintains an inventory of the file system on an individual endpoint with the following steps:

 1.    Perform initial inventory on page 31

 2.    Detect file system changes on page 31

 3.    Compute file hashes on page 32

 4.    Calculate magic number on page 32

Perform initial inventory
The file system inventory is saved in the SQLite database on the endpoint.

      Windows

         On Windows endpoints, Index uses the Master File Table (MFT) for the initial inventory, and only indexes local
         fixed drives.

      Linux

         On Linux endpoints, a platform-independent method is used to index the file system on the endpoint.

      macOS

         On macOS endpoints, a platform-independent method is used to index the file system on the endpoint.

              Index does not cross NFS mounts.

Detect file system changes
Any new file system changes are captured in the database.

 © 2021 Tanium Inc. All Rights Reserved                                                                           Page 31
Windows
On Windows systems, after the initial indexing is complete, changes are detected within a few seconds of when
the change occurs if the drive is in journaled mode. If the drive is not journaled, Index operates in platform-
independent mode, and changes are detected during the next indexing pass.
Index starts an asynchronous thread that checks the USN journal for changes, and updates the inventory in the
database. If a file is modified, any existing saved hashes for that file are removed. When a file creation or
modification is detected, the file is indexed to include the file name, file size, file creation time, file modification
time, and directory name.
For files that have one or more NTFS hard links, Index records all hard links by the associated file reference
number. This ensures that even if a hard link is removed, the remaining hard links are still in the database.
After initial indexing, Index does not detect changes made to only the attributes of a file, such as creation or
modification timestamps. If the contents of a file are modified, Index records the new file modification time stamp,
but does not update the file creation time stamp.
Linux and macOS
If the Tanium Recorder is deployed and operational on the endpoint, Index gets file change events from the
Recorder usually within a minute of the change.
If the Recorder is not available, Index uses the platform-independent indexing method. With the platform-
independent indexing, changes take longer to pick up because Index gets file changes by traversing the
directory tree.
Compute file hashes
After the initial inventory of the file system is complete, Index computes and stores the hashes of files in the database.
The Index hashing thread sleeps for the configured rescan interval. This interval is one hour by default. When the thread
wakes up, it calculates hash values for files in the database that do not have hashes.
Index can record any combination of three different hash types: MD5, SHA-1, or SHA-256. You can disable calculation
of hashes if desired.
Calculate magic number
The magic number is the first 4 bytes of the file. You can use the magic number to identify for many types of files. Magic
numbers are recorded during the hashing pass for files that do not have a magic number entry.
© 2021 Tanium Inc. All Rights Reserved Page 32Client system requirements
Operating system
l Windows Workstation: Windows XP with SP3 and later
l Windows Server: Windows Server 2003 with SP2 and later
l Linux: See Tanium Client Management User Guide: Client version and host system requirements (with Index
2.0.0 and later)
l Mac OS X: Mac OS X 10.8 and later (with Index 1.1.1.2 and later)
Disk space
To install Index normally, a minimum of 1 GB of free space must be available on the drive where Tanium Client is
installed.
How much space the Index installation uses varies depending on how much space is used on the local disks that are
being indexed. The actual space that is required for the Index database is proportional to the number of files and
directories on the local disks and what hashes are configured. For a rough estimate, the Index database uses
approximately 1 MB of space for each 1 GB of drive space that is used.
For more information about calculating the amount of space that is required for the Index database, send an email to
support@tanium.com.
CPU usage
Index monitors the CPU usage on the endpoint and throttles if needed . Index does this by measuring the amount of
resources it is using and adjusting length of time between operations. It is normal to see Index use a bit more than it is
configured limit from time to time.
The CPU usage is set via the CPUUsageLimit parameter in the Index configuration file. We suggest setting it to 5-7%.
Before you begin
l The endpoints must have Tanium Client installed. For more information, see Tanium Client Deployment Guide.
l Install the Tanium Index solution. For more information, see Install Index on page 18. If you are upgrading, see
Upgrading Incident Response on page 20.
l (Linux endpoints) For live file event monitoring with Trace, the endpoint packages for Trace must have file event
recording enabled. Check for the following sensor results:
o Run the Tanium Trace Status sensor and verify that it returns No issues found.
o Run the Tanium Trace Endpoint Filters sensor and verify that no file events are listed.
l Exempt the following process from antivirus or other host-based security solutions: \Tools\EPI\TaniumEndpointIndex.exe. For more information about AV exclusions for Tanium, see
Tanium Support Knowledge Base: Security Software Exceptions (login required).
© 2021 Tanium Inc. All Rights Reserved Page 33Deploy Index tools to endpoints
Deploy the latest Tanium endpoint Index tools to the appropriate endpoints with a scheduled action. You must target the
endpoints by operating system. One way to target by operating system is to create OS-specific computer groups.
The actions that deploy Index to the endpoints are disabled by default.
1. From the Main menu, click Actions > Scheduled Actions.
2. Select the appropriate tool deployment action and click Edit.
1. Deploy Distribute Tanium Endpoint Index Tools
2. Deploy Distribute Tanium Endpoint Index Tools for Linux
3. Deploy Distribute Tanium Endpoint Index Tools for Mac
3. Specify the scheduling details and target systems for the endpoint package distribution.
Selecting a Reissue interval ensures that endpoints that come online later get the Index tools.
4. Choose an action group of endpoints for the package.
5. Click Show Preview to Continue. Review the list of targeted endpoints and adjust the action group if necessary.
6. Click Save Action.
The action runs at the specified time or interval to distribute the Distribute Tanium Endpoint Index Tools, Distribute
Tanium Endpoint Index Tools For Linux, and Distribute Tanium Endpoint Index Tools For Mac packages to the
targeted endpoints.
The tools are deployed by default to the \Tools\EPI directory. An SQLite 3 database is used to store
file indexes and the associated file hashes in the following location: \Tools\EPI\EndpointIndex.db.
Verify deployment on endpoints
Verify that Index is installed on endpoints and confirm that the Index tools are up to date.
The Index Has Latest Tools sensor returns the version of Index that is installed on the endpoint and whether the tools
are up to date. This sensor returns two pieces of data:
Version number
The version of Index that is on the endpoint.
Package required
Specifies a number of Linux, Mac, or Windows endpoints that have a version of Index deployed on the endpoint
that does not match the version of the solution that is imported on the server. You need to deploy the Index
package to those endpoints.
© 2021 Tanium Inc. All Rights Reserved Page 34Customize Index endpoint settings
Customize Index configuration settings with the Distribute Tanium Endpoint Index Config, Distribute Tanium Endpoint
Index Config For Linux, or Distribute Tanium Endpoint Index Config For Mac packages. The default packages contain
a sample configuration file to use as a template to customize the Index settings to your environment.
1. From the Main menu, go to Content > Packages.
2. Select the appropriate package and click Edit.
3. Add your config.ini file.
a. To download the sample_config.ini, click Download .
b. Update the file to the settings that you want and save it as config.ini.
The following table provides a description of the settings in the config.ini files for Index and the operating
systems that they apply to:
Setting Windows Linux Mac
CPUUsageLimit
Indexing pauses if the calculated CPU usage exceeds the configured CPU usage
limit value during the file system inventory and computation of hashes.
CPUViolationThreshold *
A percentage of CPU use that alerts a CPU use violation.
CPUViolationInterval *
The duration in seconds for a CPU use violation to be tolerated before triggering a
violation.
StopAfterCPUViolations *
The number of reported CPU use violations to allow before stopping index. Setting
this value to 0 disables the automatic stopping of indexing.
TakeSampleOnCPUViolation *
Captures a full stack trace when index detects a resource use violation.
HashesToCalculate
specifies which hash types to calculate and store for each file hashed. Valid
values are MD5, SHA1, SHA256, and none. To disable the calculation of hashes,
set HashesToCalculate=None.
MaxFileSizeToHashMB
Limits hashing to only files whose size is less than specified. This is important
because hashing is resource intensive for large files, for example, VMDK and other
virtualization resources.
© 2021 Tanium Inc. All Rights Reserved Page 35Setting Windows Linux Mac
FileIndexesPerThrottle
The number of files to index before checking if throttling is necessary. Throttling
ensures that the overall CPU utilization averages out to the defined CPU usage
limit.
FileHashUpdatesPerThrottle
The number of updates to the hash digest to perform before checking if throttling
is necessary.
RescanInterval
When the hashing phase is complete, this is the length of time that Index monitors
for file changes before going to the next indexing phase.
ScanFilePermissions * * *
List the permissions that are associated with files when an index is performed.
TrackChanges
Enables real time file change notifications.
logging.loggers.root.level
The level of logging to apply to index operations.
FilesystemTypesToExclude *
Exclude local (and otherwise indexable) file systems from indexing based on file
system type. Provide a comma-separated list of file system types.
RecorderDBRescanInterval * *
Sets the frequency of reading pending file change events from the Event Recorder.
RecorderDBEventsPerRead * *
Sets the maximum number of file change events to read from the Event Recorder in
each batch.
RecorderDirectory * *
Specifies a non-standard Event Recorder installation location.
ExcludeFromIndexing * * *
Create exclusions to keep specific files and paths out of file system indexes.
ExcludeFromHashing * * *
Create exclusions from hashing to exclude specific files and paths from having
hash values calculated.
* = The setting is not enabled by default.
4. Click Save.
© 2021 Tanium Inc. All Rights Reserved Page 365. Deploy the Distribute Tanium Endpoint Index Config, Distribute Tanium Endpoint Index Config For Linux, or
Distribute Tanium Endpoint Index Config For Mac packages.
a. Click Actions > Scheduled Actions.
b. Select the package that you want to deploy and click Edit.
c. Edit the deployment details and target the package distribution to a specific action group.
By default, the config.ini file is located in the \Tools\EPI directory.
To ensure that updates to the modified config.ini file are preserved when you upgrade Index, see Upgrade Tanium
Index on page 21.
Start indexing
To start indexing on the endpoints that have Index tools installed, use the Deploy Start Indexing, Deploy Start Indexing
For Linux, and Deploy Start Indexing For Mac saved actions. To ensure that indexing gets restarted when a computer
restarts, configure the saved action as a scheduled action. For example, you might schedule Deploy Start Indexing to
run every 30 minutes.
Check Index status
To check indexing status, use the Index Status sensor. For more information about the status values, see Tanium
Knowledge Base Index Reference: Index Status.
Query indexed files
Use the Index Query File sensors to get details about files that have been indexed.
The Index Query File Details sensors return Created and Last Modified time stamps. The time stamps in the results
make the strings that are returned for each file unique. To reduce the overall number of strings, use the following
workflow:
1. Start with one of the following sensors that are less likely to return as many unique strings:
1. Index Query File Path Using Name
2. Index Query File Path and Hash
3. Index Query File Exists
4. Index Query File Hash Recently Changed
5. Index Query File Count
6. Index Query File Permissions*
© 2021 Tanium Inc. All Rights Reserved Page 372. After getting results from the sensors above, you can drill down to get more details with the following sensors:
1. Index Query File Details
2. Index Query File Details Using Name
3. Index Query File Details by Last Modified
4. Index Query File Details Using Name Sort By Largest
5. Index Query File Permissions*
* = To use the Index Query File Permissions sensor, the ScanFilePermissions setting in the Index config.ini must be
enabled and set to true.
Find files in a blacklist
You can provide a blacklist of hashes and compare that list with the hashes that are computed by Tanium Index. You
can use MD5, SHA1, or SHA256 hashes. Index is not able to find blacklist hashes for files excluded from hashing by
name or file size.
1. Edit the package.
a. In the Tanium Console, go to Content > Packages.
b. Select the Distribute Index Query Blacklist, Distribute Index Query Blacklist For Linux, or Distribute Index
Query Blacklist For Mac package.
c. Click Edit.
2. Update the blacklist.txt file.
The file contains a list of hashes that are separated by commas or carriage returns. If the hashes are separated by
commas, group the hashes of the same type together.
The blacklist has been successfully tested with over 100,000 entries, but start with a smaller
number of hashes and update the blacklist on a regular basis.
a. To download the current file, click Download .
b. Remove the file that is currently in the package .
c. Edit the blacklist.txt file.
d. Click Add to upload the updated blacklist.txt file.
3. Click Save.
4. In the Tanium Console, use an operating system-based question to locate computers on which to deploy the
Package. Drill down to the endpoints and click Deploy Action. Choose the Distribute Index Query Blacklist,
Distribute Index Query Blacklist For Linux, or Distribute Index Query Blacklist For Mac package.
© 2021 Tanium Inc. All Rights Reserved Page 385. Perform comparison of deployed blacklist with hashes computed by Index.
Use the Get Index Query Find Blacklist Matches sensor. This sensor returns a list of the file paths and hashes that
are listed in the blacklist.
Troubleshoot
Index not running
By default, the configuration deployment packages contain a sample configuration file: sample_config.ini. If you did
not replace this file with a customized config.ini file, the Index Status sensor returns: Missing Config File. Verify
that you have replaced the sample_config.ini file with a customized config.ini file. See Customize Index endpoint
settings on page 35.
Files and directory paths reported by Index are different compared to other methods
You might notice a difference in the files and directory paths that are reported by Index versus other methods. Windows
uses hard links, symbolic links, and junctions for some of the files that the user sees. Enumerating the files with the
Master File Table (MFT) shows the source path of the first hard link of a file, but not all of the hard links. As a result,
scanning the MFT can yield different directory paths for files than a typical directory traversal.
Links in the MFT can cause problems with finding the full path of file. If you search for a file that seems to be "missing"
from the System32 directory, you might find the file in a different location, such as the C:\Windows\SysWow64
directory. Another example, the C:\Users\all users directory, is symbolically linked to the C:\ProgramData
directory. Index follows the link and records the files in the database under C:\ProgramData. The hashes of these files
are correct and match the linked files that are in the directories that are visible to users.
The differences caused by links in the MFT are rarely an issue for forensic analysis. Indicators of Compromise (IOC)
rarely have a full path as an indicator item, and instead use a file name and MD5 hash. The blacklists of files that you
can get from the government also include MD5 hashes.
Beginning with Index version 1.7.0, hard links in Windows can now be tracked. For more information, see Hard links not
recorded.
Hard links not recorded
If you see that Index records only the first hard link for a file, and not the other hard link peers, you can verify which
machines have the configuration to record all hard links. Use Interact to ask Get Index Status from all machines .
If you see the message "Delete Index Database To Enable Hard Link Tracking", this means that these endpoints have a
version of Index that can track hard links, but Index needs to reindex the filesystem to get all of the information needed
to track the hard links in the filesystem. To enable hard link tracking, deploy the Delete Tanium Endpoint Index
database package and initiate a reindex.
Performing reindexing message
If Index is started after not running for a while, either because it was stopped or the endpoint has been offline, you might
see an entry in the TaniumEndpointIndex.log file that is similar to the following message:
© 2021 Tanium Inc. All Rights Reserved Page 39You can also read