Combined Air Emissions Reporting System (CAERS) User's Guide - Version 2.0 Last updated: 2/25/2021
←
→
Page content transcription
If your browser does not render page correctly, please read the page content below
Combined Air Emissions Reporting System
        (CAERS) User’s Guide
                Version 2.0
           Last updated: 2/25/2021
Table of Contents
    1.1      Introduction to CAERS................................................................................................................... 6
    1.2      Highlights of CAERS Features ........................................................................................................ 6
    1.3      Software Requirements for CAERS ............................................................................................... 7
2     Initial Pre-Reporting Steps .................................................................................................................... 7
    2.1      Determine Your Role as Preparer or Certifier............................................................................... 7
    2.2      Option for Reporting TRI-bound Air Toxics Data .......................................................................... 7
    2.3      Timing of Your NEI and TRI Submissions....................................................................................... 8
3     Registration ........................................................................................................................................... 9
    3.1      Pre-registration for Georgia Department of Natural Resources Registrants ............................... 9
      3.1.1          Georgia Opt-in Process ......................................................................................................... 9
      3.1.2          Additional Considerations for GADNR Registration ............................................................ 14
    3.2      Registration in CDX ..................................................................................................................... 14
    3.3      Add CAERS to your CDX Account ................................................................................................ 16
    3.4      Gain Access to CAERS and your Facility ...................................................................................... 25
4     Reporting Emissions and Facility Information via the User Interface................................................. 27
    4.1      Navigating the User Interface ..................................................................................................... 27
      4.1.1          General Description of User Interface Features ................................................................. 27
      4.1.2          Emissions Reports Page ...................................................................................................... 28
      4.1.3          Report Summary Page ........................................................................................................ 29
      4.1.4          Including an Attachment in Your Report ............................................................................ 31
    4.2      Facility Inventory......................................................................................................................... 32
      4.2.1          Facility Information ............................................................................................................. 32
      4.2.2          Emission Units Page ............................................................................................................ 36
      4.2.3          Release Points Page ............................................................................................................ 39
      4.2.4          Control Devices Page .......................................................................................................... 43
      4.2.5          Control Paths Page .............................................................................................................. 47
    4.3      Emissions inventory .................................................................................................................... 52
      4.3.1          Units .................................................................................................................................... 52
      4.3.2          Processes............................................................................................................................. 52
          4.3.2.1        Associating a Process to a Release Point ........................................................................ 57
          4.3.2.2        Entering and Calculating Emissions ................................................................................ 57
5     Reporting Emissions and Facility Information Using Bulk Upload ...................................................... 60
    5.1      The Bulk Upload Excel Template................................................................................................. 60
    5.2      Bulk Upload Steps ....................................................................................................................... 64

                                                                               ii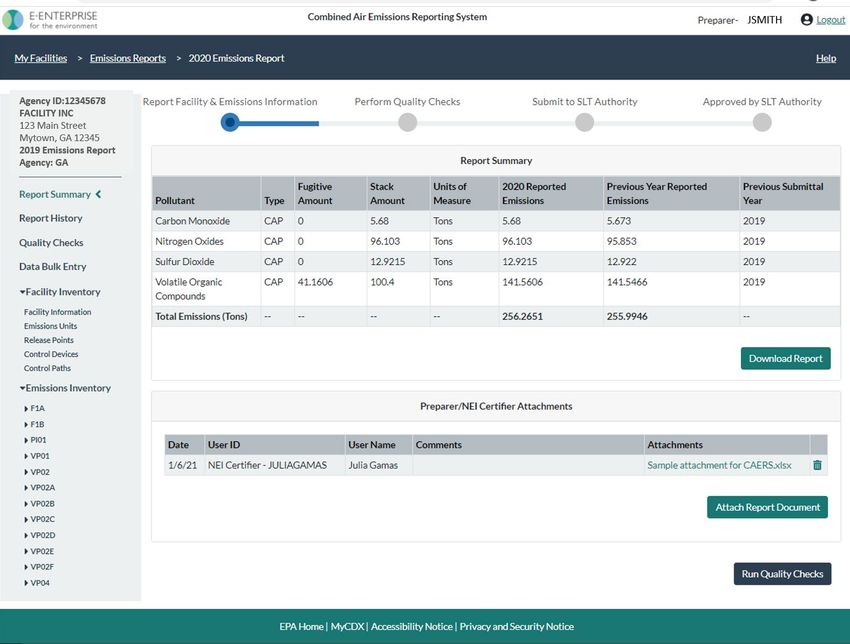
5.3       JSON ............................................................................................................................................ 65
6      Reporting Emissions Using Bulk Entry................................................................................................. 65
7      Performing Quality Checks.................................................................................................................. 66
8      Certifying and Submitting to your State, Local, or Tribal Authority ................................................... 69
9      Submission Approval........................................................................................................................... 70
10         Using Data Reported in CAERS for a TRI-MEweb submission ......................................................... 70
11         Where to Go for Help...................................................................................................................... 73
    11.1      Help with the CAERS application itself........................................................................................ 73
    11.2      Help with programmatic questions: ........................................................................................... 74
Appendix A                                 Understanding Controls ............................................................................. A-1
Appendix B                                 Additional Resources ...................................................................................B-1

List of Figures
Figure 3-1 Emissions Inventory Process Screen ......................................................................................... 10
Figure 3-2. Edit Facility Details in GECO Screen 1 ....................................................................................... 11
Figure 3-3. Edit Facility Details in GECO Screen 2 ...................................................................................... 11
Figure 3-4. Facility Operational Status ....................................................................................................... 12
Figure 3-5. Facility Emissions Thresholds Screen ....................................................................................... 13
Figure 3-6. Preparer and Certifier Form..................................................................................................... 14
Figure 3-7. CDX Login Screen ..................................................................................................................... 15
Figure 3-8. CDX Terms and Conditions....................................................................................................... 16
Figure 3-9. CDX Program Service Page ....................................................................................................... 16
Figure 3-10. Role Selection Screen............................................................................................................. 17
Figure 3-11. User Information Data Entry.................................................................................................. 18
Figure 3-12. Selection of Organization....................................................................................................... 18
Figure 3-13. Organization Information Data Entry .................................................................................... 19
Figure 3-14. Confirmation Code Entry ....................................................................................................... 20
Figure 3-15. CDX Lexis Nexis Identity Verification ..................................................................................... 20
Figure 3-16. CDX Lexis Nexis Identity Verification ..................................................................................... 21
Figure 3-17. Verification Questions ........................................................................................................... 22
Figure 3-18. CDX Electronic Signature Agreement .................................................................................... 23
Figure 3-19. eSignature Screen .................................................................................................................. 23
Figure 3-20. MyCDX Page ........................................................................................................................... 24
Figure 3-21. “My Facilities” Page in CAERS ................................................................................................ 25
Figure 3-22. Facility Search in CAERS ......................................................................................................... 25
Figure 3-23. Request Access to Selected Facility ....................................................................................... 26
Figure 3-24. "My Facilities" Page Listing Facilities ..................................................................................... 26
Figure 4-1. Begin Emissions Report............................................................................................................ 29
Figure 4-2. Emissions Report Page ............................................................................................................. 29
Figure 4-3. Facility Report Summary Page ................................................................................................. 30
Figure 4-4. Including an Attachment.......................................................................................................... 31

                                                                               iii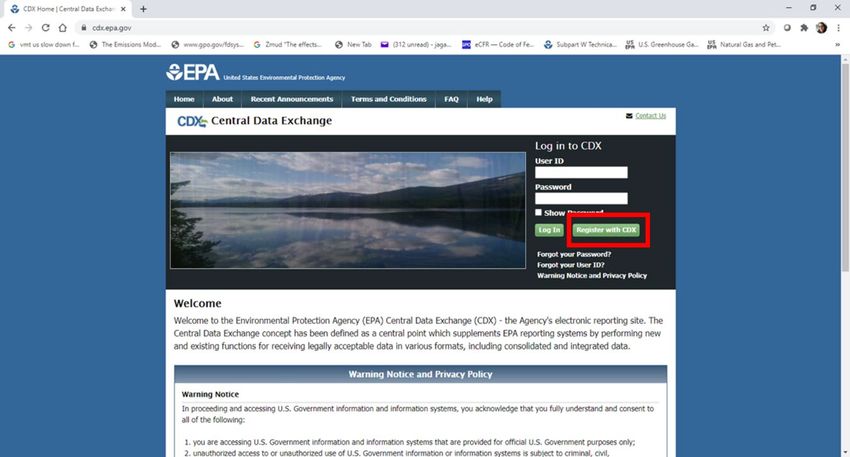
Figure 4-5. Facility Information Page ......................................................................................................... 32
Figure 4-6. Editing Facility Information ...................................................................................................... 33
Figure 4-7. Edit Facility NAICS codes .......................................................................................................... 34
Figure 4-8. Find and Select NAICS Code ..................................................................................................... 35
Figure 4-9. Enter Facility Contact Information ........................................................................................... 35
Figure 4-10. Emissions Units Page ............................................................................................................. 36
Figure 4-11. Adding a New Unit ................................................................................................................. 37
Figure 4-12. Example of a Page for a Specific Unit .................................................................................... 38
Figure 4-13. Editing a Unit.......................................................................................................................... 38
Figure 4-14. Release Points Page ............................................................................................................... 39
Figure 4-15. Adding a New Release Point .................................................................................................. 41
Figure 4-16. Example of a Page for a Release Point................................................................................... 42
Figure 4-17. Editing a Release Point........................................................................................................... 42
Figure 4-18. Control Devices Page ............................................................................................................. 43
Figure 4-19. Adding a New Control ............................................................................................................ 44
Figure 4-20. Example of a Page for a Control Device ................................................................................. 45
Figure 4-21. Editing a Control Device ......................................................................................................... 45
Figure 4-22. Associating a Pollutant and Control Efficiency to a Control .................................................. 46
Figure 4-23. Control Paths Page ................................................................................................................. 48
Figure 4-24. Adding a New Path................................................................................................................. 49
Figure 4-25. Example of a Page for a Control Path .................................................................................... 49
Figure 4-26. Editing a Path ......................................................................................................................... 50
Figure 4-27. Adding a Path Assignment ..................................................................................................... 50
Figure 4-28. Example of a Facility with Complex Controls ......................................................................... 51
Figure 4-29. Adding a New Process............................................................................................................ 53
Figure 4-30. SCC Search ............................................................................................................................. 54
Figure 4-31. Example of a Page for a Process ............................................................................................ 55
Figure 4-32. Editing a Process .................................................................................................................... 56
Figure 4-33. Release Point Apportionment................................................................................................ 57
Figure 4-34. Adding a New Pollutant ......................................................................................................... 58
Figure 4-35. Selecting a Calculation Method ............................................................................................. 59
Figure 4-36. Using EPA Emission Factor Alternative .................................................................................. 60
Figure 5-1. Example of Bulk Upload Template Worksheet ........................................................................ 64
Figure 6-1. Bulk Entry Process Information Tab......................................................................................... 65
Figure 6-2. Bulk Entry Emissions Information Tab ..................................................................................... 66
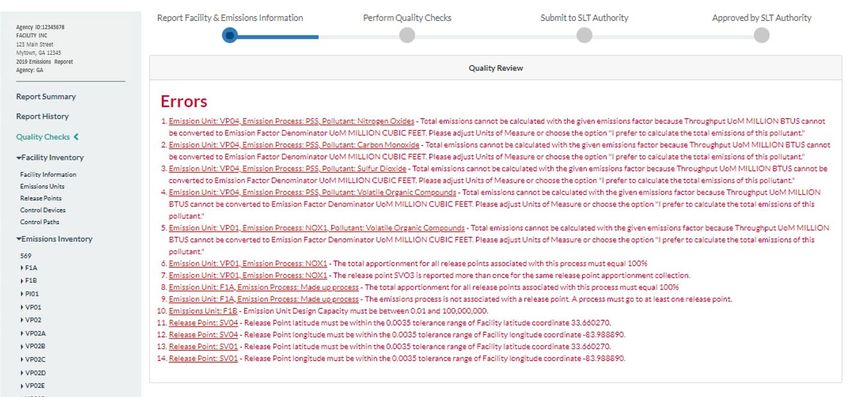
Figure 7-1. Quality Review Page ................................................................................................................ 67
Figure 7-2. Correcting an Error .................................................................................................................. 68
Figure 7-3. Completing Quality Checks ...................................................................................................... 69
Figure 8-1. Submission Certification .......................................................................................................... 70
Figure 10-1. Example of Section 5 Form R Screen in TRI-MEweb .............................................................. 71
Figure 10-2. Example of "NEI Data Available" Screen ................................................................................ 72
Figure 10-3. Example NEI Data Availability Pop-Up Window..................................................................... 72
Figure 10-4. Example Pop-Up Window for Comment................................................................................ 73
Figure A. 1. Example of a Facility with No Controls ................................................................................. A-2
Figure A. 2. Example of a Facility with a Single Control ........................................................................... A-3
Figure A. 3. Example of a Facility with Controls in Series ........................................................................ A-4
iv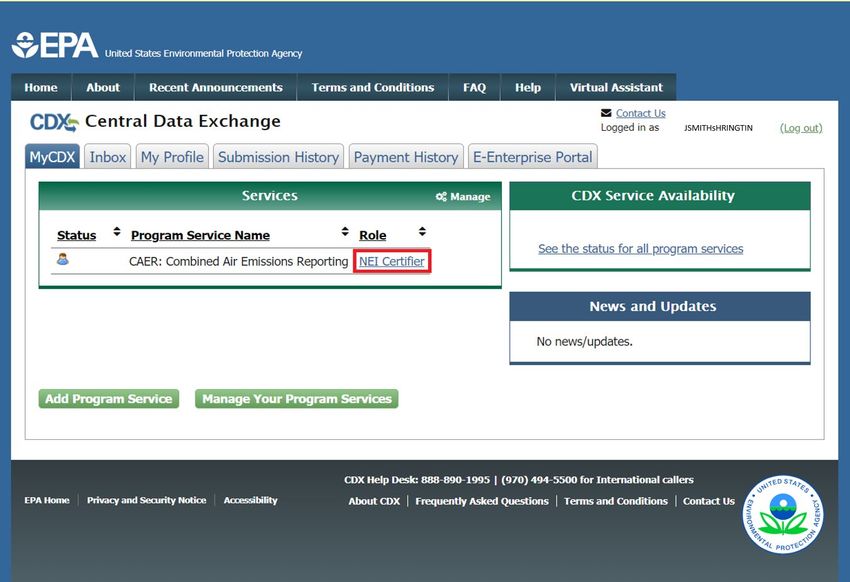
Figure A. 4.       Path Assignments for a Facility with Controls in Series ........................................................ A-5
Figure A. 5.       Example of Complex Controls ............................................................................................... A-6
Figure A. 6.       Path Assignment for a Facility with a Complex Controls ...................................................... A-6
Figure A. 7.       Planer Mill Cyclofilter Path Assignment................................................................................ A-8
Figure A. 8.       Example for Controls Working Alternately ........................................................................... A-9
Figure A. 9.       Path Assignment for Controls Working Alternately............................................................ A-10

Figure B. 1. Flow of Uncontrolled Emissions .............................................................................................B-7

List of Tables
Table 4-1. Example of Data Entry for Controls in Sequence for Path 1 ..................................................... 51
Table 4-2. Example of Data Entry for an Assignment including a Control and a Path Running in Parallel
for Path 2..................................................................................................................................................... 52

Table A. 1. Example of Associations for a Facility with No Controls ........................................................ A-2
Table A. 2. Example of Associations with No Controls and Three Release Point Apportionments .......... A-3
Table A. 3. Example Path for a Facility with a Single Control................................................................... A-3
Table A. 4. Example Associations for a Facility with a Single Control ...................................................... A-4
Table A. 7. Example Paths for a Facility with Controls in Series .............................................................. A-5
Table A. 8. Example Associations for a Facility with Controls in Series ................................................... A-5
Table A. 11. Example Paths for a Facility with Complex Controls ............................................................ A-7
Table A. 12. Example Associations for a Facility with Complex Controls................................................. A-8
Table A. 14. Path Data for Planer Mill Cyclofilter..................................................................................... A-8
Table A. 15. Release Point Apportionment Data for Planer Mill Cyclofilter ............................................ A-9
Table A. 18. Path Data for Controls Working Alternately ...................................................................... A-10
Table A. 19. Release Point Apportionment for Controls Working Alternately ...................................... A-10

Table B. 1. Default Heat Values for Fuels ..................................................................................................B-1
Table B. 2. List of Simple Unit of Measure Conversions in CAERS ............................................................B-4

                                                                                v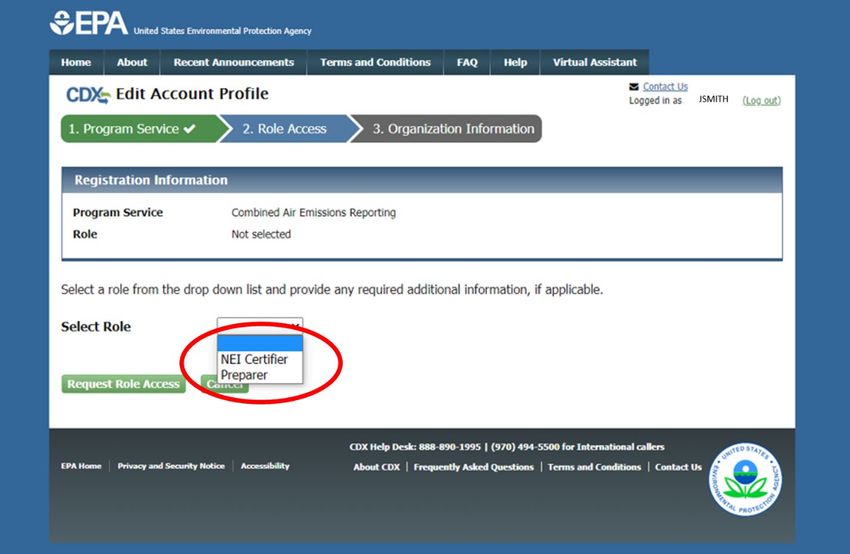
1.1 Introduction to CAERS
      The Combined Air Emissions Reporting System (CAERS) is an application that allows
industry from subscribed State, Local, or Tribal authorities (or SLTs) to report their air emissions,
so that you can:

   •    Meet specific SLT air emissions reporting requirements given individual SLT regulations.
   •    Report annual or triennial emissions to meet the requirements of the U.S. EPA’s Air
        Emissions Reporting Rule (AERR), as per the Code of Federal Regulations (or CFR) 40,
        Part 51.
   •    And, optionally, get a head start on reporting your facility’s toxics air emissions to the
        U.S. EPA’s Toxics Release Inventory (TRI), as per 40 CFR Part 372.

You should check with your SLT to determine if you meet the criteria for annual reporting.
1.2 Highlights of CAERS Features
       CAERS contains the following features that the user should be aware of. Time spent
       understanding these basic features will help the user navigate CAERS and ensure a smooth
       reporting experience.

       1. Previously reported data as a starting point for a current inventory year report.
       2. Three options for data entry:
               a. User interface – for users with few changes to a previous year report, and with
                    different kinds of changes
               b. Bulk entry – for users with a few changes to their annual throughput and emissions,
                    but with few to no changes to their facility inventory.
               c. Bulk upload – for users with a large number of changes, and/or with a variety of
                    changes from a previous year report, this includes new and/or large facilities with no
                    previous reporting history who will want to start a brand new report.
                          i. Via excel template – for users who would like to work with excel
                         ii. Via JSON upload (forthcoming) – for users who would like to send data
                             directly from their custom systems. This feature is still under construction.
                             Your input and feedback are particularly helpful at this stage.
       3. Ability to include attachments. Your SLT may require you to provide supplemental
          information to your estimates such as detailed calculations in a spreadsheet or word
          document.
       4. Bulk download. You will be able to download your previous year report in the excel template
          you will need for bulk upload. This will allow you to make the relevant changes directly to the
          template.
       5. Ability to download summary reports. You can obtain a summary of your submission in an
          excel file (different from the bulk download described above).
       6. Use of toxics air pollutants and hazardous air pollutants (HAPs) reported to CAERS for Toxics
          Release Inventory (TRI) reporting. When using the calculation features and/or uploading
          calculations for toxics emissions in CAERS, CAERS will aggregate toxics emissions for the
          facility, and leave that data ready for TRI-MEweb to pick up so it can be used for that facility’s
          air emissions reporting.
       7. A “Report History” page that tracks major activities from reporters and certifiers such as
          attachments, certification, and submission of the report.

                                                     6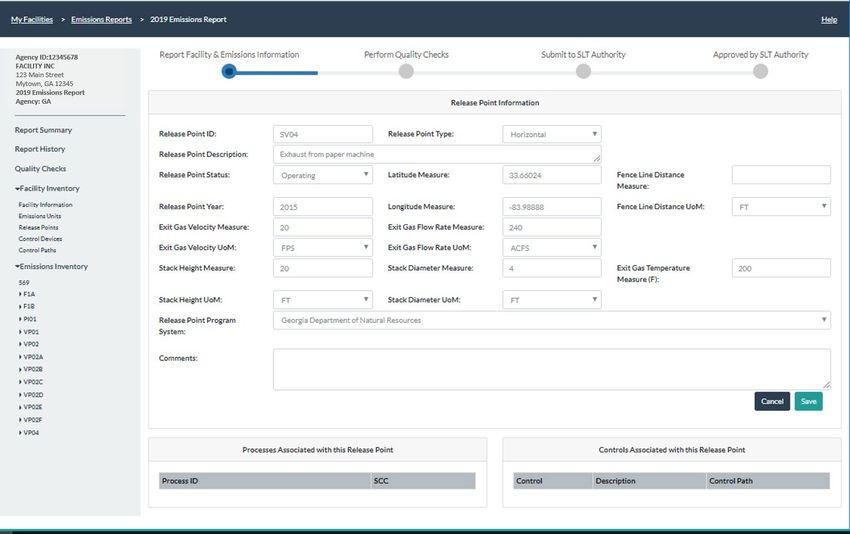
1.3 Software Requirements for CAERS
        To use the CAER system, you will need:

            •    Internet browser and connectivity: This should be a recent version of any internet
                 browser such as Chrome, Explorer, Edge, or Firefox. Your internet connectivity will
                 determine how fast data can be uploaded, as will the amount of data you are uploading
                 at one time.
            •    Microsoft Excel: Bulk uploads will be in “XLS” or “XLSX” format.

2 Initial Pre-Reporting Steps
2.1 Determine Your Role as Preparer or Certifier
        Your first step will be to determine if you are a preparer or certifier as follows:

You are a Preparer if you are authorized to prepare an emissions report for National Emissions Inventory
(NEI) and/or Toxics Release Inventory (TRI) data for a given facility. You may be a consultant, or a staff
person for the company owning the facility, for example. Note that:

    •    There may be more than one Preparer for a facility and that facility is associated with each
         Preparer’s account.
    •    There may be a single Preparer for more than one facility, and all those facilities are associated
         with that Preparer’s account.
    •    A Preparer cannot sign and submit the report like a Certifier can.

You are a Certifier if you are authorized to sign the emissions report on behalf of the facility to meet
your legal obligation for reporting to your State, Local, or Tribal authority (SLT). If your report will also
contain data going to TRI via TRI-MEweb, you will certify your TRI report within the TRI-MEweb
application, so you will not be certifying your TRI data in CAERS at this time. However, certification of
your report is needed to indicate to the system your report is complete, so that TRI data can be carried
forward to TRI-MEweb from CAERS. So long as a report is still in progress, CAERS will not make the data
available for TRI-MEweb pick up. Note that:

    •    The Certifier can do everything a Preparer does in the System. Therefore, a Certifier who is also
         the Preparer for a facility only needs to register as a Certifier for that facility and does not
         require an additional Preparer account.
    •    There may be only one Certifier for a facility. Only one individual can sign the report for that
         facility.
    •    There may be a single Certifier for more than one facility (multiple facilities associated with the
         certifier account). However, your SLT may have additional limitations to those the system
         allows, so you should check with your SLT for specific instructions.

2.2 Option for Reporting TRI-bound Air Toxics Data
      CAERS has an optional feature that allows you to get a jump start on the air toxics emissions
reporting for your facility. You can enter air toxics/HAP data in CAERS in conjunction with your NEI
reporting. When you are finished, CAERS will then add toxics data up to your facility total and leave that
data available for TRI-MEweb to pick up and prepopulate your air toxics report.

Regulations do not require your report to be reviewed by your SLT for your toxics data to be made
available for TRI reporting. Additionally, your SLT may not require you to report your facility’s air

                                                        7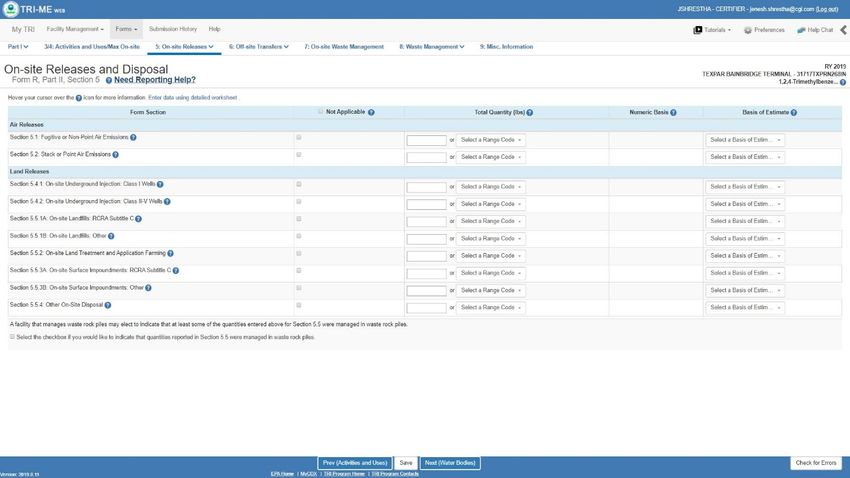
toxics/HAP emissions through CAERS. However, we are encouraging facilities to submit HAPS data at
the process level in CAERS for the following reasons:
• You’ll be able to enter this data and take advantage of the CAERS aggregating air toxics data to
the facility total.
• Having your SLT review your criteria pollutant data before your data gets to TRI-MEweb gives
you the opportunity to correct any related toxics data. For example, assume your SLT finds an
error with throughput for a unit/process affecting your facility’s CO and NOX emissions, that is
also affecting your VOC calculations. As you correct that throughput, all affected emissions are
corrected as well.
• If no HAPS are reported for the facility, then EPA estimates these emissions from your criteria
emissions data via HAP augmentation calculations. These estimates may not be as accurate as
your own data. By submitting your own HAPs emissions at process level in CAERS, you are in
charge of your data.
2.3 Timing of Your NEI and TRI Submissions
CAERS will add up all toxics/HAP emissions entered and calculated at the unit/process level, and
make those totals available to you in TRI-MEweb (as explained in Section 8). By using CAERS the goal is
for reporters to save time in doing calculations separately for each program when common input data
(e.g. throughput) can be used for TRI reporting. Therefore, a reporter should create the CAERS
emissions report leaving time for the submission to take place before the SLT submission deadline, as
well as the TRI deadline of July 1st. TRI data submissions do not require review by your SLT authority
and are picked up by TRI-MEweb by the submission deadline. A submission that, upon SLT review,
requires edits after that date, will be updated accordingly for submission to NEI. However, any toxics
data affected by such edits will be updated in TRI-MEweb at a later date. Furthermore, you will also
want to account for the your SLT’s submission deadline. For example, GADNR EI deadline is June 30th of
each year.
Finally, it is important to leave time in case issues come up that require intervention by the help desk,
SLT, or EPA staff to resolve. Were we to find any glitches in the software, those will take time to resolve
as well. Therefore, we recommend that you:
• Register as Preparer or Certifier as soon as you know your role in the process.
o If you are already registered as Preparer/Certifier for a facility from last year’s
submission, you do not need to re-register, but you should follow any additional steps
your SLT may require.
o If staff changes:
For GADNR preparers and certifiers: go to GECO to register first, then proceed
to CDX to register only after you have gone through the steps in GECO.
For other SLT preparers and certifiers, please notify your SLT immediately with
the name, email address, mailing address and phone number of the new staff
person. Then, new staff should register to CDX immediately to start and/or
continue the report.
• Coordinate your NEI and TRI reporters so that you start your report no later than one month
before the first program deadline you are facing.
• Complete your report no later than two weeks before your submission deadline, to allow for
unforeseen circumstances that might delay your emissions report.
8
For example, given that GADNR’s submission deadline is June 30th, it is best for the facility to submit its
emissions inventory through CAERS at least two weeks before that deadline to allow GADNR Reviewer’s
advanced QA reviewing process.

3 Registration
3.1 Pre-registration for Georgia Department of Natural Resources Registrants
       If you do not report to GADNR, you can proceed to the next step (Section 3.2) to start your
registration process.

This section applies only to all Georgia Department of Natural Resources (GADNR) facility preparers and
certifiers. GADNR preparers and certifiers must register first with GADNRGADNR in GECO, and follow
the opt-in process, before they can start reporting in CAERS. If you report to GADNR, you must follow
the steps outlined in this section before attempting to register in CDX and CAERS, even if you have
already reported through CAERS in a previous year.

3.1.1 Georgia Opt-in Process
       Your process will begin by logging into Georgia Environmental Connections Online (GECO). GECO
will guide you through questions to determine your opt-in status to report to the Emissions Inventory
(EI). All facilities must go through this process, whether you know you will opt in ahead of time or not.
Once you have opted in, you will be redirected to the CAER system from GECO. This process is outlined
in what follows.

After logging into GECO you will be taken to a screen to begin your emissions inventory process. Click
on the “Begin EI Process” button (Figure 3-1). You will be redirected to a facility information page where
your facility information can be reviewed and entered. Figure 3-2 and Figure 3-3 show the top and the
bottom of the facility information page respectively.

                                                     9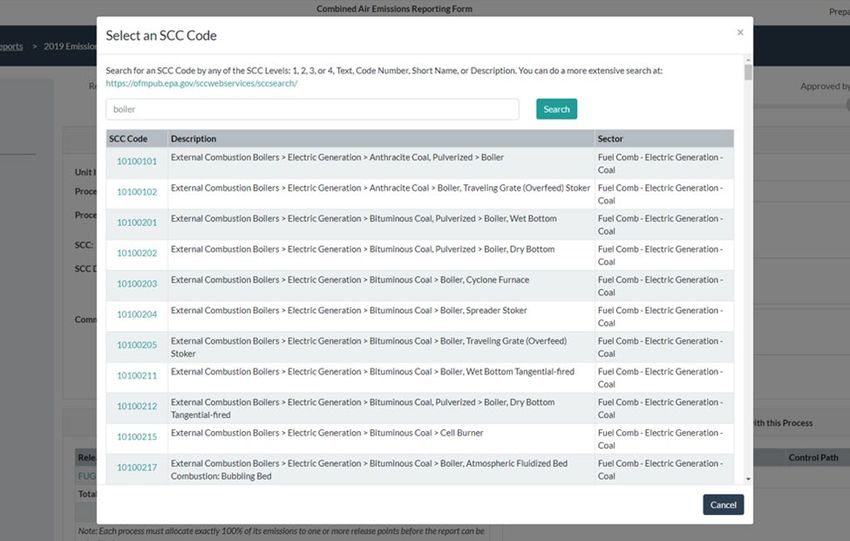
Figure 3-1 Emissions Inventory Process Screen

                                                10
Figure 3-2. Edit Facility Details in GECO Screen 1
Figure 3-3. Edit Facility Details in GECO Screen 2
11Figure 3-4. Facility Operational Status
After clicking “Save & Continue” you will be directed to the “Facility Operational Status” page where you
will be asked if your facility operated in 2020 (Figure 3-4).
If the facility operated during calendar year 2020, the user will be re-directed to the “Facility Emissions
Threshold” screen to answer a question about the facility’s emissions (Figure 3-5). The user will click on
the response to the threshold question and then click on “Submit”.
12Figure 3-5. Facility Emissions Thresholds Screen
If you have opted in, provide contact information for all the preparers and the certifier of your facility to
GADNR (Figure 3-6). This information will be needed for GADNR staff to authorize you to report in
CAERS.
13Figure 3-6. Preparer and Certifier Form
3.1.2 Additional Considerations for GADNR Registration
If you don’t have a certifier yet: For 2020EI, GECO requires the facility to submit at least one preparer
and only one certifier information before that facility can move forward to CAERS reporting. As soon
as you know who your certifier will be, go to GECO EI to submit the certifier information, and then the
certifier should go to CDX to register. At that point, GADNR staff will authorize the certifier. Only then
can the certifier enter CAERS to certify the report.
If your preparer or certifier leaves the company during reporting: Please go to the GECO EI page first,
per the instructions above, to update the preparer and/or certifier information. Then go to CDX to
register the new person or add an existing preparer or certifier to that facility. GADNR staff will
authorize the new person and allow them to enter CAERS. Keep in mind that if you don’t go through
GECO first and go to CDX directly, you will delay the process further.
3.2 Registration in CDX
In order to enter CAERS, you will need to be registered in EPA’s Central Data Exchange (CDX). If
you already have a CDX account but have not registered to use CAERS, go to section 3.3. If you are new
to CDX, click on the “Register with CDX” button (Figure 3-7).
14Figure 3-7. CDX Login Screen
You will be directed to the Terms and Conditions screen for CDX registration (Figure 3-8). After reading
these, check the box confirming that you are the registrant and click “Proceed” at the bottom left of
your screen.
15Figure 3-8. CDX Terms and Conditions
3.3 Add CAERS to your CDX Account
If you are both an authorized Certifier and Preparer, you do not need to go through this process
twice, instead, just register as Certifier in CAERS once you are in. Once you have accepted terms and
conditions, you will be taken to the Program Services page. You can search “CAER: Combined Air
Emissions Reporting” from the list, or you can type it in the search list as shown in Figure 3-9.
Figure 3-9. CDX Program Service Page
16You will be taken to the role access screen where you can choose your role as Preparer or Certifier, as
shown in Figure 3-10. Remember that if you are both Preparer and Certifier, you only need to register
as Certifier, you will not need two accounts if you have both roles.
Figure 3-10. Role Selection Screen
After selecting your role click on “Request Role Access”. This will take you through a few screens where
you will enter information about yourself, and your organization. On the User and Organization screen
(Figure 3-11) complete the User Information section, including your preferred User ID, password, and
CDX security questions and answers. Make sure to follow all instructions that are provided, including the
identity authentication questions asked. Make sure you remember the answers to those questions. The
authentication questions are an additional step that is needed to ensure that only you, the authorized
staff, can work on and submit the report, and to be in CROMERR compliance.
17Figure 3-11. User Information Data Entry
Next, scroll down to the bottom of the screen and enter Organization Information in the relevant box. If
multiple individuals work for a company, then they should all register for the same company in CDX.
After you search for an organization click on an Organization ID link to select the respective organization
(Figure 3-12).
Figure 3-12. Selection of Organization
18Figure 3-13. Organization Information Data Entry
Once you’ve selected your organization, you will be required to enter an email address and phone
number where you can be contacted. Click “Submit Request for Access” (Figure 3-13). This will
generate an email that will be delivered to the email address you provided and forward you to the
confirmation screen. This email will contain a code you will need to enter to complete your registration.
Make sure to check all your email folders to ensure it was not lost in a spam folder.
Locate the email that was automatically sent to your address and enter the provided code. Once you
have located the email and code, enter the code in the “Code” box. Then, click “Create Account” (Figure
3-14).
You will then be redirected to the ‘Identity Verification’ screen where you will provide your personal
information to gain access to CDX. You MUST provide accurate personal information during CDX
registration in order to pass LexisNexis Electronic Identity Verification (Figure 3-15).
19Figure 3-14. Confirmation Code Entry
Figure 3-15. CDX Lexis Nexis Identity Verification
20If you do not pass LexisNexis verification you will be prompted to view, print, and sign a paper ESA. If
this happens simply view and sign the paper ESA by clicking the ‘Paper Verification’ link and then closing
the resulting window. This will bring you to the “MyCDX” screen. Reach out to the CDX help desk for
further instructions.
When you are done filling out your personal information, scroll to the bottom of the Identity Verification
screen. Then, check the box as shown below and click the ‘Proceed to Verification’ button (Figure 3-16).
Once you have passed identity verification, you will be directed to choose and answer 5 challenge
questions. These will be used when signing and submitting reports in CAER. After entering your answers,
click the ‘Save Answers’ button (Figure 3-17).
You will then be prompted to electronically sign an ESA. Click the ‘Sign Electronically’ button as seen
below. Click ‘Accept’ in the pop-up window that appears after clicking the button (Figure 3-18).
Remember that you may be able to use the same Electronic Signature Agreement (ESA) in CDX that you
use for other programs and/or systems in CDX. You may need additional ESAs for additional
organizations you are associated with. You should reach out to the help desk if you have questions
about this.
Figure 3-16. CDX Lexis Nexis Identity Verification
21Figure 3-17. Verification Questions
22Figure 3-18. CDX Electronic Signature Agreement
Figure 3-19. eSignature Screen
23Enter all required information in the ‘eSignature Widget’ pop-up (Figure 3-19). At the end of the 3 steps,
click the ‘Sign’ button to complete the process.
Following clicking to sign the ESA you should receive an email that the process is complete. You will also
be redirected to the “MyCDX” screen (Figure 3-20) inside your CDX account. When this happens, your
account should be activated automatically. If you are a certifier, then the ‘NEI Certifier’ link in the ‘Role’
column on the “MyCDX” screen will be active and clickable. If you are a preparer, then “Preparer” will
appear under your Role.
Whenever you want to access CAERS, you’ll go to CDX and login to enter your credentials. For security
reasons, CDX forces users to change their password every 90 days, so make sure you have your most
recent password available to you. Once you’ve entered your login and password, you will be taken to
your “My CDX” page.
Figure 3-20. MyCDX Page
243.4 Gain Access to CAERS and your Facility
Once you click on your role, you will be re-directed to enter CAERS, and you will see “My Facilities”
(Figure 3-21). Click on the “Request Access to a New Facility” button to request that your SLT verify that
you are associated with the correct facility.
Figure 3-21. “My Facilities” Page in CAERS
The next screen will allow you to search for your facility by entering your SLT agency, name of your
facility, and other information. Once you’ve entered it, click “Search” to find your facility (Figure 3-22).
Figure 3-22. Facility Search in CAERS
A list of facilities matching your search criteria will appear. Be sure to only select the facility you are
reporting and/or certifying for. Once you have selected it, click “Request Access” (Figure 3-23). You will
25be asked to confirm you have selected the correct facility. Click “Confirm”, or click “Cancel” to go back
to the previous screen. You will receive an email from your SLT to confirm or reject your request for
access to the facility you selected. When your request has been accepted, when you enter CAERS again,
you should see your facility, listed in your “My Facilities” page (Figure 3-24).
Figure 3-23. Request Access to Selected Facility
Figure 3-24. "My Facilities" Page Listing Facilities
264 Reporting Emissions and Facility Information via the User Interface
4.1 Navigating the User Interface
4.1.1 General Description of User Interface Features
This section will help you understand the basics about navigating the CAERS User Interface (UI), that
will be helpful whether you choose to do your reporting via UI, bulk entry, or bulk upload. The UI has
many pages and data entry points, there are some common themes throughout the UI. This list will help
you understand the general layout of the UI and its characteristics. Specific features are explained in
more detail, including screenshots, in subsequent sections and are not duplicated here to avoid
repetition.
General features (refer to Section 4.1.3, Figure 4-3):
• Breadcrumbs at the top of the screens displaying the path that got you to the current screen
from previous screens.
• Submission steps bar at the top of the screen that indicates what step you are on in the
submission process.
• A menu of links to different facility and emissions data pages on the left-hand side of the screen,
that will help you find the relevant screens for viewing and data entry. Where multiple units
exist, the menu can be expanded and collapsed.
• Link to “MyCDX” at the bottom of the screen.
• Link to “Help” at the top right of your screen that takes you to a page containing the help desk
contact information and additional resources.
Data entry features:
• Organization of data in each screen in boxes. For example, facility information is organized in
the following boxes: Facility Information, Facility North American Industrial Classification
System (NAICS) Codes, Contact Information (Section 4.2.1, Figure 4-5. Facility Information
Page).
• Greyed out data entry boxes indicating where data is not expected to be changed by the user
(Section 4.2.1, Figure 4-6, for example).
• Drop down menus in some of the data entry boxes to assist the user in entering the relevant
data without errors (Section 4.2.1, Figure 4-6 for example).
• Pop-up windows directing the user to make a choice or enter specific information related to the
page the user is in (Section 4.2.1, Figure 4-7, for example).
• Data entry quality checks (warnings in purple, critical errors in red) to help the user to address
issues and corrections before submission (Section 4.2.2, Figure 4-11, for example)
• “Trash can” icons to delete specific sub-facility components. These are not be used when that
component existed in a previous submission. If data was entered in error during the current
submission, the trash can should be used. If the data existed in a previous submission, then the
component operating status should be changed to temporarily or permanently shut down (as
the case may be), and the year of that change should be recorded as well (Section 4.2.1, Figure
4-6 for example).
• Links for sub-facility components on lists to indicate when the user can edit them from there
(Section 4.2.2 ,Figure 4-10, for example).
• Process of adding sub-facility components. These must be added first before they can be
associated with other components. When a component is added as new, the associations won’t
27show up on the screen for that component until the component information has been filled out
and saved (for example, compare screens for Figure 4-11 and Figure 4-13 in Section 4.2.2).
Then, the component page can be re-opened and boxes for the associations will appear.
4.1.2 Emissions Reports Page
From “My Facilities”, click on Begin/Continue Reporting. This will take you to the “Emissions
Reports” page, where you can see all the reports for that facility (See Figure 4-1 for a new report, and
Figure 4-2 for a report in progress). The CAER system will contain your report from the last year you
submitted one, which will serve as a starting point for you to begin a new report for the current
inventory year you are reporting.
From this screen you have options to work on your report as follows:
• If you will be reporting via the UI or Bulk Entry:
o To start your current report click on “Create New Report” (Figure 4-1) to start reporting.
This will prepopulate your current year report with your previous year data. You will be
re-directed to the facility “Report Summary” page. If your facility has control
equipment, you should also familiarize yourself with Appendix A before beginning a
report.
o To continue your current report if you have already started it in a previous session, click
“Continue” to be redirected to the UI (Figure 4-2).
• If you will be reporting using Bulk Upload:
o You can download your previous year in the pre-formatted template that you can then
use as a starting point to edit and enter your current year report. If you are using bulk
upload to enter your report, refer to Section 5 and, if your facility has control
equipment, refer to Appendix A before beginning a report.
o Once you’ve filled out your template with your current report, you can upload it from
this screen as well by clicking on “Upload Report”.
• If you would like to view a previous year report, you can click on “View” to enter the UI and see
the report without modifying it.
• If you find that your current year report is in error and would like to start over, you can click on
the “Delete” button. Note that if you delete a previous year report, you will not be able to get
that data back easily and recovery may take several weeks.
Note that, at this time, you will not be able to re-submit a previous year report for a previous reporting
year.
28Figure 4-1. Begin Emissions Report
Figure 4-2. Emissions Report Page
4.1.3 Report Summary Page
Once you have selected a facility and report from the “My Facilities” page, you will be taken to a
“Report Summary” page (Figure 4-3). Your new report will be preloaded based on your previous year
submission, and include a list of pollutants for that facility, the reported emissions in the current report,
and the tons for each pollutant that were reported in your facility’s previous submission.
29Figure 4-3. Facility Report Summary Page
You will see breadcrumbs in the dark blue bar at the top of the screen. These display the path that got
you to the current screen from the “My Facilities” page. By clicking on any of the links, you will be
returned to a previous page. For example, from “2020 Emissions Report” you can click on “Emissions
Reports” to be taken back to that page.
Below the breadcrumbs, at the top center of the screen, you’ll see a bar showing the four main steps of
submission that will help guide you through the submission process:
• Report Facility & Emissions Information,
• Perform Quality Checks,
• Submit to SLT (your State, Local, or Tribal) Authority, and
• Approved by SLT Authority.
On the left-hand side you will see an expandable menu with links that will take you to different pages:
• Report History (shows a list of actions associated with the report over time and who performed
them, for example, when it was created, submitted, whether the SLT has approved it).
• Quality Assurance (QA) Checks (takes you to the list of QA checks that your report, as it stands,
is currently generating) see Section 7.
• Data Bulk Entry (takes you to the bulk entry tabs).
30• Facility Inventory data (with summary pages at different levels of detail: facility information,
emissions units, release points, control devices, control paths) see Section 4.2.1.
• Emissions Inventory (a collapsible list of units that you can expand to view the processes
associated with each unit) see Section 4.3.
4.1.4 Including an Attachment in Your Report
You can add a file to your report to explain your calculations where CAERS has not done the
calculations for you (e.g. when your estimation method is mass balance, engineering judgement,
or the emission factor you are using is not listed in the CAERS menu). To attach a file to your
report, go to the “Report Summary” page from the left-hand side menu. Below the “Report
Summary” section you will see a section titled “Preparer/NEI Certifier Attachments”. Click on the
“Attach Report Document” on the bottom right of that section (see Figure 4-4). A window will
pop up where you will be able to enter comments if needed, and then select the file to attach by
using the “Browse” button to find and retrieve your attachment. Click “OK” when you have
selected the right file to attach. Your SLT may require that the attachment should show the
formulas and their application in an excel file. For your SLT, a verbal description may not be
sufficient, as your SLT should be able to verify your estimates. Please be advised that if you do
not submit your attachment in the format your SLT requires, this may result in you report being
rejected and sent back to you automatically.
Figure 4-4. Including an Attachment
Once you have attached the file you will see it listed in the attachments section. It will also appear listed
in the “Report History” page that you can get to from the left-hand side menu of your screen.
If you need to remove an attachment, from within the “Report Summary” page, click on the garbage
icon to the right of the document attachment name. You will be asked to confirm the deletion. Once
deleted, the attachment will no longer appear in the list of attachments. However, a record of the
attachment upload and its removal will appear in the “Report History” page to help you keep track of
your work and ensure you have the most updated attachment you wish to submit with your report.
314.2 Facility Inventory
4.2.1 Facility Information
From the left-hand side menu, click on “Facility Inventory” to expand that menu. Click on
“Facility Information” to get to the facility information screen (Figure 4-5).
Figure 4-5. Facility Information Page
You will be able to edit facility information by clicking on the “Edit” button at the far right, which will
take you to the facility information edit page (Figure 4-6). Note that fields that have been locked will
not be editable. They will appear in gray. You should contact your SLT authority (for example, GA DNR)
if you think there is an error in locked fields. A gray arrow within a data field box indicates a drop-down
menu is available to choose your entry.
• Facility Operating Status: If the facility operated partially in the reporting year and was
permanently shut down in the reporting year, you will need to leave the “Operating” status
unchanged for the year you are reporting, and change it the following reporting year. Once you
change the operating status to “Permanently Shut-down”, all units, processes, controls and
release points will also be automatically set to “Permanently Shutdown”, and you will no longer
be able to enter data for the facility. For example, if the facility was operated in part in 2019
and shut down for the rest of 2019, you would change its status to permanently shut down in
2020.
32Figure 4-6. Editing Facility Information
• Adding NAICS Codes: Under the “Facility Information” box, you will be able to add a NAICS
code. More than one NAICS are allowed as secondary NAICS codes, but a single NAICS should be
designated as the primary NAICS code. When you click the “+” button at the bottom right of
that box, a pop-up window will appear to help you search for your NAICS (Figure 4-7). Type the
digits of your NAICS and a menu for the NAICS that contain those numbers will appear to help
you select the correct code (Figure 4-8). Once you’ve selected your NAICS, click the “Submit”
button. If you have questions about NAICS you can reference the U.S. Census Bureau. NAICS
change every 5 years. At the time this document was written, the codes being referenced were
from 2017.
• Facility contact information: Below the NAICS code box, you should find the “Facility Contact
Information” box(es). You can enter as many contacts for the facility as you need. For example,
you may enter a point of contact as the facility expert on emissions inventory criteria pollutant
questions, and another for the Toxics Release Inventory expert. Click on the “Add Facility
Contact Information” at the bottom right of the screen to open a window to enter new facility
contact information (Figure 4-9). Enter all relevant information such as name, number, and
make sure to select a “Contact Type”.
You will be required to enter at least one contact for National Emissions Inventory (NEI)
reporting. This should be the person that your SLT authority can reach out to if they have
questions about the submission. If a contact person for the NEI is missing, a QA error will
appear at the top of the “Facility Information” page. For the NEI contact select contact type:
“Emissions Inventory”. Click “Save” after adding the information. The application will
automatically take you back to the “Facility Information” page and you should be able to see
your contact information displayed at the bottom of the page. You can also edit an existing
contact by clicking on the “Edit” button for that contact. This will take you to that contact’s edit
page where you will be able to make changes.
33Figure 4-7. Edit Facility NAICS codes
34Figure 4-8. Find and Select NAICS Code
Figure 4-9. Enter Facility Contact Information
354.2.2 Emission Units Page
From the left-hand side menu, click on “Emissions Units” to go to a list of units in your facility
(Figure 4-10).
• To add a unit, click on the plus sign at the bottom of the list. This will take you to a blank unit
page (Figure 4-11). Add all the data fields. Messages will appear where required information is
missing. When you have entered all unit information, click “Save” and this will take you back to
the Units page. After you have finished with your entries or edits, click “Save” to go back to the
“Emissions Units” page. Your new unit will now be listed on that page as an existing unit. If you
are entering new unit data and find you have begun entering it in error, click “Cancel” to take
you back to the “Emissions Units” page without saving any edits.
Figure 4-10. Emissions Units Page
36Figure 4-11. Adding a New Unit
• To edit an existing unit, from the “Emissions Units” page click on the corresponding unit ID from
the list of units to be taken to that unit’s page (Figure 4-12). On the unit page, you’ll see the
“Emission Unit Information” box. Click on the “Edit” button at the top right of the screen to
make changes to the emissions unit information. This will take you to that unit’s edit screen
(Figure 4-13). When you are finished with your edits click “Save” to take you back to the
“Emissions Units” page. If you entered data by mistake, click “Cancel”, the changes will not be
saved, and you will be returned to the “Emissions Units” page.
37You can also read