Blackboard's Collaboration Tools
←
→
Page content transcription
If your browser does not render page correctly, please read the page content below
Blackboard’s Collaboration Tools
Blackboard’s collaboration tools allow you to communicate “live” with your class. You and your
students must schedule a time to be simultaneously logged in to use these tools. This is referred to as
synchronous, live communication. Since the students have to be present, it is not recommended that
they be used extensively in fully online courses. There are two “live” collaboration tools you can
choose from: Chat or Virtual Classroom. The chat is a simple text-based tool, similar to AOL’s Instant
Messaging. The Virtual Classroom has a text chat, but also includes a virtual white board, which can be
used to display course materials such as slide presentations, equations, and websites, but may not work.
The University also provides WebEx accounts for instructors. Instructors may find this more robust
application fits their needs better than the more simple version available in Blackboard and recorded
WebEx sessions can be added into a Blackboard course very easily. For more information and to
request a WebEx account, go to http://www.hartford.edu/aboutuofh/finance_administration/media-
technology-services/web-conferencing.aspx FCLD can provide instruction for using WebEx.
Instructors enter the chat tools by going to Control Panel Course Tools Collaboration. Students
access them by clicking on the Tools button in your course menu and selecting Collaboration.
NOTE: Java Plug-In is required for the Chat/Virtual Classroom to run. If the Java Plug-in is not
installed or if you have trouble running the collaboration tools, use the link provided by Blackboard:
“download the Java Plug-In.”
Both chat tools use a pop-up window, so participants should disable pop-up blockers prior to chatting. It
is probably a good idea to have students test out the chat fifteen minutes earlier than the scheduled
discussion time so there’s time to turn off their pop-up blockers and/or download the Java tool.
Chat
Chat is a good starting place for instructors new to synchronous communication. Participants conduct
an online discussion by typing short, text-based messages. Instructors should always notify students as
to when the chat will be and provide students with instructions for using the chat. At the scheduled
time, the instructor and students join the chat session by clicking on the name of the session.
Joining a Chat Session
BB9.1 SP11 1 Faculty Center for Learning Development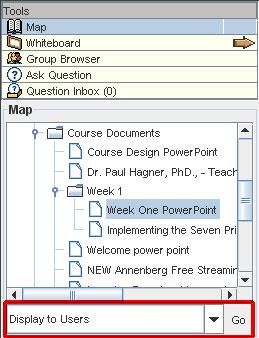
While you can easily start an impromptu chat by clicking the Office Hours button, instructors wishing
to keep recorded copies of chat sessions should name the chat session prior to launching it. To do so,
click on the downward arrow next to the Office Hours link and then click Edit, as shown below.

                                     Chat with Text Box (Instructor View)

Fill in the session name and information (including a date is helpful), and set availability options. If you
elect to add in a Start Date, students will be able to see the name of the session, but will not be able to
click on the link and join the session until the start date. Be sure Yes is selected for availability and then
select the chat tool from the dropdown menu. Click Submit.

To chat, participants type a message in the Compose text box and then hit Send or Enter. The left side
of the screen displays the participants. The right side displays the chat text.

                                     Chat with Text Box (Instructor View)

To send or respond to a private message, participants click on a student name, and then click Private
Message. Instructors can use the Controls at the top of the screen to prevent students from sending
private messages to one another.

BB9.1 SP11                                        2              Faculty Center for Learning Development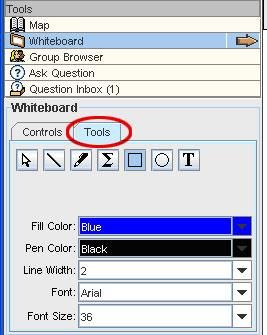
Who Gets to Chat?
By default, students are active participants and can chat as freely as the instructor but this can sometimes
become unwieldy. If instructors want the floor to themselves, they may double-click on the face icons
next to the students’ name. This changes the students to a passive role and prevents them from chatting
again until the instructor double-clicks again, changing their roles back to active ones.
Passive students are ‘ghosted.’
If a student is in passive role, but wishes to ask a
question, he can ‘raise his hand’ by clicking on
the hand icon at the bottom of his or her screen
(not visible to instructors). The number indicates
the order of student questions.
Active and Passive Students (Instructor View)
Instructor Chat Tools
There are also a few simple menus the instructor can use to
manage discussions.
Blackboard Chat Controls
View – Set Private Messaging Options (display in a separate window or within main discussion)
Controls – Set access rights for participants (active or passive). Be careful, using this menu to
give rights to passive users overrides the instructor’s ability to stop a participant from chatting.
There is also an option in this menu for ending the session for all participants.
o Clear – Clears the chat display.
o Clear Local – clear only your chat screen.
o Clear All Users – clear the chat screen for all users.
End – Click “Ok” to end the session for all users.
Archiving/Recording Chat Conversations
Many times, not all students are able to join in a chat session at the scheduled time. Blackboard allows
instructors to record and save an archive of chat sessions so that it can be made accessible to students
after the chat session has ended. Instructors must manually begin the recording process to activate
archiving of conversations.
NOTE: in previous versions of Blackboard, this archiving process was automatic.
BB9.1 SP11 3 Faculty Center for Learning Development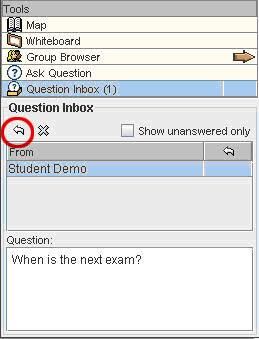
The recording controls are in the upper right hand corner of the screen.
Start - Start Recording
Pause - Pause recording
Stop – Stop recording Recording
Insert Bookmark – Mark a place within the conversation Controls
Accessing Archived Chat Sessions
To access an archived chat session, do the following:
1. Go to the Control Panel.
2. Select Course Tools Collaboration.
3. Click on the chevron next to the chat session you want to view.
4. Select Recordings to display the list of archives available for that particular collaboration
session. A list of all available archives will appear (see below).
5. Click the name of the archive. The entire conversation will appear, but it will be read-only.
Managing Archives
To edit your recordings, click the chevron button located to the right of the archived session name. You
have the following options:
1. Change the name of the archive.
2. Make archive available or unavailable to students.
3. Select Submit to save changes.
BB9.1 SP11 4 Faculty Center for Learning Development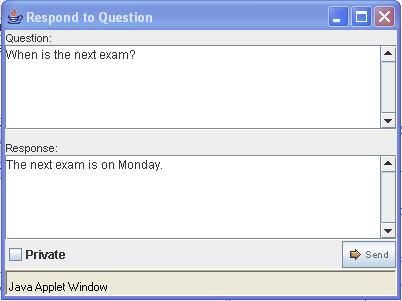
Removing Archives
1. Click on the chevron button located next to the name of the archive and select Delete.
2. You will be told that this action is final and cannot be undone.
3. Select Cancel or Delete.
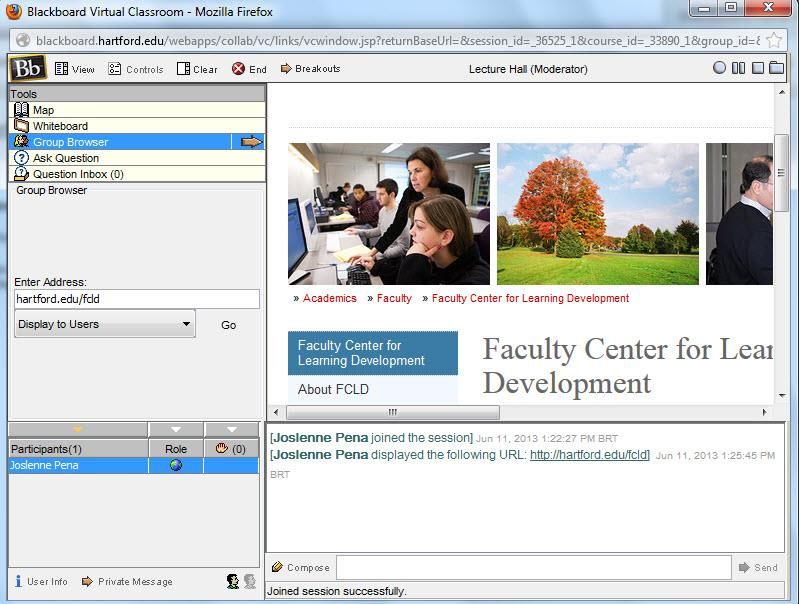
The Virtual Classroom
NOTE: As of January 2013, the Virtual Classroom appears to not be
functioning correctly. We suggest you use the University’s WebEx system
instead.
The Virtual Classroom has a text box for chatting, but also includes a Virtual Whiteboard which can be
used for displaying class materials (e.g., PowerPoint presentations), websites, and for drawing diagrams.
Joining a Virtual Classroom Session
There are four Virtual Classroom options: Map, Whiteboard, Group Browser, and Ask Questions.
BB9.1 SP11 5 Faculty Center for Learning Development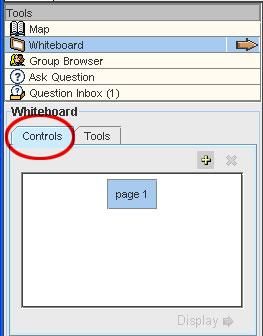
Virtual Classroom Map
The map is used to display Blackboard course
materials to students, for example to display a
PowerPoint presentation (materials must already be
uploaded to your Blackboard course).

Course contents are displayed in a tree structure.
   1. Locate the folder or area that contains the
       content you want to display.
   2. Highlight the file.
   3. From the pull down menu located under the
       course map, select one of the following:
          a. Display to Users – displays item
          b. Preview in New Window – previews
              item
          c. Refresh Tree – resets course map
   4. Click Go.

Virtual Classroom Whiteboard
The Whiteboard is comprised of “pages” or slides and used to display drawings, diagrams, and math
equations to students. To use Whiteboard, select Whiteboard and either the Controls or the Tools tab.
Controls - Create new slides or pages by clicking on the plus sign.
Tools – Use the equation or drawing tools to create dynamic displays in the pages.

             Controls Menu Option                             Drawing Tools Menu

BB9.1 SP11                                     6             Faculty Center for Learning Development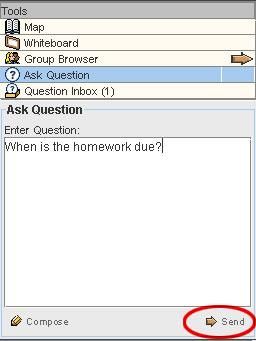
Whiteboard Drawing Tools
Specific tools allow the instructor to use the whiteboard
dynamically. Selecting the:
arrow activates the tools displayed on the top of the
main window (whiteboard display area).
diagonal line enables you to draw a straight line.
pen enables free draw.
“∑” opens an equation editor. Select “∑”, click on the whiteboard display to activate editor,
create your equation, then select Insert Equation to display it on the whiteboard.
square enables you to create a square or rectangle.
circle enables you to create a circle or oval.
“T” opens a text box. Select “T”, click on the whiteboard display area to activate the editor, type
your text, and then select Insert to display it on the whiteboard.
Whiteboard “Slideshows”
Sometimes, instructors may wish to create a pre-made whiteboard slideshow: Here’s how:
Using Pages to Display Content to Students
1. Click onto the Control tab.
2. By default you are given one page called “Page 1”.
3. Click Display (located below the tabs) to show the contents of Page 1 within the whiteboard
display area.
4. Click onto the Tools tab.
5. Use the drawing tools to add items to this page. Note: Anything you add is automatically saved.
Adding Additional Pages
1. Select the Control tab (you should see your Page 1 listed already).
2. Select the “+” sign to add an additional page. Click Display.
3. Select the Tools tab to use the drawing tools to add text, graphics or equations.
4. Return to the Control Tab to keep adding pages.
Deleting Pages
1. From the Control Tab, click once onto the name of the page you want to delete.
2. Click onto the “X” to delete it.
Saving Whiteboard Pages for the Archive
If you are archiving the course, the Whiteboard pages do not save automatically. However, you can take
a “snapshot” of the completed board to save it to the archive. To do this, click on the small camera icon
on the right side of the Whiteboard toolbar.
Snapshot icon on Whiteboard toolbar
BB9.1 SP11 7 Faculty Center for Learning DevelopmentVirtual Classroom Group Browser
Use this feature to display websites to your students while inside the virtual classroom.
Click onto Group Browser.
Type the address of the website you wish to display.
Click Go. The site will appear on the right side of your screen, above the chat window.
You must type full web addresses in order for your students to see new pages (even if you can
see them). Although you can ‘browse’ to new pages, your students can’t see them unless you
type the URL in the Address box and click on the Go button.
The Group Browser Option with the Virtual Classroom
BB9.1 SP11 8 Faculty Center for Learning DevelopmentVirtual Classroom Chat
Ask Question (Student View)
Students use the Ask Question to type
questions to instructors. The instructor uses
the Question Inbox to respond.
Students type their question within the box
(see right).
Students click Send to send the message to
their instructor.
Sending a Question to Instructor
Ask Question (Instructor View)
Instructors go to their Question Inbox to read and answer questions.
To read a question, click on the name of the message sender.
To respond, select the left arrow button just above the word “From.” A new window opens with
a Response text box. Type a response, then click Send.
Responding to Questions
Opening a Response Text Box
BB9.1 SP11 9 Faculty Center for Learning DevelopmentTroubleshooting the Virtual Classroom Chat
Have students try out the chat prior to the start time of the actual chat so they can be sure their
computer is set up with the necessary Java technology.
Post an announcement on Blackboard to remind students where to access the Virtual Classroom.
Prepare a list of “ground rules” and display them at the beginning of class to keep everyone on
topic and paying attention.
Have a backup plan in case there are glitches, and let the students know this plan in advance. A
good alternative is to post questions on the Discussion Board.
Using Internet Explorer on a PC works best for Blackboard’s collaboration tool.
Using Safari on a Mac works best, however the following setting needs to be changed:
-Run Safari and click the word Safari (upper left corner)
-Click Preferences, then click the security icon
-Change the setting for Accept Cookies from “Only from sites I visit” to Always.
If students are having trouble:
Make sure students are using a supported browser. Blackboard recommends Firefox 3.6.
Check to make sure students have downloaded the latest Java version.
Make sure students are not using a pop-up blocker. This will prevent the chat tools from
launching. Most popup blockers can be turned off temporarily.
Students may get ‘kicked off’ the chat connection. If so, have them log back on.
BB9.1 SP11 10 Faculty Center for Learning DevelopmentGetting Help with Technology at the University of Hartford Faculty Center for Learning Development (FCLD) FCLD provides consulting and instructional support to faculty and staff who are using technology in teaching and learning. The FCLD Faculty Lab in Mortensen 203a is available for faculty support and use and is equipped with instructional technology- related equipment including: PCs, Macs, scanners, and projectors as well as support staff. Faculty wishing to use the lab may contact FCLD. Phone: (860) 768-4661 Email: fcld@hartford.edu Website: http://hartford.edu/fcld/ Information Technology Services (ITS) ITS Help Desk – Computing Center For general computer and Internet/network support questions (not directly related to the classroom but rather passwords, Internet/email problems, printer not working, banner, campus facebook, and grades). Phone: (860) 768-5999 Email: its@hartford.edu Website: http://hartford.edu/its/ Media Technology Services (MTS) – Harry Jack Gray Center E113 MTS maintains and installs classroom equipment, such as projectors, Sympodiums, and interactive white boards, delivers and sets up technology needed for classes such as laptops, overhead projectors, microphones, sound systems, DVD/VCRs, digital cameras, etc., and provides instruction on its use. MTS is also responsible for overseeing ECHO360 Lecture Capture classrooms and administers WebEx web conferencing accounts. Phone: (860) 768-4643 (Main) or (860) 768-4662 (Tech Line) Website: http://hartford.edu/mts BB9.1 SP11 11 Faculty Center for Learning Development
You can also read