Cart and Pedestal User Guide - Countertop Refrigerators Undercounter Refrigerators and Freezers - Helmer Scientific
←
→
Page content transcription
If your browser does not render page correctly, please read the page content below
Cart and Pedestal User Guide
     Countertop Refrigerators
     Undercounter Refrigerators and Freezers

/C                                             360382/B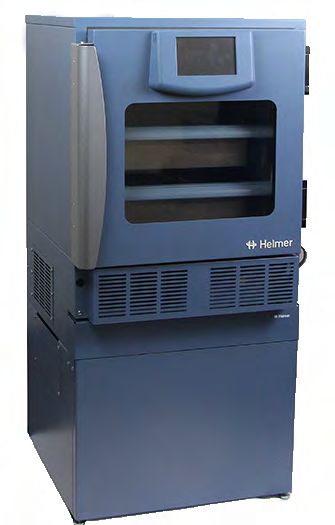
Document History
 Revision      Date              CO       Supersession       Revision Description
 A             29 MAR 2017       12712    n/a                Initial release.
 B             04 MAR 2019       14511    B supersedes A     Added content to include installation instruction for Gen 4 pedestal.

* Date submitted for Change Order review. Actual release date may vary.

     Document Updates
     This document is furnished for information use only, is subject to change without notice and should not be construed as a
     commitment by Helmer Scientific. Helmer Scientific assumes no responsibility or liability for any errors or inaccuracies that may
     appear in the informational content contained in this material. For the purpose of clarity, Helmer Scientific considers only the most
     recent revision of this document to be valid.
     Notices and Disclaimers
     This User Guide provides information about use of the Helmer cart and pedestal. Refer to the product operation or service manual
     for general information regarding your Helmer refrigerator or freezer.
     Copyright and Trademark
     Helmer® is a registered trademark of Helmer, Inc. in the United States of America. Copyright © 2019 Helmer, Inc.
     Helmer, Inc., doing business as (DBA) Helmer Scientific and Helmer.
     Confidential / Proprietary Notices
     Use of any portion(s) of this document to copy, translate, disassemble or decompile, or create or attempt to create by reverse
     engineering or otherwise the information from Helmer Scientific products is expressly prohibited.
     Disclaimer
     This manual is intended as a guide to provide the operator with necessary instructions on the proper use and maintenance of
     certain Helmer Scientific products.
     Any failure to follow the instructions as described could result in impaired product function, injury to the operator or others, or void
     applicable product warranties. Helmer Scientific accepts no responsibility for liability resulting from improper use or maintenance of
     its products.
     The component images appearing in this guide are provided for illustrative purposes only, and may vary slightly from the actual
     product components.

     Helmer Scientific
     14400 Bergen Boulevard
     Noblesville, IN 46060 USA
     www.helmerinc.com
     												                                                                                                          Part No. 360382/B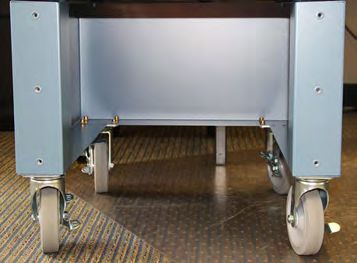
Helmer Scientific Cart and Pedestal                                                                                                                                                                                                                                                         User Guide

   Contents
   1   About this Manual.  .  .  .  .  .  .  .  .  .  .  .  .  .  .  .  .  .  .  .  .  .  .  .  .  .  .  .  .  .  .  .  .  .  .  .  .  .  .  .  .  .  .  .  .  .  .  .  .  .  .  .  .  .  .  .  .  .  .  .  .  .  .  .  .  .  .  .  .  .  .  .  .  .  .  .  .  .  .  .  .  .  .  .  .  .  .  .  .  .  .  .  .  .  .  .  . 3
       1.1 Safety Precautions and Symbols. . . . . . . . . . . . . . . . . . . . . . . . . . . . . . . . . . . . . . . . . . . . . . . . . . . . . . . . . . . . . . . . . . . . . . . . . . . . . . . . . . . 3
       1.2 General Recommendations. . . . . . . . . . . . . . . . . . . . . . . . . . . . . . . . . . . . . . . . . . . . . . . . . . . . . . . . . . . . . . . . . . . . . . . . . . . . . . . . . . . . . . . 3

   2   Countertop Cart Installation. .  .  .  .  .  .  .  .  .  .  .  .  .  .  .  .  .  .  .  .  .  .  .  .  .  .  .  .  .  .  .  .  .  .  .  .  .  .  .  .  .  .  .  .  .  .  .  .  .  .  .  .  .  .  .  .  .  .  .  .  .  .  .  .  .  .  .  .  .  .  .  .  .  .  .  .  .  .  .  .  .  .  .  .  .  .  .  . 4
       2.1             Required Parts . . . . . . . . . . . . . . . . . . . . . . . . . . . . . . . . . . . . . . . . . . . . . . . . . . . . . . . . . . . . . . . . . . . . . . . . . . . . . . . . . . . . . . . . . . . . . . 4
       2.2             Required Tools . . . . . . . . . . . . . . . . . . . . . . . . . . . . . . . . . . . . . . . . . . . . . . . . . . . . . . . . . . . . . . . . . . . . . . . . . . . . . . . . . . . . . . . . . . . . . . 4
       2.3             Location Requirements. . . . . . . . . . . . . . . . . . . . . . . . . . . . . . . . . . . . . . . . . . . . . . . . . . . . . . . . . . . . . . . . . . . . . . . . . . . . . . . . . . . . . . . . 4
       2.4             Procedure. . . . . . . . . . . . . . . . . . . . . . . . . . . . . . . . . . . . . . . . . . . . . . . . . . . . . . . . . . . . . . . . . . . . . . . . . . . . . . . . . . . . . . . . . . . . . . . . . . 4

   3   Undercounter Pedestal Installation.  .  .  .  .  .  .  .  .  .  .  .  .  .  .  .  .  .  .  .  .  .  .  .  .  .  .  .  .  .  .  .  .  .  .  .  .  .  .  .  .  .  .  .  .  .  .  .  .  .  .  .  .  .  .  .  .  .  .  .  .  .  .  .  .  .  .  .  .  .  .  .  .  .  .  .  .  .  .  .  .  .  . 6
       3.1             Required Parts . . . . . . . . . . . . . . . . . . . . . . . . . . . . . . . . . . . . . . . . . . . . . . . . . . . . . . . . . . . . . . . . . . . . . . . . . . . . . . . . . . . . . . . . . . . . . . 6
       3.2             Required Tools . . . . . . . . . . . . . . . . . . . . . . . . . . . . . . . . . . . . . . . . . . . . . . . . . . . . . . . . . . . . . . . . . . . . . . . . . . . . . . . . . . . . . . . . . . . . . . 6
       3.3             Location Requirements. . . . . . . . . . . . . . . . . . . . . . . . . . . . . . . . . . . . . . . . . . . . . . . . . . . . . . . . . . . . . . . . . . . . . . . . . . . . . . . . . . . . . . . . 6
       3.4             Procedure. . . . . . . . . . . . . . . . . . . . . . . . . . . . . . . . . . . . . . . . . . . . . . . . . . . . . . . . . . . . . . . . . . . . . . . . . . . . . . . . . . . . . . . . . . . . . . . . . . 6

   4   Cart and Pedestal Care.  .  .  .  .  .  .  .  .  .  .  .  .  .  .  .  .  .  .  .  .  .  .  .  .  .  .  .  .  .  .  .  .  .  .  .  .  .  .  .  .  .  .  .  .  .  .  .  .  .  .  .  .  .  .  .  .  .  .  .  .  .  .  .  .  .  .  .  .  .  .  .  .  .  .  .  .  .  .  .  .  .  .  .  .  .  .  .  .  .  .  . 10

   5   Product Specifications.  .  .  .  .  .  .  .  .  .  .  .  .  .  .  .  .  .  .  .  .  .  .  .  .  .  .  .  .  .  .  .  .  .  .  .  .  .  .  .  .  .  .  .  .  .  .  .  .  .  .  .  .  .  .  .  .  .  .  .  .  .  .  .  .  .  .  .  .  .  .  .  .  .  .  .  .  .  .  .  .  .  .  .  .  .  .  .  .  .  .  . 10
       5.1             Countertop Refrigerator Cart. . . . . . . . . . . . . . . . . . . . . . . . . . . . . . . . . . . . . . . . . . . . . . . . . . . . . . . . . . . . . . . . . . . . . . . . . . . . . . . . . . . 10
       5.2             Undercounter Pedestal. . . . . . . . . . . . . . . . . . . . . . . . . . . . . . . . . . . . . . . . . . . . . . . . . . . . . . . . . . . . . . . . . . . . . . . . . . . . . . . . . . . . . . . 10

360382/B                                                                                                                                                                                                                                                                                                               ii
Helmer Scientific Cart and Pedestal                                                                                        User Guide

   1       About this Manual
   This user guide is intended for use by end users of the countertop carts or undercounter pedestal and authorized service technicians.
   Generic references are used throughout this instruction to group models that contain similar features. For example, "105
   models" refer to all models of that size (iB105, HB105, iLR105, HLR105). This instruction covers all countertop and undercounter
   refrigerators and freezers which may be identified singly, by their size, or by their respective "Series."

   1.1 Safety Precautions and Symbols

           Symbols found in this document
           The following symbols are used in this manual to emphasize certain details for the user:

                         Task Indicates procedures which need to be followed.

                         Note Provides useful information regarding a procedure or operating technique when using Helmer
                         Scientific products.
                         NOTICE Advises the user against initiating an action or creating a situation which could result in damage to
                         equipment; person injury is unlikely.
                         CAUTION Advises the user against initiating an action or creating a situation which could result in damage
                         to equipment or impair the quality of the products or cause minor injury.

           Symbols found on the units
           The following symbols may be found on the refrigerator or refrigerator packaging:

                          Caution: Pinch point hazard                                Caution: Unlock all casters

                          Caution: Keep hands clear                                  Caution: Refer to Instructions for Use

           Avoiding Injury
           Review safety instructions before installing, using, or maintaining the equipment.
           ♦ Before moving unit, ensure door is closed and casters are unlocked and free of debris.
           ♦ Take care moving cart with refrigerator installed to prevent tipping when transitioning over height changes or floor gaps.
           ♦ Do not roll cart with installed refrigerator over unprotected power cords.
           ♦ Keep hands away from pinch points when removing and replacing panels on the cart or pedestal.
           ♦ Avoid sharp edges when working inside the cart or pedestal.
           ♦ Keep hands away from pinch points when closing the door.
           ♦ Do not sit, lean, push or place heavy objects on top surface.
           ♦ Using the equipment in a manner not specified by Helmer Scientific may impair the protection provided by the equipment.

   1.2 General Recommendations
   Intended Use
   The Helmer countertop cart is available in two sizes. The tall cart is intended to elevate a single MLR102 model refrigerator and
   allow temperature-controlled transport of refrigerated medications and vaccines from one location to another within the facility. The
   short cart provides easy access for under counter placement.
   The undercounter pedestal is intended to elevate a single 104 or 105 model refrigerator or freezer for ease of use.

                CAUTION
             Do not place stacked units on top of a cart or pedestal.

360382/B                                                                                                                                3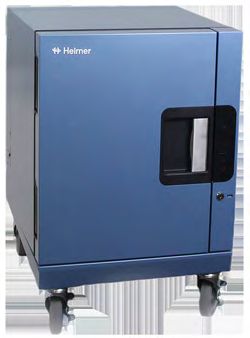
Helmer Scientific Cart and Pedestal                                                                                       User Guide

   2        Countertop Cart Installation
   2.1      Required Parts
            ♦ 401642-1          Tall Cart
            ♦ 401714-1          Short Cart

   2.2      Required Tools
            ♦ 10 mm wrench or adjustable wrench
            ♦ #2 Phillips screwdriver

   2.3      Location Requirements
            ♦ Countertop units installed on a short cart must have minimum 2" clearance above top of unit, and minimum 2" clearance
   		         on each side when placed under counter.
            ♦ Cart casters must rest on the floor.

                 NOTICE
              The maximum allowable ambient temperature for an under counter installation of the MLR102 is 28°C.

   2.4      Procedure

                 CAUTION
              • Power the refrigerator off and disconnect AC power before performing this procedure.
              • The chamber temperature may increase above the allowable temperature range for stored inventory. Take precaution
                to protect items in the chamber from extended exposure to adverse temperature.
              • Multiple countertop refrigerators may not be stacked on top of the cart.
              • The countertop refrigerator must be installed on the cart per the installation instructions provided.
              • Maximum weight per shelf decreases to 10 lbs (4.54 kg) when cart is installed.

              Setup
           1. Remove or secure moveable pieces such as shelves, probe bottle and probe(s).
           2. Carefully position refrigerator to allow access to the underside of the unit.
           3. Using your hand, unscrew and remove the 4 leveling feet from the bottom of the refrigerator. Discard or store leveling
              feet for later use (Figure 1).

              Figure 1

360382/B                                                                                                                               4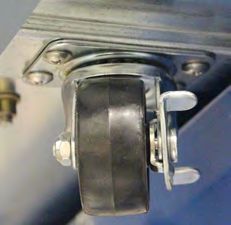
Helmer Scientific Cart and Pedestal                                                                                            User Guide

                Installing Cart
           1. Position cart in an open area.
           2. Using a #2 Phillips screwdriver, remove the six screws securing the back panel of the cart (Figure 2).

              Figure 2
           3. Using two people to lift, carefully place the refrigerator on the cart aligning the 4 threaded holes located where the
              leveling feet were with the four open holes on the top of the cart. The refrigerator should be flush with the cart on all sides
              (Figure 3).

              Figure 3
           4. Place a washer on each M6 screw (4) provided. Reaching through the back panel opening, hand screw an M6 with
              washer through each hole in the cart and into the threaded locations on the bottom of the refrigerator. Tighten screws
              using a 10 mm wrench or adjustable wrench (Figure 4).

                Figure 4
           5.   Replace the back panel of the cart by aligning the holes in the panel with the holes in the back of the cart. Hand thread
                the 6 screws and tighten using a #2 Phillips screwdriver.
           6.   Restore moveable items (shelves, probe bottle, probe(s)) inside the unit to original state.
           7.   Plug power cord into power receptacle and turn AC power ON.
           8.   Allow chamber temperature to stabilize at setpoint prior to returning items to unit.

360382/B                                                                                                                                    5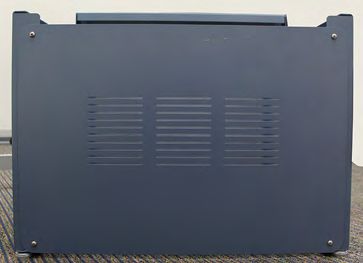
Helmer Scientific Cart and Pedestal                                                                                             User Guide

   3        Undercounter Pedestal Installation
   3.1      Required Parts
    ♦ 401625-1                    Undercounter Pedestal Kit
   				                           (includes 322474-1, Undercounter Wall Mount Bracket and 322390-1, Wall Mount Bracket)

   3.2      Required Tools
            ♦ 7/16" wrench or socket for 1/4"-20 screw
            ♦ 9/16" wrench or socket for 3/6"-16 screw
            ♦ #2 Phillips screwdriver

   3.3      Location Requirements
            ♦ Has a minimum 3" of space behind the refrigerator or freezer for clearance and feature access.

   3.4      Procedure

                 CAUTION
              • Power the unit off and disconnect AC power before performing this procedure.
              • The chamber temperature may increase above the allowable temperature range for stored inventory. Take precaution
                to protect items in the chamber from extended exposure to adverse temperature.
              • Multiple undercounter units may not be stacked on top of the pedestal.
              • The pedestal must sit using leveling legs and should never use caster wheels.
              • The pedestal kit may only be used with Helmer undercounter units.
              • Due to the size and weight of the undercounter units, extreme care must be taken when positioning the unit to allow
                accessibility to the underside.

              Remove Caster (if installed)
           1. Tilt or raise the refrigerator or freezer 1"-2" off the floor to gain access to the casters for removal.

                 Note
              Use of a pallet jack or forklift is recommended for safety. To prevent damage to the unit, push the pallet jack (or forklift)
              under the refrigerator or freezer so the forks extend beyond the opposite side of the base.

           2. Place wood blocks under the unit with the widest portion of the blocks resting on the floor to help secure the refrigerator
              or freezer.
           3. Using a #2 Phillips screwdriver, remove the 4 screws securing each caster to the base of the unit (Figure 5).

              Figure 5

360382/B                                                                                                                                      6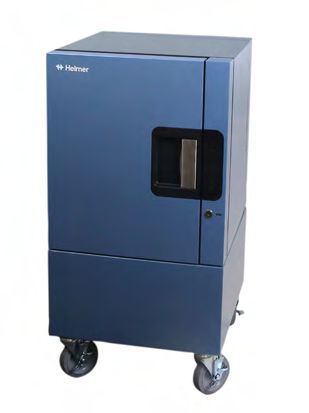
Helmer Scientific Cart and Pedestal                                                                                             User Guide

              Remove Leveling Legs (if installed)
           1. Tilt or raise the refrigerator or freezer 1"-2" off the floor to gain access to the casters for removal.

                 Note
              Use of a pallet jack or forklift is recommended for safety. To prevent damage to the unit, push the pallet jack (or forklift)
              under the refrigerator or freezer so the forks extend beyond the opposite side of the base.

           2. Place wood blocks under the unit with the widest portion of the blocks resting on the floor to help secure the refrigerator
              or freezer.
           3. Using your hand, unscrew the 4 leveling legs located in the four corners of the unit (Figure 6).

              Figure 6
              Installing Pedestal
           1. Position the pedestal in an open area.
           2. Using a #2 Phillips screwdriver, remove the screws securing the back and side panels (4 per panel) of the pedestal
              (Figure 7).

              Figure 7
           3. (Gen 3 models only) Using a #2 Phillips screwdriver, remove the screws (4) securing the front cover of the pedestal
              (Figure 8).

              Figure 8

360382/B                                                                                                                                      7
Helmer Scientific Cart and Pedestal User Guide
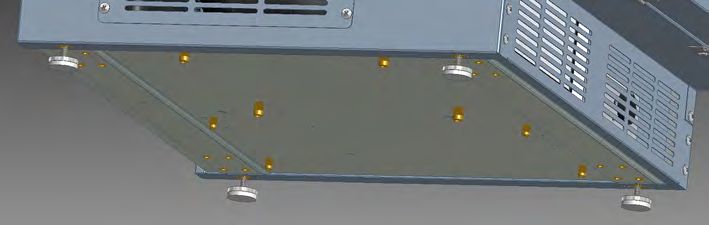
4. Using two people to lift, carefully place the unit on the pedestal aligning the four threaded holes located where the
leveling feet were with the four open holes on the top of the pedestal. The refrigerator or freezer should be flush with the
front panel and back panel of the pedestal (Figure 9).
Gen 3 Gen 4
Figure 9
5. Using the side panel openings, place a 1/4” lock washer on a 1/4”-20 hex head screw and hand screw the 1/4”-20 hex
head screws (4) in the threaded holes. Install screws in the back threaded holes first and then the front threaded holes.
Figure 10
6. Using a 7/16” wrench or socket, tighten each of the hex head screws (4) in each corner.
7. Replace the side panels and back panel by aligning the holes in the panel with the holes in the base of the pedestal.
Hand thread the screws through the holes and tighten using a #2 Phillips screwdriver.
8. Replace the front cover on the pedestal by aligning the holes on the side tabs of the cover with the holes in the
pedestal. Hand thread the screws through the holes and tighten using a #2 Phillips screwdriver.
Installing Wall Mount Brackets
CAUTION
Wall mount bracket installation is required with pedestal installation to lock the undercounter refrigerator or freezer to the
wall stud and prevent tipping.
1. Align the undercounter wall mount bracket holes with the threaded holes at the top of the undercounter refrigerator
or freezer.
2. Hand thread 3/8"-16 x 1 hex head screws (2) through bracket and threaded holes. Tighten screws using a 9/16" wrench
or socket (Figure 11).
Figure 11
360382/B 8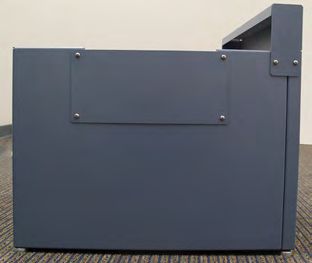
Helmer Scientific Cart and Pedestal                                                                                      User Guide

           3. Loosely attach the wall mount brackets to the undercounter wall mount bracket with the 1/4”-20 hex screws (2), nuts (2),
              flat washers (4), and lock washers (2) (Figure 12).

              Figure 12
           4. Position the pedestal assembly and top unit along the wall in the desired location.
           5. Attach wall mount brackets (2) into the wall stud following local codes.
           6. Refer to the Helmer refrigerator or freezer Operation Manual for instructions regarding unit start-up.

360382/B                                                                                                                                 9
Helmer Scientific Cart and Pedestal User Guide
4 Cart and Pedestal Care
Clean exterior surfaces with a soft cotton cloth and non-abrasive liquid cleaner
For information regarding cleaning of your Helmer countertop refrigerator, refer to the Countertop Refrigerator Operation and
Service Manual. For information regarding cleaning your undercounter refrigerator or freezer, refer to the Service Manual provided
with the unit.
Helmer recommends inspecting mounting fasteners periodically to ensure unit is securely attached to cart or pedestal.
5 Product Specifications
Note
Refer to the product Operation Manual for refrigerator and freezer specifications.
5.1 Countertop Refrigerator Cart
Tall Cart Short Cart
Cart Dimensions H x W x D in. (mm) 17.5" x 20.75" x 20.25" 9" x 20.75" x 20.25"
(445 mm x 527 mm x 514 mm) (229 mm x 527 mm x 514 mm)
Cart/Refrigerator Dimensions H x W x D in. (mm) 40.5" x 20.75" x 20.25" 32" x 20.75" x 20.25"
(1028.7 mm x 527 mm x 514 mm) (812.8 mm x 527 mm x 514 mm)
Cart Net Weight lbs (kg) 39 lbs (18 kg) 19 lbs (9 kg)
5.2 Undercounter Pedestal
Pedestal (Gen 3) Pedestal (Gen 4)
Dimensions H x W x D in. (mm) 17.5" x 24" x 24" 17.5" x 24" x 24"
(445 mm x 610 mm x 610 mm) (445 mm x 610 mm x 610 mm)
Net Weight lbs (kg) 45 lbs (21 kg) 42 lbs (19 kg)
END OF MANUAL
360382/B 10Helmer Scientific 14400 Bergen Boulevard, Noblesville, IN 46060 USA Copyright © 2019 Helmer, Inc. 360382/B
You can also read