GODADDY TO OFFICE 365 MIGRATION PLAYBOOK - T-Minus 365
←
→
Page content transcription
If your browser does not render page correctly, please read the page content below
GODADDY TO OFFICE 365
               MIGRATION PLAYBOOK

PROPERTY OF T-MINUS 365. ALL RIGHTS
RESERVED.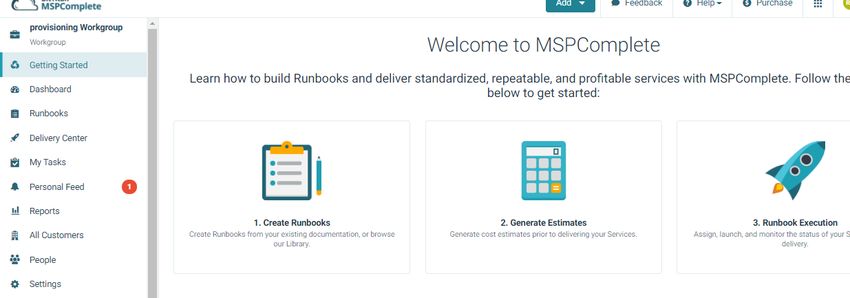
Table of Contents

Planning Phase 1: Gather All the Necessary Credentials ........................................................................................ 3

Planning Phase 2: Gather and Audit all Users part of the Migration .................................................................. 3

Prep Work Phase 1: Prepare Office 365 ......................................................................................................................... 4

Prep Work Phase 2: Prepare Source/Destination for BitTitan ............................................................................ 5

Prep Work Phase 3: Push out DMA agent ..................................................................................................................... 6

             Push out DMA agent via GPO ............................................................................................................................... 7

             Push out DMA agent via Email ........................................................................................................................ 12

Prep Work Phase 4: Setup BitTitan Project ................................................................................................................ 20

Migration Phase 1 ................................................................................................................................................................. 27

Migration Phase 2: MX Cutover ...................................................................................................................................... 30

Migration Phase 3: Post Migration Clean Up ............................................................................ 34

                                                                                         2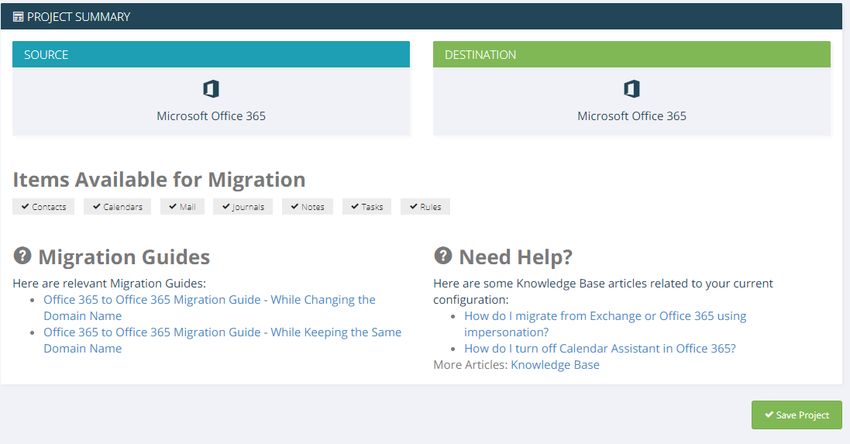
Introduction

This is a complete step-by-step guide for migrating from GoDaddy Office 365 to Office 365
using BitTitan’s migration tools. Migrating these customers to regular Office 365 requires that
you do PLAN FOR DOWNTIME. Your MX records on GoDaddy are the same as when you are
on Office 365. For this reason, you must remove your primary domain from GoDaddy and
recreate it in Office 365. If done correctly, downtime should be limited to 5-15 minutes.

                    Planning Phase 1: Gather All the Necessary Credentials

   1. Credentials Checklist
         a. Office 365 Global Admin Credentials
         b. GoDaddy Global Admin Credentials
         c. BitTitan credentials
         d. DNS Login Credentials

*Note* BitTitan comes with a tool called Deployment Pro which reconfigures Outlook profiles
after the migration. This tool can be pushed out either through GPO or email. If you are going to
be pushing this out via GPO you will additionally need:

       e. Credentials to Remote to Primary DC (RDP, TeamViewer, LogMeIn, Splashtop, etc)
       f. Enterprise Admin Credentials for Primary DC

               Planning Phase 2: Gather and audit all Users Part of the Migration

   1. Gather User List in CSV format, Export from GoDaddy Portal

   2. You will need to get a list of passwords from GoDaddy users or notify them of what their
      password will be in 365

                                                3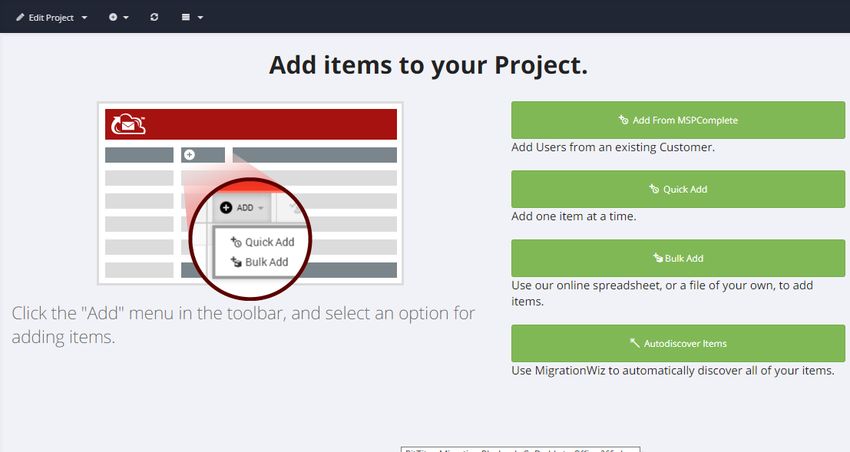
3. Gather Distribution List with members of Distribution list in CSV format

      4. Verify Organizational Units in Active Directory that will be a part of the GPO push (if
         applicable)

      5. Take note of any 3rd partner connectors for email filtering: Symantec, Barracuda, etc.
         Look up necessary steps for creating connectors in 365

      6. Define a Clear Outage Time for Domain Removal/Recreation. Should be limited to 5-
         15minutes

                               Prep Work Phase 1: Prepare Office 365

      1. Create a net new Office 365 tenant. The tenant will be spun up with the defaulted
         .onmicrosoft.com domain. This can be spun up direct with Microsoft or purchased
         through a CSP provider

      2. Add Users: Manually, Bulk Upload with a Powershell Script, Bulk Upload with CSV

             a. Powershell Script

#Connecting to Exchange Online Account#

$credential = Get-Credential

Import-Module MsOnline
Connect-MsolService -Credential $credential

$exchangeSession = New-PSSession -ConfigurationName Microsoft.Exchange -ConnectionUri
"https://outlook.office365.com/powershell-liveid/" -Credential $credential -Authentication
"Basic" -AllowRedirection
Import-PSSession $exchangeSession -DisableNameChecking

   Create a CSV with the Following Headers:
      ● UserPrincipalName
      ● FirstName
      ● LastName
      ● DisplayName
      ● Password

                                                   4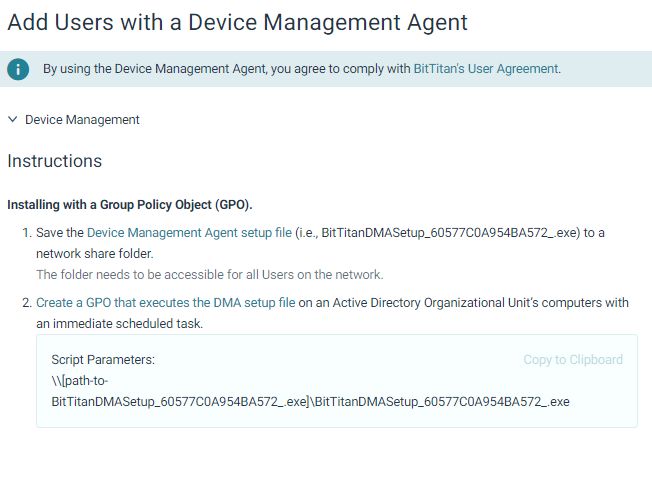
#Bulk Import Users with Passwords#

        Import-Csv -Path 'FilePath' | foreach {New-MsolUser -UserPrincipalName
        $_.UserPrincipalName -FirstName $_.FirstName -LastName $_.LastName -DisplayName
        $_.DisplayName -Password $_.Password -ForceChangePassword $False}

                         Prep Work Phase 2: Prepare Source/Destination for BitTitan

          1.    Change Send/Receive size in office 365 to max of 150m: https://help.bittitan.com/hc/en-
               us/articles/115008108047

        *Note* Make sure you are still connected to exchange online in powershell

        #Change Send/Receive Size#

         Get-Mailbox | Set-Mailbox -MaxReceiveSize 150MB -MaxSendSize 150MB

          2. Set Impersonation on Source and Destination. This will allow you to use admin creds to
             impersonate all mailboxes. With this in place, you will not need creds for all individual
             users

       *Note* You will have to connect to the GoDaddy 365 tenancy and 365 tenancy separately in
       powershell and run these commands in each session

#Setting Impersonation#

Set-ExecutionPolicy Unrestricted

$LiveCred = Get-Credential

$Session = New-PSSession -ConfigurationName Microsoft.Exchange -ConnectionUri
https://ps.outlook.com/powershell/ -Credential $LiveCred -Authentication Basic -
AllowRedirection

Import-PSSession $Session

Enable-OrganizationCustomization
                                              5
New-ManagementRoleAssignment -Role "ApplicationImpersonation" -User admin@domain.com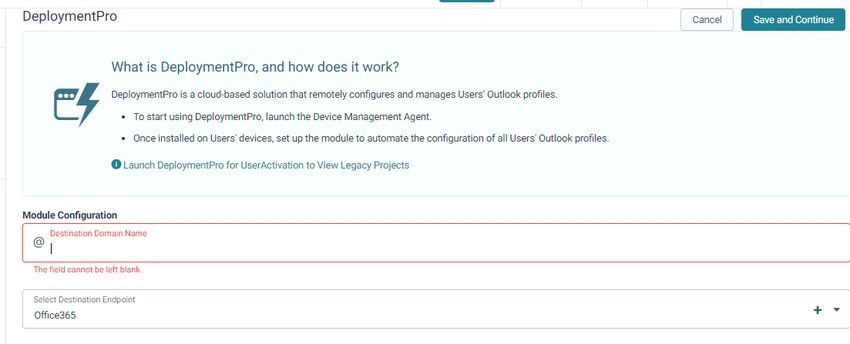
3. Notify GoDaddy about planned time of removal of domain 24hrs ahead of time

                            Prep Work Phase 3: Push out DMA agent

BitTitan comes with a deployment pro agent that automatically reconfigures outlook profiles.
This will bring over autofill settings and signatures for all users. There are two options to push
this out:
             a. GPO
             b. Email

*Note* If we are deploying the agent via GPO, users will just receive a popup asking them to
authenticate to reopen outlook after cutover. If we are pushing the agent out via email, users will
receive a message in which they will have to click on a link to install the agent on their device

   1. Login to the BitTitan Portal and Click All Customers on the left-hand column

                                                6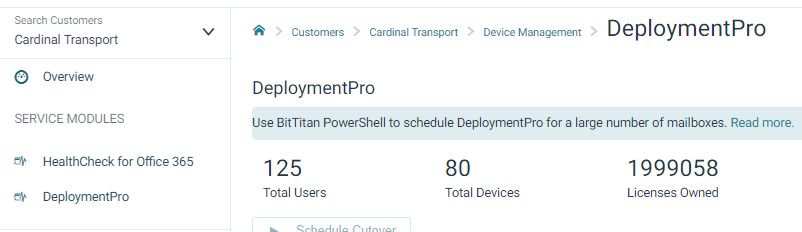
2. Click Add Customer>Fill out Customer Name and primary Domain>Click Save

Follow Steps 3-15 if you are choosing to deploy the agent via GPO

3. Remote into Primary DC

4. Open Browser and Login to BiTitan.com

5. Go to All Customers>View Users on the Customer you created

                                              7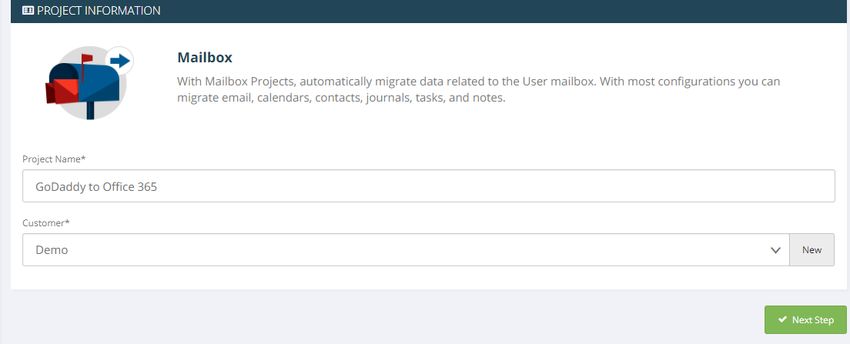
6. Click “Enable the Device Management Agent”

7. Follow the steps from the following KB Article which walks you through setting up a new
share, placing the exe in the share, creating the GPO, and scheduling it to
run:https://help.bittitan.com/hc/en-us/articles/115008110847

8. Monitor users that successfully have the agent installed by going to Customers>Select
customers>Manage>Device Management>Deployment pro

                                               8
*You will need to put in the destination domain and add the 365 endpoint*
Once users start to login to their computers, their device will be registered and their primary
UPN will be listed “Primary Email Address” column
99. Users computers will be listed and will have a "heartbeat". Once a user signs into the device
their email will be tied to the device in a one to one relationship.
10. * If a status shows a ? symbol it most likely means the computer is shut down and the tool
has been able to find a heartbeat in over 4 hours*
1011. Once all users have populated and have the DMA agent installed, Schedule the cutover
date for the agent to run on their computer. (This is after you move the domain to Office 365)
*Note* If there are multiple domains involved you will have to go to “settings” in the deployment
pro page and change the domain for the users who need the separate domain
1112. Once the agent is scheduled successfully, all users should change to a status of "running"
13.If the status does not say "running" but remains in "scheduled" reschedule again until it
moves into a running status
14.If users are not being picked up with the GPO, troubleshoot with the one remote emote user:
● Run Gpresult on their computer to see if the GPO is running
● If the GPO is running, try running the exe manually to see if it is blocked but a firewall
setting
● If it is blocked, then create an exception to the firewall to allow the exe to run.
● If it is not being blocked check to see if there are any web proxy settings that may be
blocking communication back to BitTitan
15. *This completes the steps for setting up DMA via GPO. If you have completed this
successfully then move on to the next section. If you are deploying the agent via email, follow
steps 16-26.
Deploying DMA via EMAIL
16. In the BitTitan portal, go to All Customers and select the customer you created
1217. Click Add Users Through An Endpoint
18. Click Manage Endpoint>Add Endpoint
1319. Add the GoDaddy Endpoint and Provide the Administrative Credentials
*Note* This will autodiscover users from the GoDaddy and populate them in the BitTitan portal
20. From here you can select users by checking the box next their name and selecting “Enable
Device Management Through Email”
1421.Enter a valid email in the “From” section of the template and click Send Email
*Note* You can white label this email specific to the content you want users to receive. This
email is specific to the user and cannot be forwarded to another user for them to click on the
link for the exe file. The User simply clicks on a link to open up a new page and click on one
more link to download the exe file
22. Monitor users that successfully have the agent installed by going to Customers>Select
customers>Manage>Device Management>Deployment pro
*You will need to put in the destination domain and add the 365 endpoint*
15Once users start to login to their computers, their device will be registered and their primary
UPN will be listed “Primary Email Address” column
1623. User’s computers will be listed and will have a "heartbeat". Once a user signs into the
device their email will be tied to the device in a one to one relationship.
* If a status shows a ? symbol it most likely means the computer is shut down and the tool has
been able to find a heartbeat in over 4 hours*
1724. Once all users have populated with a and have the DMA agent installed, Schedule the
cutover date for the agent to run on their computer. (This is after you move the domain to
office365)
*Note* If there are multiple domains involved you will have to go to “settings” in the deployment
pro page and change the domain for the users who need the separate domain
25. Once the agent is scheduled successfully, all users should change to a status of "running"
1826.If the status does not say "running" but remains in "scheduled" reschedule again until it
moves into a running status
19Prep Work Phase 4: Setup BitTitan Project
1. In BitTitan Portal, Open MigrationWiz by clicking on waffle icon at top of the page>Click
Mailbox Migration
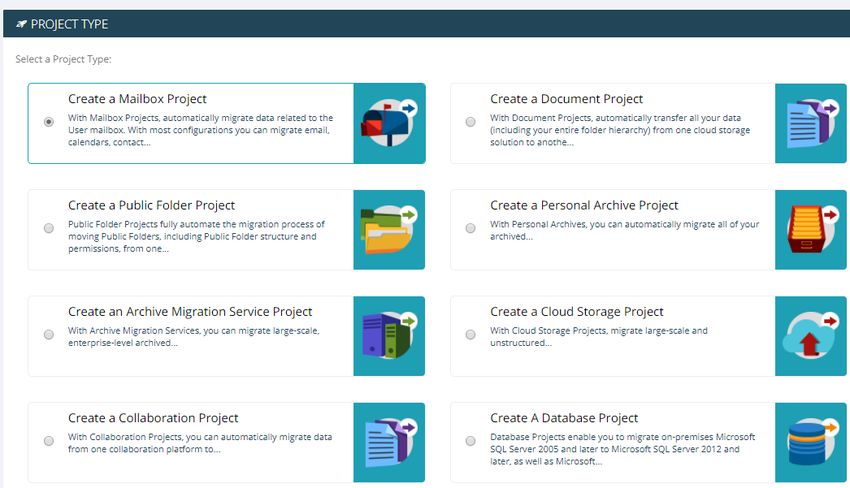
202. Click Create Project>Select Mailbox Project
3. Name the Project and select your customer from the dropdown>Click Next Step
214. If you followed the steps for email deployment for the DMA agent you should be able to select
your endpoint from the dropdown. If you did not, Select New and fill out the fields as shown
below:
225. In the Destination Settings, Click New, and add the 365 endpoint. Providing the admin
credentials
236. Click “Save and Go to Summary” This tells you whats eligible to move and give you additional
KB articles you can reference:
7. Add items to your project. If you already added users to the MSP complete portal either
through GPO or an endpoint. You can select “Add from MSP Complete”. If you have not yet,
then you can select Autodiscover items to import users to the portal
248. Audit User names and Domains (Make sure they match 365), Cleanup user list. Source
should have the domain.com format and the destination should match the
domain.onmicrosoft.com format
9. Select All Users>Verify Credentials
10. There are numerous errors that could appear here. Most of the steps I made for prep work
will make it so that you avoid most of these errors. Refer to BitTitan’s KB articles for most
common errors and how to troubleshoot. https://help.bittitan.com/hc/en-
us/sections/115003465187-Mailbox-Error-Lookup?page=2
Unsuccessful verification will show a “Failed” Message
You can click on the Failed icon to show a detailed message of what failed
25Click on “Learn More” to access BitTitan’s Relevant kb articles specific to the error:
Successful Verification will show a “Completed(Verification)” message
11. After all users have successfully completed verification, Select All users>Click on the
Hamburger icon at the top of the toolbar> Click Subscribe Users
2612. This will bring you back to the MSP complete portal. Select all users>Click Apply User
Migration Bundle
13. This takes a couple of minutes to propagate but after, in the migrationwiz portal the “User
Migration Bundle” column will change from “No” to “Yes”
Migration Phase 1
1. Preferably start at beginning of the week, plan for domain removal/recreation on Friday
evening
272. Select All Users>Click on the start button>Pre-stage Pass
3. Select a time range from the dropdown of prior to 90 days>Start Migration
4. This will give you a status bar and show the amount of data moved over in the “bytes”
column. If any users fail, it’s usually do to server timeout. Simply rerun the pre-stage pass on
these users to restart where it left off. If you click on any user’s name, you can see metrics like
upload speeds:
285. Once the pre-stage migration has run for all users and is in a "Completed" Status
6. Next we are going to perform a full migration to bring over copies of remaining mail plus
calendars, contacts, notes, journals, rules. Select All users>Click on the start button>Full
Migration
297. You can schedule this to start at a specific time if you would like:
8. Confirm all users go into a "Completed” Status
Migration Phase 2: Domain Removal Recreation
1. Login to the GoDaddy portal with Admin Creds
2. Bulk Change all users UPN to remove the primary domain.
30#Bulk Changing UPNs#
$UserCredential = Get-Credential
Connect-MsolService -Credential $UserCredential
$Session = New-PSSession -ConfigurationName Microsoft.Exchange -ConnectionUri
https://outlook.office365.com/powershell-liveid/ -Credential $UserCredential -
Authentication Basic -AllowRedirection
Import-PSSession $Session -AllowClobber
$testpath = test-path c:\temp; If ($testpath -eq $false) {new-item -type directory
c:\temp}; $dataout = @();
Get-MsolUser -All | ? {$_.UserPrincipalName -match "domain.com" } | % {Set-
MsolUserPrincipalName -ObjectId $_.objectId -NewUserPrincipalName
($_.UserPrincipalName.Split(“@”)[0] + “@domain.onmicrosoft.com”); $dataout +=
"$($_.UserPrincipalName)" ; $_.UserPrincipalName };$dataout | out-file
c:\temp\UPNChangeOutput.txt
*Note* Change variables “Domain.com” and “Domain.onmicrosoft.com” to match your
environment
3.Remove all Alias' with primary domain
#Remove Domain From Alias#
$Records = Get-mailbox -ResultSize Unlimited| where {$_.emailaddresses -like
"smtp:*@domain.com"} | Select-Object
DisplayName,@{Name=“EmailAddresses”;Expression={$_.EmailAddresses |Where-Object {$_ -
like “smtp:*domain.com”}}}
foreach ($record in $Records)
{
write-host "Removing Alias" $record.EmailAddresses "for" $record.DisplayName
Set-Mailbox $record.DisplayName -EmailAddresses @{Remove=$record.EmailAddresses}
}
*Note* Replace “Smtp:*domain.com* with the alias in your environment
4. Remove all groups with primary domain
#Remove Groups with Domain#
Get-MsolGroup -all | ?{$_.emailaddress -match "domain.com"} | Remove-MsolGroup -force
315. Remove Domain from GoDaddy Portal, this will tell you if there are any remaining
Users/Groups with the Domain still attached
6. Login to the Office 365 portal
7.Go to Setup>Domains>Add Domain
8. Add the primary domain and verify with TXT record
9. Login to DNS Portal and provide TXT Record given by Microsoft
10. Go back to the Office365 portal and Click Verify. Skip the rest of the DNS setting entries for
now. *Note* this could take up to 15min before the domain can be recreated in the 365 portal
after removing from GoDaddy
11. Bulk Update all Users UPNs
#Bulk Changing UPNs#
$UserCredential = Get-Credential
Connect-MsolService -Credential $UserCredential
$Session = New-PSSession -ConfigurationName Microsoft.Exchange -ConnectionUri
https://outlook.office365.com/powershell-liveid/ -Credential $UserCredential -
Authentication Basic -AllowRedirection
Import-PSSession $Session -AllowClobber
$testpath = test-path c:\temp; If ($testpath -eq $false) {new-item -type directory
c:\temp}; $dataout = @();
Get-MsolUser -All | ? {$_.UserPrincipalName -match "domain.onmicrosoft.com" } | % {Set-
MsolUserPrincipalName -ObjectId $_.objectId -NewUserPrincipalName
($_.UserPrincipalName.Split(“@”)[0] + “@domain.com”); $dataout +=
"$($_.UserPrincipalName)" ; $_.UserPrincipalName };$dataout | out-file
c:\temp\UPNChangeOutput.txt
*Note* This is the reverse of what we did in step #2. Change variables “Domain.com” and
“Domain.onmicrosoft.com” to match your environment
3212. Add Alias’ to Users
#Add Alias to Users#
$LiveCred = Get-Credential
$Session = New-PSSession -ConfigurationName Microsoft.Exchange –Connecti
dential $LiveCred -Authentication Basic -AllowRedirection
Import-PSSession $Session
$users = Get-Mailbox
foreach ($a in $users) {$a.emailaddresses.Add("$($a.alias)@domain.com")
$users | %{Set-Mailbox $_.Identity -EmailAddresses $_.EmailAddresses}
13. Upload All DLs with users
#Add Distribution Lists with Members#
Import-Csv -Path 'File Path.csv' | foreach {New-
Distributiongroup -Name $_.Name -PrimarySmtpAddress $_.Address
}
Import-Csv 'File Path.csv' | foreach {Add-
DistributionGroupMember
-Identity $_.DL -Member $_.Alias}
33Migration Phase 3: Post Migration Cleanup
1. In the BItTitan Portal, swap domains from the source and Destination by clicking on the
globe icon on the top toolbar:
2. Run a Full Pass again on all users (This will run a delta sync to collect any residual mail)
3. Audit Destination Environment Mailflow for Inbound/Outbound Mail
4. Login to BitTitan>Go to All customers>Select customer>Manage>Device
Management>Deployment Pro
5. Once users authenticate to DMA agent on their computer by putting in their 365 password,
the DMA status will move into "Completed" status. If in "error" status it means the users failed
authentication 3x. Reschedule the tool to run at the next time interval available.
For more info, check out this KB article on end user experience with Deployment Pro:
https://help.bittitan.com/hc/en-us/articles/115008111167-What-is-the-end-user-experience-
when-DeploymentPro-reconfigures-their-Outlook-profile-
346. Send out guides on configuring mail on Iphone/Android:
https://support.office.com/en-us/article/set-up-email-using-the-ios-mail-app-7e5b180f-bc8f-45cc-
8da1-5cefc1e633d1
https://support.office.com/en-us/article/set-up-email-in-android-email-app-71147974-7
7. Perform any account clean up that is required
35You can also read