RR-TRAN - USERS GUIDE water work - Calsense
←
→
Page content transcription
If your browser does not render page correctly, please read the page content below
®                   RR-TRAN USERS GUIDE

     RR-TRAN

    USERS GUIDE

           m aking water   work
                           since 1986
TABLE OF CONTENTS ®
TABLE OF CONTENTS
SECTION 1: RR-TRAN SECTION 4: BATTERY CHARGING &
REPLACEMENT
1A. RR-TRAN DESCRIPTION
1B. RR-TRAN TECHNICAL SPECIFICATIONS 4A. BATTERY CHARGING
4B. BATTERY REPLACEMENT
SECTION 2: SETUP
SECTION 5: FCC INFORMATION
2A. USE WITH MODEL 2100 & ET1
CONTROLLERS 5A. FCC PART 15
2B. USE WITH MODEL ET1 CONTROLLERS 1998 5B. FCC WARNING
AND OLDER WITH (-RR) BOARD.
2C. USE WITH MODEL ET2000 (400 & 500
SERIES) CONTROLLERS SECTION 6: WARRANTY INFORMATION
6A. WARRANTY INFORMATION
SECTION 3: GENERAL USAGE
3A. TURN A STATION ON
3B. TURN A STATION OFF
3C. TURN MULTIPLE STATIONS ON
3D. TURN MULTIPLE STATIONS OFF
3E. STATION AUTO UP / DOWN
3F. MASTER VALVE ACTUATION
m aking water work
since 1986® SECTION 1 RR-TRAN
SECTION 1: RR-TRAN
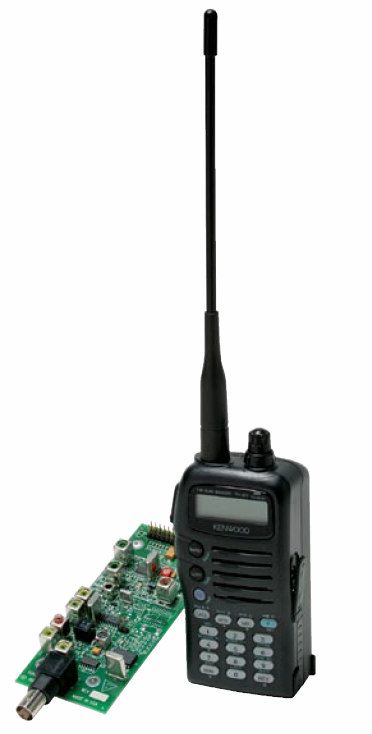
1A. RR-TRAN Description
Button descriptions:
1 PWR SWITCH - This button is used to turn the 4 VOLUME – This knob is used to increase or decrease
Handheld Radio Remote unit ON and OFF. the volume of the Handheld Radio Remote unit.
2 SQUELCH / TUNING – This knob is used for tuning 5 PTT – This button is used to transmit voice and
frequencies and adjusting the level of squelch. controller commands.
3 BAND – This button is used to select between UHF
and VHF. The VHF setting is used.
1B. RR-TRAN Technical Specifications
Transceiver Output: Variable from 50mW to 6W Compatibility
Temperature: -20 degrees to +60 degrees Celsius
Receiver Sensitivity: 0.18 uV ET1: All versions after year 1999.
Construction ET2000: All versions through 2005 and
Not using the model RRe
Transceiver: Remote control.
Dimensions: 2.3” x 4.4” x 1.3”
Transceiver weight: 11.6 oz. Model Numbers
Case: Tough polycarbonate RR: Calsense integrated Radio
Remote board.
RR-TRAN: Calsense transceiver
compatible only with the RR
Radio Remote board.
m aking water work
since 1986SECTION 2 SETUP ®
SECTION 2: SETUP
2A. Use with model 2100 & ET1
Controllers
The RR-TRAN Handheld Radio Remote can be
used in conjunction with the REC-RR Receiver to
transmit commands to any 2100 & ET1 irrigation
controller that conforms to the following guidelines:
2100 controller Figure 2.2
• Operating on software version 025 or later. 4. The Calsense controller supplies power to
the receiver, the RED indicator light on the
ET1 controller top of the receiver should be “blinking”, if the
indicator light is blinking proceed to step 5, if
• All versions prior to 1999. the indicator light is not blinking contact
• Operating on software version up to 139. Calsense.
CAUTION: 5. Insure that fully charged batteries are
installed in the transceiver (spare batteries
The use of harnesses or extensions other than and charger are available). (See Section 4
supplied by Calsense can damage the equipment Battery charging & replacement).
and void manufacturer’s warranty.
6. Turn the Transceiver ON by rotating the
1. Make sure that the On/Off volume knob on On/Off volume control knob clockwise.
the handheld transceiver is in the OFF Rotate the squelch control knob clockwise
position. until the desired noise level is reached.
(Figure 2.3).
2. Install the enclosed antennas to both the
Handheld Radio Remote and the REC-RR Note: Two-way voice communications are possible if
Radio Remote receiver (Figure 2.1). there is a second transceiver in use.
Figure 2.3
To confirm that a compatible version of software is
installed in the Calsense controller:
Figure 2.1
3. Connect the REC-RR receiver cable (9 pin
female) to the port (9 pin male) on the front 1. Press and hold the PTT
face of the controller panel (Figure 2.2). button.
m aking water work
since 1986® SECTION 2 SETUP
5. ENTER Press the ENTER key
repeatedly until the
2. Press the STAR key. controller “beeps” to exit
the Set-up mode.
Note: When not in use make sure the ON / OFF
volume control knob on the handheld transceiver is
3. Release the PTT
in the OFF position (fully counter-clockwise).
button.
2B. Use with model ET1 controllers
The controller should display:
1998 and older with (-RR) board.
“CALSENSE RADIO REMOTE STATIONS ON:”
ET1 controllers manufactured after 1999 and having
This confirms a compatible version of software is software version 139 or older have the built in Radio
installed. remote board (-RR) option available. The Radio
Remote screen can be accessed by performing the
following steps:
If the RED light on the REC-RR receiver blinks but
“CALSENSE RADIO REMOTE STATIONS ON:” TEMP
1. Press the TEMP key to
access the RADIO
does not appear, check the version of software
REMOTE screen
installed in the controller as follows:
(Figure 2.4).
Enter the ET1 controller Set-Up mode by pressing
the following sequence of keys: RADIO REMOTE: (use CHANGE key)
> Enable RADIO REMOTE NOW
IRRIGATE > Code for NORMAL COMMANDS is *111
1. Press the IRIGATE ON / > Code for ADDRESSED COMMANDS is * -
ON / OFF OFF key.
STATION Figure 2.4
2. Press the STATION UP
UP key.
Note: Use the CHANGE key to select an entry, use
the ON / ARROW and OFF / ARROW keys to scroll
STATION through the choices.
3. Press the STATION
DOWN DOWN key.
Normal Command Mode: This is the “Wake up”
command code for this specific controller. This
number can be changed to any three digit number
4. Press the ON / ARROW
ON and must be entered by the Handheld Radio
key.
Remote prior to issuing station commands.
Example:
The upper left corner of the display will show the
software version installed.
Example:
139M, 139G, 017, 023
The wake up command for this controller is 114.
m aking water work
since 1986SECTION 2 SETUP ®
Addressed Command Mode: Once set the The RADIO REMOTE ACTIVATION screen is
controller is ready to receive all commands in the displayed (Figure 2.4).
Command List. If changed, this number will have to
proceed any station number commands.
RADIO REMOTE ACTIVATION
Enable Radio Remote NOW
Example: Code for NORMAL COMMANDS is: * 1 1 1
Code for ADDRESSED COMMANDS is: * -
Receive Chanel : 5 (160.150Mhz)
Two (2) is the address command and the station Figure 2.4
number is four (4). This will turn on station 4.
Normal Command Mode: This is the “Wake up”
Note: Once set the address remains in effect until command code for this specific controller. This
either the STAR, TWO, STAR, STAR, STAR number can be changed to any three digit number
command is entered, any key at the controller is and must be entered by the Handheld Radio
pressed, or 1 hour of time has passed. Then the Remote prior to issuing station commands.
controller will default back to the STAR only
command. Example:
Example:
The wake up command for this controller is 114.
You can also accomplish this step by:
This will turn on station four (4).
3. Pressing the ENABLE RADIO
REMOTE NOW key.
2C. Use with model ET2000 Addressed Command Mode: If two users are in the
(500 & 400 Series) controllers same vicinity and each is using the Radio Remote
on separate controllers, it could be necessary to use
The RR-TRAN Handheld Radio Remote can be the Address Command mode, otherwise each user
used with any ET2000 controller that conforms to could be activating stations simultaneously on both
the following guidelines: controllers. Addressed commands can only be
entered at the controller, and will remain active only
ET2000 controller during the current session.
• All versions through 2005. Example:
At the ET2000 irrigation controller:
Two (2) is the address command and the station
1. Press the MAIN MENU key. number is four (4). This will turn on station 4.
Note: Once set the address remains in effect until
either the STAR, TWO, STAR, STAR, STAR
2. Press the RADIO REMOTE
command is entered, any key at the controller is
key.
pressed, or 1 hour of time has passed. Then the
controller will default back to the STAR only
command.
m aking water work
since 1986® SECTION 2 SETUP / SECTION 3 GENERAL USE
Example: SECTION 3: GENERAL USE
3A. Turn a station ON
To turn an individual station ON:
This will turn on station four (4).
1. Press and hold the PTT
THIS CONCLUDES THE SETUP SECTION button.
2. Press the number key for
the station desired.
3. Press the POUND key.
4. Release the PTT
button.
Example:
To turn ON station 14 press and hold the PTT key
then:
Then release the PTT key.
3B. Turn a station OFF
To turn an individual station OFF:
1. Press and hold the PTT
button.
2. Press the number key for
the station desired.
m aking water work
since 1986SECTION 3 GENERAL USE ®
4. Release the PTT
3. Press the STAR key. button.
Example:
4. Release the PTT To turn ON station 1, 4, and 23 press and hold the
button. PTT key then:
Example:
To turn OFF station 14 press and hold the PTT key
then:
Then release the PTT key.
Then release the PTT key.
3C. Turn multiple stations ON 3D. Turn multiple stations OFF
To turn multiple stations ON: To turn multiple stations OFF:
1. Press and hold the PTT 1. Press and hold the PTT
button. button.
2. Press the number key(s) 2. Press the number key(s)
for the station desired. for the station desired.
3. Press the POUND key. 3. Press the STAR key.
Repeat steps 2 and 3 until all stations desired are Repeat steps 6 and 7 until all stations desired are
ON. OFF.
CAUTION:
4. Release the PTT
Turning on more than four (4) stations at one time
button.
may cause excessive current flow and result in
damage to the controller.
m aking water work
since 1986® SECTION 3 GENERAL USE
Example:
To turn OFF station 1, 4, and 23 press and hold
the PTT key then: 4. Press the POUND key.
5. Release the PTT
button.
This will activate the Station Auto UP/DOWN mode.
Turn ON a station using the steps in
Then release the PTT key. (Section 2A turning on a station).
5. Press the STAR key to turn off
the last station selected 6. Press and hold the PTT
ONLY. button.
7. Pressing the THREE key will
6. Press the STAR key twice (2x) turn off the station ON and
to turn off ALL stations. turn ON the next higher
station.
3E. Station Auto UP / DOWN
To activate the Auto UP/DOWN mode of the 8. Pressing the ONE key will
Handheld Radio Remote. turn off the station ON and
turn ON the next lower
station.
1. Press and hold the PTT 9. Release the PTT
button. button.
Press the following keys in order. To deactivate the Auto UP/DOWN mode of the
Handheld Radio remote
2. Press the NINE key.
10. Press and hold the PTT
button.
3. Press the ONE key. Press the following keys in order.
11. Press the NINE key.
m aking water work
since 1986SECTION 3 GENERAL USE /
SECTION 4 BATTERY CHARGING & REPLACEMENT ®
SECTION 4: BATTERY CHARGING &
REPLACEMENT
12. Press the ONE key.
4A. Battery charging
You must charge the battery pack before using the
Handheld Radio Remote, or after storing the pack
13. Press the STAR key
removed from the transceiver for more than two (2)
months. It takes several charge/discharge cycles
before achieving the full battery pack capacity.
3F. Master Valve actuation CAUTION:
To open a normally closed Master Valve use the • Exceeding the specified charge period shortens
following steps: the useful life of the NiCd battery pack.
• The provided charger is designed to charge only
the provided PB-38 or PB-39 NiCd battery pack.
Charging other models of battery packs will
1. Press the POUND key. damage the charger and the battery packs.
Note: Charging should be done within an ambient
‘Master Valve” will appear on the Calsense temperature between 41 degrees and 104 degrees
controller display. Fahrenheit. Charging outside this range may not
fully charge the battery.
To re-close a “Normally Closed” Master Valve use
the following steps: Always switch OFF the Handheld Radio Remote
equipped with the NiCd battery pack before charging
the unit. Using the Handheld Radio Remote, while
charging the battery pack, will interfere with correct
charging.
2. Press the EIGHT key.
Repeatedly recharging a fully charged battery pack,
or almost fully charged pack, shortens its operating
time. To resolve this problem, use the pack until it is
completely discharged. Then recharge the pack to
3. Press the STAR key. full capacity.
If the operating time of a battery pack decreases
although the battery pack is fully and correctly
“Master Valve” will disappear from the controller charged, the battery pack life is over. Replace the
display. battery pack.
1. Install the NiCd battery pack on the
THIS CONCLUDES THE GENERAL USE Handheld Radio Remote. (See Section 4B
SECTION Battery replacement).
2. Insert the DC plug from the charger into the
DC IN jack on the Handheld radio remote
(Figure 4.1).
m aking water work
since 1986® SECTION 4 BATTERY CHARGING & REPLACEMENT
Figure 4.1
3. Insert the charger AC plug into an AC wall
outlet.
• Charging starts and will take
approximately 16 hours for PB-38 or 15
Figure 4.3
hours for PB-39.
3. To remove the battery pack, push up the
4. After 16 hours (PB-38) or 15 hours(PB39)
release latch, then slide the battery pack
remove the charger DC plug from the
back (Figure 4.4).
Handheld Radio Remote DC IN jack.
5. Remove the charger AC plug from the Ac
wall outlet.
4B. Battery replacement
Installing the NiCd Battery pack:
The battery pack is provided uncharged, charge the Figure 4.4
battery pack before using it with the handheld Radio
Remote. (See Section 4A for recharging the NiCd Installing alkaline batteries:
battery pack.).
It is recommended to use high quality alkaline
1. Position the two groves on the inside bottom batteries rather than manganese batteries to enjoy
corners of the battery pack over the longer periods of battery life. Do not use
corresponding guides on the back of the commercially available NiCd batteries.
Handheld Radio Remote (Figure 4.2).
If you will not use the Handheld Radio Remote for a
long period, remove the batteries from the battery
case.
Do not use different quality batteries together.
When the battery voltage is low, replace all four (4)
old batteries with new ones.
Figure 4.2
1. To open the battery case cover, Push on the
2. Slide the battery pack long the back of the locking tab, then pull the cover (Figure 4.5).
Handheld Radio Remote until the release
latch on the base of the Handheld Radio
remote locks the battery pack in place
(Figure 4.3).
m aking water work
since 1986SECTION 4 BATTERY CHARGING & REPLACEMENT /
SECTION 5 FCC INFORMATION ®
SECTION 5: FCC INFORMATION
5A. FCC Part 15
This equipment has been tested and found to
comply with the limits for a Class B digital device,
pursuant to part 15 of the FCC Rules. These limits
Figure 4.5 are designed to provide reasonable protection
against harmful interference in a residential
2. Insert (or remove) four AA (LR6) alkaline installation.
batteries (Figure 4.6).
This equipment generates, uses, and can generate
• Be sure to match the battery polarity frequency energy, and, if not installed and used in
with those marked on the bottom of the accordance with the instructions, may cause harmful
battery case. interference to radio communications. However,
there is no guarantee that the interference will occur
in a particular installation. If this equipment does
cause harmful interference to radio or television
reception, which can be determined by turning the
equipment OFF and ON, the user is encouraged to
try to correct the interference by one or more of the
following measures:
• Reorient or relocate the receiver
Figure 4.6 antenna.
3. Align the two (2) tabs on the battery case • Increase the separation between the
cover, then close the cover until the locking equipment and receiver.
tab clicks (Figure 4.7).
• Connect the equipment to an outlet on a
circuit different from that to which the
receiver is connected.
• Consult the dealer for technical
assistance.
Figure 4.7
5B. FCC Warning
4. To install the battery case onto (or remove
from) the Handheld Radio Remote, follow FCC WARNING:
steps 1 through 3 for “Installing the NiCd
battery pack”. This equipment generates or uses radio frequency
energy. Changes or modifications to this equipment
may cause harmful interference unless the
modifications are expressly approved in the
THIS CONCLUDES THE BATTERY instruction manual. The user could lose the authority
CHARGING & REPLACEMENT to operate this equipment if an unauthorized change
SECTION or modification is made.
m aking water work
since 1986® SECTION 6 WARRANTY INFORMATION
SECTION 6: WARRANTY INFORMATION
6A. Warranty information
The California Sensor Corporation warranties the
purchaser of its manufactured products against
defects in material and workmanship for a period of
twelve (12) months from the date of original
purchase by the owner.
California Sensor Corporation liability is limited
solely to the replacement or repair of defective parts.
There are no other express warranties. This
warranty does not apply where the equipment is
used, or installation performed, in any manner
contrary to California Sensor Corporation’s
specifications and instructions, nor where equipment
is altered, modified, misused or neglected.
California Sensor Corporation is not liable for
indirect, incidental or consequential damages in
connection with the use of equipment, including but
not limited to, vegetation loss, property damage or
personal injury from installer’s negligence.
m aking water work
since 1986RR-TRAN USERS GUIDE ®
NOTES
__________________________________________ __________________________________________
__________________________________________ __________________________________________
__________________________________________ __________________________________________
__________________________________________ __________________________________________
__________________________________________ __________________________________________
__________________________________________ __________________________________________
__________________________________________ __________________________________________
__________________________________________ __________________________________________
__________________________________________ __________________________________________
__________________________________________ __________________________________________
__________________________________________ __________________________________________
__________________________________________ __________________________________________
__________________________________________ __________________________________________
__________________________________________ __________________________________________
__________________________________________ __________________________________________
__________________________________________ __________________________________________
__________________________________________ __________________________________________
__________________________________________ __________________________________________
__________________________________________ __________________________________________
__________________________________________ __________________________________________
__________________________________________ __________________________________________
__________________________________________ __________________________________________
__________________________________________ __________________________________________
__________________________________________ __________________________________________
__________________________________________ __________________________________________
__________________________________________ __________________________________________
__________________________________________ __________________________________________
__________________________________________ __________________________________________
__________________________________________ __________________________________________
__________________________________________ __________________________________________
__________________________________________ __________________________________________
__________________________________________ __________________________________________
__________________________________________ __________________________________________
__________________________________________ __________________________________________
__________________________________________ __________________________________________
__________________________________________ __________________________________________
__________________________________________ __________________________________________
®
2075 Corte del Nogal, Suite P, Carlsbad CA 92011
1-(800)-572-8608 FAX: 1-(760)-438-2619
www.calsense.com
Stock Number: PG3-RR-TRAN-D2 Rev. 07/06
m aking water work
since 1986You can also read