Columbia Law School Configuration Manual - For Mac OS X (10.6 & 10.7) (English Language Only)
←
→
Page content transcription
If your browser does not render page correctly, please read the page content below
Columbia Law School

  Configuration Manual
              For
      Mac OS X (10.6 & 10.7)
      (English Language Only)

       Information Technology
              Contents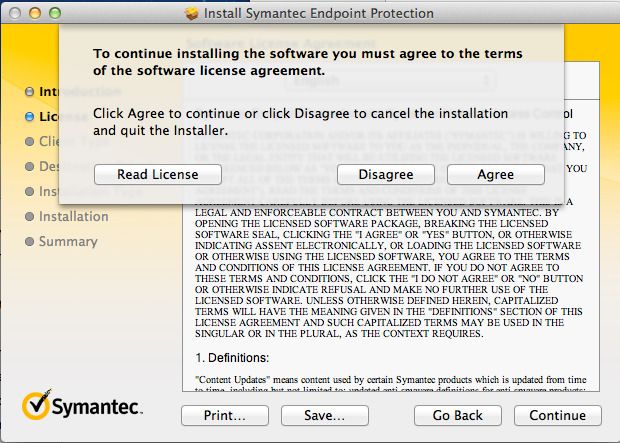
Contents

Important Note on Columbia University’s Networks .......................................................... 3
Introduction and System Requirements ................................................................................. 4
Registering Your Macintosh .................................................................................................... 5
Setting Up Automatic Macintosh OS X Updates ................................................................. 9
Installing and Configuring Symantec Anti-Virus .................................................................. 11
Adding the Student Network Drives to your Macintosh ..................................................... 15
Adding Columbia Law School Network Printers to your Mac ........................................... 17
Configuring and Connecting a VPN (Virtual Private Network) ........................................ 21

APPENDIX A: Wireless Coverage Areas At Columbia University................................. 23
APPENDIX B: Notebook Support Policy ............................................................................ 24
APPENDIX C: Obtaining Notebook Support ..................................................................... 25
APPENDIX D: Accessing G/H Drives on the Web .......................................................... 26

                                                                  2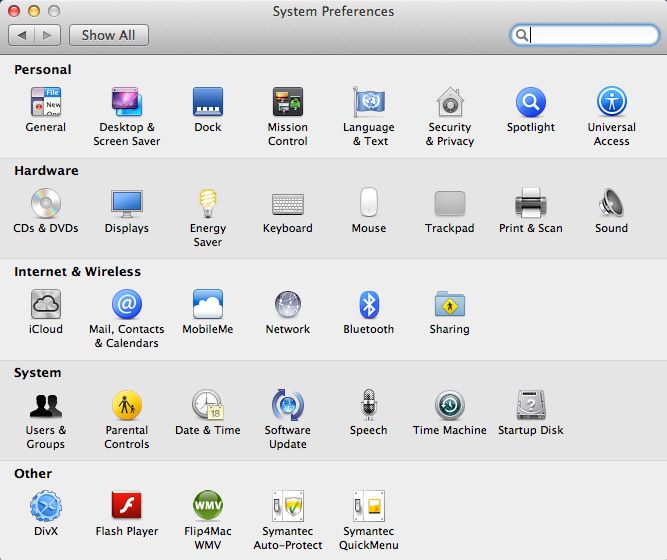
IMPORTANT NOTE ON COLUMBIA UNIVERSITY’S
                  NETWORK
If you arrive with an infected Macintosh, or if it becomes infected after you’re here, you may lose access to
the Internet until you clean it up. This can take hours, endanger your personal documents, and require you
to re-format your hard drive and re-install your operating system and all your applications from scratch.
Although the Law School IT department is here to help you should it be necessary, it’s up to YOU to take
the necessary precautions to secure your Macintosh. The checklist on the previous page and the instructions
for implementing some of these checklist items on the following pages are there to help you avoid becoming
infected and being consequently blocked off the network.

In addition, please note that you may also be blocked by CUIT (Columbia University Information
Technology), the University IT department at-large, should you connect to the University networks
immediately outside of the Law School with an infected Macintosh. You can still come to us at the Law
School IT department for assistance in getting back on the network at any time.

                                     NOTE ON SUPPORT
This document is intended for configuring a Macintosh running English-language versions of Macintosh
OS X Leopard only.

The Helpdesk at CLS-IT supports connectivity to the CLS and CUNIX networks only. This includes
connecting to the Law School network and/or dialing into the University. The Helpdesk does not provide
support for applications, operating systems, hardware, or other Macintosh issues. If your Macintosh
experiences hardware and/or software problems, contact your vendor/manufacturer for support.

Please be advised that the Helpdesk does not perform hardware/software installations. Students must
perform hardware/software installation(s) themselves as per the manufacturer’s instructions. If you
experience problems during installation, contact your vendor/manufacturer for support.

                                                     3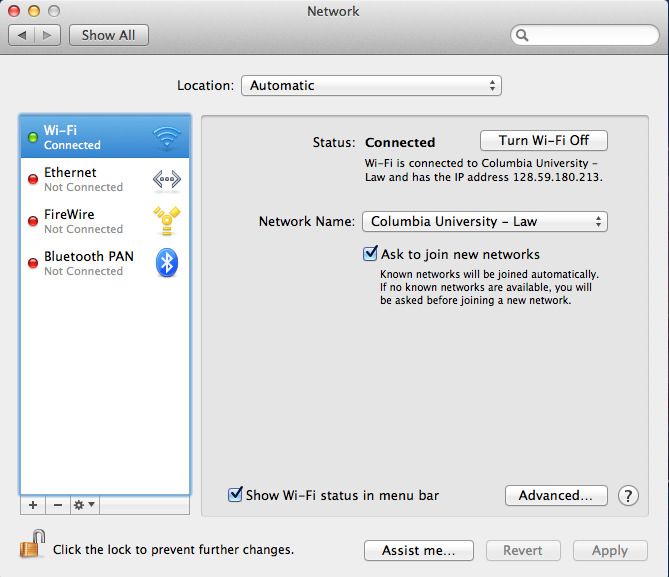
Introduction
This manual will guide you through:

    1.   Connecting your Macintosh to the Columbia Law School (CLS) network using a wired and/or wireless-Ethernet card.
    2.   Connecting your Macintosh to the Columbia University network (CUIT) using a dial-up modem and/or wireless-
         Ethernet card.
    3.   Connecting your Macintosh to the CLS High-Speed Network Printers using a wired and/or wireless-Ethernet card.

                                         System Requirements
To connect your Macintosh to both the CLS and CUNIX networks, you must have the following:

    •    A valid CLS network account
    •    A valid Columbia University Information Technology (CUIT) network account
    •    A Macintosh running at least Macintosh OS X Leopard 10.5

For wired-Ethernet connections, you will also need:

    •    An Ethernet cable
    •    A live Ethernet jack at the Law School
    •    An Ethernet enabled port on your Mac

For wireless-Ethernet connections, you will also need:

    •    An Airport card
    •    To operate your Macintosh in a designated wireless area.
         For a list of CUIT wireless coverage areas see page 34.

                                                              4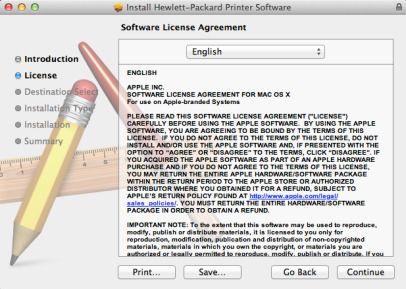
Registering Your Macintosh
The CLS Information Technology Department provides and maintains a high-speed Ethernet network. Before you can connect
to this network, you must:

                   1.   Collect information about your Macintosh.
                   2.   Register your Macintosh on the CLS network.

To do this, follow these instructions:

Step 1:            Collect Information About Your Macintosh

         1.   Please click on the “Apple” icon located
              at the top left of the screen. Please select
              “System Preferences”.

         2.   Click on the icon labeled “Network”
              under the “Internet & Wireless” section.

                                                              5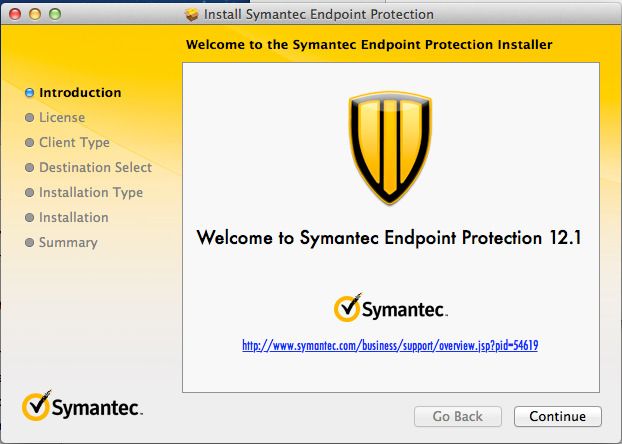
3.   Click on “Ethernet”
     NOTE: If you have a MacBook Air or
     MacBook Pro w/ Retina Display, you may
     not have this. You can skip to step 7.
4.   Please click on the button labeled
     “Advanced”

5.   Please click on the tab labeled
     “Hardware”

6.   Write down the “MAC Address” into the
     section allotted for you in step 10.

7.   Please click on Wi-Fi.
8.   Please click on the button labeled
     “Advanced”

9.   Please write down the Wi-Fi Address in
     the space allotted below

10. Enter the Ethernet ID here:               __ __ : __ __ : __ __ : __ __ : __ __ : __ __
11. Enter the Airport ID here:
                                              __ __ : __ __ : __ __ : __ __ : __ __ : __ __

12. Enter your Manufacturer here:
                                                          Apple___________

13. Enter your Apple Model here (e.g.
    MacBook Pro, MacBook Air, etc.):          __________________________

                                                  6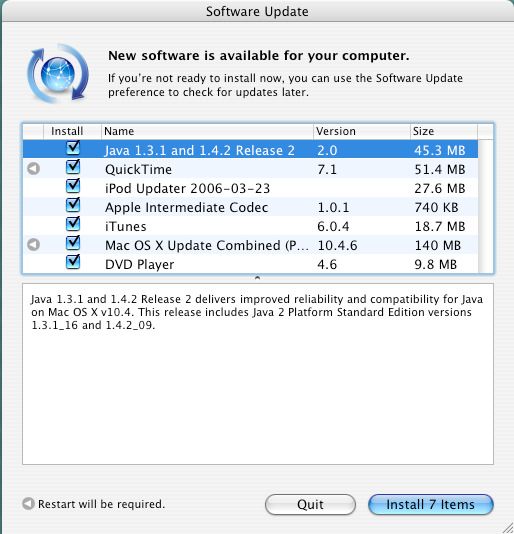
Step 2:           Register Your Apple In Lawnet
Note:   This step must be performed on a Computer with a live internet connection.

        Since you cannot access the Internet from your Macintosh through the Law School network until this
        section is completed, we recommend the following methods to connect:

                             •     If you are attending a notebook configuration session, use one of the notebooks provided by the
                                   IT department.
                                   OR
                             •     Use any Columbia Law School lab Computer or email kiosk Computer.

        1.   Go to the following website.                        www.law.columbia.edu/lawnet

        2.   Click on the “Sign In” button on the far right
             hand side of the web page. On the following page,
             Enter your Law School User Name and
             password, and then click Login.

        3.   Click on the “My Services” tab to expand the
             dropdown menu. A menu will appear, and you
             should select “Register Ethernet Card” from the
             “Information Technology” heading.

        4.   You will need to refer to page 13 for the
             information being requested.

        Card Address: This is the Physical Address you
        recorded in Step 10, on page 13. Enter the 12
        characters WITHOUT the dashes.

        Operating System: Select Lion.

        Workstation Manufacturer: Enter “Apple”

        Workstation Model: Enter the information for
        Step 13, on page 7.

        When you have entered all the required information,
        click Register.

                                                                    7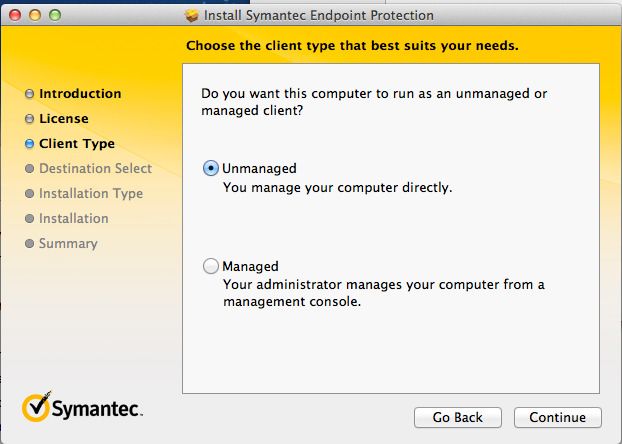
5.   You will see this confirmation screen if successful.
6.   Click View Current Registration
7.   Check to make sure that the Card Address
     you just entered matches your Physical
     Address. If you have made a mistake, check the
     box next to the Card Address and press
     Delete. Repeat step 4, on this page and
     correctly enter your information.

8.   If you have a second Physical Address you
     need to register, click Register New Card.
9.   Repeat Step 4, on page 10, entering the
     second Physical Address on page 9.
10. Once all your Physical Addresses have been
    registered, click the Sign Out button and
    proceed to the next page.

                                                            8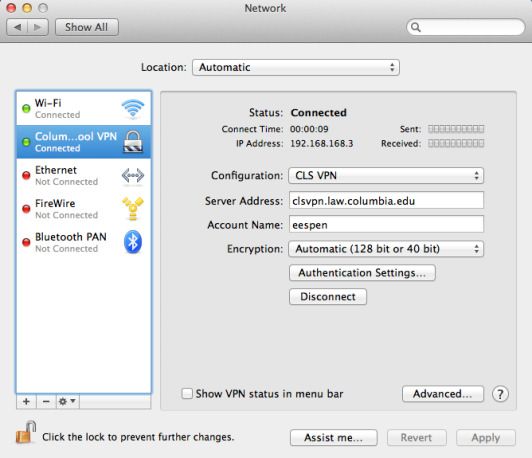
Setting Up Automatic Apple OS X Updates
IMPORTANT: These instructions will guide you through the process of setting up Macintosh OS X to download
Critical Updates automatically. These updates will be downloaded silently in the background while you work, as they
become available. When the downloads are complete, Macintosh OS X will notify you that they are ready to install.
Please DO NOT WAIT to install the updates at a later time. Many of today’s viruses and worms are created to exploit
the vulnerabilities in Macintosh OS X that these Critical Updates address. Failure to install these updates when they
are ready will leave your Macintosh prone to hackers and viruses which neither Symantec Anti-Virus nor your Firewall
will be able to block.

    1.   Please click on the “apple” icon in the top left hand
         corner.
    2.   Click on System Preferences.

    3.   In the System Preferences window click on the
         icon labeled Software Update, located near the
         bottom of the window.

                                                                 9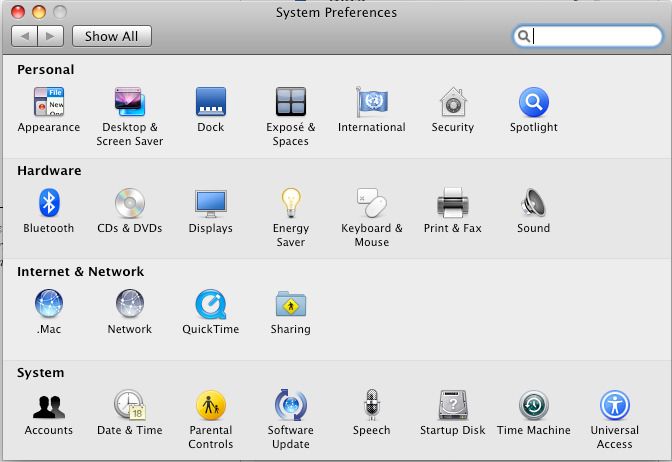
4.   Make sure that Check for Updates is checked.
          The frequency is Daily. Macintosh OS X will know
          to automatically download any updates it finds on the
          server as soon as you turn your machine on and are
          connected to the Internet.

     5.   When the Updates are ready to install, you will see a
          notification like the one pictured to the right, telling
          you that updates are ready to be installed. Simply click
          once on the “Install Items” button to begin
          installing the updates. In most cases, you will be
          required to restart the Macintosh to finish installing
          the updates. We, therefore, recommend that you save
          all your work prior to clicking on this notification and
          beginning the installation.

NOTE: As Critical Updates are meant to address
vulnerabilities in Macintosh OS X that are often found as a
result of new viruses and worms that aim to exploit them, there
may be periods in which Critical Updates seem to come out
everyday, while other times you may go for a few weeks before
seeing an update available. This is normal – just be sure to
install them as they appear.

                                                                     10
Installing Symantec Anti-Virus
Please Note: If you already have Anti-virus Currently Installed, you may continue to use your
antivirus as long as you keep it updated.
IMPORTANT: Columbia University provides a version of Symantec Anti-Virus available free of charge to Columbia
Students. Please be sure to follow these instructions while connected to the Internet. You will need the connection in
order to download the program and to update it once it has been installed. ALSO, please be sure to UNINSTALL any
previous version of Symantec/Norton Anti-virus or any other Anti-virus program on your Macintosh before you
proceed. We encourage you to consider using the University’s version (below) which will never require a subscription
fee. Instructions for removing prior versions of Symantec can be found at www.symantec.com.
1. Please click on Safari, Safari is located on the dock
(at the bottom of the screen).
2. Please type the following address into the address bar:
http://www.columbia.edu/cuit
3. Under the heading for “Services & Resources for the
CU Community”, look for the link for Software
and Downloads and click it.
4. In the next page, under “By Type,” click on
Computer Security.
5. Locate the link for Symantec Antivirus and click
it.
116. Click on the link for SEP 12.1 for Mac OS 10.5 –
10.7.
*IF YOU HAVE 10.8 Mountain Lion, DO
NOT CLICK THAT LINK. It will NOT work
for your Operating System.
7. You will then be asked to put in your UNI and
password. Please enter this information and then
click “Log in”. The UNI is the ID given to you by
the University when you first entered the school. It is
the same login and password you use to login into your
Columbia e-mail account.
8. After you click “Log In”, the file should automatically
download and save to your Downloads folder under the
name SEP_MAC.
9. After opening the folder, click on “Symantec
Endpoint Protection.dmg and once it
loads, click on “Symantec Endpoint
Protection.mpkg”
10. You will see a window that will check to see if
your computer can run the software. Click
“Continue.”
1211. You will then see the following window entitled
Install Symantec Endpoint Protection. Please
click on "Continue".
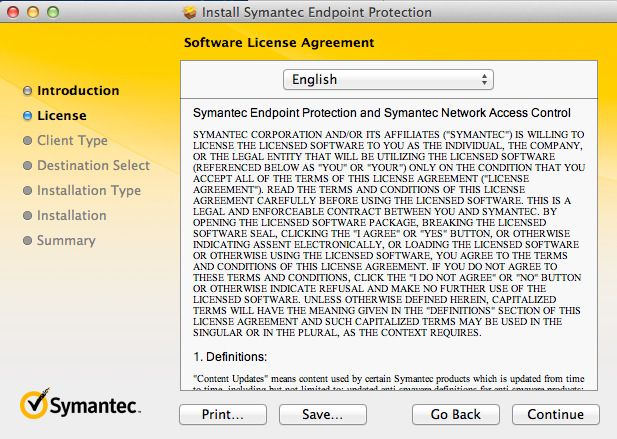
12. Next you should see a window for the Software
License Agreement, please select "Continue".
13. Next you should see a window asking you to
confirm if you agree with the terms of the License
agreement., please click “Agree.”
14. Next you will see a window that asks you what
type of client you will be running. Click “”, then
click “Continue.”
1315. You will now see a window entitled “Standard
Install on Macintosh HD”. Please “Install” to
proceed.
16. Next you will see a password authentication screen,
please enter your computer account password and
click on "Install Software".
17. You will now see a window that informs you
installation of this software requires all applications
to be closed, and you will be logged off upon
completion. Please click on "Continue
Installation".
18. You have successfully installed Symantec
Antivirus.
19. Once you Log Out and Log back on, Symantec
will automatically update the software using
“LiveUpdate.” After it finishes, click on the
“OK” button to close out of the window.
14Adding the Student Network Drives to your Macintosh
Please remember that access to your Network drives is only available while inside of
one of the Law School Academic Buildings unless you are using VPN to connect.
1. Please click Finder, and then click on
“Preferences”.
2. In the window that appears, be sure that
“Connected Servers” is checked. Once done,
you can close the window.
3. Now you will click “Go”, then “Connect to
Server”.
4. Please type the following path for access to your student G
drive:
smb://lawsrv3.law.columbia.edu/Groups
*Then click the + sign in order to add this address to
your favorite connections, just in case you lose the Alias
on your Desktop.
155. You will now click “Connect.” When prompted in the
dialogue box, the following should be what you will fill in to
complete your access to the drive:
Username: LAW\YourLawNetUsername
Password: YourLawNetPassword
NOTE: Where it says “Your Lawnet Name Here”, you
should enter your own Lawnet name.
Click the check box to remember the Username & Password
in your Keychain, and click OK. You should now see your G
drive folder.
6. For access to your student H drive, please type:
smb://lawsrv4.law.columbia.edu/students
7. Please click on the + sign to add this to your favorites, and
then press the “Connect” button.
(Repeat step 5 from above for your username and password in order
to authenticate with the Law School network.)
8. To make the Alias (i.e. Shortcut) to the G/H drives, you
will need to right click the “Groups” drive, and click on
“Make Alias”
9. A shortcut should appear, and you can rename it to
something more familiar, such as “G Drive”.
10. You will repeat these steps for the “Students” alias, and
you can rename the alias to “H Drive.”
16Adding CLS Network Printers to Your Mac
IMPORTANT: Columbia Law School has several network printers in Jerome Greene Hall for use by its students.
These printers are located on the 3rd Floor inside of the computer lab (directly across from the Library), the 2nd floor
inside of the Library (enter the Library and go downstairs), and the 4th Floor of the Library (enter the Library and go
upstairs). These printers are labeled: GRHL_3FLLAB, GRHL_216LAB, and GRHL_4FLCR, respectively.
1. You will first need to download the HP Printer drivers
from the Apple website by visiting:
http://support.apple.com/downloads
2. You may search for “HP Printer Drivers”, and once
you find them, you can begin downloading them.
3. After the download is complete, you will be able to
install the software. Double click the file
“HewlettPackardPrinterDrivers.dmg” from your
downloads folder to unpack the file.
4. You will then see a window pop up, and you will need
to launch the file
“HewlettPackardPrinterDrivers.pkg”.
5. When the package launches, you will be greeted with a
Welcome window. Click “Continue.”
6. You will now see a License Agreement window. Click
“Continue”.
7. You will be asked to confirm your agreement of the
License Agreement. If you agree to the terms, click
“Agree.”
178. The next window that should appear will inform you
how much space will be required by the installation.
You can click “Install” to proceed.
9. You will be prompted to enter the password for your
computer in order to proceed with the installation.
Enter your password, and click “Install
Software.” Because of the size, the installation may
take a couple of minutes to complete.
10. Once completed, you can click “Close” to close the
installer.
11. Once the drivers have been installed, you can proceed
to adding printers by clicking the Apple icon, and then
“System Preferences,” then on “Print &
Scan.”
12. In the window that appears, click on the “Plus” sign,
then the “Windows” icon.
1813. Select “Law”, then when the second column
populates, select “LAWPS4”.
14. You will then be prompted to log in using your Law
School username and password. Similarly to the G/H
drives, you will enter your username as
“LAW\Username”. For added convenience, you can
also check “Remember this password in my keychain”
so you won’t have to enter it in the future.
15. From there, you will select the lab printer you wish to
add. In this case, “GRHL_3FLLAB” will be the
first printer you will add.
16. Once selected, click the menu for “Choose a
Driver or Printer Model”, then on “Select
Printer Software.”
17. To shorten your search time, you may type in “HP
Laserjet 9050” in the box that says “Filter.”
18. You will select the option for “HP Laserjet 9050.”
Click “OK” to proceed.
19. To add this printer to your list, you will now click the
“Add” button on the bottom right of the screen.
1920. Your computer will now begin configuring the printer
for you.
21. Finally, you will see a window with additional options
for the printer. Be sure to check the boxes for “2000-
Sheet Input Tray (Tray 4)” and “Duplex
Unit”. Once this is done, you can click “OK” and
you should now see it on your list of printers.
NOTE: To add the printers GRHL_216LAB and
GRHL_4FLCR, you will just have to follow Steps 12-21,
and replace GRHL_3FLLAB with the printer you are looking
to add.
20Configuring and Connecting a VPN (Virtual Private Network)
1. Click on the Apple icon in the top left
hand of the desktop, please select "System
Preferences".
2. Click on the "Network" icon listed
underneath the "Internet &
Wireless" Heading.
3 .In the bottom left-hand corner, click
on the + sign, located above the lock.
*NOTE*(If the lock is locked, please click
it to unlock it, and type in your
Administrator name and Password in order
to continue making changes.
4. A new window will open. Please select
“VPN” as the interface, and VPN type
as “PPTP” You can make the Service
Name “Columbia Law School VPN.”
5. Click on “Create” and then the window
will close.
216. Click on the box for “Configuration”
and then on “Add Configuration”. In
the window that appears, type “CLS
VPN” and click “Create”.
7. In the Server Address field, type in
“clsvpn.law.columbia.edu.”
8. Under Account Name, type in your
Law School username. (e.g. eespen).
9. Click on “Authentication Settings,” and
in the password field, enter your
Lawnet password. Then click OK.
10. Now click on “Adavanced,” and in the
window that pops up, check the box
for “Send all traffic over VPN
connection.” Then click OK.
11. Now click “Connect,” and you should
be able to connect to the Law School
network via your VPN connection.
22APPENDIX A: Wireless Coverage Areas At Columbia
University
If you are not in one of the Columbia Law School buildings, but you are on the Columbia University main
campus, you can use your wireless-Ethernet card to connect to the internet if you are in any of the following
areas:
Indoor Wireless Coverage
• Butler Library 203, 306, 214A Snack/Study
Lounge, 5th Floor West Wing, 522-523
• Butler Library Stack Levels 10-11
• Hamilton classrooms 301-304,309,702-703
• Altschul classroom (417 IAB)
• Low Library: Faculty Room, Trustees Room,
West Wing Floors 1-4
• IAB 6th floor snack lounge, IAB GSAS 5th
floor study carrels
• IAB 5th floor Economics Lab, IAB
Classrooms 403, 410, Lehman Library
• CUIT Computing Helpdesk -- 102 Philosophy
• CEPSR Floors 6, 7, 8
• Lerner Hall -- Roone Arledge Auditorium &
Cinema, Satow Conference Room
• Lerner Hall -- 5th Floor Conference Rooms
(501,555)
• Lerner Hall -- 2nd Floor Ramp Lounges and
Piano Lounge
• CEPSR Lobby/Davis Auditorium
• Hartley 109
• Carleton Lounge (Mudd)
• 233 Mudd
• Watson Library (Uris Hall)
• Journalism Floors 5, 6, 8
• Lewisohn General Studies Lounge 308, 1st
Floor, 4th floor
• Engineering Terrace 351,382,389 -- BioMed
Engineering Labs
• 301 Philosophy student lounge
• 251 Engineering Terrace - Sun Lab/Gussman
Lab
• Miller Theater
• Columbia Libraries -- East Asian, Psychology,
Geology, Engineering, Mathematics,
Arts/Music, Biological Sciences, Chemistry,
and Physics/Astronomy Libraries
• 7th Floor Havemeyer Student Lounge
• 328 Havemeyer
• Hogan Hall B-Level (Columbia Earth Institute)
23APPENDIX B: Notebook Support Policy
The Information Technology Helpdesk at Columbia Law School maintains the Notebook Support Policy outlined
below. In brief, we provide:
• Support for problematic connections between notebook computers and the Law School network
• Detection and removal of viruses, worms, and dangerous spyware that attempt to get into your system
Within this framework, we support a core set of hardware and software. For purchasing advice, see the TechBrief
entitled Computer Purchasing Advice for Students.
The Helpdesk will make every effort to support network connectivity for computers meeting ALL of the following
requirements:
• Supported notebook computers:
Any Windows-based notebook computers (such as Dell, IBM, Toshiba, etc.) and Apple notebook computers
running Snow Leopard (10.6), and above. BootCamp for the Apple OS (a program designed by Apple to allow
the Mac to run Windows and the Apple OS) can be used by the student, but will not be supported or installed by
Columbia Law School IT.
• Supported Ethernet adapters:
Any make or model
• Supported Wireless adapter:
Any make or model that supports the 802.11g/n wireless networking standard
• Supported Operating Systems (English versions only): Windows XP Professional, Windows Vista Business and
Ultimate, Windows 7 Professional and Ultimate, and Mac OS X Snow Leopard or later.
• Unsupported Operating Systems:
Windows Vista Home Basic and Home Premium, Windows 7 Home Basic and Home Premium, any version of
Windows older than XP Service Pack 3, Linux, Unix, any Mac OS previous to Leopard are NOT supported.
• Students are required to configure their computers themselves, using the Columbia Law School Internet
Software Configuration Manuals
• For students experiencing problems with connectivity and/or computer virus infection, a Helpdesk Support
Specialist will be available during Helpdesk walk-in office hours. Helpdesk walk-in office hours are Monday
through Friday, from 9:00 am to 5:00 pm.
• The Helpdesk Support Specialist troubleshoots failed installation routines. The Helpdesk Support Specialist
does not perform initial installations (students must perform PC Card installations themselves using
instructions supplied by the PC Card vendor).
• The Helpdesk Support Specialist supports connectivity and computer virus infection only. This includes
connecting to the Law School network or dialing into the University. The Notebook Support Specialist does not
provide support for applications, operating systems, hardware, or other issues.
• The Helpdesk Support Specialists will make every effort to support connectivity for any English version of
Windows XP Pro, supported Windows Vista versions, supported Windows 7 versions, as well as, Mac OS X
Snow Leopard and above. For further technical assistance, contact your notebook vendor.
24Appendix C: Obtaining Notebook Support
Obtaining Notebook Support
The Information Technology Department has identified two explicit categories of technical support into which all
student-owned computers fit. The following will help you determine which category your notebook falls into.
Full Connectivity Support + Full Antiviral Support
If you have:
• Any IBM compatible notebook computer or any Mac notebook computer
AND
• English Windows XP Professional, Windows Vista Business/Ultimate or English Mac OS X Leopard
AND
• Problems connecting to the Law School Network (Ethernet) or CUNIX (modem)
AND
• Any Ethernet adapter make or model
AND/OR
• Any Wireless adapter make or model that supports the 802.11b/g wireless networking standard
Then the IT Department will do everything it can to ensure your connection. For notebook connectivity support,
please visit the Helpdesk during walk-in office hours (Monday through Friday, from 9:00 am to 5:00 pm).
Vendor Support
If you have:
• Non-English Windows or Non-English Max OS X
OR
• An unsupported Operating System such as Linux, Unix, Windows NT, Windows 3.1, DOS, etc
OR
• A non-configured computer (i.e., your Ethernet card is not fully installed)
OR
• A computer problem other than CLS network connectivity
Then the IT Department CANNOT provide technical support. You are encouraged to contact your vendor or
manufacturer for all technical support.
If you are having problems with your hardware, operating system, software, or non-Columbia ISP (Internet
Service Provider) you are advised to contact your vendor, manufacturer, and/or ISP for all technical support.
25APPENDIX D: Accessing the G and H Drives on the Web
1. Navigate to:
https://remote.law.columbia.edu
*Please note the S in HTTPS. This is
important!*
2. You will be asked for your Law School login
and password. Unlike previous examples in this
manual, do not put LAW\ before your login,
here.
3. The initial view will show you a list of files currently on
your H Drive. The date files were last modified, the time,
and their sizes will appear to the right of the screen. Folders
will have yellow folder images beside them. The G
Drive and all its folders and files, can be found in the
Groups folder.
To download a file for editing/viewing: Click the filename.
To enter a folder to see its files: Click the folder.
To upload a file:
• Make sure you are in the correct folder where
you want the file to be placed.
• Click the “Upload” button.
• Click the Browse button. Locate the file on
your computer and double-click it.
• Once the file’s location appears in the text
box, press the Upload button. Wait a few
moments for the file to be uploaded and listed
in the list of files and folders, below.
• If you are replacing an old version of a file on
the G or H with a newer version from your
computer, you may be asked to overwrite the
file. Allow it do so, if this is what you want.
26You can also read