Computers for Beginners 6: Use Email on the iPad - Toronto ...
←
→
Page content transcription
If your browser does not render page correctly, please read the page content below
Computers for Beginners 6:
  Use Email on the iPad

                      March 2020 JA/DC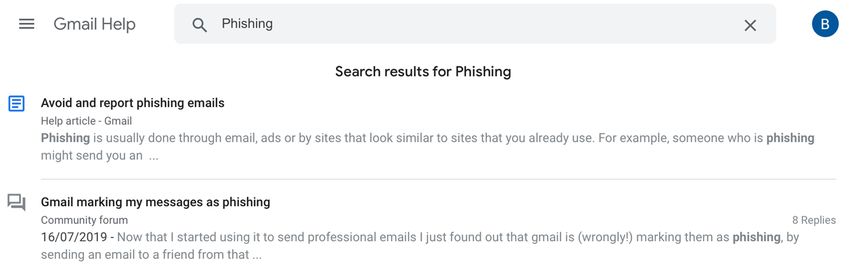
Learning Outcomes
In this class you will:
1. Learn how to Sign-in and Sign-out of a Gmail account
2. Learn how to
Read an email
Write and Send an Email
Reply to an email
Delete an email
Open or send Attachments
3. Review the basics of spam and phishing
4. Review additional resources to help you learn more
Note: Free email accounts may come with restrictions such as limited
features, storage limits, file transfer limits or advertisements.
Email on the iPad can look very different from the same email account
on a desktop computer or on your phone.
In this class we focus on the most essential features that are common
to all email services.
2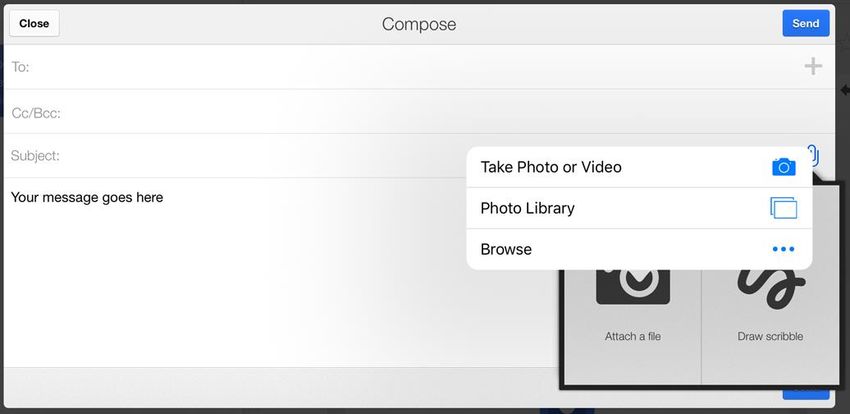
Why Use Email?
One of the most popular forms of communication today
You will need an email address to use most online services
Email is fast and cheap (once you have Internet access)
Send and receive email messages from anywhere in the world
Organize and save your emails into folders
Send one message to many people at the same time
Attach documents or pictures to your message and send via email
With Gmail, you get 15 gigabytes of storage space, across all your services
including Gmail, Google Drive and Photos
Access your email from your phone/tablet/PC or here at TPL
For most online services you will need to register with an email address
Gmail is a free web-based email service from Google. There are other services
such as Yahoo Mail and Microsoft Outlook (formerly Hotmail). We use Gmail for
our lessons because you can sign up without confirming your identity with a cell
phone.
If you have Internet access at home, or a data plan available on your phone or
tablet, you may have an email account already that was included with your
Internet Service plan (e.g. Bell, Rogers).
In today’s class you will be provided with a practice Gmail username and
password. This will allow you to log into an email account created specifically for
computer classes at the library.
If you wish to get your own email account, you will need to register with Gmail.
You can complete the registration process by making an appointment with library
staff through our Book-a-Librarian service.
NOTE: Many email providers want to send a security code to your cellphone to
confirm registration. They may also request a back-up email for use if you forget
your password. This is called 2-factor authentication.
ProtonMail does not require this additional verification, at this time, and is a
secure email system developed by a group from MIT and CERN.
Other services such as Yahoo mail, Hotmail, Outlook require authentication.
3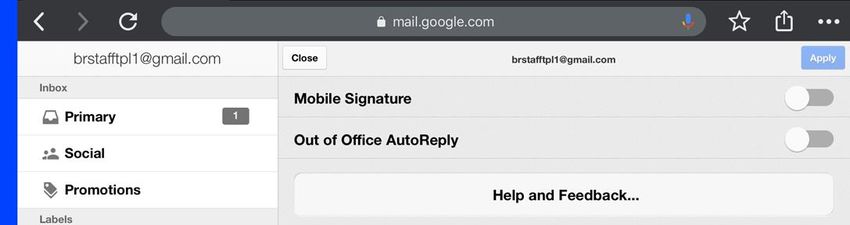
Exercise 1: Logging in to a Gmail Account

Does everyone remember how to connect to WiFi, Open the Chrome browser and
open an private Incognito window?
1. Connect to TPL Wi-Fi
2. Open the Chrome Browser App

3. Type in the address google.com/gmail
4. Type in your practice email name and tap Next
5. Type in your password and tap Next
6. Note: on an iPad you will be prompted to open the Gmail App, tap “I am not
   interested” We will use the browser app instead

                                        4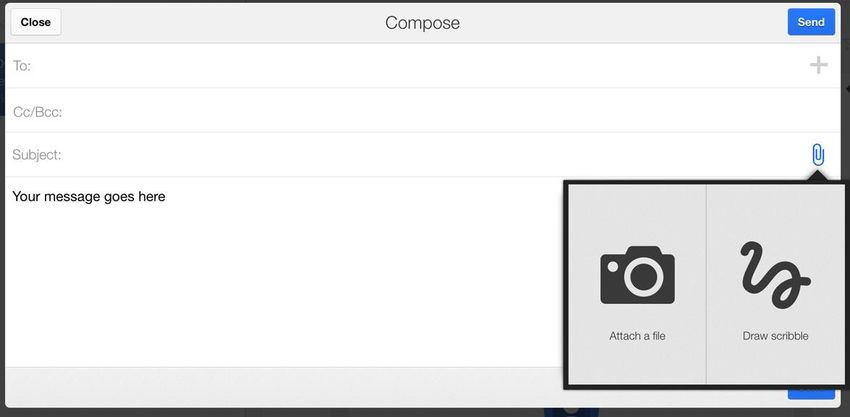
Exercise 2: Tour - The Inbox
Welcome to your Inbox! This is where all the new messages are delivered.
On this page you will see a list of emails you have received on the left.
And the email content is open and ready to read on the right
You can see:
who the message is from
the subject line
the date the message was sent
Date Name of sender Subject of email
5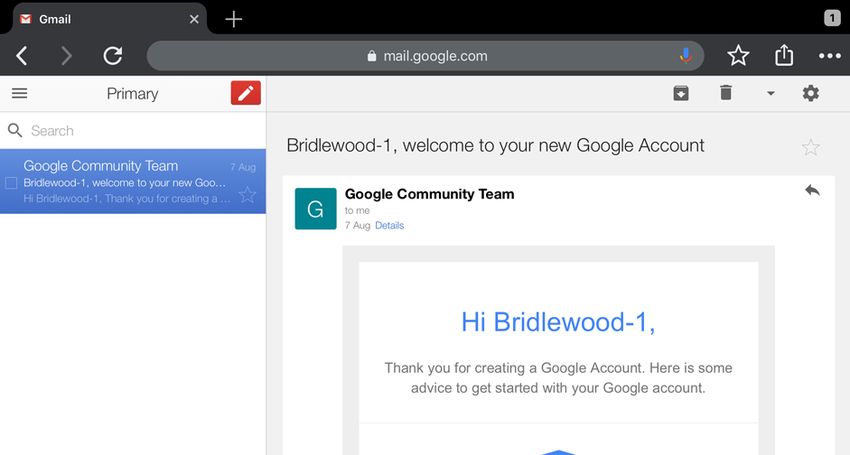
Other important tools
Compose – The Compose button is where you would tap to write a new
message to someone.
Archive - store your email in the archive to keep you Inbox clear
Delete –delete unwanted emails
Compose new email Archive email Delete email
6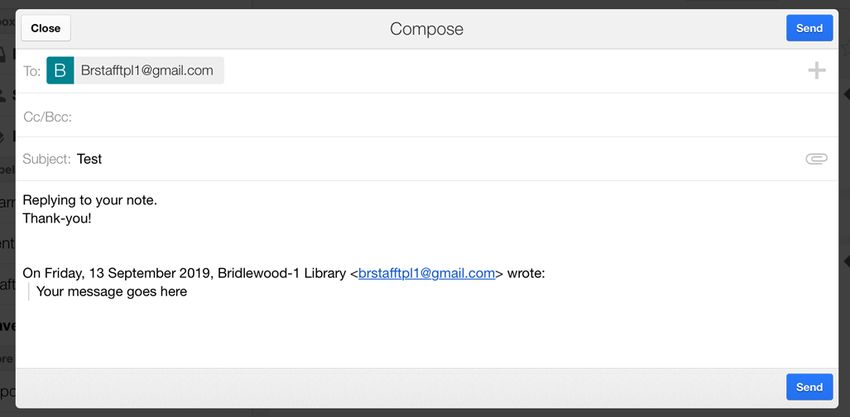
Tour - Left Panel

  1. Tap on the 3 horizontal lines on the left to see all your hidden folders or
     labels. Fun fact: this 3-line menu is referred to as a “hamburger menu”!

                                        7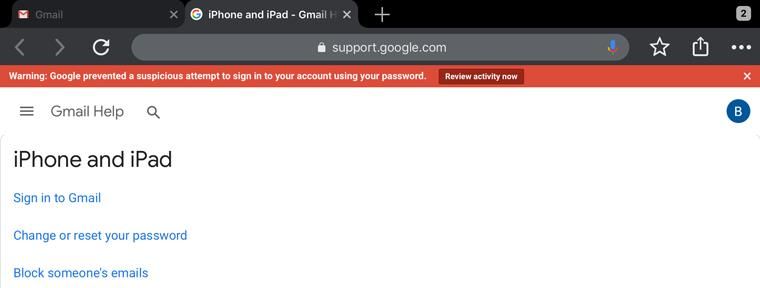
Your Inbox messages are automatically categorized into the following optional
categories, so that messages of the same type are grouped together:
Primary
Messages from friends and family, as well as any other messages that don’t
appear in other tabs
Social
Messages from social networks.
Promotions
Deals, offers, and other promotional emails.
Labels – Gmail comes with a number of useful folders which Gmail calls Labels:
Sent Mail
Drafts – as you type your email a draft is automatically saved.
Saved Email - The number to the right indicates the number of unread
messages you have.
Trash - deleted emails
Spam - unsolicited email
Explore these for a few minutes and get used to how they work
8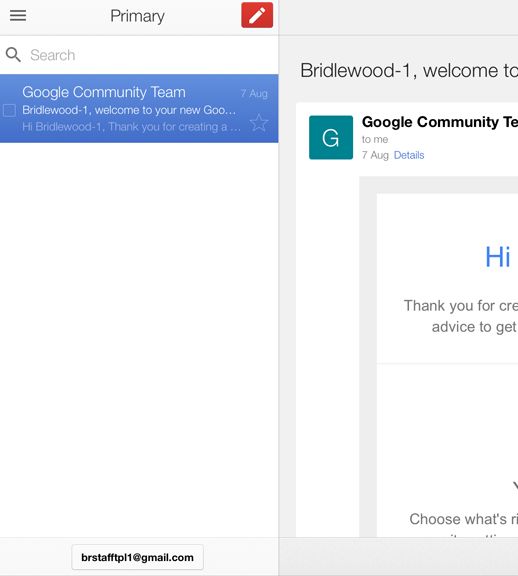
Exercise 3: Composing New Emails
Before you send an email to someone, you need to know their email address. It
should look something like this: username@emailprovider.com

1. Take the slip of paper with the Gmail username you were provided with at the
   beginning of the class and exchange it with a fellow classmate. You now have
   your neighbour’s email address!
2. Tap on the Primary Inbox.
3. Tap on the Compose button to send a new email.
4.    To - type the email address of the person to whom you are sending your
message. If you do not have a partner for this exercise, you can send an email to
yourself!

5. Subject - give your message a subject line or the title to your email. It can be as
   simple as “Hello.”
6. Message - Type your message.
7. Send – When everything looks good tap on Send.
8. A copy of your email will be saved to your Sent folder. Tap on Sent to see it.

                                          9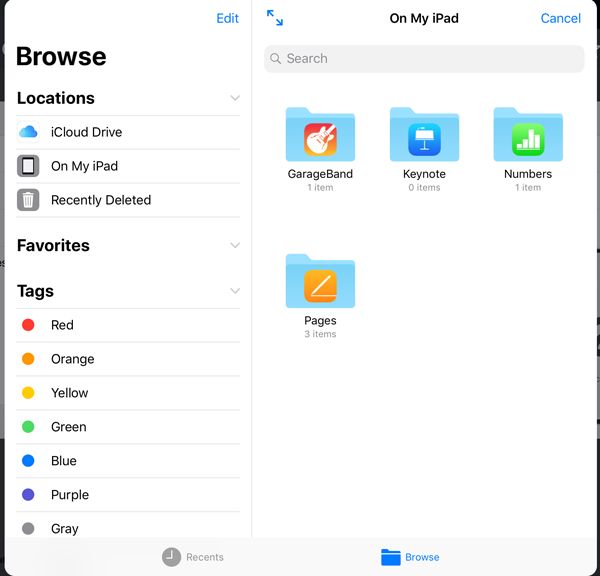
9. Drafts of your email are saved automatically. You don’t have to start over if
you run out of time.
Note:
Cc stands for Carbon Copy. You can address an email to one person in the To
field, and send a copy of the email to more people by tapping on Cc.
Bcc stands for Blind Carbon Copy. When you tap on Bcc and type email addresses
in that section, they are invisible to other recipients. No one else copied on the
email will see that others received the same message.
An example of how this could be useful: you are sending out a newsletter to 20
people but they don’t want to share their personal email address with anyone but
you, the editor. Put your mailing list in Bcc and protect everyone’s privacy.
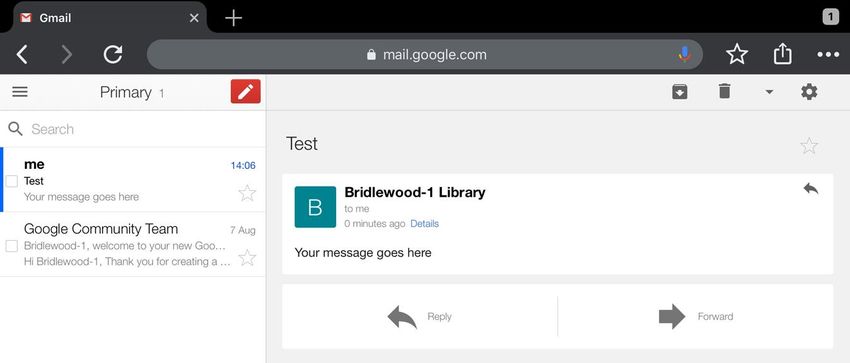
10Exercise 4: Reading and Replying to Emails
Now that you and your neighbor have sent each other emails you will have a new
message in your Inbox.
1. Tap once on your Inbox.
TIP: Your new mail will appear at the top of your inbox on the left. This is not
instantaneous – it may take a moment. You may even need to Drag down on the
inbox to “refresh” it.
2. Tap once on your message, if needed
3. Tap on Reply in the box below the email
114. A compose message window will open, and the flashing cursor indicates you
can start typing your reply. Write a short message to the sender.
You can see the original email below your new reply.
5. Forward You can also use the Forward command to share an email (and its
attachments with someone else.
TIP: The Reply All command will display as an option if multiple people received
the email and you want to reply to all of them.
12Exercise 5: Attach a File
A valuable email function is the ability to send photos and documents as
attachments. To attach a file (word document, excel file, photo, etc.,):
1. Tap on the paperclip symbol located in the Subject line, at the right.
2. On the iPad you have the option to attach a file or even draw words or a
doodle with your finger
3. Tap on Attach a File then you will see options to Take a photo, or go to your
Photo Library, or Browse (to Browse your existing files).
134. Try out one of the methods.
TIP: Be careful about attaching large files. Not all email accounts can handle them.
TIP: Attachments sent to you are denoted by a paperclip next to the item in your
inbox.
14Exercise 6: Deleting Email
Gmail has 15 GB of free storage space for your emails and other Google files. To
free up space you have the option of deleting your messages. Just tap on the
Delete button (Trash can icon).
Deleted messages are sent to the Trash folder for 30 days, then permanently
deleted.
TIP: If you receive unsolicited junk mail, you can report the messages as Spam by
tapping on the arrow next to the trash can and then tapping on the Spam button.
Check your Spam folder regularly to make sure that messages are not identified
as spam by mistake.
TIP: You can also delete multiple messages from your Inbox by using the
checkboxes, and then taping on Delete.
15Exercise 7: Using the Help Option
No matter what service or software you are using there is always a Help section.
Use it any time you get stuck or want to learn something new. It provides
excellent support and information.
1. To access Gmail Help, Tap on the Gear in the upper right corner of the
page. And Tap on Help and Feedback, then on Help.
2.
163. NOTE: a new Tab opened with a new address support.google.com. You can
use the Goggle Help site any time, not just when you are using Gmail.
4. Tap on the magnifying glass next to Search Gmail Help.
5. Let’s search for the topic: phishing by typing the keyword in the Search
Help box and press Enter.
6. Results include articles with detailed information or links to forums where
people exchange information and tips. For more information on Email
Security see Appendix 1
7. Close the Tab by tapping on the X
17Exercise 8: Sign-Out
Always log out of your email account when using a public computer or a shared
device such as these iPads.
1. Tap on your email address in the lower left corner of the Inbox or folder list.
2. Then Tap on Sign Out.
3. Close the Chrome Window by tapping on the X
18Appendix 1: Spam and Email Security
Spam Email, a type of Junk Email, are unsolicited emails that are sent to
individuals without their consent. These are commercial, sent in bulk and not
usually malicious. Gmail usually identifies Spam email and files it in your Spam
folder.
Spam emails may contain viruses and tapping on links or replying back to them
may allow the sender to access and retrieve information from your email account.
You will usually be able to identify them immediately by looking at the sender and
reading the email subject. It is best if you do not open Spam emails.
Phishing Emails are unsolicited, commercial and always malicious. These are
rarely filed in Spam as they appear to be legitimate.
They appear to be legitimate, can contain links to phony websites, often include
requests for money or donations, ask for personal information or passwords, and
use language which prey on people’s trust or which is urgent or threatening.
When reading emails and before replying or tapping on a link, ask yourself: “does
this sound too good to be true?” “Would my friend really email me and ask me to
buy a $300 gift card for her?” “Is it likely the police would contact me by email?”
Look at the details: is the email address correct? does the URL link match the
company name? Check the website of the company independently and phone
them directly to find out if the email is one they sent.
To see examples of clever phishing emails check out www.phishing.org
19Appendix 2: Email Etiquette
Email can be a fun and easy way to communicate. Here are a few things to keep in
mind when using email.
1. Know your audience – a casual tone is perfect if you are writing to a friend.
But if you are writing for business or official purposes use a more formal
tone consistent with how you would write a business letter
2. Read before you Send - Spelling, grammar and punctuation count,
especially with official or business emails. Proof read your email before you
send.
3. Subjects should be meaningful – if you are writing with a specific purpose
or for an event, use a clear and specific subject. It will help the recipient
find your email easily.
4. Keep it short – emails are not replacements for long chatty phone calls.
Choose the right tool for the job. Keep your emails clear and brief.
5. Tone – people can’t judge the tone of your email from the words alone. To
avoid misunderstandings, try not to be overly humorous or sarcastic.
6. Reply promptly - within reason, try your best to reply promptly within a
few days
7. Watch the size of your attachments – many email providers have a cap on
the file size of attachments sent and received – keep them small if possible.
8. DON’T SHOUT – the use of all caps is akin to shouting online.
9. Keep private matter confidential - always keep in mind that once you tap
on Send you no longer have control over the email. It can be forwarded to
other people by the sender. An old rule of thumb, which is still useful, don’t
put anything in an email that you wouldn’t want shared further.
10. Think before you Reply All – no one wants to read every little exchange if it
really has nothing to do with them.
20Appendix 3: Emoticons and Acronyms
Emoticons personalize your messages by adding the idea of an emotion. Here
are a few “facial expressions” you can create using characters from your
keyboard:
Happy :) or :-)
Sad :( or :-(
Surprised :o or :-o
Winking ;) or ;-)
Laughing :D or :-D
Tongue out :-P or :p
Acronyms are often used as typing shortcuts in informal communication. Here are
a few popular ones:
BFN = bye for now
BRB = be right back
BTW = by the way
FYI = for your information
HTH = hope this helps
IMO = in my opinion
J/K = just kidding
LOL = laughing out loud
OTOH = on the other hand
TTYL = talk to you later
21Appendix 4: Gmail Registration
You can register for a free Gmail account.
1. Type google.com/gmail into the address bar of your browser
2. Tap on Create an Account.
3. Fill out the registration form. The username is the start of your email address.
If someone else has taken the name you want, try adding another word or
number to make it unique, or choose one of Gmail’s alternate suggestions.
4. The password must be at least eight characters. You can use a combination of
letters, numbers, or other symbols on your keyboard. Ensure this is a password
that is easy for you to remember. Write it down and keep it safe if you need
to.
Do not use “password”, 12345, your birthday, your name, or your relative’s
name in your password as this will make it easy for others to hack your
account.
225. You can usually skip the mobile phone and current email address fields
because they are optional. However, they can be useful to add as they are
your backup security options if you forget your password in the future.
6. Complete Your Birthday and Gender.
7. Tap Next to complete the registration.
Where to Learn More
Online:
GCF Learn Email: edu.gcfglobal.org/en/topics/emailbasics/
About Phishing: www.phishing.org
Lynda.com
Lynda is a collection of high-quality instructional video accessible for free via the
library’s website: tpl.ca. You must be connected to the Internet and have a valid
library card to use this collection.
1. On the TPL home page, tap on the eLearning portal.
2. Tap on the link to Lynda.com and select Access Online.
3. Type your library card number and PIN in the boxes, Sign In and tap the
Continue button.
4. Use the top search box to find video classes, such as:
Gmail Essential Training, 2018
https://www.lynda.com/Gmail-tutorials/Gmail-Essential-Training/791338-2.html
23You can also read