Confidentiality Statement
←
→
Page content transcription
If your browser does not render page correctly, please read the page content below
Confidentiality Statement
This training program and its materials contain proprietary
 information, confidential information and business trade
    secrets and is the exclusive intellectual property of
  Safeguard Properties, LLC. Any unauthorized, copying,
  distribution or other use of this training program or its
               materials is strictly prohibited.

                 © 2011 Safeguard Properties LLC. All rights reserved.
  This material is confidential and may not be copied, used or distributed without the
                     written permission of Safeguard Properties LLC.
REO Recurrent Training
    Fannie Mae
    Expectations
Welcome Fannie Mae!

•   Increased Workload
•   Increased Expectations
•   Increased Visibility
•   Increased Accountability
•   Monthly Marketability Checks
•   Safety Hazard Checklist
Visibility

•   Safeguard FQC
•   Safeguard SQA
•   Fannie Mae Field Specialists
•   Fannie Mae 3rd Party Inspectors
•   Brokers
THE SAFEGUARD STANDARD

    The Safeguard Standard

• A property that is deficient free,
  hazard free, damages properly
  reported, and the property in a
  sales clean, marketable
  condition.
What are the Expectations?

• REO properties must be placed into marketable
  condition via an Initial Service Order
• Recurring work orders are completed to ensure
  the property remains in marketable condition –
  both interior and exterior
• Services completed to same standard
  regardless of condition of property “THE
  SAFEGUARD STANDARD”
• Demonstrate a high level of pride in
  workmanship - work done right the first time
• All completed within required timeframes
Expectations cont’d

• Where are we today?
  – Inconsistent
  – Incur costs to make repeated trips to properties to
    correct deficiencies
  – Leaving money on the table by not addressing bids
    and allowables

• Goals
  – Complete 100% of work within required timeframes
  – Address 100% of the items that require attention on
    initial services
  – Address 100% of the items that require attention on
    recurrent services
FNMA Services Time Frames

Initial Service
   • FNMA Properties are already secured by the Broker.
   • Contractors have 3 days maximum to complete all initial
     services
             • Trashout
             • Maid Service
             • Winterization (48 hours)
             • Grass Cut
             • Exterior Maintenance
             • Boarding
             • Safety Hazard Checklist (SHCL)
             • Condition Reporting
             • Quality Control Checklist (QCC)
Initial Secure

Securing FNMA Properties
•   Should be secured by broker
•   If property has not been initially secured, contact broker
•   If property unsecured due to vandalism, secure per REO pricing
•   Note: FNMA & BANA codes are the last four digits of the loan number.

Securing Outbuildings for FNMA Properties
• If found unsecured, secure per REO pricing
• Padlocks to be coded first 4 digits of the loan number

Securing Access Points for FNMA Properties
• If found unsecure, secure crawl spaces, utility access areas, attached
  exterior closets/storage areas, and animal access doors.
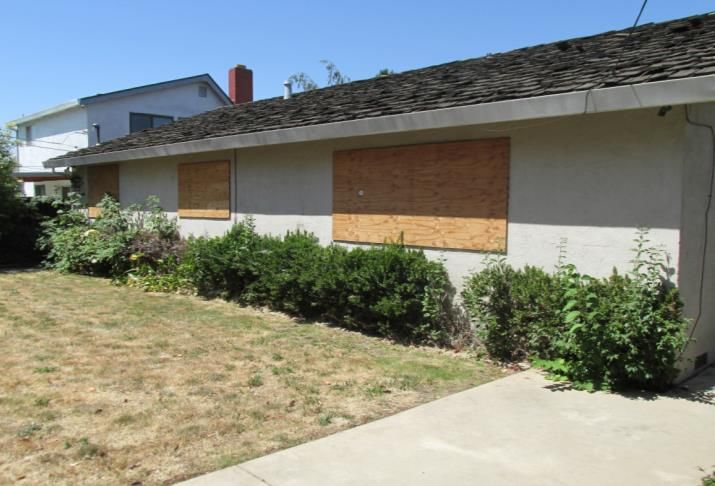
Bolt Boarding

• Do not board glass with
  small fractures - cover with
  clear tape
• Board when breakage
  exposes property to the
  elements
• Use plywood – do not use
  OSB
• Bolt-board only – no screw or
  nail boarding permitted
Improper Boarding

Why did these fail QC inspection?
Proper Boarding

• Remove broken glass
   – Inside frame
   – On ground outside
   – On floor inside
• Use two 2”x4” boards
• Single sheet of plywood –
  no OSB
• Use two bolts for each 2x4
• Follow the FHA Guidelines
  for bolt-boarding
SecureView

•   What is SecureView Clear Boarding?
•   Unique alternative to traditional boarding – installation of clear, polycarbonate board-up
    system
•   Gives appearance of traditional windows, yet secure and allows natural light
•   Secures the property without exposing its vacancy to onlookers

•   Benefits
•   Able to see into and out of the property
•   Withstands inclement weather (however not hurricane rated)
•   Secures property from the inside with no damage to the interior
•   Reduces blight and assists with stabilizing neighborhoods by reducing the stigma associated
    with seeing a boarded property
Traditional vs. Clear Traditional Boarding vs. Clear Boarding
•
                     FNMA Guidelines
    When to use SecureView:
•   At initial services, any property with any unsecured windows will have SecureView
    installed on the entire dwelling excluding the garage in all Clear Boarding states.
    CTG orders
•   We are not covering any intact openings
•   Use of Clear Boarding on sheds and outbuildings requires prior approval . Single and
    multi level units should be secured.
•   Missing exterior dwelling doors and garage doors should be boarded and painted the
    trim color of the property.
•   Retroactive properties only at clients request, New damage will be completed with
    SecureView .Existing plywood boarding stays on,unless there is a direct client
    request. Monthly Marketability Orders

•   When to Use Traditional Boarding:
•   If property is structurally unsound or has significant damage due to fire or other
    natural/unnatural causes.
•   Any property that exposes potential risks upon entering, i.e., meth labs, missing
    floors, etc.
•   If property has been identified for demolition.
FNMA Guidelines • Outbuildings, shed and detached garages will use traditional boarding unless noted. • Attached garage windows require clear boarding • If wood is used to frame an opening or to secure a door opening or outbuilding window, it should be painted to match the trim color of the house. Pricing can be found on the REO Pricing Model • No property is to ever be left unsecure . • Emergency –If boarding with plywood is necessary to secure property , the plywood will need to be replaced with SecureView in 72 hours.
Sump Pumps

• Report a sump pump on your update when one is present
  and if it is operable
• Utilities must be on when a sump pump is present

          Sump Pump              Sewage Ejector Pump
Trashout • Complete removal of all Interior and Exterior debris • All nails, picture hangers, hooks, screws and window covering hardware must be removed from walls and ceilings as part of initial services • Ensure property is clear of all; nests, cobwebs, spider webs, leaves, and brush • Leave neat wood piles only if broker approved • Remove compost/yard debris piles • Items left per broker request MUST be in writing and noted on update • Appliances NOT removed unless requested by broker
Trashout cont’d

• Leave detached interior doors, window screens,
  storm window glass, and removed window sashes
• Neatly stack these items in one location
• Broker approval not needed if they are usable and
  do not require repair
• If possible, re-hang interior doors
Trashout cont’d

• Remove pool equipment if no pool is present
   – Contact the broker to determine if these items should
     remain when the pool is on site
• Empty commercially owned trash receptacles/recycle bins
   – Place inside outbuildings or garages
   – Do NOT leave these items at the curb
• Leave useable building materials (neatly stacked) at the
  property if approved by broker
Trashout cont’d Personal Property • Garage sale value in excess of $500 for Fannie Mae • Fully photograph all rooms
CYD REO

  Photo Documentation Requirements
• Interior / Exterior
  – Photograph all debris in it’s original location
  – 1 (one) photo of a Placard for each location
     • Showing the entire room including the description placard
     • Placard should describe location of the debris and
     • Total number of CYDs in that location
        Example: Living Room, 10 CYDs
        Example: Rear yard, 10 CYDs
     • Use dry erase boards as placards
     • Need to be legible, complete and accurate
  – Provide additional photos to support debris count
  – Repeat the process, room to room
CYD REO
Photo Documentation Requirements
• Truck / Trailer / Dumpster Load photos are
REQUIRED
– A Before photo showing the empty
trailer/dumpster/truck and the house in the photo
– During photos of trailer/dumpster/truck must show the
house in the same photo (throughout the loading process)
– Photos of load intervals: ¼, ½, ¾ and Full
– Photo of the Measurement markers (in feet) must be
listed on the trailer/dumpster
– Photo of total load in truck/trailer/dumpster with placard
• Placard should list total number of CYDs for the loadBase Rate What’s not included in Base Rate: Reo Pricing Model • Oil • Tires • Maid Service • Locks • Winterization • Lawn / Shrubs • Boarding • Emergency allowable • Repair Allowable • Safety Hazard Checklist • Qualifiers
Base Rate

•   Light (7 CYD’s):
•   $250 + $150 for initial maid
•   Medium Light (10 CYD’s):
•   $325 + $150 for initial maid
•   Medium Heavy (13 CYD’s):
•   $400 + $150 for initial maid
•   Heavy (16 CYD’s): :
•   $500 + $150 for initial maid
•   30 yards:
•   $500 + $150 for initial maid
    + $27.50 for each yard over 30
Exterior Maintenance
• Exterior curb appeal is a year round concern
• Exterior curb appeal must be maintained even if
property is out of grass cut season
Winter Summer
Spring FallExterior Maintenance • Cut grass to height of 3” • Trim around foundation, fence, deck, porch, etc. • All pertinent areas are to be weed free (driveways, flower beds, sidewalks, etc.)
Exterior Maintenance

• Paved areas (sidewalks, driveways) are to be edged
• Cracks in paved areas must be weed wacked
• Remove all grass clippings from the lawn, sidewalks,
  and steps
• Sweep/blow all paved areas and entry ways

                                       Our Property
                                         (not properly edged)

                                          Neighbor’s Property
                                               (properly edged)
Exterior Maintenance • Trim shrubs and clean up clippings • Bid removal of overgrown tree limbs • Check roof and gutters for debris Note: Understanding client allowables is critical! FNMA has $100 allowable for repairing gutters and $400 for fence repairs FNMA Upgrade Package Recommendations: Landscape – upgraded landscape package Roof/Gutter – roof and gutter cleaning Exterior Window – cleaning of exterior windows
Exterior Maintenance Cut grass to height of 3” Trim around foundation, fence, deck, porch, etc. All pertinent areas are to be weed free (driveways, flower beds, sidewalks, etc.) Paved areas (sidewalks, driveways) are to be edged Cracks in paved areas must be weed wacked Trim shrubs and clean up clippings Remove all grass clippings from the lawn, sidewalks, and steps Sweep/blow all paved areas and entry ways Bid removal of overgrown tree limbs Check roof and gutters for debris Submit clear before, during, and after photos of work from all sides of property
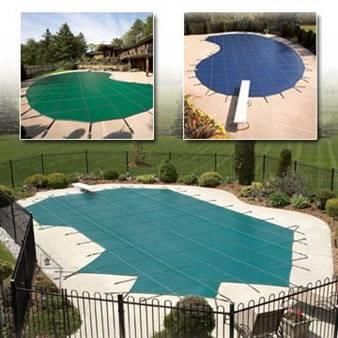
Safety Hazard Checklist

• Cut and dry – either complete or not
  complete
• Complete all Safety Hazard Checklist items
  for FNMA properties
• With exception of securing pool perimeter.
  Utilize the emergency allowable
Safety Hazard Checklist

When performing initial services on all Fannie
    Mae properties, the following items are
 common safety hazards that may be found.
     These issues should be addressed
  immediately, without bidding. It is further
    expected that the following hazardous
 conditions are monitored and addressed on
          ongoing services as well.
Safety Hazard Checklist Windows: Ensure all broken glass is removed. Cracks in glass must be taped with clear tape. Ensure all ground level windows are locked.
Safety Hazard Checklist Electrical/Gas Items: Replace any missing switch plates or outlet covers. Install any missing blank switch plates or blank outlet covers. Cap any exposed wiring. Install gas caps where needed with appropriately sized caps.
Safety Hazard Checklist Electrical/Gas Items (cont’d): Replace any missing, broken or non-functional light bulbs. Secure any loose light fixtures or ceiling fans. Roll loose cords and secure with tie.
Safety Hazard Checklist Electrical/Gas Items (cont’d): Secure all low hanging wires and cords. Install blank covers in breaker panel. Replace missing breaker panel cover (only if wires are exposed).
Safety Hazard Checklist Floors: Replace any missing floor registers or floor vent covers (if not a common size, board the opening) Tack down curled linoleum, torn carpet that is greater than 6” (cut excess and tape down) Board floor damage or open holes in floor. Remove carpet tack strips, staples and nails.
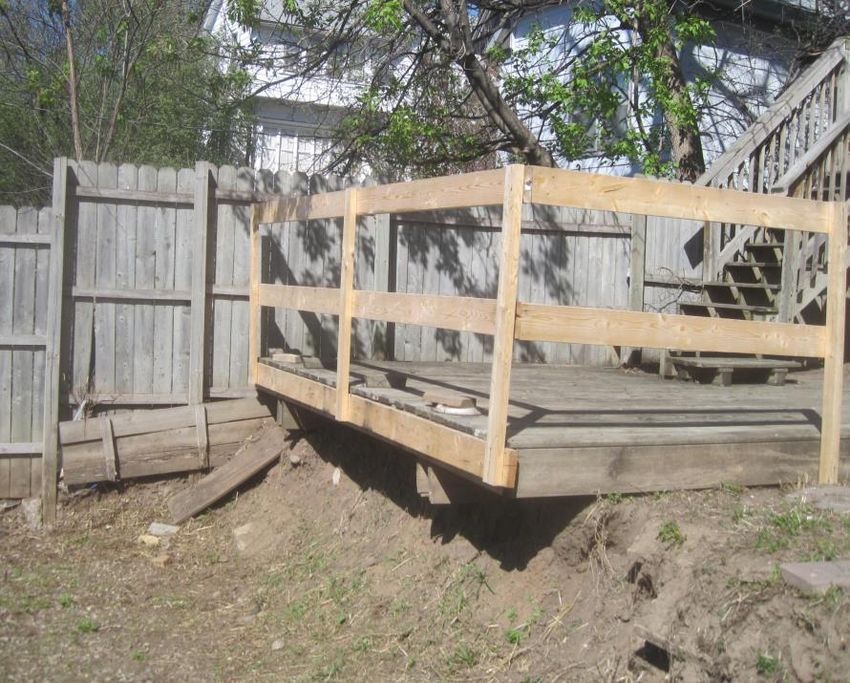
Safety Hazard Checklist Porch/Deck/Patio/Fencing: Repair or replace any missing or loose steps. Repair or Replace any missing or loose handrails. Repair or replace any floor damage. Re-secure any loose or raised fasteners
Safety Hazard Checklist Lawn: Fill any open holes in ground. Address any trip hazards (wiring or similar items at low level).
Safety Hazard Checklist Interior/Exterior Ceiling and Walls: Secure cabinets, cabinet doors, drawers and countertops that are loose enough to present a hazardous condition. Remove/ secure any hanging debris not securely attached to the wall or ceiling. Ensure all hooks, nails and/ or screws are removed from walls, ceilings and doors.
Safety Hazard Checklist Interior/Exterior Ceiling and Walls (cont’d): Ensure smoke detectors are present and operable. If not operable, replace according to local code. Replace all batteries as needed. If no Co detector present, install 1 per unit on the main floor Report any discoloration, the source, and submit bid to repair. If discoloration is greater than 100 contiguous feet, stop all work and contact Safeguard’s Vendor Management immediately.
Safety Hazard Checklist Interior/Exterior Ceiling and Walls (cont’d): Report any environmental issues or unusual conditions present at the property. Replace or secure all dryer vent covers. Cap all exposed water lines as necessary (refrigerator, washer/ dryer, dishwasher, etc.
Safety Hazard Checklist Pools/ Hot Tubs Ensure the parameter to a pool or hot tub is fully intact and secure. Submit a bid to drain, clean and refill pools. Submit a bid to install a safety mesh pool cover.
Safety Hazard Checklist

       Work must be completed properly
• Common Trends
  –   Handrails not secured to studs
  –   Improper gas caps installed and/or not tightened
  –   Exposed electrical wires not capped
  –   Outlet and switch covers not installed
  –   Missing/burnt out bulbs
  –   Chirping smoke detectors
• Exposes contractor to liability when not addressed
  or completed properly
Identifying When Railings are Needed
When?...
- Handrails: A handrail should be present on any set of steps that contains 3 steps or more.
Meaning, if you have to lift your foot 3 consecutive times to climb the staircase, a handrail must
be present. For instance, there may be only 2 steps leading up to an entrance door, but a 3rd
step must be taken to get over the threshold and into the property. This would require a handrail
(example pictured below).
- In regards to steps that are open on both sides, like the one pictured below, we should
only be installing one handrail, on the side of the door handle.
- Please Note: This guideline for handrails is independent of whether or not the steps
are at or above 24” in height.
- If less than 3 steps are present, no action will be required unless specifically requested.Identifying When Railings are Needed
- Guardrails: Guardrails should be installed when a fall hazard is present. A fall hazard is
defined as “a straight drop of 24” in height or greater”. Most common areas for meeting this
requirement are porches and second floor balconies.
- If a fall hazard of less than 24” in height is present, no action will be required unless
specifically requested.
Please Note: If you’re questioning whether or
not to install handrails or guardrails (for
example, on a high dollar home where it may
diminish curb appeal) you are required to
contact the broker from site. If the broker
does not wish to have railings installed, this
needs to be in writing from the broker and
uploaded to your work order.Required Materials for Installing Railings
How?
Required Materials
- Both handrails and guardrails for exterior use and unfinished areas inside the home need to consist
of Alkaline Copper Quaternary (ACQ) treated, wooden 2”x4”s. ACQ treated lumber should be used for
both interior and exterior applications. Never should any piece of lumber smaller than a 2”x4” be used
to construct a handrail or guardrail.
Handrails installed to finished, livable areas within the property need to be of wooden, handrail grade
material; secured by handrail brackets to the wall.
- We need to be installing wooden rails, regardless of the type of handrail/guardrail that may
have previously been installed.
If a specific handrail/guardrail is to be used outside of our current process, we can provide a bid
upon request.
- Posts (where applicable) need to be constructed from ACQ treated, wooden 2”x4”s as well. Never
should any piece of lumber smaller than a 2”x4” be used to construct framing to support handrails
and/or guardrails.Required Dimensions for Railings
Required Height and Spacing
- All handrails must measure 34”-38” in height, measured from the nose of the stair
(tread).
- All guardrails must measure a minimum of 42” in height, measured from the leading edge
of the walking surface.
- Posts and/or securing brackets for handrails should be spaced no more than 5ft apart;
leaving no less than a 1 ½” gap between any wall and the handrail.
- Posts for guardrails that are installed should be spaced apart no greater than 6ft.
- At least 2 securing points are required for all handrails and guardrails. This total number
will depend on the length of the handrail or guardrail installed.
- For instance, if a 9ft guardrail is to be installed, the securing points need to be
spaced out every 4 ½ feet, for a total of 3 posts.
- Handrails installed on staircases with a fall hazard of 24” or greater need to have a middle
railing installed. The middle railing should be installed at a 17”-19” height (approximately
half of the height of the full handrail).
- Guardrails installed for platforms 24” or higher need to have a middle railing installed. The
middle railing should be installed at 21” in height, measured from the leading edge of the
walking surface (half of the height of the full guardrail).Required Handrail Dimensions Handrail spacing and height requirements
Required Guardrail Dimensions

Guardrail spacing and height requirements
Properly Securing Handrails and Guardrails

                                      Securing Handrails and Guardrails
-   Interior handrails (consisting of handrail-grade wood) need to be secured by handrail brackets. The
    brackets need to be secured to the stud of the wall. If securing to the stud is not feasible, drywall anchors
    must be used to ensure stability.

-   Exterior handrails and guardrails will either be secured to 2”x4” posts or to an existing framework.

-   Securing Posts: Posts for handrails and guardrails should be driven into the ground (dirt), secured to the
    side of wooden porches/decks/steps, or anchored into mortar joints.

                                                  Brick Structures
In regards to the installation of handrails/guardrails to brick structures, drilling or nailing into brick is
unacceptable. The brick will crack and crumble apart, causing structural damage. When brick steps are
present, the vendor can drill into a mortar joint with a masonry bit (a pilot hole), insert a plastic anchor, and
attach the 2x4 to the anchor safely with a screw; without causing any real damage. The same method
would be acceptable with poured or pre-cast concrete. The areas where holes are created can be covered
over with mortar patching very easily and inexpensively if needed. Vendors should never create any holes
in the siding of a property or damage ornate columns. In these cases, they can set posts in the ground (dirt)
and use those for their framework to install the railing(s).
                   Please Note: If handrails or guardrails are secured directly to the siding of the property or
                   ornate columns, you (the vendor) could be held financially responsible for the damages.
Common Hardware for Securing Railings to Masonry
Masonry Drill Bit Concrete Screw
Plastic Screw AnchorsSpecial Circumstances with Masonry Steps
Broken Concrete
There are no situations where we would be unable to attach a handrail,
except if the steps have deteriorated concrete. In the case that the steps
are deteriorated, we should be blocking access to that entrance so that
someone does not get injured. Vendors should be using concrete screws
to attach handrail stock to the sides of the steps. Any handrail installed
should be done securely, so as not to give a false sense of security.Maid Service Initial Maid Service
Kitchens and Bathrooms

• Most critical areas for buyers
• Most common areas of QC
  inspection deficiencies

• Cleaning
   – Clean soap scum, lime,
     calcium, toothpaste residue,
     food matter, and general dirt
     from drain, knobs, and
     stoppers of sinks and tubs
   – Place air fresheners at all
     sinks
   – Clean inside all drawers and
     cabinets
   – Wipe down cabinet and
     drawer exteriors
Kitchens and Bathrooms cont’d Appliances • Remove damaged/inoperable appliances with written broker approval only • Move all appliances from their respective locations and clean the area behind, underneath, and beside them • Clean stoves, cook tops, ovens, microwave ovens, dishwashers, refrigerators, washers and dryers inside and out • Replace/Clean conventional stove burners and catch trays
Kitchens and Bathrooms cont’d

Remove grease, grime, residue, dust and
electrical safety hazards from range hoods
              and exhaust fans.
Kitchens and Bathrooms cont’d
• Clean Toilet
– Inside/Outside of bowl
– Top/Bottom of toilet
seat/seat cover
– Toilet tank/lid
– Behind/Around toilet base
• Remove dust and
cobwebs from bathroom
vents/fans
• Clean mirrorsKitchens and Bathrooms cont’d Tubs and Shower Stalls • Remove soap scum, hair, bars of soap, shampoo, creams, razors, shower curtains/rings/ mats/rugs, loufahs, toothbrushes • Remove bathroom accessories/caddies from tub/shower stalls, walls, and doors
Flooring

• Sweep debris, hair, grass clippings/leaves, dust, and dirt
  from all hard surface floors including basements and
  garages
• Mop tile, vinyl, and wood floors without leaving sticky film
  or residue
• Clean corners, edges, baseboards, and under toe kicks.
• Discolored areas of flooring must also be cleaned
Flooring cont’d

• Thoroughly vacuum all carpet throughout property
  including closets, stairways, and basement
• Clean corners, edges, and baseboards
• Remove debris, hair, grass clippings/leaves, dust, and dirt
• Bid cleaning of excessively dirty, but salvageable, carpet
• Remove dirty, saturated, stained, and ripped carpets that
  are not attached to the property/fitted to the room - treat
  this type of carpet as a rug
• Remove the tack strips and pad with the carpet
• Re-install HVAC floor registers
General Living Areas

• Includes porch/patio enclosures, garages,
  basements, outbuildings, and utility areas
• Treat finished and unfinished basements as
  regular living areas
• Clean and remove cobwebs
Windows

• Thoroughly clean all windows
  throughout property
• Areas commonly overlooked
  –   Screens
  –   ledges
  –   Top of sashes
  –   Sills
• Clean smudges, fingerprints,
  etc., on sliding glass doors
• Glass should be streak free
Ceilings and Registers

• Clear all ceilings of dust, dirt, and cobwebs
• Clear all floor, wall, ceiling vents, and
  registers of dust, dirt, and stains
Fireplaces

• Clear wood-burning fireplaces and hearths
  of all debris, ashes, and soot
• Fireplaces need to be vacuumed out
Odors

• Remove the source of odors and submit bids when
  necessary
• Place dated air fresheners in bathrooms, kitchens, and
  laundry rooms
• Date must be the date of services completed
• Neatly written in permanent marker
• No more than one date per air freshener
• Air fresheners are consider to be expired after 30 day’s
Commonly Missed Items

•   Porch/patio enclosures
•   Garages and basements
•   Attics and crawlspaces
•   Outbuildings and utility areas
•   Cobwebs
•   Tops of fan blades
•   Interior of washers, dryers, dishwashers
Monthly Marketability Check

 Monthly Marketability
        Check
• 10/1 We will inherit the existing inventory for FNMA
• need to correct any and all deficiencies
Monthly Marketability Check • Formally known as Maid Refresh • Performed monthly to maintain the marketability of the property • All items on Monthly Marketability (Maid Refresh) checklist are to be fully completed • All new conditions on exterior and interior MUST be addressed • A full property assessment must be completed • Opportunity for additional revenue
Monthly Marketability Check

If any of the following work is needed, you can proceed
with completing the task per client parameters and invoice
per REO pricing. There is no need to call from site. Proper
photo documentation will be required if any of the below
tasks are completed.
• Re-securing
• Debris removal
• Re-winterization (if found to be compromised and during
winterization season)
Monthly Marketability Check

Exterior
• Shrubs must be trimmed and all clippings removed.
• Weeds are to be trimmed from fence lines, foundation of the home,
  driveways, and flower beds.
• Weeds found in driveway/sidewalk/walkway cracks must be
  sprayed or removed
• All leaves must be removed from the lawn and planting areas
• Edging must be done on all walkways and driveways
• It is not acceptable to leave a property without performing the
  required standard grass cut.
• If the grass needs to be cut at the property, you must call the
  Seasonal Specialist extension 2121 for approval, prior to cutting the
  grass.
Monthly Marketability Check

Interior
•   Standard Maid Service Refresh
•   Property must pass the white glove test once the sales clean is complete.
•   Safety Hazard Checklist Items
•   There is a $500 allowable to complete any emergency repairs such as:
    – Pumping of water in the basement
    – Removal of wet, discolored carpet
    – Tarping of active leaks
•   There is a separate $500 for plumbing repairs to allow a
    winterization/dewinterization.
•   Call from site if amounts are not sufficient to complete repairs.
Monthly Marketability Check
Call from site to obtain approval for any Emergency
Repairs that may be needed and be prepared to do the
work. Do not walk away from a property that has an
emergency issue present.Marketability Check cont’d Commonly Missed Items •Smoke detector batteries chirping •Burnt out and missing light bulbs •Air fresheners not replaced or properly dated (kitchen, baths, laundry room) •New interior and/or exterior debris not removed •Basements and garages not being swept •Shrubs not trimmed •Walks/Stoops/Patios not swept
Photo Documentation

• Provide clear, date-stamped before, during, and
  after photos of all work completed

• Provide property condition photos of each room
  including attics, crawl spaces, outbuildings, etc.

• Submit inside/outside photos of appliances
Photo Direct

                           PHOTO DIRECT
•   Photo Direct will allow you to take photos of a property and attach them to a
    specific work order
•   Photos can be sent to your back office in real time. These photos will be
    housed in the filmstrip of Vendor Web
•   Photos are automatically date stamped which eliminates duplicate photos
•   Your office no longer needs to wait for crews to return from the field with
    pictures from a camera
•   The advantage with using a smartphone opposed to a camera
•   clearer pictures
•   the ability to snap pictures faster
Photo Direct
ADDITIONAL ADVANTAGES:
• Any issues found at a property which needs immediate attention can have
pictures uploaded to Safeguard and reviewed by Regional in a matter of
minutes for immediate approval to address the issue
• Loss of signal while transmitting you will not lose any work. Just re transmit
when a strong signal exists
• There are numerous Data Plans available for high volume transmitsVendor QC
Vendor Quality Control Program
•Documents required for submission monthly or as requested
– Vendor QC Summary
– Vendor property inspection list
– Failure to submit documents will result in capping of all new work
• Designate a member of team to conduct routine visits to
properties using the Quality Control Checklist (QCC)
•QCC forms must be available for review anytime by Safeguard FQC rep
•Provide Standards, Training, and Discipline to staff
•Review Safeguard memorandums with staff
•100% Initial 20% recurring.Communication with Safeguard
• Effective communication is paramount – you can NEVER
over-communicate
• If it’s not documented, it’s not done
• Always submit a status report on Vendor Web when
property is secured, trashed, winterized, etc.
– Status reports shall be submitted the same day work is
completed
• When in doubt, contact SafeguardCommunication with Brokers
• Broker Communication Requirements
– Call and e-mail the broker when work is completed
– Brokers need this information so their BPO can be
completed as soon as possible
– Form good relationships with brokers - If the broker is
not happy, our client is not happy
– Keep open dialogue regarding property conditions
• Submitted bids
• Unique circumstances (i.e., inability to clean
grease off wall after repeated efforts)
• Brokers evaluate quality of work and communicate via
Broker Sign-Off (BSO) formsCommunication with Brokers All initial services have been completed at your property located at 1102 Carrington Ave. Greensboro, NC. Work completed: Winterization – pressure test failed Grass cut – shrub trimming Trash out Maid Services Damages reported Discoloration in basement Roof is worn – no active leak Missing plumbing Bids submitted for out of scope work – needing approval Demo and remove damaged out building Fallen tree To trim trees away from the left side of the property Property conditions with special notes Bath tub has heavy rust stains – would not come any cleaner Any upgrade Packages you feel the property need Please call if there are any questions or concerns Thank You
Communication with Your Team

• Morning meetings to ensure all relevant information is
  complete and understood
• Improve efficiency of communication
   – Technology
      • Smart phones
      • iPads, notebooks, etc.
• Continuous two-way communication with field
• Clear, detailed direction for crews and office staff
Crew Training • Initial – Formal, written training plan – Establish training milestones – Office/field cross training • Ongoing Training – Routine training on new standards/requirements – Continuous re-evaluation of skill sets
Summary

• Good QC process
  – Increased profitability (fewer follow-ups)
  – More revenue (no allowables or bid opportunities or
    missed)
  – Better customer service
• Effective communication with stakeholders
  – Safeguard
  – Brokers
  – Your team members
• PRIDE IN WORKMANSHIP
You can also read