CONNECTION, TANK BAG S 1000 XR - BMW MOTORRAD - MAKE LIFE A RIDE
←
→
Page content transcription
If your browser does not render page correctly, please read the page content below
BMW
      MOTORRAD

Installation instructions

CONNECTION, TANK
BAG
S 1000 XR

MAKE LIFE A RIDE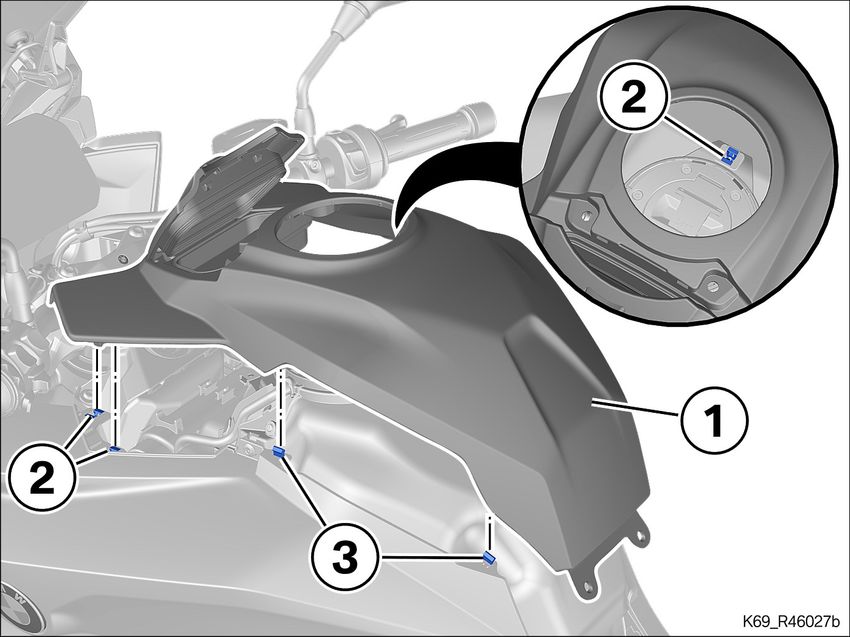
Order No. 77 01 5 A45 0C9 02/2021                                                                              2

BEFORE COMMENCING WORK, YOU MUST READ THESE INSTALLATION INSTRUCTIONS THROUGH
CAREFULLY AND MAKE SURE YOU UNDERSTAND THEM FULLY.

We congratulate you on your choice of optional accessories from BMW Motorrad that will enable you to
customise your motorcycle in accordance with your personal preferences.
Safety is invariably an essential prerequisite for extracting full benefit and enjoyment from new accessories.
Some work calls for special tools and possibly a thorough knowledge of motorcycle technology. If you are
in doubt consult a specialist workshop, preferably your authorised BMW Motorrad dealer.
Since we provide you with a multitude of accessories and optional equipment, we cannot cover all equip-
ment specifications in these installation instructions. Therefore we restrict ourselves to the basic version
of the corresponding model. The removal and installation of other possibly installed accessories is de-
scribed in the corresponding installation instructions. Consult your authorised BMW Motorrad dealer if you
no longer have access to the sets of instructions you need.
If you have questions concerning your motorcycle or any of the accessories from our range, your author-
ised BMW Motorrad dealer will gladly provide advice and assistance.
We at BMW Motorrad hope you will enjoy riding your BMW and that all your journeys will be pleasant and
safe.

THE SYMBOLS USED TO DRAW ATTENTION TO PRECAUTIONARY STATEMENTS IN THIS MANUAL
ARE AS FOLLOWS:

    CAUTION                                               WARNING

Low-risk hazard. Non-avoidance can lead to            Medium-risk hazard. Non-avoidance can lead to
slight or moderate injury.                            fatal or severe injury.

    DANGER                                                ATTENTION

High-risk hazard. Non-avoidance leads to fatal or     Special notes and precautionary measures. Non
severe injury.                                        -compliance can lead to damage to the vehicle
                                                      or accessory and, consequently, to voiding of the
                                                      warranty.

    NOTICE                                                Tightening torque

Specific instructions on how to operate, control,     Screws, bolts and nuts are tightened in
adjust or look after items of equipment on the        accordance with the applicable DIN/ISO
motorcycle.                                           standards. Tightening torques that devi-
                                                      ate from the standards are stated. Non-
                                                      compliance can result in damage to the vehicle or
                                                      accessories or can endanger the driver.

  Start of the main activity                          End of the main activity
  Start of the secondary activity                     End of the secondary activity
  Instruction                                         End of validity designation CS (construction
                                                      status), OE (optional extra) or OA (optional
                                                      accessory)

© 2021 Bayerische Motoren Werke Aktiengesellschaft
80788 Munich, Germany
Not to be reproduced by any means whatsoever, wholly or in part, without the written permission of BMW Motorrad,
After Sales.
Printed in Germany.
Subject to change without notice. Errors and omissions excepted.
Order No. 77 01 5 A45 0C9 02/2021   3

All rights reserved.

Order No. 77 01 5 A45 0C9 02/2021 4
Connection, tank bag
Requisite tools
Set of Torx bits
Torque wrench
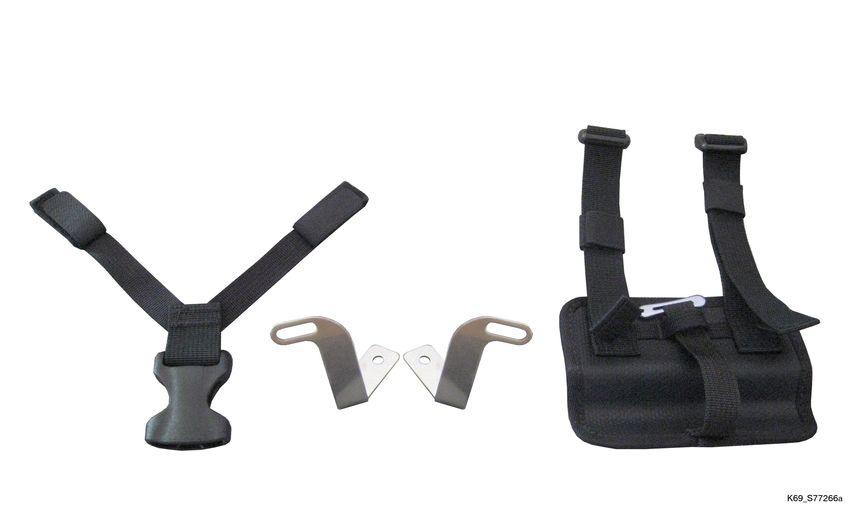
Delivery specification
Set for connection, tank bag
General instructions
ATTENTION
Vehicle not securely propped
Risk of damage to parts if vehicle topples
Prop the vehicle securely.
WARNING
Children and pets in the working area
Injury to persons
Keep children and pets away from the working area.
CAUTION
Wearing jewellery during work
Risk of injury by snagging or electrical short circuit
Remove all items of personal jewellery (rings, chains, wristwatch, etc.) before starting work.
NOTICE
Once the retrofit kit has been installed by the workshop, these installation instructions must be handed over to the
customer.
Make sure that these installation instructions accompany the retrofit kit when it is passed on to a third party.Order No. 77 01 5 A45 0C9 02/2021 5
77 45 006 Installing attachment for tank rucksack
1
Removing seat
Unlock seat lock (1) with ignition key, lift seat (2) at rear
and remove with buffers (3) from holder.
2
Removing the centre cover of fuel tank
Open storage compartment lid (1).
Remove screws (2).
Remove cover (1) to the top, detaching it from the re-
taining clips (2) and from the retaining lugs (3) on the
left and right.Order No. 77 01 5 A45 0C9 02/2021 6
3
Installing retaining bracket for tank bag
Remove screws (1) and lay them safely aside (will be
reused).
Fit retaining plate on left (1) and right (2) and install
bolts (3).
Tightening torques
Bracket for adjuster to frame
M6x30 8 Nm
Retaining plates remain permanently installed on the mo-
torcycle.
4
Installing centre cover of fuel tank
Install cover (1) securing it on left and right in retaining
clips (2) and on retaining lugs (3).Order No. 77 01 5 A45 0C9 02/2021 7
Install screws (2).
Close storage compartment cover (1).
5
Installing connections for tank bag
Work straps (1) into retaining brackets on left (2) and
right (3) and close hook and loop fasteners (arrows).
Work strap from rear attachment element (1) through
standard provided holder (2) and close closure (arrow).Order No. 77 01 5 A45 0C9 02/2021 8
6
Installing seat
Insert seat (1) with buffers (2) in holder and install.
Seat (1) engages with audible click.
7
Final check of work performed
Check the following:
The work as performed achieved the intended purpose.
All reservoirs and containers have been filled and all flu-
ids and lubricants are at their correct levels.
All threaded fasteners released beforehand have been
correctly retightened.
The fuel system is free of leaks.
The lights and signalling equipment are fully operational
and the vehicle is roadworthy.
The brake pads of the front and rear brakes are bedded
against the brake discs.
Function test, engine start suppression
Check
Set kill switch to "ON" position.
Select neutral.
Switch on the ignition.
Neutral indicator light "N" lights up.
Select a gear.
Neutral indicator light "N" goes out.
Press the starter button.
Starter does not operate.
Extend the side stand.
Pull the clutch lever.
Press the starter button.
Starter does not operate.
Retract the side stand.
Press the starter button without releasing the clutch
lever.
Starter operates.Order No. 77 01 5 A45 0C9 02/2021 9
Result
Not all test steps completed successfully.
Measure
Check the appropriate parts with the BMW Motorrad
diagnostic system.You can also read