DAYLIGHT SAVING
TIME: SPRING 2015
←
→
Page content transcription
If your browser does not render page correctly, please read the page content below

DAYLIGHT SAVING TIME: SPRING 2015
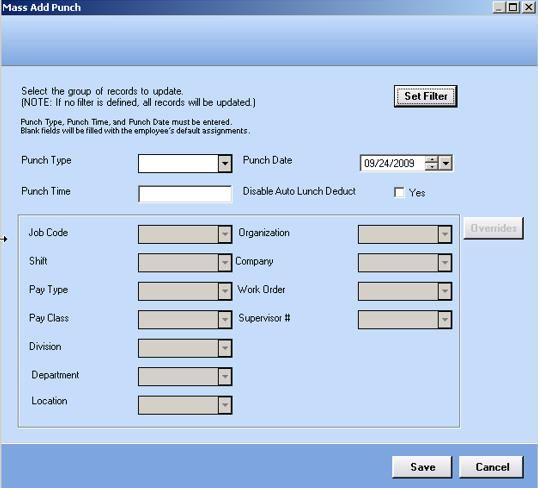
TABLE OF CONTENTS
DAYLIGHT SAVING TIME: SPRING 2015 ................................................. 3
CLOCK CONFIGURATION ........................................................................ 4
Checking Current DST Settings ...................................................................................... 4
Configuring WinCom to Update ATS Century Series Clocks Using the Polling Process . 4
Configuring WinHand to Update RSI HandPunch Clocks Using the Polling Process ...... 5
Configuring WinHand to Update ATS Global and Cyber Series Using a Directive .......... 6
Configuring VeriFone Clocks ........................................................................................... 8
Configuring HourTrack and GenPro Clocks..................................................................... 8
ADJUSTING EMPLOYEE TIME RECORDS .............................................. 9
DST Automatic Adjust Functionality ................................................................................ 9
Mass Add Punch ........................................................................................................... 10
Mass Add Pay Records ................................................................................................. 12

                                                                                                                          2
DAYLIGHT SAVING TIME: SPRING 2015
Daylight saving time (DST) is about to begin. What is the best way to
prepare for that?
You’ll need to address two primary issues during the transition to daylight saving time:
   1. Make sure all time clocks are configured to update at the appropriate time. The
      instructions for configuring clocks begin on page 4.
   2. Adjust records for employees who are punched in during the time change. The
      instructions for adjusting employee records begin on page 9.
Most of the United States and Canada will begin daylight saving time on March 8, 2015,
at 2 a.m. local time.

                                                                                           3
CLOCK CONFIGURATION
Checking Current DST Settings
Before updating time and date information, verify the latest information about daylight
saving time in your area. This can be found with a simple internet search.
The following sections detail the steps needed to adjust time and date information on
your time clocks. Refer to the section that best applies to your software and hardware
configuration.
Configuring WinCom to Update ATS Century Series Clocks Using the
Polling Process
Daylight saving time is traditionally scheduled to occur on a day and time that will
negatively impact as few people as possible. In the U.S., it happens at 2 a.m. on a
Sunday. If this day and time are convenient for you, you can set your clocks to update
after your server does. Empower recommends 3:05 a.m. for scheduled polling tasks.
1. Open WinCom.
2. Navigate to Options > System Settings. This will open the Communications
Options window.
3. Set the Send date and time to clock field value to Yes. WinCom will use the
server's date and time to update the time clocks during the regular polling
process.
Note: This is typically set up under Scheduled Tasks in Windows.
4. Click Save, then Close when you’re done.
4Configuring WinHand to Update RSI HandPunch Clocks Using the
Polling Process
Daylight saving time is traditionally scheduled to occur on a day and time that will
negatively impact as few people as possible. In the U.S., it happens at 2 a.m. on a
Sunday. If this day and time are convenient for you, you can set your clocks to update
after your server does. Empower recommends 3:05 a.m. for scheduled polling tasks.
1. Open WinHand.
2. Navigate to Setup > System Settings. This will open the WinHand System Settings
screen.
3. Check the box next to the Send date/time to clock field. WinHand will use the
server's date and time to update the time clocks during the regular polling
process.
Note: This is typically set up under Scheduled Tasks in Windows.
4. Click Save, then Close when you’re done.
5Configuring WinHand to Update ATS Global and Cyber Series Using a
Directive
ATS Global and Cyber Series clocks can be updated with the time and date information
from the server by configuring a directive in WinHand to reset the clocks. This directive
should be scheduled for some time after the time has changed on the server.
1. Open WinHand.
2. From the main WinHand screen, select “Clock Directives” from the Setup drop-
down list. This will display the Directives Main screen.
3. Click the Add button in the lower-right-hand corner. This will display the Clock
Directives Details window, as shown below:
4. Enter a description of up to 40 characters in the Description field.
5. Select whether this directive will apply to a single clock Number or a clock
Group.
6. Select the clock number or group from the Clock # drop-down list.
7. From the Task drop-down list, select “Send Reset Clock”.
8. Check the box next to Active.
9. To send the directive immediately, skip to step 15 below.
10. To schedule the directive for a future time, check the box next to Enable
Recurring.
11. Make sure the Interval box is unchecked.
612. Select the Daily option:
In the next box, select Every 1 Day(s). Make sure “1” is entered in the text box.
13. Set a time for the directive to run in the Recurring Time field and click the Add
button to add the time to the list below the text field:
Note: All times must be entered in 24-hour format.
To remove a time from the list, select the time and click the Delete button.
14. Select a Start Date and End By date from the drop-down lists. For this directive,
these dates should be the same.
15. To save the directive, click the button in the row of buttons along the top of
the screen. Close the window to return to the Directives Main screen, which now
displays a list of all saved directives:
16. Close the Directives Main screen to return to the main WinHand screen.
17. Navigate to the Processes menu and click Start Directives. The
Winhand/UNICommService field should now be green.
The directive will now process when WinHand closes, if no time was scheduled in the
configuration. Otherwise, the directive will be processed at the scheduled time.
7Configuring VeriFone Clocks
Important: Date and time are not updated with the VeriFone clocks during
communication or polling processes.
To configure daylight saving time at the clock (this can be configured any time prior to
the time change):
1. At each clock, press Clear, then Enter, then 9.
2. Enter the password. The default password is 123.
3. Enter manager code 14.
4. Input the start and end dates for daylight saving time.
Configuring HourTrack and GenPro Clocks
HourTrack and GenPro clocks should update automatically if the hardware terminal has
been programmed within the last year. If the time didn’t change, simply run a manual
upload to each terminal.
8ADJUSTING EMPLOYEE TIME RECORDS
In EmpowerTime 9.3, functionality was introduced to automatically adjust Timecards of
employees who are working during the time change and add a positive or negative pay
record. For versions below 9.3, there are two commonly used methods for adjusting
records for multiple employees at once. If you’re unsure whether your version can be
configured to adjust employee Timecards automatically or about whether the Mass Add
Punch or the Mass Add Pay Record utility is the most appropriate for you, contact
Empower Technical Support.
DST Automatic Adjust Functionality
DST Automatic Adjust Functionality can be turned on by navigating to Rules Setup >
Company Setup > System Options 2 and selecting the Yes box. You’ll also need to
click the ellipsis button beside this option to open the Daylight Savings Information
box and make sure the correct dates and Paytype are populated.
Note: Turning this option on or off requires the application to be restarted before
you can begin assigning employees.
Once you’ve restarted the application, you’ll need to make sure the Track for Daylight
Savings Time box is checked on the employee’s Time Attendance screen for the pay
record to populate.
9Mass Add Punch
The Mass Add Punch utility provides a fast way to add identical punches for a group of
employees in a company. Rather than adding punches to each employee’s Timecard,
the Mass Add Punch utility can be used to add them with a few easy clicks.
To mass add a punch:
1. Open EmpowerTime and navigate to Employees > Timecard.
2. From the Processes drop-down list at the top of the screen, select “Mass Add
Punch”. This will open the Mass Add Punch window, shown below, which
defines the type of punch to be added, the time stamp for the punch, and the
employee Timecards to which the punch will be added:
In addition, the labor detail codes associated with the punch (e.g., department,
shift, job codes) may also be defined, and are explained starting on the next
page.
3. Once all options have been configured, click Save. EmpowerTime will ask for a
confirmation; click Yes to run the mass update. Be sure to verify that the desired
punch has been applied correctly to all selected employees’ Timecards.
The information on the following page details the different options on the Mass Add
Punch window.
10Set Filter
Defines the employees whose Timecards will be updated with the new punch. By
default, the mass Add Punch utility updates all Timecards in the Employee Setup
notebook unless a filter is established. For more information on setting up filters, see
Chapter 18—System Utilities in the EmpowerTime User Guide.
Punch Type
Defines the type of punch to be added. Any kind of punch can be added with this utility.
Punch Time
Defines the time of the punch to be added.
Punch Date
Defines the date of the punch to be added.
Disable Auto Lunch Deduct
Defines whether the automatic-lunch-deduction feature should be disabled for the
selected employees on the selected day. This feature applies only when adding an In
For Day punch, as In For Day punches always define the detail for the rest of a workday.
In addition, automatic lunches can only be disabled for employees who are assigned to
a pay class that is configured to deduct lunches automatically.
Override Detail
Defines the labor detail codes to be associated with the new punch. By default, punches
added with the Mass Add Punch feature are assigned detail codes based on employees’
schedules and home assignments. Leave the fields under this section blank if the labor
details should be taken from the default sources.
11Mass Add Pay Records
The Mass Add Pay Records feature provides a fast way to add identical pay record for
a group of employees in a company.
Important: Ask your network administrator to make an external backup of the
directory before making changes with the Mass Add Pay Record feature.
There is no undo feature that can be used to reverse incorrect changes.
To mass add a pay record:
1. From the Processes drop-down list at the top of the screen, select “Mass Add
Pay Records”. This will open the Mass Add Pay Records window, shown
below, which defines the type of pay record to be added, the date of the pay
record, the number of hours, and the employees for which the record will be
added:
In addition, the labor detail records associated with the pay record (e.g.,
department, shift, job codes) may also be defined, and are explained starting on
the next page.
2. Once all options have been configured, click Save.
3. EmpowerTime will ask for a confirmation; click Yes to run the mass update.
4. Be sure to check that the desired pay record has been correctly applied to all
selected employee records.
The information on the following page details the different options on the Mass Add Pay
Records window.
12Pay Type
Defines the pay type of the pay record to be added.
Hours/Dollars
Defines the number of hours or dollars to be paid to the selected employees with the
pay record. To pay dollar amounts with a pay record, the selected pay type must be set
up as a dollars pay type.
Reason
Defines the absence reason code to be associated with the pay record. Absence reason
codes must first be defined in the Code Tables section.
Job, Shift, and Organization
Define the labor detail codes to be associated with the pay records. By default, pay
records created with this utility are assigned detail records based on employees’ home
assignments. Leave the fields under this section blank if the labor details should be
taken from the default sources.
13You can also read