DIY Wedge Espadrilles: New from Dritz - Sew4Home
←
→
Page content transcription
If your browser does not render page correctly, please read the page content below
Published on Sew4Home

DIY Wedge Espadrilles: New from Dritz
Editor: Liz Johnson
Monday, 18 July 2016 1:00

We knew these were coming, and now they’re here! The Dritz® Espadrille Wedges!The summer footwear is now available in
a DIY version. Don’t you dare roll your eyes! Making your own shoes is easier and more fun than you might imagine. We were
skeptical at first too. I mean… shoes?! Cobblers do that, right?! We have no business in the shoe business. But, Dritz® has
thought through all the hard stuff, like providing the soles and the best construction tools and figuring out the patterns; leaving
you the clever, creative part. We took on the challenge by designing toes made of stacked ribbon with a matching ribbon ankle
strap. Very chic, very simple. Make a pair for all your favorite outfits.
As you'll see in the instructions below, we stitched our ribbons to a layer of fusible interfacing, creating a pretty yet very stable
layer of “ribbon fabric." We then used this "fabric" to cut the toes of our espadrilles.

Two ribbons placed back to back become the cute ankle strap. We even came up with a clever way to finish the ends of the
ribbon with barely any bulk.
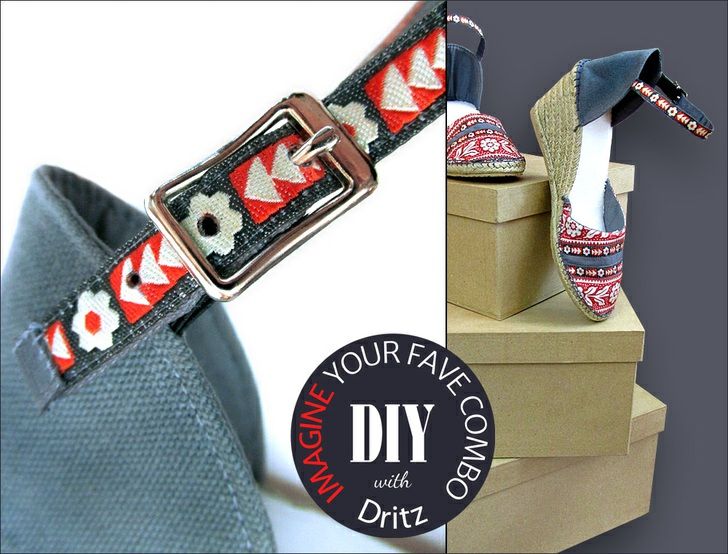
When you choose your own supplies, you can perfectly match your shoes to a specific outfit. And you can be guaranteed that
no one else will have a pair like them.
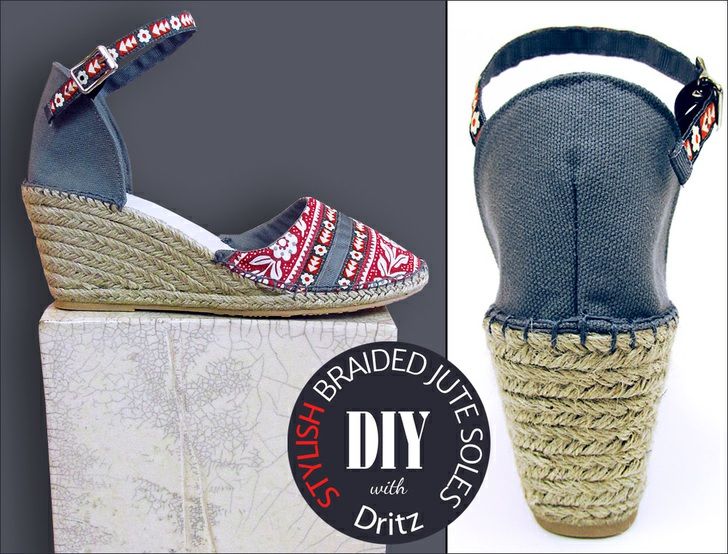
To really make the gorgeous jacquard ribbons the star of the show, we kept the espadrille’s heels in a solid color with just that
pop of ribbon color across the strap. Our thanks to Renaissance Ribbons for providing the beautiful ribbons from French
General and Sue Spargo.

The Dritz® team has worked through all the best tips and techniques to make the construction process as straightforward and
flexible as it can be. Their helpful online tutorials are very detailed, include lots of clear photos, and answer many of the most
frequently asked questions – from a size chart to detailed information on how to make the perfect blanket stitch that will attach
the toe and the heel to the sole. We highly recommend them all.
Between these Dritz® tutorials, our original article and our Holiday Espadrilles article, you’ll find all the how-to steps covered in
detail. This article is all about inspiring you to think outside the shoebox. Share your creations with us on Facebook
(sew4Home) or on Instagram where you'll find us under #Sew4Home_diy.

Here's a complete list of the information from Dritz®
     Available Fabric and Accessories
     Special Tutorials for “Peep Toe” Flat & Wedge Options – this Make Something blog post includes additional links to full downloadable
     PDF instruction sheets
     General Video Tutorial
     Basic DIY Espadrilles in Just 2 Hours
     Espadrilles Construction Tips
     Espadrilles Fitting Tips
     Summary of Available Shoemaking Components

Here are all the available components
You can find the Dritz® Espadrilles products at many fine in-store and online retailers, including Hobby Lobby.

     Jute Soles: WEDGE Soles: available in sizes for   Adults (5-10) — FLAT soles available in sizes for Adults (6-10), Kids (2-5), and Toddlers (3-
     11)
     Outer Fashion Fabrics: 24 solids and prints
     Inner Lining Fabrics: 12 solids and prints
     Yarn : 7 colors of sturdy, 100% cotton yarn
     Iron-on Stabilizer: supports the heel and toe of the shoes
     Yarn wax: prevents tangling while stitching the top to the sole - will not stain or discolor the yarn
     Needles: choose from straight and curved needles, both are especially strong to allow frustration-free stitching, and they have a larger eye for the
     thick yarn
     Needle Pullers: modified thimbles for your thumb and finger - makes it easy to grip and pull the needle; the open end accommodates a fingernail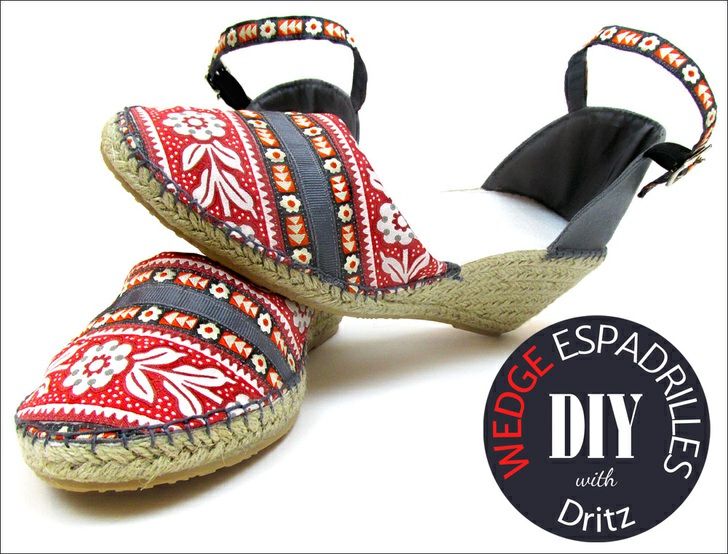
Point Turner: made of durable bamboo, it helps create crisp points and smooth curves after turning the toe and heel pieces right side out
     Glass Head Pins: extra long and extra strong nickel plated steel; these are a must-have for attaching the top to the sole without bending or
     breaking

Sewing Tools You Need

     Sewing machine and standard presser foot

Fabric and Other Supplies

NOTE: Our yardage estimates and cut lengths are based on the SIZE 7 shoes we made. Your requirements may vary slightly
but should be enough for the main adult size options.

     1 yard of 1½” wide jacquard ribbon for the toes; we used Flowers, Leaves and Dots by French General for Renaissance Ribbons
                                                              Offray Grosgrain in Pewter from The Ribbon Retreat
     1 yard of 1½” solid grosgrain ribbon for the toes; we used
     2½ yards of ⅜” wide jacquard ribbon for the toes and ankle strap; we used Hex Arrows in Brown and Orange by Sue Spargo for
     Renaissance Ribbons
     1⅝ yards of ⅜” wide solid grosgrain ribbon for the toes and ankle strap; we used Offray Grosgrain in Pewter from The Ribbon Retreat
     NOTE: The grosgrain ribbon should match the fabric used for the exterior and lining.
     ¼ yard of 44”+ wide mid-weight solid color canvas for the exterior heels: we used   9.3oz Canvas in Steel Gray from Fabric Depot
     ¼ yard of 44”+ wide quilting-weight solid color cotton for the lining of the toe and heel (it should be a close match to the exterior canvas); we used
     Kona Cotton in Pewter from Fabric Depot
     ½ yard of 20”+ wide lightweight fusible interfacing; we used   Pellon Shir-Tailor
     ONE package of   Dritz Espadrilles Iron-On Stabilizer
     ONE package of   Dritz Espadrilles Creative Yarn or TWO skeins of cotton embroidery floss in a coordinating color; we used gray cotton
     embroidery floss, purchased locally, to match our ribbon and canvas
     TWO ⅜” buckles; we used an all-purpose strap buckle from Tandy Leather
     ⅓ yard of ⅜” braided elastic; we used Dritz Braided Elastic in Black
     Hole punch or heavy-duty awl to make buckle holes in the ankle strap; we used a hole punch
     Fabric glue; we used Dritz Liquid Stitch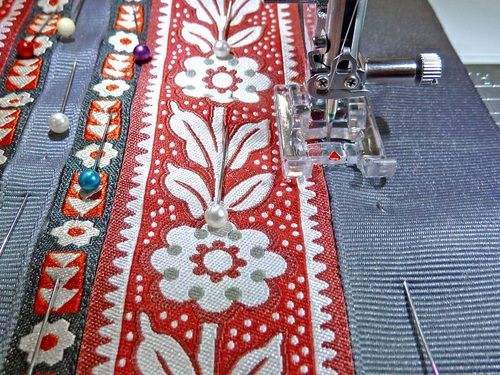
Seam sealant; we used    Dritz Fray Check

In addition to the Dritz® Espadrilles tools listed above in the main introduction, we also used our general sewing
supplies:

      All purpose thread to match the fabrics and ribbon; we prefer to use     invisible thread for ribbon stitching
      See-through ruler
      Measuring tape
      Fabric pen or pencil
      Seam gauge
      Seam ripper
      Scissors
      Rotary cutter and mat
      Iron and ironing board
      Pressing cloth

Getting Started
  1. Remove all the Dritz® elements from their packaging. The pattern pieces are bundled with the jute soles. Cut out each pattern piece along the solid
      line at the proper shoe size indication.
  2. Press all the fabric (do not press the stabilizer).
  3. Using the HEEL pattern, cut the following:
      TWO from the outer fabric, with the fabric wrong sides together
      TWO from the lining fabric, with the fabric wrong sides together
  4. Using the HEEL STABILIZER pattern and the TOE STABILIZER pattern cut TWO of EACH from the iron-on stabilizer.
      NOTE: Just as with the other fabric, fold the iron-on fabric first with the fusible side (the wrong side) facing in. This way, when you cut your two
      pieces, you'll end up with one for the left shoe and one for the right shoe with the fusible side in the correct position for each.
  5. From the lightweight interfacing cut TWO 8½” x 6½” rectangles. As noted above, this starting size may vary slightly based on your shoe size. You
      need a piece slightly larger all around than the toe pattern.
  6. To create an exact match to our “ribbon fabric” and ankle straps, cut the ribbon as follows:
      From the 1½” wide jacquard ribbon, cut FOUR 8½” lengths.
      From the 1½” wide grosgrain ribbon, cut FOUR 8½” lengths.
      From the ⅜” wide jacquard ribbon, cut SIX 8½” lengths and TWO 12” lengths.
      From the ⅜” wide grosgrain ribbon, cut TWO 8½” lengths and TWO 12” lengths.
  7. From the elastic, cut TWO 2½” lengths.

At Your Sewing Machine & Ironing Board

Create the toes
  1. Place one rectangle of lightweight interfacing fusing side up on your ironing surface.
  2. Using our plan or designing your own, create your ribbon stack. Keep in mind that you need enough ribbon top to bottom and side to side to fit the
      entire toe pattern.
3. Place the toe pattern on the stack adjusting the position to best feature the ribbon.

4. Also, remember to account for the ⅜” seam allowance all around. It might be worth it to cut a pattern from a transparent tissue or plastic film,
    drawing in the ⅜” seam allowance to truly judge your best placement, similar to the drawing shown below. We added a wide solid ribbon top and
    bottom to give us plenty of “cutting room.”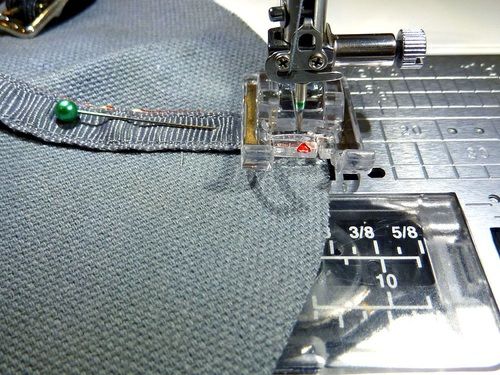
5. When you have your ribbons the way you want them, pin in place.
 6. Thread the machine with invisible thread in the top and bobbin or carefully select all-purpose thread to match each ribbon, re-threading as necessary
     as you move from ribbon to ribbon. We prefer to work with invisible thread.
 7. Edgestitch in place along both sides of each ribbon.

 8. With you iron on a lower heat setting, and using a pressing cloth, press the stitched ribbon stack to activate the fusible interfacing. Press from both
     sides. You now have “ribbon fabric” that is smooth and flexible.
 9. Replace the toe pattern into position on the ribbon fabric and cut out the first toe piece.
10. On the front, place a piece of tape, labeling this toe piece as the RIGHT toe.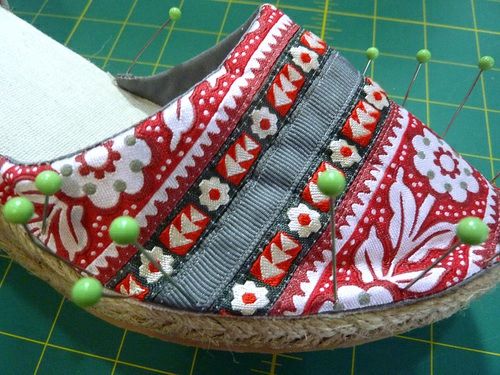
11. On the back, transfer the two inside shoe dots from the pattern. These dots indicate the opening that will be left to turn the stitched toe right side
     out.

12. Repeat to create the second ribbon stack for the opposite toe. Everything is the same, except you’ll need to flip the paper pattern so it is wrong side
     facing up when positioning it on the ribbon fabric. This insures you end up with both a right toe and a left toe.
13. Find the two pieces of toe stabilizer. Center one of the wrong side of each toe piece and fuse in place.
14. Find the two toe lining pieces. Place a toe lining piece right sides together with each toe front piece. Pin all around. Remember to keep track of
those marked dots you transferred. These will be the starting and stopping points for your seam.
15. Using a ⅜” seam allowance, stitch around the toe piece through all the layers, starting and stopping at the marked dots.16. Trim back the seam allowance all around, except for along the opening where the seam allowance should be left at ⅜". 17. Clip the corners and press open the seam allowance. 18. Turn right side out through the opening. Using the Dritz Point Turner, push out the corners and smooth the seam all around.
19. Using a pressing cloth, press flat, turning in the raw edges along the opening so they are flush with the sewn seam. Hand stitch the opening closed.

Attach the toes
 1. Measure 1½” from the point on the sole where the heel starts to slope upwards. Mark this point on either side. This is where to place the outer
     corners of the toe piece. In addition, you may want to find the exact center point at the front of the toe to insure this is positioned at the exact center
     point at the front of the sole.

 2. Pin the toe to the sole. This is where it is really great to have the long, strong Glass Head Pins from the Dritz® Espadrilles product selection.
     Push a pin through the fabric down into the jute sole at the first 1½” mark. Then, continue to pin around the side towards the front of the toe, slightly
     stretching and easing the fabric.

 3. As you move around the toe, more easing may be necessary.
4. Don't be afraid to use lots of pins. You want the toe to sit straight down onto the sole.
5. Find the yarn and pull off an approximate 60" - 70" length. Run the yarn through the yarn wax several times.
6. Thread the yarn or floss through the needle. The Dritz® Needle Assortment includes both straight and curved needles; choose whichever
works best for you. We worked with a straight needle.
7. Again starting at the first 1½” mark, i nsert the needle into the jute approximately ¼" below the top edge of the jute. Push the needle through the jute
and up through the fabric, coming straight out about ¼" in from the finished fabric edge. Pull the yarn through until the knot snugs up against the
sole.
8. Stitch the top to the sole with a ¼” - ⅜” blanket stitch. keeping your stitches as uniform as possible. We like the look of a slightly narrower spacing of
¼”.NOTE: We’ve summarized the stitching steps here, and also show a few photos below of stitching the heels in place, but
remember that additional photos and instructional detail can be found in our original tutorial our Holiday Espadrilles
tutorial as well as within all the great Dritz® tutorials linked above.
Create the heels
1. The heels are created in much the same manner as the toes but with the solid, stabilized canvas and cotton.
2. Find the two exterior heel pieces and the two heel stabilizer pieces. Keep track of right side and wrong side so you end up with both a left and a right
heel. Center the stabilizer on the wrong side of each exterior heel piece and fuse in place.
3. Using the paper pattern, transfer the dart markings. Also transfer the markings for the strap and buckle.
4. Create a dart in both heels.NOTE: If you are new to this technique, we have a full tutorial on How to Make a Dart .
5. Repeat to create a matching dart in each heel lining piece.
6. Find the strap elements: the buckles, elastic, and 12” lengths of ribbon.
NOTE: We really like the look of the ribbon strap and a standard buckle, but it is optional. You can instead simply add two apx. 27” long ribbons to
wrap and tie around each ankle. You could even eliminate the heel altogether and create a slide. Take a look at the Dritz Make Something
Blog for more information on slides and peep toe options with and without heels.
7. Place the ribbon lengths wrong sides together, pairing a jacquard with a grosgrain. Edgestitch along both sides of each ribbon pair. The ends remain
raw.
8. Find the two lengths of elastic. Fold each in half, matching the ⅜” ends, and make a tiny snip at the center of the fold.9. Unfold the elastic and loop it over the center bar of the buckle, inserting the buckle’s prong through the tiny clipped hole.
10. Re-align the ⅜” ends and pin or baste these ends together.
11. Repeat to create the opposite buckle.
12. Place a heel piece right side up on your work surface. Position the strap and buckle along the upper edge, following the lines you transferred from
the paper pattern. Pin in place.
13. Baste in place to secure.14. Coil and pin the strap at the center of the heel to keep it out of the way of the final seam.
15. Repeat to create the opposite heel with the remaining strap and buckle.
REMEMBER: The buckles and straps will be opposite one another on the two heel pieces. The buckles should be placed at the outside of the shoe.
The right heel is shown below with the buckle to the right and the strap to the left. On the left heel this would be reversed: buckle to the left, strap to
the right.
16. Place a heel lining piece right sides together with each heel exterior piece, sandwiching the strap and buckle between the layers. Pin all around,
leaving an approximate 2-3” opening along the bottom for turning.
17. Using a ⅜” seam allowance, stitch around the heel piece through all the layers, locking the seam at either side of the opening.
18. Trim back the seam allowance all around, except for along the opening where the seam allowance should be left at ⅜".
19. Clip the corners and press open the seam allowance.20. Turn right side out through the opening. Using the Dritz Point Turner, smooth the seam all around. Gently unpin the strap and buckle and pull
them into position.
21. Press flat, turning in the raw edges along the opening so they are flush with the sewn seam.
22. Edgestitch around the entire heel piece through all the layers. This will close the opening used for turning and create a stable edge all around.
Attach the heel and finish the strap
1. Find the center back of the heel, directly below the dart, and align this with the center back of the sole. As you did above, pin the heel into the jute of
the sole.2. Starting at the front of one side of the heel, again as you did above, insert the needle into the jute ¼” below the sole. then com up through he sole
about ¼” in from the edge. Pull the yarn/floss sharply to snug the knot into the jute.
3. Continue around the edge with a ¼” blanket stitch. Again, you can refer to the the Dritz links above for more details about this stitch pattern. Also,
the instructions that come with the soles have very good steps and illustrations.4. If possible, try the almost-finished shoe on its intender wearer to mark the position for the main buckle hole. If you don’t have access to the wearer,
you could also match it to a sandal from your own closet. For our size 7 shoes, our main buckle hole was 6¾" from the top seamed edge of the heel.
Mark this buckle hole point with a pin.
5. From this pin point, measure 2½” out towards the free end of the strap and trim away the excess ribbon.
6. Using a seam ripper, carefully take out about ½” of the seam along both sides at the raw end.
7. Trim back the top jacquard ribbon so it’s ½” shorter than the grosgrain ribbon beneath it.
8. Roll the grosgrain end over the jacquard end. To do this, make a ¼” fold in the grosgrain, then make an additional ¼” fold, bringing the fold over theraw edge of the jacquard ribbon. Pin in place.
9. We used a drop of fabric glue to secure our fold and then hand stitched the fold in place for extra security.
10. Place a drop of seam sealant at the main buckle hole point you marked earlier. Let it dry.
11. Measure ¼” to either side of the main buckle hole and mark for two additional holes. Add a drop of seam sealant at each of these points as well.
Three holes are recommended, but you could certainly add more.
12. Using a hole punch or an awl, make a hole at each marked point.13. Add another drop of seam sealant over each cut hole.
Contributors
Project Design: Alicia Thommas
Sample Creation and Construction Notes: Debbie Guild
Tags:
Dritz
Fabric Art & Accents
Yoga Tote with Wraparound Mat Straps: Dritz Belting
Feed Sack Big Bag: Dritz Belting and Hardware
DIY Shadow Boxes with Dritz Campaign Hardware
Slim Crossbody Shoulder Pouch: Dritz Belting and Hardware
Unisex Belted Half Aprons: Dritz Webbing and Hardware
Upcycle a Cardigan with Dritz Decorative Elastics & Closures
Great Glittering Gift Ideas: Fast and Easy with Dritz Hardware
Washed Canvas Tote with Belting Handles and Drawstring Lining: Dritz SewingFabric Storage Boxes with Faux Leather Handles: Dritz Home Décor
Dritz Lookbooks: Clever Ideas that Inspire You to Take Action
Compact Quilted Duffle with Handles & Adjustable Strap: Dritz Hardware
Using Decorative Nails and Nailhead Trim: Dritz Home Upholstery Supplies
Upcycled Cardigans: Dritz Decorative Elastics & Closures
Mesh & Cotton Beach Bags
Clear View Vinyl Tote for Events and More: Dritz Metal Hardware & Plastic Snaps
Get Creative with Dritz Clothing Patches: Eight Fun Ideas
Super Sturdy Summer Tote: Dritz Rivets & More
How to Install Dritz Home Snap-On Plastic Grommets
Bow Ties for Fashion and Fun: Dritz® Sewing Notions
Custom Zipper Pouch in Three Styles: Dritz® Labels
Overall Apron with Adjustable Waist, Rivets & More: Dritz Hardware
Asymmetrical Crossbody Bag: Dritz Hardware
Lace-up Apron in Denim: Dritz Eyelets & More
Velveteen Trimmed Tufted Bolster Pillow: Dritz Upholstery Notions
Dritz My Double Deluxe Dressform: Products We Love
Quilted Travel Duffle with Rolling Case Sleeve: Dritz Hardware
Car Caddy & Waste Bin: Dritz Hardware and Elastic
Lap Blanket with Make Your Own Chenille Accents: Dritz Quilting
DIY Wedge Espadrilles
Mesh Beach Bag: Fun & Functional with Dritz Lettering & Hardware
1 2 next › last »
This project and patterns (if any) may be downloaded for personal use only. No electronic or printed reproduction permitted
without the prior written consent of Sew4Home LLC.
Copyright 2009-2019 Sew4Home LLC. All Rights Reserved.
Source URL: https://sew4home.com/projects/fabric-art-accents/diy-wedge-espadrilles-new-dritzYou can also read