DOG FIRST AID Guide Faculty of Veterinary Medicine - Centre hospitalier universitaire ...
←
→
Page content transcription
If your browser does not render page correctly, please read the page content below
DOG
FIRST AID
Guide
Faculty of Veterinary Medicine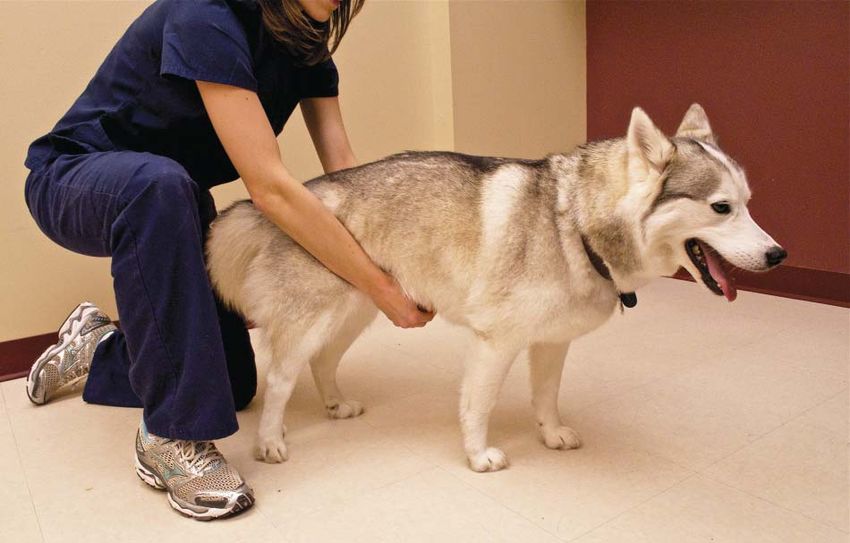
Faculty of Veterinary Medicine

Contact CHUV at
nunavik@chuv.umontreal.ca

Visit https://chuv.umontreal.ca/english/vetnunavik/ for more information
about Vetnunavik.

DOG FIRST AID GUIDE © Third Edition. 2021

Language
  • It was agreed upon to have the Dog First Aid Guide drafted in English, mutual language of all parties.

  • Il a été convenu que la langue de rédaction du Dog First Aid Guide est l’anglais, langue commune des
    parties.

Groupe International Vétérinaire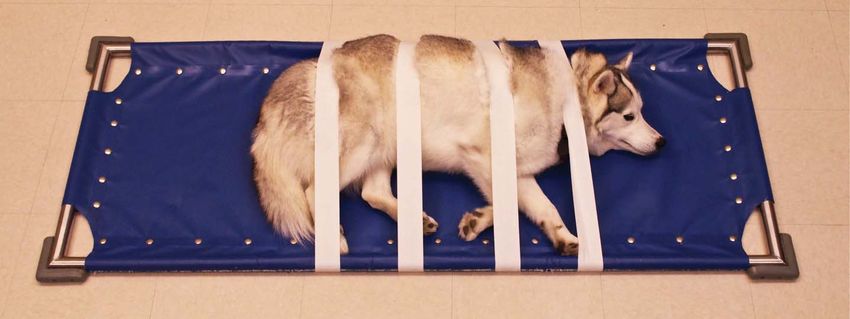
The creation of this guide was made possible thanks to the Groupe
               International Vétérinaire from the Faculty of Veterinary Medicine of Université
               de Montréal.

Conception
Cécile Aenishaenslin, DMV, and Josiane Houle, DMV, Coordinators of the Veterinary Public Health and Animal
Health Support Project in Nunavik

Authors
Andréanne Cléroux, DMV
Josiane Houle, DMV

Coordination
Josiane Houle, DMV

Design
Mathieu Dobchies

Copy editing
Mathieu Tremblay

Photographers
Émilie L. Couture, DMV
Andréanne Cléroux, DMV
Frédéric Sauvé, DMV
Manon Paradis, DMV
Bertrand Lussier, DMV

Pictures
Thank you to Lili Bergeron and Leila (Husky)!

Review
Magaly Bégin-Pépin, DMV
Denise Bélanger, DMV
Johannie Demers
Michelle Dionne, DMV
Julie Ducrocq, DMV
Taya Forde, DMV
Suzie Lemay, DMV
Bernard Raymond, DMV
Frédéric Sauvé, DMV
Alain Villeneuve, DMV
Manon Simard, B Sc, M Sc
Guillaume Théberge, DVM
Ordre des médecins vétérinaires du Québec
PLEASE NOTE: The information contained in this manual is unbiased and is
                       meant to serve as a general reference.

                This manual should be used for reference purposes only.

      In all cases, a veterinarian must be contacted for diagnosis and follow-up.
      You may contact the Veterinary Help Line (for more information please refer to the
      Veterinary Help Line chapter).

         Before giving medication sold over-the-counter to an animal, always
          contact the Veterinary Help Line to make sure it is safe to use (for
             more information refer to the Veterinary Help Line chapter).
A word from Ordre des médecins vétérinaires du Québec
L'Ordre des médecins vétérinaires du Québec acknowledges that the interventions required for the domestic
animals of the Nunavik residents represent a particular context and that this First Aid Guide aims to offer a
support to contribute to the health and welfare of animals.

L'Ordre des médecins vétérinaires du Québec wishes to underline the importance that the people participating
in the first aid programs seek veterinary advice to validate the decisions made and the interventions that will be
done when animal first aid care is provided, according to the Article 7 of the Veterinary Surgeons Act, R.S.Q.,
Chapter M-8.

In order to gather all the relevant information and the details on certain dispositions, the participants are
invited to contact the office of l'Ordre des médecins vétérinaires du Québec:

Phone : 1 800 267-1427
Fax : 1 450 774-7635
E-mail : omvq@omvq.qc.ca

Mot de l’Ordre des médecins vétérinaires du Québec
L’Ordre des médecins vétérinaires du Québec reconnaît que les interventions requises auprès des animaux de
compagnie des habitants du Nunavik sont effectuées dans un contexte particulier et que le présent Guide de
Premiers Soins vise à assurer un service de base contribuant à la santé et au bien-être des animaux.

L’Ordre des médecins vétérinaires du Québec désire souligner l’importance pour les participants aux
programmes de premiers soins de consulter un médecin vétérinaire afin de valider les décisions qui seront
prises et les interventions qui seront mises de l’avant lorsqu’il est question d’apporter des soins aux animaux,
conformément à l’Article 7 de la Loi sur les médecins vétérinaires, LRQ, c M-8.

Afin de recueillir toute information pertinente et d'obtenir les précisions sur certaines dispositions, les
participants sont invités à communiquer avec le bureau de l’Ordre des médecins vétérinaires du Québec :

Téléphone : 1 800 267-1427
Télécopieur :1 450 774-7635
Courriel : omvq@omvq.qc.ca
T ABLE OF CONTENTS

                                                                DOG
                                                                FIRST AID
                                                                Guide
      VETERINARY HELP LINE .............................................................................................8
           INFORMATION YOU SHOULD PROVIDE ............................................................8
           FACULTY OF VETERINARY MEDICINE OF UNIVERSITÉ DE MONTRÉAL ................8
      NUTRITION................................................................................................................9
           NUTRITION .......................................................................................................9
      HOW MUCH FOOD TO FEED TO AN ANIMAL............................................................9
      VACCINATION ..........................................................................................................10
           WHAT ARE VACCINES? ....................................................................................10
           HOW OFTEN SHOULD A DOG BE VACCINATED? ..............................................10
           WHERE TO GET YOUR ANIMAL VACCINATED? ................................................11
      PARASITES ................................................................................................................12
           PARASITES OF THE INTESTINE ...........................................................................12
           TREATMENT .....................................................................................................12
      RABIES ......................................................................................................................15
           GETTING BITTEN BY AN ANIMAL......................................................................15
           RABIES .............................................................................................................16
           HOW TO PREVENT RABIES ...............................................................................16
      KENNEL COUGH .......................................................................................................17
      DISTEMPER ...............................................................................................................18
      PARVOVIRUS.............................................................................................................19
      ZOONOSES ...............................................................................................................20
           POTENTIAL ZOONOSES ....................................................................................20
      HOW TO APPROACH A SICK OR INJURED DOG ........................................................21
           APPROACHING AN ANIMAL.............................................................................21
           MUZZLE ...........................................................................................................21
           RESTRAINING TECHNIQUES ..............................................................................23
           MOVING THE ANIMAL .....................................................................................23
      HOW TO DETERMINE IF AN ANIMAL IS SICK OR INJURED .........................................25
           AT A DISTANCE ................................................................................................25
           UP CLOSE ........................................................................................................25
      WOUNDS..................................................................................................................27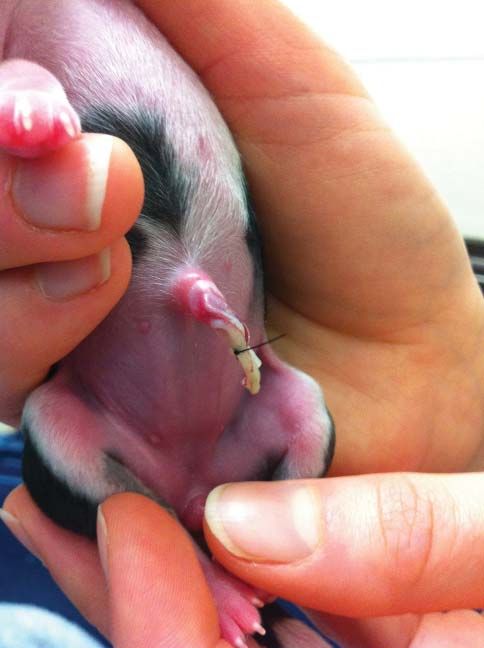
BLEEDING AND HAEMORRHAGE......................................................................27
CLEANING THE WOUND ..................................................................................29
BANDAGING A WOUND ..................................................................................29
ELIZABETHAN COLLAR .....................................................................................32
PAW PAD CUT..................................................................................................32
BITE WOUNDS .................................................................................................33
BROKEN LEG (FRACTURE) .........................................................................................34
OTHER INJURIES ........................................................................................................37
FOREIGN OBJECT IN THE EYE ...........................................................................37
FISH HOOK ......................................................................................................38
PORCUPINE QUILLS ..........................................................................................39
OTHER FOREIGN OBJECTS ................................................................................39
VOMITING ................................................................................................................40
DIARRHEA ................................................................................................................42
POISONING ...............................................................................................................43
HEAT STROKE ...........................................................................................................46
HYPOTHERMIA AND FROSTBITE ................................................................................47
HYPOTHERMIA ................................................................................................47
FROSTBITE........................................................................................................48
BREATHING PROBLEMS .............................................................................................49
CHOKING ........................................................................................................49
EYE PROBLEMS .........................................................................................................50
PINK EYE (CONJUNCTIVITIS) .............................................................................50
EAR PROBLEMS.........................................................................................................51
EAR INFECTION ................................................................................................51
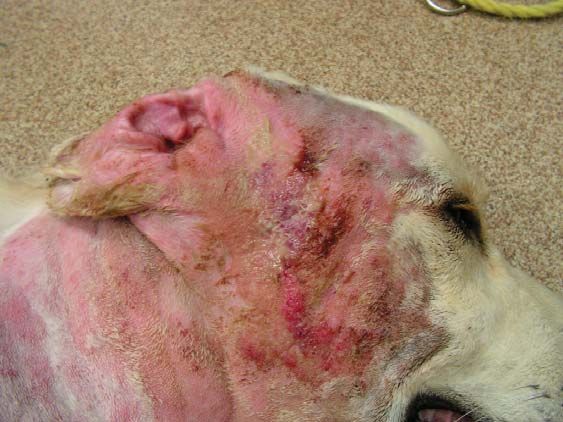
SKIN PROBLEMS........................................................................................................53
SKIN INFECTION ...............................................................................................53
ABSCESS ..........................................................................................................54
PREGNANCY, BIRTH AND NEWBORN CARE...............................................................55
PREGNANCY ....................................................................................................55
BIRTH ...............................................................................................................55
NEWBORN CARE..............................................................................................56
ORPHAN CARE.................................................................................................58
GIVING MEDICATION TO AN ANIMAL .......................................................................60
HOMEMADE RECIPES ...............................................................................................62
DAKIN SOLUTION.............................................................................................62
EAR CLEANING SOLUTION ...............................................................................62
MILK REPLACEMENT ........................................................................................62
REHYDRATION SOLUTION ................................................................................63
SUGAR BANDAGE............................................................................................63
STERILIZATION ..........................................................................................................65
WHAT ARE THE BENEFITS? ...............................................................................65
EUTHANASIA ............................................................................................................66
REFERENCES .............................................................................................................67
V      ETERINARY HELP LINE

                                nunavik@chuv.umontreal.ca
                                  514 345-8521, ext. 0065

The Veterinary Help Line and this guide were created to meet the need for veterinary services in the Northern
communities where veterinary services are not available. This service is free and only offered to the residents of
Nunavik and Eeyou Istchee territories.

Faculty of Veterinary Medicine of Université de Montréal
The Faculty of Veterinary Medicine of Université de Montréal offers free veterinary advice for cats and dogs to
all residents of these northern communities. Please leave a detailed message, including your name and a phone
number where you can be reached.

The Veterinary Help Line only allows us to offer basic advice to the pet owner; if possible, the animal should be
seen by a veterinarian in all cases.

Information you should provide
When contacting the Veterinary Help Line, please make sure to provide the following information:
  • Cat or dog;
  • Age;
  • Sex (male or female);
  • Spayed or neutered (sterilized);
  • Approximate weight;
  • Vaccines received (which ones and when);
  • Reason for contacting us;
     - General symptoms (what is the problem?)
     - When did the problem begin?
     - Evolution over time (getting better, worse or stable)
  • Did you give any treatment or medication to your animal since the problem began?
  • Is your animal vomiting or having diarrhea?
  • Is it eating and drinking like it would normally?
  • What does your animal normally eat and how many times a day/week?
  • Any associated event or condition such as fighting, pregnancy, giving birth, access to chemicals/poisons,
     etc.
  • Is your animal on any medication for other reasons (antibiotics, pain killers, etc.)?

When possible, send pictures or videos of the problem by e-mail. This will help the veterinarian to better assess
the problem and adapt the recommendations for treatment.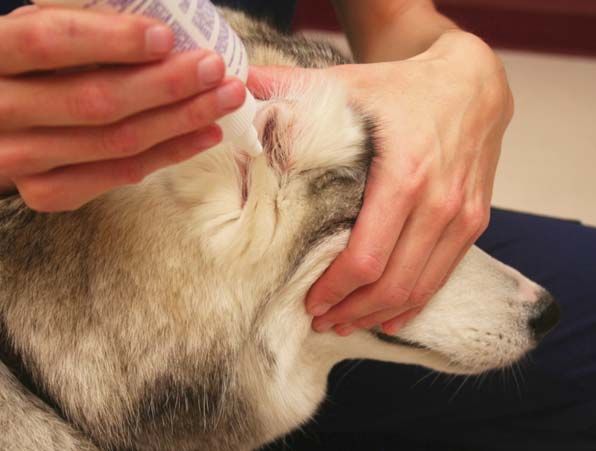
N      UTRITION
Nutrition
An animal can be fed fish, meat or dry kibble. If the fish/meat contains parasites or is not fresh, it should be
frozen for 24 hours or cooked before being fed to the animal as it could make the animal sick. At all times, the
animal should have access to fresh water.

How much food to feed an animal
Compare your animal's shape to the following chart. The ideal body score is 3.

More food should be fed to the animal if its body score is below 3.

If its body score is over 3, the amount of food fed daily should be gradually lowered until the animal reaches
the ideal body score.

Animals with an ideal weight are more likely to be healthy. Their body can fight diseases more easily, they are
more resistant to extreme temperatures (warm and cold), they have more energy and are able to run for longer
and faster.

                                    • Ribcage, spine, shoulder blades and pelvis easily visible (short hair)
                                    • Obvious loss of muscle mass

1       Emaciated
                                    • No palpable fat on rib cage

                                    • Ribcage, spine, shoulder blades and pelvis visible
                                    • Obvious abdominal tuck (waist)

2       Thin
                                    • No palpable fat on rib cage

                                    • Ribcage, spine, shoulder blades and pelvis not visible but easily palpable
                                    • Obvious abdominal tuck (waist)

3       Ideal
                                    • Thin layer of fat tissue palpable on rib cage

                                    • Ribcage, spine, shoulder blades and hipbones palpable with difficulty
                                    • Abdominal tuck (waist) absent

4                                   • Fat deposit obvious on spine and base of tail
                                                                                                                   © Royal Canin SAS 2012

         Overweight

                                    • Massive fat deposits on thorax, spine and base of tail
                                    • Obvious abdominal distension

5       Obese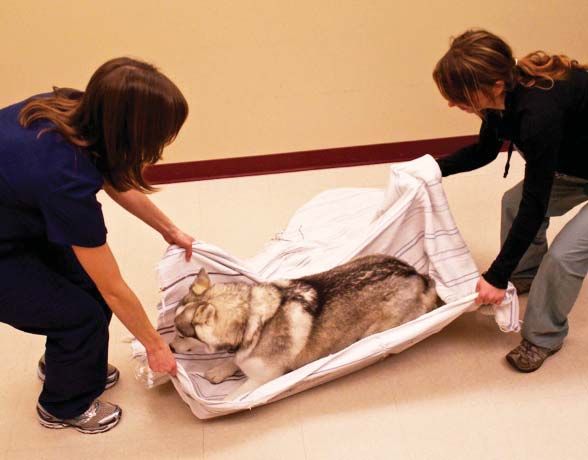
V     ACCINATION
What are vaccines?
Vaccines prepare an animal's body to fight specific diseases and prevents it from getting sick.

How often should a dog be vaccinated?

                                                     Puppies (0-1 year old)
                                                     CORE VACCINE
                                                     (PARVOVIRUS, DISTEMPER,
                                                     ADENOVIRUS, PARAINFLUENZA)
                                                     Vaccinate at 2 months, 3 months, 4 months and
                                                     1 year of age
                                                     RABIES VACCINE
                                                     Vaccinate at 3 months and 1
                                                     year of age

     Adults
     CORE VACCINE
     (PARVOVIRUS, DISTEMPER,
     ADENOVIRUS, PARAINFLUENZA)
     AND RABIES VACCINE

     Vaccinate every year for the Rabies
     and Core vaccines.

Refer to the Parvovirus and Distemper chapters for more information.

               When your animal is vaccinated, it is important to keep the vaccination certificate and
               to put the rabies tag on your animal’s collar.

                                                                                                     < 10 >
Where to get your animal vaccinated? LOCAL VACCINATORS The local vaccinator of your community can be contacted when your animal needs to be vaccinated or treated for parasites (refer to the Parasites chapter for more information). For more information, contact your Municipal Office. VACCINATION CLINICS Once or twice annually, the Centre Hospitalier Universitaire Vétérinaire (CHUV) with the help of the Ministère de l’Agriculture, des Pêcheries et de l’Alimentation du Québec (MAPAQ) organizes vaccination clinics for dogs and cats. You may contact your Municipal Office for more information about the next clinic being held in your community < 11 >
P    ARASITES
Parasites of the intestine
Parasites of the intestine are frequent. Dogs should be treated for parasites at the frequency detailed below.

SYMPTOMS OF A PARASITE INFECTION
Dogs often do not show any signs of the infection. However, adults can lose weight and puppies can be thin
but have a big abdomen when infected. Worms may be seen in the stools (look like grains of rice or spaghetti)
or vomit (look like spaghetti).

                                                                    Puppies should be treated at
                                                                    2, 4 and 6 months of age

                 Adult should be
                 treated once in March,
                 June, September and
                 December

ROUNDWORMS
Roundworms are very common. They can cause vomiting, diarrhea and weight loss. They can be seen in the
animal's stools or vomit and look like spaghetti.

This infection can be treated with Strongid T® (pyrantel pamoate) or Combantrin® (pyrantel pamoate).
Refer to the following section for more information.

TAPEWORMS
Tapeworms don't usually cause any symptoms. However, they can sometimes cause diarrhea and vomiting.
They can be seen in the animal's stools and look like grains of rice.

This infection cannot be treated with the medications described below. However, other medications can
be prescribed by a veterinarian to treat tapeworms (refer to the Veterinary Help Line chapter for more
information). This infection can be prevented by feeding frozen fish instead of raw fish to dogs.

                                                                                                          < 12 >
NORTHERN HOOKWORMS
Hookworms cause diarrhea and weight loss.
This infection can be treated with Strongid T® (pyrantel pamoate) or Combantrin® (pyrantel pamoate).
Refer to the following section for more information.
WHIPWORMS
Whipworms cause diarrhea.
This infection cannot be treated with the medications described below. However, other medications can
be prescribed by a veterinarian to treat whipworms (refer to the Veterinary Help Line chapter for more
information).
Treatment
Roundworms and hookworms can be treated with Strongid T® (pyrantel pamoate) or Combantrin® (pyrantel
pamoate). If an animal is infected with one of these parasites, treat it once and repeat the treatment 10 days
later with one of the products described below. You may then follow the prevention schedule described above.
COMBANTRIN®
You can get this medication at your health clinic or hospital. It is sold in tablets of 35mg or 125mg or in a liquid
formulation.
Liquid formulation: Shake well before use. With a syringe without a needle (found in the first aid kit), give
orally the dose of Combantrin® corresponding to your animal’s weight in this table. These doses are equivalent
to 5 mg/kg of Combantrin® (50 mg/mL).
Tablets of 35 mg or 125 mg: Give orally the dose of Combantrin® corresponding to your animal’s weight in
this table. These doses are equivalent to 5 mg/kg of Combantrin®. Refer to the Giving medication to an animal
chapter for more information.
COMBANTRIN®
Dose Dose Dose
Dog's weight
(millilitres) (35 mg tablets) (125 mg tablets)
5 kg (11 lbs) 0,5 mL ¾ tablet -
10 kg (22 lbs) 1 mL 1 ½ tablets ½ tablet
15 kg (33 lbs) 1,5 mL 2 tablets ¾ tablet
20 kg (44 lbs) 2,0 mL 3 tablets ¾ tablet
30 kg (66 lbs) 3,0 mL 4 ¼ tablets 1 ¼ tablet
40 kg (88 lbs) 4,0 mL 5 ¾ tablets 1 ¾ tablet
50 kg (110 lbs) 5,0 mL 7 tablets 2 tablets
< 13 >STRONGID T®
Contact your local vaccinator (refer to the Vaccination chapter) to have access to this medication. If not
available, contact the Veterinary Help Line (refer to the Veterinary Help Line chapter for more information).
Shake well before use. With a syringe without a needle, give orally the dose of Strongid T® corresponding to
your animal’s weight in this table. These doses are equivalent to 5 mg/kg of Strongid T® (50 mg/mL). Refer to
the Giving medication to an animal chapter for more information.
STRONGID T®
Dose
Dog's weight
(millilitres)
5 kg (11 lbs) 0,5 mL
10 kg (22 lbs) 1 mL
15 kg (33 lbs) 1,5 mL
20 kg (44 lbs) 2,0 mL
30 kg (66 lbs) 3,0 mL
40 kg (88 lbs) 4,0 mL
50 kg (110 lbs) 5,0 mL
< 14 >R ABIES
Getting bitten by an animal
WHAT TO DO IF A PERSON GETS BITTEN BY A WILD OR DOMESTIC ANIMAL
Immediately wash the bite wound(s) for 15 minutes using soap and water.
The animal might have been infected with rabies. It is therefore important to take the person to the nursery /
hospital as he or she may need to receive rabies antibodies and vaccines.
If an animal or a human is infected with rabies and develops symptoms, the disease is
always fatal. Therefore, precautions should always be taken as described above when a
person gets bitten by an animal, even if it seemed healthy.
WHAT TO DO WITH THE BITING ANIMAL
Contact your local authorities or the public health office for more information.
WHAT TO DO IF A DOG GETS BITTEN BY A WILD ANIMAL
Inform your local authorities that your dog was bitten by a wild animal. Clean the bite wound as described
below.
1. It is VERY IMPORTANT to wear latex gloves before cleaning the bite wound;
2. Clean the bite wound (Refer to the Wounds chapter for more information);
3. Wash your hands with warm water and soap;
4. Contact the Municipal Office or the local vaccinator in your community to have your animal vaccinated
within the first 7 days following the bite.
< 15 >Rabies
Animals and humans can be infected with rabies. Wild animals most often responsible for transmitting rabies
in Nunavik are the arctic foxes. Cats and dogs that come in contact with an infected animal can also become
infected.
An animal infected with rabies may take 2 days and up to over 6 months before
showing any signs of the disease. If an animal or a human shows symptoms of an
infection with rabies, the disease is always fatal.
INFECTION IN WILD ANIMALS
An infected animal may show the following signs:
• Loses of fear of human;
• Drools (foaming at the mouth);
• Roams around the village;
• Attacks dogs or humans;
• Loses its balance, has difficulty walking;
Not all wild animals show these signs. They might behave normally.
INFECTION IN DOMESTIC ANIMALS
An infected cat or dog may show the following signs:
• Loses its appetite;
• Drools (foaming at the mouth);
• Changes in behavior;
• Loses its balance, has difficulty walking;
Not all domestic animals show these signs. They might behave normally.
TRANSMISSION OF RABIES
Rabies is transmitted by the saliva of an infected animal when it bites another animal or a human. Rabies
cannot be transmitted by contact with blood, urine or stools of an infected animal.
How to prevent rabies
VACCINATION
Vaccination of dogs and cats against rabies is the best way to prevent this infection. All vaccinated animals
should wear their rabies tag on their collar. Refer to the Vaccination chapter for more information.
< 16 >K ENNEL COUGH
Kennel cough is a respiratory infection caused by a bacteria and/or virus. This disease is very contagious and is
transmitted in the air or by contact with the secretions of a sick animal.
SYMPTOMS OF KENNEL COUGH
The most frequent symptom is a persistent cough. The dog may also have less energy and eat less. Sometimes,
nasal discharges and signs of an eye infection are present.
FIRST AID
It is important you contact the Veterinary Help Line to get veterinary advice (refer to the Veterinary Help Line
chapter for more information).
Always isolate the sick animal from other dogs to prevent the transmission of the
disease.
Most infections will heal without treatment. However, the animal should always be kept at rest until all
symptoms resolve.
A treatment may be necessary in the following cases and you should contact the Veterinary Help Line to get
veterinary advice if you note one of these signs (refer to the Veterinary Help Line chapter for more information):
• The cough is important or worsens;
• The animal seems weak or tired;
• The animal is coughing, has nasal discharges and/or signs of an eye infection;
• Symptoms don’t resolve after 21 days.
< 17 >D ISTEMPER
Vaccination prevents this disease in most cases. Refer to the Vaccination chapter for
more information.
Distemper is caused by a virus transmitted by dogs or by wild animals such as foxes, wolves and minks. It is
very contagious and transmitted in the air or by contact with the secretions of a sick animal. It usually affects
dogs that are between 3 and 6 months old.
SYMPTOMS OF DISTEMPER
Lethargy, signs of an eye infection, coughing, diarrhea and vomiting are the most common symptoms of
distemper. A loss of balance and seizures may also be present.
FIRST AID
It is important you contact the Veterinary Help Line to get veterinary advice (refer to the Veterinary Help Line
chapter for more information).
Always isolate the sick animal from other dogs to prevent the transmission of the
disease.
1. Contact the Veterinary Help Line as soon as possible as medication will very likely be necessary (refer to
the Veterinary Help Line chapter for more information);
2. Ensure the animal has access to fresh water at all times;
3. Feed the animal everyday;
4. If the animal is vomiting or has diarrhea, refer to the Diarrhea and Vomiting chapters for more
information.
< 18 >P ARVOVIRUS
Vaccination prevents this disease in most cases. Refer to the Vaccination chapter for
more information.
Parvovirus is caused by a virus. It is very contagious and the virus is found in the stools of a sick animal or on
the ground where a sick animal defecated. It usually affects very young puppies but dogs of all ages may get
infected.
SYMPTOMS OF PARVOVIRUS
Weakness, liquid and bloody diarrhea, vomiting and loss of appetite are the most common symptoms of
parvovirus. Death may occur very rapidly if untreated.
FIRST AID
It is important you contact the Veterinary Help Line to get veterinary advice (refer to the Veterinary Help Line
chapter for more information).
Always isolate the sick animal from other dogs to prevent the transmission of the disease . The virus causing
this disease remains on the ground contaminated by the stools of a sick animal for several months and other
dogs may get infected if in contact with that ground. Therefore, no dog should be kept in the area where an
animal infected with parvovirus was kept for a minimum of 1 year.
1. Contact the Veterinary Help Line as soon as possible as medication will very likely be necessary (refer to
the Veterinary Help Line chapter for more information);
2. Ensure the animal has access to fresh water at all times;
3. Feed the animal everyday;
4. If the animal is vomiting or has diarrhea, refer to the Diarrhea and Vomiting chapters for more
information;
5. If the animal has access to indoors, all floors should be cleaned with bleach and water.
< 19 >Z OONOSES
A zoonosis is a disease transmitted from an animal to a human. Some diseases can be transmitted to you by
dogs. Simple precautions prevent most infections:
• Always wash your hands with soap after touching an animal;
• Don’t let an animal lick you;
• If you have to handle dog stools, do it with a shovel, a plastic bag or gloves and wash your hands
afterwards.
Potential zoonoses transmitted by dogs and cats
• Roundworms – transmitted in the stools or vomit;
• Tapeworms – transmitted in the stools;
• Hookworms – transmitted in the stools
• Whipworms – transmitted in the stools;
• Rabies – transmitted by the saliva when an infected animal bites a human;
• Cryptosporidium – transmitted in the stools;
• Giardia – transmitted in the stools;
• Toxoplasma – transmitted in contaminated meat or in the stools of an infected cat;
• Mites – transmitted through a contact with the infected animal.
This list is not exhaustive.
Refer to the Parasites and Rabies chapters for more information. For information about diseases that are not
discussed in this text, please call your local hospital or health clinic.
< 20 >H OW TO APPROACH A SICK OR
INJURED DOG
Approaching an animal
Always approach slowly and avoid direct eye contact with the animal. Let it smell the back of your hand. Try
not to make quick movements and keep an eye on its reactions. Speak in a soft, soothing voice.
WARNING SIGNS
An animal may become aggressive it is showing one or more of these signs:
• Animal is growling and its ears are flat on its head;
• Animal is showing its teeth;
• Hair is raised on its shoulders and back;
• Animal is staring at you;
• Tail is tucked between the animal’s hind legs.
To prevent dog bites, it is important to teach children how to recognize the warning
signs described above and to approach an animal safely.
Muzzle
Before providing care to a sick or injured animal, it is better to muzzle the animal. If the owner is present, ask
him or her to do it. You can use a soft rope or cloth, but rolled gauze (found in the first aid kit) works best.
This technique should NOT be used if the animal is vomiting, coughing or is not
breathing normally. Moreover, a muzzled dog should never be left unattended.
< 21 >1 Make a large loop in the rope/rolled gauze;
2 Stand behind the animal and slide the loop
around its nose;
3 Tighten the loop on the animal’s nose;
4 Wrap the ends around the animal’s nose, criss-
cross them under its chin and tie them behind
its head. The animal should be able to breathe
normally.
< 22>Restraining techniques
Before using any of these restraining techniques, it is better to place a muzzle on the animal.
STANDING POSITION
1. Place your arm around the dog’s neck. Make sure
the animal can breathe normally;
2. Look towards the animal’s rear end to avoid getting
bitten;
3. Place your other arm around the animal’s abdomen;
4. At all times, hold the animal tightly against your
body.
LYING POSITION
1. Stand or put one knee down at the dog’s side;
2. Reach over the animal's body and grab the front
and hind legs that are the closest to your body;
3. Pull the legs away from you. As the animal drops,
make sure its head doesn’t hit the ground. You may
ask someone to hold the head as you pull on the
legs;
4. Hold the front and hind legs that are touching
the ground at all times. With your forearms, put
pressure on the animal’s neck, shoulder and hips to
prevent the animal from moving and getting up;
5. Make sure the animal can breathe normally.
< 23 >Moving the animal
IN YOUR ARMS
Place one arm around the animal’s chest and the other behind its
hind legs. If the animal has a hind-leg injury, place your other arm
around its abdomen.
Watch your face and hands as the animal could turn around and
bite you.
ON A BLANKET
You can use this technique if someone can help you and if the animal stays calm. Place the animal on the
middle of a blanket in a lying position. Each person grabs a side of the blanket and lifts the animal.
ON A BOARD
Slide a board under the animal. Using tape or a soft rope, secure the animal on the board to prevent
movement.
< 24 >H OW TO DETERMINE IF AN
ANIMAL IS SICK OR INJURED
At a distance
Examine the animal from a short distance and ask yourself the following questions:
• Is it behaving normally: does it look more tired, is it showing signs of aggression or fear?
• Is it drinking and eating as much as it would normally?
• Are the animal's stools and urine normal?
• Is it vomiting or having diarrhea?
• Is it showing signs of pain: is it limping or crying?
• Is it injured or bleeding?
Up close
The heartbeat, breathing rate, temperature and the gums have to be evaluated on a sick or injured animal.
HEARTBEAT
To evaluate an animal’s heartbeat, place your hands on its chest as
shown on the picture. Count the number of beats you can feel in
10 seconds.
The best time to evaluate this is when the animal is at rest.
Puppy 15-25
Heartbeats per (1-4 months)
10 seconds
Adult dog 10-20
BREATHING RATE
To evaluate an animal’s breathing rate, stand at its side and look at the movement of its chest. Every time
the animal breathes in, its chest rises. Count the number of times the chest rises in 10 seconds. It should be
between 3 and 8 times per 10 seconds.
The best time to evaluate this is when the animal is at rest. Do not evaluate it if the animal is panting.
It is abnormal if the animal’s breathing rate is higher than 8 times per 10 seconds. It is also abnormal if the
animal is having difficulty breathing, is coughing or is making sounds when breathing.
< 25 >TEMPERATURE
Take the animal’s rectal temperature with a thermometer (found in the first aid kit). Dip the thermometer in
petroleum jelly (Vaseline® ) or in water before using it. Insert it horizontally about 2 cm into the animal's rectum
(slowly and very carefully) and keep it in place for about a minute or until the thermometer beeps. A dog’s
normal temperature ranges between 37,5°C and 39,0°C (100°F and 102°F).
It is abnormal if the temperature is below 37,0°C (98,6°F). Refer to the Hypothermia and frostbite chapter for
more information.
It is also abnormal if the temperature is higher than 39,5°C (103,1°F). Refer to the Heat stroke chapter for
more information.
GUMS
1. Lift the upper lip of the animal and run your finger on the gums. They
should be pink and a little bit wet;
2. Place your finger on the gums and apply pressure on them for
3 seconds;
3. Let the pressure go. At first, the gums should be white as shown on
this picture;
4. Quickly, the gums will become pink again as shown on this picture.
Count how many seconds it takes for the gums to go from white to
pink. It should take 2 seconds or less.
It is abnormal if it takes 3 seconds or more for the gums to go from white to pink. It is also abnormal if the
gums are very pale, blue or dark red. If you note these changes, you should contact the Veterinary Help Line
(for more information, refer to the Veterinary Help Line chapter).
< 26 >W OUNDS
Bleeding and haemorrhage
When an animal is injured, always stop the bleeding first. Then you may address the
wounds and other problems.
DIRECT PRESSURE
If possible, put on latex gloves (found in the first aid kit).
1. Apply direct pressure on the bleeding site
with a gauze (found in the first aid kit) or
a clean cloth. If it becomes soaked, apply
additional layers of gauze while maintaining
the pressure;
2. Direct pressure should be held over
the bleeding site for 10 minutes. After
10 minutes, release the pressure to verify if
the wound is still bleeding;
3. You can make a pressure bandage to keep
the gauze/cloth in place or if the bleeding is
severe. Refer to the Pressure bandage section
of this chapter for more information.
DO NOT tie an elastic, belt or rope around a limb to manage a bleeding as this could
cause severe damage to the limb.
If the bleeding is severe, use very absorbent gauzes (found in the first aid kit) or a
sanitary napkin to control the bleeding and make a pressure bandage.
< 27 >PRESSURE BANDAGE
A pressure bandage is used if a bleeding is important or if it doesn't stop after applying direct pressure on the
bleeding site for 10-15 minutes.
DO NOT make a pressure bandage if the animal cannot be supervised at all times or if
an Elizabethan collar (refer to the Elizabethan collar section of this chapter for more
information) is not placed around its neck. It is important to prevent the animal from
chewing and eating its bandage as this could cause severe complications.
1. Apply rolled gauze
or a soft cloth
around the limb/
body part to keep
the gauze you were
holding over the
bleeding site in
place;
2. Secure the bandage
in place with fabric
adhesive tape
or regular tape
applied loosely;
3. Do not apply the pressure bandage too tightly. You should be able to fit one finger under the bandage. If
you are bandaging a limb, check for swelling or discomfort of the toes: these indicate your bandage is too
tight, in which case you will need to loosen it;
4. Remove the pressure bandage after 1 hour. If the wound is still bleeding, place a pressure bandage on the
wound again and leave it on for an hour. Remove the bandage and check the wound again in an hour.
Repeat until the bleeding stops.
< 28 >Cleaning the wound
1. Wash your hands and/or put on latex gloves;
2. Stop the bleeding if any (refer to the Bleeding and haemorrhage section for more information);
3. If possible, cover the wound with a water-based lubricating gel before cleaning it. It will prevent hair from
getting into the wound while you shave the area;
4. Cut or shave 3 centimeters of hair around all sides of the wound with scissors or a hair clipper if the wound
is big and contains debris;
5. Rinse the wound with lukewarm water;
6. Clean the wound and surrounding skin with soft soap or chlorhexidine soap and rinse with water. Use
tweezers to remove debris;
7. Blot dry with a towel or a clean cloth;
8. Apply a triple-antibiotic ointment (Polysporin®) on the wound;
8. Refer to the next section for bandaging techniques.
N.B. The material and products mentioned above are likely to be found at your local clinic. Refer to the
Veterinary Help Line if needed.
After providing first aid to the animal, you should contact the Veterinary Help
Line to get veterinary advice (refer to the Veterinary Help Line chapter for more
information).
Bandaging a wound
BANDAGE
DO NOT make a bandage if the animal cannot be supervised at all times or if an
Elizabethan collar (refer to the Elizabethan collar section of this chapter for more
information) is not placed around its neck. It is important to prevent the animal from
chewing and eating its bandage as this could cause severe complications.
Read this entire section before making the bandage. Get all the material ready before you begin.
1. Clean the wound (refer to the previous section for more information);
2. If the wound is small (less than 5 centimeters), leave it uncovered. Bandage the wound if it is longer than 5
centimeters, deep or can be contaminated by dirt;
If the wound is deep or infected, apply a sugar bandage over it (refer to the
Homemade recipes chapter for more information).
< 29 >When making a bandage, wrap the different layers around the limb or body part going
in the same direction. It is easier to make a bandage when the animal is lying on its
side. For more information, refer to the Restraining techniques section of the How to
approach a sick or injured dog chapter.
3. Use a piece of non-stick pad (Telfa pad®) big enough to cover the
entire wound. You can also use a sanitary napkin;
4. Apply rolled gauze around the limb/body part to keep the non-stick
pad in place. You can also use cloth.
If bandaging a limb, foot or paw pad, apply rolled gauze on the toes
first and finish above the ankle or wrist.
If the wound is above the ankle or wrist, apply rolled gauze on the
ankle or wrist first and finish above the knee or elbow.
ALWAYS leave at least 2 toes out of the bandage as shown on
this picture;
5. Loosely apply an elastic bandage over the rolled gauze to secure the
bandage in place. It may cut off blood circulation if applied too tight.
If elastic bandage is not available, secure with fabric adhesive tape or
regular tape.
N.B. The material and products mentioned above are likely to be found
at your local clinic. Refer to the Veterinary Help Line if needed.
To ensure not to apply the elastic bandage too tight around the limb/body part,
unroll it completely prior to use and roll it up loosely back onto the roll.
< 30.You should be able to fit two fingers under the bandage. If you are bandaging a limb,
check for swelling or discomfort of the toes every day: this indicates the bandage is too
tight, in which case you will need to loosen it.
After providing first aid to the animal, you should contact the Veterinary Help
Line to get veterinary advice (refer to the Veterinary Help Line chapter for more
information).
TAKING CARE OF THE BANDAGE
1. Keep the bandage clean and dry at all times;
2. Every day, check the toes for any signs of swelling, heat, redness or pain. If any of these signs are present,
your bandage is too tight, in which case you will need to loosen it;
3. Be sure the bandage remains in place.
If the bandage is wet, change it immediately.
Unless a veterinarian gives you other recommendations, the bandage should be
changed every day for the first 2 days and then every other day.
Every time the bandage is changed, clean the wound as described previously.
You should contact the Veterinary Help Line to allow a follow-up care of the wound by
a veterinarian (refer to the Veterinary Help Line chapter for more information).
TAKING CARE OF AN ANIMAL WITH A BANDAGED WOUND
1. If the animal seems uncomfortable, or if you have any concerns about the bandage or the wound (bad
odor, pus, no improvement, etc.), contact the Veterinary Help Line as soon as possible (refer to the
Veterinary Help Line chapter for more information);
2. Keep the animal at rest until the wound is healed (usually 1 to 2 weeks). Ideally, the animal should be kept
on a chain. You can take the animal for short walks on a leash.
< 31 >Elizabethan collar
An Elizabethan collar is used to prevent an animal from removing its bandage or re-opening wounds.
You can make one using a plastic bucket. Cut a
hole large enough to fit your dog's head at the
bottom of the bucket. Tape the edges of the
hole so no rough edges are in contact with the
animal’s neck.
It must be large enough so that your animal is
comfortable, but small enough that it will not
come off easily. You can secure it with tape onto
the animal’s collar to prevent it from falling off.
You can also fabricate a collar using a cardboard
box or a sheet of soft plastic.
Keep the Elizabethan collar on at all times,
especially when you can’t supervise the animal.
The animal can wear the collar all day and sleep
with it.
With the Elizabethan collar on, your dog should
be able to breathe, drink and eat normally.
Paw pad cut
1. Wash your hands and/or put on latex gloves;
2. If the paw pad is bleeding heavily, apply direct pressure on it with a gauze. If you can’t stop the bleeding,
refer to the Bleeding and haemorrhage section of this chapter;
3. Clean the wound with soft soap or chlorhexidine soap and rinse with water. Use tweezers to remove
debris;
4. Bandage the paw if the cut is 5 centimeters long or more (refer to the Bandaging a wound section of this
chapter for more information);
5. Every time the bandage is changed, soak the paw in a Dakin solution (refer to the Homemade recipes
chapter for more information) and blot it dry with a clean cloth before applying a new bandage on it;
6. Refer to the Taking care of the bandage section of this chapter for more information about bandage care.
N.B. The material and products mentioned above are likely to be found at your local clinic. Refer to the
Veterinary Help Line if needed.
DO NOT make a bandage if the animal cannot be supervised at all times or if an
Elizabethan collar (refer to the Elizabethan collar section of this chapter for more
information) is not placed around its neck. It is important to prevent the animal from
chewing and eating its bandage as this could cause severe complications.
< 32 >Bite wounds
After providing first aid care to the animal, contact the Veterinary Help Line to seek veterinary advice (refer
to the Veterinary Help Line chapter for more information). What may look like a small or minor bite wound
may turn into a severely infected wound if not treated properly and the use of antibiotics may be necessary to
control the infection.
1. Clean the wound with soft soap or chlorhexidine soap and rinse with water;
2. Blot dry with a clean cloth or towel;
3. Apply a triple-antibiotic ointment (Polysporin®) on the wound daily until it heals;
4. Bandage the wound if it is 5 centimeters long or more.
Keep an eye on the animal for a few days as complications could occur. The following signs might indicate
that the wound is infected. If you note any of these signs, you should contact the Veterinary Help Line to seek
veterinary advice (refer to the Veterinary Help Line chapter for more information):
• Animal is weak;
• Loss of appetite;
• Wound is swollen or painful;
• Pus is coming from the wound or an abscess is forming (refer to the Abscess section in the Skin problems
chapter for more information).
Bite wounds may be very small and hard to find. Examine the entire body of your
animal using your hands to move the hair and expose the skin. Each bite wound, even
if very small, will need to be treated as described in this section.
< 33 >B ROKEN LEG (FRACTURE)
After providing first aid to the animal, contact the Veterinary Help Line to get
veterinary advice (refer to the Veterinary Help Line chapter for more information). An
animal with a broken leg must be evaluated and treated by a veterinarian. The first aid
techniques described in this section will allow you to immobilize the leg to reduce the
pain while you get advice by a veterinarian. These techniques will not contribute in any
way to the healing of the bone or the animal’s recovery.
SYMPTOMS OF A FRACTURE
Fracture is a word used to describe a break in a bone. An animal with a broken leg will limp or refuse to use it.
The leg will be swollen and painful. The position of the broken leg may also be abnormal.
FIRST AID
1. If the skin is intact, read the indications in the blue frame below and go to the next step. If the broken
bone has cut through the skin and can be seen, thoroughly rinse the wound with lukewarm water. Blot it
dry with a gauze or a clean cloth and cover the wound with a water-based lubricating gel. Use a piece of
non-stick pad to cover the entire wound. You can also use a sanitary napkin. Secure in place with fabric
adhesive tape or regular tape;
If the bone is broken above the
elbow or the knee, DO NOT bandage
the leg. It will make the leg heavier,
will cause pain, and will not help to
stabilize the fracture.
Place a bandage ONLY if the broken
bone is under the elbow or knee as
shown by the arrows on this picture.
elbow
knee
< 34 >DO NOT make a bandage if the animal cannot be supervised at all times or if an
Elizabethan collar (refer to the Elizabethan collar section of the Wounds chapter for
more information) is not placed around its neck. It is important to prevent the animal
from chewing and eating its bandage as this could cause severe complications.
It is easier to make a bandage when the animal is lying on its side. For more
information, refer to the Restraining techniques section in the How to approach a sick
or injured dog chapter. Get all the material ready before moving on to the next step.
2. Starting at the foot and ending at the shoulder or hip, wrap
the broken leg using cotton rolls. If not available, use any thick
material such as towels or blankets that you previously cut into long
10-centimeter wide strips. This layer should be about ½ to 1-inch
thick.
ALWAYS leave at least 2 toes out of the bandage as shown on
this picture;
3. Apply rolled gauze over the
layers of cotton rolls;
4. Place any hard material on
both sides of the fractured
leg to splint it. You may use
sticks, rolled magazines, or
any rigid material. Secure in
place with fabric adhesive
tape or duct tape;
< 35 >5. Apply an elastic bandage on the entire leg over the bandage
already in place. The layers of cotton rolls and rolled gauze
should be visible at both ends of the bandage. At this point, the
animal should not be able to bend its leg;
N.B. The material and products mentioned above are likely to be
found at your local clinic. Refer to the Veterinary Help Line if needed.
To ensure not to apply the elastic bandage too tight around the leg, unroll it
completely prior to use and roll it up loosely back onto the roll.
Do not apply the bandage too tight. You should be able to fit two fingers under the
bandage. Check every 12 hours on the first day, then daily for swelling or discomfort
of the toes: these indicate your bandage is too tight, in which case you will need to
loosen it.
6. Refer to the Bandaging a wound section in the Wounds chapter for more information about bandage care;
7. While waiting to transport the animal to a veterinary clinic, keep the animal at complete rest (in a cage if
possible or on a short chain).
< 36 >O THER INJURIES
Foreign object in the eye
1. Restrain the dog from moving (refer to the Restraining techniques section in the How to approach a sick or
injured dog chapter for more information);
2. Rinse the eye with saline eye wash or water for 30 seconds;
3. If necessary, gently roll the cotton end of a wet cotton swab on the eye and on the inside of the eyelids to
remove the foreign object;
4. If the foreign object is embedded (stuck) in the eye, use tweezers to carefully remove it. Do not touch the
eye with the tweezers;
5. Apply 1 centimeter of antibiotic ointment for eyes (Polysporin® for eyes) on the eye 2-4 times daily for 10
days.
N.B. The material and products mentioned above are likely to be found at your local clinic. Refer to the
Veterinary Help Line if needed.
If the foreign body is embedded in the eye, the animal will need antibiotics and
painkillers. Contact the Veterinary Help Line for more information (refer to the
Veterinary Help Line chapter for more information).
< 37 >Fish hook
Fish hooks are often found around the face, muzzle, and on the paws. If the hook is stuck in the skin, follow
these steps to safely remove it:
1. Using pliers, push
the fish hook
through the skin
until the barb is
visible;
2. Cut the barb of the
fish hook with wire
cutters;
3. Pull the hook
backwards (the
opposite way it
went in);
If the hook has been swallowed and the fish line can be seen in the mouth, do not pull
on the fish line. Contact the Veterinary Help Line to seek veterinary advice immediately
(refer to the Veterinary Help Line chapter for more information). This is an emergency
and your animal should be seen by a veterinarian.
< 38 >Porcupine quills
NEVER cut a quill. All quills must be removed from the animal's skin and mouth.
1. Using pliers, grab the porcupine quill as close as possible to the skin;
2. Pull sharply on the quill to remove it;
Examine the animal’s entire body to make sure all porcupine quills have been removed. They are often found
in the mouth, under the tongue, around the face, nose and front limbs. Run your hands through the animal’s
coat over its whole body. Examine the mouth (open it wide and use a flashlight to get a good look), lips and
tongue for porcupine quills.
Porcupine quills can be a few millimeters to several centimeters long. The ones that
are not removed will keep moving under the animal's skin until they come out and will
need to be removed.
If the wounds become infected or an abscess forms, if the animal seems more
tired, loses its appetite or has difficulty breathing, contact the Veterinary Help
Line to seek veterinary advice (refer to the Veterinary Help Line chapter for more
information).
Other foreign objects
Except fish hooks, most foreign objects may be removed by following the steps described in the Porcupine
quills section of this chapter.
If a large object is penetrating the animal’s skin or is very deep, it is VERY IMPORTANT
that you do not remove it and place a bandage around it to secure it in place. When
placing the bandage around the foreign object, go around the object with the
different layers of the bandage to make a donut-shaped bandage that will secure the
foreign object in place.
Removing the foreign object could cause severe haemorrhage and put the animal's life
in danger. Call the Veterinary Help Line to seek veterinary advice immediately (refer to
the Veterinary Help Line chapter for more information). This is an emergency and your
animal should be seen by a veterinarian.
< 39 >V OMITING
A dog may vomit after eating something bad or when it is sick.
SYMPTOMS OF VOMITING
Frequent or persistent vomiting is concerning. Diarrhea, dehydration, blood in vomit, weight loss and loss of
appetite may also be present.
FIRST AID
It is important you contact the Veterinary Help Line to get veterinary advice (refer to the Veterinary Help Line
chapter for more information).
Follow these recommendations for an adult dog. If a puppy is vomiting, follow these recommendations AND
rub corn syrup, maple syrup or honey every 4 hours on the puppy’s gums until it starts eating well.
1. Make sure the animal has access to fresh water at all times;
2. Take the animal’s food away for 8 hours;
• If the animal does not vomit during the fast (8 hours), feed it cooked ground beef or cooked fish (2 cups)
mixed with cooked rice (2 cups). This recipe should be divided in 2 to 3 meals given throughout the day.
The amount of food is calculated for a medium-size dog (20-30 kg or 45-70 lbs) and you will have to
adjust this amount based on the size of your animal. If this food is well tolerated, continue feeding it to
the dog for the next 2 days while slowly re-introducing its regular food;
• If the animal vomits during the fast (8 hours), feed it rice water (cook 1 cup of rice in 4 cups of water,
remove the rice and serve the residual water) for the next 12 hours;
› If the animal stops vomiting after being served rice water for 12 hours, feed it cooked ground beef
or cooked fish (2 cups) mixed with cooked rice (2 cups). This recipe should be divided in 2 to 3 meals
given throughout the day. The amount of food is calculated for a medium-size dog (20-30 kg or 45-
70 lbs) and you will have to adjust this amount based on the size of your animal. If this food is well
tolerated, continue feeding it to the dog for the next 2 days while slowly re-introducing its regular
food;
› If the animal is still vomiting after being served rice water for 12 hours, contact the Veterinary Help Line to
seek veterinary advice (refer to the Veterinary Help Line chapter for more information).
< 40 >If your animal is vomiting frequently or vomits 3-4 days in a row, it can become
dehydrated. Dehydration may make your animal tired and lose its appetite. If you
notice these changes, it is important your animal drinks a rehydration solution (refer to
the Homemade recipes chapter for more information).
1. Give 1 cup of the rehydration solution to your animal 3 times a day for 2 days;
2. If your animal refuses to drink it or the solution makes it vomit, try giving it ½ cup of the
solution 3 times a day for 2 days;
3. If your animal still refuses to drink it , contact the Veterinary Help Line to seek veterinary advice
(refer to the Veterinary Help Line chapter for more information).
If you saw the animal swallowing a foreign object, give the animal petroleum jelly (Vaseline®) orally:
• If the animal is small (less than 20 kg or 45 lbs) give orally 2 tablespoons 4 times a day until you find the
foreign object in the stools or petroleum jelly can be seen in the stools;
• If the animal is big (more than 20 kg or 45 lbs) give orally 4 tablespoons 4 times a day until you find the
foreign object in the stools or petroleum jelly can be seen in the stools.
If the foreign object does not come out in the stools and the animal has persistent
vomiting or diarrhea or a loss of appetite, it is important you contact the Veterinary
Help Line to seek veterinary advice (refer to the Veterinary Help Line chapter for more
information).
< 41 >You can also read