2019 Eventide Inc., One Alsan Way, Little Ferry, NJ, 07643 USA - Emote 1.1 Users' Manual - Eventide Audio
←
→
Page content transcription
If your browser does not render page correctly, please read the page content below
Emote 1.1
 Users’ Manual

                    Part No: 141318 Rev C
©2019 Eventide Inc., One Alsan Way, Little Ferry, NJ, 07643 USA

                                                                  1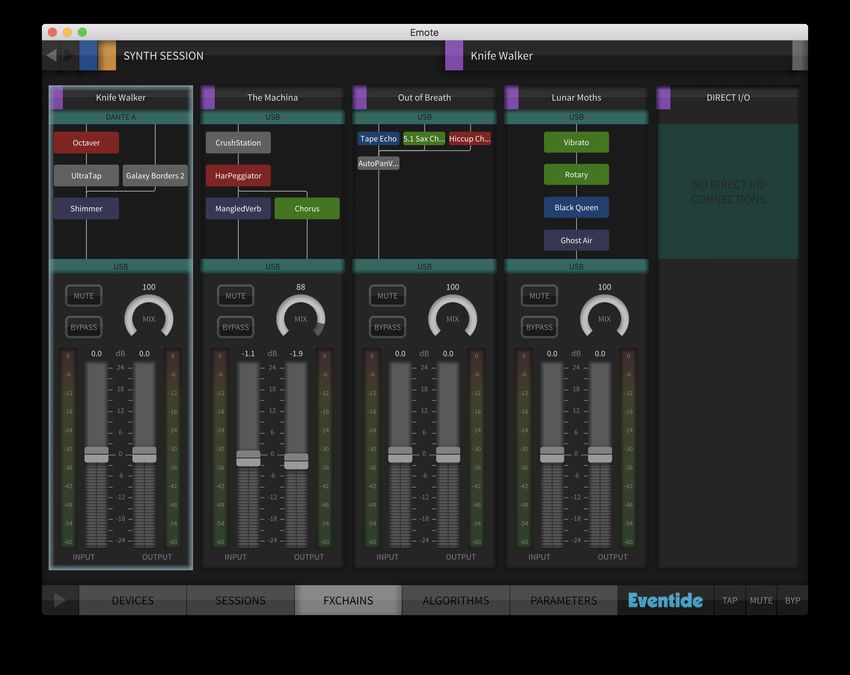
Table of Contents
Introduction ............................................................................................................................... 3
   Downloading the Installer ............................................................................................................... 3
   Making Sure Your H9000 Hardware is Up To Date ................................................................ 3
   How to Use This Document ............................................................................................................. 3
Connecting Emote to the H9000 Hardware ..................................................................... 4
The Emote User Interface ...................................................................................................... 5
   Tabs ......................................................................................................................................................... 6
   Main Screen .......................................................................................................................................... 6
   Browser Window ................................................................................................................................ 6
   Color Blocks .......................................................................................................................................... 6
   Other User Interface Controls: ....................................................................................................... 7
Using Emote ................................................................................................................................ 8
   Devices.................................................................................................................................................... 8
   Sessions .................................................................................................................................................. 9
   FX Chains............................................................................................................................................. 11
   Algorithms.......................................................................................................................................... 13
   Parameters......................................................................................................................................... 17
   Parameter Automation .................................................................................................................. 20
   Loading and Saving Files ............................................................................................................... 21
   Metering .............................................................................................................................................. 22

                                                                                                                                                                2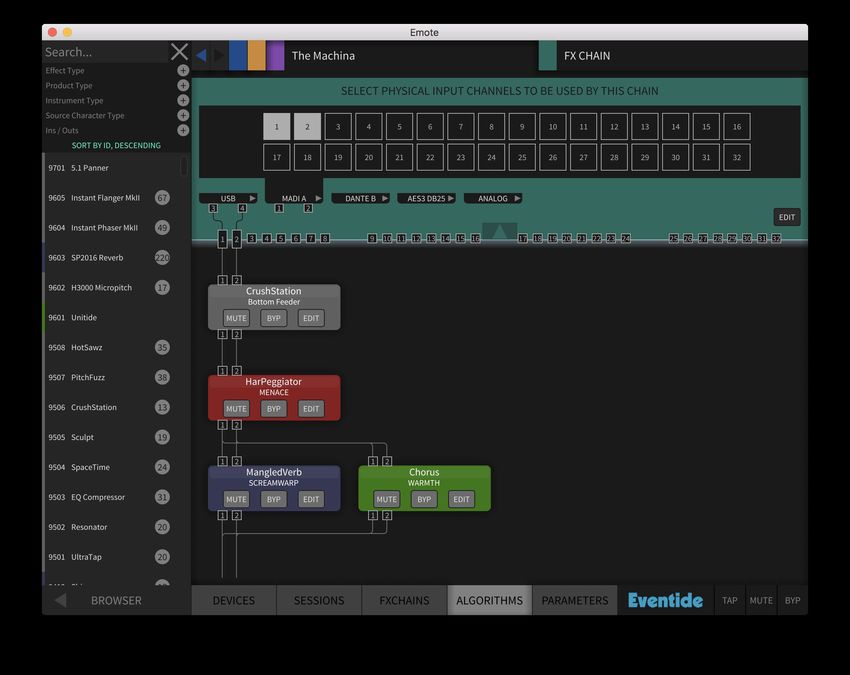
Introduction
Emote is a stand-alone program for:

   •   OS X computers running 10.9.5 or higher
   •   PCs running Windows 7 or higher
   •   VST, AudioUnit, and Pro Tools plugin formats

Emote gives you control of all features and settings of your H9000/H9000R effects
processor, allowing you to craft your effects extremely quickly and intuitively. Think
of Emote as your artistic partner, letting you dig deeper into the creative potential of
the H9000/H9000R.

Note: For brevity’s sake we will henceforth in this manual use the term “H9000” to
describe either a H9000 or H9000R hardware.

Downloading the Installer
Emote is available as a free download at
https://www.eventideaudio.com/support/downloads/emote-software-h9000

Once the installer is downloaded, double click the installer icon and follow the
onscreen instructions. The installer allows you to choose which formats of Emote to
install, as well as the install paths.

   •   On OS X, since Emote is manually downloaded from our website (as opposed
       to the OS X app store), you will be prompted to approve the installation of the
       program during the install process.

   •   On Windows machines, since Emote is not digitally signed by Microsoft, your
       machine may give you some extra security prompts while installing.

If the computer running Emote is connected to the Internet, it will automatically poll
Eventide’s servers to check for any updated versions and alert you if there is a
newer version available.

Making Sure Your H9000 Hardware is Up To Date
In order for Emote to work optimally, your H9000 should be updated to the latest
available firmware. Please refer to your H9000’s user’s manual for details.

How to Use This Document
Before using Emote, we suggest you have at least a basic familiarity with the
H9000’s hardware and effects structures. Please refer to your H9000’s user’s
manual for an overview of its operation, as well as deeper details on its functions.

                                                                                       3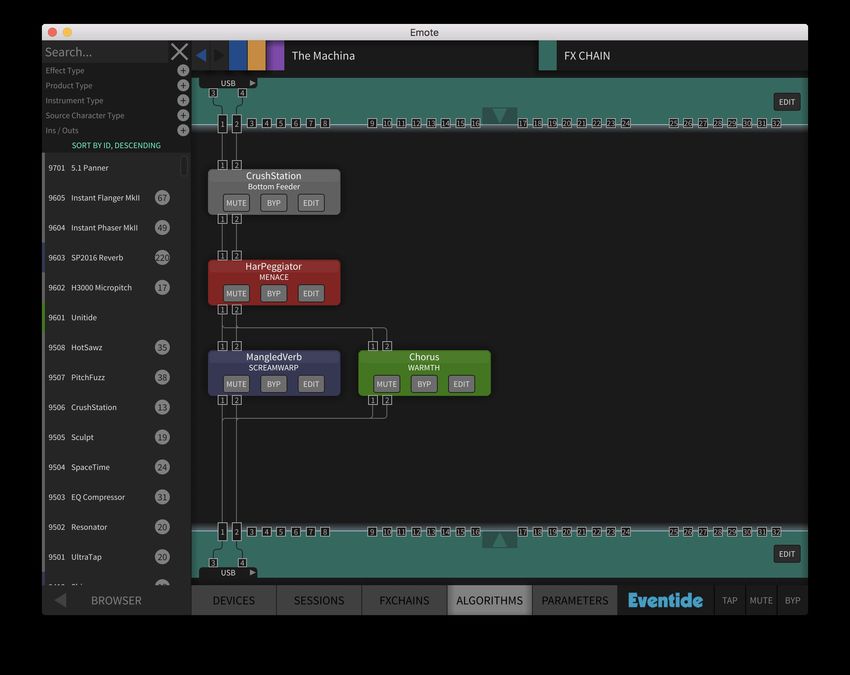
Connecting Emote to the H9000 Hardware
  •   Make sure your H9000 is connected to your local area network, using the RJ-
      45 connector on its rear panel or the included wi-fi dongle.

  •   Launch the Emote software on a computer that is connected to the same
      Local Area Network.

  •   Upon launch, Emote will show a list of available H9000 units on the left side
      of the screen. Any available H9000s will be displayed by their default names
      (or custom names, if renamed through the H900 front panel interface).

  •   Click the “connect” toggle above the H9000 icon to “activate” the unit you
      wish to control. The main interface will populate with data from that unit and
      you can now view and control that H9000.

                                                                                      4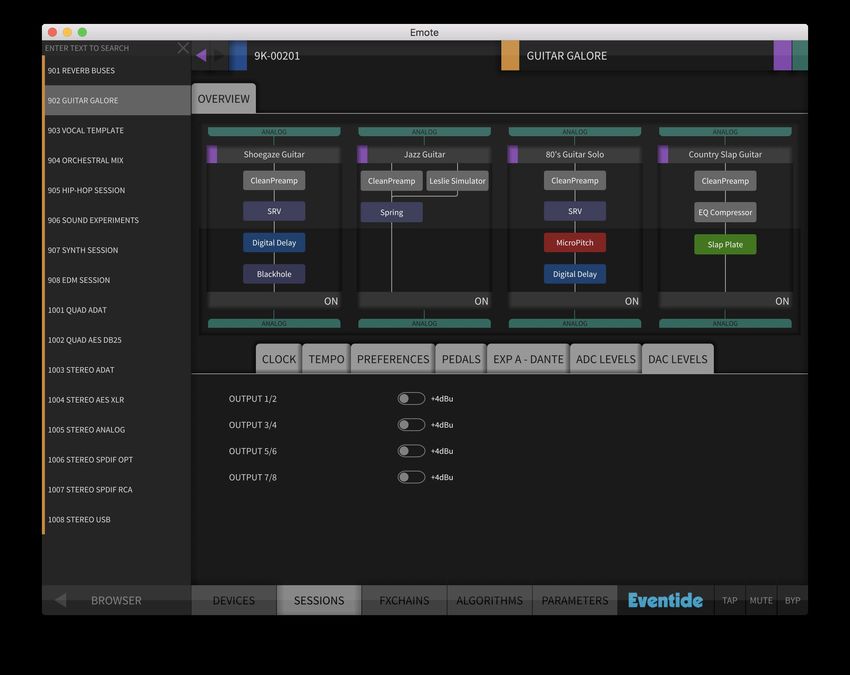
The Emote User Interface
Emote makes use of the “drag and drop” method for most operations. Anytime you
want to load a Session, FX Chain, Algorithm, etc., simply drag it from the browser
window located on the left and drop it onto the appropriate spot in the middle of the
screen.

This dragging concept also extends other areas such as moving Algorithms, or
creating Input/Output connections.

Emote’s interface contains four key areas:

1: Tabs
2: Main Screen
3: Browser Window
4: Color Blocks

                                                                                   5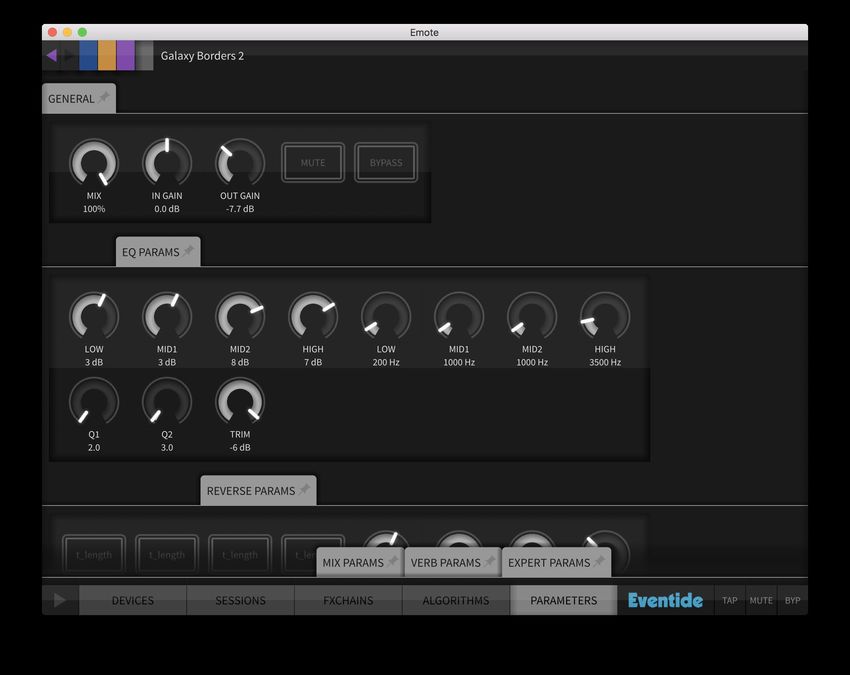
Tabs
Click on any of the 5 tabs at the bottom of the screen to quickly switch the main
screen between the following areas:

   •   Devices
   •   Sessions
   •   FX Chains
   •   Algorithms
   •   Parameters

Main Screen
The large center portion of the Emote interface changes, depending on which tab
you have clicked on. This portion of the interface is where you do most of the work
configuring FX Chains, algorithms, etc.

Browser Window
Click the large triangle in the bottom-left corner of the browser window to
show/hide its contents. The browser window’s contents change dynamically,
depending on which tab you have selected, and thus which area of the H9000’s
effects structure you are working in at the time.

Color Blocks
The color blocks at the top of the screen correspond to the different tabs at the
bottom, but also show the specific name of the relevant data.

   •   The BLUE block corresponds to the Devices tab and displays the name of the
       specific H9000 you are currently connected to.

   •   The YELLOW block corresponds to the sessions tab and displays the name of
       the currently loaded Session.

   •   The PURPLE block corresponds to the FX Chain tab and displays the name of
       the currently loaded FX Chain.

   •   The GREEN block corresponds to the Algorithms tab and displays the name
       of the currently loaded Algorithm.

Click on any color block to bring it into focus and switch to that area of the interface.
You can also click on the forward/back arrows at the top of the screen to navigate
among tabs. Note that the back and forward arrow will also respond based on your
last used page, which make navigating more fluid and intuitive.

                                                                                        6
Other User Interface Controls:

   •   Option-click (OSX)/Alt-Click (Windows) on any onscreen fader to return it to
       its default value.

   •   Click the TAP tab a single time to temporarily display the current tempo used
       by the H9000. Click the TAP tab repeatedly to manually set a new tempo.

   •   Click the MUTE tab to toggle global mute on/off.

   •   Click the BYPASS tab to toggle global bypass on/off.

   •   The Emote window can be resized within the standalone desktop application,
       but not in the plug-in versions.

   •   Click on the “Back/Forward” triangles at the top of the screen to scroll
       between different pages of the user interface.

                                                                                   7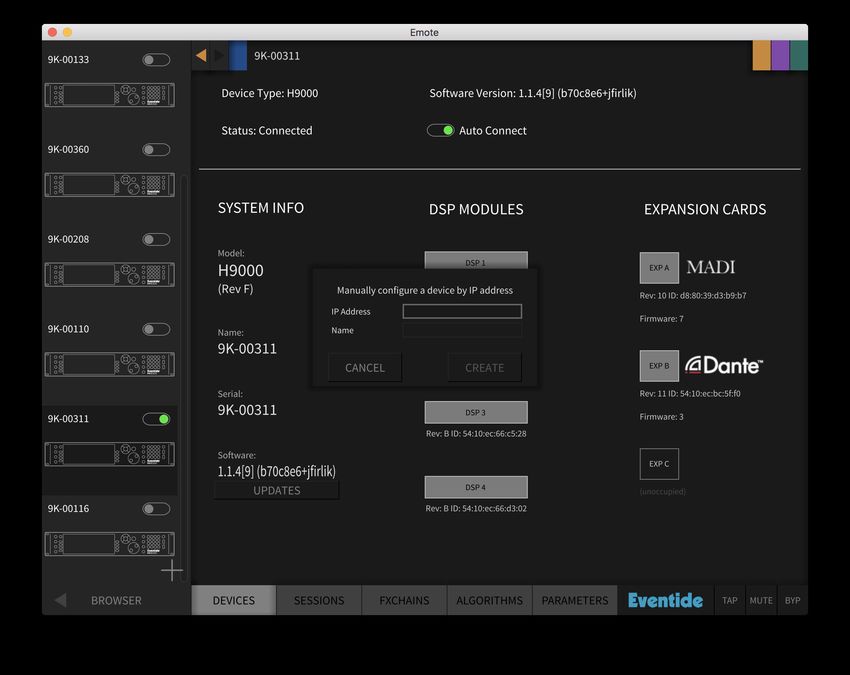
Using Emote
Devices
The devices screen shows information for the currently selected H9000 you are
controlling, such as firmware version, number of installed DSP modules, types
expansion cards and their firmware versions, etc.

In the device screen, the browser shows/hides the available H9000s present on the
local are area network.

Click the slider in the browser window to connect to the desired H9000. You can
also activate the “auto-connect” feature of a given device, to have it automatically
connect to that unit when Emote is launched on a specific machine.

Click on the + icon at the bottom of the browser window to manually enter the IP
address of an H9000 on the network. This feature can be useful if Emote is not
displaying a unit that you know is available on the network.

Note that, as seen on the above screenshot, Emote allows you to connect to multiple
H9000 units at once. You can then click on the specific unit, shown in the list on the
left that you wish to control at any given time.

                                                                                       8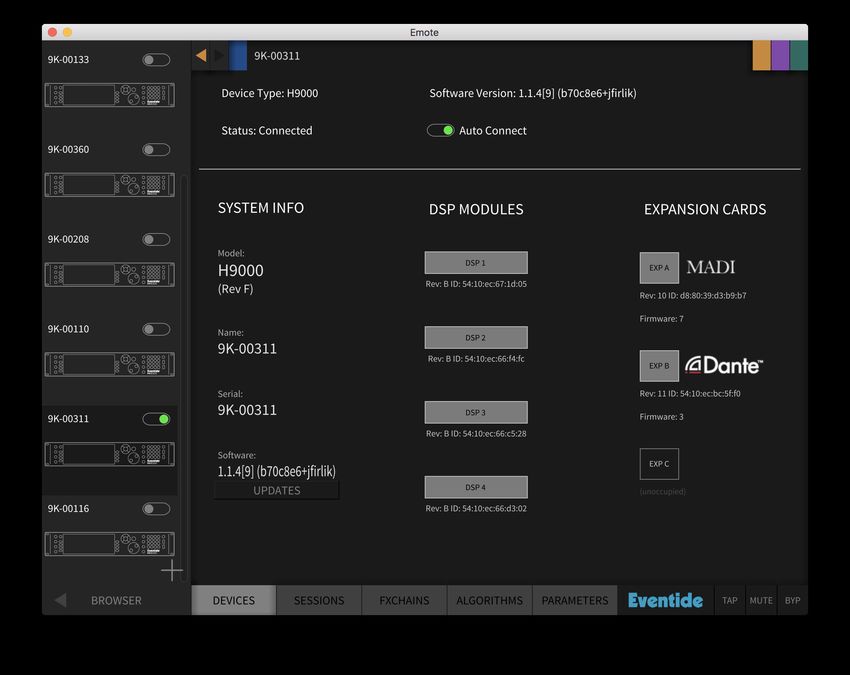
Sessions

The sessions screen offers control of two key areas:

   •   The currently loaded session and the FX Chains that make it up
   •   The assorted settings data (organized into assorted grey tabs)

Loading a Session
Use the mouse to drag and drop a session (preset or user-created) from the browser
window on the left to the middle of the screen. The session will then load.

You can also type text into the search box at the top of the browser window to find a
particular session. Click the “X” to clear the search field and once again show all
sessions.

If you have a session that is in your file browser, you can go to the Session tab on the
upper menu and click Open. From there, you can browse your computers file system
to find your desired Session. These files will be prefixed with .9ks

                                                                                      9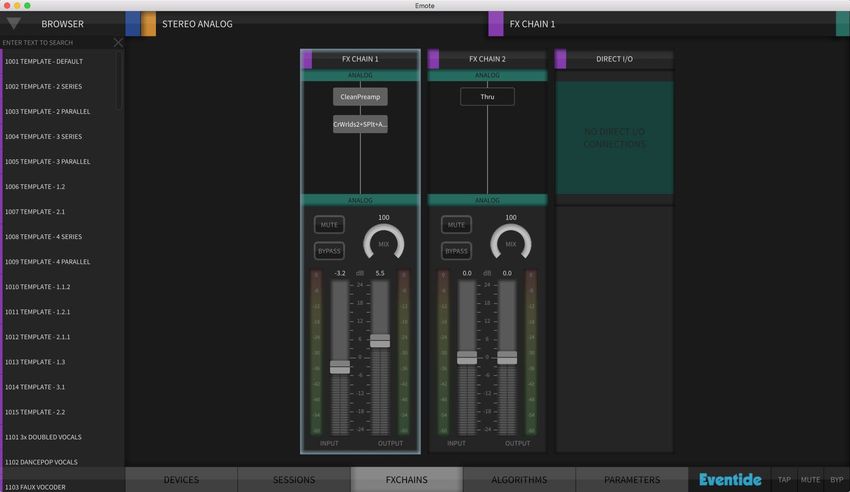
Adjusting H9000 Settings

   •   Click on the tab that represents the settings category you wish to adjust. It
       will expand to show the assorted settings in that category.

   •   Use the mouse to adjust the specific settings parameter you wish to change.

                                                                                       10
FX Chains
The FX Chains screen allows loading of specific FX Chains into available slots and
also offers adjustments of FX Chain settings.
Adding an FX Chain
Use the mouse to drag and drop an FX Chain (preset or user-created) from the
browser window on the left to the specific FX Chain slot you wish to populate. The
FX Chain will then load.
You can also type text into the search box at the top of the browser window to locate
a particular FX Chain. Click the “X” to clear the search field and once again show all
sessions.
Deleting an FX Chain
To delete an FX Chain, simply drag the FX Chain you want to delete back to the
browser window on the left and drop it. The FX Chain will then be deleted, after first
prompting you with an “Are You Sure?” message.
11Adjusting FX Chain Settings
• Use the mouse to adjust the onscreen controls for each FX Chain, including:
o Mute
o Bypass
o Input and output levels
o Mix
• Option-click the level faders or mix control top return them to their default
state.
• Double-click the FX Chain name to type a new title, then press the RETURN
key to save the new name.
• Click on an individual algorithm shown in the FX Chain to adjust its
parameters.
• Click on the input or output block of an FX Chain to adjust the parameters for
the audio input/output for that FX Chain.
12Algorithms
The algorithms screen allows you to:
• Edit Algorithm Routing Within an FX Chain
• Configure Audio Connections
• Mute and Bypass individual algorithms
13Selecting an Algorithm
In addition to the search window, Emote also offers
powerful tag filtering capabilities, built to quickly narrow
down the choices from the large number of available
algorithms.
Click on a “+” icon to show/hide an algorithm category.
Within that category, click on an algorithm type to toggle it
on/off.
The browser will now only display algorithms that match
the tags that are currently highlighted in red.
Hover the mouse cursor over an algorithm in the list to
display its description.
To remove tags, simply click on your previously selected
tags to un-highlight these selections.
14Editing Algorithm Routing Within an FX Chain
• Click and drag an algorithm to a blank area of the main screen to move or
copy that algorithm to one of the other available slots.
• Click and drag an algorithm to another algorithm slot to “swap” the position
of the two algorithms.
Note that deleting an algorithm that is used in an existing routing will keep the
routing intact, instead of erasing the routing path.
15Configuring Audio Connections
• Click on the show/hide triangle at the top of the screen to display the audio
I/O categories.
• Click on the audio I/O category (USB, AES/EBU, Analog, etc.) to show its
available I/O channels at the top of the screen.
• Click on an I/O channel of the top of the screen to activate it. The active
channel will now show up as a routing block above the algorithm.
• Use the mouse to make connections between the channels and the algorithm
connection points. Connections can be “multed” to multiple destinations, as
well as be made in series or parallel.
• Emote also allows you to graphically configure routing of Direct I/O
pathways. Please refer to the H9000 user’s manual for more information on
this function.
16Parameters
The parameters screen allows adjustment of specific parameters within an
algorithm. To get to this screen:
• Click on a specific algorithm, from the FX Chain or click ‘Edit’ on the
Algorithm block.
• Click on the parameters at the bottom of the screen.
Parameter categories are divided up into tabs; Click on the appropriate tab to
display the group of parameters you wish to adjust.
Click on a parameter tab’s “pin” control to lock that group of controls and make it
always visible.
Option-click (OSX)/Alt-Click (Windows) on a parameter to return it to its default
value.
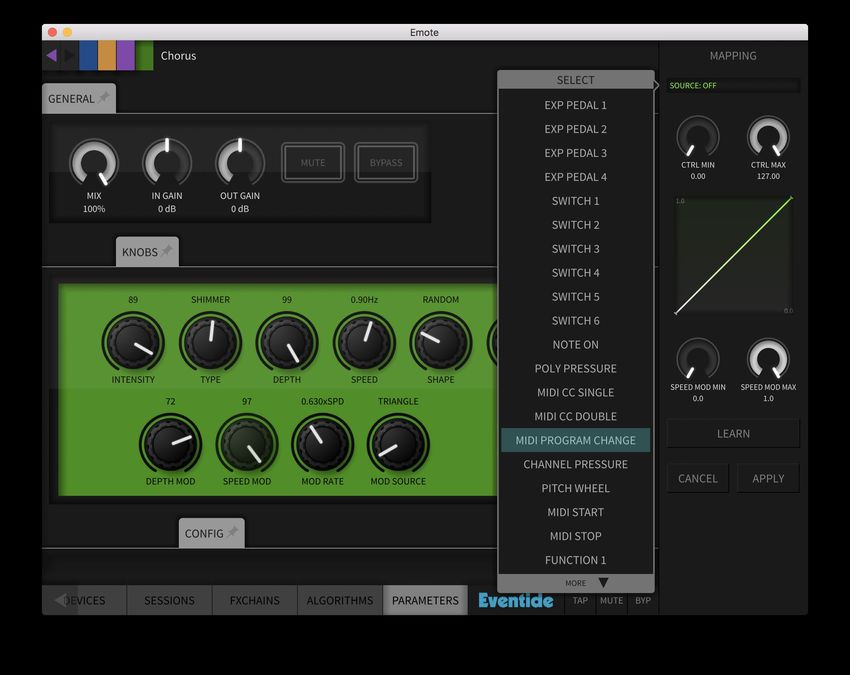
17MIDI & Controller Mapping
Parameters in Emote can be controlled by three different external controls:
• MIDI
• Expression
• Function control
This is done by right-clicking a specific parameter, then selecting the “Mapping”
control.
Doing so will bring up the mapping panel along the right-hand side, where you can
select:
• Controller source
• Action type
• Control & parameter minimum/maximum ranges.
All of these operations work the same way as the front panel of the H9000.
18You can also click the “Learn” button to assign a controller automatically. After
pressing “Learn”, move the physical control you wish to pair with the parameter and
click “Apply”.
After clicking “Apply” the parameter should show a glowing green indicator across
the range of the mapping
19Parameter Automation
You can now automate H9000 parameters, within your DAW software, using the
plugin version of Emote.
Algorithms in the H9000 can contain any number of parameters; However, most
DAW hosts assume that the plug-ins they are hosting will have a static, consistent
number of parameters, that is declared to the DAW up front.
For this reason, it is necessary to use logical parameters to map between what the
DAW sees, and what the H9000 has currently loaded.
This is achieved by using the H9000 “Functions” section as the interface to the DAW
automation. This approach also has the added benefit of being able to aggregate
multiple H9000 parameters together and automate them in a single automation
lane.
When the plug-in version of Emote is loaded into your DAW, the options for
automation will appear; each of the four possible FX chains contains 8 Functions
each.
Additionally, each separate FX chain also offers the following functions to the DAW
automation interface:
• Mute
• Bypass
• Input Gain
• Output Gain
• Mix controls
To begin automating some parameters:
• Follow the instructions in the “MIDI & Controller Mapping “ section above, to
assign some H9000 parameters to a Function.
• In your DAW, write some automation data to the lane corresponding to that
specific H9000 Function.
20Note that while four FX chains are always exposed in the DAW, there may not
actually be 4 chains running on your H9000. In this case, automating any unused
ones won’t have any effect.
If you replace an FX chain within the H9000, the DAW automation data will still
exist, and will apply to whatever parameters are assigned to the Function in the
newly created FX chain
Loading and Saving Files
Emote has menus at the top of the screen for Sessions, FX Chains, and Algorithms.
Session Menu
Within the Sessions menu, you can:
• Open a session from a file you have saved to your computer
• Save a session file to your computer
• Save a session file to the connected H9000
21FX Chains Menu
Within the FX Chains menu, you can:
• Open an FX Chain from a file you have saved to your computer
• Save an FX Chain file to your computer
• Save an FX Chain file to the connected H9000
Algorithms Menu
Within the Algorithms menu, you can:
• Open an Algorithm preset from a file you have saved to your computer
• Save an Algorithm preset to your computer
• Save an Algorithm preset to the connected H9000
Metering
Emote now has the ability to view all 8 of the H9000’s hardware IO meters in a
separate Meter Bridge window, found under the View menu of any connected
H9000.
22The meter bridge allows you to view any physical IO source or destination in banks
of 8. This is useful for debugging setup issues or doing more precise gain staging, as
these meters are hardware-based, unlike the software metering provided within
each FX chain.
Note that the H9000 shares these meter channels with the front panel LED meters;
viewing them in Emote will override any existing front panel LED meter
configurations.
23You can also read