INSTALLATION GUIDE SUNDAY, 16 FEBRUARY 2020 - SALESFORCE APPEXCHANGE
←
→
Page content transcription
If your browser does not render page correctly, please read the page content below
Installation Guide

Sunday, 16 February 2020   Copyright 2020 Cloud Masons Pty Ltd.   skedupay.com.au
Installation Guide

     Table of Contents
     Installation Guide..................................................................................................................................... 0
     About.......................................................................................................................................................... 3
     Pre-Requisites ............................................................................................................................................ 3
     Installing skedupay..................................................................................................................................... 5
        Installation Steps.................................................................................................................................... 5
        Creating & Assigning skedupay Permission Sets.................................................................................... 6
            Create the 1st skedupay Permission Set ............................................................................................. 6
            Renaming the cloned Permission Set ................................................................................................ 6
            Object and Field Settings ................................................................................................................... 7
        Billing Account Object ............................................................................................................................ 7
        Invoice Header Object............................................................................................................................ 9
        Invoice Item Object ................................................................................................................................ 9
        Contact Object Permissions ................................................................................................................. 10
        Opportunity Object .............................................................................................................................. 10
        Payment Errors .................................................................................................................................... 10
        Payment Plans...................................................................................................................................... 11
        Payments Received .............................................................................................................................. 11
        Application Settings ............................................................................................................................. 12
            Steps ................................................................................................................................................. 12
     User Access .............................................................................................................................................. 13
        Steps..................................................................................................................................................... 13
        Installation in Salesforce Professional Edition ..................................................................................... 14
            Steps ................................................................................................................................................. 14
            Revoke setup screen access ............................................................................................................. 15
     Page Layouts – Standard objects ............................................................................................................. 16
        Contact Page Layout ............................................................................................................................ 16
            Steps ................................................................................................................................................. 16
        Opportunity Page Layout ..................................................................................................................... 17
            Steps ................................................................................................................................................. 17
     Ezidebit / Salesforce Setup ...................................................................................................................... 19
        Sign up for a Skedupay account ........................................................................................................... 19
        Skedupay/Ezidebit Settings.................................................................................................................. 19
            Steps ................................................................................................................................................. 20
        Technical Setup .................................................................................................................................... 21
            Steps ................................................................................................................................................. 21
     Deploy the scheduled jobs. ...................................................................................................................... 22

Sunday, 16 February 2020                               Copyright© 2020 Cloud Masons Pty Ltd.                                                   skedupay.com.au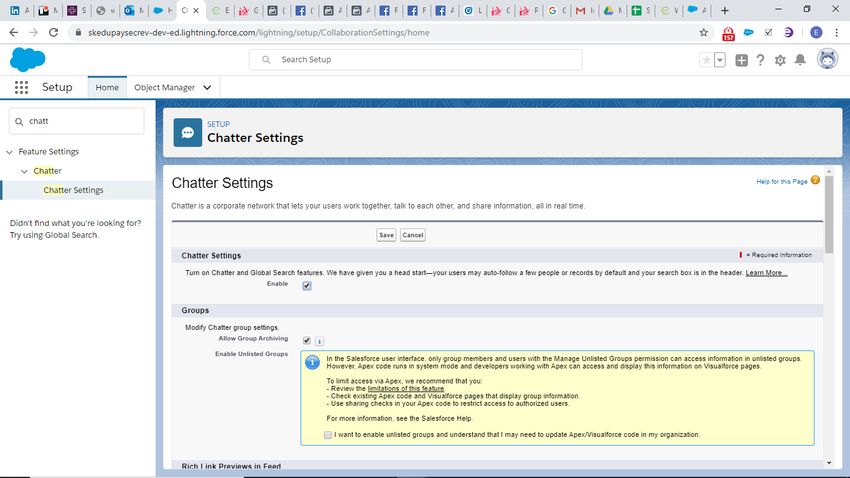
Installation Guide
        Scheduled Jobs Screen ......................................................................................................................... 22
            Steps ................................................................................................................................................. 22
        Manual Deployment Scheduled Jobs................................................................................................... 23
            Get Payments ................................................................................................................................... 23
            Send Payments................................................................................................................................. 25
            Get Customer Details ....................................................................................................................... 28
     Dashboard Access .................................................................................................................................... 31
        Steps..................................................................................................................................................... 31

Sunday, 16 February 2020                              Copyright© 2020 Cloud Masons Pty Ltd.                                                    skedupay.com.au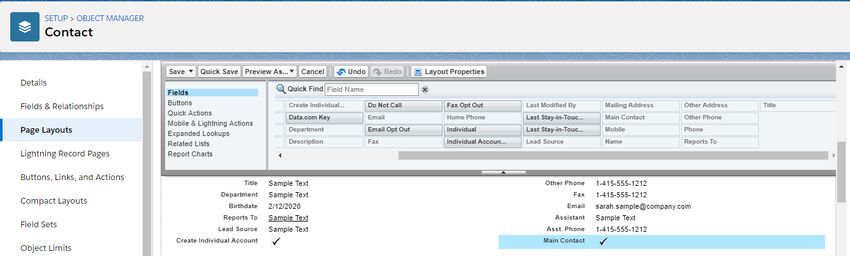
Installation Guide

     About
     Welcome to skedupay, the ezidebit payment management solution for Salesforce Sales Cloud.

     This Installation Guide will walk you through the process of configuring ecoSIStem so you can start
     creating invoices and dispatching payments in just a few hours.

     Pre-Requisites
     Before you can start accepting payments there are a few prerequisites you need to sort.

     Completing each of these pre-requisite tasks is vital as skedupay needs them to make setup easy

     1) Ensure you have all the necessary financial documents on hand. This may include:
        a. Bank Account Details
        b. Australian Company Number if applicable (Australia)
        c. Australian Business Number (ABN)
        d. GST/VAT Status
        e. For international customers, please refer to the ezidebit site in your country for the specific
           documentation you need to provide.

     2) Set up a Merchant Account with ezidebit so you can process payments.
        a. Visit https://www.ezidebit.com/en-au/sign-up to sign up in minutes

     3) Enable Enhanced Notes

Sunday, 16 February 2020             Copyright© 2020 Cloud Masons Pty Ltd.                     skedupay.com.au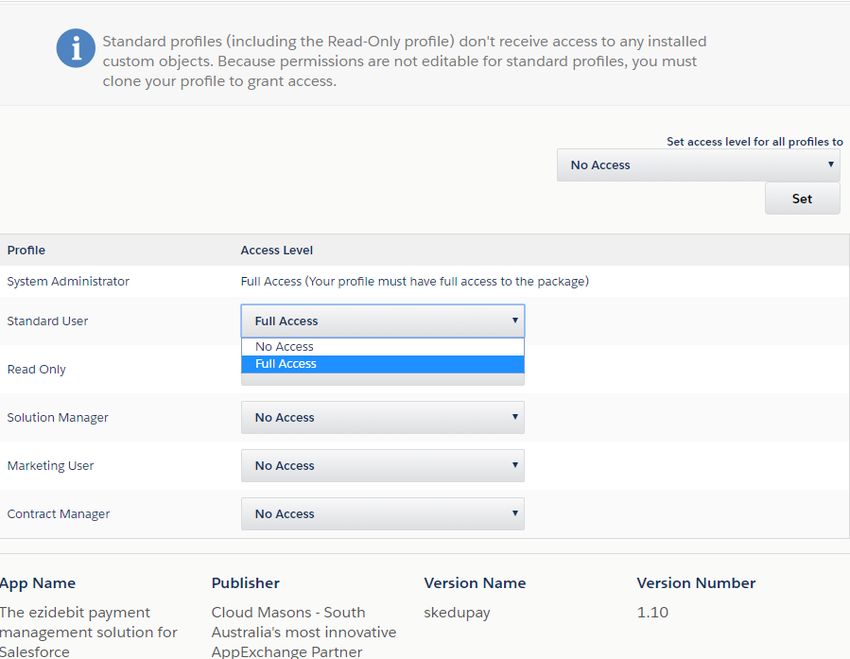
Installation Guide
     4) Turn on Chatter

Sunday, 16 February 2020   Copyright© 2020 Cloud Masons Pty Ltd.       skedupay.com.au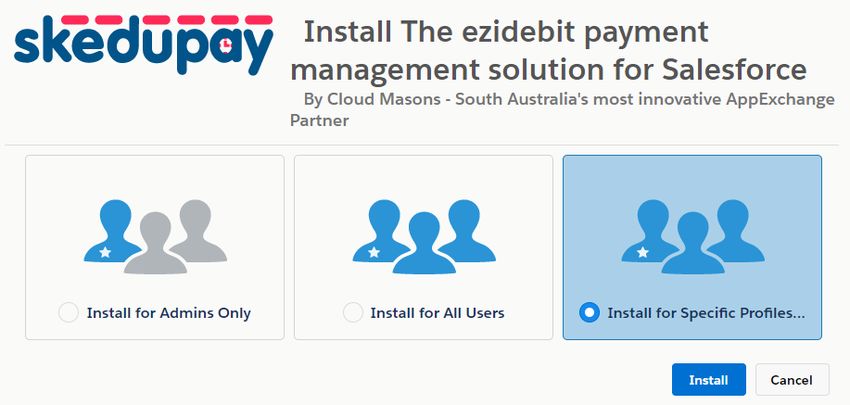
Installation Guide
Installing skedupay
Now that you have your ezidebit Merchant Account set up, it is time to start setting up skedupay in
your Salesforce environment. Frist you will install the skedupay app. Then you will configure the
Permission Sets needed to use skedupay. The final step is to connect skedupay to your ezidebit
Merchant Account.
Installation Steps
1) Login to the Salesforce org you wish to install skedupay in
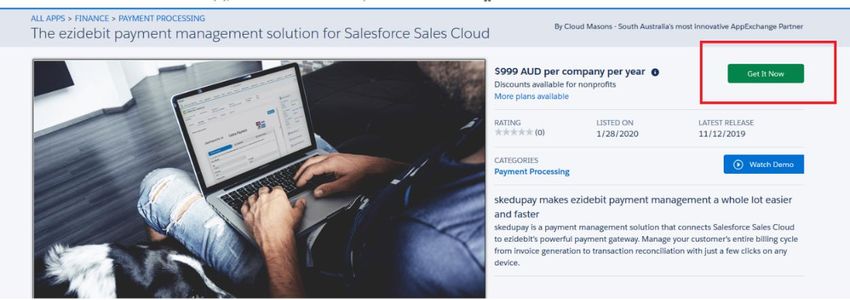
2) Visit our our Skedupay listing on Salesforce AppExchange
a. Download the User Guide
b. Download the Installation Guide
3) Click the ‘Get it Now’ green button to start the Installation process
4) Log into AppExchange with your Salesforce credentials used in Step 1
a. This ensures skedupay is installed in the right Salesforce org.
5) After a short wait, you will be presented with 3 Installation options.
6) Select the option that suits your Salesforce org’s edition (Setup > Company Information):
a. Enterprise Edition, Unlimited Edition: Choose the “Install for Admins Only” option and
assign the custom Permission Set to licensed users.
b. Professional Edition: Choose the “Install for Specific Profiles” option then remove the
relevant access rights described below for any profile that does NOT require access to
skedupay. Profiles and Permission Sets are very restrictive in this edition.
7) Then just follow the prompts on the other screens and accept the defaults to complete the
Installation process. If the installation was successful, you should be redirected to the Installed
Packages screen in your Salesforce org. Done.
Sunday, 16 February 2020 Copyright© 2020 Cloud Masons Pty Ltd. skedupay.com.au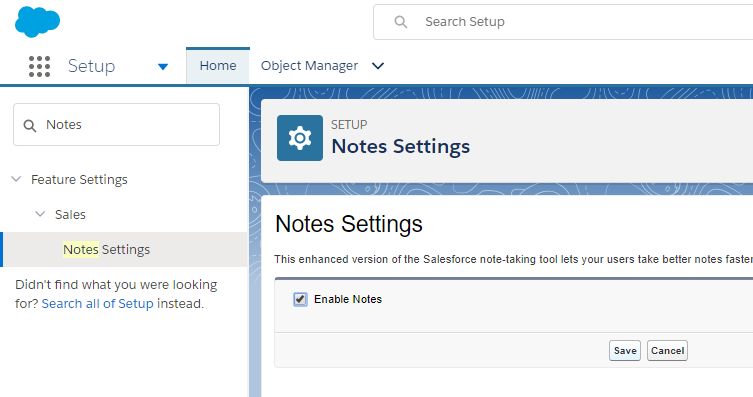
Installation Guide

     Creating & Assigning skedupay Permission Sets
     After you have finished installing skedupay in your Salesforce org, the next step is to create and assign
     Permission Sets to Users that need access to the skedupay functionality, Objects and fields.

     ALERTS ABOUT SALESFORCE EDITIONS AND SKEDUPAY LICENSES

     •   In the Per User (5 or Less) version of skedupay, each User that needs to use skedupay must have
         their own skedupay License. This is on top of their Salesforce Sales Cloud license.
     •   If you attempt to add these Permission Sets to a Salesforce User that does not have a skedupay
         license, they won’t see any of the skedupay forms, objects or fields on the screen, or be able to use
         the skedupay payment functionality
     •   skedupay will work with Service Cloud
     •   If you start out with less than 5 skedupay licenses and want to switch to the Per Org licensing
         model with unlimited licenses, just contact us on 1800 283 397. It takes only a few minutes to
         process the change.

     Create the 1st skedupay Permission Set
     We provided 2 baseline permission sets that implement most of the permissions you need to access
     and use skedupay.

     Due to some technical constraints of the Salesforce Platform security mechanisms and Editions, you
     will need to make some additional changes manually. This section walks you through that process.

     Steps
     Navigation Path: Setup → Manage Users → Permission Sets

     1) Open the Permissions Screen in Salesforce (Setup -> Search -> enter “Permission Sets” and hit
        enter
     2) Look for the ‘skedupay User’ Permission Set.
     3) Click the ‘Clone’ link to in the right-hand column
     4) Salesforce will create a copy of the ‘skedupay User’ Permission Set that you can configure

     Renaming the cloned Permission Set

     5) Click Save

Sunday, 16 February 2020              Copyright© 2020 Cloud Masons Pty Ltd.                     skedupay.com.au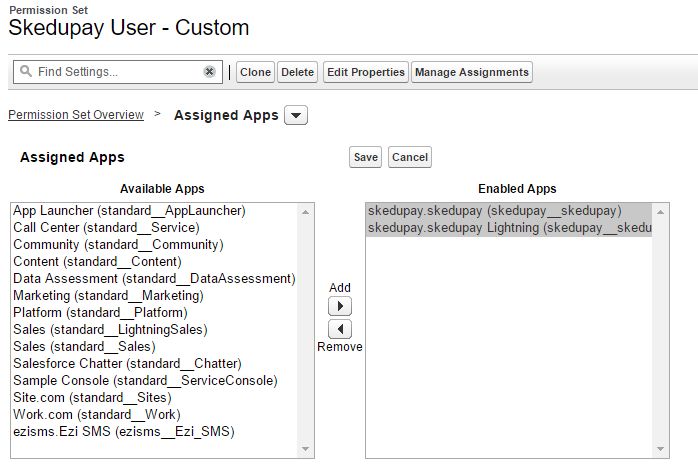
Installation Guide
     Object and Field Settings
     Now you need to set read and write access on the skedupay Objects and Fields. It’s a very
     straightforward process and should only take an hour or so to complete.

     Open the newly created Permission Set and click on the ‘Object Settings’ link

     Billing Account Object
         1) In Object Settings, select the ‘Billing Account’ Object
         2) Apply the changes shown below to the Billing Account Object Permissions and make sure both
            options are checked in the Tab Settings.

Sunday, 16 February 2020             Copyright© 2020 Cloud Masons Pty Ltd.                   skedupay.com.au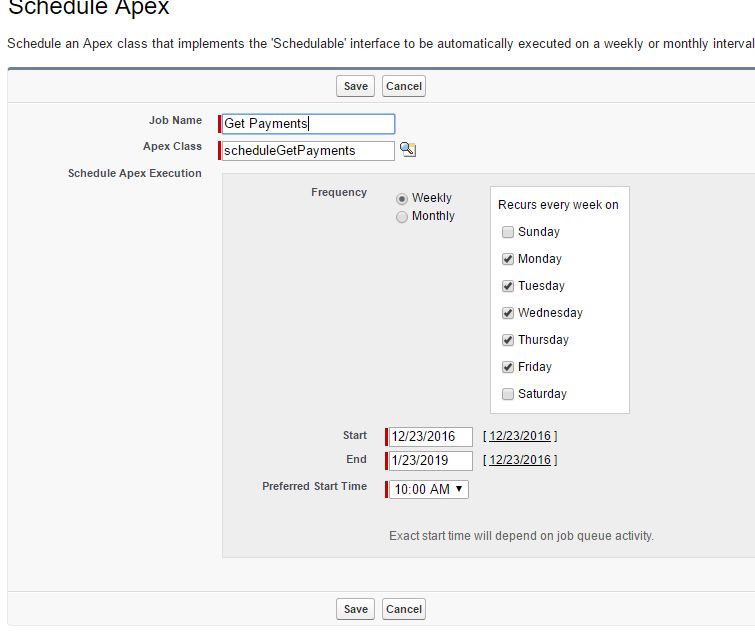
Installation Guide
        3) Set the following read/write permissions on the individual fields of the Billing Account Object
           to update the field-level security.

                                  Field                           Read   Edit
                                  Account                         Y      Y
                                  Account Balance                 Y      N
                                  Account Code                    Y      N
                                  Account Industry                Y      N
                                  Account Name                    Y      Y
                                  Account Type                    Y      Y
                                  Address Line 1                  Y      N
                                  Address Line 2                  Y      N
                                  Billing Account #               Y      N
                                  Contact Responsible             Y      Y
                                  Country                         Y      N
                                  Created By                      Y      N
                                  Direct Debit Authority Held     Y      Y
                                  Email                           Y      N
                                  Ezidebit Account Widget         Y      N
                                  Ezidebit Customer Reference     Y      Y
                                  Ezidebit DDR Address            Y      N
                                  Ezidebit DDR Sent Date Time     Y      Y
                                  Ezidebit Display Name           Y      Y
                                  Ezidebit Expiry Notification    Y      Y
                                  Ezidebit Failure Notification   Y      Y
                                  Ezidebit Payment Reminders      Y      Y
                                  Ezidebit Start Date             Y      Y
                                  First Name                      Y      N
                                  Identifier                      Y      N
                                  Internal Reference #            Y      N
                                  Invoiced Amounts (inc GST)      Y      N
                                  Last Modified By                Y      N
                                  Last Name                       Y      N
                                  Main Contact                    Y      N
                                  Mobile Number                   Y      N
                                  Mobile Number Formatted         Y      N
                                  Payment Received                Y      N
                                  Postcode                        Y      N
                                  Setup Indicator                 Y      N
                                  Setup Status                    Y      Y
                                  State                           Y      N
                                  Suburb                          Y      N
                                  Total GST Payable               Y      N
                                  Total Payments Dishonoured      Y      N
                                  Use Contact Mailing Address     Y      Y

        4) Click Save.

        NOTE: this is applicable to both the Admin and User permission sets. The field level security
        settings should already be preconfigured, and you should find that the only additional permissions
        you need to set are the Object level security.

Sunday, 16 February 2020            Copyright© 2020 Cloud Masons Pty Ltd.                    skedupay.com.au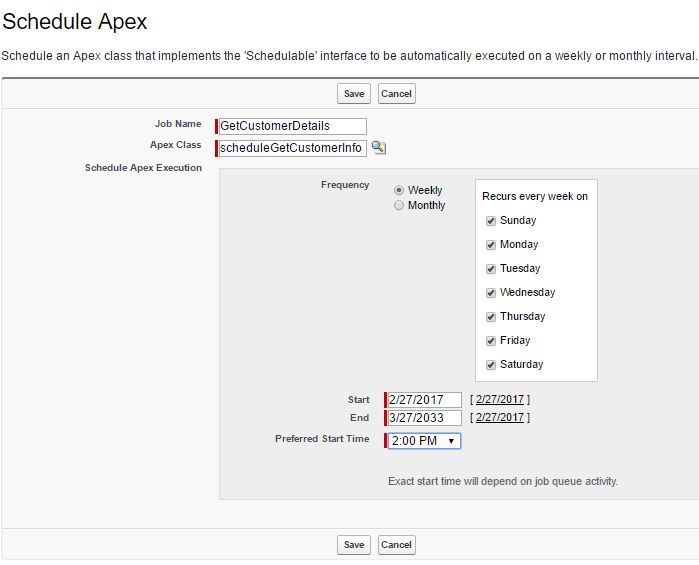
Installation Guide
     Invoice Header Object
     The invoice Header object only needs its ‘Object Permissions’ and ‘Tab Settings’ updated.
         1) In Object Settings, select the ‘Invoice Header’ Object
         2) Apply the changes shown below to the Invoice Header Object Permissions and make sure both
             options are checked in the Tab Settings.

        3) Click Save

     Invoice Item Object
     The Invoice Item object only needs ‘Object Permissions’ and ‘Tab Settings’ updated.
         1) In Object Settings, select the ‘Invoice Item’ Object
         2) Apply the changes below to the Invoice Item, Object Permissions and make sure both options
             are checked in the Tab Settings.

        3) Click Save

Sunday, 16 February 2020           Copyright© 2020 Cloud Masons Pty Ltd.                 skedupay.com.au
Installation Guide
Contact Object Permissions
The Contact object only needs three additional field access changes made.
1) In Object Settings, select the ‘Contacts’ Object
2) Apply these changes to the Contacts, ‘Field Permissions’.
Field Read Edit
Create Individual Account Y Y
Individual Account Exists Y N
Main Contact Y Y
3) Click Save.
Opportunity Object
The Opportunity object only needs seven additional field access changes made.
1) In Object Settings, select the ‘Opportunities’ Object
2) Apply these changes to the Opportunities, ‘Field Permissions’.
Field Read Edit
Account ID Y N
Billing Account Y Y
Billing Account ID Y N
Invoice Created Y Y
Product Count Y N
Product Sales Price Total Y N
Product Total Value Y N
3) Click Save.
Payment Errors
The Invoice Item object only needs its ‘Object Permissions’ and ‘Tab Settings’ updated.
1) In Object Settings, select the ‘Payment Errors’ Object
2) Apply the changes shown below to the Payment Errors, Object Permissions and make sure
both options are checked in the Tab Settings.
3) Click Save
Sunday, 16 February 2020 Copyright© 2020 Cloud Masons Pty Ltd. skedupay.com.auInstallation Guide
Payment Plans
The Invoice Item object only needs its ‘Object Permissions’ and ‘Tab Settings’ updated.
1) In Object Settings, select the ‘Payment Plans’ Object
2) Apply the changes shown below to the Payment Plans, Object Permissions and make sure both
options are checked in the Tab Settings.
3) Click Save
Payments Received
The Invoice Item object only needs its ‘Object Permissions’ and ‘Tab Settings’ updated.
1) In Object Settings, select the ‘Payments Received’ Object
2) Apply the changes shown below to the Payments Received, Object Permissions and make sure
both options are checked in the Tab Settings.
3) Click Save
Sunday, 16 February 2020 Copyright© 2020 Cloud Masons Pty Ltd. skedupay.com.auInstallation Guide
Application Settings
Next step is to give access to the skedupay app to the Salesforce Sales Cloud Users will use skedupay.
Steps
1) Return to the Settings screen of the custom skedupay Permission Sets you just created.
2) Click on the Assigned Apps link
3) Add the following applications
Repeat for any other Permission Sets you create.
Sunday, 16 February 2020 Copyright© 2020 Cloud Masons Pty Ltd. skedupay.com.auInstallation Guide
User Access
Navigation Path: Setup → Manage Users → Permission Sets > Manage Assignments
In the previous section, we set up two new Permission Sets that grants access to the skedupay-related
fields & Objects. Now you will assign the Permission Sets to the Salesforce Sales Cloud Users that have
a skedupay license.
Steps
1) Click the Manage Assignments button this will show all the users already assigned to the
permission set.
2) Click the Add Assignments button to show a list of users you can select form.
3) Choose the users that you would like to give access to skedupay and click the Assign button.
4) Finally click the Done button and the user is set up for skedupay.
Note: If you are setting up an administrator, please use the process above but use the permission
set that you cloned for Administrators. The only difference between the two should be access to
the ezidebit Settings and Scheduled Job Deployment screens.
Sunday, 16 February 2020 Copyright© 2020 Cloud Masons Pty Ltd. skedupay.com.auInstallation Guide
Installation in Salesforce Professional Edition
The alternative to setting up the permission sets described above is to grant access in the to choose
specific profiles that you would like to access the application, give each full access, then revoke the
access to the Ezidebit Settings and the Scheduled Jobs Deployment screen after install.
Steps
1) Select install for Specific Profiles.
2) Choose the profiles that you want to give access and select Full Access.
3) The next screen asks you to allow access to the two addresses that are used to access the
ezidebit addresses. You will need to update one these addresses as they will be specific to
your company, this is covered in the steps below.
Sunday, 16 February 2020 Copyright© 2020 Cloud Masons Pty Ltd. skedupay.com.auInstallation Guide
Revoke setup screen access
Navigation Path: Setup → Manage Users → Profiles
If you chose to install for certain profiles, you will need to ensure that you remove access to the
settings screen and the scheduled job deployment screen. These two screens should only be available
to administrators.
Steps
1) Navigate into the profile.
2) Under the option Visual Force Page Access, remove access to the following pages:
a. EzidebitSettings
b. DeployScheduledJobs
3) Under the Object Settings remove access to the two tabs:
a. Ezidebit Settings
b. Deploy Scheduled Jobs
Note: This will ensure that your users do not get access to the setup screens, and it is important
these are removed.
Sunday, 16 February 2020 Copyright© 2020 Cloud Masons Pty Ltd. skedupay.com.auInstallation Guide
Page Layouts – Standard objects
As many companies have already customised their page layouts on the contact and opportunity
objects, you will need your administrator add the following fields onto the page layouts, in order to
use the functionality.
Contact Page Layout
Navigation Path: Setup → Object Manager → Contact > Page Layouts > Your Page Layout
On the contact page layout there are two additional fields that should be added for skedupay, these
are:
• Main Contact
• Create Individual Accounts
There are also two additional related lists that should be added to the page layout:
• Billing Accounts – showing all billing accounts the person owns
• Invoice Headers – shows all the invoices that the person is the main contact for.
Steps
1) Navigate to the Contact Page Layout
2) Drag the two fields onto the page layout
3) Now add the two additional related Lists:
• Billing Accounts
• Invoice Headers
Sunday, 16 February 2020 Copyright© 2020 Cloud Masons Pty Ltd. skedupay.com.auInstallation Guide
4) Click Save
Opportunity Page Layout
Navigation Path: Setup → Object Manager → Opportunity > Page Layouts > Your Page Layout
skedupay adds the following fields to the opportunity. Next, we need to add these to your
opportunity page layout.
• Billing Account
• Invoice Created
• Product Count
• Product Sales Price Total
• Product Total Value
There is also an additional related list that we will add to show the invoices generated for this
opportunity.
Steps
1) Navigate to the Opportunity Page Layout
2) Drag the five fields onto the page layout, you may even want to create a specific section for these
fields
3) Drag on the new related list (Invoice Headers)
Sunday, 16 February 2020 Copyright© 2020 Cloud Masons Pty Ltd. skedupay.com.auInstallation Guide
4) Drag on the new button Create Invoice
5) Click the Save button
Sunday, 16 February 2020 Copyright© 2020 Cloud Masons Pty Ltd. skedupay.com.auInstallation Guide
Ezidebit / Salesforce Setup
The ezidebit settings screen captures all the information that skedupay needs to connect to your
ezidebit account. This section is required for all installs of skedupay, no matter how you set up your
users. There are also some additional technical settings you need to make to ensure Salesforce lets
you use the ezidebit addresses.
Sign up for a Skedupay account
If you haven’t already, this is where you need to sign up for an ezidebit account to continue setting up
skedupay. You can sign up at the following link.
Skedupay/Ezidebit Settings
Navigation Path: App Launcher → Ezidebit Settings
To begin using skedupay, you need to enter your connection and general settings information in the
ezidebit Settings screen. This data controls the connection URLs and the way skedupay behaves. The
parameters are described below.
Parameter Description
Account Widget Address The Account Widget should be used for maintenance of bank
account/credit card details for existing customers. It is possible to
create customers in the Ezidebit Management Systems without
Bank Account or Credit Card Details recorded against them, and
they will be set to a non-processing Hold Status until the
appropriate payment source is provided. This is the base address
such as https://widget.ezidebit.com.au/account/
EDDR URL The Electronic Direct Debit Request (eDDR) form is a single web
based form designed to capture Direct Debit Request authorisations
and create the payer and (optionally) their payment schedule in the
Ezidebit Management System. This will be similar to
https://ezidebit.com.au/webddr/Request.aspx
Pay Now URL This is the pay now URL and will be similar to https://simple-
business-tech.pay.ezidebit.com.au/.
Digital Key The integration Digital Key supplied to the client by Ezidebit.
Public Key The client public key or identifier compound
Register for Get Payments Indicates that the get payments interface should be run.
Enable Account Billing This swaps the organisation over to using Account Level Billing. This
means that individual accounts will no longer be auto created. One
you mark a contact as the main billing contact a billing account will
be created for that account.
Use Demo URL This setting specifies that you want to send all the interfaces to the
demo URL. This is used for testing.
Demo URL This is the demo URL. This is used for testing.
Sunday, 16 February 2020 Copyright© 2020 Cloud Masons Pty Ltd. skedupay.com.auInstallation Guide
Production URL This is the Production URL. This is used for actually billing your
clients.
GST Percent This is the standard GST percentage. Enter just the whole number
such as 10 for 10% or 12.5 for 12.5%.
GST Inclusive This identifies the prices on opportunity products as being GST
inclusive. This is important when the invoice is created from an
opportunity.
Enable Contact Billing This flag will enable the automatic creation on new individual billing
Creation accounts when a contact is created.
Steps
1) Navigate to the Ezidebit Settings view and fill out your connection details. Refer to the table
above if you are not sure of what a particular setting does.
2) Click the Save Setting button in the top right of the page to finish.
Sunday, 16 February 2020 Copyright© 2020 Cloud Masons Pty Ltd. skedupay.com.auInstallation Guide
Technical Setup
Navigation Path: Setup → Security Controls → Remote Site Setting
We now need to do a little technical setup. This is going to make sure that Salesforce lets you talk to
ezidebit. We will need to set up a remote site to allow you to call the ezidebit interfaces. You will find
three remote site settings already created. We will need to update one of these to the URL that
eziDebit sends you on signup.
Steps
1) Navigate to Setup search for remote and click on the Remote Site Settings Result.
2) Find the remote site called Ezidebit. Click the Edit button.
3) Update the URL to the value given to you by ezidebit for your pay now URL.
4) Click the Save button to save the remote site setting.
Sunday, 16 February 2020 Copyright© 2020 Cloud Masons Pty Ltd. skedupay.com.auInstallation Guide
Deploy the scheduled jobs.
Navigation Path: App Launcher → Deploy Scheduled Jobs
The next thing we need to do to set up skedupay is deploy the scheduled jobs. There are several jobs
that are executed at specific times of the day to keep your information up to date. We have made it
easy for you to deploy these, by creating an automated process to create these scheduled jobs for
you, but we have also added instructions in case you want to do it manually.
Note: you will only need to use one of the methods below to create scheduled jobs. Pick the one
you are most comfortable with, although we would recommend the Deploy Scheduled Jobs Screen.
Scheduled Jobs Screen
To deploy the scheduled jobs using the prebuilt screen, follow these steps.
Steps
1) Navigate to the Deploy Scheduled Jobs screen
2) Click the Deploy Scheduled Jobs button to begin the process.
3) Once the process has finished you will see the following message.
4) You can double check that the scheduled jobs were created, by navigating to:
Setup → Environments→ Jobs → Scheduled
Note: If you ever find you need to re-create your scheduled jobs, you can delete them from the
screen shown in step 4 above. You can then follow the same process again to re-deploy them. This
is particularly relevant for Professional Edition users who cannot schedule jobs manually.
Sunday, 16 February 2020 Copyright© 2020 Cloud Masons Pty Ltd. skedupay.com.auInstallation Guide
Manual Deployment Scheduled Jobs
You will only need to do this section if you want more control over your scheduled jobs than the
standard deploy page gives you.
Get Payments
Navigation Path: Setup → Custom Code → Apex Classes
This should be scheduled once per day. The details are only available after about 10am. When this
interface is run, it retrieves each of the payments made in the last 7 days.
Steps
1) Navigate to the Apex Classes screen. Type ‘Apex Class’ into the setup search and choose the
Apex Classes screen.
2) Click the Schedule Apex button to navigate to add a new schedule.
Sunday, 16 February 2020 Copyright© 2020 Cloud Masons Pty Ltd. skedupay.com.auInstallation Guide
3) Enter the following details:
a. Name: Get Payments
b. Apex Class: scheduleGetPayments
c. Frequency: Weekly
d. Recurs: Mon – Fri
e. Start Date: Today
f. End Date: Choose a day around 5-10 years away
g. Preferred Start Time: 10:00 am
Apex Alternative
To schedule this job through the developer console, please use Execute Anonymous to run the
following code. Please only do this if you are confident with Apex and know what you are doing.
Skedupay__scheduleGetPayments o = new skedupay__scheduleGetPayments();
System.schedule('Get Ezidebit Payments', '0 0 10 * * ?', o);
Note: The data available in this interface only changes once per day. There is no point in scheduling
this more than once a day.
Sunday, 16 February 2020 Copyright© 2020 Cloud Masons Pty Ltd. skedupay.com.auInstallation Guide
Send Payments
Navigation Path: Setup → Custom Code → Apex Classes
The send payments interface will send any payment plan payments across to ezidebit where the
payment plan is ‘Active’ and the payment plan payment due date is Tomorrow and the status = ‘New’.
When a payment is sent it is set into a status of scheduled, unless there is an error, in which case the
plan payment is set into a status or ‘Error’. This interface can be run multiple times a day as it will
only send those payments in a status of new.
Steps
1) Navigate to the Apex Classes screen. Type ‘Apex Class’ into the setup search and choose the
Apex Classes screen.
2) Click the Schedule Apex button to navigate to add a new schedule.
Sunday, 16 February 2020 Copyright© 2020 Cloud Masons Pty Ltd. skedupay.com.auInstallation Guide
3) Enter the following details:
a. Name: Send Ezidebit Payments
b. Apex Class: scheduleSendPayments
c. Frequency: Weekly
d. Recurs: Sunday – Saturday
e. Start Date: Today
f. End Date: Choose a day around 5-10 years away
g. Preferred Start Time: 5:00 am
4) Click the Schedule Apex button. To add our second send payments job.
Sunday, 16 February 2020 Copyright© 2020 Cloud Masons Pty Ltd. skedupay.com.auInstallation Guide
5) Enter the following details:
a. Name: Send Ezidebit Payments 1
b. Apex Class: scheduleSendPayments
c. Frequency: Weekly
d. Recurs: Sunday – Saturday
e. Start Date: Today
f. End Date: Choose a day around 5-10 years away
g. Preferred Start Time: 7:00 pm
Apex Alternative
To schedule this job through the developer console, please use Execute Anonymous to run the
following code. Please only do this if you are confident with Apex and know what you are doing.
scheduleSendPayments p = new scheduleSendPayments();
System.schedule('Send Ezidebit Payment Requests', '0 0 05 * * ?', p);
System.schedule('Send Ezidebit Payment Requests1', '0 0 19 * * ?', p);
Note: This interface can be scheduled around 1 – 5 times a day.
Sunday, 16 February 2020 Copyright© 2020 Cloud Masons Pty Ltd. skedupay.com.auInstallation Guide
Get Customer Details
Navigation Path: Setup → Custom Code → Apex Classes
This scheduled job retrieves customer details each day and can be run each hour if required. This is
used to retrieve the ezidebit customer number after sending an EDDR to a customer.
Steps
1) Navigate to the Apex Classes screen. Type ‘Apex Class’ into the setup search and choose the
Apex Classes screen.
2) Click the Schedule Apex button to navigate to add a new schedule.
Sunday, 16 February 2020 Copyright© 2020 Cloud Masons Pty Ltd. skedupay.com.auInstallation Guide
3) Enter the following details:
a. Name: Get Customer Details
b. Apex Class: scheduleGetCustomerInfo
c. Frequency: Weekly
d. Recurs: Sun – Sat
e. Start Date: Today
f. End Date: Choose a day around 5-10 years away
g. Preferred Start Time: 08:00 am
4) Click the Schedule Apex button to navigate to add a new schedule.
Sunday, 16 February 2020 Copyright© 2020 Cloud Masons Pty Ltd. skedupay.com.auInstallation Guide
5) Enter the following details:
a. Name: Get Customer Details 1
b. Apex Class: scheduleGetCustomerInfo
c. Frequency: Weekly
d. Recurs: Sun – Sat
e. Start Date: Today
f. End Date: Choose a day around 5-10 years away
g. Preferred Start Time: 02:00 pm
Apex Alternative
To schedule this job through the developer console, please use Execute Anonymous to run the
following code. Please only do this if you are confident with Apex and know what you are doing.
scheduleGetCustomerInfo q = new scheduleGetCustomerInfo();
System.schedule('Get Ezidebit Customer Details', '0 0 08 * * ?', q);
System.schedule('Get Ezidebit Customer Details1', '0 0 14 * * ?', q);
Note: we have shown the set up of two jobs above. If you want you can increase the frequency of
this job to hourly, depending on how quickly you need customer details updated to the system.
Sunday, 16 February 2020 Copyright© 2020 Cloud Masons Pty Ltd. skedupay.com.auInstallation Guide
Dashboard Access
Navigation Path: App Launcher → Dashboard → Dashboard List
The skedupay dashboard should be shared with those staff that need to track cashflow and follow-up
people who have not paid. The following instructions are used to share the dashboard with those
people who need it.
Steps
1) Navigate to the Dashboard Screen and choose Go to Dashboard List (you will need to do this in
Salesforce Classic).
2) Click the share button on the skedupay Dashboard folder
Sunday, 16 February 2020 Copyright© 2020 Cloud Masons Pty Ltd. skedupay.com.auInstallation Guide
3) Select the Users or Public groups link to choose who you would like to share the dashboard
with.
4) Search for a user in the search box and then click share to give them access. Then click the
done button to finish
Sunday, 16 February 2020 Copyright© 2020 Cloud Masons Pty Ltd. skedupay.com.auYou can also read