ENGLISH - BATTERY CHARGER - Fulbat
←
→
Page content transcription
If your browser does not render page correctly, please read the page content below
BATTERY CHARGER
          Smart battery charger with rejuvenation function

               For all lead-acid batteries:
              GEL, SLA, AGM, DRY, Ca/Ca

User Manual and Guide to professional battery
charging for Starter and Deep Cycle batteries.
  THIS MANUAL CONTAINS IMPORTANT SAFETY AND OPERATING INSTRUCTIONS FOR
                       6V-12V BATTERY CHARGER:   F4

                         [ENGLISH]
                                                                         1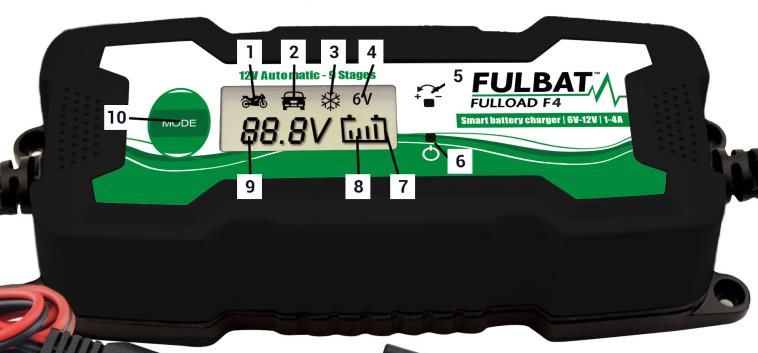
INTRODUCTION
Thank you for your purchase, please read these instructions they contain important information concerning safety, use
and disposal. Before using the product, please familiarize yourself with all of the safety information and instructions.
Only use the unit as described and for the specified applications. If you pass the product on to anyone else, please
ensure that you also pass on these instructions with it as well.
INTENDED USE
This model is multistep battery charger (called “charger” in the following) used for charging and float charge of 6V or
12V lead batteries (in the following called battery). These may be the types AGM-CA/CA-GEL-MF-VRLA with
electrolyte solution or GEL.
The manufacture/reseller is not liable for damage caused by improper use. The device is not intended for commercial
use, only be used indoors or away from direct weather or water exposure.
INTENDED INSIDE
1 Charger; 2 Clamps (1 red, 1 black); 1 Instructions for use
See Figure A Figure A
1. 12V 0.8A-(Program 2)
2. 12V 3.8A-(Program 3)
3. 12V 3.8A-(Program 4)
4. 6V 0.8A-(Program 1)
5. LED reverse connection
6. LED Stand-By
7. Charge Display
8. Condition Display
9. Voltage Display
10. ProgramSelection Button (MODE)
See Figure B Figure B
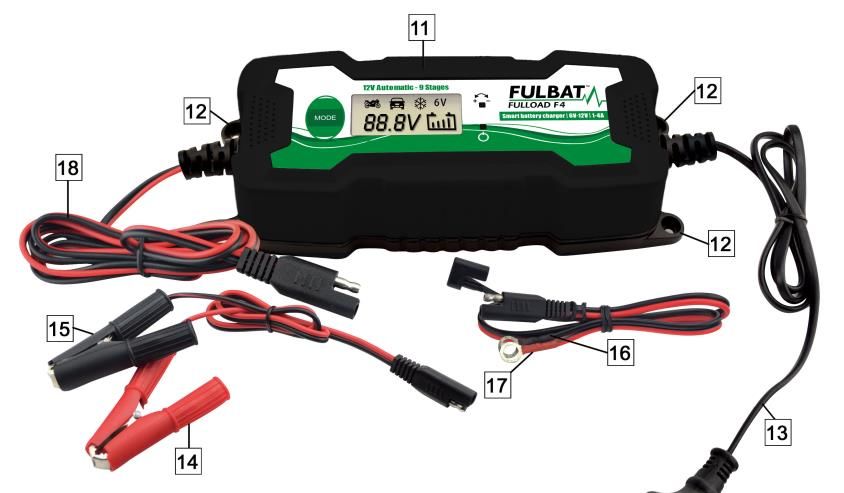
11. Charger
12. Fastening Eyelets
13. Main Lead
14. “+” pole clamp RED
15. “-” pole clamp BLACK
16. “+” pole connector cable RED
17. “-” pole connector cable BLACK
8 stages
Tension
(V)
Current
(A)
Initial Rejuvenation Soft Start Bulk Charge Absorption Monitoring Demand Long term
diagnostic Charge – with high Charge – Recharging Maintenanc
and Reverse Battery current – up to 100% e
polarity Rescue up to 80%
protection
test
2TECHNICAL DATA
Input voltage: 110V or 230V AC Rated power: 60W
Rated voltage outgoing: 6V/12V DC Rated output current: 0.8A/3.8A
Ambient Temperature: 0*C to 40*C Housing Protection type: IP 65
6V lead acid battery 1.2Ah-14Ah
Charging battery types:
12V Lead acid battery 1.2Ah-120Ah
SAFETY
Children or persons who lack the knowledge or experience to use the device or whose physical, sensory or intellectual
capacities are limited must never be allowed to use the device without supervision or instruction by a person
responsible for their safety. Children should be supervised in order to ensure that they do not play with the appliance.
WARNING Never use the charger for charging of non-rechargeable batteries. During charging, place the removed
battery on a well-aired surface. The automatic operating mode and the restrictions in use are explained further below
in these instructions.
DANGER OF ELECTRIC SHOCK!
Do not operate the appliance if the cables, the mains cable or mains plug are damaged. A damaged mains cable
indicates a life-threatening danger due to electric shock.
Before connecting to the power, ensure that the power connection is earthed, is 120V 50Hz, and is 16A fused and
equipped with an RCCB switch (residual current circuit breaker) in accordance with the current regulations. Disconnect
the charger from the grid, before you make or break connections to the battery.
First, connect the clamp that is not connected to the bodywork. Then connect the other clamp to the bodywork, away
from battery and fuel pipe. Only after this, connect the charger to the grid.
After charging, disconnect the charger from the grid. Only after this remove the clamp from the bodywork. Following
this, remove the clamp from the battery.
DANGER OF EXPLOSION AND FIRE HAZARD!
Protect yourself from a highly explosive hydrogen-oxygen reaction.
Ensure that during charge and charge retention procedures, there are no flames or sparks Ensure that the plus cable
does not come into contact with fuel lines (e.g. petrol pipe or grounded metal).
Ensure the charger and contacts are away from handle material
DANGER OF CHEMICAL BURNS!
Wear protective glasses! Wear protective gloves. If eyes or skin has come into contact with battery acid, rinse the
affected body region off with a large amount of clean water and soap.
Avoid causing a short circuit when connecting the charger to the battery. Connect the negative pole connector cable
only to the negative battery or to the body work. Connect the positive pole connector cable only to the plus pole of the
battery.
Do not place the charger close to fire, heat or to places with long-term exposure to temperatures over 50°C.
Ensure that no fuel lines, electric cables, hydraulic or water pipes are damaged by the screws during assembly of the
charger.
Do not cover the charger with any objects. Protect the electrical contact surfaces of the battery from short circuiting.
Only use the charger for charging and for float charging retention of 6V/12V lead batteries. Do not charge frozen
batteries.
OPERATION
Before use
Before connecting the charger, the operating instructions must be observed. Furthermore, the instructions of the
vehicle manufacturer regarding a permanently connected car battery must be observed. Secure the car, switch off the
ignition. Clean the battery poles. Take care that while doing so, your eyes do not come into contact with the dirt.
Ensure sufficient ventilation.
Connecting
Connect the “+” pole clamp (red) 14 of the charger to the “+” pole of the battery.
Connect the “-” pole clamp (black) 15 to the “-” pole of the battery.
Connect the mains cable 13 of the charger to the mains socket.
The battery voltage display 9 shows the current battery voltage.
3Should the connection of the clamps be swapped, the LED “reverse connection” lights up 5.
Disconnect
Disconnect the appliance from the mains supply.
Remove the “-” pole clamp (black) 15 from the “-” pole of the battery.
Remove the “+” pole clamp (red) 14 from the “+” pole of the battery.
Measuring Standby/Battery Voltage
After connection to the grid, the appliance is on Standby. The standby display 6 lights up. When the clamps are
connected, the battery voltage is shown in the LCD.The segments of the condition display 8 are empty. If the voltage
is below 3.8V or above 15V, the battery will not be charged. The display briefly shows the error message “Err”. The
appliance goes on standby.
6V battery: If the voltage range of the battery is measured asbetween 3.7-7.3V, only programme1 can be
selected.
12V batteries: If a battery is recognized in the critical voltage range of between 7.3-10.5V, the appliance checks
whether a fully charged 6V battery, or a discharged 12V battery is present. After pressing the programme selection
button 10 to select a programme, the appliance carries out a control measurement for about 90 sec.
The display shows:
If after about 90 sec. between 7.3-7.5V are detected, the 12V battery is defective. The appliance goes on standby.
Revitalizing
If after about 90 sec. voltage between 7.5-10.5V is detected a 12V battery is present. Charging starts with a pulse
charge for revitalizing. The voltage display 9 flashes. Once 10.5V are reached, the charger switches to the other charge
steps. Revitalizing is the same for all the 12V charge program
Program selection
NOTES: If a battery is detected in the voltage range of between 3.7-7.3V, theprogramm 2-3-4 can not be selected. The
charging process takes place automatically. Depending on the selected program, the characteristic charge curve is
monitored for voltage, time and temperature. Included are the diagnostics program, revitalizing mode and retention
charge. (See principle representation program 3 Fig. C)
Program Max.(V) Max.(A)
1 6V 7.3V 0.8A
2 14.4V 0.8A
3 14.4V 3.8A
4 14.7V 3.8A
Program 1 “6V” (7.3V/0.8A)
For charging 6V batteries with a capacity of less than 14Ah.
Press the program selection button 10, to select program 1. The symbol “6V” is displayed on the LCD. During charging,
the charge display 7 flashes and shows the progress of the charge procedure (1-4 bars). When the battery is fully
charged, the condition display 8 shows 4 bars. The flashing stops and the charger automatically switches to float
charge.
Program 2 “12V” (14.4V/0.8A)
For charging 12V batteries with a capacity of less than 14Ah.
Press the program selection button 10, to select program 2. The symbol is displayed on the LCD. During charging,
the charge display 7 flashes and shows the progress of the charge procedure (1-4 bars). When the battery is fully
charged, the condition display 8 shows 4 bars. The flashing stops and the charger automatically switches to float
charge.
4Program 3 “12V” (14.4V/3.8A)
For charging 12V batteries with a capacity of between 14 Ah-120 Ah.
Press the program selection button 10, to select program 3. The symbol is displayed on the LCD. During charging,
the charge display 7 flashes and shows the progress of the charge procedure (1-4 bars). When the battery is fully
charged, the condition display 8 shows 4 bars. The flashing stops and the charger automatically switches to float
charge.
Program 4 “12V”(14.7V/3.8A)
For charging 12V batteries with a capacity of between 14Ah-120Ah under cold conditions or for charging AGM
batteries. Press the program selection button 10, to select program 4.
NOTE: This program may start with a minute delay. The symbol is displayed on the LCD. During charging, the
charge display 7 flashes and shows the progress of the charge procedure (1-4 bars). When the battery is fully charged,
the condition display 8 shows 4 bars. The flashing stops and the charger automatically switches to float charge.
Float charge
As described under program, this charger features the automatic float charge. Depending on the voltage drop of the
battery, caused by self-discharge, the appliance reacts with different charge currents.
The battery can remain connected to the charger for longer periods of time.
Charger protection function
The charger switches the electronics off and switches the system instantly to the basic setting, as soon as there is an
abnormal situation, such as short circuit, critical voltage drop during charging, broken circuit or swapped connection of
the connector clamps is detected. Should the charger become too hot during charging, the output current is
automatically reduced. This protects the appliance from damage.
MAINTENANCE AND CARE
Before you carry out any work on the battery charger always pull the A/C plug out of the mains socket. The charger is
maintenance-free. Ensure that all of the battery charger components are in place and in good working condition. Do
not under any circumstances use solvents or other aggressive cleaning agents. Clean the plastic surfaces of the device
with a dry cloth. Servicing does not require opening the unit, as there are no user-serviceable parts. Store the battery
charger in an upright position. Store inside, in a cool, dry place. If the battery charger is moved around the shop or
transported to another location, take care to avoid/prevent damage to the battery charger components. Failure to do
so could result in personal injury or property damage. All other servicing should be performed by qualified service
personnel.
5CHARGEUR DE BATTERIE
Chargeur de batterie intelligent avec désulfatation
Pour toutes les batteries au plomb type :
GEL, SLA, AGM, DRY, Ca/Ca
Notice d’utilisation et consigne de sécurité pour le
chargeur de batterie 6V et 12V: F4.
[FRANÇAIS]
6INTRODUCTION
Merci pour votre achat du F4. Veuillez lire attentivement la notice qui contient des informations sur la sécurité,
l’utilisation et la mise au rebut du chargeur. Avant toute utilisation du chargeur, familiarisez-vous avec les informations
de sécurité et d’utilisation. Merci de n’utilisé le chargeur selon les recommandations de la notice et pour ses
applications spécifiées. Si vous transmettez le chargeur à une tiers-personne, veillez à lui fournir également les
instructions.
UTILISATION PREVUE
Ce modèle est un chargeur de batterie à plusieurs étapes (appelé « chargeur » dans la suite de la notice) utilisé pour la
charge de batterie 6V et 12V du type AGM, Ca/Ca, GEL, MF, VRLA avec une solution d’électrolyte ou GEL.
Le fabriquant et le revendeur ne sont pas responsable des dommages causés par une mauvaise utilisation du chargeur.
Ce chargeur n’est pas destiné à un usage commercial. Il doit être utilisé en intérieur ou à l’abri des intempéries et de
l’exposition à l’eau.
FONCTIONS DU CHARGEUR
1 Chargeur, 2 Pinces (1 rouge, 1 noir), 1 notice d’utilisation
Confère la figure A Figure A
1. 12V 0.8A-(Programme 2)
2. 12V 3.8A-(Programme 3)
3. 12V 3.8A-(Programme 4)
4. 6V 0.8A-(Programme 1)
5. LED inversion de polarité
6. LED d’allumage
7. Indicateur charge
8. Indicateur de l’état de charge
9. Indicateur tension
10. Bouton de sélection du programme (MODE)
Confère la figure B Figure B
11. Chargeur
12. Œillet fixation
13. Prise d’alimentation secteur
14. Pince rouge, polarité “+”
15. Pince noire, polarité “-”
16. “+” pole connector cable rouge
17. “-” pole connector cable noir
8 étapes
Tension
(V)
Courrant
(A)
Diagnostique Rejuvenation Démarrage Charge Char Surveillance Demand Maintenanc
initial et test Charge – en douceur initiale – d’Absorption– Recharging e Long
de protection Battery jusqu’a 80% Jusqu’a 100% terme
contre Rescue
l’inversion de
polarité
7DONNEES TECHNIQUES
Courant: 110V ou 230V AC Puissance testé: 60W
Voltage: 6V/12V DC Intensité de Charge: 0.8A/3.8A
Température ambiante 0*C à 40*C Isolation: IP 65
Batterie au plomb 6V 1.2Ah-14Ah
Types de batteries chargées
Batterie au plomb 12V 1.2Ah-120Ah
SECURITE
Les enfants, les personnes dont les capacités physiques, sensorielles ou intellectuelles sont limitées ou les personnes
qui n’ont pas les connaissances ou l’expérience nécessaire ne doivent pas être autorisé à utiliser l’appareil sans
supervision d’une personne responsable de leur sécurité. Les enfants doivent être surveillés pour qu’ils ne jouent pas
avec le charger.
ATTENTION, ne jamais utiliser le chargeur pour recharger les batteries qui ne sont pas rechargeables. Pendant la
charge de la batterie, placez celle-ci sur une surface plate et aérée. Les modes de fonctionnement automatique et les
restrictions d’utilisation sont expliqués plus loin dans la notice.
DANGER DE CHOC ELECTRIQUE !
Ne pas utiliser le chargeur si l’appareil, les câbles de charge, le câble d’alimentation ou la prise électrique est
endommagés. Un câble d’alimentation est endommagé indique un danger de mort par choc électrique. Avant la mise
sous tension du chargeur, vérifier que les branchements électriques possèdent un branchement à la terre, soit en 120V
50Hz et est protégée avec un fusible de 16A équipée d’un interrupteur RCCB (disjoncteur différentiel) conformément à
la réglementation en vigueur. Débrancher le chargeur de la prise avant de brancher ou de débrancher la batterie. En
premier, branchez la pince qui n’est pas connectée à la carrosserie, puis connectez l’autre pince à la carrosserie à l’écart
de la batterie et des durites de carburant. Vous pouvez ensuite connecter le chargeur à la prise. Après la charge,
débranchez le charger de la prise, seulement après vous pouvez retirer les pinces de la carrosserie puis de la batterie.
DANGER D’EXPLOSION ET DE RISQUE D’INCENDIE !
Protégez-vous contre les réactions hydrogène-oxygène hautement explosif. Assurez-vous que pendant la charge et la
rétention de charge il n’y ait pas de flammes ou d’étincelles. Assurez-vous également que les câbles ne sont pas en
contact avec les conduits de carburants (par exemple les durites d’essence ou la prise de terre). Assurez-vous que le
chargeur et les contacteurs sont éloignés des matériaux de la poignée.
DANGER DE BRULURES CHIMIQUES !
Portez des lunettes de protection et des gants de protection. Si les yeux et la peau entre en contact avec l’acide de la
batterie, rincez la zone du corps affectée avec une grande quantité d’eau propre et du savon. Evitez de provoquer des
court-circuit quand vous connectez le chargeur à la batterie. Veuillez à ne connectez le câble, pince négatif
uniquement à la batterie sur le pôle négatif ou sur la carrosserie. Veuillez à ne connectez le câble, pince positif
uniquement sur le pôle positif de la batterie. Ne placez pas le chargeur près du feu, d’une source de chaleur ou dans
une zone exposée à des températures supérieures à 50°C. Assurez-vous qu’aucun conduit de carburant, de câble
électrique, de tuyaux hydrauliques ou d’eau n’est endommagé par un vise avant de brancher le chargeur. Ne couvrez
pas le chargeur avec des objets. Protégez toutes les surface de contact électrique de la batterie contre les court-circuit.
OPÉRATION
Avant l’utilisation
Avant de brancher le chargeur, les instructions d’utilisation doivent être lues et respectées. Ainsi que les instructions du
constructeur du véhicule concernant la batterie du véhicule qui est connectée en permanence. Fixez et coupez le
contact du véhicule. Nettoyez les pôles de la batterie. Veillez à que vos yeux ne rentrent pas en contact avec des
saletés. Enfin, assurez-vous d’avoir une ventilation suffisante.
Branchement du chargeur
Connectez la pince rouge « + » (14) du chargeur, sur le pôle « + » de la batterie. Connectez la pince noire « - » (15) du
chargeur, sur le pôle « - » de la batterie. Branchez le câble d’alimentation (13) du chargeur sur une prise d’alimentation.
L’écran affiche la tension actuelle de la batterie (9). Dans le cas d’une permutation des pinces, la LED “inversion de
polarité” est allumée (5)
Déconnection du chargeur
Débrancher le câble d’alimentation du chargeur de la prise d’alimentation.
8Retirez la pince noire « - » (15) du chargeur, du pôle « - » de la batterie.
Retirez la pince rouge « + » (14) du chargeur, du pôle « + » de la batterie.
Mesure de la tension/Mesure de la tension de la batterie
Après le branchement du chargeur à une prise secteur, le chargeur est en veille et l’écran (6) s’allume. Lorsque les
pinces sont connectées, la tension de la batterie est indiquée sur l’écran LCD. Le niveau de charge de la batterie est
vide. Si la tension est inférieure à 3,8V ou supérieur à 15V, la batterie ne sera pas chargée. L’écran indique brièvement
le message d’erreur suivante « Err » et le chargeur se met en veille.
Batteries 6V : Si la tension de la batterie est comprise entre 3,7V et 7,3V, seul le programme 1 pourra être utilisé.
Batteries 12V : Si la batterie a une tension critique comprise entre 7,3V et 10,5V, le chargeur va vérifier si la batterie
n’est pas une batterie 6V entièrement chargée ou une batterie 12V déchargée. Après avoir appuyé sur le bouton
« mode » pour sélectionner un programme (10), le chargeur effectue une mesure de contrôle pendant environ 90
secondes.
L’ecran indique :
Si après 90 secondes d’attente la batterie de 12V est détecté entre 7,3V et 7,5V, elle est considérée comme
défectueuse, le chargeur se met en veille.
Reconditionnement
Si après 90 secondes d’attente la batterie de 12V est détecté entre 7,5V et 10,5V, elle est considérée comme bonne.
Dans ses conditions la charge commence avec une charge en impulsion pour la revitaliser. Sur l’écran la tension
clignote (9). Une fois les 10,5V atteint, le chargeur passe aux autres étapes de charge.
Sélection d’un programme
NOTES : quand une batterie est détectée avec une tension entre 3,7V et 7,3V, les programmes 2-3-4 ne peuvent être
sélectionnés. Le processus de charge se déroule automatique. Selon le programme choisi, la courbe de charge, le
temps et la température sont surveillées pour la tension de la batterie. Il est inclus différents programmes : diagnostic,
revitalisation, charge (cf. programme de représentation des principes 3Fig. C)
Programme Max.(V) Max.(A)
1 6V 7,3V 0,8A
2 14,4V 0,8A
3 14,4V 3,8A
4 14,7V 3,8A
Programme 1 6V” (7.3V/0.8A)
Pour charger des batteries 6V d’une capacité inférieure à 14Ah.
Appuyez sur le bouton “mode” pour sélectionner le programme 1 (10). Le symbole “6V” apparaît sur l’écran. Pendant la
charge, sur l’écran l’indicateur de charge (7) clignote et indique la progression de la charge (1 à 4 barres). Quand la
batterie est chargée, l’indicateur de charge (8) affiche 4 barres, le clignotement s’arrête et le charger passe
automatiquement en mode maintenance.
Programme 2 “12V” (14.4V/0.8A)
Pour charger des batteries 12V d’une capacité inférieure à 14Ah.
Appuyez sur le bouton “mode” pour sélectionner le programme 2 (10). Le symbole apparaît sur l’écran. Pendant
la charge, sur l’écran l’indicateur de charge (7) clignote et indique la progression de la charge (1 à 4 barres). Quand la
batterie est chargée, l’indicateur de charge (8) affiche 4 barres, le clignotement s’arrête et le charger passe
automatiquement en mode maintenance.
9Programme 3 “12V” (14.4V/3.8A)
Pour charger des batteries 12V d’une capacité inférieure à 14Ah-120Ah.
Appuyez sur le bouton “mode” pour sélectionner le programme 3 (10). Le symbole apparaît sur l’écran. Pendant la
charge, sur l’écran l’indicateur de charge (7) clignote et indique la progression de la charge (1 à 4 barres). Quand la
batterie est chargée, l’indicateur de charge (8) affiche 4 barres, le clignotement s’arrête et le charger passe
automatiquement en mode maintenance.
Programme 4 “12V”(14.7V/3.8A)
Pour charger des batteries 12V d’une capacité inférieure à 14Ah-120Ah dans des conditions froides ou pour les
batteries AGM. Appuyez sur le bouton “mode” pour sélectionner le programme 4 (10).
NOTE : ce programme peut démarrer avec une minute de retard. Le symbole apparaît sur l’écran. Pendant la
charge, l’indicateur de charge (7) clignote. Une fois la batterie chargée, l’indicateur du niveau de charge (8) affiche 4
barres et le clignotement s’arrête. Quand la batterie est chargée, le chargeur passe automatiquement en maintenance
de la charge de la batterie.
Maintenance de charge
Comme évoqué dans les instructions, le chargeur dispose d’un maintien de charge automatique. Selon les chutes de
tensions de la batterie par le chargeur, il réagira avec différents courants de charges. Ainsi la batterie peut rester
branché au chargeur pendant une longue période.
Fonctions de protection du chargeur
Le chargeur s’etaint automatiquement en cas de situ tion anormal, probleme de voltage, court circuit, mauvaise
connection, problem de polarité, trop fort chaleur…
Si le chargeur devient trop chaud pendant son fonctionnement, le courant de charge est automatiquement réduit. Afin
de protéger le chargeur de tout dommages.
MAINTENANCE ET SOINS
Avant d’effectuer toute manipulation avec le chargeur, débranchez-le de la prise électrique. C’est un chargeur sans
entretien. Avant et après chaque utilisation assurerez-vous que tous éléments qui composent le chargeur sont à leur
place et en bon état de fonctionnement. Ne jamais utiliser de solvant ou autres détergents agressifs. Nettoyez les
surfaces en plastique du chargeur avec un chiffon sec. L’entretien du chargeur ne nécessite pas son ouverture. Il n’y a
aucune pièce réparable par son utilisateur. Ranger le chargeur dans une position verticale dans un endroit frais, sec et
en intérieur. Si le chargeur est déplacé dans le magasin ou transporté vers un autre lieu, veillez à ne pas endommager
les composants du chargeur. Ne pas le faire pourrait entraîner des blessures ou des dommages matériels. Toutes les
autres réparations sur le chargeur doivent être réalisées par du personnel qualifié.
10CARREGADOR DE BATERIAS
Carregador inteligente com função de rejuvenescimento
Para baterias de chumbo-ácido:
GEL, SLA, AGM, DRY, Ca/Ca
Manual de Utilização e Guia para Profissionais
para o carregador de baterias.
ESTE MANUAL CONTÉM INSTRUÇÕES IMPORTANTES DE SEGURANÇA E OPERAÇÃO
PARA CARREGADOR DE BATERIAS 6V-12V BATTERY CHARGER: F4
[PORTUGUESE]
11INTRODUÇÃO
Obrigado pela sua compra, leia atentamente estas instruções que contêm informações importantes sobre segurança,
uso e descarte. Antes de usar o produto, familiarize-se com todas as informações e instruções de segurança. Use o
produto apenas como descrito e para as utilizações indicadas. Se transmitir o produto para qualquer outra pessoa,
certifique-se que também transmite estas instruções.
UTILIZAÇÃO PREVISTA
Este modelo é um carregador de bateria de várias etapas (doravante denominado “carregador”) usado para
carregamento e manutenção de baterias de chumbo de 6V ou 12V (doravante denominado “bateria”). Estes
carregadores podem ser de tipos AGM-CA / CA-GEL-MF-VRLA com solução eletrolítica ou GEL.
O fabricante / revendedor não se responsabiliza pelos danos causados por uso indevido. O produto não se destina ao
uso comercial, apenas deve ser utilizado em ambientes fechados e longe da exposição directa ao clima ou água.
ELEMENTOS PREVISTOS
1 Carregador; 2 Garras (1 vermelho, 1 preto); 1 Manual de Utilização
Ver Figura A Figura A
1. 12V 0.8A-(Programa 2)
2. 12V 3.8A-(Programa 3)
3. 12V 3.8A-(programa 4)
4. 6V 0.8A-(Programa 1)
5. LED de Conexão Reversa
6. LED Stand-By
7. Indicador de carga
8. Indicador de condição
9. Indicador de voltagem
10. Botão de Selecção do Programa (MODE)
Ver Figura B Figura B
11. Charger
12. Fastening Eyelets
13. Main Lead
14. “+” pole clamp RED
15. “-” pole clamp BLACK
16. “+” pole connector cable RED
17. “-” pole connector cable BLACK
8 fases
Tensão
(V)
Corrente
(A)
Teste de Carga de Carga lenta Carga Carga Monitori- Carrega- Manuten-
diagnóstico Rejuvenesci bruta – absorção – zação mento ção de
inicial e de mento - até 80% até 100% longo prazo
proteção de Resgate de
polaridade Bateria
reversa
12DADOS TÉCNICOS
Tensão de entrada: 110V ou 230V AC Potência nominal: 60W
Tensão nominal de saída: 6V / 12V DC Corrente de saída nominal: 0.8A / 3.8A
Temperatura ambiente: 0*C a 40*C Tipo de proteção da caixa: IP 65
Bateria chumbo-ácido de 6V 1.2Ah-14Ah
Carregamento de tipos de bateria:
Bateria chumbo-ácido 12V 1.2Ah-120Ah
SEGURANÇA
Crianças, pessoas que não tenham conhecimento ou experiência para usar o produto ou pessoas com
capacidades físicas, sensoriais ou intelectuais limitadas nunca devem ser autorizadas a usar o produto sem
supervisão ou instrução por uma pessoa responsável pela sua segurança. As crianças devem ser
supervisionadas para garantir que não brincam com o aparelho. AVISO Nunca use o carregador para
carregar baterias não recarregáveis. Durante o carregamento, coloque a bateria removida numa superfície
bem ventilada. O modo de operação automática e as restrições de utilização são explicados mais abaixo
neste Manual.
PERIGO DE CHOQUE ELÉTRICO!
Não utilize o aparelho se os cabos, o cabo de alimentação ou a ficha de rede estiverem danificados. Um cabo
danificado indica um risco de vida devido a choque elétrico.
Antes de ligar à corrente, certifique-se de que a conexão está ligada à terra, seja de 120V 50Hz e tenha 16A fusível e
equipada com um interruptor RCCB (disjuntor de corrente residual) de acordo com as normas vigentes. Desligue o
carregador da rede antes de fazer ou desfazer as ligações à bateria.
Antes de ligar à corrente, certifique-se de que a conexão está ligada à terra, seja de 120V 50Hz e tenha 16A fusível e
equipada com um interruptor RCCB (disjuntor de corrente residual) de acordo com as normas vigentes. Desligue o
carregador da rede antes de fazer ou desfazer as ligações à bateria.
Após o carregamento, desconecte o carregador da rede. Depois disso, remova a garra da carroceria. Depois disso,
remova a garra da bateria.
PERIGO DE EXPLOSÃO E PERIGO DE INCÊNDIO!
Proteja-se de uma reação altamente explosiva de hidrogénio-oxigénio. Certifique-se que durante os procedimentos de
carga e retenção de carga não há chamas ou faíscas. Certifique-se que o cabo positivo não entra em contato com
linhas de combustível (por exemplo, tubo de combustível ou metal aterrado). Certifique-se que o carregador e os
contatos estão longe do material de manuseamento.
PERIGO DE QUEIMADURAS QUÍMICAS!
Use óculos de proteção! Use luvas de proteção. Se os olhos ou a pele entrarem em contato com o ácido da bateria, lave
a zona afetada com uma grande quantidade de água limpa e sabão. Evite causar um curto-circuito ao conectar o
carregador à bateria. Conecte o cabo conector do pólo negativo somente à bateria negativa ou à carroceria. Conecte o
cabo do conector positivo somente ao pólo positivo da bateria. Não coloque o carregador perto de fogo, calor ou em
locais com exposição prolongada a temperaturas superiores a 50°C. Certifique-se que não há tubos de combustível,
cabos elétricos, tubos hidráulicos ou de água danificados pelos parafusos durante a montagem do carregador. Não
cubra o carregador com nenhum objeto. Proteja as superfícies de contato elétrico da bateria contra curtos-circuitos.
Utilize apenas o carregador para o carregamento e manutenção de baterias de chumbo de 6V / 12V. Não carregue
baterias congeladas.
OPERAÇÕES
Antes de utilizar
Antes de conectar o carregador, deve observar as instruções de operação. Além disso, deve ainda onservar as
instruções do fabricante do veículo relativas a uma bateria de carro permanentemente conectada. Imobilize o carro,
desligue a ignição. Limpe os pólos da bateria. Tome cuidado para que, ao fazê-lo, seus olhos não entrem em contato
com a sujeira. Assegure a existência de ventilação suficiente.
Conectar
Ligue a garra do pólo “+” (vermelho) 14 do carregador ao pólo “+” da bateria.
Ligue a garra do pólo “-” (preto) 15 ao pólo “-” da bateria.
Ligue o cabo de alimentação 13 do carregador à tomada de corrente.
O indicador de tensão da bateria 9 mostra a tensão atual da bateria.
13Caso a conexão das garras esteja trocada, o LED “conexão reversa” acende 5.
Desligar
Desligue o aparelho da rede elétrica.
Remova a garra do pólo “-” (preto) 15 do pólo “-” da bateria.
Remova a garra do pólo “+” (vermelho) 14 do pólo “+” da bateria.
Medição da tensão standby / bacteria
pós a conexão à rede, o produto está no modo standby. O indicador de standby 6 acende. Quando as garras são
conectadas, a tensão da bateria é indicada no LCD. Os segmentos da indicação de condição 8 estão vazios. Se a tensão
estiver abaixo de 3.8V ou acima de 15V, a bateria não será carregada. O indicador mostra brevemente a mensagem de
erro "Err". O aparelho fica em standby.
Bateria de 6V: se a voltagem da bateria for medida entre 3.7 – 7.3V, somente o programa 1 pode ser selecionado.
Baterias de 12V: se uma bateria for reconhecida na faixa de tensão crítica entre 7.3 e 10.5V, o aparelho verificará se se
trata de uma bateria de 6V totalmente carregada ou de uma bateria de 12V descarregada. Depois de premir o botão de
selecção de programa 10 para seleccionar um programa, o aparelho realiza uma medição de controlo durante cerca de
90 segundos.
O indicador mostra:
If after about 90 sec. between 7.3-7.5V are detected, the 12V battery is defective. The appliance goes on standby.
Revitalizing
Se depois de cerca de 90 segundos forem detectados entre 7.3 e 7.5V, a bateria de 12V está com defeito. O aparelho
fica em standby. A revitalização é a mesma para todo o programa de carga de 12V.
Seleção de programa
NOTAS: Se for detectada uma bateria com tensão entre 3.7 e 7.3V, o programa 2-3-4 não pode ser selecionado. O
processo de carregamento decorre automaticamente.
Dependendo do programa selecionado, a curva de carga característica é monitorizada em função da tensão, tempo e
temperatura. Incluem-se o programa de diagnóstico, o modo de revitalização e a carga de retenção. (Ver
representação do programa 3 Fig. C)
Programa Max.(V) Max.(A)
1 6V 7.3V 0.8A
2 14.4V 0.8A
3 14.4V 3.8A
4 14.7V 3.8A
Programa 1 “6V” (7.3V/0.8A)
Para carregar baterias de 6V com uma capacidade inferior a 14Ah.
Prima o botão de seleção de programa 10 para seleccionar o programa 1. O símbolo “6V” é apresentado no LCD.
Durante a carga, o indicador de carga 7 pisca e mostra o progresso do processo de carga (1-4 barras). Quando a bateria
está totalmente carregada, o indicador de condição 8 mostra 4 barras. O pisca pára e o carregador muda
automaticamente para a “carga de manutenção”.
Programa 2 “12V” (14.4V/0.8A)
Para carregar baterias de 12V com uma capacidade inferior a 14Ah.
Prima o botão de selecção de programas 10, para seleccionar o programa 2. O símbolo é apresentado no LCD.
Durante a carga, o indicador de carga 7 pisca e mostra o progresso do processo de carga (1-4 barras). Quando a bateria
está totalmente carregada, o indicador de condição 8 mostra 4 barras. O pisca pára e o carregador muda
automaticamente para a “carga de manutenção”.
14Programa 3 “12V” (14.4V/3.8A)
Para carregar baterias de 12V com uma capacidade entre 14 Ah e 120 Ah.
Prima o botão de selecção de programas 10, para seleccionar o programa 3. O símbolo é apresentado no LCD.
Durante a carga, o indicador de carga 7 pisca e mostra o progresso do processo de carga (1-4 barras). Quando a bateria
está totalmente carregada, o indicador de condição 8 mostra 4 barras. O pisca pára e o carregador muda
automaticamente para a “carga de manutenção”.
Programa 4 “12V”(14.7V/3.8A)
Para carregar baterias de 12V com uma capacidade entre 14 Ah e 120 Ah sob condições frias ou para carregar baterias
AGM. Prima o botão de selecção de programas 10 para seleccionar o programa 4.
NOTA: Este programa poderá começar com um minuto de atraso. O símbolo é apresentado no LCD. Durante a
carga, o indicador de carga 7 pisca e mostra o progresso do processo de carga (1-4 barras). Quando a bateria está
totalmente carregada, o indicador de condição 8 mostra 4 barras. O pisca pára e o carregador muda automaticamente
para a “carga de manutenção”.
Carga de manutenção
Conforme descrito no programa, este carregador apresenta a carga automática de manutenção. Dependendo da
queda de tensão da bateria, causada por descarga automática, o aparelho reage com diferentes correntes de carga. A
bateria pode permanecer conectada ao carregador por períodos mais longos.
Função de proteção do carregador
O carregador desliga o sistema eletrónico e muda instantaneamente o sistema para a configuração básica assim que
se detecte uma situação anormal, tal como um curto-circuito, queda crítica de tensão durante o carregamento, circuito
cortado ou uma conexão trocada das garras do conector. Se o carregador ficar muito quente durante a carga, a
corrente de saída será reduzida automaticamente. Isso protege o aparelho contra danos.
MANUTENÇÃO E CUIDADOS
Antes de efectuar qualquer trabalho no carregador, puxe sempre a ficha A/C para fora da tomada. O carregador não
necessita de manutenção. Certifique-se de que todos os componentes do carregador estão no lugar e em boas
condições de funcionamento. Não use, sob nenhuma circunstância, solventes ou outros agentes de limpeza agressivos.
Limpe as superfícies plásticas do carregador com um pano seco. A manutenção não requer a abertura do aparelho uma
vez que não há peças que possam ser reparadas pelo utilizador.
Guarde o carregador na posição vertical. Guarde o carregador no interior, num local fresco e seco.
Se o carregador for transportado na loja ou para outro local, tenha cuidado para evitar / prevenir danos nos
componentes do aparelho. Não fazer isso pode resultar em ferimentos ou danos materiais. Todos os serviços de
manutenção devem ser executados por pessoal qualificado.
15CARICA-BATTERIE
Carica-batterie intelligente con funzione di rigenerazione
Per tutte le batterie al Piombo-Acido:
GEL, SLA, AGM, A SECCO, Ca/Ca
Manuale d’uso e guida per la ricarica professionale delle batterie, sia per le batterie di
avviamento (progettate per fornire picchi sporadici di poche decine di secondi), sia per le
batterie a ciclo proforndo (progettate per fornire una tensione costante man mano che la
batteria si scarica).
QUESTO MANUALE CONTIENE IMPORTANTI ISTRUZIONI OPERATIVE E DI SICUREZZA
PER IL CARICA-BATTERIE “ F4” (6V-12V)
[ITALIANO]
16INTRODUZIONE
Grazie per aver acquistato questo prodotto. Ti consigliamo di leggere attentamente queste istruzioni, perchè
contengono importanti informazioni sulla sicurezza, sull’uso e sullo smaltimento. Prima di usare il prodotto, è utile
familiarizzare con tutte le istruzioni e le indicazioni di sicurezza. Prima di trasferire il prodotto a qualcun altro,
assicurarsi di trasferire anche queste istruzioni.
USO PREVISTO
Questo modello è un caricabatterie a cicli (qui di seguito denominato "carica-batterie") utilizzato per la ricarica e la
carica flottante di batterie al piombo da 6 V o 12 V (qui di seguito chiamate batterie). Le batterie possono essere del
tipo AGM-CA / CA-GEL-MF-VRLA con soluzione elettrolitica o GEL.
Il produttore/rivenditore non è responsabile per i danni causati da un uso improprio. Questo dispositivo non è
progettato per uso commerciale. Deve essere usato in ambienti all’interno e lontano dall’esposizione diretta alle
condizioni climatiche ed all’acqua.
CONTENUTO INTERNO
1 Carica-batterie; 2 Morsetti (1 rosso, 1 nero); 1 libretto di istruzioni
Vedere la Figura A Figura A
1. 12V 0.8A-(Programma 2)
2. 12V 3.8A-(Programma 3)
3. 12V 3.8A-(Programma 4)
4. 6V 0.8A-(Programma 1)
5. LED collegamento inverso
6. LED Stand-By
7. Display della ricarica
8. Display per lo stato del carica-batterie
9. Display del voltaggio
10. Pulsante di selezione del programma
(MODE)
Vedere la Figura B Figura B
11. Charger
12. Fastening Eyelets
13. Main Lead
14. “+” pole clamp RED
15. “-” pole clamp BLACK
16. “+” pole connector cable RED
17. “-” pole connector cable BLACK
8 fasi
Tensione
(V)
Corrente
(A)
Diagnosi Fase di Avviamento Carica Carica di Monitoraggio Richiesta di Manutenzion
iniziale e test di rigenerazione dolce cumulativa assorbimento - ricarica e a lungo
protezione – Salvataggio con corrente fino al 100% termine
inversione di batteria elevata - fino
polarità all'80%
17DATI TECNICI
Tensione di ingresso: 110V o 230V AC Potenza nominale: 60W
Tensione nominale in uscita: 6 V / 12 V CC Corrente nominale di uscita: 0.8A / 3.8A
Ambient Temperature: Da 0 * C a 40 * C Tipo di protezione: IP 65
Batterie da 6V al Piombo-Acido 1.2Ah-14Ah
Indicato per i seguenti tipi di batterie :
Batterie da 12V al Piombo-Acido 1.2Ah-120Ah
SICUREZZA
I bambini o le persone a cui mancano le conoscenze o l'esperienza per utilizzare il dispositivo o le cui capacità fisiche,
sensoriali o intellettuali sono limitate non devono mai essere autorizzati a utilizzare il dispositivo senza la supervisione
o le istruzioni di una persona responsabile della loro sicurezza. I bambini dovrebbero essere sorvegliati per assicurarsi
che non giochino con l'apparecchio. ATTENZIONE: Non usare mai il carica-batterie per ricaricare batterie NON-
ricaricabili. Durante la ricarica, posizionare la batteria su un superficie ben arieggiata. La modalità operativa
automatica e le restrizioni in uso sono spiegate più avanti in queste istruzioni.
PERICOLO DI SHOCK ELETTRICO
Non maneggiare e non usare il dispositivo se le prese o i cavi sono danneggiati. Un cavo o una presa danneggiati sono
una minaccia alla vita delle persone, perchè possono causare il pericolo di shock elettrico.
Prima di collegare l'alimentazione, assicurarsi che il collegamento sia protetto dai dispositivi di messa a terra, sia a 120
V 50 Hz, sia dotato di fusibile da 16 A e sia dotato di interruttore RCCB (interruttore differenziale) in conformità con le
normative vigenti. Disconnettere il caricabatterie dalla rete, prima di effettuare o interrompere le connessioni alla
batteria.
Innanzitutto collegare il cavo di collegamento NEGATIVO al POLO NEGATIVO della batteria. Poi collegare il cavo di
collegamento POSITIVO al POLO POSITIVO della batteria. Infine collegare il carica-batterie alla rete elettrica.
Quando il processo di ricarica è terminato, scollegare il carica-batterie dalla rete elettrica. Solo dopo averlo scollegato
dalla rete elettrica, rimuovere le pinze dai terminali della batteria.
PERICOLO DI ESPLOSIONE E DI INCENDIO
Proteggersi da eventuali reazioni altamente esplosive di idrogeno-ossigeno. Assicurarsi che durante la ricarica o la
ritenzione della carica, non ci siano fiamme o scintille. Assicurarsi che i cavi non entrino in contatto con i tubi
carburante (tubo benzina oppure metallo messo a terra). Assicurarsi che le pinze non tocchino altri materiali durante
l’utilizzo del carica-batterie.
PERICOLO DI USTIONI CHIMICHE
Bisogna sempre usare occhiali protettivi. Bisogna sempre indossare guanti di protezione. Se gli occhi o la pelle entrano
in contatto con acido della batteria, lavare immediatamente la parte interessata con abbondante acqua pulita e
sapone. Evitare di provocare cortocircuiti quando si collega il caricabatterie alla batteria. Collegare il cavo del
connettore polo negativo solo al polo negativo della batteria. Collegare il cavo del connettore polo positivo solo al polo
positivo della batteria. Evitare di posizionare il carica-batterie vicino al fuoco, fonti di calore o posti con esposizione a
temperature superiori ai 50° C per prolungati periodi di tempo. Assicurarsi che i tubi carburante, i cavi elettrici, i cavi
idraulici ed idrici non siano danneggiati dalle viti durante il montaggio del carica-batterie. Evitare di coprire il carica
batterie con oggetti. Proteggere le superfici elettriche di contatto da eventuali corto-circuiti. Utilizzare il caricabatterie
solo per la ricarica e per mantenimento della carica di batterie al piombo da 6V /12V. Non caricare batterie congelate.
UTILIZZO
Prima dell’uso
Prima di collegare il carica-batterie alla rete, leggere attentamente le istruzioni. Inoltre, osservare le istruzioni del
costruttore del veicolo, in merito alle batterie permanentemente collegate all’automobile. Mettere in sicurezza
l’automobile e staccare l’accensione. Pulire i poli delle batterie. Mentre si puliscono i poli, evitare che lo sporco entri in
contatto con gli occhi. Garantire una sufficiente ventilazione.
Collegamento
Collegare il morsetto del polo positivo “+” (rosso) del carica-batterie, al polo positivo “+” della batteria.
Collegare il morsetto del polo negativo “-” (nero) del carica-batterie, al polo negativo “-” della batteria.
Collegare il cavo di alimentazione “13” del caricabatterie alla presa di corrente.
Il display della tensione della batteria “9” mostra la tensione attuale della batteria.
Se la connessione delle pinze viene invertita, il LED 5 "reverse connection" si accende.
18Scollegamento
Scollegare il dispositivo dalla rete elettrica.
Scollegare il polo negativo “-“ (nero) 15 dal polo negativo “-“ della batteria.
Scollegare il polo positivo “+“ (rosso) 15 dal polo positivo “+“ della batteria.
Misurazione della tensione di standby della batteria
Dopo il collegamento alla rete elettrica, il dispositivo si trova in posizione di “Standby”. La posizione di “Standby”
mostra 6 luci. Quando i morsetti sono collegati, il voltaggio della batteria viene visualizzato in LCD. I segmenti della
visualizzazione della condizione 8 sono vuoti. Se il voltaggio è al di sotto di 3.8 V o superior a 15 V, la batteria non si
ricarica. In questo caso il display visualizza il messaggio di errore “Err”.
Batterie da 6V: se il voltaggio della batteria è compreso tra 3.7V e 7.3V, solo il programma 1 può essere selezionato.
Batterie da 12 V: se viene rilevata una batteria nell'intervallo di tensione critico compreso tra 7,3V e 10,5V,
l'apparecchio controlla se è presente una batteria da 6 V completamente carica o una batteria scarica da 12 V. Dopo
aver premuto il pulsante di selezione del programma 10 per selezionare un programma, l'apparecchio esegue una
misurazione di controllo per circa 90 secondi.
Il display mostra :
Se dopo 90 secondi circa, viene rilevato un voltaggio tra 7,3V e 7,5V allora significa che la batteria da 12V è difettosa. Il
dispositivo va in “standby”.
Revitalizzazione
Se dopo 90 secondi circa, viene rilevato un voltaggio tra 7,5V e 10,5V allora significa che è presente una batteria da 12V.
La ricarica comincia con una ricarica ad impulso per la revitalizzazione. Il display di tensione lampeggia 9 volte. Quando
vengono raggiunti i 10,5V, il carica-batteria passa alla successiva fase di ricarica.
La revitalizzazione è uguale per tutti i programmi di ricarica a 12V
Selezione del programma
NOTE: Se viene rilevato un voltaggio della batteria compreso tra 3,7V e 7,3V, allora i programmi 2-3-4 non possono
essere selezionati. Il processo di ricarica avviene automaticamente. A seconda del programma selezionato, vengono
monitorati tensione, tempo e temperatura. Sono inclusi il programma di diagnostica, la modalità rivitalizzante e la
carica di mantenimento. (Vedere il programma di rappresentazione di principio 3 Fig. C)
Programma Max.(V) Max.(A)
1 6V 7.3V 0.8A
2 14.4V 0.8A
3 14.4V 3.8A
4 14.7V 3.8A
Programma 1 per batterie da “6V” (7.3V/0.8A)
Per la ricarica di batterie da 6V con una capacità inferiore a 14Ah.
Premere il pulsante 10 di selezione del programma, per selezionare il programma 1. Il simbolo “6V” viene visualizzato
sul display LCD. Durante la ricarica, il display di ricarica lampeggia 7 volte e mostra l’avanzamento della procedura (1-4
barrette). Quando la batteria è completamente carica, il display 8 mostra 4 barrette piene. Il lampeggiamento finisce
ed il carica-batterie passa automaticamente alla carica fluttuante.
Programma 2 per batterie da “12V” (14.4V/0.8A)
Per la ricarica di batterie da 12V con una capacità inferiore a 14Ah.
Premere il pulsante 10 di selezione del programma, per selezionare il programma 2. Il simbolo viene visualizzato
sul display LCD. Durante la ricarica, il display di ricarica lampeggia 7 volte e mostra l’avanzamento della procedura (1-4
barrette). Quando la batteria è completamente carica, il display 8 mostra 4 barrette piene. Il lampeggiamento finisce
ed il carica-batterie passa automaticamente alla carica fluttuante.
19Programma 3 per batterie da “12V” (14.4V/3.8A)
Per la ricarica di batterie da 12V con una capacità compresa tra 14Ah e 120 Ah.
Il simbolo viene visualizzato sul display LCD. Durante la ricarica, il display di ricarica lampeggia 7 volte e mostra
l’avanzamento della procedura (1-4 barrette). Quando la batteria è completamente carica, il display 8 mostra 4
barrette piene. Il lampeggiamento finisce ed il carica-batterie passa automaticamente alla carica fluttuante.
Programma 4 per batterie da “12V” (14.7V/3.8A)
Per la ricarica di batterie da 12V con una capacità compresa tra 14Ah e 120 Ah, in condizioni climatiche fredde oppura
per la ricarica delle batterie del tipo AGM.
NOTA: Questo programma può cominciare con un minute di ritardo. Il simbolo viene visualizzato sul display LCD.
Durante la ricarica, il display di ricarica lampeggia 7 volte e mostra l’avanzamento della procedura (1-4 barrette).
Quando la batteria è completamente carica, il display 8 mostra 4 barrette piene. Il lampeggiamento finisce ed il carica-
batterie passa automaticamente alla carica fluttuante.
Carica flottante
Quesot carica-batterie permette la carica flottante.
A seconda della caduta di tensione della batteria, causata dall'auto-scaricicamento, l'apparecchio reagisce con correnti
di carica diverse. La batteria può rimanere collegata al caricabatterie per lunghi periodi di tempo.
Funzione di protezione del carica-batterie
Il carica-batterie spegne l'elettronica e commuta istantaneamente il sistema sull'impostazione di base, non appena si
verifica una situazione anomala, come il cortocircuito, la caduta di tensione critica durante la carica, il circuito
interrotto o la connessione invertita dei morsetti. Se la temperatura del carica-batterie dovesse diventare troppo alta
durante la ricarica, la corrente di uscita verrebbe automaticamente ridotta per evitare danni al dispositivo.
CURA E MANUTENZIONE
Prima di eseguire qualsiasi lavoro sul carica-batterie, estrarre sempre la spina A / C dalla presa di corrente. Il
caricabatterie non richiede manutenzione. Assicurarsi che tutti i componenti del caricabatterie siano installati e in
buone condizioni. Non utilizzare in nessun caso solventi o altri detergenti aggressivi. Pulire le superfici in plastica del
dispositivo con un panno asciutto. La manutenzione non richiede l'apertura dell'unità, poiché non ci sono parti
riparabili dall'utente. Conservare il carica-batterie in posizione verticale. Conservare all'interno, in un luogo fresco e
asciutto. Se il carica-batterie viene spostato nel negozio o trasportato in un'altra posizione, fare attenzione ad evitare /
prevenire danni ai componenti del carica-batterie. In caso contrario, potrebbero verificarsi lesioni personali o danni alle
cose. Tutti gli altri interventi di manutenzione devono essere eseguiti da personale di assistenza qualificato.
20BATTERIELADEGERÄT
Intelligentes Batterieladegerät für tiefentladene Batterien.
Für alle Blei-Säure-Batterien:
GEL, SLA, AGM, DRY, Ca/Ca
Benutzerhandbuch und Anleitung zum professionellen
Laden von Starter- und tiefentladenen Batterien.
DIESES HANDBUCH ENTHÄLT WICHTIGE SICHERHEITSANLEITUNGEN FÜR 6V-12V BATTERIELADEGERÄT : F4
[DEUTSCH]
21EINFÜHRUNG
Vielen Dank für Ihren Kauf. Bitte lesen Sie diese Anleitung, die wichtige Informationen zu Sicherheit, Gebrauch und
Entsorgung enthält. Bevor Sie das Produkt verwenden, machen Sie sich bitte mit allen Sicherheitsinformationen und
Anweisungen vertraut. Verwenden Sie das Gerät nur wie beschrieben und für die angegebenen Anwendungen. Wenn
Sie das Produkt an Dritte weitergeben, sorgen Sie bitte dafür, dass diese Anleitung auch weitergeben wird.
VERWENDUNGSZWECK
Bei diesem Modell handelt es sich um ein mehrstufiges Batterieladegerät (im Folgenden "Ladegerät" genannt), das
zum Laden und Erhaltungsladen von 6V oder 12V Bleibatterien (im Folgenden Batterie genannt) verwendet wird. Dies
können die Typen AGM-CA / CA-GEL-MFVRLA mit Elektrolytlösung oder GEL sein.
Der Hersteller / Wiederverkäufer haftet nicht für Schäden, die durch unsachgemäßen Gebrauch entstehen. Das Gerät
ist nicht für den gewerblichen Gebrauch bestimmt, es darf nur in Innenräumen geschützt vor direkter Witterung oder
Wassereinwirkung verwendet werden
LIEFERUMFANG
1 Ladegerät; 2 Klammern (1 rot, 1 schwarz); 1 Gebrauchsanweisung
Siehe Abbildung A Abbildung A
1. 12V 0.8A- (Programm 2)
2. 12V 3.8A- (Programm 3)
3. 12V 3.8A- (Programm 4)
4. 6V 0.8A- (Programm 1)
5. LED-Reverse-Verbindung
6. LED-Stand-By
7. Ladeanzeige
8. Zustandsanzeige
9. Spannungsanzeige
10. Programmwahltaste (MODE)
See Figure B Abbildung B
11. Ladegerät
12. Befestigungsösen
13. Hauptleitung
14. "+" Polklemme ROT
15. "-" Polklemme SCHWARZ
16. "+" Polanschlusskabel ROT
17.”-“ Polanschlusskabel SCHWARZ
8 Stufen
Spannung
(V)
Strom
(A))
Erstprüfung Verjüngungsla Soft Start Massenladung Absorptionslad Überwachung Wiederaufladun Langzeitwart
und dung - Battery mit hohem ung - bis zu g ung
Polschutztest Rescue Strom - bis zu 100%
80%
22You can also read