ENGLISH - Matrox Maevex 6020 Remote Recorder
←
→
Page content transcription
If your browser does not render page correctly, please read the page content below
ENGLISH

Matrox® Maevex™ 6020 Remote Recorder

                              User Guide
                               20272-301-0300
                                   2021.08.20

   www.matrox.com/video
                                     1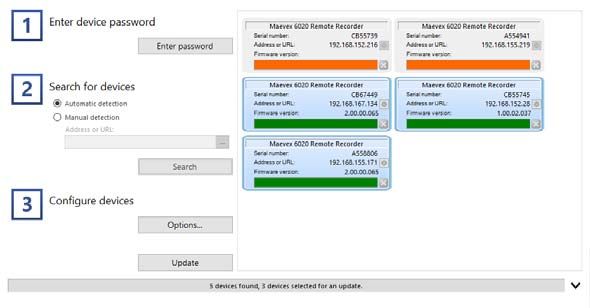
Contents
Matrox safety information ...................................................................................... 5
         Installation and operation .......................................................................................................................5
         If a power supply (internal or external) was included with your product ............................................6
         If your product includes laser-based technology ...................................................................................6
         If your product includes a battery ...........................................................................................................6
         Repair .......................................................................................................................................................7

Overview ................................................................................................................. 8
         Hardware supplied ...................................................................................................................................8
         Hardware required (sold separately) ......................................................................................................8
         Optional hardware (sold separately) ......................................................................................................8
         More information ....................................................................................................................................9

Getting started ...................................................................................................... 10
         Before you begin ....................................................................................................................................10
         Setup overview .......................................................................................................................................11

Connecting your Maevex remote recorder .......................................................... 12
         Before you begin ....................................................................................................................................12
         Connection overview .............................................................................................................................12
         Description of supported connections .................................................................................................14
         Step-by-step connection setup ..............................................................................................................15
         Powering your device on and off ..........................................................................................................18
         More information ..................................................................................................................................18

Validating your Maevex setup .............................................................................. 19
         Connection checklist .............................................................................................................................19
         Description of status LEDs ....................................................................................................................19
         Validating network discovery ................................................................................................................20

Configuring your Maevex remote recorder ......................................................... 21
         Before you begin ....................................................................................................................................21
         Assigning an IP address or a host name ...............................................................................................21
         Obtaining a registration key for your remote recorders ......................................................................22
         Downloading your Matrox Maevex 6020 Configuration and Firmware Utility ................................22
         Running your configuration and firmware utility ...............................................................................22
         Understanding your configuration and firmware utility .....................................................................22

2   Matrox Maevex Series – User Guide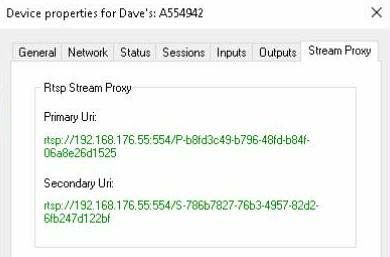
Starting the configuration .....................................................................................................................24

Using your configuration and firmware utility ..................................................... 25
         Enter device password ...........................................................................................................................25
         Search for devices ...................................................................................................................................26
         Configure devices ...................................................................................................................................27
         Verifying your Panopto settings ............................................................................................................31
         More information ..................................................................................................................................31

Understanding the device properties of your remote recorder .......................... 32
         Accessing your device properties ..........................................................................................................32
         General ...................................................................................................................................................32
         Network ..................................................................................................................................................33
         Status ......................................................................................................................................................34
         Sessions ...................................................................................................................................................34
         Inputs .....................................................................................................................................................34
         Outputs ..................................................................................................................................................34
         Stream proxy ..........................................................................................................................................35

Managing your recordings ................................................................................... 36
         Starting a recording manually ...............................................................................................................36
         Choosing a preview mode .....................................................................................................................37
         Viewing your device status information ...............................................................................................37
         Understanding the local storage of recorded sessions .........................................................................39
         Maximum bit rates ................................................................................................................................39
         Managing your sessions on the Panopto server ...................................................................................40

Troubleshooting .................................................................................................... 41
         What to do if you have a problem .........................................................................................................41
         Common problems and solutions ........................................................................................................41
         Resetting your device .............................................................................................................................43

Product information .............................................................................................. 44
         Specifications ........................................................................................................................................44
         Analog audio ..........................................................................................................................................45
         External power supply ...........................................................................................................................45
         Product dimensions ...............................................................................................................................46
         Environmental .......................................................................................................................................46
         Supported standards ..............................................................................................................................47
         Notes and limitations ............................................................................................................................47

                                                                                                           Matrox Maevex Series – User Guide                          3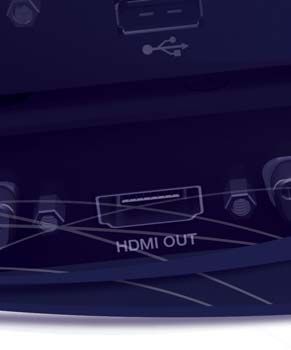
Appendix A – Firewall requirements .................................................................... 49
         Maevex 6020 Configuration and Firmware Utility ..............................................................................49
         Maevex 6020 devices ..............................................................................................................................50
         Adding rules to your Windows Firewall settings .................................................................................50

Appendix B – Providing adequate airflow to your Maevex device .................... 51

Customer support ................................................................................................. 52
         Matrox web ............................................................................................................................................52
         View your warranty information ..........................................................................................................52
         View the third party software notices ...................................................................................................52
         Register your Matrox product ...............................................................................................................52

4   Matrox Maevex Series – User Guide
Matrox safety information
To ensure safe and reliable operation of your Matrox product, to avoid personal injury, and
to prevent damage to your computer or Matrox hardware, read the following guidelines.
Installation and operation
Read and retain all instructions. Only use your Matrox product according to the
instructions, operating ranges, and guidelines provided in the Matrox user guide and
other related Matrox documentation. Failure to follow these instructions could result in
damage to your product or injury to the user or installer.
Don’t expose your Matrox product to rain, water, condensation, or moisture.
Caution: Hot Surface, Do Not Touch
Your Matrox product can become hot while operating. Ensure that your
computer cover is secured in place before turning it on.
Always turn off your computer, unplug it, and then wait for it to cool before removing
the cover of your computer to touch any of its internal parts or to install your Matrox
card. Allow hot surfaces to cool before touching your Matrox unit.
Attention: Surface chaude, ne pas toucher
Votre produit Matrox peut devenir chaud durant son fonctionnement.
Assurez-vous de bien fermer le couvercle de votre ordinateur avant de
l’allumer.
Éteignez votre ordinateur, débranchez-le et attendez qu'il refroidisse avant d'ouvrir
son couvercle pour accéder à ses parties internes ou pour installer votre carte
Matrox. Laissez les surfaces chaudes refroidir avant de toucher votre appareil
Matrox.
Static electricity can severely damage electronic parts. Before touching any electronic
parts, drain static electricity from your body (for example, by touching the metal frame
of your computer).
When handling a card, carefully hold it by its edges and avoid touching its circuitry.
Don’t stack devices or place devices so close together that they’re subject to recirculated
or preheated air.
Don’t operate your system or Matrox product near a heat source or restrict airflow to
your system, and make sure the ambient temperature doesn’t exceed the maximum
recommended temperatures. Don’t block ventilation holes on your unit or system.
Matrox Maevex 6020 Remote Recorder – User Guide 5If a power supply (internal or external) was included with your
product
Don’t place the external power supply directly on top of the device.
Only use power supplies originally supplied with the product or use a replacement that’s
approved by Matrox. Don’t use the power supply if it appears to be defective or has a
damaged chassis.
Any AC-powered product must be connected to a grounded outlet installed by a licensed
electrician. Don’t defeat the safety purpose of the polarized or grounding-type plug. A
polarized plug has two blades with one wider than the other. A grounding-type plug has
two blades and a third grounding prong. The wide blade or the third prong are provided
for your safety. If the provided plug doesn’t fit into your outlet, consult a licensed
electrician to replace the obsolete outlet.
Make sure that nothing rests on the power cables and that the cables aren’t located where
they can be stepped on, pinched, or tripped over.
Don’t use damaged power cables.
Unplug your system or device during lightning storms or if unused for long periods of
time.
If your product includes laser-based technology
The device contains a Class 1 laser product for use only under the recommended
operating conditions and guidelines. For more information, see your Matrox user guide.
Invisible laser radiation may be emitted from disconnected fibers or connectors. Don’t
stare into beams or view directly with optical instruments.
Only use optical transceivers originally supplied with the product or use a replacement
that’s approved by Matrox.
For more information on laser support and compliance, see your Matrox user guide.
If your product includes a battery
The battery is non replaceable.
To dispose of your product, see www.matrox.com/environment/weee.
6 Matrox Maevex 6020 Remote Recorder – User GuideRepair
Don’t attempt to open or repair a power supply unit (if one was supplied).
Don’t attempt to open or repair your Matrox product.
If there’s a fault with your Matrox product, review your Matrox warranty for more
information.
Matrox Maevex 6020 Remote Recorder – User Guide 7Overview
Thank you for purchasing a Matrox Maevex 6020 Remote Recorder. Your Matrox Maevex 6020
product is a dedicated multi-encoder and multi-recorder device designed specifically for the
Panopto™ online video management platform.
Hardware supplied*
Maevex 6020 remote recorder device, 1 power supply
3.5 mm Male to 2 RCA Female stereo adapter (6 inch)
Hardware required (sold separately)
Network cable (CAT 5, 5e, 6, or 7)
Shielded HDMI® cable or certified high-speed HDMI cable
Optional hardware (sold separately)
Depending on your connection setup, you may also need any of the following hardware:
Kuando™ Busylight
Analog audio cable
Microphone
HDMI cable or adapter (for your monitor type)
DisplayPort cable or active adapter (for your monitor type)†
USB to serial adapter
* The hardware supplied with your Matrox product may vary depending on the SKU or part number of your product. For more
information, contact your Matrox representative.
† Only active adapters (sold separately) are supported. Passive adapters aren’t supported.
8 Matrox Maevex 6020 Remote Recorder – User GuideMore information
Matrox hardware – Your Matrox user guide provides information on installing and
connecting and configuring your Matrox hardware. Be sure to check for any last-minute
release notes included with your product. Also, check the Matrox web site
(www.matrox.com/video) for the latest Matrox software, technical support, and product
information.
Panopto software – For more information on scheduling and managing your recordings,
see your Panopto documentation.
Matrox Maevex 6020 Remote Recorder – User Guide 9Getting started
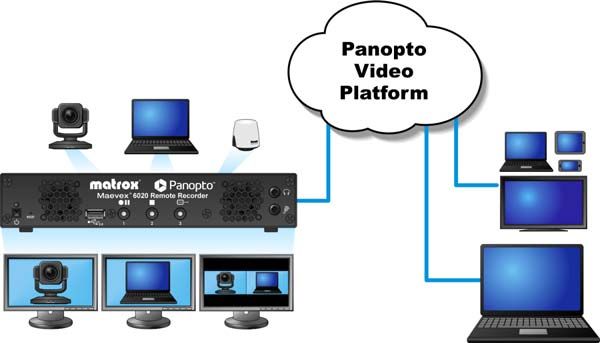
Maevex 6020 Remote Recorder provides hardware streaming and recording technology that’s
integrated into the Panopto™ cloud video platform. Your Maevex device has two (2) 1080p inputs
with multiple on-device quality recordings per input and two channels of 1080p live streaming while
recording multiple sessions. The recorded sessions are simultaneously saved to the device’s solid state
drive (SSD) and uploaded to the Panopto cloud for immediate delivery, video-on-demand (VOD), or
later transmission.
Before you begin
We recommend you have the following:
IP address or host name for your remote recorder
NTP (Network Time Protocol) server
DHCP (Dynamic Host Configuration Protocol) server
DNS (Domain Name System) server
System running Microsoft® Windows®
One output device (monitor) for previewing your recording session
Camera or video source
Panopto account
10 Matrox Maevex 6020 Remote Recorder – User GuideSetup overview
To set up your Matrox product:
1 Connect your product – see “Connecting your Maevex remote recorder”, page 12.
2 Validate your setup – see “Validating your Maevex setup”, page 19.
3 Configure your product – see “Using your configuration and firmware utility”, page 25.
4 Manage your recordings – see “Managing your recordings”, page 36.
Matrox Maevex 6020 Remote Recorder – User Guide 11Connecting your Maevex remote
recorder
Before you begin
Whenever you change your connection setup, make sure you’re using the correct
connectors and that all connectors are properly fastened.
Don’t connect or change input connections while your Maevex device is turned on. If
connections are changed while your Maevex device is turned on, your devices may not
be properly detected or your video sources may be lost. For more information, see
“Notes and limitations”, page 47.
Review the safety information provided. For more information, see “Matrox safety
information”, page 5.
Connection overview
Maevex 6020 remote recorder (Front)
Power button
Control buttons
USB (Front)
Headphone Microphone
12 Matrox Maevex 6020 Remote Recorder – User GuideMaevex 6020 remote recorder (Back)
HDMI In
(source)
Line In
(source)
12V 5A
LAN
(network)
USB (Back)
12V d.c. power
HDMI Out
(monitor)
DisplayPort
(console display)
Matrox Maevex 6020 Remote Recorder – User Guide 13Description of supported connections
Connector Description
Connect the 12V d.c.power supply included with your product to this
connector. While the 12V d.c. power supply is connected to the device
12V d.c. power and electrical socket, the power LED ( ) is active (not black).
For more information on LEDs, see “Description of status LEDs”, page
19.
Use these buttons to manually control the recording process. For more
Control buttons
information, see “Starting a recording manually”, page 36.
Optional – Connect a DisplayPort monitor to this connector to use as a
console display. You can use a console display to preview your video
DisplayPort source and what’s being recorded.
Note: Your DisplayPort monitor must support a resolution of 1280 × 720.
For more information, see “Notes and limitations”, page 47.
Headphone Optional – Connect your headphones to this jack.
Connect your camera or video source to this connector.
HDMI In Note: To connect to this connector, you need a shielded HDMI cable or
certified high-speed HDMI cable.
Optional – Connect a digital monitor to this connector.
HDMI Out
Note: To connect to this connector, you need a shielded HDMI cable.
LAN Connect a network cable to this connector.
Optional – Connect the analog audio output of your video source to this
Line In
jack.
Optional – Connect your microphone to this jack.
Microphone Note: Audio priority is given to the microphone connector. For more
information, see “No audio”, page 42.
Use the power button ( ) to power your device on or off. For more
Power button
information, Powering your device on and off.
USB (Front) Optional – Connect your Kuando™ Busylight UC Omega device either
to the USB 2.0 connector (front) or to the USB 3.0 connector (back) on
your Maevex device.
Optional – Connect a USB to serial adapter to connect your RS232
device to your remote recorder unit. For more information on enabling
USB (Back) RS232, see “Advanced settings”, page 27.
Optional – Connect your external storage device to copy your last
recorded session to a USB flash drive. For more information, see
“Advanced settings”, page 27.
14 Matrox Maevex 6020 Remote Recorder – User GuideStep-by-step connection setup
This section guides you through the step-by-step connection setup of your Maevex 6020 remote
recorder.
1 Connect your camera
Connect your camera to the HDMI In 1
connector on your remote recorder unit.
12V 5A
2 Connect your video source
If you’re using a video source (such as a
laptop), connect your video source to the
HDMI In 2 connector on your remote
recorder unit.
12V 5A
3 Connect your monitor
12V 5A
Connect the monitor cable to the HDMI
Out 1 connector on your remote recorder
unit.
If you’re connecting a second monitor,
connect the monitor cable to the
HDMI Out 2 connector on your remote
recorder unit.
If your monitor doesn’t support HDMI
output, use an HDMI adapter to connect
your monitor to your remote recorder unit.
Matrox Maevex 6020 Remote Recorder – User Guide 154 Connect your console display
(optional) 12V 5A
If you’re connecting a console display to
your unit, connect the monitor cable to the
DisplayPort connector on your remote
recorder unit.
Note: The DisplayPort console display connector is automatically disabled if no
console display is connected. To make sure your display console is properly detected,
connect your console display before turning on your device.
5 Connect your USB device
(optional) 12V 5A
If you’re connecting a USB device to your
unit (for example, a Kuando™ Busylight UC
Omega device or external storage device),
connect the USB cable to the USB (Back)
connector on your remote recorder unit.
If you need to connect an RS232 controller
device, use a USB to serial adapter to
connect your RS232 device to your remote
recorder unit.
6 Connect to your network
12V 5A
Connect a network cable to the LAN
connector on your remote recorder unit.
7 Connect your analog audio
input (optional)
Connect the analog audio output of your
video source to the Line In ( ) connector
on your remote recorder unit.
12V 5A
16 Matrox Maevex 6020 Remote Recorder – User Guide8 Connect your USB device
(optional)
If you’re connecting a USB device to your
unit (for example, a Kuando™ Busylight UC
Omega device or external storage device),
connect the USB cable to the USB (Front)
connector on your remote recorder unit.
If you need to connect an RS232 controller
device, use a USB to serial adapter to
connect your RS232 device to your remote
recorder unit.
9 Connect your headphone or
microphone (optional)
Connect your heaphone to the Headphone
( ) connector on your remote recorder
unit.
Connect your microphone to the
Mircrophone ( ) connector on your
remote recorder unit.
Note: Audio priority is given to the microphone connector. For more information
on audio priority, see “No audio”, page 42.
10 Connect your power supply
12V 5A
Connect your power supply included with
your product to the 12V DC connector on
your remote recorder unit. While the
12V DC power supply is connected to the
unit and electrical socket, the power LED
( ) is active (not black).
For more information on LEDs, see
“Description of status LEDs”, page 19.
Matrox Maevex 6020 Remote Recorder – User Guide 17WARNING: To avoid damaging the power connector on your
unit or on your power cable when unplugging a unit, firmly hold
the power connector, pull back the connector on the cable, then
carefully remove the power cable.
Powering your device on and off
To power on or off your device, press the ( ) button on your
device.
After connecting your Maevex remote recorder, validate your
connection setup (see “Validating your Maevex setup”, page 19).
More information
After connecting your Matrox device, turn on your device (see “Powering your device on and off ”,
page 18). We recommend you validate your connection setup and network discovery before you
continue (see “Validating your Maevex setup”, page 19).
After validating Maevex setup, install and configure your Matrox software (see “Configuring your
Maevex remote recorder”, page 21).
18 Matrox Maevex 6020 Remote Recorder – User GuideValidating your Maevex setup
After connecting your Maevex devices, we recommend you validate your connection setup and
network discovery before you continue.
Connection checklist
After connecting your Maevex device, we recommend you validate your audio and video connections
before you continue:
Audio connection – Connect headphones to the Headphone jack on your remote
recorder.
Video connection – Connect a console display to the DisplayPort connector on your
remote recorder.
Description of status LEDs
The LED on your Maevex device provides information to help you
troubleshoot your Maevex product. The following describes the LED
on your Maevex device.
LED color Maevex 6020 remote recorder
No LED (black) Device isn’t powered.
Green (solid) Device is active.
Green (standby) Device has been turned off but is still powered.
Green (slow blink) Device is rebooting.
Green (fast blink) Configuration reset in progress.
Amber (solid) Device is in maintenance mode.
Amber (slow blink) Device is restarting and is in maintenance mode.
Amber (fast blink) Device is updating the firmware.
Device has detected a fatal error. Try powering your device off
and on (see “Powering your device on and off”, page 18). If,
Red (solid) after restarting your device, the LED is still red, contact your
vendor for technical support (see “Customer support”, page
52).
Matrox Maevex 6020 Remote Recorder – User Guide 19Network connector
The network connectors on your product use LEDs to provide
information on the network activity and presence. The following
describes the different network connector LEDs. Network Network
activity presence
LAN LAN
LED color
(Network activity) (Network presence)
No LED (black) No network activity detected. Transmitting at 1 Gbps.
Green (fast blink) Network activity detected. —
Amber (solid) — Transmitting at 100 Mbps.
Validating network discovery
Maevex devices are initially assigned their IP addresses through DHCP (Dynamic Host Control
Protocol). After connecting your devices, we recommend verifying that all of your devices are
discovered by the network. For more information, contact your network administrator.
Multiple subnet support
Maevex devices that are in the same subnet are detected through the UPnP (Universal Plug and Play)
protocol. If your devices are in different network subnets, you need to validate network discovery in
each subnet separately. For more information on using different subnets, contact your network
administrator.
After validating your connection setup, configure and update your Matrox Maevex remote recorder
(see “Using your configuration and firmware utility”, page 25).
20 Matrox Maevex 6020 Remote Recorder – User GuideConfiguring your Maevex remote
recorder
This section describes how to configure and update your Matrox Maevex remote recorder.
Before you begin
Make sure you connect your product before configuring it. For more information on
connecting your product, see “Connecting your Maevex remote recorder”, page 12.
You may need administrator rights to install or uninstall certain software. For more
information, see Windows documentation or contact your system administrator.
Make sure you have an NTP (Network Time Protocol) server. For more information,
contact your network administrator.
Make sure you have a Panopto account. For more information, contact your Panopto
administrator.
Windows Server 2019, Windows Server 2016, and Windows Server 2008 R2 – Make sure
the SSDP Discovery service, network discovery, and file sharing options are enabled.
Make sure you’re using the Matrox Maevex 6020 Configuration and Firmware Utility on
a system that’s running Microsoft® Windows®.
Make sure you have a recorder registration key from Panopto. For more information, see
“Obtaining a registration key for your remote recorders”, page 22.
Assigning an IP address or a host name
To locate a remote recorder, Matrox software uses the device IP addresss through UPnP or the host
name through a DNS server. For more information on which network protocol you should use
contact your network administrator.
Matrox Maevex 6020 Remote Recorder – User Guide 21Obtaining a registration key for your remote recorders
To configure your remote recorder, you need a registration key from Panopto:
1 Sign in to the Panopto server as an administrator.
2 Click System Remote Recorders Manage registration keys Create a new
registration key.
3 Take note of your registration key. The same registration key can be used for multiple
recorders.
Downloading your Matrox Maevex 6020
Configuration and Firmware Utility
Matrox makes the latest software available on the Matrox web site
(www.matrox.com/en/video/apps/drivers).
Running your configuration and firmware utility
Run the MVX-6020_Setup-FW_Util.msi program locally (not over a network) on a system running
Microsoft® Windows® and follow the on-screen instructions.
This installs the Matrox Maevex 6020 Configuration and Firmware Utility.
Understanding your configuration and firmware utility
Your Matrox Maevex 6020 configuration and firmware utility guides you through the steps to enter a
device password for (step 1), search for (step 2), and configure and update (step 3) your Maevex 6020
devices.
22 Matrox Maevex 6020 Remote Recorder – User GuideConfiguration overview
To configure your devices:
1 Enter device password – Enter a password for your Maevex devices (see “Enter device
password”, page 25).
2 Search for devices – Search for the Maevex devices to configure and update by selecting
Automatic detection or Manual detection (see “Search for devices”, page 26).
3 Configure devices – Configure your device settings (such as your Panopto™ account,
your proxy server, and the date and time settings of your Maevex devices), and update
the firmware of your devices (see “Configure devices”, page 27).
WARNING: For your configuration settings to be properly applied, you must Update your
devices (complete step 3).
Understanding your device tile
The tile provides the following information about
your device.
A Device name.
B Device serial number or the Panopto friendly name.
C IP address.
D Device properties. For more information, see “Understanding the
device properties of your remote recorder”, page 32.
E Firmware version.
F Device status. For more information, see “Understanding your
device status”, page 23.
Understanding your device status
Depending on the status of a device, the color of the status bar changes:
Detected Device is detected and firmware is up to date.
(Green)
Updating Device update in progress.
(Yellow)
Matrox Maevex 6020 Remote Recorder – User Guide 23View only Device information can be viewed, but not modified. (Device isn’t
(Orange) detected, device is locked or unauthorized, or the firmware is out of
date.) For more information, see “Using your configuration and
firmware utility”, page 25.
Error detected Device has encountered an error. The status and information of the
(Grey) device can’t be updated. To fix this, try rebooting your device.
Update failed Device update has failed. To fix this, try rebooting your device.
(Red)
Undetected Device can’t be detected. When a device is no longer detected, the
(Black) tile lists the last known IP address of that device. To fix this, review
your settings and search for your devices again.
Managing your device tiles
To access the shortcut menu, right-click your device tile. The menu items include:
Sort by Sort the device tiles listed by Product name, Serial number, IP address,
and Updated status.
Unselect all devices Unselect all the devices listed.
Progress update
To see the progress of your device search or update, click the Show log ( ) icon at the bottom of the
program window.
Starting the configuration
For more information on configuring your remote recorder, see “Using your configuration and
firmware utility”, page 25.
24 Matrox Maevex 6020 Remote Recorder – User GuideUsing your configuration and firmware
utility
This section describes how to use your configuration and firmware utility.
Enter device password
Enter a password for your Maevex devices. This prevents unauthorized users from making changes
to your device.
Enter password
Click Enter password to assign a password to your
devices. When you’re done, click OK.
Note: We strongly recommend you take note of the password entered. This password is stored
on your devices at the first configuration and firmware update. You will need this password
to update or change the configuration of your device.
Matrox Maevex 6020 Remote Recorder – User Guide 25Search for devices
Search for the Maevex devices to configure and update by selecting Automatic detection or Manual
detection.
Automatic detection
To search for the Maevex devices on your subnet,
select Automatic detection.
To start searching for devices, click Search.
Manual detection
If devices aren’t automatically detected, you can
manually locate one or more Maevex devices using
their IP address or host name. To manually locate the
devices, select Manual detection, and then enter the
IP address or DNS host name of each Maevex device
you want to locate.
If you’re entering multiple addresses, separate each
address with a space. (You can also enter the IP
addresses or host names by clicking the browse
button ( ) and entering one IP address or host
name per line.)
When you’re done, click Apply. To discard the last
changes made, click Cancel.
To start searching for devices, click Search.
Stopping the search
Searching for the Maevex devices on your network may take a few minutes. Once your device or
devices are located, you can stop the search. To stop searching for devices, click Stop. To resume
searching for devices, click Search again.
Authenticate the devices found
If a device has a different password (from the
password entered in Step 1), you will be prompted to
authenticate the devices found.
26 Matrox Maevex 6020 Remote Recorder – User GuideIf prompted, enter the Password for the devices found, then click Authenticate.
Note: If you enter the old password to authenticate your device, you will be able to
take control of the device and the device will be updated with the password you
entered in step 1. The old device password will then become invalid. If you do not
want to update the device password (for example, if the device belongs to someone
else), click Cancel instead of Authenticate.
Configure devices
Enter your Panopto™ account information, and configure the Advanced settings (such as your
proxy server, and the date and time settings) of your Maevex devices.
To configure your devices, click the Options button.
Panopto account
Enter your Panopto account information (Site name
and Recorder registration key).
Date and time
The default NTP server name is
time.matrox.com. If you have your own NTP
server, enter the name of your server.
Advanced settings
To view and edit your advanced settings (such as network and serial port settings), click
Advanced settings.
Network configuration If your
Maevex devices are behind a proxy server,
you must set a proxy.
Enable the Set a proxy option, then enter the
proxy settings (Server, Port, User name, and
Password) for your system.
For more information, contact your network administrator.
Matrox Maevex 6020 Remote Recorder – User Guide 27Audio You can adjust the volume on your
HDMI inputs, Line In, Headphone, and
Microphone connections. This determines the
audio level of your recording from the
respective inputs.
Color settings for indicator
light You can adjust the color of
your Kuando Busylight to indicate the
various states of your remote recorder
(Recording, Paused, and Error). You
can also adjust the Brightness level of
your light.
Manual control options
Lock power button – Lock (disable) the
power button on the Maevex device to
prevent users from pressing the button
and shutting down the device.
Lock recording button (no manual recording) – Lock (disable) the record button on the
Maevex device to prevent users from pressing the button and starting a recording. For
more information on using the record button on your device, see “Starting a recording
manually”, page 36.
Enable alternate API enabled recording commands – Enable alternate recording
commands through the Maevex REST API or the RS232 serial connection. To select this
option you must first lock the recording button. When you select this option, you’ll have
to specify your Panopto credentials and serial port settings.
Panopto credentials – Enter your Panopto
account credentials to enable an RS232 (or
serial) connection.
Serial port – Enable an RS232 (or serial)
connection. To enable RS232, first enter your
Panopto account credentials (User name and
Password), then specify the following serial
port settings:
Baud rate – The speed, in bits per seconds
(or baud), used for the RS232 connection.
Data bits – The number of bits per block of data transmitted.
28 Matrox Maevex 6020 Remote Recorder – User Guide Stop bits – The number of bits used to identify the end of a data block.
Parity – The type of parity bits used for the data transmitted.
Flow control – The signal type used to pause and resume data transmission.
Proxy stream options
Enable proxy streams – This option is
disabled by default. When disabled
(checkbox is not selected), the other
options are greyed out. Select the
checkbox to enable proxy streams for remote monitoring. The proxy stream addresses
will be displayed in the Maevex 6020 Configuration and Firmware Utility. (You can also
find the proxy stream addresses under Management Links in the Configuration tab of the
remote recorder on the Panopto web page.) Streaming starts when the first connection
is made. The video for the proxy stream is at a low resolution (lowest level of the quality
ladder is used). RTSP proxy streams are available for the primary and the secondary
video streams, as well as for the audio of the primary stream.
Note: Before enabling proxy streams, make sure you have the necessary bandwidth
for the recording uploads and the proxy streaming to occur simultaneously.
Disable uploads during streaming – Select this option to disable asynchronous
uploads to the Panopto server of the recorded content while the proxy stream is in
use. Recorded content is stored in the local memory buffer in the meantime.
Scheme - Select from Unicast, Multicast, and Interleaved routing schemes. The
default is Unicast.
BasePort - Applicable for Multicast only. For Multicast schemes, you can enter a
base port between 1026 and 65526. If you enter 0 while in Multicast, the base port is
chosen automatically.
RTSPPort - The value can be from 1 to 65535. The default value is 554.
Matrox Maevex 6020 Remote Recorder – User Guide 29Other options
Copy last recorded session to USB – Enable this to copy the last recorded session from
the internal SSD to a USB flash drive. To start copying the session, connect a USB flash
drive to a USB connector on your Maevex device.
WARNING: While the session is copying, the Record/Pause ( ) control
button LED continues to blink red. Don’t remove the USB flash drive while the
Record/Pause control button LED is blinking red. The LED stops blinking
when the copy is completed (for a long session, this may take a while). When
the LED stops blinking, it’s safe to remove the USB drive.
Disconnecting the USB flash device while the copy is in progress will cause the
mount process to remain in an invalid state, and subsequent attempts to copy
to USB may not work. If this happens, we recommend rebooting your Maevex
device. For more information, see “Powering your device on and off ”, page 18.
Copy last recorded session to USB – More information
Before copying to USB, make sure your USB flash drive is formatted to NTFS.
Also, make sure that the USB drive has enough free space.
Before starting a new copy, disconnect the USB flash drive used for the last
session (if still connected), then reconnect the USB drive to start copying a new
session.
Only the highest quality version of the recording (highest resolution and bit
rate) is copied.
To apply your changes, click OK. To discard the last changes made, click Cancel.
Updating your devices
Select the devices whose firmware and / or configuration you want to update. If the utility detects a
device that has an older firmware version, that device is automatically selected to be updated.
You can only select devices that have been authenticated (see “Authenticate the devices found”, page
26). Authenticated devices have a green status bar. Devices that haven’t been authenticated have an
orange status bar.
To update the firmware of your selected devices and apply any changes made to their configuration,
click Update. Wait while the devices are being updated (up to 10 minutes).
30 Matrox Maevex 6020 Remote Recorder – User GuideVerifying your Panopto settings
1 Sign in to the Panopto server as an administrator.
2 Click System Remote Recorders, then configure your remote recorder settings.
For more information, go to http://support.panopto.com and search for remote recorder
configuration and quality settings.
More information
For more information on accessing and modifying the advanced settings of your remote recorder, see
“Understanding the device properties of your remote recorder”, page 32.
After configuring your Maevex remote recorder, you can start recording (see “Managing your
recordings”, page 36).
Matrox Maevex 6020 Remote Recorder – User Guide 31Understanding the device properties of
your remote recorder
This section describes how to access the device properties of your Maevex remote recorder.
Accessing your device properties
To access additional properties, settings, and information for your device:
1 From the list of detected Maevex 6020
devices, select the tile of the device you
want to modify.
2 Click the Properties button ( ) next
to the IP address.
General
This provides general information (such as
serial number and version) specific to your
Maevex 6020 hardware.
This also enables you to download your device
logs, get your upload activity summary, and
format the local SSD memory buffer.
Getting your device logs
The device logs contain information
on your Maevex 6020 device. This
information is useful for
troubleshooting purposes.
To download the logs for your device,
click Get the device logs.
Erasing your device logs
Erase the log files created for your
Maevex 6020 device.
32 Matrox Maevex 6020 Remote Recorder – User GuideGetting your upload summary
The upload summary provides information on all upload activity to the Panopto server from
the previous days.
To save the summary of your upload activity, click Get the upload summary. You’ll be
prompted to choose a destination folder for your file.
Formatting your SSD
To format the internal solid state drive (SSD) on your device, click Format the SSD.
WARNING: Formatting the SSD permanently erases all recordings from this
device. Any recordings that haven’t been uploaded to the Panopto server will be
lost. For more information, see “Understanding the local storage of recorded
sessions”, page 39.
Rebooting your device
To reboot your remote recorder, click Reboot the device.
Network
This contains the network settings for the connection and IP address of your Maevex remote recorder.
By default, your Matrox device is configured to use a Dynamic IP address (DHCP).
To manually assign a static IP address to your Maevex device:
1 Select Static IP address, then specify the
IPv4 address, IPv4 netmask, IPv4
gateway, and DNS servers for your
Maevex device.
2 When you’re done, click Apply.
For your devices to be detected, you
may need to search for the devices
again.
Matrox Maevex 6020 Remote Recorder – User Guide 33More information on network settings
IPv4 address – An IP address between 192.168.0.0 and 192.168.255.255
(recommended). Also, we recommend you assign an IP address within the subnet of
your network.
IPv4 netmask – The subnet mask defining group of IP addresses in your subnet. By
default, the subnet mask is 255.255.255.0.
IPv4 gateway – The gateway is often the same as your IP address, but the last byte may
be 0 or 1.
DNS servers – The address of your DNS (Domain Name System) server or servers. If
you’re entering multiple addresses, separate each address with a space.
For more information on assigning a static IP address, contact your network administrator.
Status
This provides the status information (such as network information, device temperature, and disk
usage) of your Maevex remote recorder. It also provides information on the recording sessions
scheduled on the Panopto server.
The status information is automatically updated every five (5) seconds.
Sessions
This provides information (such as file size and upload status) on the current recording sessions.
To view the current media files, click Show.
Inputs
This provides the status information of the input devices connected to your Maevex remote recorder.
This also enables you to select the Quality ladder level (1 to 4) for the connected device.
Outputs
This provides the status information of the output devices connected to your Maevex remote
recorder.
34 Matrox Maevex 6020 Remote Recorder – User GuideStream proxy
This provides the RTSP proxy stream addresses
for the primary and secondary streams.
Matrox Maevex 6020 Remote Recorder – User Guide 35Managing your recordings
Starting a recording manually
Note: To schedule a recording or manage live streaming, see your Panopto documentation.
Your Maevex device enables you to manually start a recording. Use the three (3) buttons on the front
of the device to manually control the recording process.
Record/Pause Stop Preview
Button Description
Record – To start a recording, press this button. When the recording
starts, the button LED turns solid red. While the recorded session is
copying to USB, the button LED turns fast blinking red.
Record/Pause
Pause/Unpause – To pause or unpause a recording, press this button
again. When the recording is paused, the button LED turns blinking red.
Press this to stop a recording that was started using the Record button.
Stop
Press this to cycle through the preview modes. The preview modes enable
you to view what’s being recorded, your video source, or both. For more
Preview
information, see “Choosing a preview mode”, page 37.
Locking the record button
You can use the Configuration and Firmware Utility to lock the Record button on your Maevex device.
Locking the record button prevents users from recording manually. For more information, see
“Configure devices”, page 27.
36 Matrox Maevex 6020 Remote Recorder – User GuideScheduled recording rules
Scheduling a recording through Panopto software affects the functionality of the recording buttons
on your Maevex device:
Up to 15 minutes before the start of a Only the Pause and Stop buttons work.
scheduled recording
At the start of a scheduled recording If a scheduled session is running, the current
manual recording is stopped.
During a scheduled recording (session is Only the Pause button works.
running)
Choosing a preview mode
Your Matrox device supports the following three preview modes.
Primary preview The primary preview enables you to view
what’s being recorded.
Secondary preview The secondary preview enables you
to view your video source information (for example, a
slideshow or video).
Side-by-side preview The side-by-side preview enables
you to view both the primary preview and secondary
preview in a side-by-side view.
Viewing your device status information
When you cycle through the preview modes, certain status information may appear on your preview
screen, such as the:
Preview mode selected – Indicates if the primary, secondary, or side-by-side preview
mode is selected (see “Choosing a preview mode”, page 37).
Serial number and IP address of the device – Identifies the device by its serial number
and IP address.
Recording notification – The recording status of Ready, Recording, or Pause appears at
the bottom with its icon.
Matrox Maevex 6020 Remote Recorder – User Guide 37 Recording timer – The timer of the recording session. The timer starts at 00:00:00 when
the recording session begins. The clocks continues to run when the recording session is
paused. The recording timer disappears when the recording stops.
Note: This information is displayed when the recording state is Recording or
Paused. This information may not appear if your local preview monitor's native
resolution is less than 1680 x 1050.
Volume meter – Indicates the audio level of the output (Left and Right channels
separately).
Internal SSD space used – Indicates the amount of space used by the device’s internal
Solid State Drive (SSD). If the internal buffer space is low or full, see “Internal SSD buffer
space is low or full”, page 43.
Connection status – Provides information on the registration and connection of your
device to the Panopto server:
No IP address Remote recorder IP address not available.
No site access Unable to reach the Panopto server.
Recorder connected Remote recorder is connected to the Panopto server.
Recorder connection Connection to the Panopto server has failed.
failed
Recorder not configured Invalid Panopto account information. No site name
and/or recorder registration key.
Recorder registration Maevex remote recorder registration has failed. Make
failed sure you’re using the latest software version, your
proxy is properly configured (if applicable), and your
Panopto account information (site name and
registration key) are correct. If the problem persists,
contact your technical support representative.
Recorder unexpected Unknown connection error has occurred.
connection error
RTMP bandwidth failure Remote recorder is connected to the Panopto server
but encountering bandwidth issues with active RTMP
sessions.
38 Matrox Maevex 6020 Remote Recorder – User GuideUnderstanding the local storage of recorded sessions
Your Maevex 6020 device has an internal 128 GB SSD hard drive that’s used as a local buffer for
recording. Recordings on the local buffer are discarded only once they’re successfully uploaded to the
Panopto server or until memory space is required by a new recording session. The recording buffer of
the local SSD hard drive has a capacity of approximately 16 hours (before upload to the Panopto
server).
While recording to the local SSD memory buffer without live RTMP streaming (webcast), your
Maevex device simultaneously uploads the recording to the Panopto server. This allows the upload to
be completed shortly after the recording session ends (usually a couple of minutes). If Disable
uploads during streaming is enabled under Advanced settings Proxy stream options, the recorded
content is stored in the local SSD memory buffer and not uploaded to the Panopto server until the
stream is stopped on the decoder that is viewing the proxy streams.
If your Maevex device is configured to simultaneously record and live stream (RTMP webcast), all
upload processes (of current and/or previous unfinished sessions) are paused. This maximizes
network bandwidth availability for the current live RTMP stream and avoids overloading the network
with simultaneous upload data transfers. A device resumes unfinished upload processes as soon as
live RTMP streaming tasks are completed.
Maximum bit rates
The following are the maximum bit rates for upload when recording or live streaming for given
Panopto quality settings.
Recordings without live RTMP streams – The recording is simultaneously uploaded to
the Panopto server at the rate possible given the available bandwidth. If full bandwidth
is available, the impact on the SSD buffer is negligible. Also, your recordings will be
complete and available within a few minutes from the end of the session.
Recordings with live RTMP streams – The recording isn’t simultaneously uploaded to
the Panopto server to minimize the bandwidth needed by the system for upload. In this
case, the recording will upload to the Panopto server after the session is complete, unless
another recording with live stream starts before the upload of the previous recording is
complete.
Panopto quality level* Recording bit rate† Optional RTMP live streaming
bit rate
1080p 13 Mb/s 6.7 Mb/s
Ultra 6.4 Mb/s 3.2 Mb/s
High 4.5 Mb/s 2.1 Mb/s
Standard 2.6 Mb/s 1.2 Mb/s
Matrox Maevex 6020 Remote Recorder – User Guide 39Panopto quality level* Recording bit rate† Optional RTMP live streaming
bit rate
Basic 1 Mb/s 0.7 Mb/s
* Quality levels and bit rates are defined by the Panopto server settings and are subject to change.
† Includes multiple downscaled recordings.
Depending on your source resolutions, the maximum bit rate may be less than those listed.
If RTMP live streaming is enabled, it is recommended to make sure the required network bandwidth
is available at all times, and to configure the network for prioritized packet transmission.
Managing your sessions on the Panopto server
Use Panopto software to create, schedule, and manage your recording sessions. For more
information, see your Panopto documentation.
40 Matrox Maevex 6020 Remote Recorder – User GuideYou can also read