Introduction - Assistive Eyewear
←
→
Page content transcription
If your browser does not render page correctly, please read the page content below
EyeCU - Assistive Eyewear
                              Team 36 - Nikhil Mehta, Irfan Suzali, Abishek Venkit
                                    ECE445 Project Proposal - Spring 2020
                                               TA: Shuai Tang
1 Introduction
1.1 Problem and Solution Overview

Many of us take full vision for granted in our everyday lives, and enjoy the benefits of being able to read, identify
objects, and navigate around the world without concern. However, it’s not that simple for the 7 million people
in the US [1] , and millions more around the world, that live with visual impairments. Although many visually
impaired people live perfectly functional, independent lives, there are still some situations that are not fully
accessible. For our project, we will be focusing on the specific problem of reading text. The lack of ability to
read text is an extremely common problem for people with high visual impairment or blindness, and can
prevent a person from being fully independent. For example, if a person with visual impairments goes to a
grocery store to purchase milk, they will be unable to identify which milk carton contains whole milk, 2%, or
soy without assistance from another person, or an app on your smartphone. This is just one of many examples
in which the ability to read text quickly and seamlessly would be extremely beneficial, and we envision a better
way to accomplish this task.

Our target market for our product will be people with severe visual impairments, without the ability to read
from any distance. This can range from some visual ability, but without the ability to read, to complete
blindness with no visual ability at all. Our solution for this group is an eyewear device that has the ability to
capture an image using a built-in camera, identify and read text from the image, and finally convert that text to
speech and play it in your ear. This system will be wearable, always ready at the push of a button, and a
user-friendly way to assist with reading text. Although the scope of our project is confined to reading text for
now, the potential is much greater, and we envision that this system can be extended to run many other
computer vision detection tasks in the future. However, even in its most simple state, we believe that the value
will still be substantial.

Partial inspiration for this project came from an existing app called “Be My Eyes” [2]. This app already serves
almost 200,000 people with visual impairments, by connecting them with a sighted volunteer over a video call.
This allows the person with low vision to ask questions and receive feedback from a sighted volunteer. Although
this system is simple and gained some attention, it doesn’t accomplish the goal of full integration and
independence because it relies on a network of sighted volunteers for the service to function. There may also be
a delay between requesting a volunteer and receiving one, and requires you to navigate to the app before getting
assistance. We can improve upon this by providing the same benefits, but in a ready-to-use, simple package, and
without the need for a volunteer network. Another benefit we provide over “Be My Eyes” is ease of use. It
would be more difficult for someone with complete blindness to use the app properly, because it involves
navigating to the app and a smartphone. Our product will be much more accessible, without any need to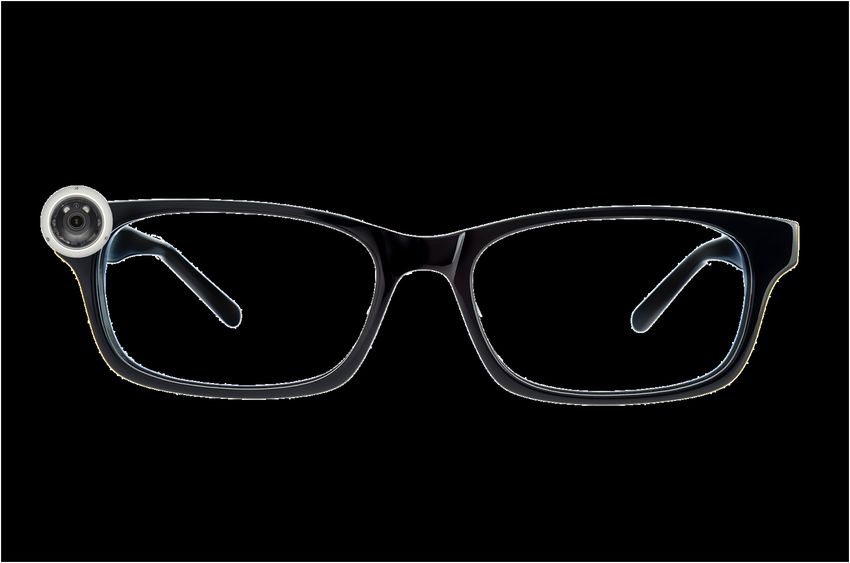
navigate a smartphone. The product will always be ready to use, and more physically intuitive, because the user
will only need to point their head towards whatever they want dictated.
To accomplish our text recognition task, we require a computer vision model to recognize and identify words in
an image, which is known as Optical Character Recognition, or OCR. We’re confident in our ability to do this
because this has been a huge area of development for the past several decades, and there are many open source
resources that can accomplish this at a very high accuracy rate, including OpenCV Tesseract [9], Google OCR
[7], and Kraken OCR. These are well-established and documented, and will help us accomplish our task
effectively.
Next, in order to dictate the text to the visually impaired user, we must convert that text string into a speech
signal using a Text-to-Speech system, or TTS. TTS is another highly developed area, commonly used in voice
assistants and other text dictation tools.
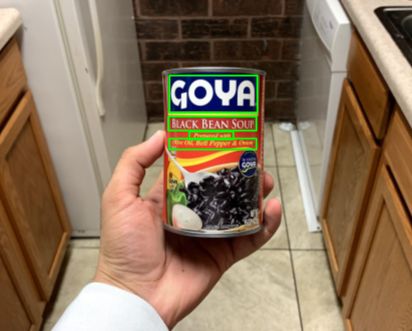
1.2 Visual Aid
Figure 1: Example usage of Eyewear Device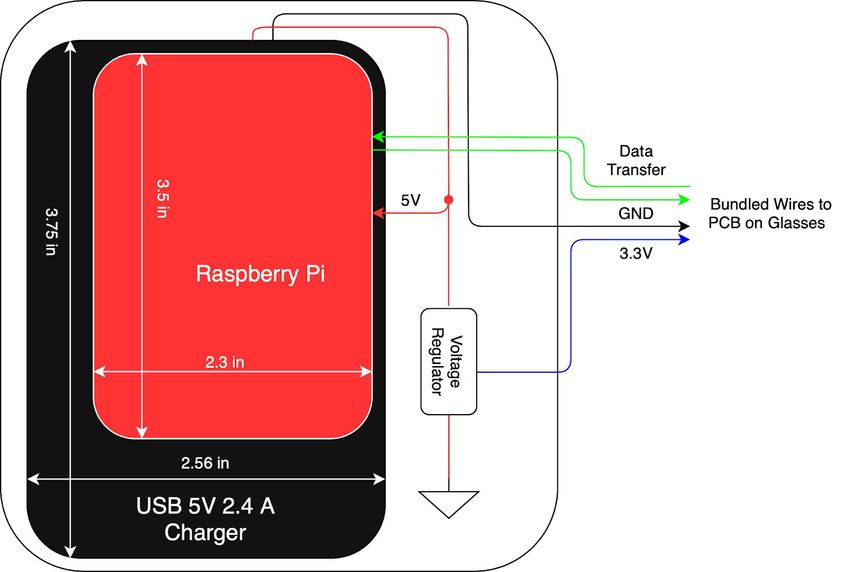
Figure 2: Captured Image with Text Detected

1.3 High-Level Requirements

    ●   The speech produced by the device must have a word accuracy of above 90% on clear, unobstructed
        text, and above 75% for several surface distances up to a meter away, on a variety of surface textures,
        text styles, and text clarity.
    ●   The glasses must weigh between 30-70 grams, and be comfortable enough for regular wear.
    ●   The device must be reliable (powered and functional) for 30+ translations (2.5 uses per hour for a 12
        hour period).

2 Design
For design purposes, our block diagram has been designed with modularity in mind so that testing of different
modules could be done independent of other components. We have identified 4 main modules essential for our
project to function as proposed. The control unit will control the I/O of the project, sending the correct signals
to modules when needed. There are two peripheral modules, the camera module and speaker module, which
will handle the visual and audio components of the project. Within the camera module, the Raspberry Pi is
responsible for the computer vision task. The power supply module will power all hardware.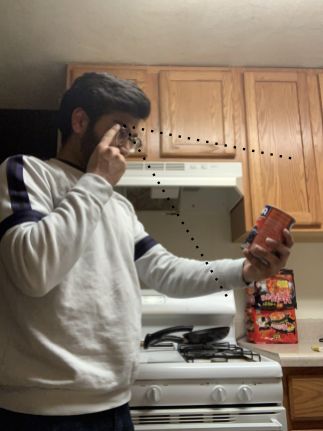
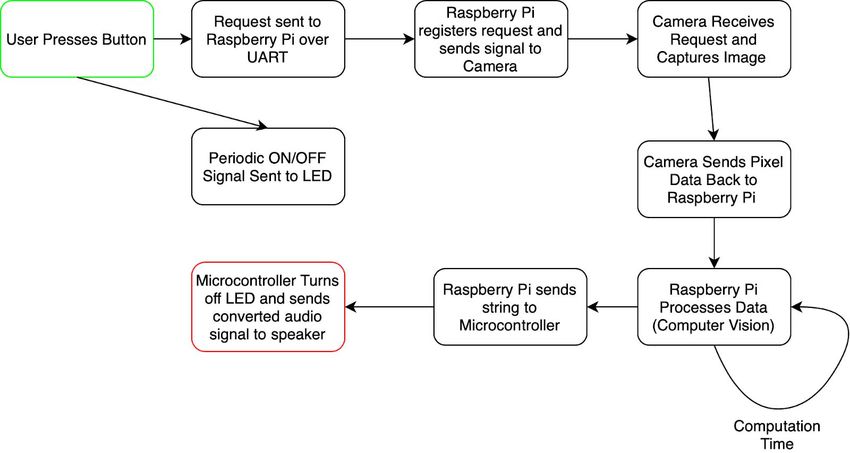
Figure 3. Block Diagram

2.1 Physical Design

The physical design is comprised of two main components, the wearable sunglasses and pocket module. The
sunglasses will have the camera and PCB board built into the sunglasses, one on each side to distribute weight
for stability reasons. Two wires (which will run down the sides of the glasses) will connect the pcb and the
camera to the pocket module where the power supply and image processing component is held.
(Wearable Glasses)                               (Pocket Module)
                     Figure 4. Physical Design
2.4 Control Unit
The control unit needs to process string data coming from the Raspberry Pi, handle button presses from the
user, control the status LED, and output audio to the speaker module. The button presses will be processed by
the microcontroller, which needs to communicate with the Raspberry Pi to take a picture and receive string data
after computation. Simultaneously, the status LED will be activated. Finally, the text is converted to speech and
played by the speaker.
2.4.1 Microcontroller
The microcontroller will be a PIC32, specifically the PIC32MX270F256D, and will communicate with the
Raspberry Pi using UART. The Raspberry Pi will use the GPIO 14 and 15 for data transmit and the PIC32 will
use the remappable UART port . It will run the Software Automatic Mouth (SAM) Text-to-Speech (TTS)
program, and interface with the status LED and speaker [4]. In order to communicate with the Speaker, it will
provide a PWM output on its RB4 output port.
Requirements Verification
1. Communicate with Raspberry Pi over 1. Verification 1
UART > 5 Mbps a. Connect PIC32 to Raspberry Pi
2. Provide valid PWM output on RB4 port. GPIO UART pins.
b. Generate Random 0.5 Mbit data
string to send from Raspberry Pi to
PIC32.
c. Start a timer, send data from
Raspberry Pi to PIC, and send an
echo back, stop timer.
d. Verify the time < 100ms.
2. Verification 2
a. Generate a 0.5V square wave PWM
signal with 1s period.
b. Output signal onto RB4 port,
connected directly to a tweeter.
c. Verify sound output (soft periodic
beeping on tweeter)2.4.2 Input Button
The input button will be a standard push button, and will signal the start of the picture → speech action. The
specific button will be a 401-1586-ND.
Requirements Verification
1. Easy to press (no destabilization on presses) 1. Verification 1
2. Reliable (requires a single press) a. Press button while wearing glasses
and ensure no discomfort or
destabilization.
2. Verification 2
a. Ensure a single button press lights
up LED (100 trials must yield >95%
success).
2.4.3 Status LED
The status LED will indicate when the computation process is occuring by flashing on and off. This will be
used for debugging purposes, and to notify bystanders of an image capture. LED model:
C512A-WNN-CZ0B0151.
Requirements Verification
1. Must be visible from 2-3 meters away. 1. Verification 1
2. Must draw ~10 mA. a. Stand from 3 meters away and
identify LED flashes.
2. Verification 2
b. During button presses, measure the
amperage of the LEDState/Data Flow Diagram 3 Tolerance Analysis The success of the project is determined mainly by our ability to convert images to text and text to speech. Thus, it is important that our camera module be able to efficiently and successfully detect text within an image with a certain degree of accuracy. Once processed, we would then need to process the string of text to an audio form that could be outputted with enough clarity for the user to understand. Since our project is centered around the user, we must ensure that the results achieved meet a certain benchmark to ensure usability. Doing so will be the greatest challenge of the project. One aspect that we will need to monitor closely is the computer vision and the algorithm that converts images to text generation. An issue that we may develop is reading unwanted text within the scene. We will need to establish a field of vision to read from to ensure that the system can process the right information. We would look into the constraints of the camera and calculate the range of depth suitable for users and implement this within our algorithm. 4 Cost and Schedule 4.1 Cost Analysis In the academic year ‘14-’15, the average salary of a student who graduated with a BS in Computer Engineering was $84,250/year [10]. Dividing the salary by the amount of work hours in a year, 2080
hrs/year, we arrive at an hourly rate of $40.50/hour. We will assume that an employee will work 8
hours a day every week for 16 weeks. We arrive at a total of 128 hours to complete the project.

 Employee                    Rate                        Hours                       Labor Cost

 Employee X                  $40.50                      128                         $12,960

4.1 Parts Acquisition

Parts                                            Cost             Reason
Battery Pack                                     $18              Power Supply
Raspberry Pi 4                                   $53              Process image to text
Raspberry Pi compatible camera                   $13              Capture text
PCB 8 Ohm Speaker                                $2.50            Output text to user
General circuit components                       $10 (estimate)   Circuit design
Voltage Regulator                                $2.77            Power Supply
PIC32                                            $4.09            Microcontroller
Total Cost per Unit                              $93

4.2 Schedule

  Week     Deadlines/Objective                  Irfan                   Nikhil                  Abishek
                    s
2/24/2020 Design Document             -Establish cost and         -Refine problem         -Outline
          check                       schedule                    statement               requirements and
                                      -Finalize and order parts   -Develop circuit        verifications
                                      -Develop circuit            schematics              -Tolerance Analysis
                                      schematics                                          -Develop circuit
                                                                                          schematics
3/2/2020   Refine Design              -Test voltage regulator     -Design PCB and         -Test amplifying
           Document                   and microcontroller         submit audit            circuit
                                      module
3/9/2020   Submit PCB order           -Test Raspberry Pi and      -Research OpenCV -Developing
           and complete testing       camera module               implementation   text-to-speech
           of hardware modules                                    on Raspberry Pi  software
           on breadboard
3/16/2020 SPRING BREAK
3/23/2020 Refine PCB design -Refine PCB design -Solder components
and test and test PCB
modules on PCB -Solder components and
board test PCB
3/30/2020 Testing -Solder components and -Develop computer -Develop
test PCB vision software text-to-speech
-Assist in debugging software
software
4/6/2020 Finalize PCB design -Solder components and --Develop computer -Develop
test PCB vision software text-to-speech
-Assist in debugging software
software
4/13/2020 Debug and Final -Address any issues -Address any -Address any issues
Testing issues
4/20/2020 Mock Demo -Practice for mock demo -Practice for mock -Practice for mock
demo demo
4/27/2020 Demonstration & -Practice demo -Practice demo -Practice demo
Mock Presentation -Start on final paper -Start on final paper -Start on final paper
5/4/2020 Presentation & Final -Review final paper
Paper -Review final paper -Review final paper
5 Ethics and Safety
We have an obligation to our profession to uphold the highest level of ethical and professional conduct.
We stand to follow and commit ourselves to the guidelines stated by the IEEE Code of Ethics. Therefore, it is
our duty to outline the ethical and safety concerns that may arise with our proposed project.
We acknowledge that there is a certain degree of error that can arise from recognizing text from images
given different situations. The core of the project depends on users being able to trust our system to identify text
with a certain degree of accuracy. According to #3 of the IEEE Code of Ethics [6], it is our duty to be honest of
the estimates provided from the available data provided to us. To uphold this, we plan on allowing only text
identified to a certain degree of certainty to be outputted through the system. Users should be able to trust our
system in giving valuable and actionable insight so that they may make decisions accordingly.
Safety of the user is of utmost importance especially since there are significant hardware components
situated on the body of the user. #1 of the IEEE Code of Ethics [6] outlines the importance of safety and health
of users and the public. Components of our system have a possibility of overheating and exploding.
Our main concerns for safety stem from the external battery and a possibility of a short circuit. The
external battery runs the risk of overheating due to an excessive current or voltage passing through it [3]. We
intend to design our PCB with overcurrent and overvoltage precautionary by implementing a resettable fuse
and zener diode. Human error during the design and building of the circuit is unavoidable. It is possible that
whilst designing the PCB board, a reverse polarity may have been introduced. We plan to introduce diodes toensure the proper setting of polarities. To avoid a short circuit from external factors such as exposure to liquids, we can encase electronics in durable hardware components.
References
[1] “Blindness Statistics,” National Federation of the Blind. [Online]. Available:
https://www.nfb.org/resources/blindness-statistics. [Accessed: 13-Feb-2020].
[2] “Bringing sight to blind and low-vision people,” Be My Eyes. [Online]. Available:
https://www.bemyeyes.com/. [Accessed: 13-Feb-2020].
[3] “DC Power Supply Protection from Unexpected Damage and Inconvenience,” Altium,
01-May-2018. [Online]. Available:
https://resources.altium.com/pcb-design-blog/dc-power-supply-protection-from-unexpected-
damage-and-inconvenience#. [Accessed: 13-Feb-2020].
[4] “English text to speech on a PIC microcontroller,” ToughDev, 05-Jul-2019. [Online].
Available:
http://www.toughdev.com/content/2014/09/english-text-to-speech-on-a-pic-microcontroller/.
[Accessed: 13-Feb-2020].
[5] L. Hattersley, “Raspberry Pi 4 vs Raspberry Pi 3B ,” The MagPi magazine, 13-Nov-2019.
[Online]. Available:
https://magpi.raspberrypi.org/articles/raspberry-pi-4-vs-raspberry-pi-3b-plus. [Accessed:
13-Feb-2020].
[6] “IEEE Code of Ethics,” IEEE. [Online]. Available:
https://www.ieee.org/about/corporate/governance/p7-8.html. [Accessed: 13-Feb-2020].
[7] S. Panigrahi, “Google's Optical Character Recognition (OCR) software works for 248
languages,” Opensource.com. [Online]. Available:
https://opensource.com/life/15/9/open-source-extract-text-images. [Accessed: 13-Feb-2020].
[8] “Raspberry Pi FAQs,” Raspberry Pi Documentation. [Online]. Available:
https://www.raspberrypi.org/documentation/faqs/. [Accessed: 13-Feb-2020].
[9] A. Rosebrock, “OpenCV OCR and text recognition with Tesseract,” Pyimagesearch. .
[10] Department of Electrical and Computer Engineering, ‘Salary Averages’, 2018, [Online].
Available: https://ece.illinois.edu/admissions/why-ece/salary-averages.asp [Accessed: 3-Oct
2018]You can also read