Food Processor with Blender - Andrew James
←
→
Page content transcription
If your browser does not render page correctly, please read the page content below

Food Processor with Blender

 Thank you for your purchase. We hope that you are satisfied with
                your new Andrew James product.

To fully and safely enjoy the benefits of your new product, please read the
        manual fully before use and keep safe for future reference.

                                     1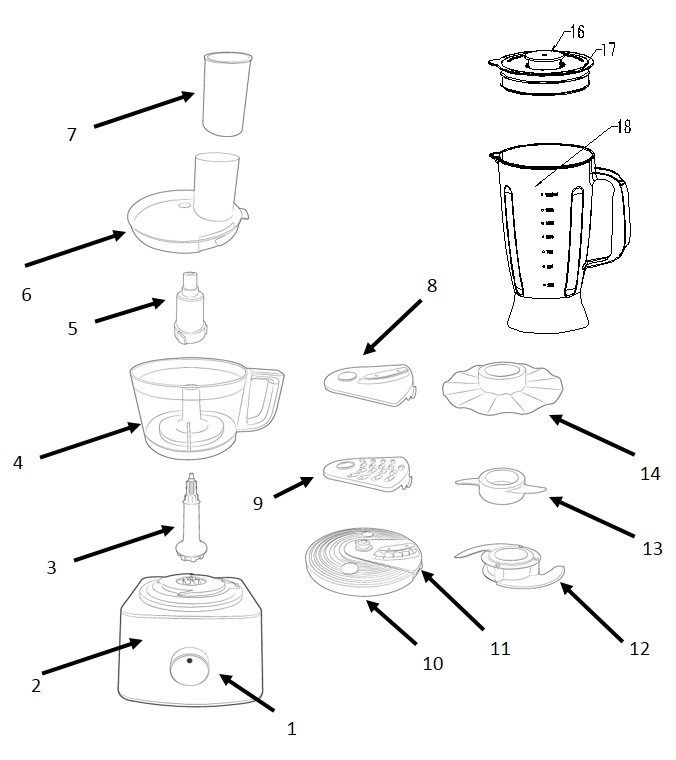
Appliance information
Approximate dimensions (mm)
Diagram not to scale

                                                       436

                                                     230

                         260

        Voltage (v)               220-240
        Frequency (Hz)            50/60
        Power (w)                 700
        Cable length              110cm
        Product weight            3.5Kg
        Fuse                      13a
        Processor bowl capacity   • 2 Litre air capacity

                                  • 1.4 Litre liquid capacity

        Blender jug capacity      1.8 Litre

                                  2
Safety information
When using any electrical appliance, basic safety precautions should
always be followed, including the following;
• This appliance is intended for indoor, household use. Unintended
use or operation may result in personal injury, damage to property
or damage to the appliance that will void the warranty.
• This appliance can be used by children aged from 8 years and
above and persons with reduced physical, sensory or mental
capabilities or lack of experience and knowledge if they have been
given supervision and/or instruction concerning safe use of the
appliance and the understanding of hazards. Children shall not play
with the appliance. Cleaning and user maintenance shall not be
made by children unless they are older than 8 years old and
supervised.
• Keep the appliance and its cord out of reach of children less than 8
years old.
• Never handle or operate any appliance with wet or moist hands.
• Do not immerse appliance, cord or plug in water or other liquids.
Take care whilst cleaning.
• If the appliance has fallen in water do not reach for it, immediately
switch the appliance off at the mains and unplug it.
• Ensure that the cord is not in a position where it can be pulled or
tripped over accidentally. Never use the cord to carry or pull the
appliance. Do not let the cord hang over the edge of a table or
counter.
• Keep the cord away from heated surfaces.
• Do not use the appliance if it has malfunctioned, been dropped or
damaged in anyway. If the unit has been damaged take the unit for
examination and/or repair by an authorised service agent.
• Do not attempt to open the appliance, repair or modify the
appliance, use the appliance for unintended applications or use
accessory attachments not recommended by the manufacturer.
Failure to follow these instructions may result in fire, electrical
shock, or risk of injury to persons.
3• Do not place the appliance near a naked flame, hot gas or electric
burners, or any appliances generating heat.
• Always remove the plug safely from the socket after use. Do not
pull from the cord.
• Ensure that all packaging is removed before use.
Appliance specific safety information
• Incorrect use or misuse may result in injury.
• Switch off and unplug the appliance when not in use, when
changing accessories or mixing ingredients with utensils
• Do not push food with fingers, or other objects (like knives), always
use the enclosed pusher.
• Accessory blades are very sharp. Handle carefully during assembly,
emptying the bowl and during cleaning after use.
• Remove accessory blades before pouring contents from the bowl
• This appliance is not dishwasher safe.
• Do not use the product with wet hands
• Do not attempt to use non-standard attachments.
• Liquids should be allowed to cool to room temperature before
blending.
• This appliance includes a safety interlock switch which prevents
operation unless the bowl and cover are securely installed.
• This appliance incorporates a protective device against high motor
temperatures. If the motor temperature becomes too high, the
unit will turn off automatically and will resume operation when the
motor has cooled sufficiently.
• If the protective device operates, switch off and allow to cool for a
minimum of 15 minutes.
• Before removing the lid from the bowl or the bowl from the base,
switch off and wait until the components stop rotating.
4• Do not use the lid interlock to Start or Stop the processor, always
use the ON/OFF speed control.
• Do not place this appliance on or near any gas or electric burner or
inside a heated oven.
Rated Run Time (RRT)
Warning: Do not exceed the Rated Run Time.
• Electrical appliances intended for food preparation are designed
with sealed enclosures or with small openings in the enclosure to
prevent contamination.
• The lack of openings in the enclosure restricts airflow and
increases the internal operating temperatures. A Rated Run Time
(RRT) is stated to prevent overheating and potential damage.
• The RRT for this appliance is:
• 3 minutes chopping/processing
• 30 seconds for Blending
• Periods of continuous use should not exceed the RRT.
• Allow the appliance to rest for 5 minutes after each period of use.
• Exceeding the Rated Run Time is an abusive condition where
the appliance may overheat indicated by an increased enclosure
temperature and possible odour.
• Switch off and allow the appliance to cool.
5Before first use
• Unpack the appliance and remove all packaging.
• Wash all parts of the appliance thoroughly before first time use. Refer to
cleaning and maintenance.
• Ensure that the capacities are not exceeded.
Appliance components illustration
1. Control Dial 10. Disc Holder
2. Motor Base 11. French Fries Disc
3. Drive Shaft 12. Chopper Disc
4. Processing Bowl 13. Kneading Disc
5. Blade Adapter 14. Emulsifying Disc
6. Cover 16. Blender Measuring Cup
7. Pusher 17. Blender Jug Cover
8. Slicing Disc 18. Blender Jug
9. Shredder Disc
6How to use
Chopper Disc
The chopping blade is the most versatile of all the attachments and the length of
the processing time will determine the texture achieved. For coarser texture use
the pulse control.
Use the chopping blade for cake and pastry making, chopping raw and cooked
meat, vegetables, nuts, pate, dips, pureeing soups and to also make crumbs from
biscuits and bread. It can also be used for yeasted dough mixes. Use the kneading
tool for kneading dough, particularly yeasted mixes.
Assembly
Position the drive shaft on motor base.
Slot the processing bowl over the drive
shaft and turn clockwise to lock into
place on the motor base.
Place the blade adaptor onto the drive
shaft.
4. Take the chopping blade and place onto
the blade adaptor.
5. Place cover onto the bowl and turn
clockwise until the cover interlocks on
bowl.
6. Use the pusher to push food into feeding
chute.
Disassembly
1. Switch off the appliance.
2. Remove the bowl cover by clasping the
feeding tube and rotating the bowl cover
anti-clockwise to unlock it from the bowl.
3. Remove the chopper blade and blade
adapter to empty the ingredients.
4. Unlock the bowl from the power unit by
rotating it anti-clockwise using the
handle.
5. Remove the drive shaft and clean the appliance as instructed in the cleaning
section of the manual.
7Kneading Disc/Emulsifying Disc
Assembly
Position the drive shaft on the motor base.
Slot the processing bowl over the
drive shaft and turn clockwise to
lock into place on the motor base.
Place the blade adaptor onto the
drive shaft.
Take the required disc and place
onto the blade adaptor, the bigger
blade should go on first.
Place cover onto the bowl and turn
clockwise until the cover interlocks
on bowl.
Use the pusher to push food into
feeding chute.
Disassembly
1. Switch off the appliance.
2. Remove the bowl cover by clasping
the feeding tube and rotating the
bowl cover anti-clockwise to unlock
it from the bowl.
3. Remove the disc and blade adapter
to empty the ingredients.
4. Unlock the bowl from the power
unit by rotating it anti-clockwise
using the handle.
5. Remove the drive shaft and clean
the appliance as instructed in the cleaning
section of the manual.
8Slicing Disc, Shredder Disc & French Fries Disc
Choosing Your Disc
1. Take your desired disc and slot over the central plastic cylinder of the disc holder
2. Gently push down on the disc until you hear it lock into place
Changing Disc
1. Gently pull the hook over the clip
2. Repeat “choosing your disc” instructions above
Assembly
1. Position the drive shaft on motor base
2. Slot the processing bowl over the drive
shaft and turn clockwise to lock into place
on the motor base
3. Place disc holder onto the drive shaft
4. Place cover on bowl
5. Turn cover clockwise until cover interlocks
on bowl.
6. Put food into the feeding chute. Use
pusher to push the food down for
processing
Disassembly
1. Switch off the appliance.
2. Remove the bowl cover by clasping the
feeding tube and rotating the bowl cover
anti-clockwise to unlock it from the bowl
3. Remove the disc holder to empty the
ingredients
4. Unlock the bowl from the power unit by
rotating it anti-clockwise using the handle
5. Remove the drive shaft and clean the
appliance as instructed in the cleaning
section of the manual
9Blender
• Use the blender for pasta sauces, soups, milkshakes etc.
• Do not use the machine continuously for more than 30 seconds on this function.
The motor should be allowed to cool down for at least 1 minute. Only use for a
maximum of 3 times before letting the machine cool down fully.
• Do not put hot liquids into the blender as this will cause the jug to crack. Please
ensure that the temperature of the ingredients do not exceed 30°C above room
temperature.
• Allow the jug to warm up to room temperature before adding warm liquids.
Assembly
1. Attach the blender to the motor unit by rotating clockwise until it is locked into
place.
2. Remove the lid by gently pulling, place in the ingredients and replace the lid back
on the jug by reversing the action.
3. Turn the control dial to your required setting.
Disassembly
1. Remove the jug from the motor unit by rotating anti-clockwise using the handle.
2. Lift the lid off the appliance and pour out the ingredients.
3. Clean as instructed in the cleaning section of the manual.
10Recipes
Chunky pesto Attachment: Chopper
Ingredients
• Bunch of fresh basil • 75g sunflower seeds
• 3 cloves of garlic • 6 tbsp. olive oil
• 3 tbsp. parmesan cheese
Method
1. Place garlic cloves, basil and 2 tbsp. of olive oil into the mini chopper
bowl. Pulse until the garlic is fine.
2. Add grated parmesan cheese and the rest of the olive oil. Pulse until ingredients
are combined.
3. Add the sunflower seeds. Pulse once last time. Don’t pulse too much here as you
want the sunflower seeds to remain chunky.
Serving tip
Stir through cooked gnocchi and sprinkle with extra parmesan for an Italian treat.
Tomato bread Attachment: Kneading tool
Ingredients
• 250g strong white bread flour • 55g sundried tomatoes, jarred
• 1 tsp salt • 1 tbsp. oil from sundried tomatoes
• 7g yeast • 110ml warm water
Method
1. Add salt, flour and yeast to the 1.5l bowl. Using kneading tool, mix on minimum
for 30 seconds.
2. Add water, sundried tomatoes and oil. If the sundried tomatoes are large, chop
into 3 pieces.
3. Mix for 1-2 minutes until dough is formed.
4. Remove dough and place in a bowl covered with cling film. Stand the bowl in a
warm place for approximately 60 minutes, until the dough has doubled in size.
5. Knead the dough by hand for 2 minutes. Shape and place in a tin, cover and
stand in a warm place until the dough has doubled in size.
6. Preheat the oven to 180°C/Gas mark 4.
7. Place the dough in the oven for 35 minutes.
Tip
To check the bread is cooked, tap the base of the bread with your fingers, if hollow
sounding it is ready.
11Caramelised Onion Tart Attachment: Cutting discs
Ingredients
• 340g short crust pastry • 120g Gruyere cheese
• 4 red onions, skinned and halved • 1 tbsp. oil
• 4 eggs • Salt and pepper
• 200ml milk
Method
1. Preheat the oven to 190°C/Gas mark 5.
2. Roll out pastry to fit a 20cm quiche tin. Place the pastry in the tin and push in to
the sides. Trim the pastry around the edge of the tin.
3. Cut a circle of greaseproof paper just larger than the tin and place on top the
pastry. Pour in baking beans or dried peas/beans and bake in the oven for
10mins. Remove the pastry from the oven, take the greaseproof paper and
baking beans off the pastry then put the pastry back in the oven for a further 5
minutes.
4. Attach the thick slicing disc (c) onto the drive shaft. Skin and halve the onions.
Turn the Multifunctional Food Processor on to minimum speed and use the food
pusher to guide the onion down the feed tube. When all of the onion is sliced,
turn off the Multifunctional Food Processor.
5. Heat 1 tbsp. of oil in a frying pan. Sauté the onion in the frying pan until soft and
caramelised. Allow to cool slightly then place on the pastry base.
6. Beat together eggs and milk and season well with salt and pepper. Pour over
the onions on the pastry base.
7. Attach the fine shredding disc (b) to the drive shaft. Turn the Multifunctional
Food Processor on to minimum speed and use the food pusher to guide the
cheese down the feeder. When all of the cheese is grated, turn off the
Multifunctional Food Processor. Sprinkle the grated cheese over the top of the
tart evenly.
8. Place in the oven for 35-40 minutes until the cheese is golden brown and the
filling is firm.
12Troubleshooting
Problem Solution
• Ensure assembly is correct and the
bowl and lid interlocks are made
• Make sure power is plugged in and
Machine does not work
switched on
• Check if the mains haven't tripped or if
there is power outage
• Processing bowl may have loosened
during vigorous processing, re-install
bowl to make the interlock
Machine suddenly stops running
• The Motor Thermal protection may
have operated. Wait a minimum 15
minutes for the unit to cool
Motor is running but components
• Ensure drive shaft is correctly installed.
aren't moving
Cleaning and maintenance
• Switch off and always unplug the processor from the power outlet before
cleaning the appliance.
• Clean the motor base with a soft slightly damp cloth. Do not put it under running
water and do not submerge it in water or any other liquids.
• All accessories should be washed by hand, for hand washing use tepid water and
normal detergent.
• Do not use chemical or abrasive washing up liquids.
• Store the appliance in a dry area, preferably in its original box.
• Some foods may discolour the plastic. This is perfectly normal and wont harm
the plastic or affect the flavour of your food. Rub with a cloth dipped in
vegetable oil to remove the discolouration.
• Handle sharp blades carefully.
• Do not under any circumstances place any of the parts in the dishwasher or
immerse the motor base in water.
13UK and EU warranty
Your new Andrew James product comes with a 24 month guarantee and a 2 year
fixed warranty, effective from receipt confirmation. Your receipt or order number is
required as proof of purchase date so it is imperative that you keep it safe. This
guarantee only applies if the item has been used solely for the use intended, and all
instructions have been followed accordingly. Please note this product is only for
domestic use only and is not for commercial use.
Abuse of your product will invalidate the guarantee. Returned goods can only be
accepted if repackaged properly within the original colour product box, and
presented with the original receipt of sale/order number. This does not affect your
statutory rights.
Returned products must be cleaned and returned to us in as close to delivery
condition as possible.
If your product develops a problem within the first 12 months of the fixed warranty,
we will pay all shipping costs to have it returned to us. After 12 months the
customer will be liable for the cost of returning the product to us. We will then pay
to have the repaired/replaced item shipped back to the customer.
If you wish to return your item for a full refund, you have the right to do so within
the first 7 days. For our returns policy please go to:
www.andrewjamesworldwide.com
Customers are responsible for any taxes applied to our products when they are
shipped outside of the EU.
All of our prices are inclusive of VAT.
Once a product has been returned to us, we will aim to repair or replace it within 30
days of receipt.
The guarantee does not cover any defect arising from improper use, damage, build-
up of lime scale or repair attempts made by third-parties. Also, the guarantee does
not cover normal wear and tear of individual parts.
Class II electrical safety information
Always ensure the voltage on the rating label corresponds to the power supply
where the product is being used.
Class II double insulation. This appliance is double insulated therefore no
earth connection is required.
Check the power cord and plug regularly for any damage. If the cord or the plug is
damaged, it must be replaced by a qualified electrician or a service repair centre to
avoid a hazard.
Precautions should be followed for safe cable management and connection to the
power supply.
14If a new mains plug needs to be fitted follow the fitting instructions supplied with
good quality BS1363A plugs. If in doubt consult a qualified electrician or appliance
repair agent.
a) Remove and safely dispose of the old plug.
b) Connect the brown lead to the live terminal “L” in the new plug.
c) Connect the blue lead to the neutral “N” terminal.
d) Recommended fuse: 10 A.
Warning! For double insulated product no connection is made to the Earth
terminal.
Use of an extension cable is not recommended. If an extension cable is required, it
should be rated no less than 13A and be fully unwound before use to avoid
overheating. Do not connect multiple appliances to the extension cable
Do not attempt to modify electrical plugs or sockets or attempt to make an
alternative connection to the electrical supply.
Disposal of the appliance
Waste Electrical & Electronic Equipment (WEEE) Waste & Recycling
Disposal of Electrical and Electronic Waste
Non-household waste. This product must not be disposed of together with
ordinary household waste.
Separate collection of used products, batteries and packaging allows the
recovery and recycling of materials. Reuse of materials helps prevent
environmental pollution and reduces the demand for raw materials.
Local authorities, retailers and collection organisations may provide for
separate collection of electrical products, batteries and packaging.
Contact Details
Address: Andrew James UK Ltd, Lighthouse View, Spectrum Business Park,
Seaham, Durham, SR7 7PR, UK
Customer Service Telephone: 0191 377 8358
Email: customerservices@andrewjamesworldwide.com
Twitter: @andrewjamesltd Facebook: Andrew James
Copyright Andrew James
AJ001326 | 01/2019
www.andrewjamesworldwide.com
15FR
Processeur Multifonctionnel
Merci pour votre achat. Nous espérons que vous êtes satisfait de votre nouveau
produit Andrew James.
Pour profiter pleinement et en toute sécurité des avantages de votrenouveau
produit, veuillez lire entièrement le manuel avant utilisation et conservez-le pour
vous y référer ultérieurement.
Consignes de sécurité générales
Lorsqu’on utilise les appareils électriques, il faut suivre les consignes
de sécurité ci-dessous:
• Cet appareil est destiné à être utilisé par des personnes de plus de
8 ans et des personnes ayant les capacités physiques, sensorielles
ou mentales réduites, ou le manque d'expérience et de
connaissances, à moins qu'ils n'aient été donnés supervision ou des
instructions quant à l'appareil et ils comprennent tous les dangers.
Les enfants ne sont pas autorisés à jouer avec l’appareil. Le
nettoyage et l’entretien ne devraient pas être effectués par les
enfants à moins qu’ils aient plus de 8 ans. Garder l’appareil et le
cordon hors de la portée des enfants de moins de 8 ans.
• Veuillez s’assurer que la tension de votre maison correspond à la
tension indiquée sur l’appareil.
• Veuillez vérifier régulièrement qu’il n’y a pas de signes de
dommages sur le cordon d’alimentation ou sur la fiche. Si le cordon
d’alimentation ou la fiche est endommagé, il doit être remplacé par
un électricien ou un centre de service. Pour plus d’informations
veuillez contacter notre service clientèle.
• Cet appareil n’est conçu que pour l’utilisation domestique. Un
usage incorrect va invalider la garantie. Le fournisseur ne peut pas
être tenu pour responsable de blessures ou de dommages si
l’appareil est utilisé pour les fins autres que celles prévues.
• Un usage abusif peut aussi endommager l’appareil et causer des
blessures.
16• Ne jamais utiliser l’appareil s’il a fait tomber ou s’il y a des signes de
dommages sur l’appareil. Si l’appareil est endommagé il doit être
examiné/ réparé par un technicien autorisé.
• Ne jamais plonger le bloc moteur, la fiche ou le cordon
d’alimentation dans l’eau ou tout autre liquide.
• Si le cordon d’alimentation est endommagé il doit être remplacé
par le fabricant ou par une personne qualifiée pour éviter tout
danger.
• Ne jamais laisser l’appareil pendre d’une table ou d’un comptoir.
Veuillez positionner l’appareil en assurant qu’il ne peut pas vous
trébucher ou être tiré par inadvertance.
• Ne jamais laisser le cordon d’alimentation entre en contact avec les
surfaces chaudes ou les brûleurs chauds ou placer l’appareil dans
un four chaud.
• Il n’est pas recommandé d’utiliser une rallonge ou une multiprise
avec l’appareil. Si nécessaire veuillez utiliser une rallonge qui
correspond à la tension de l’alimentation pour éviter le surchauffe.
Ne jamais brancher tout autre appareil sur la rallonge. Veuillez
positionner la rallonge en assurant qu’il ne peut pas vous
trébuchera ou être tiré par des animaux ou des enfants.
• Toujours utiliser l’appareil sur une surface plane et stable. Ne
jamais placer l’appareil sur une surface chaude.
• Veuillez s’assurer qu’il y a assez d’espace autour de l’appareil
pendant l’opération.
• Toujours débrancher l’appareil en tout sécurité. Ne jamais tirer sur
le cordon pour débrancher l’appareil.
• Ne jamais toucher l’appareil avec les mains mouillées.
17Consignes de sécurité spécifiques
• Toujours nettoyer avant utilisation.
• Une mauvaise utilisation ou une utilisation incorrecte de l’appareil
peut entraîner des blessures.
• Éteignez et débranchez l'appareil lorsqu'il n'est pas utilisé, pendant
le changement d'accessoires ou pendant le mélange des
ingrédients.
• Ne pousser pas les ingrédients dans l’appareil avec les mains.
• Ne touchez aucun élément de la machine en mouvement avec des
ustensiles ou les mains.
• N'utilisez pas l'appareil pour des ingrédients durs tels que les
viandes congelées, les os, etc.
• Les lames accessoires sont très tranchantes. Manipuler avec soin
pendant le montage, la vidange et le nettoyage du bol après l’avoir
utilisé.
• Retirez les lames accessoires avant de verser le contenu du bol.
• Ne pas laver les lames accessoires dans le lave-vaisselle.
• Ne pas utiliser l’appareil avec les mains mouillées
• N'essayez pas d'utiliser d’accessoires ou de pièces jointes non
standard avec cet appareil.
• Ne versez pas de liquides chauds dans l'appareil. Les liquides
doivent être laissés refroidir à température ambiante avant de les
mélanger.
• Ne jamais dépasser les quantités maximales.
• Cet appareil comprend un interrupteur de sécurité qui empêche
l’appareil de se mettre en marche à moins que le bol et le couvercle
ne soient solidement assemblés.
• Cet appareil intègre un dispositif de protection contre les
températures élevées du moteur. Si la température du moteur
devient trop élevée, l'appareil s'éteint automatiquement et
reprend son fonctionnement lorsque le moteur a suffisamment
18refroidi. Si le dispositif de protection se met en marche, éteignez-le
et laissez l’appareil refroidir pendant au moins 15 minutes.
• Avant d'enlever le couvercle du bol ou de retirer le bol de la base,
éteignez le robot culinaire et attendez que les composants de
l’appareil cessent de tourner.
• N'utilisez pas le verrouillage du couvercle pour démarrer ou arrêter
le processeur, toujours utilisez la fonction ON / OFF.
• Ne posez pas cet appareil sur ou à proximité d’un bruleur à gaz,
d'un brûleur électrique ou à l'intérieur d'un four chauffé.
Durée d'exécution nominal
Avertissement: Ne dépassez pas le temps de fonctionnement
nominal.
Les appareils électriques destinés à la préparation des aliments sont
conçus avec des armoires scellées ou avec des petites ouvertures
dans le boitier pour éviter toute contamination.
L'absence d'ouvertures dans le boitier limite le flux d'air et augmente
la température interne pendant son fonctionnement. Un temps
d’exécution nominal (TEN) est indiqué pour éviter la surchauffe et les
dommages potentiels.
Le TEN pour cet appareil est :
3 minutes pour le hachage / traitement
30 secondes pour le mélange
Les périodes d'utilisation continue ne doivent pas dépasser le TEN.
Laisser l'appareil reposer pendant 5 minutes après chaque période
d'utilisation.
Dépasser le temps de fonctionnement nominal est une situation
abusive où l'appareil peut surchauffer, ce qui est indiqué par une
augmentation de la température du boitier et des odeurs.
Éteignez et laissez l'appareil refroidir.
19Avant la première utilisation
• Déballez l'appareil et retirez tous les emballages.
• Lavez toutes les parties de l'appareil avant la première utilisation. Se reporter à la
section sur le nettoyage et à l'entretien.
• Assurez-vous que les capacités indiquées dans les spécifications ne soient pas
dépassées.
Illustration des composants de l'appareil
1. Cadran de commande 10. Support de disque
2. Base moteur 11. Disque à frites
3. Arbre de transmission 12. Disque hachoir
4. Bol de traitement 13. Disque de pétrissage
5. Adapteur lame 14. Disque émulsionneur
6. Couvercle 16. Tasse à mesurer pour mélangeur
7. Poussoir 17. Couvercle pour bol mélangeur
8. Disque trancheur 18. Bol melangeur
9. Disque éminceur
20Comment l'utiliser
Disque à hacher
La lame à hacher est la plus polyvalente de toutes les attaches et la durée du
traitement déterminera la texture obtenue. Pour une texture plus grossière, utilisez
la fonction impulsion.
Pour assurer la longévité de votre machine, ne l’utilisez pas continuellement
pendant plus de 3 minutes avec cette fonction. Le moteur doit refroidir pendant au
moins 30 minutes avant la prochaine opération.
Utilisez le disque hachoir pour faire des gâteaux et des pâtisseries mais aussi des
viandes crue et cuite, des légumes, noix et du pâté, des trempettes, des purées de
soupe et des chapelures de pain. Il peut également être utilisé pour les mélanges de
pâte à levure. Utilisez l'outil de pétrissage pour pétrir la pâte, en particulier les
mélanges à levure.
Assemblage
1. Positionnez l'arbre de transmission sur la base du moteur.
2. Faites glisser la cuvette sur l'arbre de transmission et tournez dans le
sens des aiguilles d'une montre pour le verrouiller sur la base du moteur.
3. Placez l'adaptateur de lame sur l'arbre de transmission.
4. Prenez la lame à hacher et placez-la sur
l'adaptateur de lame.
5. Placez le couvercle sur le bol et tournez dans le
sens des aiguilles d'une montre jusqu'à ce que le
couvercle se verrouille sur le bol.
6. Utilisez le poussoir pour pousser les aliments
dans la goulotte d'alimentation.
Démontage
1. Éteignez l'appareil.
2. Retirez le couvercle du bol en saisissant la
goulotte d'alimentation et en tournant le couvercle
du bol dans le sens inverse des aiguilles d'une
montre pour le déverrouiller.
3. Retirez la lame du hachoir et l'adaptateur de
lame pour vider les ingrédients.
4. Déverrouillez le bol de l'unité d'alimentation en
le tournant dans le sens inverse des aiguilles d'une
montre à l'aide de la poignée.
5. Retirez l'arbre de transmission et nettoyez
l'appareil comme indiqué dans la section
nettoyage du manuel.
21Disque de pétrissage / disque émulsionneur
Assemblage
1. Positionnez l'arbre de transmission sur la base du moteur.
2. Faites glisser le bol de traitement sur l'arbre de transmission et tournez dans le
sens des aiguilles d'une montre pour le verrouiller sur la base du moteur.
3. Placez l'adaptateur de lame sur l'arbre de transmission.
4. Prenez le disque requis et placez-le sur l'adaptateur de lame, en faisant passer la
plus grande lame en premier.
5. Placez le couvercle sur le bol et tournez dans le sens des aiguilles d'une montre
jusqu'à ce que le couvercle se verrouille sur le bol.
6. Utilisez le poussoir pour pousser les aliments dans la goulotte d'alimentation.
Démontage
1. Éteignez l'appareil.
2. Retirez le couvercle du bol en saisissant la
goulotte d'alimentation et en tournant le
couvercle du bol dans le sens inverse des
aiguilles d'une montre pour le déverrouiller.
3. Retirez le disque et l'adaptateur de lame
pour vider les ingrédients.
4. Déverrouillez le bol de l'unité
d'alimentation en le tournant dans le sens
inverse des aiguilles d'une montre à l'aide de
la poignée.
5. Retirez l'arbre de transmission et nettoyez
l'appareil comme indiqué dans la section de
nettoyage du manuel.
22Disque trancheur, disque hachoir et disque « frites »
Choisir votre disque
1. Prenez le disque désiré et placez-le sur le cylindre en plastique central du porte-
disque.
2. Appuyez doucement sur le disque jusqu'à ce que vous l'entendiez se verrouiller
en place.
Changement de disque
1. Tirez doucement le crochet sur la barrette.
2. Répétez les instructions indiquées dans la section « choisir
votre disque ».
Assemblée
1. Positionnez l'arbre de transmission sur la base du
moteur.
2. Faites glisser le bol de traitement sur l'arbre de
transmission et tournez dans le sens des aiguilles
d'une montre pour le verrouiller sur la base du
moteur.
3. Placez le porte-disque sur l'arbre de transmission.
4. Placer le couvercle sur le bol.
5. Tourner le couvercle dans le sens des aiguilles
d'une montre jusqu'à ce que le couvercle se
verrouille sur le bol.
6. Mettez de la nourriture dans la goulotte
d'alimentation. Utilisez le poussoir pour pousser la
nourriture vers le bas pour le traitement.
Démontage
1. Éteignez l'appareil.
2. Retirez le couvercle du bol en saisissant la
goulotte d'alimentation et en tournant le couvercle
du bol dans le sens inverse des aiguilles d'une
montre pour le déverrouiller dans le bol.
3. Retirez le porte-disque pour vider les ingrédients.
4. Déverrouillez le bol de l'unité d'alimentation en le tournant dans le sens inverse
des aiguilles d'une montre à l'aide de la poignée.
5. Retirez l'arbre d'alimentation et nettoyez l'appareil comme indiqué dans la
section nettoyage du manuel.
23Mélangeur
Utilisez le mélangeur pour sauces à pâtes, soupes, milkshakes etc.
N'utilisez pas la machine en continu pendant plus de 30 secondes avec cette
fonction. Le moteur doit refroidir pendant au moins 1 minute. Utiliser seulement 3
fois au maximum avant de laisser la machine refroidir complètement.
NE PAS METTRE DE LIQUIDES CHAUDS DANS LE MÉLANGEUR AU RISQUE DE
FISSURER LE BOL. LA TEMPÉRATURE DES ALIMENTS AJOUTÉS AU MÉLANGEUR NE
DOIT PAS EXCÉDER 30 ° C AU-DESSUS DE LA TEMPÉRATURE AMBIANTE.
Laissez le récipient réchauffer à température ambiante avant d'y ajouter des
liquides chauds.
Assemblage
1. Fixez le mélangeur sur le bloc moteur en le tournant dans le sens des aiguilles
d'une montre jusqu'à ce qu'il soit verrouillé en place.
2. Retirez le couvercle en tirant doucement, placez les ingrédients a l’intérieur et
replacez le couvercle sur le récipient en inversant l'action.
3. Tournez la cadran sur le réglage requis.
Démontage
1. Retirez la verseuse de l'unité moteur en la tournant dans le sens inverse des
aiguilles d'une montre à l'aide de la poignée.
2. Soulevez le couvercle de l'appareil et versez les ingrédients.
3. Nettoyer comme indiqué dans la section nettoyage du manuel.
24Recette de pesto épais Pièce jointe : Hachoir
Ingrédients
• Bouquet de basilic frais
• 3 gousses d'ail
• 3 cuillerées à soupe de parmesan
• 75g de graines de tournesol
• 6 cuillerées à soupe d’huile d'olive
Comment se préparer
1. Déposer les gousses d'ail, le basilic et les 2 cuillerées à soupe d'huile d'olive dans
le mini hachoir. Battez jusqu'à ce que l'ail soit fin.
2. Ajouter le parmesan râpé et le reste de l'huile d'olive. Battez jusqu'à ce que les
ingrédients soient bien mélangés.
3. Ajouter les graines de tournesol et battez une dernière fois mais pas trop car
vous voulez que les graines de tournesol restent épaisses.
Suggestion de présentation
Ajoutez des gnocchis cuits et saupoudrer de parmesan pour un régal à l’italienne.
25Dépannage
Problème Solution
• Assurez-vous que l’assemblage de l’appareil
soit correcte et que le bol et le couvercle
soient correctement verrouille
La machine ne fonctionne pas • Assurez-vous que l'alimentation soit bran-
chée et allumée
• Vérifiez que l’alimentation réseau ne soit pas
déclenché ou qu’il est une panne de courant
• Le bol de traitement peut s'être desserré
pendant un traitement vigoureux, réinstaller
le bol pour le verrouiller
La machine s'arrête brusquement
• La protection thermique du moteur a peut-
être fonctionné. Attendez au moins 15 mi-
nutes pour que l'appareil refroidisse
Le moteur tourne mais les composants ne • Assurez-vous que l'arbre de transmission est
bougent pas correctement installé
Nettoyage
• Toujours éteindre et débrancher le robot culinaire de la prise de courant avant
de le nettoyer.
• Nettoyez la base du moteur avec un chiffon humide. Ne pas mettre ou immerger
l'appareil sous l'eau courante ou tout autre liquide.
• Tous les accessoires doivent être lavés à la main en utilisant de l'eau tiède et un
détergent normal.
• N'utilisez pas de liquides de lavage chimiques ou abrasifs.
• Rangez l'appareil dans un endroit sec, de préférence dans sa boîte d'origine.
• Certains aliments peuvent décolorer le plastique. Ceci est parfaitement normal
et ne nuira pas au plastique et n’affectera pas la saveur de vos aliments. Frottez
avec un chiffon imbibé d'huile végétale pour enlever la décoloration.
• Manipulez les lames tranchantes avec précaution.
• Ne placez en aucun cas l'une des pièces de l’appareil dans le lave-vaisselle et ne
plongez pas la base du moteur dans l'eau.
26Garantie UK & UE
Votre nouveau produit Andrew James est livré avec une garantie de 24 mois et une
garantie fixe de 2 ans, à compter de la confirmation du reçu. Votre reçu ou numéro
de commande est requis comme preuve de date d'achat, il est donc impératif que
vous le gardiez en sécurité. Cette garantie ne s'applique que si l'article a été utilisé
uniquement pour l'usage prévu, et toutes les instructions ont été suivies en
conséquence. Veuillez noter que ce produit est destiné uniquement à un usage
domestique et non à un usage commercial.
L'abus de votre produit invalidera sa garantie. Les produits retournés ne peuvent
être acceptés que s'ils ont été reconditionnés correctement dans leurs boîtes
d'origine et sont présentés avec le reçu de vente originale ou le numéro de
commande. Ceci n’affecte en rien vos droits statutaires.
Les produits rendus doivent être nettoyé et nous être rendus dans un état aussi
proche que possible de l’original.
Si votre produit présente un problème pendant les 12 premiers mois de la garantie,
nous nous portons garant des frais d’expédition pour nous le retourner. Après les
12 premiers mois de la garantie, le client est responsable des frais de retour du
produit. Nous nous chargerons ensuite des frais de retour du produit vers le client.
Si vous souhaitez retourner votre article pour un remboursement complet, vous
pouvez le faire dans les 7 premiers jours. Pour notre politique de retour veuillez
vous référer a notre site internet a:
www.andrewjamesworldwide.com
Les clients sont responsables des taxes appliquées à nos produits lorsqu'ils sont
expédiés en dehors de l'UE.
Tous nos prix incluent la TVA.
Une fois qu'un produit nous a été retourné, nous viserons à le réparer ou à le
remplacer dans les 30 jours suivant sa réception.
La garantie ne couvre pas les dommages, défauts résultant d’une mauvaise
utilisation, d’une accumulation de calcaire ou de tentatives de réparations
effectuées par des tiers. En outre, la garantie ne couvre pas l'usure normale des
pièces individuelles.
Catégorie 2 de sécurité électrique
Assurez-vous que la tension indiquées sur la plaque signalétique corresponde à
celle du système d’alimentation électrique de la résidence.
Classe II à double isolation. Cet appareil est muni d’une double isolation, ne
nécessitant pas de connexion terre.
Vérifiez régulièrement que le fil d’alimentation électrique et la fiche ne sont pas
endommagés. Si le cordon ou la prise est endommagé, celle-ci doit être remplacée
par un électricien qualifié ou un centre de réparation pour éviter tout risque.
27Des précautions doivent être prises pour une gestion sécurisée des câbles et une
connexion à l’alimentation. Si une nouvelle prise secteur doit être installée, suivez
les instructions de montage fournies avec les fiches BS1363A. En cas de doute
consultez un électricien qualifie ou un réparateur d’appareils.
a) Enlevez et jetez en toute sécurité l’ancienne fiche
b) Connectez le fil marron a la borne “L” de la nouvelle prise
c) Connectez le fil bleu à la borne “N” neutre
ATTENTION! Sur un appareil à double isolation il n’y a aucune mise à la terre.
L’utilisation d’une rallonge n’est pas recommandée. Si une rallonge est requise,
celle-ci doit avoir une note d’au moins 13A et être complètement déroulée avant
d’être utilisé pour éviter la surchauffe.
Ne pas tenter de modifier les prises électriques ou d’essayer de faire une autre
connexion à l’alimentation.
Mise au rebut du produit
Déchets d'Équipements Électriques et Électroniques (DEEE) Déchet &
Recyclage
Traitement des déchets électriques et électroniques
Déchets non ménagers. Ce produit ne doit pas être éliminé avec les
ordures ménagères normales.
La collecte séparée des produits usages, des batteries et des emballages
permet la récupération et le recyclage des matériaux. La réutilisation des
matériaux aide à prévenir la pollution de l’environnement et réduit la
demande de matières premières.
Les autorités locales, les détaillants et les organismes de collecte peuvent
prévoir une collecte séparée des produits électriques, des piles et des
emballages.
Informations de contact
Adresse: 2 Lighthouse View, Spectrum Business Park, Seaham, Co. Durham, SR7
7PR, UK
Assistance Clientèle Tel: +441913778358
Email: customerservices@andrewjamesworldwide.com
Twitter : @AndrewJamesFr Facebook : Andrew James France
AJ001326| 01/2019
www.andrewjamesworldwide.com
28DE
Multifunktionale Küchenmaschine
Vielen Dank für Ihren Kauf. Wir hoffen, dass Sie mit Ihrem neuen Andrew James
Produkt zufrieden sind.
Um das Potenzial Ihres neuen Produkts zu maximieren, lesen Sie bitte das
Handbuch vollständig durch und bewahren Sie für zukünftige Referenz auf.
Sicherheitshinweise
Beim Benutzen von elektrischen Geräten sollten folgende
Sicherheitshinweise stets befolgt werden:
• Dieses Gerät ist geeignet für die Benutzung durch Kinder ab 8
Jahren sowie Personen mit physischen, sensorischen oder
mentalen Einschränkungen oder Unerfahrenheit im Umgang mit
elektrischen Geräten, solange Sie von einem erfahrenen
Verantwortlichen beaufsichtigt oder über den Gebrauch und
mögliche Gefahren aufgeklärt werden. Kinder dürfen nicht mit dem
Gerät spielen, halten Sie das Gerät von Kindern unter 8 Jahren fern.
• Stellen Sie stets sicher, dass die Voltkennzahl des Gerätes der
Voltzahl Ihres Haushaltes entspricht.
• Überprüfen sie das Stromkabel und den Stecker regelmäßig auf
Schäden. Ein beschädigtes Stromkabel muss ausschließlich vom
Hersteller oder einem qualifizierten Elektriker ausgetauscht
werden; kontaktieren Sie im Zweifelsfall den Kundenservice.
• Nutzen Sie das Gerät ausschließlich zu seinem vorgesehenen
Zweck. Dieses Gerät ist nur für den Haushaltsgebrauch bestimmt.
Industrieller oder kommerzieller Gebrauch lässt die Garantie
verfallen. Der Hersteller ist nicht verantwortlich für Schäden oder
Verletzungen, die durch unsachgemäßen Gebrauch entstehen.
• Benutzen Sie das Gerät nicht, wenn es beschädigt ist; kontaktieren
Sie den Kundenservice.
• Tauchen Sie den Motorteil, Stecker oder das Stromkabel niemals in
Wasser oder andere Flüssigkeiten.
• Achten Sie darauf, dass das Kabel nicht vom Tisch bzw. der
Arbeitsfläche herunterhängt, um versehentliches Herunterziehen
29und Stolpern zu vermeiden.
• Halten Sie das Kabel fern von heißen Oberflächen. Halten Sie das
Gerät fern von heißen Kochflächen, Brennern und beheizten Öfen.
• Wir empfehlen, keine Verlängerungskabel zu verwenden. Sollte die
Verwendung jedoch unvermeidbar sein, so muss das Kabel dieselbe
oder eine größere Wattzahl als das Gerät aufweisen, um
Überhitzen zu vermeiden. Verwenden Sie keine weiteren Geräte an
diesem Verlängerungskabel und stellen Sie sicher, dass das Kabel
nicht von Kindern heruntergezogen werden kann oder eine
Stolpergefahr darstellt.
• Verwenden Sie das Gerät ausschließlich auf einer glatten, ebenen
und stabilen Oberfläche.
• Stellen Sie sicher, dass ausreichend Platz um das Gerät vorhanden
ist, wenn Sie es benutzen.
• Trennen Sie das Gerät stets auf sichere Art und Weise von der
Stromversorgung, ziehen Sie nicht am Stromkabel, um den Stecker
aus der Steckdose zu entfernen.
• Benutzen Sie das Gerät niemals mit feuchten Händen.
Gerätespezifische Sicherheitshinweise
• Immer vor Gebrauch reinigen.
• Falsche Verwendung oder falscher Gebrauch kann zu Verletzungen
führen.
• Schalten Sie das Gerät aus und ziehen Sie den Netzstecker, wenn
Sie es nicht verwenden, wenn Sie Zubehörteile wechseln oder
wenn Sie Zutaten mit Utensilien mischen.
• Drücken Sie die Zutaten nicht mit den Händen herunter.
• Berühren Sie keine Teile des Geräts mit Händen oder Utensilien,
während sie sich bewegen.
• Verwenden Sie das Gerät nicht für harte Zutaten wie gefrorenes
Fleisch, Knochen usw.
• Zubehörklingen sind sehr scharf. Bei der Aufbau, beim Entleeren
der Schüssel und während der Reinigung nach dem Gebrauch
vorsichtig handheben.
30• Entfernen Sie die Zubehörklingen, bevor Sie den Inhalt aus der
Schüssel gieβen.
• Reinigen Sie die Zubehörklingen nicht in die Spülmaschine.
• Verwenden Sie das Gerät nicht mit feuchten Händen.
• Versuchen Sie nicht, nicht standardisierte Zubehöre zu verwenden.
• Gieβen Sie keine heiβen Flüssigkeiten in das Gerät. Flüssigkeiten
sollten vor dem Mischen auf Raumtemperatur abkühlen.
• Überschreiten Sie niemals die maximalen Mengen.
• Dieses Gerät verfügt über einen Sicherheitsverieglungsschalter, der
den Betrieb verhindert, sofern Schüssel und Abdeckung nicht fest
installiert wird.
• Dieses Gerät enthält eine Schutzvorrichtung gegen hohe
Motortemperaturen. Wenn die Motortemperatur zu hoch wird,
schaltet sich das Gerät automatisch aus und nimmt den Betrieb
wieder auf, wenn der Motor ausreichend abgekühlt ist.
• Wenn das Schutzgerät funktionert, schalten Sie es ab und lassen Sie
es mindestens 15 Minuten abkühlen.
• Bevor Sie den Deckel vor der Schüssel oder der Schüssel vor der
Basis abnehmen, schalten Sie das Gerät aus und warten Sie, bis die
Komponenten aufhören sich zu drehen.
• Verwenden Sie nicht die Deckelverrieglung, um die
Küchenmaschine zu starten oder zu stoppen. Verwenden Sie immer
die EIN/AUS-Geschwindigkeitssteuerung.
• Stellen Sie das Gerät nicht in der Nähe von Gas- oder Elektroherd
oder in einem beheizten Ofen auf.
31Vor der ersten Verwendung
• Packen Sie das Gerät aus und entfernen Sie alle Packungen.
• Waschen Sie alle Teile des Geräts vor dem ersten Gebrauch. Siehe den Absatz:
Reinigung und Wartung.
• Stellen Sie sicher, dass die in den Spezifikationen angegebenen Kapazitäten nicht
überschritten werden.
Gerätekomponenten Illustration
1. Drehregler 10. Scheibenhalter
2. Motor-Basis 11. Pommes frites-Scheibe
3. Antriebswelle 12. Häcksler-Klinge
4. Nahrungsmittelverarbeiter-Schüssel 13. Knetzubehör
5. Klingenadapter 14. Emulgierscheibe
6. Decke 16. Mixer-Messbecher
7. Stopfer 17. Mixerkrug-Decke
8. Schneidscheibe 18. Mixerkrug
9. Reibscheibe
32Wie man es benutzt
Häcksler-Scheibe
Die Häcksler-Klinge ist die vielseitigste alle Zubehörteile und die Dauer der
Bearbeitungszeitbestimmt die erzielte Textur. Für eine gröbere Textur verwenden
Sie die Pulssteuerung.
Um eine lange Lebensdauer Ihrer Maschine zu gewährleisten, verwenden Sie diese
Funktion nicht länger als 3 Minuten. Der Motor sollte vor dem nächsten Einsatz
mindestens 30 Minuten abkühlen.
Verwenden Sie das Häcksler-Klinge für Kuchen und Gebäck, rohes und gekochtes
Fleisch, Gemüse, Nüsse, Pastete, Dips, zum pürieren von Suppen und auch zum
Krümeln von Keksen und Brot. Es kann auch für Hefe Teig Mischungen verwendet
werden. Verwenden Sie das Knetzubehör zum Kneten von Teig, insbesondere von
Hefezubereitungen.
Montage
1. Die Antriebswelle auf der Motorbasis positionieren.
2. Die Nahrungsmittelverarbeiter-Schüssel über die Antriebswelle stecken und im
Uhrzeigersinn drehen, bis sie am Motor Motor-Basis einrastet.
3. Setzen Sie den Klingenadapter auf die Antriebswelle.
4. Nehmen Sie die Häcksler-Klinge und legen Sie es auf den Klingenadapter.
5. Setzen Sie die Decke auf die Schüssel und drehen
Sie im Uhrzeigersinn, bis die Abdeckung auf der
Schüssel verriegelt ist.
6. Verwenden Sie den Stopfer, um das Lebensmittel
in die Schurre zu drücken.
Demontage
1. Schalten Sie das Gerät aus.
2. Entfernen Sie die Schüsselabdeckung, indem Sie
die Schurre umschlieβen und die
Schüsselabdeckung gegen den Uhrzeigersinn
drehen, um sie aus der Schüssel zu lösen.
3. Entfernen Sie die Häcksler-Klinge und der
Klingenadapter um die Zutaten zu leeren.
4. Entriegeln Sie die Schüssel vom Netzteil, indem
Sie sie mit dem Griff gegen den Uhrzeigersinn
drehen.
5. Entfernen Sie die Antriebswelle und reinigen Sie
das Gerät wie im Reinigungsabsatz des Handbuchs
beschrieben.
33Knet-/Emulgierscheibe
Montage
Positionieren Sie die Antriebswelle auf dem Motorsockel.
Den Arbeitsbehälter über die Antriebswelle schieben und im
Uhrzeigersinn drehen, um ihn auf dem Motorsockel zu
fixieren.
Setzen Sie den Messeradapter auf die
Antriebswelle.
Nehmen Sie die gewünschte Scheibe
und setzen Sie sie auf den
Klingenadapter, die größere Klinge
sollte zuerst aufgesetzt werden.
Deckel auf die Schale legen und im
Uhrzeigersinn drehen, bis die
Abdeckung in der Schale verriegelt ist.
Verwenden Sie den Schieber, um das
Futter in den Zuführschacht zu
schieben.
Demontage
Schalten Sie das Gerät aus.
Entfernen Sie die Schalenabdeckung,
indem Sie den Zuführschlauch
festhalten und die Schalenabdeckung
gegen den Uhrzeigersinn drehen, um
sie aus der Schale zu entriegeln.
Entfernen Sie die Scheibe und den
Messeradapter, um die Zutaten zu
entleeren.
Entriegeln Sie die Schüssel vom
Aggregat, indem Sie sie mit dem Griff
gegen den Uhrzeigersinn drehen.
Entfernen Sie die Antriebswelle und reinigen Sie das Gerät
gemäß den Anweisungen im Reinigungsabschnitt des
Handbuchs.
34Schneidscheibe, Häcksler-Klinge & Pommes frites-Scheibe
Auswahl die Scheibe
1. Nehmen Sie die gewünschte Scheibe und schieben Sie sie über den zentralen
Kunststoffzylinder des Scheibenhalters.
2. Drücken Sie die Scheibe vorsichtig nach unten, bis sie einrastet.
Wechseln der Scheibe
1. Ziehen Sie den Haken vorsichtig über den Clip.
2. Wiederholen Sie die obene Anweisungen zur « Auswahl Ihre
Scheibe ».
Montage
1. Die Antriebswelle auf der Motorbasis positionieren.
2. Die Nahrungsmittelverarbeiter-Schüssel über die Antriebswelle stecken und im
Uhrzeigersinn drehen, bis sie am Motor Motor-Basis einrastet.
3. Die Scheibenhalter auf die Antriebswelle setzen.
4. Deckel auf die Schüssel setzen.
5. Deckel im Uhrzeigersinn drehen, bis der Deckel in
der Schale einrastet.
6. Geben Sie Lebensmittel in die Schurre.
Verwenden Sie den Stopfer, um das Lebensmittel
zur Verarbeitung herunterzudrücken.
Demontage
1. Schalten Sie das Gerät aus.
2. Entfernen Sie die Schüsselabdeckung, indem Sie
die Schurre umschlieβen und die
Schüsselabdeckung gegen den Uhrzeigersinn
drehen, um sie aus der Schüssel zu lösen
3. Entfernen Sie den Scheibenhalter, um die Zutaten
zu leeren.
4. Entriegeln Sie die Schüssel vom Netzteil, indem
Sie sie mit dem Griff gegen den Uhrzeigersinn
drehen.
5. Entfernen Sie die Antriebswelle und reinigen Sie
das Gerät wie im Reinigungsabsatz des
Handbuchs beschrieben.
35Mixer
• Verwenden Sie den Mixer für Nudelsaucen, Suppen, Milchshakes, usw.
• Verwenden Sie das Gerät nicht länger als 30 Sekunden für diese Funktion. Der
Motor sollte mindestens 1 Minute abkühlen. Nur maximal 3 mal verwenden,
bevor die Maschine vollständig abkühlen gelassen wird.
• KEINE HEIßEN FLÜSSIGKEITEN IN DEN MIXER GEBEN, DA SONST DER KRUG REIßT.
DIE TEMPERATUR DER DEM MIXER ZUGEGEBENEN LEBENSMITTEL SOLLTE 30°C
ÜBER DER RAUMTEMPERATUR NICHT ÜBERSCHREITEN.
• Lassen Sie den Krug auf Raumtemperatur erwärmen, bevor Sie warme
Flüssigkeiten hinzufügen.
Montage
1. Befestigen Sie den Mixer an der motoreinheit, indem Sie ihn im Uhrzeigersinn
drehen, bis er einrastet.
2. Entfernen Sie den Deckel durch leichtes Ziehen, setzen Sie die Zutaten ein und
setzen Sie den Deckel wieder auf der Krug, indem Sie den Vorgang umkehren.
3. Drehen Sie das Einstellrad auf die gewünschte Einstellung.
Demontage
1. Entfernen Sie den Krug von der Motoreinheit durch Drehen gegen den
Uhrzeigersinn mit dem Griff.
2. Heben Sie den Deckel vom Gerät ab und gieβen Sie die Zutaten aus.
3. Reinigen Sie das Gerät gemäβ Reinigungsabsatz des Handbuchs.
36Grobes Pesto Rezept Zubehörteil: Häcksler
Zutaten
• Ein Bund frisches Basilikum
• 3 Knoblauchsehen
• 3 EL Parmesankäse
• 75g Sonnenblumenkerne
• 6 EL Olivenöl
Methode
1. Legen Sie Knoblauchzehen, Basilikum und 2 EL Olivenöl in den Mini-Häcksler
Schüssel. Pulsieren Sie bis der Knoblauch fein ist.
2. Fügen Sie geriebenen Parmesankäse und den Rest des Olivenöls hinzu. Pulsieren
Sie bis die Zutaten kombiniert sind.
3. Fügen Sie die Sonnenblumenkerne hinzu. Pulsieren Sie einmal beim letzten Mal
und pulsieren Sie nicht zu viel, denn Sie möchten, dass die Sonnenblumenkerne
klobig bleiben.
Serviertipp
Rühren Sie das Pesto durch gekochtes Gnocchi und streuen Sie mit extra
Parmesankäse für einen italienischen Leckebissen.
37Reinigung
• Schalten Sie die Küchenmaschine aus und ziehen Sie ihn immer aus der
Steckdose, bevor Sie das Gerät reinigen.
• Reinigen Sie die Motor-Basis mit einem feuchten Tuch. Stellen Sie das Gerät nicht
unter flieβendes Wasser und tauchen Sie es nicht in Wasser oder andere
Flussigkeiten ein.
• Das gesamte Zubehör sollte von Hand gewaschen werden. Verwenden Sie
lauwarmes Wasser und normales Reinigungsmittel.
• Verwenden Sie keine chemischen oder abrasiven Spülmittel.
• Lagern Sie das Gerät an einem trockenen Ort, vorzugsweise in der
Originalverpackung.
• Einige Lebensmittel konnen den Kunststoff verfärben. Dies ist völlig normal und
wird den Kunststoff nicht schädigen oder den Geschmack Ihres Essens
beeinträchtigen. Reiben Sie mit einem in Pflanzenöl getauchten Tuch, um die
Verfärbung zu entfernen.
• Behandeln Sie scharfe Klingen vorsichtig.
Fehlerbehebung
Problematik Lösung
• Stellen Sie sicher, dass der Aufbau korrekt ist und die
Schüssel- und Deckelverriegelungen hergestellt ist.
• Stellen Sie sicher, dass die Stromversorgung
Die Maschine funktioniert nicht
angeschlossen und eingeschaltet ist.
• Überprüfen Sie, ob das Netz nicht ausgelöst hat oder
ob ein Stromausfall vorliegt.
• Die Verarbeitungsschüssel kann sich während der
kräftigen Verarbeitung gelockert haben. Setzen Sie
die Schüssel wieder ein, um die Verrieglung
Die Maschine hört plötzlich auf zu
herzustellen.
laufen.
• Der Motor Thermoschutz hat möglicherweise
funktioniert. Warten Sie mindestens 15 Minuten, bis
das Gerät abgekühlt ist.
Der Motor läuft, aber die • Stellen Sie sicher, dass die Antriebswelle korrekt
Komponenten bewegen sich installiert ist.
nicht.
38You can also read